RSS
 

Posts Tagged ‘Light’

Ice Light 2 on the way with brighter LEDs and new battery system

06 May

Westcott has announced the second incarnation of its Ice Light LED lighting wand. Ice Light 2 promises to be 50% brighter than the previous model and comes equipped with Bluetooth for remote control and an interchangeable, rechargeable lithium ion battery. The light has a color temperature of 5500K, Color Rendering Index of 96 and a beam angle of 72.6 degrees. Read more

Articles: Digital Photography Review (dpreview.com)

 
Comments Off on Ice Light 2 on the way with brighter LEDs and new battery system

Posted in Uncategorized


How to See the Light for Portraits: A Quick Tip for Beginners

05 May

Light1_2

As a beginning photographer, one of the easiest ways to move from taking average snapshots to more professional looking portraits is to develop a good understanding of light. Harsh and uneven lighting can often be distracting and make the photograph look amateur, whereas even lighting allows the viewer to focus solely on the subject and is more visually appealing.

Spending some time learning about the exposure triangle, the quality and direction of light is a great first step, something that I highly recommend to everyone. That said, even if you understand the theoretical aspects of light, it can still be difficult to walk into a park with your children, or clients, and know intuitively where to situate your subject for the best possible portrait lighting. So, I’d like to share one quick and easy trick that you can use to help you “see” the best light if you’re unsure of where to begin:

The Circle Trick

Step One:

Have your subject stand facing you, at the appropriate distance for whatever focal length you’re using. Think of the two of you being like a clock, with you in the center tether position and your subject as the clock’s hour arm in the 12 o’clock position. Take a photo.

In this instance, I was photographing my daughter in our backyard at about 6:30pm. My starting (12 o’clock) position was with the sun behind her.

Step Two:

Have your subject move to the three o’clock position. Pivot with them so that you continue to face each other. Take another photo.

Now, I’ve moved her into the 3 o’clock position. You can see that if you’re looking at her, the sun is predominantly on the left side of the image.

Step Three:

Have your subject move to the 6 o’clock position. Again, pivot with them. Take another photo.

Now, she’s moved into the six o’clock position, and is looking into the sun. You can see that’s going super well.

Step Four:

Have your subject move to the nine o’clock position. Continue to pivot with them, and take another photo.

Finally we’ve moved into the nine o’clock position. As you’re looking at her, the light is primarily on the right side of her face.

Step Five:

Review the four photos that you’ve just taken, and decide which one offers the most appropriate lighting for the look you’re trying to achieve.

Unless you’re shooting at high noon with the sun directly above you, you’ll probably notice that the lighting will vary dramatically between each of the four photos, with some being much more visually appealing than others. This gives you a great starting point to be able to visually “see” the light and quickly determine which direction you’d like your subject to be facing for your portraits (or in a large park, which general direction you may want to head for your session).

Bonus Tip:

If you notice pretty severe backlighting as in the photo for the 12 o’clock position above, and that is not the look you’re trying to achieve, try having your subject sit down!

This image was taken in the exact same location as the “12 o’clock” image above, only with my daughter sitting on the ground instead of standing.

Keep in mind that the circle trick works in the reverse as well, with your subject standing in the same location and you walking around them as the positions of the clock. Sometimes it’s easier for the photographer to do the bulk of the moving around rather than the subject. On the other hand, I spend a lot of time photographing elementary age children, and find that they really enjoy getting to be a special helper at the beginning of a photo shoot. Getting them engaged early on is a good way to help them to feel comfortable with me. In fact, even though I don’t actually need to use the circle trick anymore to be able to see the light, sometimes I still use it as a quick ice breaker at the beginning of sessions with younger children, showing them the four different photos at the end.

For many people, understanding the quality and direction of light is something that’s learned practically – the more you practice, the more you’ll eventually begin to be able to “see” the light intuitively. This is one really simple (and quick!) way to begin to train your eye to begin to see light – so if lighting for portraits is something that you tend to struggle with, grab a friend and give it a try!

googletag.cmd.push(function() {
tablet_slots.push( googletag.defineSlot( “/1005424/_dPSv4_tab-all-article-bottom_(300×250)”, [300, 250], “pb-ad-78623” ).addService( googletag.pubads() ) ); } );

googletag.cmd.push(function() {
mobile_slots.push( googletag.defineSlot( “/1005424/_dPSv4_mob-all-article-bottom_(300×250)”, [300, 250], “pb-ad-78158” ).addService( googletag.pubads() ) ); } );

The post How to See the Light for Portraits: A Quick Tip for Beginners by Meredith Clark appeared first on Digital Photography School.


Digital Photography School

 
Comments Off on How to See the Light for Portraits: A Quick Tip for Beginners

Posted in Photography


What’s that noise? Shedding some light on the sources of noise

27 Apr

How would you react if you were told that the aperture and shutter speed you choose make more difference to image noise than the ISO setting? You might be surprised to discover that a lot of the noise in your images doesn’t come from your camera at all: it comes from the light you’re capturing. Our own Richard Butler explains. Read more

Articles: Digital Photography Review (dpreview.com)

 
Comments Off on What’s that noise? Shedding some light on the sources of noise

Posted in Uncategorized


The Ultimate Guide to Natural Light Photography

22 Apr

Dps covers template 363x448

As a photographer, the most powerful tool you have is natural light

It may be free for the taking – but are you making the most of it to create beautiful images?

Today I’m pleased to announce the launch of our latest dPS eBook – Life in Natural Light by Rachel Devine.

Rachel is someone I have had come to photograph my family – largely because I love the way that she uses natural light to capture special moments of life – so when our team began talking about who we wanted to write this eBook Rachel was the first person to come to mind.

In this beautifully illustrated eBook Rachel reveals her secrets for finding and using natural light to tell unique visual stories, enhance mood and create quality images.

Knowledge, Advice and Inspiration

I love what Rachel and our team have done in producing this eBook. You’re going to come away from reading it with a few really important things:

  • a comprehensive understanding of the different types of natural light (because it’s something that is always changing)
  • practical advice on how to spot, control and harness the power of natural light
  • inspiration to get out and shoot having seen Rachel (and other photographers) beautiful images

What more could you want – theory, advice and inspiration that will transform your approach to this important topic!

NewImage

Our Early Bird Offer to dPS Readers

To celebrate the launch of Life in Natural Light we’ve put together a fantastic little bundle together for you. You’ll not only get this great eBook but bundled with it comes:

  • 16 Lightroom presets for you to use, optimized for natural light and custom-created by Rachel herself
  • A natural light printable worksheet, to use as a quick reference in the field

Normally this bundle would retail for $ 29.99 USD but for a limited time you can pick it up for just $ 19.99 USD.

Learn more about Life in Natural Light and grab your copy today here.

googletag.cmd.push(function() {
tablet_slots.push( googletag.defineSlot( “/1005424/_dPSv4_tab-all-article-bottom_(300×250)”, [300, 250], “pb-ad-78623” ).addService( googletag.pubads() ) ); } );

googletag.cmd.push(function() {
mobile_slots.push( googletag.defineSlot( “/1005424/_dPSv4_mob-all-article-bottom_(300×250)”, [300, 250], “pb-ad-78158” ).addService( googletag.pubads() ) ); } );

The post The Ultimate Guide to Natural Light Photography by Darren Rowse appeared first on Digital Photography School.


Digital Photography School

 
Comments Off on The Ultimate Guide to Natural Light Photography

Posted in Photography


Quality of Light – What is Beautiful Light?

22 Apr
quality of light

This photo is lit by the soft light found inside on a sunny day. The light suits the subject because it reveals all the detail on the antique scales.

We talk about quality of light a lot in photography. I often use the word beautiful, and tell people that great photos require beautiful light. But what is beautiful light?

To answer that we need to understand that light has many qualities that vary immensely, depending on factors like the light source, time of day, season, and location. Light can be extremely hard (one extreme) or very soft (the other extreme) or anywhere in-between. It takes time to appreciate the nuances and variations of light and learn how to use light that suits both the subject matter, and the style that you are shooting.

What is hard light?

Hard light is strong, directional light that casts deep, hard-edged shadows. It’s the quality of light you get in the middle of a sunny, cloudless day, or from an unmodified flash head.

quality-light-hard-soft-10

Hard light, generally speaking, is considered bad lighting for many types of photography. There are two fundamental problems with hard light.

One is contrast – the brightness range (between the area lit by the light source and the shadows it casts) is so great that the camera’s sensor (or film) can’t record detail in both. The other is that hard light is not as aesthetically pleasing as soft light in many situations. It’s another generalization, I know, but it’s the reason that time and time again you will be advised not to take photos in midday sun or with an unmodified flash head.

The key to working with hard light is to recognize its limitations and find suitable subjects to work with. Personally, I find that black and white is better than colour for working in hard light, and that subjects like buildings can work quite well.

quality of light

Hard light is considered unsuitable for portraits because the hard shadows create too much contrast across the model’s face and are not flattering. However, you may be able to work in hard light with a male model, especially in black and white, as it tends to suit the ruggedness of a man’s face. Regardless of whether your model is male or female, simply facing them into the light so that shadows are as small as possible can work well.

I don’t have any portraits that show these techniques myself, but here are a couple of examples from photographer Betina la Plante. Just click the links to see the photos.

Female portrait taken in hard light. Note how the model faces the light so that the shadows are minimized.

Male portrait taken in hard light. See how the photographer used the deep shadow cast by the hard light to throw one side of the model’s face into shadow and bring out the texture of his skin.

quality-light-hard-soft-11

In both cases the black and white treatment suits the hard light.

Another solution is to use portable flash to light the model when shooting in hard light. The idea is that the softer light from the flash (fitted with appropriate modifier) overpowers or fills in the hard light from the sun. That’s what I did with the following image.

quality of light

What is soft light?

Soft light is that which casts either no shadows, or shadows with soft edges. It is more suitable than hard light for many subjects, including many types of landscape and portraits (but especially portraits).

For example, if you are taking someone’s portrait during the middle of a sunny day, then one of the best things you can do is find some shade, and take a photo of your model there. The softness of the light, and the fill from the brighter, sunlit surroundings, is a very flattering type of light that makes the model’s face glow and creates large catchlights in her eye.

quality of light

You also get nice light for portraits after the sun has set at the end of a sunny day, when the sky is filled with a soft glow from the last rays of the setting sun. This works best during the longer days (and twilights) of spring and summer.

quality of light

If you are using flash, then a modifier such as a softbox or umbrella softens the light, making it more flattering for portraits (although it won’t be as soft as the types of natural light just described).

In-between light

I’ve just described several scenarios, starting with midday sun, which is very hard, through to shade or twilight, where the light is very soft. The truth is that most light falls somewhere between these two extremes.

For example, lets say you are taking a landscape photo on a sunny day. The light changes as the sun gets lower, softening and changing in colour. The exact changes depend on the time of year, atmospheric conditions and the weather. Here in New Zealand, the light is very hard, especially during the summer, until the sun slips below the horizon. In other places the prevalent atmospheric conditions may make the light much softer, even on a sunny day.

This photo was taken just after the sun had set. The light was soft and warm, but still hard enough to pick out the side of the island.

quality of light

The key is to find the point at which the light suits your subject, in the style that you’re trying to shoot. Depending on what you want to achieve, the light is most likely to be suitable sometime during the transition from the hard light of the day to the soft light of twilight. It’s up to you to familiarize yourself with the lighting conditions in the places that you shoot, and to learn to recognize how hard or soft the light is, and when the quality of the light matches the subject you want to shoot.

This photo was taken on an overcast day. The soft, even lighting means the toy car casts a soft shadow. The soft light makes it easy for the camera to record all the important details, avoiding clipped highlights and overly dark shadows.

quality of light

Size of the light source

So far I’ve just talked about light in terms of its quality. I think the best way to evaluate the quality of light is to learn to look at it and assess the direction it’s coming from, plus the hardness or softness of the light, for yourself by seeing how it falls on the subject.

But it will help if you understand the key factor that differentiates a hard light source from a soft one is the size of the light source relative to the subject.

The key factor that differentiates a hard light source from a soft one is the size of the light source relative to the subject

For example, if you use a flash head without a modifier to take a portrait, the light is hard because the light source is much smaller than your model. To make the light softer, you need to use the largest modifier you can and move the flash as close to your subject as you can.

quality-light-hard-soft-9

The light on a sunny day is hard because the sun is small in relation to your subject. If you were able to look at it without damaging your eyes it would appear to be just a dot in the sky.

Yet if it is cloudy, foggy, or raining, the weather conditions diffuse the light, spreading it out so that it seems to be coming from the entire sky, rather than a single point in the sky. The light source is now very large compared to the subject, and the light much softer.

A similar diffusion effect occurs as the sun nears the horizon at sunset.

Your turn

Hopefully this article has helped you understand the key differences between hard and soft light. How important is the quality of light in your work? What types of light do you prefer to shoot in? Please let us know in the comments.


Mastering PhotographyComposition and line

My ebook Mastering Photography: A Beginner’s Guide to Using Digital Cameras introduces you to digital photography and helps you make the most out of your digital cameras. It covers concepts such as lighting and composition as well as the camera settings you need to master to take photos like the ones in this article.

googletag.cmd.push(function() {
tablet_slots.push( googletag.defineSlot( “/1005424/_dPSv4_tab-all-article-bottom_(300×250)”, [300, 250], “pb-ad-78623” ).addService( googletag.pubads() ) ); } );

googletag.cmd.push(function() {
mobile_slots.push( googletag.defineSlot( “/1005424/_dPSv4_mob-all-article-bottom_(300×250)”, [300, 250], “pb-ad-78158” ).addService( googletag.pubads() ) ); } );

The post Quality of Light – What is Beautiful Light? by Andrew S. Gibson appeared first on Digital Photography School.


Digital Photography School

 
Comments Off on Quality of Light – What is Beautiful Light?

Posted in Photography


28 Ethereal Images of Light Rays that Glow

18 Apr

To photographers light is the most important thing above all else. It is the ultimate prize to come home with a photo with “good light”.

One type of light that is truly ethereal is the phenomenon of rays of light. It is only possible for light rays to be visible in an image when certain atmospheric conditions exist; there must be some kind of particle suspended in the air for the light to bounce off such as dust, fog, or smoke.

Here are 28 images of light rays that have a certain glow about them. Enjoy!

Photograph Home by matt dinning on 500px

Home by matt dinning on 500px

Photograph Poland by Artur Magdziarz on 500px

Poland by Artur Magdziarz on 500px

Photograph Amazing Earth by Rick White on 500px

Amazing Earth by Rick White on 500px

Photograph The Valley of Light by Michael Shainblum on 500px

The Valley of Light by Michael Shainblum on 500px

Photograph A Journey to the Light by Rarindra Prakarsa on 500px

A Journey to the Light by Rarindra Prakarsa on 500px

Photograph Raging Light by Martin Kornmesser on 500px

Raging Light by Martin Kornmesser on 500px

Photograph Praying by La Mo on 500px

Praying by La Mo on 500px

Photograph The Cave by Tommy  Angelsen on 500px

The Cave by Tommy Angelsen on 500px

Photograph Dawning by Dylan Toh  & Marianne Lim on 500px

Dawning by Dylan Toh & Marianne Lim on 500px

Photograph heavenly autumn 7 by Bart Ceuppens on 500px

heavenly autumn 7 by Bart Ceuppens on 500px

Photograph Hold On Tight by Vichaya Pop on 500px

Hold On Tight by Vichaya Pop on 500px

Photograph Light shower by Martin Kornmesser on 500px

Light shower by Martin Kornmesser on 500px

Photograph Waiting for a New Life! by Mardy Suong Photography on 500px

Waiting for a New Life! by Mardy Suong Photography on 500px

Photograph Nori Othman by Mohammed Abdo on 500px

Nori Othman by Mohammed Abdo on 500px

Photograph Beams of Light by BP Chua  on 500px

Beams of Light by BP Chua on 500px

Photograph Peter's ray by Jarno Dijkstra on 500px

Peter's ray by Jarno Dijkstra on 500px

Photograph Better than Coffee by Tracey Harrison-Hill on 500px

Better than Coffee by Tracey Harrison-Hill on 500px

Photograph Upper Antelope Canyon by Victor Chen on 500px

Upper Antelope Canyon by Victor Chen on 500px

Photograph Descending by Thomas Conrad  on 500px

Descending by Thomas Conrad on 500px

Photograph Sunset With A Twist by Michael Shainblum on 500px

Sunset With A Twist by Michael Shainblum on 500px

Photograph Sonnenstrahlen im Wald by Leo Pöcksteiner on 500px

Sonnenstrahlen im Wald by Leo Pöcksteiner on 500px

Photograph The lake by Christian Wig on 500px

The lake by Christian Wig on 500px

Photograph morning by Alberto Melcangi on 500px

morning by Alberto Melcangi on 500px

Photograph Enveloping light by Stefan Andronache on 500px

Enveloping light by Stefan Andronache on 500px

Photograph Fresh Beginning by Scott Knox on 500px

Fresh Beginning by Scott Knox on 500px

Photograph Ray Of Light by Roland Guth on 500px

Ray Of Light by Roland Guth on 500px

Photograph Home is where the light is by Claudiu Guraliuc on 500px

Home is where the light is by Claudiu Guraliuc on 500px

Photograph Entrance by markus  on 500px

Entrance by markus on 500px

googletag.cmd.push(function() {
tablet_slots.push( googletag.defineSlot( “/1005424/_dPSv4_tab-all-article-bottom_(300×250)”, [300, 250], “pb-ad-78623” ).addService( googletag.pubads() ) ); } );

googletag.cmd.push(function() {
mobile_slots.push( googletag.defineSlot( “/1005424/_dPSv4_mob-all-article-bottom_(300×250)”, [300, 250], “pb-ad-78158” ).addService( googletag.pubads() ) ); } );

The post 28 Ethereal Images of Light Rays that Glow by Darlene Hildebrandt appeared first on Digital Photography School.


Digital Photography School

 
Comments Off on 28 Ethereal Images of Light Rays that Glow

Posted in Photography


Weekly Photography Challenge – Light Rays

18 Apr

Rays of light are that golden egg photographers dream about, lust after, desire with all their heart. Earlier I shared a set of images that display a great example of rays of light.

Geert Orye

By Geert Orye

Weekly Photography Challenge – Rays of Light

So now it’s your turn to go out and replicate this type of photograph. You may think – that’s impossible how can I create that if it doesn’t already exist? Well there are some things you can do to help it along.

  • Look for a foggy day or condition
  • Go out to shoot in the early morning and look for mist that is laying low over the land with the sun coming through it
  • Find a dusty old dirt road and drive up and down it a few times, then get out and start shooting
  • Go to a historic site or museum and see if you can shoot inside some of the old musty buildings, look for light coming in the windows
  • Sheer curtains or blinds over a window can help too

So get out and look for the light. Here are a few more examples:

HuTDoG83

By HuTDoG83

Caruba

By caruba

Deepak

By Deepak

Alexander Kesselaar

By Alexander Kesselaar

Billy Wilson

By Billy Wilson

Chantrybee

By chantrybee

Lawrence OP

By Lawrence OP

Share your rays of light images here:

Simply upload your shot into the comment field (look for the little camera icon in the Disqus comments section) and they’ll get embedded for us all to see or if you’d prefer upload them to your favourite photo sharing site and leave the link to them. Show me your best images in this week’s challenge. Sometimes it takes a while for an image to appear so be patient and try not to post the same image twice.

googletag.cmd.push(function() {
tablet_slots.push( googletag.defineSlot( “/1005424/_dPSv4_tab-all-article-bottom_(300×250)”, [300, 250], “pb-ad-78623” ).addService( googletag.pubads() ) ); } );

googletag.cmd.push(function() {
mobile_slots.push( googletag.defineSlot( “/1005424/_dPSv4_mob-all-article-bottom_(300×250)”, [300, 250], “pb-ad-78158” ).addService( googletag.pubads() ) ); } );

The post Weekly Photography Challenge – Light Rays by Darlene Hildebrandt appeared first on Digital Photography School.


Digital Photography School

 
Comments Off on Weekly Photography Challenge – Light Rays

Posted in Photography


5 Ways to Use a Beauty Dish Light for Portraits

12 Apr

The beauty dish. It’s one of my favorite light modifiers, which is why I’m so excited to share some techniques you can try with your beauty dish. Don’t have one? Not to worry. There are plenty of DIY beauty dish project plans online. I’ve actually made them out of aluminum turkey pans. When you decide to step up to a more professional beauty dish, however, they are usually not as expensive as most light modifiers and you can get them for speedlights or studio strobes.

Beautydish 2

Beauty dishes are a niche modifier usually reserved for beauty shots. These tend to be head and shoulder portraits that highlight makeup and hair, and are commonly used in the fashion industry. So why should you try it? Well, it’s fun to see if you can make images like you see in the fashion magazines, it’s also very creative. You really have to plan and construct the entire image. This may include everything from your choice of background, lighting setup, and hair and makeup.

The quality of light produced by a beauty dish is not as soft as a softbox, but it is softer than an umbrella, and not as hard as just using a 7 inch reflector. The light falloff is quite rapid, which helps to sculpt the subject’s face and to show texture in their skin. Beauty dishes often produce nice catch lights in the eyes and shadows under the jaw line. They are versatile modifiers because you can change the quality of light by choosing a dish with a silver, or white, inner surface. The white surface will produce slightly less specular highlights on the subject’s face. You can also control the spill of light by using a grid and even further soften the light by adding a sock over the front.

Beautydish 3

When you plan a shoot using a beauty dish, only use it on clients or models with very good skin because the light pattern it produces can show off imperfections like wrinkles and blemishes. It’s also helpful to find a good makeup and hair artist because you will be showing off the subject’s face in detail. If you’re not ready to pay a makeup artist for this service, you can offer them a trade for images so they can expand their portfolios; or, if you’re really lucky sometimes you can find a model that is skilled at doing her own makeup.

When setting up your camera, I recommend a lens in the 85-200mm range. I use studio strobes and an aperture around f/8 or f/11. I would also recommend using a boom arm because it will help you put the beauty dish in just the right spot, without getting in the way of your shot. The beauty dish will give you very nice light on the subject’s face. Keep in mind you often need to spice up the image with a rim (or accent) light, hair light or a background light.

Beautydish 3 2

Let’s get started with five ways to use your beauty dish:

1. One light with a reflector: Clam shell lighting)

This is the typical way you will see a beauty shot set up. The dish is positioned right above the subject’s face, pointed down slightly, so the center of the dish is aimed at the subject’s forehead, right between the eyes. The dish should be close to your subject to produce soft light, usually within two to four feet. When you set this up, make sure you can see catchlights in the top of subject’s eyes. Then add a reflector under the beauty dish to bounce light back up on to their face. This will help minimize the shadows under chin, and add a catch light at the bottom of the eyes. You will have to put your camera between the beauty dish and the reflector. Some photographers also like to add black cards on either side of the subject to help create shadows on the sides of the face.

Beautydish 1 2 Beautydish 2 2

2. Two light setup: Clam shell lighting

This is basically the same as number one above, except you use a strobe in place of the reflector. This allows you control of the power output of the fill light. I prefer to use a strip box for this purpose, set one or two stops darker (lower) than the main light.

Beautydish 7b Beautydish 8

3. Add a sock over the beauty dish

The sock is a piece of diffusion material, that looks like a shower cap, which you put over the beauty dish. This softens the light on the subject’s face, and if you are getting shiny spots it will reduce the specularity of the light. Using a sock will produce a creamy look, with less skin texture.

Beautydish 9

4. Add a grid to the beauty dish

The grid will focus the light into more of a spotlight type pattern, which can be used to create some interesting effects. Just make sure the grid is pointed directly at the subject or the light pattern will not strike the face correctly. The easiest way to check this is to make sure the subject can see directly through the grid to the light source.

Beautydish 4

5. Take it outdoors

The beauty dish is a great light modifier for outdoors because it’s more compact than a softbox, but can be used like one. The light quality will be softer than an umbrella, and won’t catch the wind as much as an umbrella or a softbox. It can be used as the main light source or as a fill light. If you use it as a main or fill light you can set it up at a 45 degree angle like you might use a softbox. When the light conditions are warm in tone such as sunrise or sunset, you may want to add a color temperature orange gel over the beauty dish to help blend the strobe’s light with the sunlight.

Beautydish 6

The beauty dish is a bit of a specialist tool that can produce wonderful lighting patterns when used correctly. However, it can also be used in many creative ways to produce interesting shots. I hope you have fun giving the beauty dish a try.

Beautydish 5

googletag.cmd.push(function() {
tablet_slots.push( googletag.defineSlot( “/1005424/_dPSv4_tab-all-article-bottom_(300×250)”, [300, 250], “pb-ad-78623” ).addService( googletag.pubads() ) ); } );

googletag.cmd.push(function() {
mobile_slots.push( googletag.defineSlot( “/1005424/_dPSv4_mob-all-article-bottom_(300×250)”, [300, 250], “pb-ad-78158” ).addService( googletag.pubads() ) ); } );

The post 5 Ways to Use a Beauty Dish Light for Portraits by Gary Detonnancourt appeared first on Digital Photography School.


Digital Photography School

 
Comments Off on 5 Ways to Use a Beauty Dish Light for Portraits

Posted in Photography


How to Make a DIY Light Panel or Scrim

07 Apr

how-to-guide-banner

In an earlier article we discussed 10 reasons why you should consider using a light panel instead of a softbox for your next shoot. In this, part two, I am going to:

  • Show you how to create your own self-standing PVC light panel frames and accessories
  • Share some cheap fabric alternatives to use with your new frames
  • Offer helpful tips on making them stronger and easier to assemble

Before we get started, I want to talk a little bit about the size of our panels versus what you may buy online. There are a lot of different brands of frames out in the market, and most of them top out at around 72”. A six foot tall panel might sound plenty big, but when you are shooting someone who is tall, you are not going to have the area of coverage you need around your model’s head. To remedy this, you will have to attach the panel to your light stands, using an adapter, to raise it off the floor.

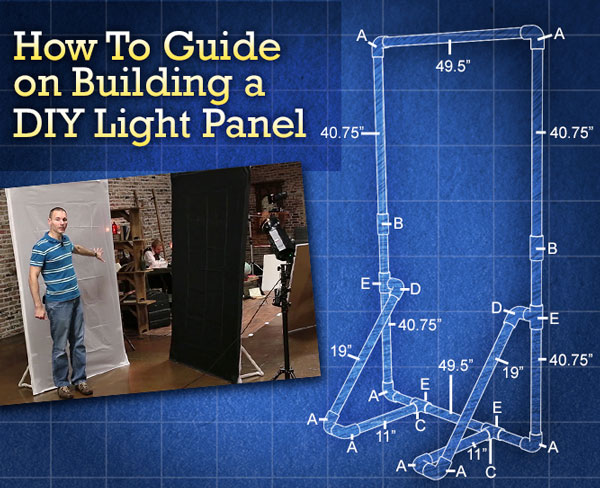
The panels we are going to create measure in at roughly seven feet tall, giving you a little more headroom and allowing you to free up your light stands for things such as… lights!

With that being said, while the panel part of this project is pretty quick and easy, creating the fabrics can be a bit more daunting, especially if you are uncomfortable around a sewing machine.

If you do not want to tackle making your own fabrics, you can still clamp large pieces of fabrics to the frame – such as bed sheets. Another option would be to build your frames to the smaller dimensions as a name-brand panel, then purchase the fabrics from that company. The money you save building the panels might even be enough to cover the cost of the fabrics.

Here are the main things you are going to need to create your panel:

List of Tools for Creating the Frame

  1. Ratcheting PVC cutter or shears
  2. Measuring tape
  3. A marker

As far as PVC goes, your local hardware store will most likely have two lengths to choose from. Depending on how you are going to transport the PVC, you can choose between the standard 10 foot sections or pre-cut five foot sections. The 10 foot sections will save you more money, but getting them home may prove a bit tricky, unless you have a long vehicle such as a truck, SUV, or van.

I like to build my panels out of ¾” Schedule 40 pipe. Schedule 40 is both rigid and lightweight. If you decide to buy the PVC in 10 foot sections, you will need three pieces per panel. If you go with five foot sections, you are going to need six pieces per panel.

As far as fittings, you are going to need: (all fittings Schedule 40)

  • Eight 90 degree ¾” elbows
  • Two ¾” couplers
  • Two ¾” slip to threaded adapters
  • Two ¾” slip to threaded street elbows
  • Four ¾” threaded saddle tees
fittings

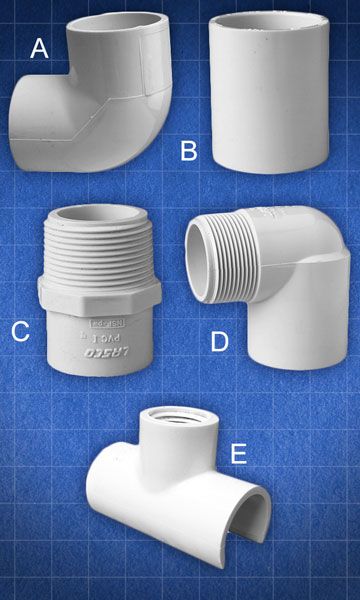
(A) 90 degree ¾” elbow (B) ¾” coupler (C) ¾” slip to threaded adapter (D) ¾” slip to threaded street elbow (E) ¾” threaded saddle tee

That should do it. Let’s get started on the panel.

Measure and mark

With your tape measure and marker, measure and mark your cuts on each section of pipe. When measuring your cuts, be sure to start your measurement from the last mark you made.

Your marks need to be at:

For 10’ pipe

Piece 1

  • Mark 1 – 40.75” (103.5 cm)
  • Mark 2  – 40.75“ (103.5 cm)
  • Mark 3 – 19” (48.3 cm)
  • Mark 4 – 19” (48.3 cm)

Piece 2

  • Mark 1 – 40.75” (103.5 cm)
  • Mark 2  – 49.5“ (125.7 cm)
  • Mark 3 – 11” (27.9 cm)
  • Mark 4 – 11” (27.9 cm)

Piece 3

  • Mark 1 – 49.5” (125.7 cm)
  • Mark 2  – 40.75“ (103.5 cm)

For 5’ pipe

Piece 1

  • Mark 1 – 40.75” (103.5 cm)
  • Mark 2  – 19“ (48.3 cm)

Piece 2

  • Mark 1 – 40.75” (103.5 cm)
  • Mark 2  – 19“ (48.3 cm)

Piece 3

  • Mark 1 – 40.75” (103.5 cm)
  • Mark 2  – 11” (27.9 cm)

Piece 4

  • Mark 1 – 40.75” (103.5 cm)
  • Mark 2  – 11” (27.9 cm)

Piece 5

  • Mark 1 – 49.5” (125.7 cm)

Piece 6

  • Mark 1 – 49.5” (125.7 cm)

Once you have finished marking all of your cuts, take your PVC cutters or shears, and cut out all the pieces. When you’re done you should have:

  • Panel Sides: four  40.75” pieces
  • Panel Top and Bottom: Two 49.5” pieces
  • Leg 1: One 11” and one 19” piece
  • Leg 2: One 11” and one 19” piece

Next, take one of your leftover scrap pieces and cut two small sections of pipe, roughly 1.25” inches in length. These will later be inserted into the elbow joints of the legs, so that they can pivot.

Assembly

panel-construction-diagram

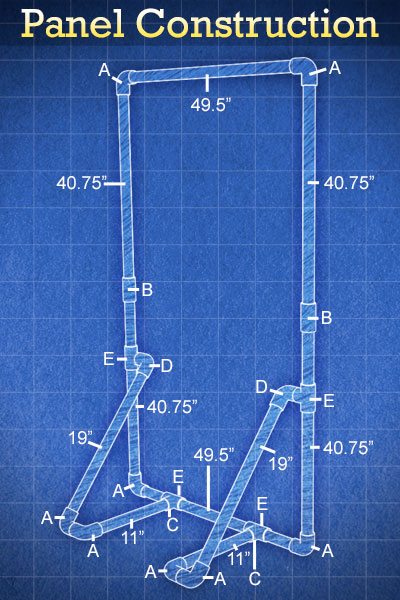
Assembly diagram showing each length of pipe, and each fitting, that make up the completed light panel. Letters coincide with above fitting diagram.

To create the sides of the panel, join together the ends of two side pieces with a coupler. Next, connect the top and bottom sections to the side pieces using 90 degree elbows.

Three short sections of PVC are all that make up the feet for your panel. First, add a 90 degree elbow to the 19″ and 11″ pieces of pipe. Attach the threaded coupler adapter to the other end of the 11” piece, then attach the 90 degree street elbow to the other end of the 19” piece. Next, screw a threaded saddle tee connector onto each of the threaded adapters. Finally, join the two pieces together by inserting the small piece of PVC between the two 90 degree elbows. You should now have a pivoting leg that can snap onto your panel, so that it can stand on its own without having to attach it to a light stand.

leg-assembly

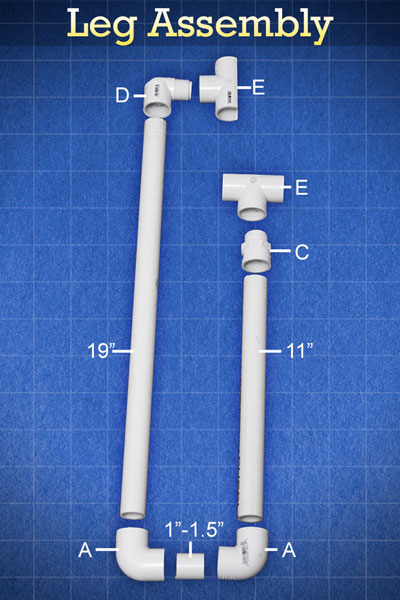
Assembly diagram showing how to assemble the snap-on panel legs. Letters coincide with the above fitting diagram.

*Quick Tip*

The shape of the legs are great for placing sandbags on, whenever you are on location and it is breezy.

Fabrics

I have three main types of fabric that I always keep handy. Diffusion, black, and white. You should be able to find everything you need at your local fabric store. For the diffusion panel, I use a white (translucent) rip-stop nylon. For the black, I use a nylon material. Make sure that it does not let a lot of light pass through it, that it’s fairly opaque. For white panels, I found that the white lining of blackout curtains works awesome! It does not have to be hemmed, and it does not allow light to pass through it, which seems to make it a very efficient bounce source. Just make sure you pick the whitest blackout fabric you can find. (The fabric comes in off-white colors, as well.)

The fabrics for the panels can be made by cutting out pieces of material, about 2-3 inches larger than the  4’ x 7’ frame, then hemming them. Hemming is not required but will keep the edges tidy and professional looking.

To make the fabric panels easier to attach to the frames, sew 10” strips of wide elastic on a diagonal to the back corners of each piece. Once added, attaching the panels to the frames is as easy as slipping each corner into the elastic pocket.

elastic-strip

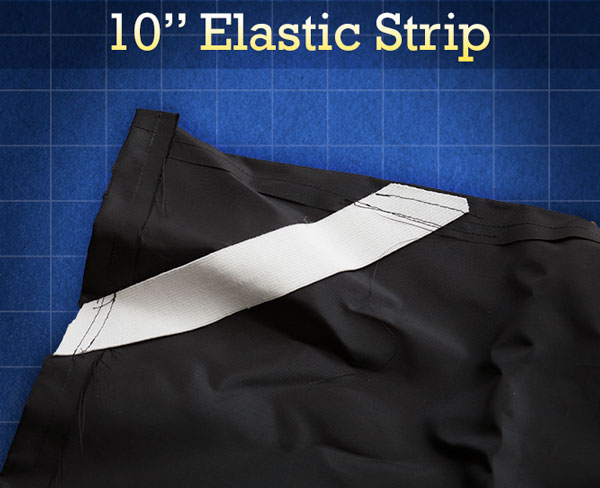
Example of elastic strip pocket, created to make fabrics easier to attach to panel frame.

At this point, you have pretty much finished your DIY light panel. Now, I am going to show you some additions that will make your light panel even more versatile.

Accessories

Crossbar

A crossbar is a great thing to add to your panel for extra strength in outdoor windy conditions, and it can make the panel a lot easier for an assistant to hold and position.

To add a crossbar to your panel, just cut out an extra 49.5” section of PVC, the same size as the top and bottom sections of our panels. Next, replace the couplings on each of the side pieces with a ¾” tee. This will give you a channel to attach your crossbar to. That is all there is to it!

A Bungee or Shock Cord

If you decide to make more than one panel, you are soon going to realize how cumbersome it is to dump out all the individual pieces and sort through them.

To make your life a little easier, you can use a 23 foot length of thin elastic bungee (shock) cord and run it through each piece of your panel. The bungee cord keeps all your pieces together when the panel is broken down, and the slight tension helps pop the pieces into place when you are ready to set things up.

To add the shock cord to your frame, lay out all the un-assembled pieces on the ground and start feeding the elastic cord through the PVC. Next, pull the two ends of the bungee cord tight until the ends of the frame touch each other, then tie the ends together. Finally, cut off and discard any extra cord.

Single and Double Clips

clips

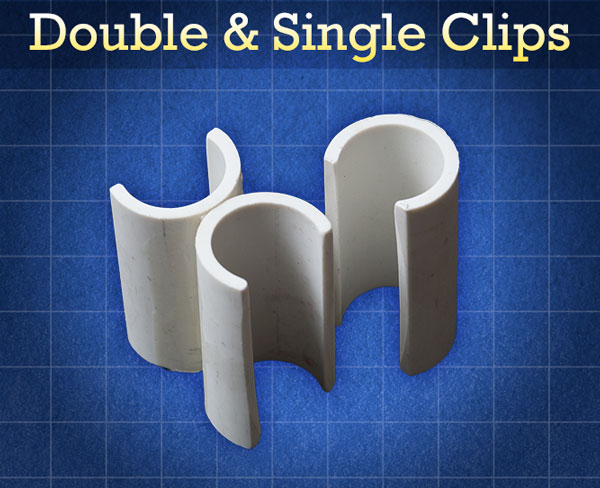
Single and double clips are an essential accessory to carry in your bag, along with your panels. Single clips offer a great way to attach pieces of fabric to your frame, or further secure your fabrics for windy conditions.

Things Needed to Make Clips:

  1. Measuring Tape
  2. Marker
  3. 5’ section of 1” Schedule 40 Pipe
  4. Ratcheting PVC Cutter/Shears
  5. Dremel tool with cutting and grinding attachment
  6. PVC cement
  7. C-Clamp

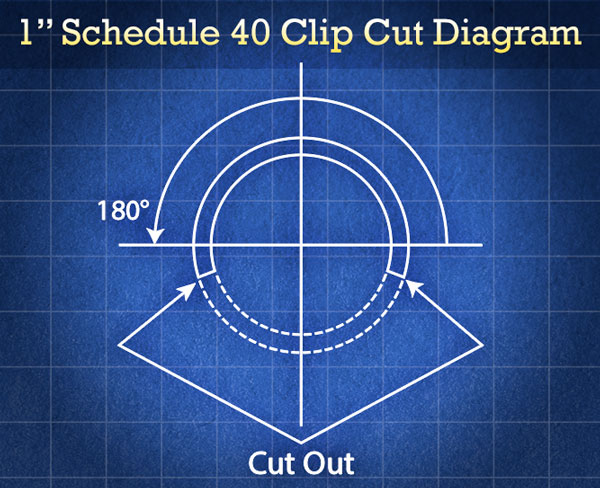
To create a single clip, cut a 2” section of pipe using your shears. Next, use a Dremel tool fitted with a cutting wheel to cut a section from the PVC. (Use the circumference diagram below as a reference, to produce a sufficient clip.) Once you finish cutting out the section, use a grinding attachment to bevel, smooth, and round any rough edges.

clip-cut-diagram

Double clips are made by cementing two single clips together, then attaching a c-clamp to them until the cement dries. These clips do an awesome job of attaching two or more frames together. For instance, by using double clips, you can create a giant 8’x7’ diffusion source, bounce source, or v-flat.

Adding Strength

Though PVC frames are cheap and lightweight, their strength does not stand up to their commercial aluminum counterparts. If you find that you are needing your panel frames to be stronger and more rigid, there are a few things that you can do to strengthen them without adding a lot to their weight. (The only downside of each method is that you won’t be able to use bungee cord to keep the panels together.)

Spray Foam

Filling your tubes with spray foam might be the easiest way to add stiffness and strength to your panels. To insure that there are no voids left in the pipe during the filling process, drill a few small holes along the length of each section. The holes should be just large enough to stick the straw of the spray foam through. Once each section is filled, make sure that it is placed on a flat surface, otherwise it will stay bent once the foam dries.

Dowel Rods

Wooden dowel rods are another great way to strengthen your PVC frames. This method will require a saw to cut off the excess ends of the dowels. A ¾” dowel will not fit snugly into most ¾” pipe. (The inner diameter of the pipe is more around .8”.) To remedy this, try wrapping the ends of the dowels in a few layers of gaffer or duct tape, then hammer them into the pipes using a rubber mallet. You can also try applying a large glob of PVC cement to the rod before placing it inside the tube. Once the cement dries, it should hold the dowel in place.

Closing Thoughts

I hope this article has proven helpful and has made you excited to start using light panels in your photography. If you have not yet read the first article entitled “10 Reasons to Ditch Your Softbox for a Light Panel”, I encourage you to do so. This article shows the benefits of using a light panel over a softbox and shares techniques that will help you get the most out of using one.

Until next time, go out, have fun, experiment and create something awesome!

googletag.cmd.push(function() {
tablet_slots.push( googletag.defineSlot( “/1005424/_dPSv4_tab-all-article-bottom_(300×250)”, [300, 250], “pb-ad-78623” ).addService( googletag.pubads() ) ); } );

googletag.cmd.push(function() {
mobile_slots.push( googletag.defineSlot( “/1005424/_dPSv4_mob-all-article-bottom_(300×250)”, [300, 250], “pb-ad-78158” ).addService( googletag.pubads() ) ); } );

The post How to Make a DIY Light Panel or Scrim by Joel Dryer appeared first on Digital Photography School.


Digital Photography School

 
Comments Off on How to Make a DIY Light Panel or Scrim

Posted in Photography


DIY Light Modifier You Can Do With Savage Translum Material

31 Mar

Translum Blue 600

The thing studio product photographers hate the most is when undesirable reflections show up in their images. There are many ways to control these and I’ve got one that you can easily build at home. It’s a DIY project using the Savage Translum material.

What you’ll be creating is a rollable sheet of Translum with a hole in the middle for your camera lens. That will enable you to set it between the object you’re photographing and the camera which will eliminate the big direct reflections you get by using a softbox pointed straight on the subject.

Compare 600

What is Savage Translum material?

Savage is known for their paper backgrounds. They have a ton of them and are pretty much the industry standard as far as that goes. However, they do make other studio product such as the Translum material. It is a roll of thick white translucent styrene plastic, 54” wide (or 60”, depending on the model you get) by 18 foot long. When you put a light behind it, it gets highly diffused and loses two stops of light (that is, with the heavyweight version).

There are many uses for it such as; creating a pure white background and making DIY light diffusers and reflectors. Currently, there are three options (lightweight, medium and heavyweight). The difference is the quantity of light you lose and, thus, the amount of diffusion. You lose two stops with the heavyweight (it’s the original Translum), 1.5 stops with the medium weight and ¾ of a stop using the lightweight one. I think of the heavyweight for use with flash whereas the lightweight Translum would be to diffuse window light, for example. One thing that makes that material so useful is that is very cuttable and encourages improvisation in the studio, leading to more creative light setups. You can pick some up at all the big camera stores (B&H, Adorama, Amazon).

Build it!

Before you can start building, you’ll need to gather the items you’ll need in the project. They are:

  • A roll of Savage Translum
  • A measuring tape
  • A pencil
  • A pair of scissors
  • A compass (to trace the circle)
  • A X-acto (utility) knife
  • A central vacuum system with 2” PVC pipe the width of your roll (54” or 60”)
  • A handsaw (to cut the PVC)
  • A roll of Tuck Tape
  • A roll of painter’s tape

The very first thing you’ll need to do is determine the length of the sheet of Translum you’ll want. Mine measures 54” wide (the size of the roll) by 50” long. You can have it as long as you want, but I suggest not going less than 50” and also not too long because you may want to use the remaining Translum later and it would be a waste (to the floor is usually sufficient).

Once that’s done, simply measure the desired length and cut it. A pair of regular kitchen scissors works wonder to do so.

Next, decide where to place the hole for the lens to fit through. I would suggest putting it 6-12″ lower than the exact center, because you need a lot less material under your camera than you do up top. Once that’s done, mark that point and grab a compass (if you don’t have one, any round object that’s large enough will work just as well). To select the size of the hole, you want it to be as small as possible but still big enough so that the front of your lens can pass through.

Take the diameter of your lens and add an inch just so you have some play. Then, make the appropriate circle with the compass and grab an X-acto knife and a cutting board. Again, it is surprisingly easy to work with Translum and cutting the circle should be a breeze. The easiest way to do so it is by placing it on the floor (put the cutting board underneath the Translum to protect your floor). Since the plastic is really sturdy and resistant, it’s no problem if you step on it. Try to cut the circle so that you end up with a it in one piece as it will be useful in the future.

Next cut the central vacuum system PVC pipe. These are good because they are light, inexpensive, and available at your local hardware store. I strongly suggest that you take a 2” diameter one. Since they are sold 10 feet long, you’ll need to cut it to the right size for your Translum. A regular handsaw does the job.

TuckTape 600

Once that’s done, you can start assembling everything (see photo above). The best tape to stick the sheet to the PVC is a roll of Tuck Tape. Duct tape is not strong enough and gaffer’s tape is thick and expensive. The PVC will be at the top of the sheet so make sure it is on the end that is the farthest from the hole that’s near the middle. You want to put down a piece about two feet on the Translum. Half of the width of the tape should be on the PVC and the other on the sheet of diffusion. After, just finish taping that side down, flip everything 180° and apply pressure on the sheet of Translum so that the tape you just put on is folded nicely. Finally, you want to to place another row of Tuck Tape on the opposite side of the Translum, so that the construction is rock solid.

The last step is to tape a piece of wood at the bottom in order to add rigidity, and to limit the tendency of the material to curl up. While any diameter will work, I recommend you that you use 5/8 of an inch. The best way to add the wood is to put tape running the full width of the roll with the sticky side facing up (again, half the tape should be on the plastic). Then, just put the wood at the end of the tape and slowly roll up toward the Translum. That way, most of the wrinkles will be eliminated.

Wood 600

To store the sheet when you’re done using it, just roll it around the PVC pipe and use a few pieces of painter’s tape to hold it in place.

Results and other setups

The most basic, and effective, setup to use the DIY sheet of Savage Translum for catalog product shots on a white background is as follows: place a softbox (or stripbox) at about a 45° angle where the top almost touches the upper edge of the Translum sheet. The horizontal center of the softbox should align with the camera. You can place the Savage roll between the object and the camera lens with the lens through it very slightly. This will create very soft lighting without any big and ugly direct reflections.

To compare, I shot an iPad (for its shininess) in two ways: one setup without the Translum sheet and one with. The light was moved down in the first image so there is a part with a reflection and one without. In the image just under, you can see the tremendous differences between the two. All of the settings were identical.

No Translum 600 IPad Reflection 600
Translum 600 IPad 600

As much as I like Savage Translum, it is not perfect and will never give you a final image right out of the camera (nothing will). The shot above still need quite a bit a retouching to be complete.

Remember I recommended keeping the hole for the lens away from the middle? Well, for another setup, you can put the lens back into the sheet, hold it in place with a little piece of scotch tape and move the whole Translum sheet to any other position other than in front of the camera. That allows a huge amount of different setups to be created. Experiment with different light modifiers for your flash or even none at all. Try moving the material everywhere and see what it does to the shot. That’s where the fun is!

This is just one of the many uses of the wonderful Savage Translum! What’s nice is that, when you’re ready for another DIY project, you’ll still have more than 13 feet of the stuff left.

Have you used the Translum diffusion sheet before? Did you come up with another DIY light modifier? Tell us below, we all love the share our ideas.

Read more about light modifiers here in this Beginner’s Guide to Light Modifiers

googletag.cmd.push(function() {
tablet_slots.push( googletag.defineSlot( “/1005424/_dPSv4_tab-all-article-bottom_(300×250)”, [300, 250], “pb-ad-78623” ).addService( googletag.pubads() ) ); } );

googletag.cmd.push(function() {
mobile_slots.push( googletag.defineSlot( “/1005424/_dPSv4_mob-all-article-bottom_(300×250)”, [300, 250], “pb-ad-78158” ).addService( googletag.pubads() ) ); } );

The post DIY Light Modifier You Can Do With Savage Translum Material by Tristan Robitaille appeared first on Digital Photography School.


Digital Photography School

 
Comments Off on DIY Light Modifier You Can Do With Savage Translum Material

Posted in Photography