RSS
 

Posts Tagged ‘Light’

How to Mix Ambient Light and Fill-Flash for Outdoor Portraits

31 Mar

If you have ever wondered how to improve your outdoor portraits. Turn off your Smartphone, shuffle your schedule, and make sure you read every single word on this page. Because outdoor portrait lighting secrets will finally be revealed.

Below is an example of one of my typical on-location lighting setups. It consists of a studio strobe with a battery pack and a Westcott 35″ Deep Parabolic Zeppelin modifier.

Mod1

I am guessing you have most likely stumbled upon this article because you are searching for a way to improve your outdoor portraits. If you would like to capture perfectly exposed images in ambient light, the real secret is to use fill-flash and a light modifier. Sure, if you have a reflector and an assistant you may be able to achieve similar results using only natural light. But in this article, I am going to assume you shoot outdoor portraits by yourself and you are looking for the easiest way to control, and modify the light in your images.

Below is an example of an image taken with the above lighting set up, where I lowered the background exposure with a three stop neutral density filter.

Lia1

Before we go any further, I just want to caution you, you may find some aspects of this article confusing the first time you read them. So I have included a video tutorial for you to further illustrate the lighting concepts discussed here.

Let’s break it down step by step:

Step #1 – meter the background

Step one is to meter the background area behind your subject, using either a light meter or your in-camera meter. For example, let’s say you metered the background at f/5.6 and you took a test exposure with your camera.

Step #2 – check highlights on the test shot

The second step is to examine your test shot and to make sure there are no blown out highlights in the brightest part of your image. Some DSLR models have a highlight warning indicator that you can enable and you can also view the Histogram to help you decide if your exposure falls within an acceptable range. The reason you are checking for blown out areas, is that once you loose detail in the highlights, the information from that part of the image is lost forever. So adjust your exposure if necessary to ensure you have an accurately exposed image with highlight detail intact.

Malia1

Step #3 – check highlights on the test shot

Once you are pleased with the background exposure you may find that your subject appears too dark in relation to the background. Your next step is to match the foreground exposure with fill-flash. To do that, you can use either a speedlight or a studio strobe with the light modifier of your choice.

Let’s go into a little more detail. For example, if your background is exposed at f/5.6 then you have to match the same exposure on your subject’s face. Sounds simple right? Here is where you can run into some problems. If you meter the background at f/16 on a sunny day, but the speedlight you are using only meters f/11 at full power – then what do you do? Your subject will appear darker than the background. What are your choices?

In most cases your first impulse would be to raise the shutter speed, but when you’re using strobe lights you are capped at a shutter speed between 1/160 and 1/200th of a second. In some cases you may be able to use high-speed sync, but for the purpose of this article let’s say your maximum shutter speed is 1/200 (your camera’s native flash sync speed). If that is the case, you will have to use a two or three stop neutral density filter to lower the background exposure, so you can match the foreground exposure to the background.

Have I lost you yet? In case you find this concept difficult to grasp, I have included another video tutorial below on outdoor portraits using fill-flash, where I use a three stop neutral density filter to bring down the ambient exposure. In this example that allows me to use a wide open aperture, in combination with fill-flash to create a blurry background effect.

If you are like most people, it will probably take you a little practice until you feel comfortable balancing ambient light and fill-flash. Take your time and have fun with it. Read the article a few times and watch the video tutorials again. Once you have a pretty good grasp of the concepts discussed, head out and practice balancing your exposure. Some people prefer a background exposure that is one to two stops darker than their subject. Experiment with different ratios until you find a look that suits your style.

Sheena1

Please post any questions you have in the comments below.

googletag.cmd.push(function() {
tablet_slots.push( googletag.defineSlot( “/1005424/_dPSv4_tab-all-article-bottom_(300×250)”, [300, 250], “pb-ad-78623” ).addService( googletag.pubads() ) ); } );

googletag.cmd.push(function() {
mobile_slots.push( googletag.defineSlot( “/1005424/_dPSv4_mob-all-article-bottom_(300×250)”, [300, 250], “pb-ad-78158” ).addService( googletag.pubads() ) ); } );

The post How to Mix Ambient Light and Fill-Flash for Outdoor Portraits by Craig Beckta appeared first on Digital Photography School.


Digital Photography School

 
Comments Off on How to Mix Ambient Light and Fill-Flash for Outdoor Portraits

Posted in Photography


Light Footed: Smart Shoes Paint with Light As You Dance

27 Mar

[ By Steph in Design & Products & Packaging. ]

orphe smart shoes 6

Paint with light in real-time with a pair of shoes that not only have 100 LED lights embedded into the sole, but are also fitted with advanced motion tracking sensors to put on a dazzling show matched to your movements. Orphan by Japanese startup No New Folk Studio is a programmable performance shoe that can be set to blink and change color according to the speed and orientation of the dancer’s movements.

orphe smart shoes 5

The Orphe shoes are essentially an artistic medium, bringing technology, dance and light painting together in a highly customizable experience. Users can either use the accompanying app to communicate with the shoes via Bluetooth, or pre-program their own effects. But the functionality goes beyond personal expression.

orphe smart shoes 7

orphe smart shoes 1

“The 9-axis sensors embedded in each sole pick up the movements of each shoe in real time. This data can then be used to wirelessly control various external devices, allowing the shoes to function as musical instruments, video game controllers, foot switches, etc.”

orphe smart shoes 4

orphe smart shoes 3

Orphe smart shoes 2

Each shoe contains a small circuitboard with an ARM Cortex-M3 microprocessor, a tracking device, a wireless module and a charging circuit as well as the LED light strip. The project is

The Orphe shoes are essentially an artistic medium, bringing technology, dance and light painting together in a highly customizable experience. Users can either use the accompanying app to communicate with the shoes via Bluetooth, or pre-program their own effects. But the functionality goes beyond personal expression. “The 9-axis sensors embedded in each sole pick up the movements of each shoe in real time. This data can then be used to wirelessly control various external devices, allowing the shoes to function as musical instruments, video game controllers, foot switches, etc.” Each shoe contains a small circuitboard with an ARM Cortex-M3 microprocessor, a tracking device, a wireless module and a charging circuit as well as the LED light strip. The project is currently seeking funding on IndieGoGo, with backers snagging their own pair for $ 270 as a reward.”>currently seeking funding on IndieGoGo, with backers snagging their own pair for $ 270 as a reward.

Share on Facebook


[ By Steph in Design & Products & Packaging. ]

[ WebUrbanist | Archives | Galleries | Privacy | TOS ]


WebUrbanist

 
Comments Off on Light Footed: Smart Shoes Paint with Light As You Dance

Posted in Creativity


Finding the Best Quality of Light During the Day

27 Mar

Light is the main ingredient in any photograph. Without light, you cannot make an image. Photography is all about drawing or painting with light. One book I read on the subject said that light IS the subject in photography, in many ways, this is true. Light is a difficult phenomenon to quantify. Most of the time, we don’t really think about light in our day to day lives.

Shoot for the light...

Shoot for the light…

As a photographer however, light is your currency. Without it, you cannot create an image. If you were in a lightproof room, with no light entering the room at all, it would be nearly impossible to make a photograph. However, if you were to light one candle in that lightproof room, suddenly you could make many images. Light is the key to every photograph ever made.

As a result of light being so ethereal, the photography world has tried to make sense of it. Photographers speak about the attributes of light, namely: quality, direction, color and intensity. In this article, I want to look at the first of those definitions, known as quality of light.

What is quality of light?

Light quality is determined by the source of the light. Small light sources that are far from the subject, will create harsh lighting conditions, while a large light source will create soft lighting conditions. Another way to think of it is to look at the shadows what are created by your light source. If the shadows are clear and defined, then your light source is small relative to your subject, and the light is harsh and high contrast. If the shadows are blurry or nondescript, then the light source is large compared to your subject, and the light is soft and low contrast.

A small light source could be something like the popup flash on your camera. This is a small, sharp source of light that will blast bright light into your scene. It creates hard shadows and will create a high contrast scene. A large light source could be the light on an overcast day. The sun’s light is scattered, or diffused, by the cloud cover so the light becomes larger, soft, and less defined.

Warm sunset colours over the Vancouver runway

Warm sunset colours over the Vancouver runway

Time of day is key

You will be shooting either in daylight or nighttime conditions and often in the soft light between day and night. Each situation comes with its own challenges. If you are serious about taking your photography to the next level, you need to be shooting more often during the golden hour of the day. The golden hour occurs from about half an hour before, until about an hour after sunrise in the morning, and then an hour before sunset, to about 20 to 30 minutes after the sun has gone down in the evening. If you are going to shoot in this soft light, you will need a tripod, the rewards will be well worth the effort. It is not always possible to shoot at these times of day, so below are some guidelines about shooting throughout the day. Another good time to photograph is during the blue Hour which is the hour after the sun has set (more on this later).

1. Shooting in the middle of the day

Many of us were taught to shoot under bright sunlight, in the middle of the day, with the sun behind us. Sure, that can work, but you won’t get dramatic results every time, in many cases, your images will look very average. This is because light is harsh at this time of day.

Generally, when the sun is high in the sky, it is a small light source compared to the subject. This means that your subject will have very bright highlights and very dark shadows. This is high contrast scene. Also, the shadows will be very well defined and the light will be very directional. In other words, you will be able to see clearly where the sun is because the shadows will be very well outlined.

If you are photographing a wedding at midday in the summer (this is often the case) and the bride is in the full sunlight, you will have have some harsh shadows under her eyes to deal with. That’s not to say that you should never photograph in the midday sun, you can, but you need to know how to deal with the contrast situation. That might mean you need to use a reflector to put some of the light back into the bride’s face, or use some fill flash to lighten the shadows under her eyes. Remember, the brighter and smaller the light source, the harsher the quality of light.

Panoramic image taken at midday in full sun. The image works because the image is properly exposed for the bright sun.

Panoramic image taken at midday in full sun. The image works because the image is properly exposed for the bright sun.

2. Shooting during the golden hours

Shooting in the early morning, before the sun has risen, or shooting at sunset as the sun goes down, gives you a great opportunity to capture images, in dramatic light. Many of the scenes that people love to see in photography, are very often low light or golden hour ones. The reasons why these times are so good to shoot at area:

  • The light is golden in colour and changes colour from yellow, to orange to magenta.
  • The light is soft, i.e. no major contrast such as hard shadows and very bright highlights.
  • Colors are more exaggerated, the color of the light is far more emphasized, much more oranges, reds and magentas are visible in the scene.

It is for these reasons that photographers choose to shoot in the early morning or early evening, these times produce the most dramatic images.

Golden hour shot of the city with a warm glow in the sky.

Golden hour shot of the city with a warm glow in the sky.

3. Shooting during the blue hour

Blue hour conditions don’t always occur, but when they do, the results are spectacular. For the best possible blue hour conditions, you will want a sunset with very little, to no clouds in the sky. Summertime is normally good for this, but any time of year can work. If there is 80% cloud cover, you will probably not see the blue light in the sky, so a clear sky is important to make this work. Blue Hour is the time after the sun has dropped below the horizon and the sky goes a radiant blue for a while. The blue lasts anywhere from 40 minutes to an hour, and that’s the time you want to be photographing.

To make sure you get it right, be in position and set up 20 minutes before sunset. That way, when the light starts getting good, you are able to hit the shutter release and make some great images. Cityscapes work really well for blue hour images. The reason is that the sky will go blue, but the city will be reflecting the yellowy, orange light of the sunset. This means that you will have the sun setting behind you.

The beauty of blue hour images is that that the blue and yellow colours work well together, they are complementary colours on the visual colour wheel, so the scene is visually appealing. If you are not sure about when blue hour will be, you can visit this site and simply enter your city name and it will tell you what time it will be occurring in your city, on a given evening and morning. There is even an iPhone app you can download to work this out in the field, pretty amazing!

Blue Hour panoramic, the blues and the yellows work well in this image

Blue hour panoramic, the blues and the yellows work well in this image

What do I need to use to get the best images

A tripod is always a good idea. You will be able to make sure that your camera is perfectly still as you make longer and longer exposures. As the light starts fading, your exposures may be a few seconds long, this is impossible to handhold without getting blurred images. Use the best quality lenses you have and a cable release or remote shutter release to avoid any camera shake. You will want to set your camera up in manual mode and have your aperture settings at f/8 or f/11. Set your shutter time accordingly, make sure your ISO setting is at 100 and you are ready to go. When the light show starts happening, click away and enjoy the results!

googletag.cmd.push(function() {
tablet_slots.push( googletag.defineSlot( “/1005424/_dPSv4_tab-all-article-bottom_(300×250)”, [300, 250], “pb-ad-78623” ).addService( googletag.pubads() ) ); } );

googletag.cmd.push(function() {
mobile_slots.push( googletag.defineSlot( “/1005424/_dPSv4_mob-all-article-bottom_(300×250)”, [300, 250], “pb-ad-78158” ).addService( googletag.pubads() ) ); } );

The post Finding the Best Quality of Light During the Day by Barry J Brady appeared first on Digital Photography School.


Digital Photography School

 
Comments Off on Finding the Best Quality of Light During the Day

Posted in Photography


A Beginners Guide to Light Modifiers

25 Mar

Regardless of the light source you use (daylight, continuous or flash) it’s really easy to use light modifiers or shapers to train the light in any direction you want.

light-modifers

***A quick note about costs

Every kind of light modifier will have a top of the line version and a really cheap version. The main difference between the options is that the cheaper ones won’t be as durable. This becomes important when you’re using them every single day.

When you’re learning how to use them however, I recommend choosing cheap versions. You’ll figure out how they work and save yourself a lot of money.

I rarely work without some sort of diffusion because using naked flash spreads the light around too much. The result is hard shadows that I personally think look really unflattering.

Nobody is ever going to tell you, “Wow I love the way your hard lighting has captured and enhanced every single pore, line and blemish on my skin. I actually look ten years older. Thanks!”

There are, of course, many really cool uses for hard lighting and some photographers can make it look brilliant. I’m just not one of them. I like to control the light and only illuminate certain areas of my shot.

There are a couple of factors I consider before deciding what kind of light modifier to use:

1. What kind of lighting am I trying to replicate?

Fill Flash Light Styles HARD

As a general rule of thumb if you are in hard light conditions like full sun, then opt for a light modifier that creates hard light like a gridspot, beauty dish, fresnel lens or naked flash.

Fill Flash Light Styles Soft

If the light is soft like early morning, twilight, open shade, or overcast then chose a light modifier that produces soft light such as: a scrim, umbrella or softbox.

2. What kind of mood I’m in

What are the best light modifiers to recreate soft light?

The Umbrella

An umbrella creates a quality of light that is soft and abundant, and very forgiving. They are great to use if you want to light a large area with flat even lighting. Because umbrellas are quite easy to use, and relatively cheap, they are great as your first light modifier.

On the downside, umbrellas will over-light your shot spreading lots of light around. Lots of light. Everywhere. Like a hose with its spray nozzle set to “everywhere”.

UMBRELLA_bounce

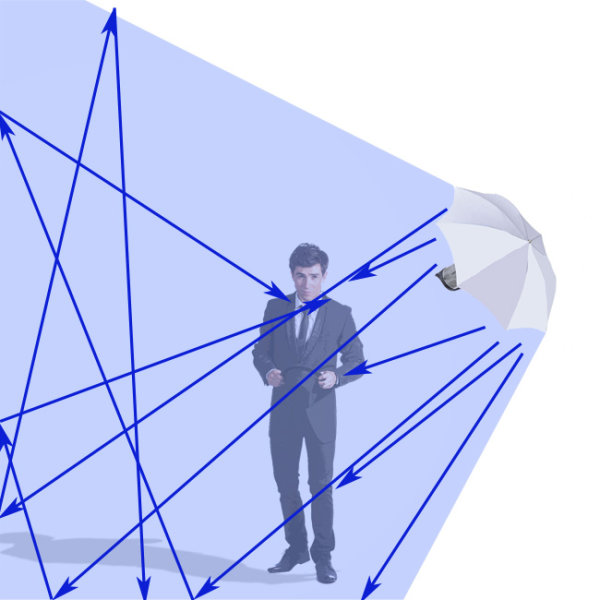
Bounce umbrella throws light everywhere

Just like I consider eating Nutella straight out of the jar a sometimes food, you should consider using umbrellas as an only use in case of emergency style of lighting. If I overuse either, things tend to get a bit ugly.

Types of umbrella light shapers

  • Silver/gold reflective umbrella: These babies throw light everywhere. They are great for lighting large groups of people. The silver umbrella will give you a slightly cooler light, while the gold umbrella creates warmer light. Both produce a slightly harder light than the white reflective umbrella.
  • White reflective umbrella: This umbrella creates a soft light with slightly less spread and contrast than the silver or gold reflective umbrellas. Because the style of light created allows people to move around a lot and in a constantly even source of lighting, they are great to use when you are shooting groups and couples under pressure, like for an event.
  • White Shoot through umbrella: These are perfect as your first light modifier as they diffuse and spread light quite evenly.
Shoot Through_UMBRELLA

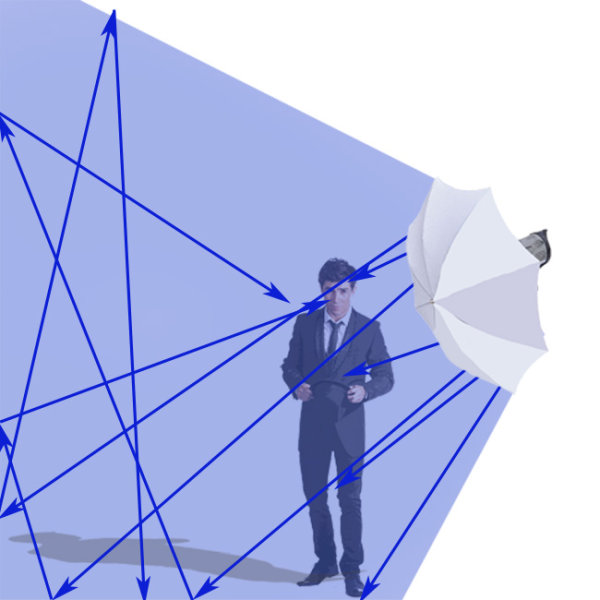
White shoot through umbrella

When my children were young, I taught them how to ride bikes using training wheels. The wheels boosted their confidence more than anything else. After a while, I took the wheels off and they rode on two wheels as if they’d been doing it all their lives.

Training wheels

I think using flash with umbrellas is the same. Use them as a learning tool until you get your balance, then move on to a better bike.

A final note on umbrellas

They are perfect for indoor lighting but become tricky, actually downright dangerous, to use outside. I’ve had countless (expensive) lights blown over using umbrellas! If you must use them then please make sure you have somebody holding them, or sand bags to keep them in place.

Scrim, baby

Scrim

After you’ve ditched your umbrella training wheels, the next step is to work with a scrim panel which is a square or rectangular frame with a fabric diffusion material covering it. Of all the light modifiers, a scrim is probably the most versatile and a must have in your kit.

Shapers scrim
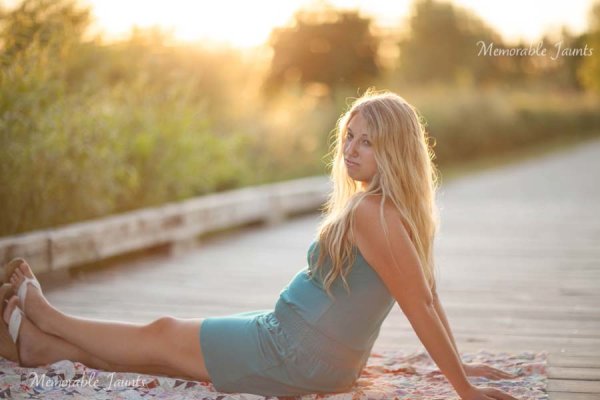
This is a really cool way to create large areas of soft diffused light, as if you were shooting next to a large window, or have light clouds over the sun.

Remember: The larger the light source, the softer the light.

This is a piece of equipment that you can easily make yourself. I used a DYI one for my first 10 years as a photographer and they are great for diffusing flash, continuous light, and sunshine.

Using a softbox

softbox

Small softbox 580EX+Lumiquest+stand 1

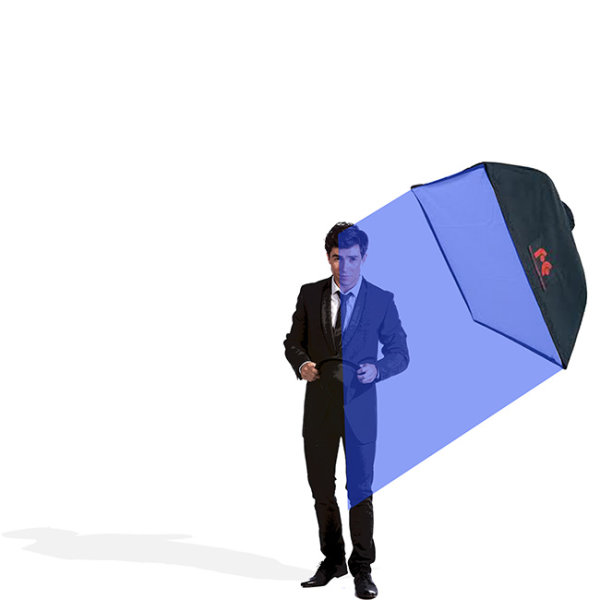
This image of race-car driver, Glauco Junior Solleri, was taken using a speedlight and small Lumiquest Pro softbox. This is a low-cost and versatile modifier that creates a beautiful soft light source that you can easily control. In this instance I only wanted to light Glauco’s face and let the background go to black, If I had used an umbrella (and spray light everywhere) the entire background would also be lit, killing my moody vibe.

If I could only pick one light modifier to take to a deserted island, it would have to be the softbox. Small, medium, or large – this little puppy is my go to light source for 80% of my shoots.

Why? The quality of light is soft, flattering and malleable. Changing the angle and proximity of the softbox to the sitter easily changes the hardness of light, and direction of shadow.

It’s one of the light modifiers that, I feel, recreates the effect of soft daylight through a window. I think what I like most about this light modifier is that it’s subtle. Highlights gently merge to shadows. I think I love this light modifier more than Nutella – there I said it.

Different softboxes

I use a few different kinds of softboxes depending on where and what I’m shooting.

If it’s a studio shoot I love using my Chimira Medium softbox with white reflective interior. The white interior creates a softer light and this particular softbox has an extra layer of diffusion on the inside, adding even more softness to the light.

Some photographers remove this interior panel because they like having more contrast of the harder light (because it’s not as diffused as much), but I prefer less contrast. You can also increase the spread and contrast of your light by using silver or gold interior panels.

Shooting using beauty lights

The beauty dish I have is quite a cheap brand, which goes to show you don’t need to shell out a lot of money for every piece of equipment. I like mine because it works with my speedlight, my Elinchrom monolight, and battery flashes.

Beauty-2

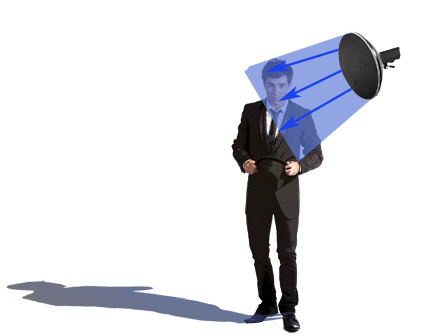
I like that kind of versatility in equipment because it means I have more options on the day of the shoot, and less to carry around!

The beauty dish differs from other light modifiers because it gives you a distinct circular, soft-contrast light, which is perfect for lighting faces and defining bone structure such as cheek bones and chin lines. They also create a circular catch light in your model’s eyes, which makes the reflection seem quite natural.

You can see why these modifiers are popular with fashion/beauty and celebrity photographers.

The downside of using beauty dishes is that the fall-off, from light to dark, is very rapid so you’ll often get shadows under your model’s chin and nose. You can compensate for the shadows by adding a fill board, like a white reflector, to reflect light up, onto your subject’s face.

Why would you use this over other modifiers?

A beauty dish gives you a certain look. It will just light a small area and flatten out your model’s features. It makes people look great but you need to light your model in quite a specific way, lighting them from above, to really pull it off.

Using a grid spot

Gridspot Gridspot 2

A portrait shoot I did with Australian actor Scott McGregor shows lighting without gridspot (left) and with gridspot (right).grid

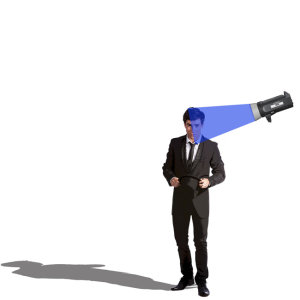
The gridspot is a bit of kit you can use in conjunction with a speedlight, monolight, or battery operated flash. The width of the grid and the size of the holes will affect the width of the light beam hitting your subject. This is a hard focused light. I love to use grid spots in the same way I use beauty lights.

Why would you use this over other modifiers?

I like using grid spots because they create a similar light to beauty dishes. The light is a bit harder but they’re perfect for single portraits because you can pop a bit of light onto someone’s face and shoulders without impacting the background mood.

They are also perfect to use outside as they won’t get blown about.

Gridspot typesjpg

BeautyDish+Grid 1

Beauty dish with a gridspot

Fresnel light (lens)

Fresnel

The Fresnel light modifier gives a soft, crisp and very distinct look to my portraits. In this portrait of Australian actor Robbie Magasiva, I’ve placed the Fresnel light slightly to camera right to create a shadow, which I’ve softened by using an umbrella (Sprays soft light everywhere) to increase the amount of daylight fill.

Fresnel 2

A Fresnel is a light modifier that can be focused. They were first used in lighthouses, then the technology was developed to include continuous lighting for movies and television.

The style of lighting is soft and crisp, reminiscent of 1940s portrait lighting. This style of lighting has become really popular lately, particularly with fashion and editorial photographers. The downside of this type of lighting is you need to hock a kidney to afford one.

Octabox

Beauty dish Octa

Here are two different ways to use the Rotalux deep octabox. The image on the left of actor Firass Dirani is shot using a deep octabox as a beauty dish. The light source is hard and drops off rapidly under his chin to give a hard and contrasty light source, which not only defines and sculpts his features it also gives the image an edgy look.

The image on the right of actor Harley Bonner is shot using the same Rotalux deep octabox as I used with Firass but this time I’ve added the interior and exterior bevel giving a much softer light which blends in with the muted light and low key feel I was going for.

An octabox is what you’d get if a softbox and umbrella got married and had babies. An octabox has soft light, just like its mama the softbox, but spreads its light around more just like his daddy the umbrella.

They are fantastic for lighting large groups evenly. The other advantage some people like is they give round catch lights.

I don’t own an Octabox because I’m not a huge fan but do have a Rotalux deep octabox, which is what you get if a softbox married a beauty dish and made babies. This, as far as I’m concerned is a match made in heaven for lighting single portraits.

Octabox

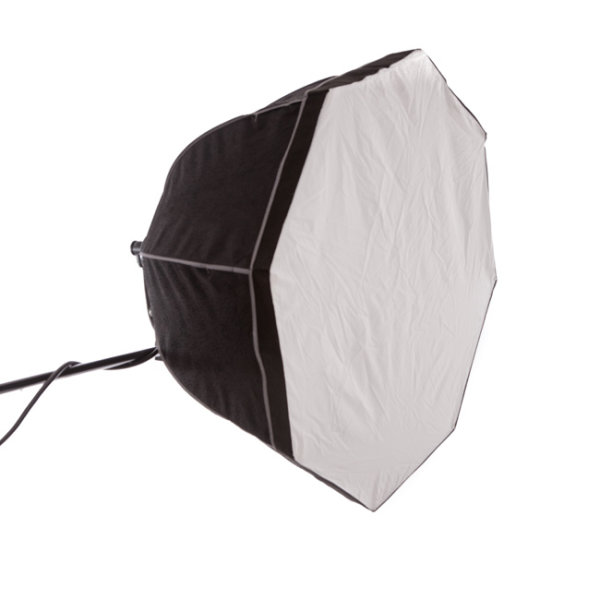
Octobox with the front panel in.

octabox-interior-baffle

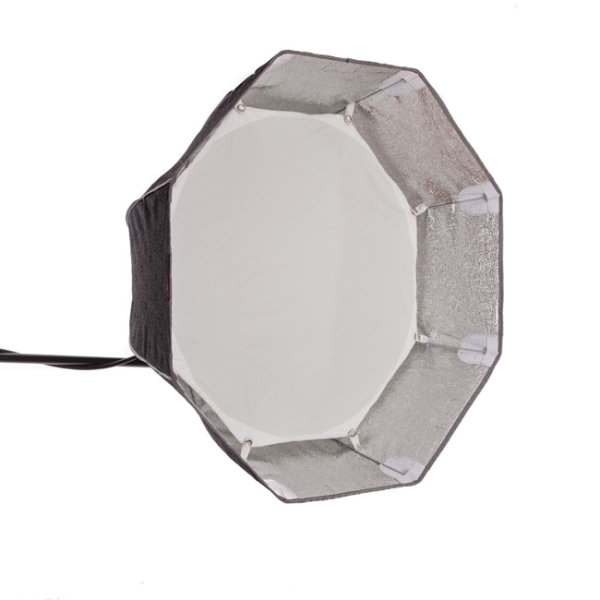
Octobox with interior baffle exposed.

octa_as_beauty_dish

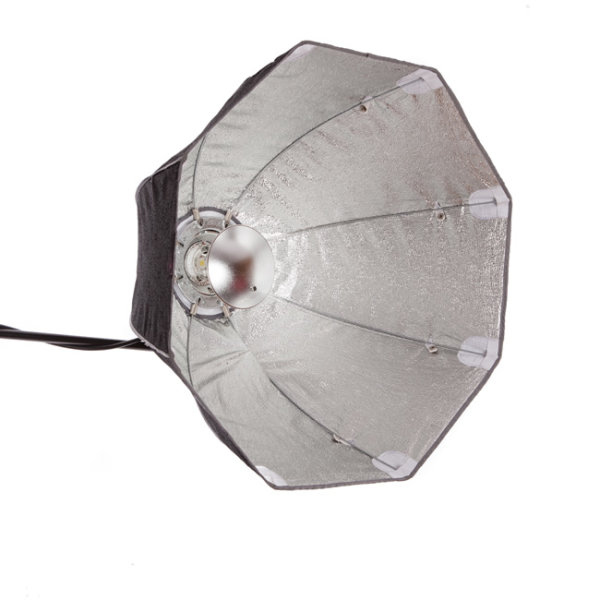
Octobox as a beauty dish.

Mixing modifiers

Combolights

Model credit: Fat Tony and Co., image courtesy Nine Network Australia.

I often mix my lighting modifiers to make my images more interesting. In this television promotional shot I did for Fat Tony and Co., I used a medium deep octabox as my main light and a gridspot as a hair light. I also added an umbrella for fill light to camera left because the deep octabox alone was too moody and I wanted more detail in the shadows.

Do you have a favorite light modifier or do you like working with naked flash? Do you have examples of your favorite images? Please share them in the comments below. I’d love to see them and hear your thoughts.

googletag.cmd.push(function() {
tablet_slots.push( googletag.defineSlot( “/1005424/_dPSv4_tab-all-article-bottom_(300×250)”, [300, 250], “pb-ad-78623” ).addService( googletag.pubads() ) ); } );

googletag.cmd.push(function() {
mobile_slots.push( googletag.defineSlot( “/1005424/_dPSv4_mob-all-article-bottom_(300×250)”, [300, 250], “pb-ad-78158” ).addService( googletag.pubads() ) ); } );

The post A Beginners Guide to Light Modifiers by Gina Milicia appeared first on Digital Photography School.


Digital Photography School

 
Comments Off on A Beginners Guide to Light Modifiers

Posted in Photography


Tips for Using Golden Hour Light for Portraits

24 Mar

Memorable_Jaunts_Portraits_During_Golden_Hour_DPS_Article-12

Most photographers will argue vehemently that the golden hour – that pocket of time just after sunrise and just before sunset – produces some of the most gorgeous light ever. Golden light shows up during this time, generally about an hour or so before sunset (after sunrise). However these times are not exact because golden light does depend on where you live. The further away from the equator you are located, the longer golden hour lasts. The closer to the equator you are, the shorter it is. Golden hour is also seasonal.

Memorable_Jaunts_Portraits_During_Golden_Hour_DPS_Article-13

There is a reason why most natural light photographers tend to schedule their portrait sessions around golden hour – to maximize the amount of golden light that they can use and get amazing results for their clients.

Why do you want to use golden light?

There are several reasons why golden light is so sought after.

Golden light is very soft

Memorable_Jaunts_Portraits_During_Golden_Hour_DPS_Article-7

Soft light illuminates the skin tones evenly.

Since the sun is almost setting or just rising during golden hour, the sunlight tends to be much softer than when the sun is high in the sky. During the golden hour, you can have your subjects look towards the sun and not have to squint or shield their eyes. Practice discretion on how long you want them to stare at the sun, and also take care not to point lens and cameras directly into the sun.

Golden light is warm

Memorable_Jaunts_Portraits_During_Golden_Hour_DPS_Article-10

The warm colors of sunlight are striking against the green grass.

It is easy to think that any form of sunlight is warm – whether the sun is high in the sky, or close to the horizon. But in reality, the warmth varies as the sun moves across the sky. Sun near the horizon has less intensity of direct light since it must travel through more of the atmosphere. You may notice, it is much easier to look at a sunrise and sunset with the naked eye – not that you should because it can damage the retina. As per wikipedia, more blue light is scattered during golden hour, so the sun’s light appears more reddish.

Golden light has dimension

When the sun is high in the sky, particularly around noon, the overhead light is very harsh, creating strong highlights and dark shadows. This type of lighting is not very flattering or desirable especially in portrait photography. Most photographers will use external flash or even a reflector to add additional light to the subject’s face or body, to make the light more even. Because the contrast is lower during golden hour, shadows and highlights are not that extreme. In addition, the sun’s smaller angle to the horizon produces long shadows.

Memorable_Jaunts_Portraits_During_Golden_Hour_DPS_Article-14

How do you use golden light?

Location scouting

Take the time to know the area that you are looking to do photography. There are many website and apps that can provide exact sunrise and sunset times. Some even take it a step further and provide golden hour times – which is specifically for photographers! Even the location matters when searching for golden light. If your photoshoot is in a park that has a lot of tree cover, the light will be further diffused, giving you the option of having a spotlight type effect for your portraits. If you are in a big city, take advantage of the natural block that tall buildings provide when photographing a subject.

Metering

Golden light can be challenging from a metering perspective. Most people leave it in standard (matrix or evaluative) mode and then play around in post-production to try and get the look they want. There is an easier way to eliminate all that time spent in front of the camera. Spot metering is my preferred metering method particularly for backlighting situations. I spot meter off the subject’s face or shadowy part of the image and then recompose and adjust exposure compensation half a stop or more to get the look I want.

Front lighting

Memorable_Jaunts_Portraits_During_Golden_Hour_DPS_Article-1

Options for front lighting include the sun along the side of the subject as well as subject facing the sun.

Front lighting is when your subjects face the sun directly. Because of the low angle of the sun and the soft light, the sun isn’t as harsh and your subjects will not be squinting as they face the sun. The light is even and warm so make sure that is the look you want – gorgeous, warmly lit, imagery!

Backlighting

Memorable_Jaunts_Portraits_During_Golden_Hour_DPS_Article-9

Memorable_Jaunts_Portraits_During_Golden_Hour_DPS_Article-6

Backlighting is when you put the subjects between you and the sun. This creates a warm glow and looks really stunning. Make sure you expose for your subject’s skin tones. If you expose for the sun, then you will get a silhouette effect (which might not be the look you are going for, but is equally stunning).

Rim light

Memorable_Jaunts_Portraits_During_Golden_Hour_DPS_Article-3

Rim lighting occurs when you are using the sun to backlight the subject. Here the subject is between you and the sun. If you have a darker background, you can see a faint glow outlining them. That is a rim light and it really helps the subjects pop out in the image, drawing attention to them, adding separation of subject from the background.

No matter what type of golden hour lighting you use, you are bound to get some awesome images. Experiment with various locations and techniques. Also go back to the same location at various times of the year and track how golden hour lighting changes – you will learn to gauge, judge, and use light as a key element in your portrait photography.

googletag.cmd.push(function() {
tablet_slots.push( googletag.defineSlot( “/1005424/_dPSv4_tab-all-article-bottom_(300×250)”, [300, 250], “pb-ad-78623” ).addService( googletag.pubads() ) ); } );

googletag.cmd.push(function() {
mobile_slots.push( googletag.defineSlot( “/1005424/_dPSv4_mob-all-article-bottom_(300×250)”, [300, 250], “pb-ad-78158” ).addService( googletag.pubads() ) ); } );

The post Tips for Using Golden Hour Light for Portraits by Karthika Gupta appeared first on Digital Photography School.


Digital Photography School

 
Comments Off on Tips for Using Golden Hour Light for Portraits

Posted in Photography


A light touch: Dean Bradshaw’s commercial and personal portraiture

22 Mar

‘Conceptual’ and ‘commercial’ photography are styles that relatively few are able to achieve success in, especially at the same time. But Dean Bradshaw’s intellectual and humorous approach to advertorial work sets his portfolio far above that of the typical commercial photographer. Take a look at a selection of his imagery and find out a few insights behind his success in our Q+A. See gallery

Articles: Digital Photography Review (dpreview.com)

 
Comments Off on A light touch: Dean Bradshaw’s commercial and personal portraiture

Posted in Uncategorized


Altopias: Speculative Art Explores Both Dark & Light Futures

17 Mar

[ By WebUrbanist in Art & Drawing & Digital. ]

iceberg on a beach

The world of future-focused artwork tends to examine extreme outcomes, but this artist’s visions represent a compelling range of possibilities from catastrophic to optimistic, Dystopian to Utopian with other shades of gray in between.

dust storm in barcelona

no snow in alps

First consider the range of negative outcomes and what they would do to villages, towns and cities around the world (as illustrated in this first round of images above and below) – built environments afflicted by surprising climatic changes like heat waves, ice storms and droughts.

venice run dry

desert meets water

On the one hand, Evgeny Kazantsev considers these disaster scenarios, from dust storms in Barcelona and villages in the Alps without snow to Venice gone dry and oceans overrunning desert cities. But this is only half of the story.

Next Page – Click Below to Read More:
Altopias Speculative Art Explores Both Dark Light Futures

Share on Facebook


[ By WebUrbanist in Art & Drawing & Digital. ]

[ WebUrbanist | Archives | Galleries | Privacy | TOS ]


WebUrbanist

 
Comments Off on Altopias: Speculative Art Explores Both Dark & Light Futures

Posted in Creativity


Weekly Photography Challenge – Darkness and Light

14 Mar

Have a look at these example images using light and dark for dramatic effect.

In photography light is everything. But to have depth and drama you must also have dark and shadow. So it’s your turn to interpret that and see how you can use darkness and light in your images this week.

Weekly Photography Challenge – Darkness and Light

Photophilde

By photophilde

Look for contrast, drama and moody lighting. Harsh lighting might work in your favour here but isn’t mandatory. Think about shadows, look for subjects with unique shapes.

Here are a few more examples:

Ester-**

By ester-**

Seyed Mostafa Zamani

By seyed mostafa zamani

Bill Gracey

By Bill Gracey

Ray Schamp

By Ray Schamp

Jesse Freeman

By Jesse Freeman

Nicolas Alejandro

By Nicolas Alejandro

Share your dark and light images here:

Simply upload your shot into the comment field (look for the little camera icon in the Disqus comments section) and they’ll get embedded for us all to see or if you’d prefer upload them to your favourite photo sharing site and leave the link to them. Show me your best images in this week’s challenge. Sometimes it takes a while for an image to appear so be patient and try not to post the same image twice.

googletag.cmd.push(function() {
tablet_slots.push( googletag.defineSlot( “/1005424/_dPSv4_tab-all-article-bottom_(300×250)”, [300, 250], “pb-ad-78623” ).addService( googletag.pubads() ) ); googletag.pubads().enableSingleRequest();
googletag.pubads().disableInitialLoad();
googletag.pubads().collapseEmptyDivs( true );
googletag.enableServices();
} );

googletag.cmd.push( function() { googletag.display( ‘pb-ad-78623’ ); } );

googletag.cmd.push(function() {
mobile_slots.push( googletag.defineSlot( “/1005424/_dPSv4_mob-all-article-bottom_(300×250)”, [300, 250], “pb-ad-78158” ).addService( googletag.pubads() ) ); googletag.pubads().enableSingleRequest();
googletag.pubads().disableInitialLoad();
googletag.pubads().collapseEmptyDivs( true );
googletag.enableServices();
} );

googletag.cmd.push( function() { googletag.display( ‘pb-ad-78158’ ); } );

The post Weekly Photography Challenge – Darkness and Light by Darlene Hildebrandt appeared first on Digital Photography School.


Digital Photography School

 
Comments Off on Weekly Photography Challenge – Darkness and Light

Posted in Photography


26 Images of Light and Dark that Speak to the Soul

13 Mar

In case you hadn’t noticed, this past week we had a theme to a lot of the articles – light!

In keeping with that topic here are some images that feature light and dark. You can’t have contrast without both of them, and you can’t have light without dark. It’s sort of a symbiotic relationship.

Photograph Cloisters by Michael Sinat on 500px

Cloisters by Michael Sinat on 500px

Photograph Sunlight shining through a green leaf by A_Kiggal on 500px

Sunlight shining through a green leaf by A_Kiggal on 500px

Photograph Deadly Beauty 2 by Rick Priest on 500px

Deadly Beauty 2 by Rick Priest on 500px

Photograph ~collar by chinh n on 500px

~collar by chinh n on 500px

Photograph ~abstract leaf (I) by chinh n on 500px

~abstract leaf (I) by chinh n on 500px

Photograph Fragility by Noelle Buske on 500px

Fragility by Noelle Buske on 500px

Photograph Old carriage interior with light intruding by Anna Váczi on 500px

Old carriage interior with light intruding by Anna Váczi on 500px

Photograph The lonely light by Karthik babu on 500px

The lonely light by Karthik babu on 500px

Photograph The Light of the Night by Joerg Bonner on 500px

The Light of the Night by Joerg Bonner on 500px

Photograph Ajar by Tony Antoniou on 500px

Ajar by Tony Antoniou on 500px

Photograph crazy lights by Adriano Saccio on 500px

crazy lights by Adriano Saccio on 500px

Photograph Beautiful city II. by Petr Kubát on 500px

Beautiful city II. by Petr Kubát on 500px

Photograph Light Path by Abdulmajeed  Aljuhani on 500px

Light Path by Abdulmajeed Aljuhani on 500px

Photograph Path of life II by Janek Sedlar on 500px

Path of life II by Janek Sedlar on 500px

Photograph Right Light by Daniel Bosma on 500px

Right Light by Daniel Bosma on 500px

Photograph Foggy path by Jose Ramon Santos Mosquera on 500px

Foggy path by Jose Ramon Santos Mosquera on 500px

Photograph Owl can smile by Drak ? Spirit  on 500px

Owl can smile by Drak ? Spirit on 500px

Photograph The essence of night by Liban Yusuf B&W on 500px

The essence of night by Liban Yusuf B&W on 500px

Photograph Walking in the dark by Carles Carreras on 500px

Walking in the dark by Carles Carreras on 500px

Photograph Black & White Flower by Alecia Groth on 500px

Black & White Flower by Alecia Groth on 500px

Photograph Oak and Winter Fog by Jeff Reindl on 500px

Oak and Winter Fog by Jeff Reindl on 500px

Photograph Geng by Bry Manaloto on 500px

Geng by Bry Manaloto on 500px

Photograph Silence by Ztd125 on 500px

Silence by Ztd125 on 500px

Photograph Stage Light on Queen Anne by Jocelyn Ball on 500px

Stage Light on Queen Anne by Jocelyn Ball on 500px

Photograph Abadoned by Luke Rooney on 500px

Abadoned by Luke Rooney on 500px

Photograph The Bird by Mark Horvath on 500px

The Bird by Mark Horvath on 500px

googletag.cmd.push(function() {
tablet_slots.push( googletag.defineSlot( “/1005424/_dPSv4_tab-all-article-bottom_(300×250)”, [300, 250], “pb-ad-78623” ).addService( googletag.pubads() ) ); googletag.pubads().enableSingleRequest();
googletag.pubads().disableInitialLoad();
googletag.pubads().collapseEmptyDivs( true );
googletag.enableServices();
} );

googletag.cmd.push( function() { googletag.display( ‘pb-ad-78623’ ); } );

googletag.cmd.push(function() {
mobile_slots.push( googletag.defineSlot( “/1005424/_dPSv4_mob-all-article-bottom_(300×250)”, [300, 250], “pb-ad-78158” ).addService( googletag.pubads() ) ); googletag.pubads().enableSingleRequest();
googletag.pubads().disableInitialLoad();
googletag.pubads().collapseEmptyDivs( true );
googletag.enableServices();
} );

googletag.cmd.push( function() { googletag.display( ‘pb-ad-78158’ ); } );

The post 26 Images of Light and Dark that Speak to the Soul by Darlene Hildebrandt appeared first on Digital Photography School.


Digital Photography School

 
Comments Off on 26 Images of Light and Dark that Speak to the Soul

Posted in Photography


Beginner’s Guide to Light Painting

13 Mar
Mill Falls in Logan, Ohio. Main source of light for this scene was the street lights on the bridge over the river. The bridge was light painted with a high power spot light and some light was also add to the rocks in the foreground. Exposure was 69 seconds. Aperture was set at f/14 to maximize the star burst on the street lights. This image won the auther Bruce Wunderlich a photographers choice award in the 2014 Shoot the Hills photo contest.

Mill Falls in Logan, Ohio. The main source of light for this scene was the street lights on the bridge over the river. The bridge was light painted with a high-powered spotlight. Light was also add to the rocks in the foreground. Exposure was 69 seconds. Aperture was set at f/14 to maximize the starburst on the street lights. This image won me a Photographers Choice award in the 2014 Shoot the Hills photo contest.

What is light painting?

Light painting is an imaging technique that uses a moving light source to add light to an under-illuminated subject while taking a long-exposure photograph. A scene or object can be brought to life by painting with a beam of light!

You, the photographer, becomes an artist, and instead of just capturing an image as presented, with light painting you create the image that the camera is capturing. Light painting may take lots of patience and practice to perfect, but the results can be very rewarding. But let’s not make this sound too complicated – light painting is a lot like any low light photography, except in this scenario we are putting an outside light source in motion to enhance an image. Let’s take a look at some of the basics for light painting photography.

School_house_in_snow

Schoolhouse in the snow – 170 second exposure, f/8, ISO 100. Notice the light coming from inside the school house, added from the outside by shining a flash light through windows on the back side of the building.


Tools

  • Camera – Any digital camera capable of manual settings (Bulb).
  • Tripod – One of the most important tools to produce light paintings is a sturdy tripod. In most cases your shutter is going to be open for several minutes and it is very important that your camera does not move during the exposure.
  • Shutter release – Either use a cable release or a remote shutter release to begin your exposure. If you don’t have either of these, use your camera’s timer function to initiate the shot. To light paint, it is very important that you never touch your camera or tripod to prevent vibrations during the exposure.
  • Stop watch – A stop watch or some other way of timing your exposures is helpful, since most of these exposures are going to require your camera set to Bulb.
  • Light source – Many different types of lights can be used to do light painting. These light sources are your brushes and may include: flashlights, torch lights, lasers, glow sticks, flash or strobes, cell phones, or even candles. Just about anything that can produce light can be used as a brush to do light painting. Different light sources will produce different colors of light. For example, a LED light source will produce a cooler (blue) colored light, while a halogen source will produce a much warmer (orange) colored light.
  • Color gels –  Color gels can be used over your lights to alter the tint of your light and add color to your painting.
Exposure time 30 seconds at f/8

Exposure time 30 seconds at f/8

Camera Settings

  • Mode – Use the Manual mode setting, which allows you to set your shutter speed and aperture.
  • Image quality – Set your image quality to RAW, which allows you to capture as much information about your image as possible. (This is not a necessity if you are uncomfortable with shooting RAW, but is a recommendation.)
  • White Balance –  If you are wanting to balance your lighting to the light source, choose either the Incandescent or Tungsten setting. However, sometimes experimenting with other white balance settings can produce some interesting light effects. Daylight white balance is a good starting point if you want to use the color tones of your light sources. Auto White Balance is not recommended.
  • ISO – Set to a low ISO, such as 100.
  • F-stop or aperture – Stop down to f/8 or f/10, which allows you to get more depth of field and enables you to use a longer shutter speed.
  • Shutter speed – Set shutter speed to Bulb, so your actual shutter speed will be determined by the amount of ambient light in the scene.
  • LCD brightness – Lower the brightness of your LCD preview, because the normal setting is too bright at night and will make your image look bright when it is really under-exposed.
  • Histogram – Use your histogram to help check your exposure. If the histogram charts heavily over to the left, your image is going to be mostly dark.
  • Blinkies – Turn on your blinkies (highlight warning) to help you determine if your highlights are exposed properly. It is perfectly acceptable for your brightest highlights to have the blinkies if the rest of your image is properly exposed.
  • Image Stabilization – Set to Off. With your camera on a tripod, having image stabilization turned on can actually fool your camera or lens and cause blurring in your image.
  • Long exposure noise reduction – Recommended setting is Off. This setting can be set to On, but will cause your exposures to double while the camera takes a second black exposure to help remove noise. If your camera is set to a low ISO, the noise level will be low enough in most cases to make this setting unnecessary. Still, it is a good idea to check your noise level before you start, and some older cameras may require this setting to be On to get usable noise levels.
Still_life

This vase was back lit with a candle and the flowers were painted with a small pen light. 30 second exposure, f/16 ISO 100.


Begin with ambient light

The first step before beginning any light painting is to determine the ambient light in your scene. Determining base exposures can be time consuming when you are experimenting with exposures that could be three to four minutes long. Here is a little trick that can help expedite this process.

  1. Set your ISO to six stops higher than the ISO you plan to use. Example, if you are planning to shoot at ISO 100, set your ISO to 6400.
  2. With your camera set at ISO 6400, experiment to find out how many seconds you will need to expose the ambient light of your scene. Every second of exposure at ISO 6400 is equal to one minute at ISO 100.
  3. So now set your ISO back to 100 and prepare to begin your exposure in minutes instead of seconds. Many cameras lowest ISO is 200 so 6 stops higher would be 12800, and if you cameras lowest ISO is 50, six stops higher would be 3200.
30 second exposure at ISO 800. In this image the ISO was increased to shorten the exposure to 30 second any exposure longer then that would cause a noticeable blur on the stars. Light Painting was applied from the front of the subject without letting the light shine directly back at the camera.

30 second exposure at ISO 800. In this image the ISO was increased to shorten the exposure to 30 second because any exposure longer then that would cause a noticeable blur on the stars. Light painting was applied from the front of the subject without letting the light shine directly back at the camera.

Focusing

Focusing your camera is an important step and in the dark it can sometimes be difficult to achieve. The simplest way to get your focus is to shine a light source to a spot in your scene that you have determined must be in focus. Using autofocus, place your focus point on the light and make sure your camera is focused on that point. Now change your camera from autofocus to manual and your focus will not change. But remember, if you move the camera you must turn your autofocus back and refocus. Back button focusing is another great way to achieve focus for light painting.

The Exposure

At this point, you have determined your exposure time and have your camera focused on your subject. It’s time to begin your exposure and start painting. Most cameras will allow you to set exposures of up to 30 seconds. For exposures over 30 seconds, set your shutter speed to Bulb. Use your cable release or remote to trigger your shutter open. Your shutter will remain open until you press the release again. Use your stop watch, or the timer on your phone, to time the exposure length.

1971 VW bus

This vintage 1971 bus was painted using one LED flash light on the outside, with a second light used inside to light up the interior of the bus. White balance was set to Daylight, which cause the LED light to produce the cool blue cast around the bus.

Painting techniques

  • Paint from the sides – Don’t just stand behind your camera and wave your light around over your image. Painting flat surfaces from the side will allow you to bring out the textures of the surface.
  • Use lots of different angles – for instance, when painting the ground hold the beam low and pan the light over the ground. This will keep the ground from appearing flat and bring out all the details of the surface. Also, by adding light from many angles your resulting image will have an interesting three dimensional effect.
  • Don’t stand between the camera and your light source or you will show up as a silhouetted ghost in your image.
  • Wear dark non-reflecting clothing and keep moving. Again, you do not want to appear as a ghost in your image!
  • Don’t shine the light source back at the camera, or else you will create a bright spot in the image.
  • Use a flash light with a red filter when you need to check your camera to make adjustments. The red light will keep you from ruining your night vision.
  • Different surfaces are going to react to light differently. Wood surfaces may require more light than shiny surfaces such as metal or glass, as rougher surfaces absorb more light than smooth surfaces.
  • Keep your light moving. Move the beam in slow strokes to add light and make faster strokes in areas where less light is needed.
  • Paint in up-and-down or side-to-side strokes, just like one paints with real paint.
  •  You are more than likely not going to get the shot you want on the first try, and it may take multiple attempts to get an image that you are satisfied with. For this reason, try to keep track of how much light you add to each surface. Develop a plan so that you can make adjustments to each exposure until you get the image you have visualized.
Howard Ignatius

30 second exposure at f/5.6, ISO 1250 (to get the stars to show up). By Howard Ignatius

Be Creative

These are a few basic tips to help you get started with light painting. There is so much more you can do with this medium. Be creative and fearless about trying new things. Once you start to get the hang of light painting, there is no limit to the images you can create with your camera in the dark and a few creative light sources. Do you have any additional tricks or tips for light painting to share?

googletag.cmd.push(function() {
tablet_slots.push( googletag.defineSlot( “/1005424/_dPSv4_tab-all-article-bottom_(300×250)”, [300, 250], “pb-ad-78623” ).addService( googletag.pubads() ) ); } );

googletag.cmd.push(function() {
mobile_slots.push( googletag.defineSlot( “/1005424/_dPSv4_mob-all-article-bottom_(300×250)”, [300, 250], “pb-ad-78158” ).addService( googletag.pubads() ) ); } );

The post Beginner’s Guide to Light Painting by Bruce Wunderlich appeared first on Digital Photography School.


Digital Photography School

 
Comments Off on Beginner’s Guide to Light Painting

Posted in Photography