RSS
 

Posts Tagged ‘Light’

Sony offers free inspection and service for RX1R II ‘light leak’ issue

21 Jan

Sony has posted an advisory on its support website for owners of the Cyber-shot DSC-RX1R II regarding reported ‘light leak’ issues. Those who have experienced photos with ‘unwanted light’ can send the camera to Sony for free inspection and repair if needed.

Only a certain set of cameras are affected, with serial numbers falling between 6310198 and 6311127. If that’s you, Sony can be contacted at 1-239-245-6360 in the US. The company says that this inspection service will be offered through the end of March 2018.

Articles: Digital Photography Review (dpreview.com)

 
Comments Off on Sony offers free inspection and service for RX1R II ‘light leak’ issue

Posted in Uncategorized


Tips for Using a Handheld Light Meter

17 Jan

In modern DSLRs they all have a light meter built-in to the camera. But sometimes you want a more accurate reading, or to measure the amount of light when using flash (your camera can’t do that), in which case you would turn to a handheld light meter.

Check out this video from Adorama TV (host Daniel Norton) for some light meter basics.

This second video is more advanced. Once again from Adorama TV, with host Mark Wallace, this one covers how to meter for light ratios. Read more about ratios here: Lighting Ratios to Make or Break your Portrait.

In the video above he is using the Sekonic L-358 light meter. Here are a couple other choices, also made by Sekonic. I personally use the L-308 and it works just fine. You don’t need one that’s really fancy but the one he used does have the memory storage for comparing the light, the L-308 does not. So if you want that feature you may want to opt for the L-358.

Have you used a light meter before? If you are shooting with speedlights or studio lights you may find it necessary, but if you shoot landscapes and use mostly natural light you probably do not need one. Let us know your experience in the comments below.

googletag.cmd.push(function() {
tablet_slots.push( googletag.defineSlot( “/1005424/_dPSv4_tab-all-article-bottom_(300×250)”, [300, 250], “pb-ad-78623” ).addService( googletag.pubads() ) ); } );

googletag.cmd.push(function() {
mobile_slots.push( googletag.defineSlot( “/1005424/_dPSv4_mob-all-article-bottom_(300×250)”, [300, 250], “pb-ad-78158” ).addService( googletag.pubads() ) ); } );

The post Tips for Using a Handheld Light Meter by Darlene Hildebrandt appeared first on Digital Photography School.


Digital Photography School

 
Comments Off on Tips for Using a Handheld Light Meter

Posted in Photography


World’s Only Light Art Museum is in an Underground Brewery

14 Jan

[ By Steph in Art & Installation & Sound. ]

light art museum main

Deep within the cooling and storage cellars of the former Linden brewery in the German city of Unna, darkened tunnels house the eerily glowing exhibitions of the world’s first and only light art museum. Established in 2001, the Centre for International Light Art is home to eleven sprawling installations within its 8,200 square feet, including Olafur Eliasson’s The Reflective Corridor, a 33-foot-high waterfall of light. Each was created specifically for this unique subterranean space.

light art museum

Director John Jaspers describes the featured artists, including James Turrell and Joseph Kosuth, as “the Rembrandts and van Goghs of light art.” Their creations range from Keith Sonnier’s light graffiti rendered palpable in three-dimensional space via neon tubes, entitled ‘Tunnel of Tears,’ to Turrell’s surreal oculus entitled ‘Third Breath.’

light art museum 2

light art museum 7

light art museum 4

Each exhibit interacts with the stark, aging surfaces within the 167-year-old complex, which was formerly just one of many industrial ruins found within Germany’s coal center. The little-known museum attracts only about 25,000 visitors per year, owing partially to the fact that local laws require limited-capacity guided tours due to emergency evacuation concerns.

Screen Shot 2016-01-13 at 5.30.52 PM

Screen Shot 2016-01-13 at 5.31.09 PM

Screen Shot 2016-01-13 at 5.31.24 PM

Screen Shot 2016-01-13 at 5.31.38 PM

That could change as the museum gains more recognition internationally, especially with its first annual international Light Art Award competition, which aims to promote artists working in the field of light art. It’s located about three hours outside Berlin. Take a virtual tour at the Centre for International Light Art Unna website.

Share on Facebook


[ By Steph in Art & Installation & Sound. ]

[ WebUrbanist | Archives | Galleries | Privacy | TOS ]


WebUrbanist

 
Comments Off on World’s Only Light Art Museum is in an Underground Brewery

Posted in Creativity


Metz announces UK availability of new mecablitz 44 AF-2 flash/video light

12 Jan

German flash manufacturer Metz has said that the mecablitz 44 AF-2 flash unit that it announced at the end of last year will be available immediately in the UK at a price of £179.99. The gun is an update of the 44 AF-1, and brings with it compatibility with Fuji’s X-system and a built-in LED for videographers. 

Originally announced in November last year, the 44 AF-2 is designed for full frame and APS-C DSLRs, as well as a collection of mirrorless cameras. It has a maximum guide number of 44m / 144 ft at ISO 100 when used with a 105mm lens, and offers an automatic zoom head that covers angles for lenses from 24-105mm. A wide diffuser extends that coverage to 12mm. 

Metz has included a video light in the form of an LED that has an output of 100 Lux at one meter, and which can be controlled via four brightness levels. The LED can also be used as a modeling light to accompany the flash head. 

The flash can be integrated into the wireless flash control systems of Canon, Nikon, Panasonic, Olympus, Pentax, Sony and Samsung cameras, and is additionally compatible with Fuji and Leica cameras when mounted in the hotshoe. Depending on the model in use, the 44 AF-2 can be used as a commander in a wireless set-up, or only as a slave. 

In manual mode the gun has four output levels, and in all modes it can be triggered at the beginning or the end of the exposure. High speed modes allow synchronization with shutter speeds beyond the usual maximum sync speeds of the host camera. 

The gun is designed to be easy to use and sits slightly above the middle of the company’s AF range of hotshoe mounted flash units. 

This will be the first Metz flash unit launched since the Metz-Werke GmbH & Co. company became insolvent and the flash business was saved by Germany’s Daum Group, which is better known for making fitness equipment. The flash side of the business is now called Metz mecatech GmbH. 

In Europe the flash unit will cost 190 Euro, but it doesn’t appear to have been launched in the USA yet. For more information on the Metz mecablitz 44 AF-2 see the Metz website.

Articles: Digital Photography Review (dpreview.com)

 
Comments Off on Metz announces UK availability of new mecablitz 44 AF-2 flash/video light

Posted in Uncategorized


How to Build an LED Light and Make an Orb

04 Jan

Orb15

This article will tell you all about the what, where and when of orbs. Let’s start by defining them.

What’s an orb?

Well it’s both a cool, and fun, method of light painting that anyone can do. Basically you make a circuit with some LEDs (light emitting diodes), a battery, some wire, and a switch. You weight the LEDs, and then spin these in a circle as you move around a fixed point. Shot outside in the evening using a long exposure, this spinning creates a really cool looking sphere. By using different LEDs, you can make these spheres (called orbs) in different colors. There’s a small bit of tech involved in building them, but it’s not super hard. It’s also a project you can very definitely do with your preteen or early teen child.

Orb01

Equipment needed

The minimum you need to make an orb is:

  • An LED (or a few LEDs to make it brighter)
  • Battery
  • Battery Clip
  • Push button to make a switch
  • Wire
  • A weight: literally anything to make the LED at the end of the wire heavy, so it spins easily
  • Resistor(s): The value depends on the type and number of LEDs you use
  • Soldering iron, solder, wire cutters, and PVC tape

Orb02

Building your LED light

Note from the Editor: Please take extreme safety precautions if you attempt this yourself. If you are not familiar with electronics get help from a friend or someone who is an expert.

Now for the tech bit. Attaching an LED to a battery can fry the LED. So to protect it, you need to use a resistor. You may need more than one if you use an array of LEDs. Use this LED Array Wizard, and finding the values is painless. You can enter in information about the LEDs into the wizard and get both the circuit, and the resistor values.

I bought the parts for this orb locally from a Maplin store (UK based), but you can get them from any electronics components store . Make sure to find the LED Forward Voltage (often 2-3.3 volts) and the current (often 20-30mA) for the LED Array. For this project I got four orange super-bright LEDs, with a forward voltage of 2v and current of 30mA. The wizard suggested I wire them in series and use a 39ohm resistor. (As it turned out, I had two red and two orange LEDs).

Orb03

Soldering this together takes a little skill. The trick is to tin the wires, LED Legs, etc., before bringing them together to solder the connection. Pay attention to the connections.

Orb04

The red wire from the battery clip should go to the switch, and the black wire should go (via the other wire) to the negative legs of the LED Array (or resistor in this case). From the other side of the switch, the wire should go the the positive side of the LED Array.

Orb05

For the array, make sure to connect the LEDs correctly, as they only work in one direction. Generally one leg is longer than the other, indicating the positive terminal. Follow the wizard circuit to be safe. The resistor can be wired in any direction. Wire the array, then connect the wires from the switch, and test the circuit before committing to the final solder.

Orb06

I’ve used an old adaptor nut as a weight. Even if your weight might fit over the LEDs, put it on the cable before the final solder, just in case. Once you’ve done the soldering, test again, and then use insulation tape (PVC tape) to wrap around each LED leg and the resistors, making sure none of them can touch any other. A short here could prevent the orb from working.

Orb07

Use the tape to secure your weight. Give it a test spin. You should be able to hold the battery and switch in one hand, and spin with the other. Practice getting the spin right, before pressing the switch.

Spinning technique to make the orb

You’re nearly ready for the real deal, your first orb shot! But first, you need to master a key technique – centering the orb. The first thought is to spin the orb around yourself, but this won’t actually make an orb, it just makes a mess. I mean it looks okay, but it’s not an orb. To get an orb, the center of the spin must be static. Essentially you need to shuffle around your spinning hand to make it work. A great tip is to put something on the ground – a coin helps because you can see the light hit it – and spin above it.

It takes practice to get perfect, and plenty of my orbs are not perfect, but they still look okay. They are loads of fun either way! Some people shuffle forwards, I tend to shuffle backwards. See which one suits you best.

Camera settings

Next you need to know how to set the camera. Here’s the exact setting to use: er… there is none. It depends on what you want in the photo. You need the exposure to capture the LEDs, and your surrounding area, at night or somewhere dark usually. This means a minimum of 30 seconds, but generally longer. So, you need to use Bulb mode on your camera, along with a remote cable. It may be obvious, but you’ll need a tripod to hold the camera steady during the exposure.

Bulb mode means the camera will record the image, as long as the shutter button is held down. If you use a remote cable with a button lock, you can set the remote, walk off, do your orb, come back to the camera, and then release the lock to end the exposure. As long as the button is held, the camera will continue exposing.

Orb08

Take an initial test shot of your location with settings of about 30 seconds at f/8, ISO 100 (see image above). You’re checking that the location will expose correctly first. Change the settings to get the exposure you need. If you’re on your own, use the 10 second timer on the camera to allow yourself enough time to get to your start position. Swing the orb, and once it’s moving, press the switch to light it up. Spin around a fixed point as recommended. That’s it. Go check your camera at the end and then refine your exposure.

Orb09

Anywhere that the orb looks out of place makes for a great shot. Also wet ground or still water is great, as you get reflections of the orb as well.

Orb10

Once you’ve gotten the bug, you’ll realize that the battery area is a bit flimsy and needs something more solid. For my own orbs, I put the battery and switch into a metal box with a 1/4 inch jack socket. I added a matching jack plug to the cable, replacing the battery and switch. That way I can use one box with a number of different coloured orbs. That’s a project for another day. Have fun making your orbs!

Orb11

Orb12

Orb13

Orb14

Have you ever tried this technique before? Or are you itching to try this? If you do – please share your images, and any questions, in the comments below.

googletag.cmd.push(function() {
tablet_slots.push( googletag.defineSlot( “/1005424/_dPSv4_tab-all-article-bottom_(300×250)”, [300, 250], “pb-ad-78623” ).addService( googletag.pubads() ) ); } );

googletag.cmd.push(function() {
mobile_slots.push( googletag.defineSlot( “/1005424/_dPSv4_mob-all-article-bottom_(300×250)”, [300, 250], “pb-ad-78158” ).addService( googletag.pubads() ) ); } );

The post How to Build an LED Light and Make an Orb by Sean McCormack appeared first on Digital Photography School.


Digital Photography School

 
Comments Off on How to Build an LED Light and Make an Orb

Posted in Photography


Light Balance: Illuminated Seesaws in a Montreal Plaza

29 Dec

[ By Steph in Art & Installation & Sound. ]

see saws 2

Don’t even try to suppress your inner child when you come across a public installation as fun as this interactive collection of illuminated seesaws in Montreal, which play music in time with riders’ movements. Looking to inspire a bit of spontaneity in the streets, collaborating firms CS Design and Lateral Office offer up an all-ages playground stretching for a full block in the city’s Place des Festivals.

see saws 3

see saws 4

Entitled ‘Impulse,’ the installation is comprised of 30 glowing seesaws with built-in speakers. Take a seat and they’ll produce a series of musical sounds, the lights strengthening and fading in intensity depending on the angle of the board. When the bulk of them are occupied, they join together into symphonies of light and sound that can either spontaneously synchronize or become totally random and chaotic.

see saws 1

see saws 5

The seesaws are paired with colored LEDs projected onto the adjacent building facades, turning the whole square into a light show after dark. Every visitor has a different experience depending on where they’re sitting, how fast they move up and down, and how many other seesaws are engaged.

light projections 2

light projections

“Through the use of architectural lines, a hypnotic soundtrack and an entertaining illusion of depth, the nine architectural video projections echo the seesaws of the Place des Festivals,” say the designers. “Playing with the notions of balance and unbalance, symmetry and asymmetry, tension and harmony, the video projections are visual experiments illustrating the original soundtrack created for each video.”

Share on Facebook


[ By Steph in Art & Installation & Sound. ]

[ WebUrbanist | Archives | Galleries | Privacy | TOS ]


WebUrbanist

 
Comments Off on Light Balance: Illuminated Seesaws in a Montreal Plaza

Posted in Creativity


Manfrotto updates Digital Director app to add remote control of its LED light panels

15 Dec

Italian accessory manufacturer Manfrotto has released a new app for its Digital Director iPad cradle that allows users to wirelessly control Manfrotto Lykos and Litepanels Astra LED lights. The 2.0 app is capable of handling up to 13 panels via a Bluetooth connection, so brightness levels can be controlled from the camera position. The app can switch the lights on and off as well, and when the BiColor models are in use color temperature can be adjusted between daylight and tungsten settings. Lights can be controlled individually, or in groups, though some models will need a Bluetooth dongle to make them compatible with the system. 

The update also brings zebra patterning to the live view display, showing when areas of the image to be captured will be over- or under-exposed, and focus peaking can now be customized with different colors and strengths. In review mode the app can now crop images, either freely or with set proportions, and pictures can be rated in the gallery with stars that are compatible with other desktop software programs. 

For more information visit the Manfrotto website, and you can read our review of the Manfrotto Digital Director here. 


Press release:

Manfrotto Announces New Digital Director App 2.0

Upper Saddle River, N.J. (December 10, 2015) – Manfrotto, a leading global innovator and manufacturer of premium photo, video and lighting support products and accessories, has launched the Digital Director App 2.0, the updated App for Manfrotto’s Digital Director, which brings new enhancements to professional and enthusiast photographers and videographers who wish to make shooting much smarter. 

The Digital Director App 2.0, now available in the App Store on Apple iPads, includes new and improved features, in particular:

REMOTE CONTROL OF LIGHTS

The new Digital Director App 2.0 not only controls all Nikon and Canon DSLR key camera functions, but turns the iPad into an innovative interface, enabling total remote control of Manfrotto LYKOS and Litepanels ASTRA LED lights (up to 13 lights!) via Bluetooth®. Lights can be controlled remotely: you can turn lights on/off, adjust dimming level and color temperature, set up groups and configure multiple scenes directly from the iPad.

FOCUS PEAKING & ZEBRA FILTER 

From the Digital Director App 2.0’s general settings, in the Digital Director Options, it’s possible to set up new features. The implemented Focus Peaking Filter presents new options: the possibility to adjust the intensity of the filter and to select the desired color for the peaking (red, blue, green, yellow). In addition, the new Zebra Filter helps to adjust exposure through striped patterns that indicate the overexposed and/or underexposed areas of the image.

INTUITIVE POST PRODUCTION IMAGE ADJUSTMENT

The new App 2.0 offers new tools for post production: cropping free or with proportion, blur and saturation. Together with the existing functions (rotate, contrast, light, checking histogram and EXIF information), it may also allow you to make final adjustments on the image in just a single touch of your finger on the iPad screen.

The App 2.0 integrates new and improved features such as control of new Manfrotto LYKOS LED lights and Litepanels ASTRA, new Focus Peaking settings, Zebra filter, new post-processing tools, gallery photo sorting and image rating that is included in the .jpeg file shared from Digital Director via FTP and email. With these upgrades, Digital Director can better help professional and enthusiast image makers make their shooting workflow more effective and intuitive.

DIGITAL DIRECTOR

Manfrotto Digital Director is the only Apple certified (MFi – Made for iPad Certification) electronic device that connects your camera and iPad, via USB cable, to help manage the photo and video workflow from the setting of your camera (Canon and Nikon DSLR) to sharing your pictures. It features a built-in Apple microchip that works with the 600MHz 256MB DRAM ARM® Cortex®-A8 microprocessor, simultaneously, in order to ensure the perfect communication between the iPad and the camera. The result is perfect control of all shooting parameters of different DSLR cameras, a smooth and consistent video streaming between devices with extremely low latency time, and an ultra-fast, high-quality image download onto the iPad.

Articles: Digital Photography Review (dpreview.com)

 
Comments Off on Manfrotto updates Digital Director app to add remote control of its LED light panels

Posted in Uncategorized


13 Tips for Doing Action Photography in Bad Light

15 Dec

Elizabeth-Bars

Sometimes I feel cursed. Like any parent I want to take pictures of my kids doing their activities. However, I have a daughter who is a gymnast. For a photographer, that is a toxic combination of very fast action with generally poor light. But then it gets worse. My other daughter is very involved with her school’s theatre program. That means I’m trying to take pictures of her acting, singing, and dancing in the worst light imaginable.

As a result, I spend a lot of my time trying to photograph action in bad lighting. Having done so for a while now, I have a few tips to pass along, so hopefully this will be easier for you next time you find yourself in a similar a situation – shooting action photography in bad or low light conditions.

#1. Use Manual Mode

Before you even think about shooting, make sure your camera is set up for success. Let’s start with the shooting mode. No matter what mode you normally use, in this context you are going to need a large degree of control over your camera’s settings. Manual mode gives you complete control, so it is generally a good choice. If you are not comfortable using Manual, or if you face changing light conditions, use Aperture Priority.

Hannah1

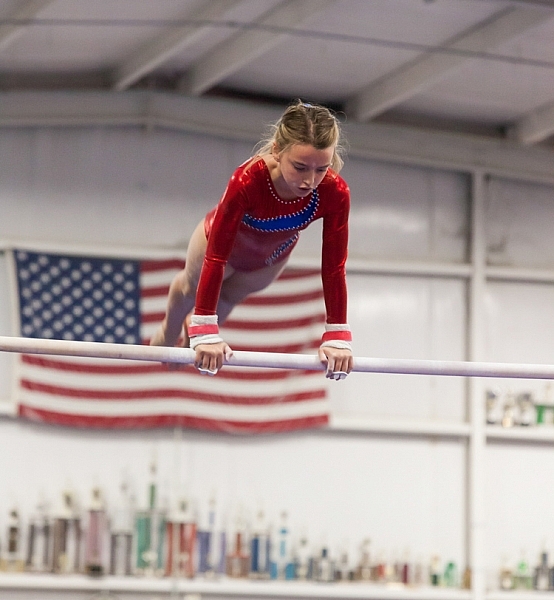
Shutter speed: 1/320; Aperture: f/2.8; ISO 3200.

You will be using very specific exposure settings that the camera probably wouldn’t choose on its own. We will get to those settings in a moment, but using Manual (or Aperture Priority) will allow you to use them.

#2. Use Fast Glass

Next, you’ll need to decide which lens to use. Use your longest and fastest lens (fast glass) here. The low light environment means that you will want a lens with a wide aperture, that lets in a lot of light. The fact that your subject is likely to be rather far away from you means that you will also need a longer focal length. I personally use a 70-200mm f/2.8 and it works great. I could see even using a longer lens than that.

You may be inclined to use a teleconverter to get some extra reach. If you aren’t familiar with teleconverters, they are extensions that fit between your camera and lens, which increase the magnification of the lens, usually by 1.4 or 2 times. In other contexts, they work great – in a low light environment, however, they don’t. A 1.4x teleconverter costs you 1 stop of light and a 2x teleconverter costs you 2 stops of light. If you start with an f/4 lens, it is now an f/8 lens. That won’t work here. There just isn’t enough light. If you need the extra reach, you are better off taking the picture without it and then cropping it later.

Pub-music

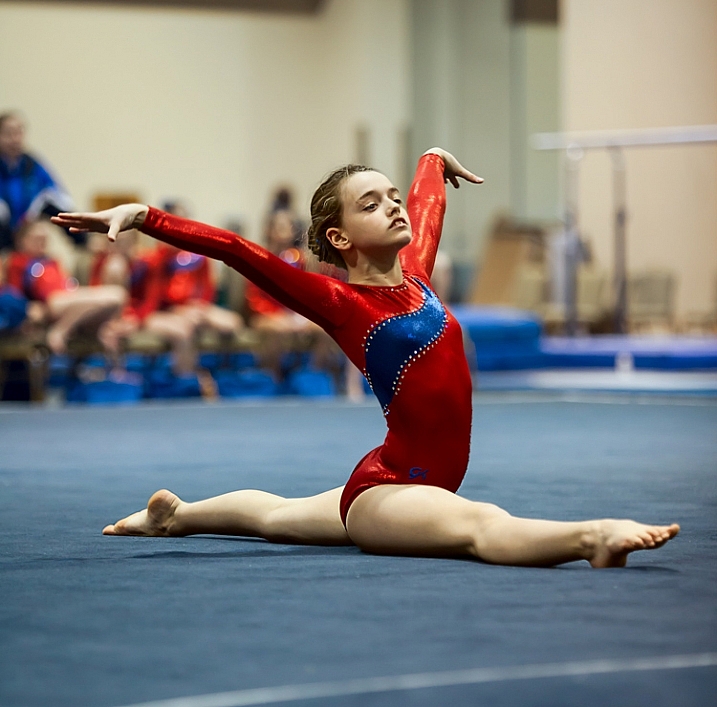
Sometimes a slower shutter speed adds a sense of movement. Shutter speed: 1/10; Aperture: f/4; ISO: 6400.

#3. Shoot Wide Open

Now it is time to prepare the shot. The first exposure setting to make is the aperture. Deciding which aperture to use in this context is easy. Put the aperture at its widest setting, which is the smallest f-number. Doing so lets in the most light. The downside is that you will have a very shallow depth of field. However, in this context that should not matter. You will only want your subject in focus and having some background blur is just fine (sometimes even preferable).

#4. Set a Fast Shutter Speed

Next you will set your shutter speed. The trick here is to make sure you are using a fast enough one. If your subject is not moving, then your minimum shutter speed will be a function of your focal length. The Reciprocal Rule states that your minimum shutter speed for a sharp picture should be the inverse of your focal length. So if you are shooting at 100mm your shutter speed should be 1/100 of a second or faster.

When your subject is moving, things change a bit and you will need to use an even faster shutter speed. I find that 1/200th of a second is a minimum for a moving subject if you want to avoid any blur. Start with that setting, and increase it if you have enough light. Try hard to avoid using a slower shutter speed unless you are trying to add a slight blur to your subject, to show a sense of movement. Otherwise, even if you don’t see any blur when you look at your pictures in the LCD, it might still be there and you will be disappointed when you get back to your computer to find you have a card full of blurry pictures.

Elizabeth-Floor

In this picture, I was able to get away with a shutter speed of only 1/160th of a second because my subject wasn’t moving. . . (Shutter speed: 1/160; Aperture: f/2.8; ISO: 2000)

#5. Set the ISO (High)

The final exposure setting to make is ISO. Since you have already set your aperture and shutter speed, the ISO just is what it is. Set the ISO to whatever level is necessary to achieve a proper exposure.

Don’t be alarmed if you need to use a very high ISO to get a proper exposure. I routinely use ISO 1600 or 3200, and sometimes I even need to put it to ISO 6400. These are ISOs I would never even think about using in most other situations, but they are often necessary here.

. . . but in this photo where my subject was moving, 1/160th of a second wasn't quite fast enough (Shutter speed: 1/160; Aperture: f/2.8; ISO 3200)

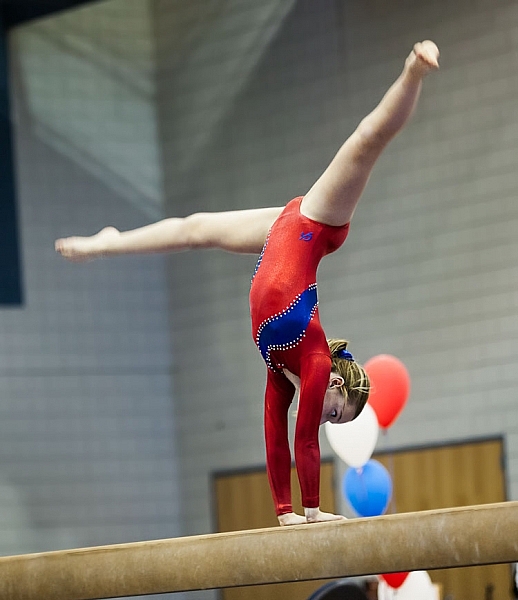
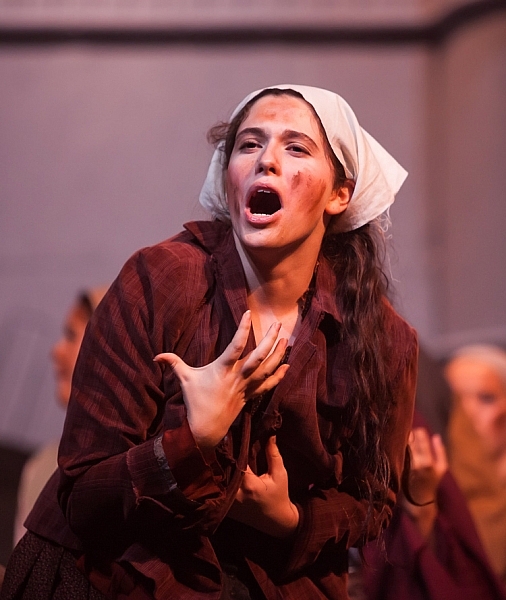
. . . but in this photo where my subject was moving, 1/160th of a second wasn’t quite fast enough. Arguably the blur in the legs implies movement, but it isn’t what I was trying to do (Shutter speed: 1/160; Aperture: f/2.8; ISO 3200).

#6 Test Your Exposure Settings Before the Action Begins

Test your exposure settings before the action starts. Since you are indoors, the light is often unchanging. In that case you can tweak the exposure settings and then more or less forget about them while you concentrate on the action. Where there is changing light, you will need to revisit the exposure settings often. In any case, start by making sure they are right, and do a test.

#7. Zoom In

Now let’s concentrate on the taking pictures part. In composing the picture, the first rule is to fill the frame. Zoom in on your subject. Don’t leave a lot of background. The important part of your picture is your subject, and they should dominate the picture.

#8. Wait for Peak Action

(Shutter speed 1/250th of a second; Aperture f/2.8; ISO 6400).

(Shutter speed 1/250th of a second; Aperture f/2.8; ISO 6400).

You may be inclined to machine gun your subject during the action. I know that there are many photographers who do that with great success, but I find it rarely works for me. Instead, anticipate moments of peak of action and prepare for them. When the peak action arrives take 2 – 4 shots very quickly (make sure your camera is in continuous shooting mode) and then recompose. When something else of interest happens, take 2 – 4 more shots, and so on.

Try to anticipate those moments of peak action. When you do so, and you shoot in a quick burst, you are more likely to get the best shots.

#9. Don’t Overlook Breaks in the Action

It may seem odd, but breaks in the action are often great times to shoot. By a break in the action, I mean two things.

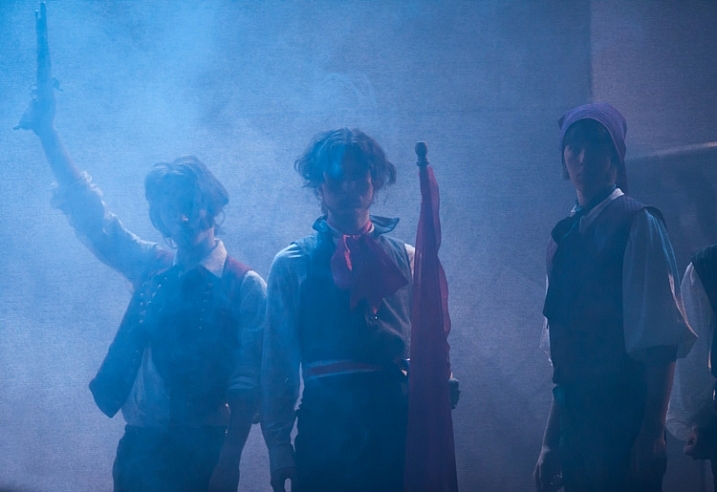
The first is a momentary pause during the event. For example, in gymnastics after a difficult move there is typically a momentary pose. The same holds true in singing and dancing, as they hold a pose after finishing a part of a routine. The pose often makes a great shot, plus they aren’t moving so you won’t have as big of a problem with blur.

A break in the action will sometimes provide great shots while allowing you to use a slower shutter speed (Shutter speed: 1/50th of a second; Aperture f/2.8; ISO 3200).

A break in the action will sometimes provide great shots while allowing you to use a slower shutter speed (Shutter speed: 1/50th of a second; Aperture f/2.8; ISO 3200).

The second break in the action I am talking about is an actual break, like the end of a period in sports. There are often warm-up drills going on at that time that lend themselves to great shots. Plus you are typically allowed a bit more latitude in terms of your own movements, and you don’t have to worry about getting in anyone’s way. The best part is that no one will know whether you took the shot during a drill or the real game/match/meet. In fact, after a year or two, you probably won’t remember either!

#10. Nail the Focus

Because you are shooting with your aperture wide open, you will have a very shallow depth of field. That means the focus will be unforgiving and if you miss it there is no leeway.

So what should you focus on? Well, the subject, of course. If your subject is a person, then always focus on the eyes. If the eyes are on different planes, focus on the nearest eye.

This is an area where it pays to be comfortable with your camera’s autofocus modes. Your camera will have a mode designed to focus on stationary points (Canon calls this One-Shot and Nikon and Sony call it AF-S). Your camera will have another autofocus mode designed to track moving subjects, which Canon calls AI Servo and Nikon and Sony call AF-C. In the case of a moving subject, this mode will continuously track your initial focus point and readjust as it moves. Most photographers use this mode in the case of a subject that is moving. I personally almost always use the stationary autofocus, but use whichever one you are comfortable with.

Hannah2

Shutter speed: 1/640; Aperture: f/2.8; ISO 3200.

Another decision you should make to help with your focusing is whether to use back button focus. Normally, your camera focuses when you press your shutter button half way down. You can, however, set your camera to focus when you press a button on the back of the camera instead. I prefer this method because the focus will not automatically reset with each picture, Either way is fine, but back button focus gives you slightly more control over your camera’s focus so you might want to give it a try.

#11. Chimp!

That’s right, I want you to chimp. This refers to the act of looking at your photos on the camera’s LCD screen. Some photographers look down on this practice and referred to it as chimping (supposedly because the people looking at the LCD make “oo oo” noises while looking at their pictures, similar to chimpanzees). I actually think you should look at your LCD in any shooting context, but in this situation it is important to do so. There is just too much that can go wrong, and you need to make sure you are getting the shots. You might have the exposure wrong, your focus might be off, the action might be too fast for your shutter speed, and so on. You do not want to get home and discover you were doing something wrong, that could have been corrected while you were shooting.

#12. Additional Noise Reduction

You will have your own workflow for post-processing your pictures, so I will not dwell on that too much here. There are a few things, however, that are particularly important in this context, that I want to pass along. The first is that you will need to do some noise reduction since you will be using high ISOs for these shots, and you should probably do it in a manner that is a little different than you are used to doing.

Start off by using Lightroom’s noise reduction in the usual manner. Push the Luminance slider under Noise Reduction to the right. There is an equivalent slider in Adobe Camera Raw (ACR), if you use Photoshop or Photoshop Elements. Keep the increase moderate at this point, I find that is usually in the range of 10-15.

After that, reduce the noise in the background further. The background of your picture will usually be blurry because you used a large aperture, so the loss of detail from the additional noise reduction will not hurt anything. In Lightroom, use the Adjustment Brush and push the noise slider to the right, painting in where you want the noise reduction. Photoshop users can do the same thing in ACR or create a new layer with noise reduction, while masking off the subject.

Using Lightroom's Adjustment Brush to Sharpen and Add Noise Reduction

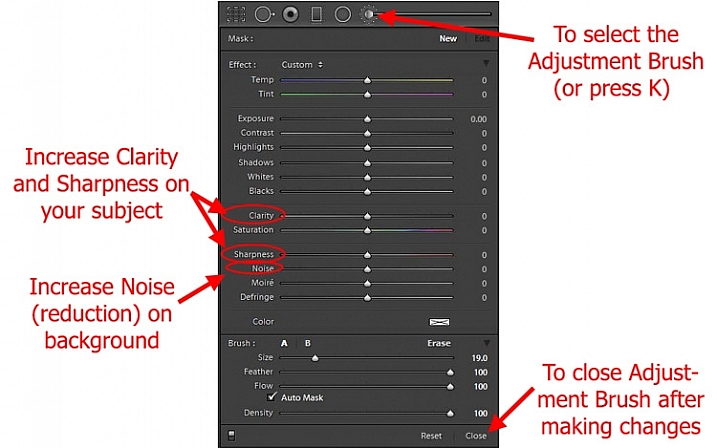
Using Lightroom’s Adjustment Brush to Sharpen and add Noise Reduction – you will need two adjustment brush points added, one for the subject and a second for the background.

Note: you will need to add two adjustment brush points to do this (because you’re making different adjustments to each), one for the subject (to increase Clarity and Sharpness, see below) and a second for the background (to increase Noise Reduction).

#13. Sharpen the Subject

Next, sharpen your photo but, similar to the noise reduction you did above, you should tailor it to this situation. To start off, apply a slight amount of sharpening to the whole image, but not as much as you would usually apply because it will likely also cause an increase in noise.

Then apply sharpening to the subject only. In Lightroom, use the Adjustment Brush again. This time increase the Clarity and Sharpening amounts. Apply the effect only to your subject, while leaving the background alone. In Photoshop you can do the same thing in ACR or create a new layer that you sharpen, and mask off everything but your subject. The extra sharpening will help make your subject stand out a little bit better.

Conclusion

Photographing action in low light is a severe test of your camera equipment and your photography skills. It pays to have fast glass and a camera that performs well in low light. Using the tips in this article, you should be able to set up your camera and make the proper exposure settings. It will take practice to consistently nail the focus. It will take even more practice, and a little bit of luck, to capture the moments of peak action. But when you do, it is priceless.

Do you have any other tips or tricks that you use when shooting action in bad or low light? Please share in the comments below.

googletag.cmd.push(function() {
tablet_slots.push( googletag.defineSlot( “/1005424/_dPSv4_tab-all-article-bottom_(300×250)”, [300, 250], “pb-ad-78623” ).addService( googletag.pubads() ) ); } );

googletag.cmd.push(function() {
mobile_slots.push( googletag.defineSlot( “/1005424/_dPSv4_mob-all-article-bottom_(300×250)”, [300, 250], “pb-ad-78158” ).addService( googletag.pubads() ) ); } );

The post 13 Tips for Doing Action Photography in Bad Light by Jim Hamel appeared first on Digital Photography School.


Digital Photography School

 
Comments Off on 13 Tips for Doing Action Photography in Bad Light

Posted in Photography


Discover the Secrets of Natural Light Photography With This 70% Off Deal

13 Dec

As we announced yesterday – today is Day 1 in our 12 Deals of Christmas dPS – and we’re kicking things off with fantastic deals on or popular Natural Light eBooks.

You can pick either one up for $ 7 (65% off) or grab them both for an even more amazing price of just $ 12 USD (a 70% saving).

PicMonkey Collage

The eBooks are:

  • Natural Light: Mastering a Photographer’s Most Powerful Tool – by travel photographer Mitchell Kanashkevich
  • Life in Natural Light: The Ultimate Guide Guide for Photographers – by family photographer Rachel Devine

These eBooks are normally $ 19.99 – today only either one is $ 7 USD!

Both of these beautifully illustrated and informative eBooks tackle this vitally important topic for photographers from different perspectives but together they make a beautiful little bundle of learning for just $ 12 (70% off).

Taking beautiful photos using nothing but the light around you can often seem as difficult as using the Jedi Mind Trick to get the people in your lens to sit still. But these two books will help you see your photography in… well…. a whole new light.

We could go on about these eBooks all day but this deal only lasts 24 hours so head to our 12 Days of Christmas Page and grab yours before this deal is over.

googletag.cmd.push(function() {
tablet_slots.push( googletag.defineSlot( “/1005424/_dPSv4_tab-all-article-bottom_(300×250)”, [300, 250], “pb-ad-78623” ).addService( googletag.pubads() ) ); } );

googletag.cmd.push(function() {
mobile_slots.push( googletag.defineSlot( “/1005424/_dPSv4_mob-all-article-bottom_(300×250)”, [300, 250], “pb-ad-78158” ).addService( googletag.pubads() ) ); } );

The post Discover the Secrets of Natural Light Photography With This 70% Off Deal by Darren Rowse appeared first on Digital Photography School.


Digital Photography School

 
Comments Off on Discover the Secrets of Natural Light Photography With This 70% Off Deal

Posted in Photography


Lumu Power meters light, flash and color temperature

02 Dec

The team behind the Lumu smartphone light meter has launched a Kickstarter campaign to fund the production of Lumu Power, their next generation device. In addition to ambient light levels, the Lumu Power is also capable of measuring flash exposure and color temperature. Read more

Articles: Digital Photography Review (dpreview.com)

 
Comments Off on Lumu Power meters light, flash and color temperature

Posted in Uncategorized