RSS
 

Posts Tagged ‘Light’

Weekly Photography Challenge – Low Light Photography

18 Aug

Shooting in low light can be challenging, especially for newbie photographers. So now is the perfect time for you to practice so you can master it and be ready for anything!

Weekly Photography Challenge – Low Light Photography

Need help? Try these dPS articles:

  • Tips for Better Results When Shooting in Low Light Conditions
  • 6 Tips To Help You Shoot In Low Light Without a Tripod
  • 6 Tips for Getting Consistent Results Shooting in Low Light
  • How to Shoot in Low Light – 9 Commonly Asked Questions
  • Cheat Sheet: What Gear and Settings to Use for Low Light Photography

Simply upload your shot into the comment field (look for the little camera icon in the Disqus comments section) and they’ll get embedded for us all to see or if you’d prefer, upload them to your favorite photo-sharing site and leave the link to them. Show me your best images in this week’s challenge. Sometimes it takes a while for an image to appear so be patient and try not to post the same image twice.

Is it noisy? Yes but not outrageously so (shot with a Canon 5D Mark III). But without the use of the 50mm lens and high ISO, this shot isn’t even possible.

Share in the dPS Facebook Group

You can also share your images in the dPS Facebook group as the challenge is posted there each week as well.

The post Weekly Photography Challenge – Low Light Photography appeared first on Digital Photography School.


Digital Photography School

 
Comments Off on Weekly Photography Challenge – Low Light Photography

Posted in Photography


How to do Light Painting and Illuminate Your Photography

17 Aug

The first time I did light painting was by mistake. It was New Year’s Eve, it was cold and dark, my brother was holding a sparkler, and I was playing with my camera.

Midwinter light painting - How to do Light Painting and Illuminate Your Photography

I was immediately fascinated by the result. Until then, I had always thought of and used photography as a way to capture what I saw. But there was a photo of something ephemeral I hadn’t perceived with my eyes but could see only thanks to the camera.

That was a long time ago, but it’s when I started appreciating the camera not just as a tool to record what I saw, but as an additional sense that could help me see even more. My appreciation of light painting has only grown since then.

Light painting with lights from a broken monitor - How to do Light Painting and Illuminate Your Photography

What is light painting?

Light painting is a pretty broad term that includes everything from using a light source to illuminate specific parts of a scene, to using the light itself as the main subject.

The light source can be everything from a flashlight or a phone to light panels or headlights or even the moon! Basically, it can be anything that emits light.

Light painting with the moon - How to Write with Light and Illuminate Your Photography

The light source in this photo is the moon; instead of moving the light source, I moved the camera.

Light painting is a fun way of taking your photography to the next level. Even if it isn’t something that you think would fit your style of photography, it’s worth trying both for the fun of it and for the things you’re guaranteed to learn about your tools and the art.

In this article, I hope to give you some inspiration and the basic information you need to start experimenting. I’ll be focusing on the kind of light painting where the light itself is the main subject, and specifically on something that might more accurately be described as light scribbling. You’ll see what I mean.

Light painting and light scribbling on a piano: the Pythagoras theorem

What’s the point?

There is always a point to try something you’re going to learn from, and that you’re going to enjoy doing.

I’m mainly illustrating this article with some light scribbled equations that I made some time ago. What was the point? Geeking out, finding something to do on a dark winter’s night, getting familiar with my new tripod, practicing manual exposure, and getting better at writing backward.

I accomplished most of it.

Einstein's famous equation made by light painting.

Doing light painting is indeed a great way to learn about camera modes and settings you might not commonly use. For most kinds of light painting, you’ll need darkness, and darkness brings with it a whole new set of challenges.

You’ll need to do quite long exposures and to find a way to illuminate the parts of the scene you want while avoiding capturing yourself in the picture. You’ll often also need to focus manually and figure out the best exposure for your photo, which can be quite different from that for most other scenes.

A physiogram made with a head lamp. - How to do Light Painting and Illuminate Your Photography

A physiogram is made by hanging a light source and photographing its movement.

I’m mostly using light scribbled equations in this article, but the technique can also be used for creative birthday cards, unique wedding portraits, and a non-permanent kind of street art.

Your imagination is the limit!

How complicated is it?

It’s surprisingly easy to get started with light painting or scribbling, and the basic tools are nothing fancy. At its most basic, you’ll need a camera, a tripod, and a mobile light source. That’s all.

To get you started, I’ll be using my equations to explain the process and the tools. Use this as a starting point to extrapolate from and to experiment with to get what you want.

Light painting an equation: the circumference of a circle

Setup

To get a photo like the one above, you’ll need your camera and a tripod (or a stable surface to keep your camera on), and a dark night. Since it takes a while to write, your shutter speed should be on Bulb, which means that the shutter stays open until you close it.

Making many of these long exposure photos will use up your battery quite quickly, especially if it’s also a bit cold outside, so bring an extra battery or two. You need to change the drive mode to self-timer/remote, so you don’t shake the camera when it starts exposing and to help you with focusing.

Often you don’t need to stress about standing ready to scribble, though. Uou can just walk into the frame after you start the exposure.

Capturing fire with a long exposure. Light painting tips

Focusing

Focusing takes a bit of effort, but it’s nothing too tricky. The difficulty comes from the darkness of the scene, which means that the camera might have a hard time focusing automatically.

You can focus manually, but what I usually do is let the camera focus automatically. I mark the spot where I’m going to stand to do the scribbling, go to that spot in front of the camera (or ask a helper to do it), turn on my light source and use the remote trigger to take a test shot.

Then, before doing anything else, I turn the focus to manual so the camera doesn’t start focusing again when I want to take the real photo. This way the camera will stay focused on the spot you chose, as long as you don’t touch the lens.

Light painting scribbling in the attic: the Hardy-Weinberg equation.

After that, all that’s left to do is the scribbling!

Make sure to wear something dark if you don’t want to be visible in your photo. For writing, you want a light source, such as a flashlight, that can be easily turned off and on. This way, you can make separate symbols without too much effort.

Before you open the shutter and start taking the photo, think about what you’re doing. If you’re writing something, practice the motion you want to do in the air so you get a feel for it. Then start taking the photo, scribble, draw, paint or do whatever it is you want to with your light, and stop the exposure.

It will probably take a few tries to get it right, so be patient and enjoy the process. You’ll definitely be creating something unique.

NOTE: You don’t necessarily need to write backward. If there is nothing else in the scene with words you can simply flip the image later on the computer. 

Light painting equations at night: the Lotka-Volterra equation.

In this one, the boat worked as a canvas: instead of drawing in the air I could draw straight onto the boat.

Conclusion

Drawing or painting with light is a really fun and rewarding exercise that requires some patience, but not much else.

I’d love to see your photos of light painting and scribbling and hear your thoughts in the comments below.

The post How to do Light Painting and Illuminate Your Photography appeared first on Digital Photography School.


Digital Photography School

 
Comments Off on How to do Light Painting and Illuminate Your Photography

Posted in Photography


3 Tips For Photographing Kids in Harsh Light

02 Aug

You’ve probably heard that the absolute best time for taking gorgeous portraits is before sunset at golden hour. I love the golden hour as much as the next photographer. But I’m also a mom, and I know the importance of being able to capture photographs of your kids throughout day-to-day life, not just when the lighting conditions are ideal.

Let’s face it – birthday parties, parades, celebrations, and field trips often happen in the middle of the day when the light is harsh and more difficult to work with. How do you capture those special midday moments?!

kids eating popsicles - 3 Tips For Photographing Kids in Harsh Light

You can absolutely take amazing photos of your kids no matter the time of day! In this article, I’ll share three quick and easy tips for those times when you want to capture memories and are photographing kids in harsh lighting conditions.

1. Find or Make Some Shade

One of the easiest ways to approach photographing kids in harsh lighting conditions is to find or make some open shade.

If you’re outdoors, look for a group of trees, a small hill, a tall building, or even part of a play structure that can provide you with a bit of shade for your photo. When you’re looking at the shadows on the ground, try to find a patch of shade that doesn’t have “hot spots” of sunlight mixed in with the shade. Mottled light is generally not the most flattering type of light for photographs.

If you aren’t able to find open shade, you can also create it. I’ve used everything from a sun hat to a couple of friends holding a beach towel in the air to create a small patch of shade for a photo of my kiddos. Be creative!

girl in a watermelon hat - 3 Tips For Photographing Kids in Harsh Light

2. Find Your Light

Unless you’re shooting right at high noon, the light from the sun will still have some direction to it. If you’re familiar with the circle trick, this is a great time to utilize it so that you can easily visualize the direction of the light.

Snapping photos without taking the direction of light into account often results in lackluster images with squinting subjects and uneven unflattering lighting.

kids squinting in the sun - 3 Tips For Photographing Kids in Harsh Light

This is an example of what NOT to do when shooting in harsh lighting conditions. See how the girls are squinting and the light is uneven across their faces?

However, spending just a few seconds thinking about the direction of the source of light makes for a much better image in exactly the same location. One simple way that I often communicate this to kiddos is to ask them to stand with their feet pointing towards the head of their shadow.

two girls backlit by the sun - 3 Tips For Photographing Kids in Harsh Light

Nine times out of ten, this simple instruction quickly orients kids so that the direction of light (backlit) is most flattering. You may still end up with some hot spots across their shoulders and the tops of their heads, but typically the light will be nice and even across their faces, which is really my goal when shooting in harsh light or full sun.

3. Try a Fill Flash

girl backlit with water in the background - 3 Tips For Photographing Kids in Harsh Light

So, what if the background you’re trying to capture doesn’t allow you to orient your child in the best way given the direction of light?

Whether you’re taking photos of a historical landmark or a hometown parade, there is another trick you can utilize in harsh lighting conditions. That is to use your on-camera flash as a fill light to help diffuse any harsh shadows and brighten your subject’s face.

For example, the above image was taken at a local lake. Because of the location of the dock coupled with the time of day, I wasn’t quite able to get the sun all the way behind my daughter, resulting in a bit of a hot spot on the right edge of her face, while the rest of her face is just a bit dark.

If this effect bothers you, give fill flash a try!

This second image (above) was taken at the same time, in the same place. But this time I used my camera’s flash to soften some of the highlights near her face. You’ll notice that the coloring of the water is entirely different when using a fill flash versus without it. Additionally, her eyes seem to have more pop with the flash compared to without it.

Whether or not to use fill flash in harsh lighting conditions is really a matter of aesthetic preference. But it’s certainly worth a try if something feels a bit off when you’re shooting in harsh light.

In a nutshell, don’t be afraid of photographing kids in full sun – it’s easier than you may think. Give it a try, and chime in and share your best images with us below.

The post 3 Tips For Photographing Kids in Harsh Light appeared first on Digital Photography School.


Digital Photography School

 
Comments Off on 3 Tips For Photographing Kids in Harsh Light

Posted in Photography


You can now use Elinchrom’s ELB 500 TTL light with Sony, Olympus cameras

31 Jul

Elinchrom has announced a firmware update for its Transmitter PRO — formerly named Skyport Plus HS — that brings support for its ELB 500 TTL for Sony and Olympus cameras.

Firmware version 2.1 for Sony and Olympus now includes TTL, High Speed Sync (HSS) and Hi-Sync (HS) functionality when used with the ELB 500 TTL. These features, which are described in detail on Elinchrom’s website, bring more robust creative control to Sony and Olympus camera systems. Now, Canon, Nikon, Sony and Olympus users can all take full advantage of Elinchrom’s different flash modes.

Below is a full list of the release notes for firmware version 2.10 for Sony and Olympus (Canon and Nikon are on firmware version 2.20):

  • Skyport Plus HS is now named Transmitter PRO.
  • 2 modes are available: Manual, compatible with all Elinchrom units, and TTL for the ELB 500 TTL.
  • Swapped position of unit selection and modeling light feature on main dashboard.
  • Improved menu ergonomics – access features in the setup menu with the wheel and setting selection is clearer.
  • Automatic switch to HS mode – the camera’s shutter speed dictates which mode is activated.
  • Possibility to display power in F-Stops or Ws.
  • Unit name or unit ID can now be displayed.

Elinchrom also notes in the press release that Fujifilm users ‘will soon be rewarded for their wait.’ According to Elinchrom, the Transmitter PRO for Fujifilm will be available in September 2018.

You can download the latest firmware on Elinchrom’s firmware updater page.

Articles: Digital Photography Review (dpreview.com)

 
Comments Off on You can now use Elinchrom’s ELB 500 TTL light with Sony, Olympus cameras

Posted in Uncategorized


SLC 2L-03: Use Your Second Light to Hide Your First Light

27 Jul

As promised in the last sunset lighting tip post, a second quick hack for dusk/lit portraiture. This one involves helping your camera's chip see a contrasty scene more like the way our eye sees it. Read more »
Strobist

 
Comments Off on SLC 2L-03: Use Your Second Light to Hide Your First Light

Posted in Photography


Tips for Better Results When Shooting in Low Light Conditions

23 Jul

Shooting in low light conditions can result in beautiful photographs. But it also presents plenty of technical challenges for you as a photographer to overcome.

noodles in a person's hands - Tips for Better Results When Shooting in Low Light Conditions

The main issues with doing low light photography are:

  • You may not be able to use a shutter speed fast enough to hand hold your camera without creating camera shake.
  • If you use a high ISO, your photos can be very noisy.
  • Shooting at a wider aperture might not give you the depth-of-field you need to get enough of the subject in focus.
  • Your pictures can be underexposed and lack shadow detail.
  • It may be difficult for your lens to focus in low light.

Working with a tripod can greatly reduce some of these technical difficulties, but what about situations where shooting handheld is usually a necessity, like street photography? Or in places where a tripod may be prohibited, like a restaurant or museum?

There are ways to take control of your camera to ensure you get the most out of these challenging situations.

urban street scene high viewpoint - Tips for Better Results When Shooting in Low Light Conditions

Tip #1 – Use a Prime Lens

There is no denying that zoom lenses are convenient, but choosing a prime over a zoom lens can ensure that your images will be that much sharper.

Zoom lenses are constructed with extra glass elements that move in order to zoom. More elements within the lens contribute to lens diffraction, a phenomenon of optical physics that degrades the quality of an image. Lens diffraction is why a generic prime lens can often be sharper than a much pricier zoom counterpart.

2 images of a tree and leaves - Tips for Better Results When Shooting in Low Light Conditions

Shot with an 85mm prime lens.

Tip #2 – Use Shutter Priority

We’re taught that the best way to get great photos is to always shoot in Manual Mode, but sometimes this isn’t the case. In low light photography, shooting in shutter priority mode will help you take better control of your camera.

Shutter Priority mode lets you set the ISO and shutter speed, while the camera will calculate the best aperture for the lighting conditions in which you’re working.

The shutter speed needs to be fast enough to prevent camera shake. Your settings will vary, depending on your focal length and the size of your camera’s sensor. A good approach is to start with the same number (as a fraction) as your focal length for a full frame camera, and then add a stop (double it).

For example, if you are shooting with a 50mm on a full frame camera, try 1/100th of a second and check your results. For a cropped sensor, double your focal length number and add a stop (so 50mm x 2 = 100 x 2 = 200 so 1/200th).

Keep in mind that this is only a guideline. It’s to be used as a quick baseline from which to start. Your camera, the lens you’re using, and the environment you’re shooting in are all factors that will influence your end result.

Tip #3 – Use a High ISO

Tips for Better Results When Shooting in Low Light Conditions - tree with pink lights in it

Your images can be very noisy at a high ISO. Some cameras handle high ISO settings better than others, but the vast majority of DSLRs (and mirrorless cameras) these days have good ISO capabilities. At least good enough to give you a decent base file for post-processing.

Lightroom and Photoshop can fix noise effectively, but the best results can be had with a program called Dfine from DxO’s Nik Collection. (Note: Once available for free, this plug-in can now be purchased with the entire Nik Collection from DxO).

The software measures select areas of your image for noise and adjusts it automatically. You can also take control and selectively increase and decrease noise reduction intensity and type in different parts of the image.

Before beginning to shoot in low light, I recommend doing an ISO test to determine how far you can push it with your camera. Run a few images through your post-processing program of choice and analyze the results. If you need to do a lot of noise reduction, your images might end up looking too plastic.

Tip #4 – Use Back Button Focus

Many of us rely on autofocus these days, especially if we have less than 20/20 vision. Both autofocus and manual focus have their pros and cons.

For example, when using autofocus, it’s very easy for the camera to miss focus at wider apertures. Also, when a scene lacks contrast, which is often the case in low lighting scenarios, the lens may struggle to find focus. You can remedy this by focusing on the edge of a brighter spot in your frame and then recomposing.

Tips for Better Results When Shooting in Low Light Conditions - images show in low light with back button focus

You’ll need to use focus lock, or back button focus so your camera doesn’t attempt to refocus once you try to recompose. Back button focus moves the trigger for focusing from the shutter button to the back of your camera. When your focus is not set with the shutter button, your camera will not attempt to refocus when you take a shot.

I always have my camera set to back button focusing, whether I am shooting in low light or not.

Low Light Portraits

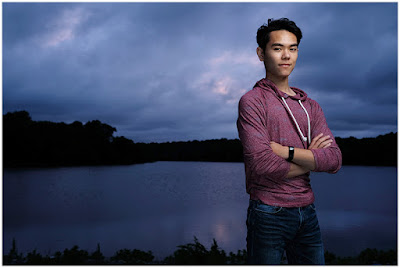
If you need to shoot portraits in low light without a tripod, try image stabilization if your lens offers this technology. Image stabilization counteracts any minor vibration due to shaky hands.

An image stabilizer can help you shoot at a slower shutter speed that you ordinarily would with a lens that doesn’t have this function.

When shooting portraits, shoot at the lowest (widest) aperture possible. It will give you a narrower depth of field, which will help you blur out a busy background by letting it fall out of focus. If possible, use a reflector to bounce some light onto your subject’s face.

Tips for Better Results When Shooting in Low Light Conditions - portrait in low light

This child portrait above was shot handheld, very late in the day, without a reflector. Despite using some of the tips outlined here, it still was underexposed. I was able to bring some brightness back by using Curves in Photoshop and lightened the right side of her face a bit to counter some of the dreaded raccoon-eyes you often get with low light portraits.

Post-processing can go along way toward counteracting some of the problems encountered in low light photography, but trying to get things as perfect as you can in-camera, will save you a lot of time and headaches later.

Low Light Landscapes

Shooting at the golden hour or blue hour, when the light is low, is an ideal time to shoot landscapes. But it also presents the same challenges. In this case, a good, sturdy tripod is essential.

Also, you’ll need a shutter release. Manually depressing the shutter button will cause a vibration that will introduce camera shake and cause your images to be less than sharp.

When shooting landscapes in low light conditions, use Manual or Aperture Priority mode and be careful not to underexpose, or you’ll end up with too little shadow detail.

Your aperture should be fairly narrow, such as f/8 or f/11. Stopping down to apertures such as f/16 or f/22 can cause lens diffraction, in either prime or zoom lenses, no matter the quality. Shooting at f/8 will give you a good depth of field and enough sharpness. Not to mention, most lenses function at their best around this aperture.

Tips for Better Results When Shooting in Low Light Conditions - marina at night shot

Bulb mode is also a great way to shoot landscape photography. This mode is mostly used for long exposures at night or in dark conditions and allows you to do an exposure longer than 30 seconds. You can keep the shutter open as long as required to get the shot in this mode.

If image sharpness continues to be an issue, taking three identical images with different focus points and blending them together using the focus stacking function in Photoshop is an excellent remedy.

Low Light Indoors

Sometimes you’ll need to shoot indoors in low light where you can’t use a flash, such as in a museum or a restaurant. You can choose to crank up your ISO and try Shutter Priority, as mentioned above.

For shooting subjects like food or still life indoors in natural light, shoot by a window and do a long exposure with the camera on your tripod. As long as you have some light, you can still shoot. Use reflectors to bounce some of the light back onto your subject.

Long exposures can be used for still life indoors pomegranate - Tips for Better Results When Shooting in Low Light Conditions

In Summary

The key to getting consistently great results shooting in low light is understanding the principles as outlined above. Take some time to practice and take notes on what you observe while trying to get a well-exposed image.

After a while, it will become second nature for you to know what to do in any given low light situation.

The post Tips for Better Results When Shooting in Low Light Conditions appeared first on Digital Photography School.


Digital Photography School

 
Comments Off on Tips for Better Results When Shooting in Low Light Conditions

Posted in Photography


Leica participates in $121M funding round for computational photography company Light

19 Jul

As far as camera makers go, Leica and Light could not be further apart. Leica has a rich photographic heritage and, at least in the minds of many photographers, stands for beautifully manufactured mechanical devices. Light is a very new company and with its 16-sensor L16 camera is by many regarded as a spearhead of innovation in digital imaging.

Nonetheless – or maybe because of those differences – Leica is now an investor and shareholder in Light. The latter just announced a $ 121 million Series D funding round led by SoftBank Vision Fund. Leica is one of the participants in the round as well, investing an undisclosed amount.

The company confirms that we will see Light-powered smartphones later this year

In the announcement the company confirms that we will see Light-powered smartphones later this year and says it is planning to use the funding to expand in sectors beyond consumer imaging.

“The new funding will allow Light to expand the reach of its imaging platform beyond consumer photography and into security, robotic, automotive, aerial and industrial imaging applications,”

Leica on the other hand seems to be hoping to get its hands on on some of the computational imaging technologies that Light is developing.

“With the rapid development of the computational photography, partnering with the innovators at Light [allows] Leica to extend its tradition of excellence into the computational photography era.”

Articles: Digital Photography Review (dpreview.com)

 
Comments Off on Leica participates in $121M funding round for computational photography company Light

Posted in Uncategorized


Beginner’s Guide to Natural Light in Landscape Photography

06 Jul

Photography is all about light. The same scene with the same composition can look completely boring under one set of lighting conditions and very dramatic under different conditions. Good light makes the difference.

But does that imply there is also such a thing as bad light? I don’t think there is such a thing. The key is to understand what kinds of images to make under the lighting conditions you are presented with when you are photographing.

White House in Arnarstapi Harbor, Iceland - Beginner’s Guide to Natural Light in Landscape Photography

An overcast sky creates a soft landscape with no shadows.

Understanding the three characteristics of natural light will help you use the light to your advantage and make images with an impact no matter what conditions you have to work with.

The Quality of Light

By quality of light, I am referring to how hard or soft the light is.

Hard light happens during midday when the sun is high in the sky and there are no clouds to filter the light. This kind of light is harsh and bright, but it can also create interesting shadows and contrast.

Shadow on the Dunes - Beginner’s Guide to Natural Light in Landscape Photography

Harsh mid-afternoon light casts a dramatic shadow on this sand dune emphasizing its shape.

Soft light happens on a cloudy day when the clouds diffuse the light making it even with no shadows or bright spots. It also occurs in the shade.

Even on a day when there are no clouds, when the sun is lower in the sky the light passes through more atmosphere which softens the light. This is why golden light at the edges of the day is softer then midday light.

The Color of Light

The color of natural light from the sun changes during the course of the day. Before the sun rises, when the first light of the day appears in the sky, the light is a cool blue. During sunrise, the light is golden. As the sun gets higher in the sky, it is bright with little color tint at all.

Organ Pipe Cactus - Beginner’s Guide to Natural Light in Landscape Photography

During Golden Hour, the last of the day’s light casts a warm golden light on these cacti.

At the end of the day the opposite thing happens. When the sun is low on the horizon before sunset, you get the golden glow. After sunset is twilight when the light is a cool blue (blue hour).

Saguaro Cactus by Anne McKinnell - Beginner’s Guide to Natural Light in Landscape Photography

Once the sun has set, the light becomes a cool blue and the landscape is soft with no shadows.

The Direction of Light

Front light is when the light comes from behind you and hits the front of your subject directly. Front light can be unforgiving, washing out colors and minimizing textures. So if you are going to use it, it’s best to do so when the sun is low in the sky when it is warmer and softer.

Angel Peak New Mexico by Anne McKinnell - Beginner’s Guide to Natural Light in Landscape Photography

Front light hits the mountain, but it is a soft light since it is also at golden hour.

Backlight is when the sun is directly in front of you and behind your subject, lighting it from behind. I love backlight because the deep contrast between the highlights and shadows is so dramatic.

Backlighting is also perfect for making silhouettes when you have subjects with great shapes.

Organ Pipe Cactus by Anne McKinnell - Beginner’s Guide to Natural Light in Landscape Photography

The cactus is lit from behind creating an interesting silhouette during sunset.

Sidelight is when the sun is beside you, lighting your subject from the side. This kind of light is excellent for emphasizing shape and texture.

The sidelight on this saguaro cactus emphasizes it’s shape and texture.

What to do when …

So how do you use this information to your benefit? When you are out photographing consider the characteristics of the light you are presented with and use that to decide what kinds of photographs to make.

Harsh mid-afternoon light

The light is high in the sky, extremely bright and harsh with only a little color. This is a good time to look for shadows or photograph in the shade.

Shadow Patterns by Anne McKinnell - Beginner’s Guide to Natural Light in Landscape Photography

Harsh mid-afternoon light can create interesting shadows.

An overcast day with dull light

This kind of midday light has little color, but it is soft with no shadows; think soft. This kind of light is perfect for making soft flower photos, close-ups with even light, or waterfall photos where direct light would cause unwelcome bright spots.

If there is any texture to the clouds in the sky, that is good. But if the sky is pure white, eliminate it from the frame.

Skogafoss Iceland by Anne McKinnell - Beginner’s Guide to Natural Light in Landscape Photography

Waterfalls are a perfect subject for an overcast day.

Golden Hour

The sun is low in the sky casting beautiful soft warm light at golden hour, so it’s hard to go wrong in this situation. Think about the direction of light. Front light will create a warm glow on buildings and mountains, sidelight will emphasize the shape of hills, backlight will create dramatic silhouettes and you could create a sunburst by using a small aperture.

Spider Rock, Canyon de Chelly National Monument, Arizona - Beginner’s Guide to Natural Light in Landscape Photography

The day’s last light casts a golden glow on the edge of the canyon.

Blue Hour

The sun is below the horizon giving you soft, even, cool light. The direction of light does not apply here. Combine this type of light with a long exposure to emphasize the soft feeling if you have any moving elements like water or clouds. Combine twilight with city lights for more drama.

Li River and Karst Mountains in Guilin, China - Beginner’s Guide to Natural Light in Landscape Photography

There was barely any light in the sky at all during this 15-second exposure.

The best way to learn how different types of light affect your images is to photograph the same subject under various conditions. Pick something that is easily accessible to you and photograph it with front light, sidelight, and backlight. Photograph it at midday, during golden hour and at twilight. Photograph it under harsh mid-afternoon light and on a cloudy day when the light is soft.

Understanding these characteristics of natural light will ensure that you can make the most of the lighting conditions you have and create photos with impact at any time of day.

The post Beginner’s Guide to Natural Light in Landscape Photography appeared first on Digital Photography School.


Digital Photography School

 
Comments Off on Beginner’s Guide to Natural Light in Landscape Photography

Posted in Photography


Light reportedly has phones with ‘between 5 and 9 lenses’ due out later this year

03 Jul

In 2015, Light burst onto the photography scene with the introduction of the L16, a portable camera that promised ‘DSLR quality’ photos in a pint-sized package thanks to a unique design that featured 16 different lenses and sensors.

It wasn’t until 2017 that we were able to get a peek at the first full-res image samples. Since then, there hasn’t been a lot of positive feedback surrounding the functionality and image quality of the camera, but it seems they’re far from done working on its multi-camera setups.

According to a report from Geoffrey A. Fowler of The Washington Post, Light has shown off concepts and working prototypes of phones that include between five and nine lenses. ‘[Light] says its phone design is capable of capturing 64 megapixel shots, better low-light performance and sophisticated depth effects,’ says Fowler in the article.

We’re not exactly sure what Fowler means when he says ‘its phone design,’ as Light has never stated intentions of creating its own phone. What Light has said in the past is that it’s working with manufacturers to put its cameras and software into future devices.

In speaking to Wired in December 2017, Senior Vice President of Marketing and Product Design at Light, Bradley Lautenback, said ‘one manufacturer is already at work on a Light-enabled phone, and more are in the works.’

According to The Washington Post report, Light says ‘a smartphone featuring its multi-lens array will be announced later this year.’ There’s no word on what manufacturer it’ll be from, but considering Foxconn is an investor in Light, it wouldn’t be a surprise to see it from a company with ties to the Taiwanese manufacturer.

The list of smartphone manufacturers who are customers of Foxconn include: Apple, Blackberry, Huawei, Microsoft, Motorola, Xiaomi and others.

Articles: Digital Photography Review (dpreview.com)

 
Comments Off on Light reportedly has phones with ‘between 5 and 9 lenses’ due out later this year

Posted in Uncategorized


Samsung’s ISOCELL Plus promises better color accuracy and low light performance

28 Jun

Samsung’s ISOCELL smartphone image sensor technology was introduced in 2013. It uses physical barriers between neighboring pixels to reduce color crosstalk and expand the capability to capture light, compared to conventional backside-illuminated (BSI) image sensors.

Now the Korean company has launched ‘ISOCELL Plus’ which has been developed in cooperation with FujiFilm. It replaces the metal grid at the front of the pixels with a new ‘mystery’ material, providing even better separation between pixels.

This material reduces reflections and light absorption by the barriers between pixels, leading to increased light sensitivity of up to 15% and better color fidelity. According to Samsung the technology allows for the design of sensors with 0.8µm and smaller-sized pixels without a loss in performance. This is 1/3rd the size of the pixels in a typical 1″-type sensor and should allow smartphone sensors with a resolution of 20MP and higher.

“We value our strategic relationship with Samsung and would like to congratulate on the completion of the ISOCELL Plus development,” said Naoto Yanagihara, corporate vice president of Fujifilm. “This development is a remarkable milestone for us as it marks the first commercialization of our new material. Through continuous cooperation with Samsung, we anticipate to bring more meaningful innovation to mobile cameras.”

In combination with other new mobile imaging technologies, such as multi-frame stacking and multi-sensor camera modules, ISOCELL Plus should allow for the design of smartphone cameras with even better low light performance than we’re seeing in current models.

Samsung will be showcasing the new sensors at Mobile World Congress Shanghai come end of June, but for now there is no word on when to expect the new technology in a production smartphone.

Articles: Digital Photography Review (dpreview.com)

 
Comments Off on Samsung’s ISOCELL Plus promises better color accuracy and low light performance

Posted in Uncategorized