RSS
 

Posts Tagged ‘Light’

How to Mimic Window Light in a Studio Environment

24 Jun

One of the most common reasons you hear from photographers who avoid off-camera flash lighting is that it looks artificial. Yes, studio lighting can look artificial, but sometimes that’s part of the charm. Nobody claims portraits made with a ringlight look natural, but that doesn’t stop the thousands of photographers (myself included) that use them all of the time. But that doesn’t mean that it is impossible to mimic window light in the studio.

In fact, that’s kind of the point most of the time.

How to Mimic Window Light in a Studio Environment - portrait of a lady in the studio

Obtaining natural looking result in a studio is fairly easy with a few basic tools and some know how.

With studio lighting, you can create whatever lighting you want at any time. Providing that you have the right tools (and they are pretty basic), creating natural looking portraits in a studio environment with off-camera flash is exactly as difficult as creating portraits using window light.

Why is window light so wonderful?

b/w window light portrait - How to Mimic Window Light in a Studio Environment

Window light has a lot of wonderful qualities that make it a great choice for photographing people and other subjects.

In a nutshell, windows give you a constant (during daylight hours) and large light source to work with. The light itself is soft, diffused (assuming that direct sunlight is not entering through the window), and lends itself well to virtually all subjects including portraits.

It also tends to be very directional (depends on how you position yourself and the subject in relation to the window), making it easy to work with to shape your subject.

two b/w portraits - How to Mimic Window Light in a Studio Environment

Window light can give a variety of results depending on the time of day and the size and shape of the window. As such, there is no one size fits all solution to mimic window light and recreate it in the studio.

On top of that, we see things lit in window light all day, every day. It is a very natural state of things and it’s how we recognize the world around us. This familiarity makes window light an obvious choice.

Add to that that the master painters created a great many of their portraits in a studio lit by window light. The most obvious point of reference here would be Rembrandt since this style of lighting is one of the most common techniques that photographers use today.

The reasons for unnatural looking light

b/w portrait with ring lighting used - How to Mimic Window Light in a Studio Environment

Some light sources, like the ringlight used here, are by nature very unnatural looking. When trying to recreate natural light, try to stay away from specialist tools like these and tri-flectors.

There are a couple of reasons why studio lighting can look canned and unnatural. These are:

  • Too many lights – When using natural light, you’re usually shooting with only one light source. Perhaps there’s a reflector involved or there might be multiple windows, but for the most part, it’s one light. Going into a studio environment where a single setup can involve a key light, a fill light, a hair light, two rim lights and two background lights can feel both complicated and wrong (unnatural). Fair enough.
  • The modifiers are too small – In most cases, windows are quite big. This means that the light source you are using to light your subject is large. Big light sources give soft, flattering light. Add some mesh curtains to that window and the light gets even softer and more diffused. What does that tell you about the size of modifier you need to use on your studio portraits to get soft light?
  • The lights are too far away – In terms of the softness of the light, it’s the size of the light source in relation to the subject that determines how soft or hard it appears. If you have an 8′ octabox twenty feet from your subject, it will appear quite small comparatively; therefore, the light will be a bit hard. If you have a small pop-up softbox on there, it will be even harder. Bring your lights in as close as you dare to get for the softest light possible. If you have a small modifier, I recommend having it so close you can barely shoot past it without getting the light source in the frame.
  • You’re using an odd light source – Specialist lights, like the ringlight used in the image above, create light that you wouldn’t normally find in natural scenarios. Even if a viewer doesn’t understand the why behind it, people are quite intuitive when things seem weird. If you’re going for a natural look, avoid lights like these.

How to recreate and mimic window light in the studio

Here, you’ll see just how easy it is to mimic natural light in a studio environment. Here’s what you’ll need to get started:

  • An off-camera light source. Strobes, flashguns and continuous lights will all work equally well.
  • A large light modifier. These examples use a 5′ Octabox (or recessed softbox as PixaPro like to call it), but anything will do. If you don’t have any large modifiers yet and are unsure about what to get, consider starting with a large translucent umbrella. They’re big, dirt cheap, fold away easily and produce a nice, soft light.
  • White or silver reflector. This one’s optional, but you should have one anyway. If you’re using a really big modifier, the wraparound of the light may mean you don’t even need it, but they are useful for filling in dark shadows on the unlit side of your subject.

Setting up

behind the scenes studio shots - How to Mimic Window Light in a Studio Environment

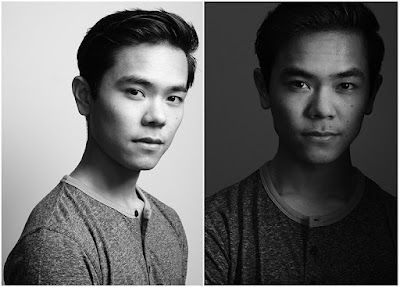
A medium sized octabox placed close to an above the subject and a silver reflector was all it took to create these images.

To get started, place your light about three or four feet from your subject. Turn the light so that it’s forty-five degrees (in relation to your subject.) Raise the light up as high as you can (making sure the subject still has catchlights in their eyes). High ceilings are a bonus.

The reason for this is that with window light, the light is often coming from above. The window is shaping the light into the room, but it is still coming down into the room. If you’re using modelling lights or continuous lights, watch the catchlights in your subject’s eyes. Once they are falling towards the top of their eyes, you’re good to go.

Likewise, also watch where the shadows are falling. If the contrast seems too high, introduce a reflector. This does take practice, so don’t worry if you can’t tell just yet. It may help if you squint your eyes tightly. This makes it easier to see the contrast. In these examples, the silver reflector was placed flat and in front of the subject at around waist level.

Now, all that you have to do is to take a light meter reading (or take a test shot), adjust your settings (either in-camera or on the flash) and start taking photos.

portrait of a lady in pink - How to Mimic Window Light in a Studio Environment

To start with, try having your subject turned toward either the light or the camera. Beyond that, there’s not really much else to it.

How to Mimic Window Light in a Studio Environment

Practice makes it simple

If you are completely new to off-camera lighting, this may seem like a lot to get. I promise it’s not. Once you’ve set this up a few times, it becomes so easy that there’s not much more effort involved than placing someone in front of a window.

The advantages here are that you aren’t at the mercy of the weather or the time of day and once you get started with a set-up, the light won’t change unless you tell it to.

Just remember to keep the light both high and close and there isn’t much room to go wrong.

two images of a lady - How to Mimic Window Light in a Studio Environment

Putting it to use

If you’ve had any hesitance to use studio lights for any of the reasons listed in this article, hopefully, you can see that with the right techniques, you needn’t worry at all. Honestly, it’s not as difficult or complicated as it seems. If you’re still unsure, rent a studio for an hour and put it to practice. You may be surprised at what you find out and learn.

The post How to Mimic Window Light in a Studio Environment appeared first on Digital Photography School.


Digital Photography School

 
Comments Off on How to Mimic Window Light in a Studio Environment

Posted in Photography


The Power of Shooting Simply with One Light and a Reflector

12 Jun

In this article, I’ll give the virtues and benefits of shooting simply, with only one light and a reflector.

Lighting is often perceived as a complicated beast, but does it have to be? Sure, in terms of technical aspects, there’s an awful lot to learn before you can truly master lighting. There are also plenty of techniques that involve numerous light sources at various power outputs, rigged together with any number of modifiers.

But are these necessary? If you want to learn every aspect of lighting inside and out, then the answer is yes. However, when you are a beginner, I would argue that it’s far too easy to get bogged down in those complications when in reality, you could conceivably go an entire photographic career without touching them.

One light

The Power of Shooting Simply with One Light and a Reflector - b/w portrait of a lady

With a single light source and a reflector for fill, you have enough creative options in terms of lighting that you could go an entire lifetime with nothing more and still fill a diverse and varied portfolio. Technically the reflector is a second light source if you want to get into that, but it’ll be referred to as a reflector for our purposes here.

You may not want to and it’s more than likely that once you’ve got the basics of lighting down, you’ll want to dive deeper and deeper until you get to those ultra complicated set-ups, but it is possible. One light set-ups can give you both dramatic, shadowy photos which ooze mood as well as bright, cleanly lit images with plenty of detail throughout.

The Power of Shooting Simply with One Light and a Reflector - 6 images of portraits of ladies

On top of that, there’s only one light to set up, only one light to modify and only one light to meter. If you’re working with limited time, say 20 minutes to set up, take a few shots and get out of there.

Four, five and six light set-ups just aren’t going to be an option. Of course, it’s also a whole lot easier to lug around one light then it is to take five.

Terms you need to know

This article will cover examples that are based in a studio where all ambient light is cut out (with one exception) and bounce is controlled through light placement or flags. As such, the light and the reflector are the only things lighting the images and each has its own respective role.

Key Light – The key light is your main light source. In these instances, it’s the actual strobe. It could just as easily be any other type of light source such as a window or a street light. This is the main light that you will be shaping your subject with.

Fill Light – In these examples, the fill light is the job of the reflector. When placed opposite the key light, the reflector bounces light back onto your subject and fills in the shadows. This helps to reduce contrast and also tends to lead to more flattering images of human subjects. A fill light does not have to be a reflector. Again, it could be any light source that acts independently of your key light to fill in shadows on your subject.

Reflector

The Power of Shooting Simply with One Light and a Reflector - studio setup with one light and a reflection

In all of these examples (except one that’s annotated), the reflector used is a large, cheap 5-in-1 reflector. You can buy one of these from just about anywhere that sells photo equipment for around $ 20 or less. Sure, there are expensive versions, but in my experience, they’re not worth the extra money. Get a good sized (32″ or 42″) cheap one and take it everywhere. Don’t be too precious with it and let it get dirty, battered and warped through use. They’re easily replaced.

If you don’t want to buy one, reflectors are pretty easy to make. White foamcore, posterboard, cardboard painted white, or a styrofoam insulation are all easily turned into reflectors.

Modifiers

Since the specific focus of this article is portraits, all of the modifiers used range from fairly big to huge. This is so that the light was as soft and flattering as possible. You can absolutely use a single hard light source with a reflector, so don’t consider the absence of examples of hard light here to be some kind of rule against it.

Example 1

The Power of Shooting Simply with One Light and a Reflector - color portrait of a lady

This shot is about as simple as it gets. The subject was placed a few feet from the background. The light source was a 5-foot octabox which was placed at forty-five degrees from the subject. The distance of the light was determined by watching how the modeling light fell on the subject and where the catchlights were in her eyes. It ended up about five feet away.

The Power of Shooting Simply with One Light and a Reflector - studio setup behind the scenes shot

Because the octabox is quite a big modifier, it would have been possible to get away without using a reflector. The soft light the large modifier produces would wrap around the subject in a pleasing way. It also means that the subject could turn and face any direction she wanted for posing.

Regardless, I still chose to add a reflector to bring up the shadow side. It was placed as close to the subject as possible so as not to interfere with composition.

Example 2

The Power of Shooting Simply with One Light and a Reflector - dark moody portrait

Much like the first example, this image was created with the light source at a 45-degree angle to the subject. This time, the modifier was a mid-sized 2×3′ softbox.

To get the softest quality of light, it was placed as close as possible to the model without interfering with image composition. There are few things as annoying as having to retouch the corner of a softbox or a beauty dish out of every frame.

The Power of Shooting Simply with One Light and a Reflector- lighting setup

This time, the reflector was turned slightly away from the light source. This was because I didn’t want the full surface area of the reflector to be filling in the scene as I wanted to retain some of the dramatic lighting that the single smallish light source provided.

Example 3

The Power of Shooting Simply with One Light and a Reflector - two images of a girl in studio

This is exactly the same set up as the previous example, all that changed here was the modifier.

The softbox was exchanged for a beauty dish to increase contrast and add drama. The reflector was turned slightly so that it had maximum impact on the shadow side.

The Power of Shooting Simply with One Light and a Reflector - lighting setup in the studio

Example 4

The Power of Shooting Simply with One Light and a Reflector - b/w images in the studio

To really take advantage of the contrasty lighting possible with one light, I opted for a large, gridded beauty dish in this example. Again, placed at forty-five degrees (notice a pattern here?), the light fall-off is much more abrupt than here, as compared with the bigger softboxes.

The Power of Shooting Simply with One Light and a Reflector - dramatic studio setup

At 120 cm, this particular beauty dish is quite a bit larger than normal. As such, it is still quite soft, with a bit more wraparound than its smaller, more normal sized siblings.

A silver reflector was added to bring up the shadow side of the subject in order to ensure separation from the background and to keep the shadows from becoming pure black.

Example 5

The Power of Shooting Simply with One Light and a Reflector - lighter portrait of a girl

In a previous article, I wrote that you may very well never use a gold reflector. I’ve been thinking about that a lot since I wrote it and endeavoured to do exactly that. Instead of using the gold side of a normal 5-in-1 reflector, I used a Westcott Omega reflector, on which the gold is far subtler and less intrusive, making it much, much more flattering for portraits.

The key light in this image was a five foot octobox. If you look at the catchlights, you will see two other light sources. To camera left, there was a wall of windows which was underexposed by a stop to act as fill. To camera right is the gold reflector.

By adding a single light source to the ambient light, you get an incredible amount of versatility of what you can achieve.

Example 6

The Power of Shooting Simply with One Light and a Reflector - studio portrait

This image was created exactly the same way as the previous one with the same octabox and the same gold reflector. This time, however, the power output of the flash was turned up so that it killed the ambient light from the windows. The reflector was also placed slightly to the rear of the subject in order to bring detail back into her hair.

The Power of Shooting Simply with One Light and a Reflector

Example 7

The Power of Shooting Simply with One Light and a Reflector

One technique that I really love is to place the light source directly in front of the model (it’s okay to move it to the side a bit so that you can shoot past it) and as close as possible. With a single light, this can create some lovely, dramatic images. This was done with a large beauty dish.

The Power of Shooting Simply with One Light and a Reflector

The white reflector was placed flat and rested on the subject’s knees. This results in a makeshift clamshell technique, but instead of two lights, you’re only using one.

Wrap-up

I could go on and on and on about this. The point here is to remind you to never forsake the power of simplicity when it comes to lighting techniques.

Sure, those set-ups with half a dozen lights, three reflectors, nine flags, your neighbor’s dog and a Swiss passport are great and you should absolutely explore them. Just be mindful that not every job has to rely on such complexities. Stripping things back to basics can, and does yield wonderful results.

Tips

Here are a few tips and trick to help you get the most out of your single one light source set-ups:

  • For portraiture, get the light in close. The larger the apparent light source, the softer the light. The softer the light, the more flattering it is for the subject.
  • Don’t just introduce a reflector blind and leave it there. Watch what it’s doing. Use modeling lights and learn to see the subtle differences the reflector creates. It’s hard at first, but with practice, you’ll start seeing the changes.
  • Meter with and without the reflector. As the reflector is acting as an independent light source, you can meter its exposure. If you want a specific ratio, or you know you want your fill two stops underexposed, meter it.
  • Don’t be afraid to turn the reflector at funny angles. If it’s a large reflector, in particular, you probably don’t want or need the whole surface area in use. Turn it any which way that provides the effect that you’re looking for.
  • You don’t shoot with off-camera lighting. So what? All of this applies to window light as well. A light source is a light source.
  • Don’t have a reflector? Buy one right now. Seriously. Stop what you’re doing and order one right now. They’re important and they’re not expensive. Godox sells one for less than $ 15.
  • Use these techniques on anything. I’m a portrait photographer, so the focus here has been portraits. But every single aspect covered here can be used when lighting any subject at all. Flowers? Check. Animals? Check. Food? Check.

Conclusion

In terms of variations on these techniques, this article hasn’t been anywhere near comprehensive. Honestly, using a single light and a reflector will give you an infinite variety of techniques to use in your photography.

When you’re starting out, I strongly encourage you to explore these as much as possible before moving on to more complicated set-ups as you may find, that most situations would benefit from the simplicity.

The post The Power of Shooting Simply with One Light and a Reflector appeared first on Digital Photography School.


Digital Photography School

 
Comments Off on The Power of Shooting Simply with One Light and a Reflector

Posted in Photography


How to Capture and Sculpt the Color of Light

07 Jun

The Basic Mechanics of Capturing Light

When the light of a scene enters the camera lens, it is dispersed over the surface of the camera’s image sensor, a postage-size electrical circuit containing millions of individual light receptors. Each receptor measures the strength of the light striking it in a metric called “lumens.” Each receptor on this sensor records its light value as a color pixel.

Color of Light Camera Mechanics

The camera’s image processor reads the color and intensity of the light striking each photoreceptor and maps each image from those initial values, producing a reasonable facsimile of the original scene. When this bitmap of pixels is viewed from a distance, the eye perceives the composite as a digital image.

Two important light issues must be addressed when capturing a photograph: light dynamic range (exposure) and color balance (temperature).

Light (Dynamic) Range

The full range of light that exists on a sunny day is virtually impossible to capture with your digital camera. Light range is defined as the dynamic difference between direct sunlight and absolute darkness.

Even though the image sensors in today’s digital cameras continue to improve, corralling all of nature’s dynamic range of light remains a futile challenge.

Color of Light Range

This statement is easier to understand when you consider the fact that camera sensors register far less light than the human eye, and not even the eye cannot tolerate unfiltered exposure to the sun. Any more than a couple of seconds of direct sunlight will absolutely damage several different parts of the human eye.

Fortunately, your body won’t allow you to stare directly into the sun for any longer. The light emitted from the sun is the strongest, most brilliant, and purest form of light in the universe. Luckily, very few scenes you will want to capture with a camera will involve shooting directly into the sun.

Camera settings

Most cameras have an automatic program mode that adjusts the three settings in the camera that affect exposure: f-stop, shutter speed, and ISO. The A/Av (Aperture Priority) mode allows you to set the size of the lens opening (f-stop) while the camera automatically sets the shutter speed. The S/Tv (Shutter Priority) mode lets you set the duration of the shutter opening (shutter speed) while the camera automatically adjusts the size of the lens opening.

Your camera’s ISO (International Standards Organization) setting adjusts the light sensitivity of the camera’s image sensor, allowing you to capture scenes in dim or bright light.

Color of Light A S ISO

The Histogram

Your camera provides a small graph, called a histogram, that roughly indicates how well the camera is set to capture the scene. This graph displays the range of light coming through the lens and approximates the current light distribution that will be captured under the current settings. By adjusting the three settings mentioned above, you can shift and somewhat distribute this range of light so as to best record the full range of light.

My best advice about using the histogram in your camera is to adjust the big three controls (aperture, shutter speed, and ISO) to center the graph on the scale. While this won’t guarantee the most dynamic use of the tonal aspect, it will give you the latitude to adjust that tonal information in post-processing.

But remember, the histogram reads light range but doesn’t address the issue of color balance at all. Which brings us to the next point.

Color Balance

Setting your camera to capture the correct color of light is not as simple and straightforward as it might seem. It is certainly not as automatic as the Auto White Balance setting might suppose. You should understand what your camera means by AWB before you bet your pictures on it. I’ll explain this in some detail below.

Even if you are shooting in RAW mode, it’s a good idea to evaluate the light temperature of the scene and set your camera accordingly. RAW processing will allow you to change the color balance in post-production, but good estimating will certainly shorten the processing time.

Color of Light WB

Select the appropriate color (White Balance) in your camera’s settings.

Color of Light

Every scene’s color cast is influenced by the temperature of the light illuminating that scene. When the scene is captured outside, the sun’s position in the sky and the influence of cloud cover alters the colors of the light. Your camera offers two ways to compensate for the differences in color temperature (White Balance).

Auto White Balance

The Auto White Balance (AWB) sensor in your camera will seek any prominent white or neutral subject in the scene and will shift the entire color balance of the scene in an effort to neutralize the tint of that element. The assumption when using the AWB setting is that you (1) desire the current lighting condition to appear perfectly neutral in color, and (2) are certain that recognizable and visible elements in the scene are truly neutral in color.

Color of Light Presets

This series of shots were made under cloudy skies while on my lanai (porch). The preset White Balance settings used were: top left: Shade; top right: Cloudy; bottom left: AWB; and bottom right: AWB with flash fill.

Any cloud cover interfering with the sunlight will have a slight influence on the neutrality of 6500° (natural sunlight) lighting. Once again, be aware that AWB takes that slight shift in color out of the equation. Most of the time, this is a good idea. But if early morning or late afternoon (golden hour) lighting is to be recorded accurately, that AWB setting will try to neutralize those warm colors and you will, therefore, lose the mood.

Color of Light AWB

Top: the lack of an absolutely neutral color in this dominantly warm-toned outdoor scene fooled the camera’s AWB setting. So the khaki colored seat cover and the rattan chest were neutralized in the top photo. Bottom: setting the camera’s white balance to Cloudy correctly recorded the scene.

Preset Color Balance Options

Your camera offers several presets to offset any known color casts caused by specific lighting situations.

Daylight sets the camera to record scenes under typical midday outdoor lighting. For outdoor photo situations under normal weather conditions, Daylight is a safe bet. The Daylight setting’s color temperature is balanced for sunny days and photos that are taken in direct sunlight. Daylight is the most neutral of the three outdoor settings and provides rich, natural-looking colors on sunny and even partly-cloudy days.

Color of Light Daylight

The camera’s Daylight setting is ideal for bright sunny days. I love to shoot nature shots in the strong sunlight of mornings, particularly between the hours of 8 and 10 AM.

Shade shifts the colors toward orange to compensate for the bluish interference of nominal clouds. When the weather conditions are normal (sunny) but your subject is located in the shade, the scene’s color temperature actually changes slightly. If the camera’s white balance setting is Daylight, and the people are in the shade their skin tones will lack the sun’s warmth because the sun’s rays are not hitting the subject directly.

Color of Light Shade

Even though there was plenty of sun outside, the flowers were located entirely in the shade. So the white balance was set to Shade to retain the warm greens of the leaves in this shot.

Cloudy offers a yet stronger orange shift to compensate for completely overcast (stormy) skies. When the weather conditions are overcast and clouds block the direct sunlight, the bluish color of the clouds actually removes the warmth of the sun.

On the color wheel, blue is directly opposite yellow. When these two colors influence each other, they dull each color’s intensity. When the blue-gray clouds block the sun they diminish the sun’s (yellow) warmth. For this reason, the Cloudy White Balance setting introduces more color warmth into the scene.

Color of Light Cloudy

Quite obviously this picture was taken under stormy conditions. If the camera’s white balance wasn’t set to Cloudy (or Overcast), the little boy’s skin would appear a lifeless gray.

Flash provides a very similar color temperature lighting as Daylight and is intended to prepare the image sensor for artificial daylight or “Speedlight” type flash devices.

Color of Light Flash

The camera’s automatic use of the flash in the “fill” function provided just enough light to balance the sunlight coming through the side window. Careful placement of the subject allowed this simple lighting to deliver a professional look.

Tungsten shifts the colors toward the blue end of the color range to compensate for the warmer shift of incandescent lights.

Fluorescent attempts to compensate for the greenish cast of gas-charged fluorescent lights.

All of these presets attempt to correct non-neutral lighting conditions.

Color of Light Tungsten

The even warmth of tungsten lighting is best captured with your camera’s Tungsten WB setting. While Auto WB does an acceptable job of interpreting tungsten amidst other types of lighting, when table lamps are in the picture, Tungsten color balance is the right choice.

Custom White Balance

Among the other color balance settings, your camera offers a custom lighting (Custom White Balance, PRE on Nikon cameras) setting. With that option selected, you hold a neutral gray (18%) card in front of the lens and press the shutter button. The camera will read and lock in the color temperature of the light reflected from that card. That reading you take will now become the standard for the camera’s white balance until you select another setting.

Color of Light Color Checker Gray Card

When in doubt about mixed lighting conditions, the use of a gray card for establishing accurate color balance is the most accurate way to go.

Conclusion

The takeaway truth here is that you have very powerful exposure and color balance tools at your disposal. Whether you shoot with an expensive DSLR or a smartphone, take your art seriously. Invest the time to learn something new about photography every day.

Stay focused.

The post How to Capture and Sculpt the Color of Light appeared first on Digital Photography School.


Digital Photography School

 
Comments Off on How to Capture and Sculpt the Color of Light

Posted in Photography


The Importance of Light While Shooting in a Studio

30 May

One of the most  important things about professional photography is lighting. Light is the one  element that can make or break a photo shoot. Having the correct lighting at the right time is of the utmost importance. Yet, many photographers, especially beginners, tend to overlook this fact.  Every aspect of photography relies heavily on lighting. After all, light is the Continue Reading

The post The Importance of Light While Shooting in a Studio appeared first on Photodoto.


Photodoto

 
Comments Off on The Importance of Light While Shooting in a Studio

Posted in Photography


Tutorial: How to light paint product photo backgrounds on the cheap

17 May

Dustin Dolby of workphlo is great at creating professional product shots using just one or two speedlights and some compositing in Photoshop. In this tutorial, he combines that approach—it takes just two speedlights to light these bottles, and he could have made due with one—with some simple smartphone light painting to create a dynamic and colorful soft drink product shot.

Here are the four exposures he composited together to light just the bottle. One shot using a stripbox through a diffusion panel on the right, one with a reflector added in on the left, another to light the label, and a fourth to give the bottle a bit of pop from behind:

$ (document).ready(function() { SampleGalleryV2({“containerId”:”embeddedSampleGallery_2436914201″,”galleryId”:”2436914201″,”isEmbeddedWidget”:true,”selectedImageIndex”:0,”isMobile”:false}) });

Combine that with a long-exposure light painting shot done in darkness by simply waving a smartphone with a solid color background around behind your product, and you get these two final images—one for each flavor:

Check out the full video up top to see how all of these images were composited together to create the final product photos. And if you’re just getting into product photography and enjoy simple, one or two-light setups, definitely give the whole workphlo YouTube channel a look.

Articles: Digital Photography Review (dpreview.com)

 
Comments Off on Tutorial: How to light paint product photo backgrounds on the cheap

Posted in Uncategorized


Researchers use AI to brighten ultra-low light images without adding noise

15 May

Researchers with the University of Illinois Urbana–Champaign and Intel have developed a deep neural network that brightens ultra-low light images without adding noise and other artifacts. The network was trained using 5,094 raw short-exposure low-light and long-exposure image pairs—the end result is a system that automatically brightens images at a much higher quality than traditional processing options.

The deep learning system was detailed in a newly published study that points out the limitations of alternative “denoising, deblurring, and enhancement techniques” on what the team calls “extreme conditions,” such as low-light images that are too dark to discern without processing.

Using traditional methods to process these images often results in high levels of noise that isn’t present when using the machine learning technique:

The team used images captured with a Fujifilm X-T2 and Sony a7S II, and also demonstrated the system on photos taken with an iPhone X and Google Pixel 2 smartphone. High-resolution comparison images are available here, and a PDF of the full study can be found here.

This is the latest example of machine learning ‘AI’ being used to automatically enhance images—ideally speeding up post-processing tasks while reducing the user’s workload. Last year, for example, a system called Deep Image Prior was demonstrated using an image’s existing elements to intelligently repair damage, and Adobe and NVIDIA are both working on AI-powered Content Aware Fill.

Articles: Digital Photography Review (dpreview.com)

 
Comments Off on Researchers use AI to brighten ultra-low light images without adding noise

Posted in Uncategorized


How a Studio Photographer Came to Love Natural Light Again

10 May

I’m a studio photographer. There are no two ways around that fact. It also happens to be the way I like it. I prefer the absolute control I have over every single factor in a studio environment. That way, I’m not at the whim of changing light at different times of the day or inclement weather.

How a Studio Photographer Came to Love Natural Light Again - studio portrait of a lady

As a studio photographer, my preferences are for an environment where I control every aspect of the light.

A lot of this might have to do with the fact that I live in the United Kingdom, and for the most part, the stereotypes about the weather aren’t wrong. That and daylight hours throughout the year vary wildly. In the summer, I may have daylight until 11 PM, in the winter, that changes to 3 PM. Locked away in my studio, I don’t have to worry about sudden unpredicted rain (in Yorkshire, there’s a lot of it).

I don’t have to worry about summer temperatures dropping below ten degrees (Celcius) causing severe discomfort for my subjects and myself. Most importantly, I don’t have to worry about the light being even slightly different then I want. In a studio, I decide what I want and if the lights aren’t quite there, I change them until they are as desired.

Of course, I have nothing against natural light. I just have a preference based on how I like to work.

Using Natural Light

outdoor portrait of a girl - How a Studio Photographer Came to Love Natural Light Again

On occasion, I get out to use natural light when there’s something specific to achieve.

This doesn’t mean I have forsaken natural light as some sort of taboo subject. No, I still use it from time to time, but it’s usually when I’m trying to do something specific in a certain location or with a special technique that can’t be done in a studio.

portrait of a man with gray hair - How a Studio Photographer Came to Love Natural Light Again

This image was taken only as a technical exercise because of how the light was behaving in a bit of open shade close to sunset.

Shifting perspective

How a Studio Photographer Came to Love Natural Light Again - window lit studio

The large windows in this natural light studio make the space a veritable playground for any photographer enthusiastic about lighting.

Last year, I booked a natural light studio with enormous windows for the first time and the experience completely changed the way I think about these things. I went in treating the whole thing as an experiment. As such, I had no concrete plans. I was going to go in and explore the space, look for pockets of light, and try to seize whatever opportunity presented itself.

How a Studio Photographer Came to Love Natural Light Again - portrait of a lady indoors

The dim, overcast day made for this glorious soft light coming through the windows.

Long story short, I was hooked in minutes. I’m sure the sight of me bouncing from corner to corner going “Ooo, look at the light here and look it at it over here” was more than a bit comical.

The whole experience was like a four hour treasure hunt. It seemed like everywhere I turned, the light was doing something new that was worth exploiting. I can easily compare the feeling to the enthusiasm I felt when I first got a camera and just randomly walked around taking photos of everything and burning through film like it didn’t matter.

As an added bonus, the changeability of the light (one of the factors that kept me firmly in the studio) made new opportunities all the time. On several occasions, I’d move from one spot to another, only to see what the light was doing in the first spot later on and I’d go straight back to it and get completely different results.

girl next to a window - How a Studio Photographer Came to Love Natural Light Again

A short while after the previous image was taken, the sun came out a bit changing the light from this window completely.

There is one thing that I found very hard to replicate in a studio environment. This particular studio is in an old industrial mill and the windows (there are a lot of them) are gargantuan. This gave the light a beautiful soft quality that would be hard to replicate with artificial lighting.

Needless to say, I loved my first time in a natural light studio and have since made it a point to go back and try to find other natural light venues as well.

lady in a gold top - How a Studio Photographer Came to Love Natural Light Again

Even from further away, the light from the windows was still soft and provided gentle tonal transitions.

New ideas

An unexpected side effect of this experience is that I every time I come out of one of these places, I leave with a head full of ideas on how I can apply what I’ve seen the light doing in the studio.

darker portrait of lady in yellow top - How a Studio Photographer Came to Love Natural Light Again

Using a strobe with High-Speed Sync functionality allowed me to darken the studio’s windows for a dramatic background while lighting the subject the way I would in a normal studio environment.

On top of that, I have always forsaken the option of mixing natural light with flash. For whatever reason, I never really felt that it was worth the effort. My opinion on this has changed dramatically since my first visit to that studio. Now I’m always looking for new ideas on how I can use and exploit natural light at any time of day and mix it with studio strobes if need be.

portrait of a girl with long blond hair - How a Studio Photographer Came to Love Natural Light Again

Also made using High-Speed Sync, the flash allowed me to fill in the shadows created by the backlighting from the windows. The result is an even exposure throughout the frame and no blown out windows.

Am I a Convert to Natural Light?

I’m still a studio photographer, there’s no doubt about that. I still prefer the control the studio provides and I will still default to that. However, I won’t be going out of my way to avoid natural light settings in the future.

Between the multitude of opportunities these experiences provided me and the ideas I took away from them, I will be making it a point to regularly shoot in natural light just to shake things up a bit if nothing else.

The end

The point of all this? Good question. If you’re like me, and you find yourself stuck in a rigid pattern, such as my adherence to studio work, I encourage to make the conscious choice of going out and pursuing the exact opposite.

You might very well find that your convictions towards whatever it is you’re stuck to aren’t founded as solidly as you had thought. If nothing else, it will give the opportunity to learn something new and to grow as a photographer and nobody can argue that that’s a bad thing.

The post How a Studio Photographer Came to Love Natural Light Again appeared first on Digital Photography School.


Digital Photography School

 
Comments Off on How a Studio Photographer Came to Love Natural Light Again

Posted in Photography


Tips for Doing Natural Light Headshots and Portraits

08 May

You may think that headshots are just like portraits or perhaps think that they are only best photographed in a studio space. Thankfully, natural light headshots can help you to achieve the perfect look and portraits for your clients.

Both indoors and outdoors, natural light will give you a more organic and authentic feel to your client’s headshots. Making the photos more personable and versatile when it comes to using them on social media, resumes, or the like.

Natural light headshots - portrait of a man in cactus setting

Using natural light allows you to create headshots with a more authentic feel.

Advantages of Natural Light Headshots

While studio headshots are the more traditional route for this style of photography, natural light will offer more options as far as backgrounds and lighting than you could ever imagine.

Photographing in natural light gives you more mobility to go from indoor to outdoor without fussing with setting up or tearing down a whole set.

Natural light headshots - two photos of a lady indoors and outdoors

Natural light gives you the opportunity to photograph your client both indoors and at outdoor locations.

You also have the opportunity to photograph your client more organically and more authentically than a traditional headshot in a studio light setup. These types of headshots are growing in popularity since they can be versatile for social media and online profiles.

For example, a wedding decorator actually decorating an event can be a great optional headshot since this way her clients can see her working the event, in addition to the waist cropped headshot.

Natural light headhshots

Photographing your client in natural light helps to create more authentic and real shots that can be used for different purposes.

Natural light also helps you choose backgrounds that perhaps you don’t have available or can’t afford in a studio setup. Brick, repetitive lines like stairs, textured concrete, etc., will give your client more options when choosing her headshots.

Photographing Indoor Natural Light Headshots

Your client may ask you to photograph them in the very place where they work, which will most likely be inside. If this is the case, ask them if you can photograph during midday. This ensures that you will get the best possible light entering their office or building.

Natural light headshots - two portraits of ladies

Using elements already found inside near large windows can offer subtle backgrounds without distracting from your client.

When you are photographing headshots it’s very important to keep your background in mind. Look for evenly dispersed, soft light and a neutral background. Headshots are meant to put the focal point of the photo on the person’s face. Neutral backgrounds help to isolate your client and keep the focus on them. This is one advantage of photographing inside.

Ideal backgrounds where natural light is abundant can include office building lobbies, large windowed offices with lounge seating, plain neutral colored walls, rooms with an interesting pendant or incandescent lighting.

Natural light headshots

Using natural light and combining it with the ambient light in the building can give the portrait a more interesting look.

Photographing Outdoor Headshots

If your client has asked you to photograph them at their workplace, don’t feel pressured to only photograph them indoors. Most often office buildings will have beautifully manicured gardens, atriums, or lawns where you can photograph your client’s headshots.

Choose the background wisely

Try to steer away from too busy a background, though, as this can cause the background to compete with your client. Photographing your client in the shade is most likely to give you the best results as you don’t want to have blotchy lighting on your client’s face or body.

Natural light headshots

Use neutral backgrounds for your client’s headshots in natural light.

Shooting on location can also offer you other options such as textured walls, patterned walls like a brick wall, solid concrete walls, and staircases. All of which creates a neutral background where you will have an overflow of natural light.   

Natural light headshots

Using different types of backgrounds can give your client options.

One of the best backgrounds that you can use is the pavement. Placing your client on a ladder, crate, or having them crouch down will help you get the right angle so that the pavement becomes an even colored background.

If you do use the pavement, place your client close to the edge where the sunlight and shade meet, this will create a natural reflector and bounce light back onto your subject.

Natural light headshots

Using both solid pavement and a manicured garden can offer your client variety.

Add variety

Another advantage to photographing on location is that you can add variety to the session without being limited. Photograph your client with a textured background and then try a solid background.

Even though placing your client in the shade is ideal, you can also use the sunlight as a hair light or to light parts of the background to create more depth in the image.

Natural light headshots

Depending on where you place your client, you can choose how you want to light the headshot. More light or with more drama.

Depending on what your client intends to use the headshots for, you may even try facing your client towards the setting sun.

Natural light headshots

Facing this model towards the sun gives his headshot a different look.

One more advantage of on-location headshots is the option of bringing props for your client’s headshot. For example, if they are a photographer, they can bring cameras. Or if they are a travel writer, they can bring suitcases. Or a fashion blogger with accessories.

All of these, with the various backgrounds work well to create the perfect headshot for your client.

Natural light headshots

Natural light headshots can give you the option of using props to create a more stylized portrait.

In Conclusion

Natural light headshots

Using props can also enhance the effect of your client’s headshots and portraits.

Given that you are using natural light as your main source for your client’s headshots and portraits means that you will be able to offer more variety to your client. This is a great advantage because it can give your client the chance to use the photographs for different purposes.

Furthermore, your client will have more natural and authentic headshots versus more traditional studio headshot, which is becoming more and more popular as well.

The post Tips for Doing Natural Light Headshots and Portraits appeared first on Digital Photography School.


Digital Photography School

 
Comments Off on Tips for Doing Natural Light Headshots and Portraits

Posted in Photography


SLC-1L-03: Need Light With More Edge? Aim It Away From Your Subject.

04 May

The two photos above have the same light source, same light location and same white background. The only difference in the second photo is that the light has been aimed differently. Pointing your light away from your subject—and using the edge of the beam—is a quick way to sculpt much more interesting light on a head shot or portrait.

But how far away do you need to aim it? Further than you'd think. And finding the nice edge to your light is definitely a game of inches.

Here's how to do it.Read more »
Strobist

 
Comments Off on SLC-1L-03: Need Light With More Edge? Aim It Away From Your Subject.

Posted in Photography


How to Control Your Background Tones by Manipulating Light Fall-Off

04 May

In this article, I’ll show you how to control your background by manipulating light fall-off.

When using studio lighting, one of the most frustrating things to deal with can be backgrounds. Sure, if you have space, time and the money, you can just stock up on seamless backgrounds covering white, black and everything in between. But if you are on a budget, or are already taxing the limits of your storage space, that’s often not a viable option.

The good news is that it’s entirely possible to take a white or grey background, whether it’s a wall or a seamless backdrop, and manipulate your light so that the background appears black or any shade of grey you can imagine.

The method discussed in this article is quite easy.

How to Control Your Background by Manipulating Light Fall-Off - portrait with black background

Understanding how the rate of fall-off effects your lighting will grant you great control over how your background appears in your photos.

Move the light

To control your background, all that you have to do is move your light. It’s counterintuitive though. To get a darker background, you will move the light closer to your subject. For a lighter background, you would move the light further away.

This approach has the effect of changing the background; however, it also completely alters the quality of light falling on your subject.

For this demonstration, I used a small softbox (around 3×4′) placed directly in front of and above the subject. In the sequence of images below, you can clearly see that the light source is simply moved backward in increments of two feet. Also, you’ll see that the softbox was angled upwards slightly as it moves back so that it points toward the subject and not the floor.

How to Control Your Background by Manipulating Light Fall-Off

The light source is two feet away from the subject and angled down at forty-five degrees.

How to Control Your Background by Manipulating Light Fall-Off

At four feet, the light had to be angled upwards slightly so that it remained pointed at the subject.

How to Control Your Background by Manipulating Light Fall-Off

At six feet, the light on the subject gets noticeably harder, but the background appears as it is in life (its actual shade).

How to Control Your Background by Manipulating Light Fall-Off

The light source as seen 10 feet from the subject.

In terms of the background, the way this works is through light fall-off. As the light source gets closer to your subject, the rate of light fall-off increases.

In the simplest terms possible, this means that as you move your light closer to your correctly exposed subject (remember to recalculate your exposure everytime you move your light), the light reaching your background loses intensity at a higher rate, making the background appear darker.

In this progression (starting left to right) the light begins two feet away from the subject and is moved back in two-foot increments until it is 10 feet away in the right-hand frame.

For these examples, I used a middle grey background to better illustrate the dramatic changes in tonality as the light is moved.

In the first image on the left, the light is two feet away from the subject, rendering the grey backdrop nearly black. At four feet away, in the second image, the background gets noticeably lighter. By the fifth image, at 10 feet away, the grey tone of the background almost matches the subject’s light grey shirt.

Because the light was moving away from the subject in each frame, the exposure had to be metered for each change. The image on the left was shot at f/11, while the one on the right was shot at f/2.8, which is a total of four stops of difference in exposure.

Left: soft light with the light source two feet away. Right: hard light then it’s 10 feet away. Here you can clearly see the difference in the quality of light. Pay close attention to the tonal transition between the shadow and highlight areas of both images.

It’s important to note that moving the light closer, or further away, will also have a dramatic effect on how the light appears on your subject. As the quality of light is altered on the background, it also changes on your subject. Bringing it in close will change both the softness and intensity of the light on your subject, making it both brighter in terms of exposure and softer (quality of light is directly related to the size of the light source and distance from the subject).

Moving the light away from your subject will result in a lighter backdrop. Aside from that, this will also result in harder light on your subject. Just be aware that a lot of subjects won’t suit being lit with hard light and be careful with how far you go, and you should be fine.

Move the light too far back, however, and you may as well be using a small flash from a closer distance. For example, the softbox used here from 10 feet away is only barely distinguishable from a bare speedlight at a closer distance.

The end

That’s it. This technique is easy to put into practice even if you don’t yet understand the technicalities of the Inverse Square Law that makes it work. It isn’t foolproof, however, and you may want to have other tricks up your sleeve if you’re in a position where you don’t have enough space to work with.

Background lights and flags can both go a long way to helping you solve exposing your background the way you want as well. This method is just one other option to add to your skillset, hopefully bringing you one step closer to getting things right in camera.

The post How to Control Your Background Tones by Manipulating Light Fall-Off appeared first on Digital Photography School.


Digital Photography School

 
Comments Off on How to Control Your Background Tones by Manipulating Light Fall-Off

Posted in Photography