RSS
 

Posts Tagged ‘Life’

The V-Coptr Falcon is a bi-copter drone that has a 50-minute battery life

16 Jan

The company that created the self-flying Hover 2 is back with a new, uniquely-designed unmanned aerial vehicle. Inspired by the V-22 Osprey military aircraft, the V-Coptr Falcon is a compact, foldable, first-of-its-kind V-shaped drone that boasts only 2 propellers. A reduced number of rotors, coupled with a more aerodynamic design, means less power is consumed during operation. As a result, the Falcon can fly up to 50 minutes.

The Falcon has a 12MP, 1/2.3-inch Sony sensor with a 77º FOV on a 3-axis gimbal. Video can be recorded up to 4K/30p, 2.7k/60p, and 1080/120p. Photos can be captured in both RAW and JPEG format while video is limited to MP4. There is 8GB of internal storage available onboard though adding an external microSD card with up to 256GB storage is recommended.

Front-facing stereo cameras provide obstacle avoidance that functions at a speed of up to 7m/s. The BlastOff controller can operate for 2.5 hours, fully charged, and it gives the Falcon a range that extends up to 7,000 meters (4.3 miles). Autofollow mode is available and users can also take advantage of the pre-programmed flight paths and post-editing templates found in Cinematic Shots.

Similar models from DJI, Autel, and Parrot boast a flight time of up to 30 minutes, maximum. Slower rotation of aerodynamically-designed propellers help the Falcon stay airborne for up to 20 minutes longer. With its 12MP, 4K/30p camera, the Falcon is most similar to DJI’s Mavic Pro Platinum. The V-Coptr Falcon retails for $ 1000, with a required $ 100 deposit, and will start shipping in February 2020.

Articles: Digital Photography Review (dpreview.com)

 
Comments Off on The V-Coptr Falcon is a bi-copter drone that has a 50-minute battery life

Posted in Uncategorized


RAW Photo Editing in Lightroom: How to Make Your Photos Look Real to Life

05 Jan

The post RAW Photo Editing in Lightroom: How to Make Your Photos Look Real to Life appeared first on Digital Photography School. It was authored by Kevin Landwer-Johan.

dps-raw-photo-editing-in-lightroom

RAW photo editing in Lightroom is necessary to make your photos look realistic. Saving your photos as RAW files, they will not look like what you see with your eyes. Photos your camera captures look different than how we see. This is especially so in high-contrast lighting.

We can see more detail in highlights and shadows. This will change as camera technology advances.

RAW files are always flat and dull-looking before post-processing. RAW photo editing is necessary to balance the light and color to get your photos looking lifelike.

RAW Photo Editing Edited Beetle

Edited image made to look more vibrant and lifelike from the original RAW file. © Kevin Landwer-Johan

Don’t believe what you see

Chimping will rarely give you a true picture of the detail in your RAW images. What you see on your camera screen is a JPG photo that contains less information than the RAW file. This is different for each make and model of camera. You need to use your imagination and fill in where there appears to be no detail. You must also consult your histogram to keep your imagination in check.

You can extract more detail during RAW photo editing than is displayed on your camera’s monitor. Know your camera well and how the RAW files respond when you post-process them. Then you can have a better idea when you chimp your pictures.

What shows on your camera monitor after you take a photo may show loss of detail in the highlights or shadows. High contrast lighting exaggerates this. Learn to recognize the difference between what you are looking at and the way the pictures of it look. This will help you make better exposure choices.

Having presets active when you import photos to Lightroom will alter the images. Otherwise, images import as the camera recorded them. I prefer to have all my Lightroom settings at zero when I import. This means that when I start my RAW photo editing, I know precisely what I am dealing with.

RAW Photo Editing Zeroed Beetle

Original, unedited image showing all the Lightroom sliders zeroed. © Kevin Landwer-Johan

RAW photo editing from scratch

Lightroom has many presets. Some of them come with the software, others you can download and install. Many of them, when applied, will give your photos a somewhat surreal look. You can create:

  • Monotone images
  • Add a sepia look
  • Saturate or Desaturate
  • Colorize, Posterize and Solarize

Gimmicks abound. Sometimes applying a creative preset can enhance a photo. The ways you can transform your photos are endless.

RAW Photo Editing Cool Light Beetle

RAW image wit a ‘Cool Light’ preset applied. © Kevin Landwer-Johan

You can edit to make photos look however you want them to. It’s up to your creative ideas. But often you will want to edit your RAW photos to make them look realistic.

When you edit RAW photos for a natural-looking result, keep in mind how you saw what you photographed. How was the lighting? Was it high or low contrast? Did it have a warm or cold cast? Was it more neutral? What did the colors look like? If you consider the reality of a scene then you can recreate this during RAW photo editing.

Thinking about what you saw when you were taking your photos will help you edit them more realistically. It’s not always possible to remember clearly. This is when you need to think objectively and aim to find a balance in lighting, contrast, and color when you working on RAW photo editing.

Find a balance – what looks right?

Editing your photos so they look real to life means you must find the right balance. In Lightroom, the sliders I use most often to achieve this are (in no particular order):

  • White Balance Temp
  • Exposure
  • Highlights
  • Shadows
  • Blacks
RAW Photo Editing Edited Flower

Use the sliders on the Develop Module to make photos look life like. © Kevin Landwer-Johan

The other sliders in the Basic panel I will use less often. Their use depends on the lighting condition from when I took the photo. At times I will make alterations to individual colors using the Saturation and Luminance sliders. You can find these in the HSL/Color panel.

There are many ways to achieve similar results in Lightroom. The ones I mention here are the ones I find to give me the best results. If you prefer an alternative way of doing the same thing, please share it in the comments below.

Photos taken at different times of the day and night require editing to suit the lighting. Whether the light is high or low contrast will also make a difference. Photos taken on a sunny day require different editing to photos you take when it’s cloudy, or you’re indoors.

Don’t overdo any of the changes you make. Avoid pushing sliders to their extremes. This will help you keep a more realistic look to your photos. Once you start having to max out the sliders, you will find that image quality begins to deteriorate. Pixelation, banding, and other imperfections will begin to appear.

RAW Photo Editing Zeroed Farmer

Zeroed Settings

RAW Photo Editing Edited Farmer

Sliders adjusted to make the photo more realistic-looking. © Kevin Landwer-Johan

Contrast and exposure challenges

How well-exposed your photos are will affect the amount of effective RAW photo editing you can carry out. When you have to push sliders to their extremes, it’s usually a sign your photo was not well exposed. It can mean the contrast range in your composition is too broad for your sensor to capture detail in both the shadow areas and highlights.

RAW photo editing has its limits. You will not always be able to make a photo look like what you saw. This is most often true when contrast is high because camera sensors are still more limited than how we see.

Generally, aiming to bring down the highlights and draw up the detail in shadows will make a photo look more real to life. If an image was poorly exposed, in part or whole, it is more challenging to make it look how you remembered seeing it.

RAW Photo Editing Edited Orchid

Hard light with overexposed highlights. © Kevin Landwer-Johan

To avoid this, compose your photos so that the contrast range you capture is within the dynamic range of your camera. If there are very bright and dark areas in your composition, recompose. Aim to have the tone range narrower. This often means taking photos where there’s no bright lights or deep shadows in your frame.

If you can not do this, don’t be overly concerned about losing detail in the highlights, as this is not such a problem. In bright lighting conditions, our eyes will often not be able to see detail on light-colored or very reflective surfaces. We will still be able to see detail in the shadows.

Setting your exposure so you can capture shadow detail will make it easier to edit the RAW photos in Lightroom. This will help you get them looking realistic.

RAW Photo Editing Edited House

Edit each photo individually to get them looking most realistic. © Kevin Landwer-Johan

Think about Lightroom RAW photo editing when you take photos

When you take photos, consider the changes you can make to your RAW images later. The more photos you take and edit, the more naturally this will occur.

Thinking about what you can do in post-production might seem like cheating to some. I don’t see it that way. It’s a matter of working with the tools we have available to us. Modern digital technology gives us opportunities to make photos look more realistic.

When RAW photo editing well-exposed images, you can make them look real to life when this is your intention. Having well-exposed RAW files means you can balance light, contrast, and color.

Have a look back over some photos you have post-processed recently. Do they look how you remember seeing what you photographed? How could you alter them to make them look more real to life?

The post RAW Photo Editing in Lightroom: How to Make Your Photos Look Real to Life appeared first on Digital Photography School. It was authored by Kevin Landwer-Johan.


Digital Photography School

 
Comments Off on RAW Photo Editing in Lightroom: How to Make Your Photos Look Real to Life

Posted in Photography


The 6 Top Photoshop Tools for Still Life Photography

04 Dec

The post The 6 Top Photoshop Tools for Still Life Photography appeared first on Digital Photography School. It was authored by Darina Kopcok.

top-photoshop-tools-for-still-life-photography

Even if you do most of your editing in Lightroom, you’ll still find that you need Photoshop to really finesse your photos. Because it’s a pixel editor, Photoshop offers you more retouching tools and gives you further control than you can obtain from Lightroom.

In still life photography, like food and product, every aspect of your image needs to hold up to scrutiny for maximum impact. It needs to look clean and perfect.

There are certain tools in Photoshop that will help you tweak the best out of your images.

Although this article won’t go in-depth for every single tool – you’d need several articles for that – it will get you up and running in applying some basic treatments to your still life photography.

So without further ado, here are the most useful Photoshop tools for still life photography.

Photoshop for still life photography

1. Spot Healing Tool

The Spot Healing tool is one Photoshop tool that you’ll use on every still life image you retouch in Photoshop. This tool has improved greatly over the years.

Similar to the Healing Brush tool, it samples pixels from the surrounding areas to correct blemishes and imperfections. However, unlike the Healing Brush, it automatically samples the pixels without your having to specify where they should come from.

Why is this so great? Because the Spot Healing brush does this way better than it used to. This means you can remove dust and small marks very quickly.

If you’ve ever tried the Spot Removal tool in Lightroom, you’ll know that clicking on it repeatedly will quickly slow down Lightroom’s performance. Photoshop will give you better results, more quickly.

When you’re dealing with still life photography, remember that you want a clean-looking image. Zooming in on your photo at 100% and cleaning up any dust or blemishes will make a big difference in the overall aesthetic.

To use the Spot Healing tool, select it from the tool menu or hit J.

Zoom into your image and simply click on the blemish you wish to correct. It will automatically sample from an appropriate area and apply the pixels.

You can also clean up a larger area by brushing over it.

One thing to note is that if you use it repeatedly in a small area, the pixels can start looking unnatural and plastic-like.

The 6 Top Photoshop Tools for Still Life Photography

2. Patch Tool

The Patch tool is another Photoshop tool for still life photography that you’ll most likely use on the majority of your images.

It works great on small areas by creating a selection and replacing the pixels with other pixels of your choosing. It considers lighting, shade and texture when sampling an area.

The 6 Top Photoshop Tools for Still Life Photography

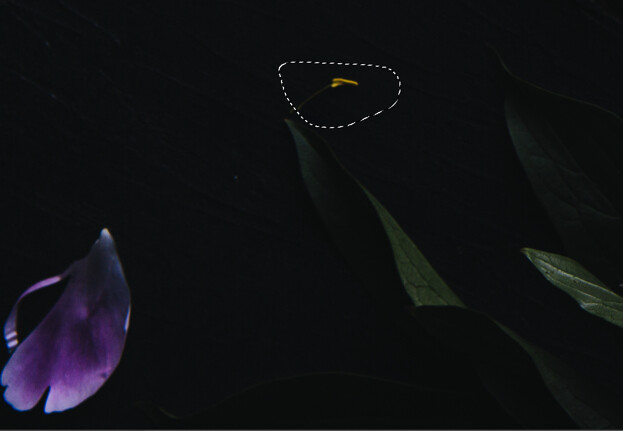
In the image below, I wanted to get rid of the yellow filament from my flower because I found it distracting.

There are many ways to do this in Photoshop, but I find the patch tool quick and seamless for this type of correction.

To use the tool, select it from the toolbar.

Draw a selection around the area that you wish to correct.

The 6 Top Photoshop Tools for Still Life Photography

Click on your mouse and drag the selection to an area that you would like to replace the selected pixels with. Let go of the cursor.

Press Command D to undo the selection.

To have greater control over the final result, make sure you have Content-Aware selected in the tool menu and play with the Structure and Color to further influence the edges.

Photoshop Tools for Still Life Photography

The 6 Top Photoshop Tools for Still Life Photography

3. Content-Aware Fill

Content-Aware Fill is sort of like the Patch tool on steroids.

It was first introduced in CS5 as a fill option in the Fill Dialog box. In 2019, Adobe improved this tool by leaps and bounds.

Content-Aware analyzes the pixels from a chosen area to determine what pixels it should use to remove unwanted objects. With the improvement, it allows you to choose exactly where you want it to sample the pixels from. It gives you so much more control and also allows you to rotate, scale or resize your selection, and preview the results.

To use Content-Aware Fill, draw a selection around the area you would like to correct. The Lasso tool makes a nice, versatile tool, but I often use the Rectangular or Elliptical Marquee tools.

Go to Edit and choosing Content-Aware Fill from the dropdown menu.

Photoshop tools for still life photography

This opens up the Content-Aware task space.

Photoshop tools for still life photography

On the right-hand side of the task space, you’ll see a Preview area that will show you how the changes are affecting your image.

If required, resize the sampling area with the Sampling Brush Tool.

You can find the tools for Content-Aware Fill in the left-hand corner of the workspace. The Brush tool is the first one on the top and the one you’ll most often use.

The 6 Top Photoshop Tools for Still Life Photography

You’ll also notice on the right-hand side of the workspace that you can make adjustments to the opacity.

The 6 Top Photoshop Tools for Still Life Photography

Save your changes as a Duplicate Layer.

I often use Content-Aware Fill to even-out my still life photography backgrounds, which tend to look less even in color and texture as I would like.

In this image of a salad, I wanted to even-out the left-hand corner of the image, which was looking too dark, despite my removing vignetting. I used the Rectangular Marquee tool to select the part that I wanted to change and brushed out the parts of the image I didn’t want sampled from.

The 6 Top Photoshop Tools for Still Life Photography

I played around with the opacity until I got something that looked good, which in this case was 66%.

4. Clone Stamp Tool

Can anyone live without the Clone Stamp tool?

No matter what kind of photography you do, you probably use the Clone Stamp tool a lot. Great retouching is largely about cleaning up the little things, which all come together for a powerful, transformative effect. Clone Stamp is one of the crucial Photoshop tools for still life photography.

The Clone Stamp tool allows you to copy pixels to a different part of the image to another. It’s great on areas where you have texture and pattern, or an edge. However, with this tool there is no real blending, so you often have to use it with other tools to get a more seamless-looking result.

Note that if you work with the Clone Stamp tool on its own layer, you can use it with other tools such as Free Transform to make further adjustments to the cloned areas.

Photoshop Tools for Still Life Photography

In the image above, I used a surface that was textured and knotty, but I wanted it to look smoother. I did this (achieving the image on the right) by cloning smoother areas over the bumpy areas.

To utilize the Clone Stamp tool, select it from the toolbar by hitting S for the shortcut, or hit Cmd/Ctrl+S 

Photoshop for still life photography

Select the area that you wish to paint the pixels from by choosing Opt/Alt. The selection point will be indicted by the crosshairs.

Paint with your cursor over the area you want to correct while making sure the crosshairs don’t pick up any pixels you don’t want.

Photoshop tolls for still life photography

5. Transform

Transform is another of the useful Photoshop tools for still life photography because it allows you to make changes and adjustments to objects in your image, like straightening and shaping.

For example, I decided to make a change to the olive oil bottle in the image below. I wanted to adjust the direction the handle was facing and to make the bottle appear larger in scale. I did this easily and quickly with Transform.

The 6 Top Photoshop Tools for Still Life Photography

Start with your background layer or your top layer. Use the appropriate tool to make a selection. In this case, I used the Lasso tool but I could have also used the Quick Selection tool.

photoshop tools for still life photography

Copy the selection onto another layer by hitting Ctrl/Cmd+J.

The 6 Top Photoshop Tools for Still Life Photography

Then hit Ctrl/Cmd+T to bring up Transform, or go to Edit and choose Transform from the Menu.

Make the adjustment by manually rotating or expanding the Transform box by clicking on the white points/squares.

photoshop tools for still life photography

Hit Enter to accept the adjustment.

Always make sure to constrain proportions when necessary.

6. Focus Stacking

If you’re shooting a product, you’ll usually need your subject to be sharp throughout. This means using a high F-stop number like F/13 or F/16. However, this requires a lot of power if you’re using flash.

You can also get lens diffraction at these higher numbers, which will degrade the quality of your photo.

The answer to shooting with a wider aperture and still getting a sharp image is to focus stack in Photoshop.

This is when you take two or three images with different focus points and blend them together to create one image file that is sharply in focus throughout. It’s a quick process and isn’t anywhere near as complicated as it sounds.

To utilize focus stacking, make sure your images have the same exposure and alignment.

Export PSD files into a folder or onto your desktop where you can easily navigate to them. 

Follow these steps:

  • Open Photoshop.
  • Go to File and choose Scripts.
  • Select Load Files into Stack.
  • Click Browse and select all the images from where you saved them initially.
  • Check the Box for Attempt to Automatically Align Source Images.
  • Click OK. Each of the images will open as a new layer in Photoshop.
  • Hold down Shift and click on the top layer in the Layers panel to highlight all the layers.
  • Under Edit, select Auto Blend-Layers.
  • Check the box for Stack Images and also for Seamless Tones and Colors. DO NOT check ‘Content-Aware.’ Click OK.
  • Save the final image.

If you have uploaded a lot of images, flatten the final image by selecting Layer -> Flatten Image -> Save.

photoshop tools for still life photography

Three images focus-stacked in Photoshop

Conclusion

Photoshop is a powerhouse of a program and there are many tools that can help you retouch your photography. The tools mentioned here are my top Photoshop tools for still life photography. They are easy to learn and utilize, and will quickly take your images to the next level.

Do you have any other Photoshop tools for still life photography that you’d like to share? Do so in the comments section!

The post The 6 Top Photoshop Tools for Still Life Photography appeared first on Digital Photography School. It was authored by Darina Kopcok.


Digital Photography School

 
Comments Off on The 6 Top Photoshop Tools for Still Life Photography

Posted in Photography


Treat yourself 2019: 10 gifts for the most important photographer in your life: you

17 Nov

Treat Yourself 2019

You’ve worked hard and been good all year, it’s time to treat yourself.

Photographers are notorious for being difficult to please when it comes to gift receiving. We often have both brand-specific and/or expensive taste. So this holiday season, instead of leaving your holiday wishes up to the gift gods/friends and family, why not indulge yourself in the gear you actually want?

We’ve spent all of 2019 shooting, testing and obsessing over the latest cameras, lenses and accessories. And what follows are the items we, as the staff of DPR, most desire. For photographers, by photographers, we present Treat Yourself 2019. Happy shopping!

Peak Design Travel Tripod

Peak Design Travel Tripod | $ 350 (aluminum), $ 600 (carbon fiber) | PeakDesign.com

By far one of the hottest accessories to come out this year was the Peak Design Travel Tripod. Available in aluminum and carbon fiber, it’s quickly become our favorite tripod for on-the-go work thanks to its compact size (it breaks down smaller than the competition), high-degree of stability and well-designed, low-profile ballhead.

We obviously prefer the carbon fiber version, which is lighter and more stable than the aluminum one. But we’d still take PD’s aluminum model over just about any other travel tripod in the game. So treat yourself to the gift of stability, wherever you may go.

View our Peak Design Travel Tripod
hands-on slideshow

Sony Cyber-shot RX100 VII

Sony RX100 VII | $ 1300 | Sony.com

Sony got just about everything right in the RX100 VII, the ultimate do-it-all compact camera. The RX100 series has long impressed, but it wasn’t until this iteration that they really nailed down the autofocus implementation as well as the AF performance. Sony also made a series of much-needed usability improvements.

These upgrades help to better unlock the camera’s full potential, allowing users to make the most of a long, sharp, versatile zoom lens, super-fast burst shooting and class-leading stills and video quality. So treat yourself to the Swiss Army Knife of cameras.

Read our Sony RX100 VII Review conclusion

Sony TOUGH SD cards

Sony Tough Cards | $ 60 (32GB), $ 110 (64GB), $ 210 (128GB) | Sony.com

One thing we lost when the industry mostly abandoned CF cards in favor of SD cards is the structural integrity of the media. Like many photographers, I have an ever-growing pile of busted SD cards at my desk, some with missing ribs, some with cracks along their seams and others that have just disintegrated completely. Fortunately Sony has solved the issue of the fragile SD with their SF-G series TOUGH cards.

These cards are molded from one piece of composite material with no seams and no ribs around the contact points. They’re drop, crush and bend-proof far beyond that of a traditional SD card. And an IP68 dust and water-proof rating means they’re not going to let you down, even in the worst conditions. Plus they offer super-fast transfer speeds up to 299Mb/s and write speeds up to 200MB/s. Simply put, these are the most reliable cards we’ve come across. And there’s no better treat than peace of mind.

Read more about Sony’s Tough SD cards

Gnarbox 2.0 SSD

Gnarbox 2.0 SSD | $ 500 (256GB), $ 600 (512GB), $ 900 (1TB) | Gnarbox.com

Speaking of peace of mind, having reliable memory cards is only part of the battle. The journey from photos being shot, to being backed up properly is one with occasional bumps in the roads – bumps that can cause devastation.

The Gnarbox 2.0 SSD looks to smooth out some of these bumps by offering a rugged go-anywhere SSD solution meant for backing up files as soon as they’re shot, with the added ability to tag and sort images via mobile device. The Gnarbox has a built-in SD slot, USB-C connectivity and a Micro-HDMI port. It’s also weather, dust and impact-resistant. Batteries are swappable and it can even be used to charge another device. But perhaps most importantly, transfer speeds are super-fast (up to 350MB/s), plus integration with Photo Mechanic and Lightroom makes it an even more versatile tool for those on-the-go. It’ll even play nice with iPad Pro devices when connected via USB-C.

Read more about the Gnarbox 2.0

Olympus XA 35mm film rangefinder

Olympus XA | $ 65-120 (used)

We’ve long preached the values of shooting film as a photographic companion to your digital work, or vice versa. Both mediums offer benefits that will improve your photography. Seeing as this is a digital camera site, we figured most people around here don’t have analog on their mind. But let’s change that.

If you’ve never shot film, or haven’t in a while, the Olympus XA is an enjoyable and affordable entry into the 35mm medium. Released in the late 70’s, this pocketable aperture-priority rangefinder (one of the world’s smallest) offers a fixed 35mm F2.8 lens hidden behind a sliding cover. The lens is sharp, the shutter is very quiet and the camera itself is full of wacky charm, from the tiny rangefinder tab, to the big red square shutter release, to the four-bladed aperture. In short, the XA is both fun and capable, without taking itself too seriously. Just like you.

Read more about the Olympus XA and other film cameras we recommend

Leica Q2

Leica Q2 | $ 5000 | us.Leica-Camera.com

Speaking of rangefinders, what ‘Treat yourself’ list would be complete without a Leica product? Among the DPReview staff, the rangefinder-style Leica Q2 was easily one of the most lusted-after cameras of the year. And why shouldn’t it be? The combination of a seriously-sharp 28mm F1.7 lens in front of a high-res 47MP full-frame sensor in a beautifully-designed body with excellent ergonomics makes the Q2 the ‘créme de la créme’ of modern fixed-lens cameras. Plus Leica redesigned the Q2 from the inside out to add extensive weather-sealing. They also updated the EVF and improved battery life.

And if the price tag seems a bit steep, perhaps you can justify picking the Q2 up for that special someone (that’s you) knowing there will never be another lens to drool over for the camera. Owning one is an end in itself to one’s gear lust. Probably. Maybe. Whatever… treat yourself!

Read our Leica Q2 Review conclusion

DJI Mavic Mini

DJI Mavic Mini | $ 399 (drone), $ 499 (Fly More Combo) | store.DJI.com

If the idea of using a drone as a creative tool hasn’t hovered noisily to the top of your mind yet, now is the perfect time to consider aerial photography/videography. Most people think of drones as big, loud nuisances, zipping around like angry bees. But the just-announced DJI Mavic Mini is compact (palm-sized), lightweight and reasonably quiet. It’s also super easy to fly. And despite its comparably lower price tag, it offers many of the same features found in its pricier DJI siblings like an accident avoidance camera, return-home functionality and a 3-axis camera gimbal.

The camera aboard the Mini is relatively modest with a 12MP 1/2.3-inch sensor capable of JPEG-capture only and up to 2.7K/30p or 1080/60p video. But for first time fliers, it’ll easily give you just about the same image/video quality of a smartphone, with the advantage of a bird’s eye view. So go on and treat yourself to a fresh new perspective, courtesy of this tiny/fun drone.

Read our DJI Mavic Mini Review

RucPac Professional Tech Gloves

RucPac Tech Gloves | $ 40 | RucPac.com

Cold hands are a reality for many photographers, especially those passionate about landscape, wildlife and sports. Sacrificing dexterity for warmth is simply not an option when ‘the shot’ can come and go in an instant. We’ve used finger-less gloves in the past, but found they don’t keep our hands all that warm. And ordinary gloves don’t provide enough finger movement. If only there were a warm form-fitting glove with good dexterity. Oh wait, there is! RuPac’s Tech gloves.

This pair of hotties comes in two sizes with sticky rubberized grips along the palm and fingers. They’re made of a weather-resistant polyester material that’s thick enough to provide a good deal of warmth on a cold day, but not so thick that they’ll limit hand movement or tactile response. They’re not going to save your paws from an Arctic chill, but for reasonable cold, they’ll get the job done. Plus they offer touchscreen compatible material at the tips of the index fingers and thumbs. So treat yourself to some happy hands this winter.

CAM-IN camera strap

Cam-IN camera strap | $ 25-35 (depending on style) | Cam-In.dk or Amazon.com

Let’s be honest – the strap that came in the box with your camera works just fine. But if you’re looking to treat yourself to something a little more stylish yet highly-functional, look no further than Danish brand CAM-IN’s leather and rope camera straps.

These straps looks great, are made from high-quality materials and feature excellent craftsmanship. They’re also fairly affordable. Simply put, they’ll provide you camera support long into the future, while looking snazzy all along the way. What more could you ask for? Treat yourself.

‘Parks Project’ National Parks/National Geographic apparel

Parks Projects T-shirts, hoodies and hats | $ 35-70 | ParksProject.us

Photographers are not usually known as a well-dressed bunch, but all more reason to freshen up your look with some new threads. And why not support a worthy cause while doing so? Parks Project is a clothing brand that’s partnered with more than 50 non-profits to help restore and protect National Parks in the United States through donations and volunteer work. You can read more about their contributions here. As photographers, many of us have a special relationship with the outdoors: all the more reason to protect it.

Most of Parks Projects’ clothing features hip/retro designs related to specific National Parks like Yosemite, Yellowstone and Zion. They also recently launched a super cool National Geographic collaboration. If there’s a clothing line more appropriate for photo nerds, without being cheesy, we haven’t seen it. TREAT YOURSELF.

Articles: Digital Photography Review (dpreview.com)

 
Comments Off on Treat yourself 2019: 10 gifts for the most important photographer in your life: you

Posted in Uncategorized


DIY Photography Backdrops for Still Life and Product Photography

24 Sep

The post DIY Photography Backdrops for Still Life and Product Photography appeared first on Digital Photography School. It was authored by Darina Kopcok.

Your choice of backdrop can have a big impact on the final look of your photos.

You may have purchased expensive professional photography backdrops because you know this. 

But whether you’re a hobbyist or pro, you probably already spend enough on your photography that you don’t want to shell out the big bucks for your props. Luckily, with a bit of creativity, you don’t have to.

Here are some of the best ways to create beautiful DIY photography backdrops for still life and product photography.

diy-photography-backdrops

Painted canvas backdrop

For a magazine-quality look, my top pick for a still life photography backdrop is painted canvas.

Professional canvas backdrops are expensive, but you can make your own for a fraction of the retail price.

Go to your local hardware store and buy a canvas painter’s drop cloth.  These are pieces of canvas you use to protect the floor when painting interiors.

Canvas drop cloths are usually large, so you can cut them into four pieces to get four backgrounds out of one stretch of fabric. Make that eight if you go double-sided. 

While you’re at the hardware store, purchase two or three paint samples in a similar tone for each backdrop. Note that the canvas soaks up a lot of the paint, so you may need to purchase primer as well, or use more paint than you thought. 

Layer the paint onto the canvas with a small, good-quality roller, moving the roller in different directions.

To add more texture, scrunch up a rag or use a large sea sponge and dip it into the paints. Randomly press the rag onto the canvas.

Your backdrops will have a natural texture that enhances but doesn’t compete with your subject. The canvas also has a great subtle texture, too. 

diy-photography-backdrops

Ceramic flooring tile

Another beautiful yet simple background is porcelain or ceramic tiles. You can get them from your local home improvement store. These are inexpensive and look great. They’re easily wipeable, which is a bonus if you’re dealing with food or liquid products.

Just make sure that any tiles you pick aren’t shiny, so you don’t get glare.  Good colors to choose are grey, black, white, or cool brown tones like taupe. These neutrals will enhance and complement a wide variety of products or still life subjects. They are better for smaller subjects because they tend to not be very large.

diy-photography-backdrops

Painted wooden backdrops

These days, there are a lot of suppliers selling painted custom backdrops for still life photography, but painting some yourself can be a lot less costly, and you don’t need any special skills. 

To make your own, buy thin plywood sheets at the home improvement store. Pieces that are at least 2×3 feet should accommodate most of your set-ups. The bigger stores like Home Depot can also cut larger pieces into smaller ones for you, so you can get more mileage out them.

You can purchase paint samples from the hardware store as well, or use craft paints. Just make sure that any paints or varnishes you use are matte. Even some of the satin types can cause unwanted shine in your images. 

Choose three or four colors in a similar color family and pour them together in the middle of the board. Take a large sea sponge and dab the paint all over the board to create a blended and subtle, mottled effect.

Finish with a thin coat of matte, water-resistant sealer. 

DIY Photography Backdrops for Still Life and Product Photography

Linens

Having a variety of linens on hand will make your life a lot easier as a still life photographer. 

Depending on what you shoot, these can run the gamut from natural fabric like linen to lightly patterned damask tablecloths.

You can use the fabric as the entire backdrop, as shown in the image below, or just to cover a portion of another backdrop.

When covering your entire surface with a piece of linen or tablecloth, place another layer of fabric underneath. This will plump it up and make it look more attractive.

Again, when choosing your colors, stick to neutrals. Shades of blue also look good, especially in dark and moody images. You can choose a pastel or brighter color depending on what you’re shooting and your desired result.

The key is that you don’t want your photography backgrounds competing with and drawing the eye away from your main subjects.

DIY Photography Backdrops for Still Life and Product Photography

Vintage Tray

Don’t get rid of any old or vintage trays you may have kicking around. They also make great photography backgrounds for still life. 

Depending on the metal, they will often have a lovely patina that will add something special to your shots. They look great close up or at a distance, or can be used as an element in telling your story.

You can often find vintage trays for an affordable price at secondhand or antique stores.

As with any backdrop, it should not be reflective. 

Note that in the images below, the tray doesn’t look overly shiny, even though I backlit my subjects. It has a nice and subtle texture. 

diy-photography-backdrops


Colored papers

Colored or textured craft or construction paper can make pretty and inexpensive photography backdrops that are light and easy to store.

Source large pieces of craft paper or construction paper at your local craft supply store, or check out sites like Amazon for packages of paper offering a variety of colors.

In the image below, I used a large piece of yellow construction paper as my background. To recreate this look, distance your paper a fair bit away from your set. This will help you get a blurred out horizon line and so your subject doesn’t look “stuck” to your background.

diy-photography-backdrops

Wooden cutting boards

Depending on the size, a wooden cutting board can function as a nice backdrop or be used as a layering piece in some types of still life shoots, like food photography.

Be careful about purchasing boards with a warm, orange, or yellowish tinge. Since most food is quite warm in tone, an image that is warm throughout can end up looking dated.

Also, the camera tends to exaggerate this orange tone. I find that I have to decrease the orange saturation in all of my images to start with.

Look for light boards like pine, or boards in deep espresso for darker shots. You can also paint these in whatever color you want. In the image below, I painted mine white and distressed it with fine sandpaper.

Be sure to keep painted boards for photography purposes only, because they won’t be food safe.

DIY Photography Backdrops for Still Life and Product Photography

To sum up

There are so many different ways to create stunning still life and product photography backdrops without the expense of buying and shipping wooden backdrops from specialist suppliers.

These are just a few ideas, but also look at contact paper, wallpaper, burlap, and old pieces of wood.

Experiment with the items you already own before spending a lot of money on costly photography backdrops. 

Do you have other tips for DIY photography backdrops? Share with us in the comments section!


DIY-photography-backdrops


The post DIY Photography Backdrops for Still Life and Product Photography appeared first on Digital Photography School. It was authored by Darina Kopcok.


Digital Photography School

 
Comments Off on DIY Photography Backdrops for Still Life and Product Photography

Posted in Photography


10 Cheap Photography Accessories that will Make Your Life Easier

07 Aug

The post 10 Cheap Photography Accessories that will Make Your Life Easier appeared first on Digital Photography School. It was authored by Suzi Pratt.

Camera gear is notoriously expensive, but there are some cheap photography accessories out there. Here are 10 affordable gadgets that you should seriously consider adding to your camera bag, no matter what kind of photography you do. They can help make your photoshoots run smoother and your workflow more effective.

1. Camera cleaning supplies

10-cheap-photography-accessories

No matter how careful you are with your camera gear, it is bound to get dirty. Thus, it is essential to always have your camera and lens cleaning supplies on hand. Luckily, these items are pretty cheap, so there’s no excuse for not having them around. Here are a few cleaning tools in particular:

  • Lens cloth: microfiber cleaning cloths remove dust and smudges from filters and the front of your lens.
  • Rocket blower: also known as a bulb blower, use this rubber device to blow the dust off your camera sensor and the front of your lens. If using it on your camera sensor, be sure to point your camera downward so the dust will fall to the ground.
  • Lens pen: these have a similar function to lens cloths, but they are easier to keep clean and target problem areas.
  • Lens cleaning liquid: when a lens cloth or pen isn’t doing the trick, cleaning liquid will often give you the best results.

2. Rain sleeve

Even though many cameras and lenses are touted as weather-resistant, it’s still a good idea to carry rain gear with you. This is helpful not only for downpours but for shooting in other wet conditions such as riding on a boat or sitting in the first row at Sea World.

There are all kinds of rain cover options out there, including regular plastic shopping bags and Ziplock bags.

If you have a relatively small camera, a DIY home version might be just fine. But for those with larger cameras and lenses, it’s best to invest in dedicated camera rain sleeves, such as these made by OP/TECH. They are pretty cheap and reusable, and they have custom sizes to better fit your camera setup than what a regular plastic shopping bag can offer.

3. Foldable reflector

No matter what kind of photography you do, you should own a reflector. These flexible devices are great for adding a kiss of light to any scene. Reflectors come in many sizes and shapes.

The most versatile ones are 5-in-1, offering white, silver, gold, black, and translucent surfaces.

The latter surface is one that I use often to filter light and make it softer. This is where the LED flashlight can come into play if you filter its light via the translucent part of the reflector. Size-wise, reflectors can be pocket-sized, or human-sized. Get the size that makes the most sense to you or stock up on multiple ones.

4. Bubble leveler

Although many cameras have built-in digital levelers, sometimes it is easier to have a physical bubble leveler that you can always refer to. These cheap bubble levelers fit on the cold shoe mount of your camera and help you get a straight and level shot.

As an added bonus, you can also use these to level other items such as prints of your pictures when mounting them to a wall.

10-cheap-photography-accessories

5. Battery holder

Most photographers have several spare batteries for their cameras. But do you have a method for keeping your batteries organized? If not, you need a battery holder. Think Tank makes battery holders for different capacities, such as 4 spare batteries or 2. They even have one for AA batteries. When I use these battery holders, I put them in facing the same way and replace them upside down as they drain and need to be recharged. That way, I know not only where all of my batteries are, but which ones need to be charged.

Cheap camera accessories

6. Memory card wallet

Similar to battery holders, it’s also a good idea to have a memory card wallet.

When I first started out in photography, I was a staunch believer in having as few memory cards as possible so that I didn’t accidentally misplace them. While this might be an okay practice for some, the truth is that camera file sizes keep getting larger. That means you’ll likely need to carry more memory cards.

If you use more than one memory card, you should have a system for keeping them organized. That’s where a memory card wallet is helpful. Use them not only to keep track of your cards, but also to know which ones are empty, and which are full (i.e. by turning them upside down when full).

Cheap camera accessories

7. Silver Sharpie

Have you ever noticed that a lot of camera gear tends to be black in color? Everything from batteries and memory cards, to camera bodies and lenses, they all seem to be the same color. This can make it tricky for labeling them with your name or indicators to tell them apart. Enter the silver Sharpie.

This is one of those tools I never knew I needed until I started using it. The main thing I use it for is to write my name and a unique number on each of my memory cards. I have 13 of them, so I need a way to tell them apart. I do the same for my camera batteries, external hard drives, and all kinds of items.

8. LED flashlight

This is an item that is so small and easy to slip in your camera bag that you might as well carry one. Portable light sources have a variety of uses, namely helping you find gear in your camera bag in dark lighting scenarios. Flashlights can also help you make a creative image via light painting, or adding a bit of extra light to a scene, especially when paired with the next item on the list.

9. External battery pack

These last two items might be arguable in terms of their “cheapness,” but they have a relatively low investment price considering how long they can last. An external battery pack is especially helpful today since many modern cameras can be charged via USB input.

You can also juice up your cell phone on the go, which is probably very helpful for photography since there are many smartphone camera apps out there to help you take better photos.

I’m a fan of Anker battery packs, such as the Anker PowerCore 10000, which goes for about $ 30.00 USD. I’ve owned the previous version of this battery pack for over 5 years, and it is still going strong.

Cheap-photography-accessories

10. Joby Gorillapod

These flexible tripods have been around forever and they are still incredibly useful. Think of those awkward places where a regular tripod won’t quite fit, and the Gorillapod is your answer for anchoring your camera to grab those unique shots.

Admittedly, Gorillapods aren’t the cheapest accessories out there, but it does depend on which size you buy. Smaller Gorillapods (for smaller cameras) can go for under $ 30 USD, but the larger ones will go for upwards of $ 40 USD. This may seem cheap to you, or it may seem expensive.

Either way, know that these Gorillapods are built to last. I have one that is over 7 years old and it still holds up both my Canon DSLRs and Fujifilm mirrorless cameras just fine.

Cheap camera accessories

Over To You

There you have it – 10 (relatively) cheap camera accessories that all photographers should have.

Would you add any items to this list? Let me know in the comments below!


10-cheap-photography-accessories


The post 10 Cheap Photography Accessories that will Make Your Life Easier appeared first on Digital Photography School. It was authored by Suzi Pratt.


Digital Photography School

 
Comments Off on 10 Cheap Photography Accessories that will Make Your Life Easier

Posted in Photography


How to Change a Background in Photoshop for Still Life or Food Photography

07 Aug

The post How to Change a Background in Photoshop for Still Life or Food Photography appeared first on Digital Photography School. It was authored by Ana Mireles.

Food photography is all about communicating an ambiance or mood. Plating, styling, and props will help, and using the right backdrop can go a long way to tie everything together. Learn how to use Photoshop to change the background without having to buy new ones.

change-background-in-photoshop

To have the right background for every shot means having a lot of tabletops, pieces of wood, linen, etc. These things cost and take a lot of space. If you don’t have the budget or storage capacity for it, this article can help you out. By doing a good selection and using layers, I’ll show you how to change your background in Photoshop.

A precise selection is key to change your background

First, you need to be able to work separately on your background, for this, you have to select it. There are many selection tools in Photoshop, feel free to choose the one you want. However, I recommend the pen tool for more advanced selections. If you need some help with it check out: Why Learning the Pen Tool in Photoshop is Worth the Effort.

Image: Use Photoshop selection tools to change your backdrop without affecting your subject

Use Photoshop selection tools to change your backdrop without affecting your subject

Once you’re satisfied you can duplicate the layer by going to Menu-> Layer->Duplicate layer.

Now add a mask by clicking on the Create Mask button from the bottom of the panel. Because you had your subject already selected, it will create the mask with that shape.

From now on, your changes will only be seen on the background that you had selected.

If you would like to understand masks better, check out Photoshop Masks 101.

change-background-in-photoshop

Photoshop layers mask help you change the appearance of your background for food photography

Modify the colors to simulate a different background

Now you can freely modify the backdrop using any adjustment layers that control color, brightness, hue, saturation etc.

Just click on the Create New Fill or Adjustment Layer button from the bottom of the Layers panel to see all the choices.

Since you are working on separate layers, your original remains untouched and you can always go back to it if you do something you are not happy with.

Image: Photoshop have many adjustment layers to choose how you want to change your backdrop in food...

Photoshop have many adjustment layers to choose how you want to change your backdrop in food photography

You can add as many layers as you want. For example, I modified the hue and saturation, then added a warming photo filter. Just be sure to always apply the mask to the layer (not the background) or the adjustments will show in the entire image.

A white background is easier to change

For this option, you need to have a texture ready before you start. You can buy them on stock photography websites, or you can make your own. I find it useful to photograph fabrics, wood, stones or anything I can use later so that I have many options available. For inspiration and details, you can read How to Create Your Own Unique Textures and Apply Them To Your Photography.

Image: A white background allows you to incorporate textures and change the background of your food...

A white background allows you to incorporate textures and change the background of your food photography

Select the background like in the other example, only this time it might be easier because of the contrast created by the white background.

Easy to use selection tools like Quick Selection or Color Range can save you a lot of time, just pay attention to the edges and details.

Always zoom in to fine-tune your selection. Then save it by going to the menu Selection->Save Selection.

change-background-in-photoshop

A good selection helps you change only the backdrop with Photoshop tools

Apply your texture as the new backdrop

Now add the texture you chose for your new background. You can do this by going to Edit->Place if you want it as a Smart Object. However, if you don’t plan to modify it then just paste it on top. Either way, it will create a new layer on top that will cover your original image.

Place or paste a texture in Photoshop to use as a new background in your food photography

To give visibility to your subject, load the selection you saved by going to the menu Selection->Load Selection. Then click the Add Mask button like in the first example.

Load a selection and add a mask to see the food on top of the background

Integrate your new background

Now you can see the cherries but they look a bit fake. To improve this, change the layer blending mode. I find Multiply does a very good job for this.

If you want to know more about blending layers watch this Comprehensive Guide to Photoshop Blend Modes.

Once you have done that, you can also adjust the opacity. The shadows now make the photo feel natural.

Use blending modes to incorporate the background and make it more realistic

And you’re done.

It’s that easy to change your background in Photoshop!

If you want you can keep on working on it to make it more dramatic or moody. Make use of adjustment layers, filters, and even more textures until you get the effect that you want.

change-background-in-photoshop

Photoshop allows you to use layers, filters and textures to create special moods in food photography

I hope you liked these ideas and found inspiration to keep on trying different things.

Go out and give it a try, and share your images with us in the comments section!

And to further improve your food photography, I’ll leave you here a list with some great articles.

Recommended readings

  • If you’re feeling more crafty, try making Easy and Affordable DIY Food Photography Backdrops.
  • Keep in mind you’ll also need some props, so check out these tips to DIY Food Photography Props on a Budget.
  • And if you’re ready to really jump in with both feet, you can’t miss The dPS Ultimate Guide to Food Photography.


change-background-in-photoshop

The post How to Change a Background in Photoshop for Still Life or Food Photography appeared first on Digital Photography School. It was authored by Ana Mireles.


Digital Photography School

 
Comments Off on How to Change a Background in Photoshop for Still Life or Food Photography

Posted in Photography


Video: A BTS look at how Fujifilm’s GFX 100 was brought to life, from concept to reality

12 Jun

In September 2018, Fujifilm made the official announcements that it was working on a 100-megapixel medium format mirrorless camera—the Fujifilm GFX 100. Since then, we’ve had exclusive hands-on time with the behemoth, published our first-impression video review and shared pre-production photo samples.

We’re yet to get our hands on a fully-reviewable version of the GFX 100, but to tide you over in the meantime, we’re sharing a little documentary from Cinema5D that takes a behind-the-scenes look at the development process of Fujifilm’s latest medium-format mirrorless camera system.

A screenshot from the mini-doc showing how the IBIS is pieced together in the factory.

Titled ‘Birth of a Camera: Fujifilm GFX 100,’ this 17-minute video is part one of a two-part series that takes an exclusive inside look at the development process of the GFX 100. Throughout the video, Cinema5D co-founder Johnnie Behiri travels to various Fujifilm locations in Japan to talk with the executives, engineers and designers that had a part in bringing the GFX 100 to life.

The video addresses how the development process took place, from the initial conception to the final mock-up. Little by little, Behiri follows the vague chronological timeline of the creation process, from talking with the initial Fujifilm ‘CLAY’ designers who sketched up the original form of the camera to the engineers who created countless mock-ups to ensure the required components could fit inside the frame of the camera.

A screenshot from the mini-doc that shows how testing is done on the face-detection autofocus.

It’s a bit of a long watch, but well worth it if you have some free time over your lunch break or before bed.

Behiri notes in the accompanying blog post for this video that while Fujifilm does run a paid banner campaign on its website, the project was initiated and its production costs entirely self-funded by Cinema5D.

Articles: Digital Photography Review (dpreview.com)

 
Comments Off on Video: A BTS look at how Fujifilm’s GFX 100 was brought to life, from concept to reality

Posted in Uncategorized


8 Rules for the Creative Life

03 Jun

The post 8 Rules for the Creative Life appeared first on Digital Photography School. It was authored by Mat Coker.

The biggest stumbling block for many photographers is not knowing how to be creative. You have some natural talent but never seem to break out and become a satisfied creative person. Thankfully, some rules govern a happy and productive creative life. These rules help you to get control and live out your creativity – even with a busy work schedule, and without sacrificing valuable time with your family.

Here are eight of those rules that will help you thrive as a creative photographer.

Practice your creativity.

Kids have creativity mastered. They may not be very good yet, but they do it all the time. Their life is ordered around exploration and little creative projects. Between the new skills they learn, and the volume of their output, their natural ability increases quickly.

1. Don’t rely on your natural talent

Maybe you’ve got a natural eye for photography, but that’s not enough. You’ll hit a wall some day and not know how to overcome it.

Even with a good eye already, you should keep learning more about what makes for a good photograph. Go ahead and put your own creative spin on what you’re learning. When you work hard and understand what makes your photography good, you’ll always have ideas and principles to pull from, even when you’re completely uninspired. At the very least, you’ll be able to keep working until truly creative ideas strike you.

Don’t rely on natural talent. Understand how photography works, and exercise your creativity so that you can turn it on whenever you need it. 

Practice your creativity

2. Successful creative people never stop

Successful creative people never stop working. They are not lazy. They rise to the top because of how hard they work.

But this doesn’t mean that you shouldn’t sleep or never step back from your creative endeavors. Successful creative people rest in order to recharge and come back to their work even stronger.

When you think about it, you’re always doing something with your time (even if it’s just scrolling social media). But the best creative people are intentional and constructive with their time. If you’re always doing something anyway, then why not prioritize something creative?

Many people think they lack time to devote to their photography. You have time, but you’re choosing to spend it on other things. Write down exactly what you do all day. You’ll be shocked at how much time you waste. Don’t waste your time, do photography instead.

Get up one hour earlier. Study and practice photography before your day even begins. You’ll be cheating time by using what you usually would have slept away.

Think about where you could be in a year if you devote one hour to photography every day. Henri Cartier-Bresson says that your first 10,000 photos are your worst. If that’s true, then hurry up and get them behind you. You only need to take about 28 pictures a day over a year.

But working hard does not mean that you need to neglect your family in the process. A workaholic career can destroy your family, and this is not healthy for them or you. Many traveling photographers abandon their families in the name of doing something meaningful with their work. However, what good is their work to the world if their own family suffers for it?

Work, work, work. Get up one hour earlier to do it, but guard your family from abuse of work.

Black and white Rembrandt lighting

I know this photo is grainy and a little soft. It’s okay with me because I’ve acquired a taste for imperfect black and white photos (and Rembrandt lighting).

3. Creativity generator

Exploration is a creativity generator. So explore your craft, other peoples craft, and the whole world around you.

If your craft is portraiture then you need to explore portraiture. But you should also explore other types of photography (photojournalism, macro, wildlife, etc.). You’ll discover interesting ways to improve your portraiture as you study other forms of photography.

Take your learning beyond photography. Study all sorts of creative disciplines (writing, painting, sculpting, or architecture). You don’t have to learn to do these things, just learn about them.

Read memoirs and biographies of creative people too. See what a successful creative life looks like. And learn from the mistakes of tragic lives.

Part of creativity is bringing familiar things together in new ways. The more you explore, the more you have to bring together.

Exploration leads to endless creative possibilities.

4. Capture your ideas before they disappear

As you learn, work and explore, you’re going to need a way to capture the creative ideas that keep coming into your mind. They light up brightly but disappear quickly. You need to capture those ideas like fireflies in a jar.

Rather than jumping from idea to idea without ever completing anything, carry a notepad or recording device to capture your ideas. Record your idea and then get back to the project you’re working on. Being single-minded is far better than scattering your mind across many half-finished projects. Those half-finished projects will likely become never-finished projects.

Sift through your ideas later when you need something new to work on. You’ll find that many of those ideas weren’t worth pursuing. Moreover, you’ll realize that there were some gems that you had completely forgotten about.

You’ll end up with a lot of ideas, let the best ones rise to the top over time.

creative black and white photos.

While watching my son build Lego, I noticed the gesture expressed in his toes. Part of exploration is just watching what is going on around you.

5. Build bridges

Some people prefer to work as a team, others prefer to work on their own. Even if you prefer to pursue your craft on your own, you should still gather with other photographers.

You should especially gather with ones who photograph different subject matter than you. The friendship and feedback will encourage you and help you to avoid becoming narrow and stagnant.

It can get very lonely being the only creative person you know, especially if your spouse doesn’t share your drive for creativity. Before you know it, you’re like an isolated island.

Build bridges to the other creative people around you. 

6. One explosion can ruin everything

It’s better to build bridges than it is to burn them.

All it takes is one big emotional outburst to ruin your career as a creative person. Whether you’re an entrepreneur or work in a team, nobody wants to put up with your anger or dramatic outbursts. Treat everyone around you with respect. Even go as far as to treat them as more important than yourself. Everyone will love working with you.

If you do let your emotions get the best of you, be quick to make amends.

Excessive negative emotion stifles your creativity. Be kind to yourself as well and get help dealing with your stress.

In a world of difficult people, be the easy person to work with.

Creative community

Gathering with other creative people.

7. Help other creative people be better than you

It would be natural to assume that if you’re generous with your talent, time and resources that people will just take advantage of you. That might happen. But soon enough your generosity will align with people who will be forever grateful for it.

I still remember those who went out of their way to help me when I first started out. They could have protected themselves from the new photographer, wishing that he would fail and disappear. Instead, they helped me. Now, I help other photographers, even if they seem like my direct competitors.

It seems counter-intuitive, but you’ll help yourself more when you help others first. At times, focusing on another person’s creativity may help you more than focusing on your own.

Be the first in a fellowship of creative people helping each other to get better, and better, and better.

Improve creativity

My daughter wanted to make her own birthday cake. We let her.

8. Turn off your phone

You need to have periods of time when you are uninterrupted. The last thing you need when you’re brainstorming ways to complete a creative project is a phone constantly alerting you to something else.

Practice turning your phone off for a couple of hours at a time – maybe even a whole day. It’s liberating to think, play, and be creative without the distraction.

While I was driving back from a 3-hour creative session this morning, I saw a person checking their phone while they waited at a red light. I had a lot on my mind and couldn’t fathom adding a phone to the mix. Now I know that looking at my phone means that whatever creative ideas were on my mind will vanish. So I only look at it a couple of times a day.

We easily become addicted to our digital technology, and a “fear of missing out” keeps us constantly checking in. I’ve developed a greater satisfaction in my creativity and a greater fear of losing my creative drive in the moment. My phone is off most of the time.

You don’t want to trade your creativity for endless digital chatter. Phones, tablets, and computers are useful. But they have a way of talking over.

Turn your phone off and switch your creative mind on.

The creative life

When you follow these eight rules, your creativity will be able to thrive.

You’ll have distraction-free time to learn, work, and explore.

You’ll find yourself encouraged by the other creative people in your life.

Moreover, you’ll always be growing and so will your creativity.

Do you have other tips for your creative life? Please share them with us in the comments below.


The post 8 Rules for the Creative Life appeared first on Digital Photography School. It was authored by Mat Coker.


Digital Photography School

 
Comments Off on 8 Rules for the Creative Life

Posted in Photography


Simple Methods for Creating Better Still Life Images

16 May

The post Simple Methods for Creating Better Still Life Images appeared first on Digital Photography School. It was authored by Charlie Moss.

Many find shooting still life images a real challenge when they’re just starting out because it can be hard to know where to start. But taking the time to shoot a great still life can be a rewarding and somewhat meditative pastime for photographers.

Still life photography can help you hone your photographic skills at your own pace while still creating work that can go in a portfolio or be printed for your wall. But styling tabletop images doesn’t come naturally to all photographers, so here are some simple things to think about when you’re next shooting still life.

Choose props for color and mood

Now might be a good time to go and brush up on your color knowledge, because you’re really going to need it when it comes to creating still life images! Everything, including the colors, in your still life scene, will be there because you put it there. Nothing has to make it onto your tabletop studio if you don’t want to include it in your shot.

Colors can be a way of introducing either harmony or contrast. If you were photographing something blue, for example, and you used blue and green backgrounds you’d have a very harmonious and potentially calm image. On the other hand, if you added yellows or oranges into the scene, it would create tension and result in a more dynamic overall feeling to the shot.

You can bring color to your still life images in different ways. Backgrounds, fabrics, plates, bowls, vases – all these items are props that you can start collecting to build up a color library of props. Don’t forget natural objects like flowers and foliage too; they can often really bring a shot to life.

Selecting complementary backdrops

Your backdrops will often be the most dominant colors in your scene, so pick wisely (it’s also hard to change it once you’ve started arranging your props). Pick your backdrops according to the feel you’d like to create in your final image.

Backdrops can be anything that works with the scene you’re creating. It might be a marble countertop, a beautiful old farmhouse table, or a complementary piece of fabric. Whatever helps to set the mood for your images.

As well as the color of your backdrop, think about the texture as well. A scuffed up, blackened old baking tray creates a very different feel to draped silk. Think about the way that different backdrops make you feel as you select them for your scenes and decide if that’s correct for the kind of story you’re trying to tell in your photograph.

Over time you will build up a library of different backdrops to use in your shots. Then you can create a whole variety of different styles of images just by switching out the backdrop. Keep your eye open when you’re out and about for potential backdrops to add to your library!

Thinking about texture

I love including texture in my still life photographs, and it has become a part of my style now. Scouring both high street and artists shops for interestingly textured table linens, bowls, and backgrounds for my still life images are favorite pastimes.

Along with all the other elements of a still life image, texture can really help set the mood. Are you shooting something rustic that would have its story helped by the introduction of some beautiful coarse fabric? Or maybe you’re photographing a more modern scene that would benefit from glossy backdrops and slick, shiny props?

It also adds interest and depth to your final image. If you look around the room you’re in I’m sure you’ll see a whole variety of different textures. Perhaps you have a smooth leather chair with a velvet cushion on it, placed next to a distressed wood coffee table. Our lives are a riot of different textures, and these affect our senses both visually and through touch.

Since you can’t touch the objects in a photograph, you need to tell the viewer what they’re like. Texture is the main way to visually convey what something would feel like if you reached into the photograph and touched it. With that in mind, pay attention to what the textures in your shot are telling your viewer.

Create a beginning, middle, and end

Just like a good story, a photograph needs a beginning, middle, and end. Except we usually refer to these things as foreground, middle ground, and background when it comes to visual storytelling. Creating a layered effect in your photographs helps to create depth in what is a two-dimensional object.

Try building your still life scenes intentionally. First of all, place your main object roughly where you think you’d like it to be. It helps if you put your camera on a tripod for this because you can keep the framing and focus consistent.

After you’ve placed your main object try creating some foreground interest. This could be some petals if you were photographing flowers, or perhaps the curled corner of table linen if you were shooting food. Anything that leads the eye into the shot without distracting too much from the main focal point is good. You want something that adds to the story.

Lastly, place a background element in your scene. In the shots above, I’ve added a yellow napkin which both creates interests and adds a contrasting color, but you could be more subtle. Your background itself could also be your background element if it were sufficiently interesting! It should be like a “full stop” to your composition; ending the viewer’s attention the same way that a full stop ends a sentence.

You might find it easier to play with compositional colors and shapes for the foreground and background if you use a shallow depth of field. Rendering these elements as out of focus in your scene helps to keep the viewer’s attention on the main focus of your image.

Finishing an image in post-processing

There’s no rule in creative still life photography that says the colors have to be true to life. Using different colors – or even turning your digital files black and white – can result in a change of mood and story.

Processing your still life images in Adobe Lightroom allows you to create duplicates of images and try out different color treatments while comparing them side by side. It’s great for black and white conversions too. The best thing about Adobe Lightroom is that the editing is completely non-destructive to the original file. This means you can try out everything from wild color treatments to something more conservative and always go back to the original file.

I touched on color grading your still life photographs in a previous article. It can help evoke different moods, bringing different colors to the fore. It can also help to make items really pop off the page if you use color grading in a way that emphasizes your main subject.

Color grading your shots can also help to contribute to a more coherent style in your work. You don’t always have to treat the color in your images the same way, but over time you might notice that you seem to pick up a style the more you shoot. This can help to make your work recognizable which you might find desirable.

Put it all Together

Now that you know the simple ways that you can improve your still life images it’s time for you to have a go. Get some inspiration, shoot some images, and then come back and let us see them in the comments!

Don’t be afraid to work slowly and try new things when you’re shooting still life. The objects in your scene are not going anywhere, and they won’t run out of patience as a portrait subject will! Also remember, you don’t have to show anyone the images if you’re not completely happy with them.


The post Simple Methods for Creating Better Still Life Images appeared first on Digital Photography School. It was authored by Charlie Moss.


Digital Photography School

 
Comments Off on Simple Methods for Creating Better Still Life Images

Posted in Photography