RSS
 

Posts Tagged ‘Life’

The gear that changed my (photographic) life: the Canon EOS 10D

18 Apr

This article was originally published in 2017 as part of our ‘Throwback Thursday’ series.

A few months ago I wrote a short article about the Canon EOS D30. The D30 was a groundbreaking camera in its day, being the first ‘affordable’ DSLR and the first to feature a large-format CMOS sensor. Yes, its autofocus system was woeful, and the LCD display on the back was about as useful as making a sketch from memory, but back in 2000, everybody wanted one.

I was definitely curious about the D30, but given that in 2000 I was a first-year undergraduate student, such an expensive camera was far beyond my reach. It would be another couple of years before I saved up enough money to buy my first DSLR, and the camera I eventually settled on was the successor to the successor of the EOS D30 – the counterintuitively named Canon EOS 10D1.

The break with Canon’s previous naming convention was appropriate, though. The 10D was a substantially new camera compared to the models that preceded it, and it replaced the D60 with an almost indecent haste (the D60 had been on the market for little more than a year before the 10D came along). Compared to the plastic-bodied D30/D60 it was better built, featured a far superior rear LCD (with a usable magnification feature) offered a more rounded styling, closer in spirit to the EOS-1D series, and was much quicker in operation.

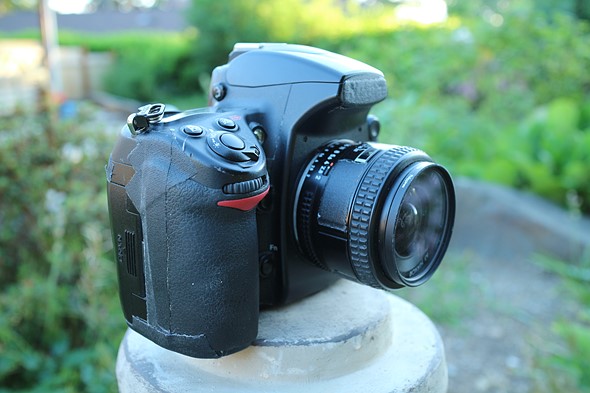
The 10D was a thoroughly modern camera in 2003, and remained on the market for some time. Canon took the basic form factor of the D60 and modernized every aspect of that model’s performance and styling.

The 10D’s DIGIC processor drove a blisteringly fast (ahem…) continuous shooting rate of 3 fps, operation was snappier, including reduced shutter-lag, and the 10D’s 7-point autofocus system was a huge improvement over the 3-point system in the D30 and D60, which seemed prehistoric even back then. Although the 10D’s 6MP CMOS sensor was based on the one previously used in the D60, Canon had refined the manufacturing process in the meantime. Consequently it offered slightly better resolution than its predecessor, superior noise performance and a wider ISO span, topping out at a grainy but usable ISO 3200.

Remarkably, despite all of these improvements, the 10D was also $ 500 cheaper than the D60.

Although it definitely wasn’t in the same ballpark as the EOS-1D in terms of speed or construction, the 10D beat the pants off Canon’s then-current pro sports model in terms of image quality. Significantly, the core specification of the 10D was close enough to the EOS 30 / Elan 7 that film holdouts didn’t have to feel too badly short-changed by the costly jump into digital.

With the EOS 10D’s accessory grip attached, it was almost possible to believe that I was shooting with an EOS-1D.

Almost…

So, to recap – the 10D offered a very usable sensitivity range of ISO 100-3200, 3 fps continuous shooting, 7-point AF system, magnesium-alloy body shell and a substantial price reduction. In 2003, it all added up to a hugely desirable camera.2

Canon EOS 10D Sample images (2004-5)

$ (document).ready(function() { SampleGalleryV2({“containerId”:”embeddedSampleGallery_8248806925″,”galleryId”:”8248806925″,”isEmbeddedWidget”:true,”selectedImageIndex”:0,”isMobile”:false}) });

Because it was so popular, the 10D was pretty scarce for several months after its introduction. After saving up my wages for an entire summer (a story told in more detail here), I ended up purchasing mine from a ‘big box’ high-street retailer, because it was out of stock everywhere else – something I later came to regret.

I decided to pull the trigger on a 10D for several reasons. In a rare attack of foresight, I determined that this digital thing probably wasn’t a fad, and with ambitions to become a photographer of some kind, it seemed sensible to dive in as soon as possible. And while previous DSLRs had felt like too much of a compromise, the 10D seemed to meet my most important criteria.

As a budding theatre and live music photographer, I was hitting the limits of what I could do with film, both technically and practically. Technically speaking, high ISO film exposed in marginal light and processed at your average high-street pharmacy simply doesn’t look very good – especially if you’re talking about high-speed color emulsions. From a practical standpoint, development and printing turnaround times were a problem if I wanted to get images to people quickly. And forget about serious commercial work – by 2003, the magazines and websites I was interested in working for were increasingly insisting on digital file delivery.

A typical monochrome conversion of a shot taken in the Assembly Rooms Theatre. The 10D’s highest ISO settings were grainy, but perfectly usable – especially when converted into black and white.

The first quasi ‘commercial’ work I ever did was head-shots and performance images for Durham University’s student theatre. Student productions rotated every few weeks, and every production wanted some prints to display outside the theatre. I can’t remember the first production that I shot digitally (was it Harold Pinter’s ‘The Caretaker’?)3 but compared to film, it was vastly easier. Ironically, I was a sort of caretaker for the theatre at the time, since I lived in a small flat above the lobby. Being able to shoot a dress-rehearsal in the theatre, then head upstairs to make my edit and print the images – sometimes all in the same evening – was a revelation. I can’t remember how much I charged for my services, but I made enough over a couple of years to buy a couple of new lenses.

And for a while it seemed like it was lenses that were the problem. Initially I had two lenses for my 10D. A 50mm F1.8 (of course), and a 24-70mm F2.8L. Later I added a 70-200mm F2.8L and a 17-40mm F4L (all purchased used). The 10D worked perfectly with all of them, except the 24-70mm. For whatever reason, camera and lens did not get on at all. Chronic back-focusing was apparent even through the 10D’s viewfinder, and this was before the days of AF micro-adjustment. The 24-70mm was simply unusable on my 10D, but it focused perfectly on other DSLRs that I borrowed from friends, or rented in an increasingly desperate attempt to figure out what was going on.

A live shot from one of my first proper commissions – a major awards show tour that came through Newcastle in 2005 – not far from where I lived at the time. It looks like I benefited a bit from someone else’s flash, in this shot. Thank you – whoever you were.

The retailer I bought my 10D from wasn’t particularly interested in helping, so I sent it back to Canon at least four times during the first year I owned it, shooting on film during the long intervals when it was away for service. Every time it came back as ‘up to specification,’ but the back-focusing problem remained. Finally, after a lot of back and forth, I send the 10D in with the troublesome 24-70mm, and was rewarded with a ‘fixed’ camera, complete – funnily enough – with a new serial number. Knowing what I know now, I should have sent the camera and lens back together in the first place.

Even this frustrating experience wasn’t enough to dull my excitement at owning and using the 10D. It really was a fantastic camera at the time, and it helped me gain a footing in the not-at-all-lucrative world of performance photography. My first magazine commissions were shot with the 10D. I learned about the benefits of shooting Raw with the 10D (albeit rather belatedly). The first camera I ever had confiscated at a music venue4 was the 10D. It was my main camera for a couple of very formative years, before being relegated as a second body beside to the truly magnificent EOS-1D Mark II (which I’m hoping to write about at a later date).

The 10D couldn’t do everything (it choked up when shooting several Raw files in a sequence, and in low light its off-center AF points were little more than decorative), but it opened up a completely new world for me.

One of my favorite bands of the mid-2000s was ‘Hope of the States’. I probably photographed them more than any other band, for a while. This shot is from another awards show in London in 2005. Despite the off-center composition, most likely I used the central AF point for this image, since the 10D’s off-center points didn’t work very well at all in low light.

And it’s a world I’m still living in. Without the 10D, there is no doubt in my mind that I wouldn’t have become a music photographer, and if I hadn’t become a music photographer, I probably wouldn’t have ended up as a photography journalist. Whether or not that’s a good thing is something I’m happy to leave to the commenters to decide.

Did you own a 10D? Let us know.

Read Phil Askey’s review of the EOS 10D (2003)

Canon EOS 10D Review Samples (2003)

$ (document).ready(function() { SampleGalleryV2({“containerId”:”embeddedSampleGallery_5774422920″,”galleryId”:”5774422920″,”isEmbeddedWidget”:true,”selectedImageIndex”:0,”isMobile”:false}) });


1 – A note on Canon’s confusing naming convention. The ‘D30’ because it was a digital camera with 3 million pixels. The D60 because it was basically a D30 with a new 6 million pixel sensor. And the switch to 10D because – I assume – Canon and Nikon’s lawyers had a little chat.

2 – In fact, just about the only people who weren’t singing Canon’s praises at the time were recent D60 owners.

3 – The Assembly Rooms – it’s still there, and this being student theatre, there’s every chance that they’re currently staging a production of Harold Pinter’s ‘The Caretaker’, too.

4 – It was all just one big misunderstanding. Specifically around two people’s definitions of the word ‘permission’.


If you have a piece of gear that you’d like to write about, we’d love to hear from you – and you might even get featured on the DPReview homepage. Leave us a short note in the comments and if you have a longer story to tell, send it to us, and we’ll take it from there.

Articles: Digital Photography Review (dpreview.com)

 
Comments Off on The gear that changed my (photographic) life: the Canon EOS 10D

Posted in Uncategorized


The gear that changed my (photographic) life: reader responses

17 Apr

Reader responses: the gear that changed your (photographic) life

As we share stories of the gear that made the biggest difference to our photography, we’ve asked DPR readers to respond with their stories as well. To our delight (and believe us, we need delight right now), hundreds of you have responded. While we’ve enjoyed reading them all, below are some excerpts from our favorites.

Find out what gear changed the lives of your fellow readers, and be sure to respond with your own if you haven’t already! We’ll continue sharing our favorites until, uh, something different happens in the world.

35mm F2 AIS Nikkor

Image via Wikimedia Commons by Paul1513

lightandaprayer: A 35mm f2 AIS Nikkor was one of the first lenses I bought new for use with a battered black Nikkormat FT2 I found at an LA pawnshop. I still own the lens; I sold the much-loved FT2 to a friend’s son and later replaced it with a mint FT2 that I still use today.

Ultimately the 35mm was replaced with a 35-70 2.8 Nikkor and it quickly became one of my most used work lenses. But a 35mm always had a place in my bag. I’m glad that I have hung onto much of my fave film-era prime glass. I simply enjoy using them more than any AF lens on both digital and film Nikons.

Read the full comment

Kodak Brownie 127

Image via Wikimedia Commons by Enrique

entoman: The gear that changed my life was a Kodak Brownie 127…. given to me as a Christmas present at age 8.

I think I knew instantly that I wanted to be a photographer. When I collected my black and white prints from the local chemist, a kind young lady assistant said “Ooh, these are good pictures, are you going to be a professional photographer when you grow up?”

She inspired me, so I took more pictures. And I’ve never stopped.

Read the full comment

Nikon D4

Razor Sharp Studios: For me the Nikon D4 that I purchased in 2013 took my sports photography to a whole new level. Until then I was barely getting 5 or 6 fps with a gripped D300. In the super quick world of horse racing, I would barely get a second worth of time at the finish line to capture the winning horse…

Being able to go up to 10 fps greatly helped me get more keepers in terms of published images. Still one of my favourite work bodies in the field.

Photo taken in Dubai in 2018 at the Meydan racetrack.

See more of his work on Instagram at @zoomnclick.

Read the full comment

Minolta SRT101

Photo via Wikimedia Commons user Hiyotada

gopherino: My Dad turned me on to photography… He was his high school yearbook photographer/editor, and 28 years later, so was I. By the time I went from Brownie to Instamatic to polaroid, it was time to learn to covet my Dad’s Minolta SRT101…

Photography, travel, tennis and business were interwoven threads that bound me with a most amazing father. He would have been 92 this year, and I think of him every time i pick up my Sony FF cameras and lenses.

Read the full comment

Nikkormat FT3

WV Communications: My dad let me use his Nikkormat FT3 in high school as the yearbook photographer. What a great camera, although the meter was a little wonky. If I asked nicely, I could use his black Nikon F2 with motordrive for football games. I felt pretty awesome clicking off frames of Tri-X.

By the time I was in college shooting for the school paper, I scraped enough money together to buy a brand new FM10, which while a great camera, was in a much lesser league than the classics. By that time, we were developing film and then scanning into a Mac Quadra for layout. I feel fortunate to have experienced the twilight of the film era. Now I’m getting back into film for the joy of it.

Read the full comment

Samsung EX1 / TL500

thielges: For me it was the Samsung EX1 (TL500). Having previously used a Konica Minolta A2, I saw the EX1 as being a lighter carry around camera, not a replacement for the A2. Then one day I was processing photos from both cameras and noticed how those from the EX1 really popped in comparison. Crisp, bright, and with noticeable broad dynamic range.
From then on I used the EX1 exclusively and bought another Samsung travel zoom to cover the tele end….

Read the full comment

Panasonic LX3

Samuel Dilworth: The LX3 was a revelation to me… It made the digital dream a reality, although I had other digital cameras before (notably a Nikon D60 and lenses).

I had moved to Paris, and the combination of that city’s beauty and this small, functional, Raw-capable camera gave me many photos I liked at the time. I should reprocess them with today’s Raw-developing software.

Read the full comment and see more sample photos

Articles: Digital Photography Review (dpreview.com)

 
Comments Off on The gear that changed my (photographic) life: reader responses

Posted in Uncategorized


DPReview TV: The gear that changed Jordan’s life

16 Apr

DPReview TV host Jordan Drake tells us about the one piece of photography gear that changed his life. Find out why it may be the reason he’s on the DPReview team today.

Subscribe to our YouTube channel to get new episodes of DPReview TV every week.

  • Introduction
  • The video camera that changed Jordan's life (Sony TRV-330)
  • The stills camera that changed Jordan's life (Panasonic GF1)
  • Why the GF1 changed Jordan's life
  • The wrap

Articles: Digital Photography Review (dpreview.com)

 
Comments Off on DPReview TV: The gear that changed Jordan’s life

Posted in Uncategorized


DPReview TV: The gear that changed my life

09 Apr

We all have some piece of photo gear that changed the way we work. In this video, DPReview TV host Chris Niccolls tells us what product rocked his world. The answer may surprise you.

Subscribe to our YouTube channel to get new episodes of DPReview TV every week.

  • Introduction
  • The wrist strap
  • The problem(s) with neck straps
  • Chris's journey…
  • The DIY wrist strap
  • Chris's favorite wrist straps
  • Conclusion
  • Whoops!

Articles: Digital Photography Review (dpreview.com)

 
Comments Off on DPReview TV: The gear that changed my life

Posted in Uncategorized


The top Still Life Photography Cleaning Techniques in Photoshop

08 Apr

The post The top Still Life Photography Cleaning Techniques in Photoshop appeared first on Digital Photography School. It was authored by Darina Kopcok.

The top Still Life Photography Cleaning Techniques in Photoshop featured image

Photoshop is a powerful program with a great variety of tools to help you get the most out of your images. From simple cleaning techniques to complex composites, the software offers everything photographers need for photo manipulation at all levels.

There are a variety of tools to help you, depending on your subject and goals for your image. With the exception of product photography, there are only a few key tools that you’ll need 90% of the time in retouching still life photography. Cleaning techniques in Photoshop are the foundation of beautiful imagery in this exciting but challenging genre.

Let’s take a look at what they are.

cleaning techniques in Photoshop
Canon 5D Mark III, EF 100mm 1:2.8, 1/160 f/9 ISO 100 Manual Mode, Evaluative Metering

The cleaning tools in Photoshop

There are just a few key tools that you need for cleaning techniques in Photoshop. These are: the Spot Healing tool, the Healing tool, the Clone Stamp tool, and the Patch tool. These tools are all you really need to take your still life images from good to great.

Each tool has its strengths and weakness. Some will achieve desired results more easily than others. When you combine the tools together, the result is a clean and refined image.

The top Still Life Photography Cleaning Techniques in Photoshop
Canon 5D Mark III, EF 100mm 1:2.8, 1/250 f/5.6 ISO 100 Manual Mode, Evaluative Metering

The Spot Healing Tool

The Spot Healing tool is the quickest way to fix little blemishes in Photoshop because it doesn’t require you to select an area to sample pixels from. Photoshop’s algorithm looks at nearby pixels and replaces them with pixels that it determines to be a good match.

When using this tool, you have some choices that will help Photoshop make the best guess as to what pixels would be the best replacement.

cleaning techniques in Photoshop

You can find the Spot Healing tool by the icon that looks like a bandaid. The shortcut for this tool is “J“.

When using this tool, you have some choices that will help Photoshop make the best guess as to what pixels would be the best replacement.

First, you want to choose a very soft brush. Start with a hardness of “0” and increase it slightly if needed. When retouching in Photoshop, every image is unique, so you have to assess your approach on a case-by-case basis.

Proximity Match will only look at the pixels around the sample area.

The top Still Life Photography Cleaning Techniques in Photoshop

When you use this tool, it’s best to choose Content-Aware Fill. This will ensure that the tool chooses pixels that will give you a seamless result.

In still life photography, it’s a good starting tool to quickly clean up any dust or small bits and blemishes before moving on to bigger blemishes or imperfections. It’s better than using the Spot Removal tool in Lightroom because if you use this tool repeatedly, it will slow down Lightroom’s performance very quickly.

Although the Spot Healing tool is one of the best cleaning techniques in Photoshop, one drawback to note is that using it excessively in a given area can lead to a plastic-like look. You may have to layer your use of this tool with others.

The Healing Brush Tool

The top Still Life Photography Cleaning Techniques in Photoshop
Still life should look clean and refined. Canon 5D Mark III, EF 24-70mm f/2.8, 1/160 f/9 ISO 100 Manual Mode, Evaluative Metering

The Healing Brush tool is similar to the Spot Healing Brush tool. However, when using this tool, you choose the area that you want to sample from. This gives you much more control, but of course, it’s not as quick as simply using the Spot Healing tool.

Imperfections blend into the surrounding areas. the brush works by matching texture, lighting, transparency, and shading of sample pixels to the pixels in the area we want to heal.

To use this tool, pick a source point to sample from. Think about what is going to work in terms of color and texture.

Start with a hardness of zero. You need a soft brush, but can add a bit of hardness if needed, depending on what you want to heal

Choose Aligned and Current & Below.

Choose where you want to select from and head over to where you want to “paste” the pixels

When utilizing cleaning techniques in Photoshop, the Healing Brush is a powerful tool because of the control it gives you.

cleaning techniques in Photoshop
Using the Healing Brush to clean up small flaws. Canon 5D Mark III EF 100mm 1:2.8 1/160 f/5.6 ISO 100 Manual Mode, Evaluative Metering

The Patch Tool

Using the Patch tool in Photoshop is another important tool for cleaning techniques in Photoshop. It’s like a large, customizable Healing Brush tool. The Patch tool repairs a selected area with pixels from another area. It seeks to match, lighting, shade, and texture from sample pixels to the source.

The top Still Life Photography Cleaning Techniques in Photoshop

It basically works like a “cut and paste” tool. However, it doesn’t work very well on larger areas because there usually are differences in tonality.

If you need to work on a larger area, you should attack the area by working in sections. Also, note that it also doesn’t work well on edges. In this case, you may have to use another tool or combine it with another tool for more precision.

The top Still Life Photography Cleaning Techniques in Photoshop

To use the Patch tool, select it from the sidebar or use the “J” key. Also, decide on your blending parameters.

The Patch tool’s Content-Aware mode works on empty layers by sampling below. It shuffles the content around a bit as it acts like a patch. If you’re using normal mode, don’t worry about lightness or color, as there will be a healing calculation when you release the mouse.

Use your mouse or pen to draw a slightly loose selection around the problem area (as pictured above) and then drag it to an area that might work to replace the pixels. You can drag it several times until you find a proper match.

The top Still Life Photography Cleaning Techniques in Photoshop

The Clone Stamp Tool

Perhaps one of the most popular and often used tools in Photoshop, the Clone stamp tool may possibly be your best ally when employing cleaning techniques in Photoshop.

The Clone Stamp copies pixels to a new location. With this tool, you’re literally painting over one part of an image with another. You can do this in both very small and large amounts, depending on the brush size you use.

Unlike the Patch Tool, it works very well in areas where you have texture, pattern, or an edge. It doesn’t work as well in areas where you have conflicting exposures on colors.

Although it’s a fantastically useful tool, when it comes to cleaning techniques in Photoshop, it might not work perfectly in every situation; you’ll need to combine it with other tools and techniques.

To activate the Clone Stamp, use the shortcut > Cmd/Ctrl + S.

cleaning techniques in Photoshop
Use the clone stamp to clean up areas with texture.

You can also use “T” to Transform to adjust further. This means that you can alter the size and rotation of your cloned area to make it blend better.

One last tip

The top Still Life Photography Cleaning Techniques in Photoshop
Canon 5D Mark III, EF 100mm 1:2.8, 1/160 f/5.6 ISO 100 Manual Mode, Evaluative Metering

When working with cleaning techniques in Photoshop, it’s a good idea to work using a lot of layers. This will allow you to go back a few steps if you make mistakes.

Using these tools together in Photoshop will give you the best results and will cover most of your bases when retouching your still life photography.

Do you have any other tips you’d like to share with us on cleaning techniques in Photoshop for still life images? If so, please do so in the comments section.

The post The top Still Life Photography Cleaning Techniques in Photoshop appeared first on Digital Photography School. It was authored by Darina Kopcok.


Digital Photography School

 
Comments Off on The top Still Life Photography Cleaning Techniques in Photoshop

Posted in Photography


Stuck at Home? – Ways Still Life Photography Can Keep Your Skills Sharp

08 Apr

The post Stuck at Home? – Ways Still Life Photography Can Keep Your Skills Sharp appeared first on Digital Photography School. It was authored by Rick Ohnsman.

Still life photography at home – 11 ideas featured image

As I write this, many of us are holed up at home. So what can we do to continue to practice our craft as photographers, have a bit of diversion and enjoyment, and maybe learn some new techniques? I suggest you give still life photography at home a try.

Stuck at Home? - Ways Still Life Photography Can Keep Your Skills Sharp
Still life images like this were what painters often did back before there was photography. This shot needed no fancy equipment. The “light-painted” shot used only a flashlight and a long exposure. This is just one of the techniques you can try if you want to give still life photography at home a try. Canon 6D with Canon 50mm “nifty-fifty” lens, 5 sec. f/14 ISO 100

If you’re a landscape, sports, fashion, portrait, or type of photographer who does work requiring you to get out and about, working at home doing still life photos on the kitchen table could be a new thing. Still life? Really? Why? Well, stay with me here and we’ll explore all the things you can learn.

1. Composition

In much of photography, you deal with the scene as you find it. Maybe one of the best things about still life photography is you are in complete control. You pick the subjects, the arrangement, and the background.

Making a shot in a hurry before the moment passes isn’t an issue. You can take your time, practice compositional concepts like the Rule of Thirds, the Rule of Odds, leading lines, negative space, simplification, background choice, depth-of-field, and many other artistic concepts of composition.

You set the scene and are in complete control. Few other genres of photography offer such an advantage.

Stuck at Home? - Ways Still Life Photography Can Keep Your Skills Sharp
A simple photo that explores some of the standard composition rules – Rule of Thirds, Rule of Odds, Leading Lines, etc. The monochrome version simplifies the image even further, making the shot even more about shape, line, tone, and texture. Sony DSC-HX5V, 1/100 sec. f/10 ISO 125

2. Lighting

Let there be light.

You decide what type, how many sources, whether to use hard or soft lighting. Might some colored lighting using gels give the look you want?

How will you use light to draw the viewer’s eye where you want it?

Have you explored the use of reflectors, fill light, or “flags” to block light from certain portions of the scene? Do you know what a gobo or a cucoloris is? A shoot, grid, or gridded-snoot?

Still life photography at home lets you be the set and lighting director.

Stuck at Home? - Ways Still Life Photography Can Keep Your Skills Sharp
It’s all about the lighting. I photographed the clock in front of a computer monitor with clock-themed images on it. The clock itself, I light-painted with a flashlight. Canon 50D with Tamron 17-50mm lens, 10 sec. f/18 ISO 100. The kiwi slices were placed in a glass dish and lit from below with an LED flashlight. LG G4 cellphone camera, 1/30 sec. f/1.8 ISO 200

3. Explore camera angles

A distinction between a snapshooter and a photographer is the former sees a scene, raises the camera to their eye, and snaps a shot. Little thought is given to composition and most photos are taken from the eye-level of the photographer. Yawn.

In a world where we are inundated with images, making yours different is the only way to stand out. Finding perspectives others haven’t thought of is one way to do that.

Stuck at Home? - Ways Still Life Photography Can Keep Your Skills Sharp
Learn to see differently. This is a window blind shot as illuminated by the morning sun. The photo was then rotated 90-degrees counter-clockwise. Canon 6D with Canon 24-105 f4 Lens, 1/6000 sec. f/16 ISO 800

Rather than always shooting from eye or tripod level, mix it up. Get up and look down for a birds-eye vantage point. Get down and try a worms-eye view. Have you heard of a “Dutch-tilt”? Maybe try looking through objects, using them as frames for your subject.

Much of my photography is landscape work, so I’m a dedicated tripod shooter. The advantages of that are, of course, stability and repeatability. I can leave the camera in a fixed spot and move other things; the lights and subjects, use long and different exposures and have variations of the same shot.

There’s something to be said, however, for getting off the tripod.

Going handheld will help you move more easily and explore different angles. Whatever you do, let me repeat something I said earlier…work to make your image different.

Stuck at Home? - Ways Still Life Photography Can Keep Your Skills Sharp
See if you can identify these household objects. When doing macro, and seeing differently, even stuck in the house you can find subjects for still life photography. (Clockwise from top left – Canon 6D , reversed lens, 1/40 sec. ISO 400, Canon 6D w/ reversed lens, 1/40 sec ISO 400, Canon 6D with Tamron 90mm macro lens, 1/4 sec. f/32 ISO 1250, Canon 6D with Tamron 90mm macro lens, 1.3 sec, f/32, ISO 1250

4. Lens selection

Doing still life photography at home is a great time to explore how different lenses can give you different looks.

You won’t have to worry so much about dust getting on your sensor as you change lenses and you’ll have a place to put lenses down while you do change them (rather than fearing a fumble onto the ground).

Try some things. Note how a wide-angle lens emphasizes the size of objects nearest the lens, how a telephoto compresses space between objects, or how a wide aperture reduces your depth-of-field. Learn what the “sweet-spot” is of each of your lenses, that aperture where the lens is at its sharpest.

Table-top photography is also a great opportunity to play with prime lenses, moving the camera or subject rather than zooming. I’ve grown to love my little Canon “nifty-fifty” for use in doing still life photography at home. This economical little lens might be one of my sharpest.

Stuck at Home? - Ways Still Life Photography Can Keep Your Skills Sharp
Using my shell/beach-stone collection and a pair of my wife’s sandals I was able to make this product-photography-like shot. Note the camera angle looking almost straight down. Canon 6D with Canon 50mm f/1.8 prime lens, 1/80 sec. f/20 ISO 200

5. Get close with macro

If you’ve not tried macro photography, being sequestered at home is a perfect opportunity to give it a try. It requires practice, patience, and a controlled environment where you are in charge of the composition and lighting (and there’s no wind). Being able to slow down and pay careful attention is a real plus, as being meticulous is a key to making good macro shots.

Stuck at Home? - Ways Still Life Photography Can Keep Your Skills Sharp
Often, your cell phone camera can take a great macro photo. This feather was shot with my LG V30 cell phone.

So you don’t have a macro lens? Try some alternatives.

The reversed-lens macro technique is a great way to dip your toe in macro waters on a budget. You will also find that common household objects become fascinating subjects when photographed at a macro level. Just be careful – macro-photography is contagious.

Stuck at Home? - Ways Still Life Photography Can Keep Your Skills Sharp
Don’t have a dedicated macro lens? This extreme macro, (the drop was only about 2mm wide), was shot with an old Vivitar film camera lens. The lens was reversed and combined with three (12mm, 20mm, and 36mm) extension tubes combined with the reversed lens at 28mm. This is also a 2-image focus stack – one for the drop and the other for the flower inside. Extension tubes on my Canon 6D. 15 sec. reversed lens, ISO 100

6. Tell a story

When choosing your subjects for a session of still life photography at home, give thought to telling a story. Rather than just choose random objects, think like a movie set director using the scene to tell the story.

Use your objects, background, lighting, camera angle, and whatever other photographic tricks you can summon. Your objective is to make the viewer see the story in your photo. A picture can be worth a thousand words, if you choose those “words” carefully.

Stuck at Home? - Ways Still Life Photography Can Keep Your Skills Sharp
Carefully selecting your still life subjects can allow you to create a story. My titles might help you understand what I was illustrating here. “Awaiting Santa” – Canon 50D, Canon 50mm prime lens, .5 sec,f/5.6, ISO 100 , “Family Album Photographs” – Canon 6D, Canon 50mm prime lens, f/22, ISO 800 , “Doc Brown makes a housecall,” – Canon 50D, XX lens, f/XX, ISO XXX , “The Conchologist” – Canon 6D, Canon 24-105 lens, 1/6 sec. f/4, ISO 100

7. Simple is better

A photo friend once said something that has stuck with me about a good photo – “Anything that doesn’t add, detracts.”

It’s important that, with a glance, the viewer immediately “gets it.” Without even thinking, they know what your intended subject is and what you are trying to communicate.

Landscape photographers must find ways to simplify the scenes they photograph, but as a still life table-top photographer, you have complete control.

Carefully consider what to put in and what to take out, where to concentrate the light, what to leave in shadow, and what is in and out-of-focus. The strongest photos will be those with a single, powerful message.

Stuck at Home? - Ways Still Life Photography Can Keep Your Skills Sharp
Sometimes the simplest images can be the most powerful. Canon 50D, Canon 50mm prime lens, 8 sec. f/22, ISO 100. Frozen with flash.
Stuck at Home? - Ways Still Life Photography Can Keep Your Skills Sharp
Ordinary objects can become much more interesting with dramatic lighting. This one was light-painted with a flashlight. Canon 6D, Canon 24-105 lens, 10 sec. f/11, ISO 100

8. Reflect on this

Reflections can elevate an otherwise ho-hum subject to a new and exciting level. When doing still life photography at home, a good method of creating a reflection is to use a piece of black plexiglass under your set-up.

Unlike a mirror, which will create two reflections due to the surface and the mirrored back of the glass, the acrylic sheet creates just one. Of course, the inventive photographer will find other ways to create reflections as well.

Stuck at Home? - Ways Still Life Photography Can Keep Your Skills Sharp
A piece of black plexiglass reflects the jar of marbles. The string of Christmas lights provides a background of bokeh highlights. Canon 6D, Canon 24-105mm lens, 1/8 sec. f/4, ISO 800

9. Bokeh and how to use it

“Bokeh” (however you pronounce it), is defined as the “blurred quality or effect seen in the out-of-focus portion of a photograph taken with a narrow depth of field.”

Still life photography is a great opportunity to explore how you can use it to simplify the background, keep viewer attention where you want it, and enhance the story you’re trying to tell. You can also try some special effects bokeh using patterns cut in pieces of paper and put on your lens. If you’re a shut-in frustrated photographer, why not brighten your day making some fun “bokehlicious” pics?

Stuck at Home? - Ways Still Life Photography Can Keep Your Skills Sharp
My Canon “nifty-fifty”, the 50mm f/1.8 prime which often isn’t much over $ 100 US, is one of my sharpest lenses. It also creates interesting bokeh highlights when opened up to a wide aperture. Canon 50D, Canon 50mm “nifty-fifty” lens, 1/25 sec. f/2.8, ISO 100

10. Food photography

Food photography is by its very nature, still life photography.

Top food photographers make good money by making food images look especially delicious. Study great food photos for clues as to composition, lighting, backgrounds, props, camera angles, and other tricks. Then see if you can emulate those tricks.

Maybe grab some cookies and a glass of milk, or a beer and some pretzels, and see what you can do to replicate great photo photography looks. Not only will you hone your photo skills, but when you’re done, you can have a snack.

Stuck at Home? - Ways Still Life Photography Can Keep Your Skills Sharp
Food photography certainly falls into the genre of still life. This is definitely something to try if you’re having to stay home. Canon 20D, Canon 50mm prime lens, 1/250 sec. f/4, ISO 200

11. For my next trick

Two different years I did what some call a “Project 52,” a photo assignment a week for an entire year. I made it a point to try some special tricks I’d never tried before – photographing smoke, water splashes, flames and sparks, and oil and water abstracts.

Using both long exposures, as well as the extremely short duration of a flash and a camera trigger, were things I learned.

If you need ideas, search dPS, or Google “creative photography” and see what catches your eye, then figure out how to do it yourself. Part of the fun of still life photography at home is using your creativity to make shots you’ve never before attempted.

Stuck at Home? - Ways Still Life Photography Can Keep Your Skills Sharp
Light for these shots is provided solely by the sparklers used. The long exposure allows for interesting light trails. Left – Canon 50D, Canon 50mm prime lens lens, 4 sec. f/11, ISO 100 Right – Canon 50D, Canon 50mm prime lens, 1 sec. f/11, ISO 100
Stuck at Home? - Ways Still Life Photography Can Keep Your Skills Sharp
Who says still life photos must be still? The “Raspberry Milk Splash” froze the action using the short duration of a speedlight, Canon 50D, Tamron 17-50 lens, 1/60 f/25, ISO 100. “Tumblin’ Dice” was a longer exposure with a second-curtain sync flash. Canon 50D, Canon 17-40 lens, 1.0 sec f/13 ISO 100

12. Advertising and product photography

Making the ordinary extraordinary is why skilled advertising photographers get paid the big bucks. Pick up a magazine and study the way common objects are staged, lit, and photographed. Then find some objects at home and see if you can emulate those looks.

What might look like a simple shot is often much more complex if you were to take a look behind the scenes. Don’t have a studio with a bunch of fancy lights and modifiers? No worry, see what you can do “on the cheap” with simpler lighting equipment. You might be surprised at how using brains rather than bucks can still result in a stunning photo.

Stuck at Home? - Ways Still Life Photography Can Keep Your Skills Sharp
When doing still life photography at home, remember that rather than having powerful studio lights or even Speedlights, you can simply increase the exposure time since your subject isn’t moving and you can shoot using a tripod. Small, inexpensive hardware store LED lights like these can work surprising well.

Something else to consider is making photos for items you’d like to sell on places like eBay, Craigslist, or other online sites.

Your item with a nicely lit and composed shot will attract much more attention (and perhaps even fetch a higher price) than a “quicky” snapshot someone else made with their cellphone.

If you plan to do a lot of this kind of work, you might also look into buying a simple light tent or perhaps making your own. For smaller objects, a collapsible light tent can be had for under $ 20.00 U.S. and will give you pretty good results.

Stuck at Home? - Ways Still Life Photography Can Keep Your Skills Sharp
Note the lighting set-up in the inset shot using just the cheap LED flashlights for illumination. When doing still life photography at home, learn how you can get big results with little lights. Canon 6D, Canon 24-105 lens, 3.2 sec, f/14 ISO 100
Stuck at Home? - Ways Still Life Photography Can Keep Your Skills Sharp
I wanted to accentuate the “emergency feel” of this police badge and so used a blue-gelled light on camera left and a red-gelled light on the right. Canon 6D, Canon 50mm prime lens, 2 sec. f/20 ISO 100.

13. No travel required

Even in times when we feel more comfortable traveling, not all of us can get to the exotic hot spots where we see other photographers going. I’m not expecting to get to Iceland anytime soon.

When doing still life photography at home, that’s not an issue. No one is going to guess that the location where you took that really cool still life photo was your kitchen table.

I formerly wrote for another now discontinued online photo site, Improve Photography, and did an article called “Tips for the Non-Traveling Photographer.” I’d encourage you to have a look, as almost all of the images in that piece were done at home or within 20-miles of my house. Imagination can often take you much further as a photographer than a passport.

Stuck at Home? - Ways Still Life Photography Can Keep Your Skills Sharp
Stuck at home? Drag out that collection of whatever you might have and photograph it for fun. “Campaign Buttons” – Canon 6D, Canon 24-105mm lens, 6 sec. f/22 ISO XXX. “Foreign Coins” – Canon 6D, Canon 24-105mm lens, 2.5 sec. f/22 ISO 100

14. Exercise for photo fitness

Want to be more photographically-fit? The key is the same as increasing your physical fitness – work out more.

The key to being a better photographer is routinely making more photos, learning new techniques, and practicing. Waiting to pick up the camera until you go on a special trip, attend an event or make family photos isn’t going to cut it if you want to be good. Unless you’re taking photos at least a few times a week, you’re probably not getting enough “photographic exercise” to be a strong photographer.

Stuck at Home? - Ways Still Life Photography Can Keep Your Skills Sharp
No flash, but high noon sun, a reflector, an aquarium, a high shutter speed, a fast trigger finger, timing, some luck and a lot of tries were what was needed for this shot. I had a fun afternoon making all kinds of splash photos on a picnic table in the backyard. Canon 50D, Canon 50mm f/1.8 lens, 1/3200 sec. f/4 ISO 400.

These are unusual times. You may find you’re not able to get out as much, perhaps not even going to your regular job. So why not use that free time to keep yourself engaged, entertained, and further your photo education?

Try some still life photography at home. Shoot, review, repeat.

As you get better, do as you would with exercise, and make the next session more challenging. Then post your images online and here in the comments section of this site so we can admire your work.

Be engaged, be productive, be learning and growing as a photographer and above all… Until next time, be well my friends.

The post Stuck at Home? – Ways Still Life Photography Can Keep Your Skills Sharp appeared first on Digital Photography School. It was authored by Rick Ohnsman.


Digital Photography School

 
Comments Off on Stuck at Home? – Ways Still Life Photography Can Keep Your Skills Sharp

Posted in Photography


The gear that changed my (photographic) life: my dad’s Nikkormat FT3

03 Apr

In an album at my parents’ house there’s a photo of me holding my dad’s camera at an embarrassingly awkward age in my childhood – or maybe I was just way ahead of the big, nerdy glasses trend? I remember the afternoon it was taken. My dad and I went for a walk in the park near our house and he showed me how to use his Nikon FT3.

I was hesitant – pushing the shutter felt like an enormous responsibility – and when I pointed it at a snow-covered tree stump I asked him “Is this a good picture?” Dad responded with something along the lines of “I don’t know, that’s up to you.” Making me rely on my own instincts rather than giving me a quick answer, what a classic dad move.

Eventually I, like many of my fellow elder millennials, decided the time was right to pick up film photography

It would be a long time before I revisited photography as a serious hobby, and eventually as a central component of my full-time job. Slowly I learned the ins and outs of digital photography, but film remained a bit of a mystery – intimidating, uncharted territory I would need to become familiar with if I really wanted to call myself a photographer.

Eventually I, like many of my fellow elder millennials, decided the time was right to pick up film photography. Dad sent me the FT3 and a box of lenses, and while I quickly learned that while the fundamentals were the same, there was indeed plenty to learn about this unfamiliar medium. Here is a list of things I discovered, in no particular order:

  • The FT3 is HEAVY. The thing is built like an absolute tank and would probably survive a nuclear disaster. It’s the cockroach of cameras.
  • Don’t take your T-MAX to Walgreens to have it processed.
  • I can’t rid myself of the urge to check the back of the camera no matter how many times I remind myself there’s nothing there.
  • There’s nothing quite like the excitement of seeing the finished product.

The FT3 gave me a full appreciation of all the conveniences that digital photography provides, and how much I had taken them for granted. It’s an entirely different frame of mind shooting a finite number of images and carefully considering your exposure settings. It gave me a feeling of having *made* an image in a way that’s not quite the same with digital.

I know that when I want to get back in the film game it’s going to be ready and waiting

I wish I could say that I shoot with the FT3 more often than I actually do. It’s been sitting on a shelf long enough to accumulate a significant layer of dust and I’m ashamed to admit it’s been playing the part of home decor more than functional camera. But its personal significance remains, and I know that when I want to get back in the film game it’s going to be ready and waiting – like an old friend, or some good advice your dad once gave you.

$ (document).ready(function() { SampleGalleryV2({“containerId”:”embeddedSampleGallery_1582060322″,”galleryId”:”1582060322″,”isEmbeddedWidget”:true,”selectedImageIndex”:0,”isMobile”:false}) });
Articles: Digital Photography Review (dpreview.com)

 
Comments Off on The gear that changed my (photographic) life: my dad’s Nikkormat FT3

Posted in Uncategorized


The gear that changed my (photographic) life: the Panasonic Lumix DMC-LX3

01 Apr
Looking back, the LX3’s clever use of its sensor wasn’t the aspect that had most impact on me.

In terms of my own photography, probably the most significant camera I’ve owned is my first SLR: a Pentax P30 (P3 in the US). It was a birthday present, bought second-hand when I was in my early teens and it introduced me to many of the basic concepts of photography. It’s the camera I shot with when I tried my hand in the darkroom and it still holds a special place in my heart. I’ve not used it for many years, but it was still working quite happily the last time I tried.

But the one that has perhaps ended up having most effect on me was the Panasonic Lumix DMC-LX3. I’d only been formally reviewing cameras for sixth months and the LX3 was the eighth camera I was asked to cover. All had been compacts, some had been better than others, but I recognized there was something different about the LX3.

The most significant camera I’ve ever owned is my Pentax P30 but the camera that’s had most impact on me is perhaps the Panasonic LX3

I’d enjoyed using the camera, which is always a good start, but it was when I got to selecting images for the gallery that it really hit home that this was something a bit special. Part of it was that the aspect ratio switch on the top of the lens had prompted me to make greater use of the camera’s multi-aspect sensor. But more than this, the pictures just looked better.

Looking back, there’s not a good shot in there, not amongst my images, at least. But the general image quality was so much higher than I’d got used to, from the middling IXUSes and woeful superzooms I’d owned and reviewed up to that point. It was the first time that it really sank in to me just how much difference sensor size and lens brightness could make.

Obscure but important details

Up until that point, when filling in that part of the spec sheet I’d rather glazed over, not fully appreciating the difference between the small sensor formats. And I suspect it’s not just me that struggles to mentally conjure the size differences between 1/2.3”-type and 1/1.7”-type sensors.

The LX3 uses a series of crops from a 11.3MP 1/1.63″ sensor. The largest of these crops is 66% larger than the 1/2.5″ sensor in the Canon A720 IS that I’d reviewed just beforehand. This is not something I was able to work out in my head.

I’m not great at fractions at the best of times but mix in some decimals, add an unfamiliarity with inches, demand the mental gymnastics of relating diagonals to area and garnish with some inherent inconsistencies of the naming system, and I won’t be able to spontaneously comprehend the impact.

But that difference was there to be seen.

Exponents of ?2

Then there was the brighter lens. F2.0-2.8 won’t get you much in the way of shallow depth-of-field in most circumstances, but it gets you a lot more light than the F2.8-4.8 lenses that had become typical elsewhere. Again, it’s not necessarily easy to think in exponents of the square root of two, but there are few enough commonly quoted F-stops that you quickly learn that F2.0 is a whole stop faster than F2.8 and that doubling the number would give a two-stop difference, so it’s easier to at least get a feel for the magnitude of the numbers.

Camera Lens Lens
(full frame equiv. terms)
Canon Powershot A720 IS 5.8 – 34.8mm
F2.8 – 4.9
35 – 210mm
F17 – 30
Panasonic Lumix DMC-LX3 (4:3 sensor region) 5.1 – 12.8mm
F2.0 – 2.8
24 – 60mm
F9 – 13
Olympus E-510
with kit zoom
14 – 42mm
F3.5 – 5.6
28 – 84mm
F7 – 11
It has its detractors, but the idea of equivalence can help overcome the ambiguity of sensor size and aperture impact, by reporting everything on a common basis. Here it’s clear that the LX3 offered capabilities closer to a contemporary DLSR costing twice as much, rather than a conventional compact.

The LX3 helped me see the light, if you’ll excuse the tenuous pun. There are a great many other things that make one camera enjoyable and another one less so, but so much of image quality stems from how much light you can capture. The LX3 did well on both fronts.

It would be another couple of years until I really understood how that additional light delivers the additional quality, but the LX3 was the camera that made me really recognize and appreciate the differences a bigger sensor and a brighter lens can make to almost any type of camera.

Straightening out a wrinkle

The LX3 was also interesting in that its lens required distortion correction and, when we first processed the Raw files from a pre-production sample, these corrections weren’t being applied. At a stroke it became clear how, almost overnight, compact cameras had gone from offering zooms that started at 35 or 36mm equiv., to suddenly gaining 28 and 24mm wide-angle capabilities: we’d just not encountered enough of these cameras with Raw to be able to see behind the curtain.

Wide-angle lenses had just started to become commonplace in compact cameras, but the LX3’s Raw output finally gave away how the change had come about.

With its limited 24-60mm equivalent focal length range, the LX3 also teaches a valuable lesson about the trade-offs required to create a camera that’s small, offers good image quality and could be launched at a comparatively affordable $ 500/£399.

Looking back, the LX3 was a great camera. Its JPEG color wasn’t a patch on the output of any modern camera but it helped inspire a resurgence of enthusiast compacts with short, bright lenses, before the 1” sensor rendering the whole lot obsolete. Back before equivalence simplified things, it was a camera that helped me cut through the fog of obscure sensor size terminology, learn the value of a lens that stays bright across its range, and appreciate that maths can provide a more compact alternative to extra glass when you’re designing a lens. None of us as individuals get to decide whether it’s seen as a classic, but it was a hugely significant camera to me.

$ (document).ready(function() { SampleGalleryV2({“containerId”:”embeddedSampleGallery_9924184790″,”galleryId”:”9924184790″,”isEmbeddedWidget”:true,”selectedImageIndex”:0,”isMobile”:false}) });


If you have a piece of gear that you’d like to write about, we’d love to hear from you – and you might even get featured on the DPReview homepage. Leave us a short note in the comments and if you have a longer story to tell, send it to us, and we’ll take it from there.

Articles: Digital Photography Review (dpreview.com)

 
Comments Off on The gear that changed my (photographic) life: the Panasonic Lumix DMC-LX3

Posted in Uncategorized


The gear that changed my (photographic) life: Nikon’s 35mm F2 AF-D

29 Mar
My workhorse combo for many years (with a cleaner UV filter, I promise).

I finished my undergraduate degree in visual journalism using a Nikon D80 while many of my peers were using Nikon’s D90, D300 and D700 cameras. I was, shall we say, a bit jealous. The change in overall image quality from the switchover of 10MP CCD sensors to 12MP CMOS sensors in all of Nikon’s camera bodies (both APS-C and full-frame) wasn’t lost on me, and I couldn’t help but think one of those cameras was really the key to making me a better photographer.

They weren’t. I got a fancy, brand-new D7000 when I graduated and got my first real job, and a very well-used full-frame D700 after that. They were great cameras (I still have that D700), but it wasn’t so much the cameras that helped me grow. It was my embracing of prime lenses that pushed me photographically, and chief among them, the Nikkor 35mm F2 AF-D lens which was all but glued to my D700 for years.

ISO 200 | 1/160 sec | F2.8

Up until this point, I thought I needed a decent wide-aperture zoom to cover everything. I felt I needed the versatility of varied focal lengths, and the idea of having a zoom became a crutch I leaned on. The F2.8 constant aperture on the Promaster 17-50mm lens (I swear, all the reviews said it was just a rebadged Tamron) mounted to my D80 helped during Bellingham, WA’s interminably short and dark winter days, but ultimately, it was $ 250 USD down the drain for my photographic journey.

Why? Because I spent so much time shooting at the wide end of the zoom range, trying to fit everything in and capture every essence of the scene in each photograph. By looking at the broader picture, I was missing some of the details.

Once I got that D700 and figured I needed some lenses made for it, I picked up a secondhand 35mm F2 on a whim and discovered that – for myself – I had been shooting photographs wrong a lot of the time.


Nikon 35mm F2 AF-D sample gallery

$ (document).ready(function() { SampleGalleryV2({“containerId”:”embeddedSampleGallery_6642767826″,”galleryId”:”6642767826″,”isEmbeddedWidget”:true,”selectedImageIndex”:0,”isMobile”:false}) });


Framing is everything. We ‘crop’ just about everything in our lives, whether we want to admit it or not. This is a philosophical debate in and of itself, but pretending we’ve come out on the other side of that debate, I quickly found that 35mm lenses provide my eyes with a sense of ‘here’s the most important thing in the scene, but with just the right amount of context’. The photos coming out of this lens and camera combo just felt right.

When I twisted my 35mm F2 D lens onto my D700 and peered through the viewfinder, I found that instead of trying to fit everything in a 26-28mm equivalent frame, I needed to pick-and-choose-and-layer things into my 35mm equivalent view. My photographs improved because of that. I thought to myself, this is a great way to document the world in front of me. I can get used to figuring out how to cut out the ‘fat’ in the image, and focus on the most important bits.

ISO 200 | 1/1000 sec | F8

Fast forward many years, and I still tend to judge a new camera system by whether or not it has a decent and affordable 35mm equivalent prime-lens option. I know that it’s not to everyone’s taste (sorry, Chris, I know you hate 35mm), but with the 35mm F2, my D700 was my carry-everywhere camera for years, and I can honestly look back on my time with it and realize how it helped make me the photographer I am today.


If you have a piece of gear that you’d like to write about, we’d love to hear from you – and you might even get featured on the DPReview homepage. Leave us a short note in the comments and if you have a longer story to tell, send it to us, and we’ll take it from there.

Articles: Digital Photography Review (dpreview.com)

 
Comments Off on The gear that changed my (photographic) life: Nikon’s 35mm F2 AF-D

Posted in Uncategorized


Fujifilm introduces X-T4 with in-body image stabilization and improved battery life

26 Feb

$ (document).ready(function() { SampleGalleryV2({“containerId”:”embeddedSampleGallery_0079559932″,”galleryId”:”0079559932″,”isEmbeddedWidget”:true,”selectedImageIndex”:0,”isMobile”:false}) });

Fujifilm has announced the long-awaited X-T4, a stills/hybrid that brings a much-desired feature to the X-T range: in-body image stabilization. The IBIS system on the X-T4 can reduce shake by up to six stops on eighteen of the company’s lenses, and up to five stops on the rest. Fujifilm has redesigned the shutter mechanism, which is rated to 300k cycles and is quieter than on the X-T3. The new shutter can support bursts at 15 fps.

While the X-Trans sensor is the same as the X-T3, the autofocus system has received an upgrade, with improved face and eye detection as well as subject tracking. Fujifilm has also added a new Eterna Bleach Bypass Film Simulation mode, support for ‘lossy’ Raw files and additional precision when adjusting tone curves.

The design of the camera has changed in several ways. The LCD is now fully articulating, an AF-On button has been added and the metering switch has been replaced with a stills/video toggle. The grip has been enlarged, the rear control dial protrudes a bit more from the back of the camera and the eyecup is less likely to come off. Settings for stills and videos are now separate, with each mode having their own Q Menu. The X-T4 uses the new NP-W235 battery, which can take 500 shots per charge using the LCD.

On the video front, the camera gains a 240 fps high-speed mode and interface improvements, but the loss of a dedicated headphone socket will not be popular with videophiles: a USB-C dongle must be used. Just like the X-H1, if you want a dongle-less microphone socket, you’ll need to buy the battery grip.

The Fujifilm X-T4 will be available this Spring, in your choice of silver or black. The body-only kit will be priced at $ 1699. When bundled with the 18-55mm F2.8-4 the price is $ 2099, and the 16-80mm F4 kit comes in at $ 2199.

Press release:

INTRODUCING THE FUJIFILM X-T4: CRAFTED FOR THE MODERN IMAGE-MAKER

Valhalla, New York – February 26, 2020 – FUJIFILM North America Corporation is proud to announce the launch of the FUJIFILM X-T4 (hereinafter “X-T4”), a flagship model of the X Series family of mirrorless digital cameras.

The X-T4 is an astounding imaging tool, packing a newly designed IBIS, a quiet new shutter unit, a new vari-angle LCD screen, a new Eterna Bleach Bypass Film Simulation, and a new, large-capacity, battery all into a compact and lightweight camera body. This camera is the perfect tool for today’s image makers and is an ideal multi-functional solution for visual storytellers to use in creating their stories.

More information about the key features of X-T4:

Designed for Quality and Speed

Fujifilm’s state-of-the-art X-Trans CMOS 4 sensor and X-Processor 4 combination sits at this camera’s core, pairing this exceptional, 26.1MP, back-side illuminated sensor with a powerful quad-core CPU to produce images with wide dynamic range and incredible image quality, doing so with lightning-fast processing and precision AF performance, right down to -6EV.

IBIS Puts Stability in the User’s Hands

A huge part of creating great photos or videos is being in the right place at the right time – and that often means making handheld images to get to the heart of the action. X-T4’s five-axis In-Body Image Stabilization (IBIS) provides up to 6.5 stops1 of image stabilization to make sure that, even in the midst of all the excitement, images remain steady and sharp. Combine this with the new four-axis Digital Image Stabilizer, and there’s lots of room to maneuver.

Steady, Reliable Performance

For any serious image maker, having a tool that can be relied upon to perform flawlessly whenever it is required is extremely important. For this reason, X-T4 features a newly developed mechanical shutter that is the fastest and most robust in the history of the X Series. Not only can it make 26.1 Megapixel images at 15 frames per second, but it is also rated for 300,000 actuations. Combined with its larger capacity battery that is capable of up to 600 frames per charge2, X-T4 has the power and the durability to give users the peace of mind that they’ll never miss the perfect opportunity.

Find the Best Angle for the Story

When chasing the perfect image, versatility is key. The 1.62 million pixel vari-angle touchscreen LCD featured on X-T4 can be adjusted to make it visible from a wide range of positions. This not only provides a high-quality monitor to frame with, but also provides quick and simple controls when they’re needed most. On the flip side, there are times when it’s necessary to minimize the light and distractions that a screen can create. That’s why X-T4’s LCD has been designed to easily fold away so it is completely hidden from view, leaving the updated 3.69 million pixel/100fps electronic viewfinder to focus on the moment at hand.

When a Story Needs Movement

The modern image maker is blurring the lines between photography and videography, and X-T4 has been designed to celebrate this new generation of hybrid creativity. With the simple flick of a switch, movie mode is activated, meaning X-T4 is capable of recording both professional-level DCI 4K/60p and Full HD/240p super slow-motion video. It is also possible to record F-Log footage in 10-bit color, straight to the card. What’s more, the innovative AF-C subject tracking works in low-light conditions down to -6EV and the camera’s use of a new, high capacity battery lets content creators push their creative limits.

Powerful Image Manipulation Made Easy

For over 86 years, FUJIFILM Corporation has produced photographic films that have been used by some of the world’s best-known moviemakers to create some of the world’s most successful movies. This legendary reputation in color science is celebrated with the company’s hugely popular selection of film simulation modes, which digitize some of the industry’s most iconic films and puts them right at hand. X-T4 introduces ETERNA Bleach Bypass, the newest addition to the much-loved collection of Film Simulation modes available in the X Series product line, which creates a beautiful de- saturated, high-contrast look that image-makers will find irresistible.

X-T4 will be available in both black and silver and is expected to be available for sale in Spring 2020 at a manufacturer’s suggested retail price of $ 1,699.95 USD and $ 2,199.99 CAD.

Fujifilm X-T4 specifications

Price
MSRP $ 1699 (body only), $ 2099 (w/18-55mm lens), $ 2199 (w/16-80mm lens)
Body type
Body type SLR-style mirrorless
Body material Magnesium alloy
Sensor
Max resolution 6240 x 4160
Image ratio w:h 1:1, 3:2, 16:9
Effective pixels 26 megapixels
Sensor size APS-C (23.5 x 15.6 mm)
Sensor type BSI-CMOS
Processor X-Processor 4
Color space sRGB, Adobe RGB
Color filter array X-Trans
Image
ISO Auto, 160-12800 (expands to 80-51200)
Boosted ISO (minimum) 80
Boosted ISO (maximum) 51200
White balance presets 7
Custom white balance Yes (3 slots)
Image stabilization Sensor-shift
Image stabilization notes Some lenses limited to 5 stops of correction
CIPA image stabilization rating 6.5 stop(s)
Uncompressed format RAW
JPEG quality levels Fine, normal
File format
  • JPEG (Exif v2.3)
  • Raw (14-bit RAF)
Optics & Focus
Autofocus
  • Contrast Detect (sensor)
  • Phase Detect
  • Multi-area
  • Center
  • Selective single-point
  • Tracking
  • Single
  • Continuous
  • Touch
  • Face Detection
  • Live View
Autofocus assist lamp Yes
Manual focus Yes
Number of focus points 425
Lens mount Fujifilm X
Focal length multiplier 1.5×
Screen / viewfinder
Articulated LCD Fully articulated
Screen size 3
Screen dots 1,620,000
Touch screen Yes
Screen type TFT LCD
Live view Yes
Viewfinder type Electronic
Viewfinder coverage 100%
Viewfinder magnification 1.125× (0.75× 35mm equiv.)
Viewfinder resolution 3,690,000
Photography features
Minimum shutter speed 30 sec
Maximum shutter speed 1/8000 sec
Maximum shutter speed (electronic) 1/32000 sec
Exposure modes
  • Program
  • Shutter priority
  • Aperture priority
  • Manual
Built-in flash No
External flash Yes (via hot shoe or flash sync port)
Flash X sync speed 1/250 sec
Drive modes
  • Single
  • Continuous (L/H)
  • Bracketing
Continuous drive 20.0 fps
Self-timer Yes
Metering modes
  • Multi
  • Center-weighted
  • Average
  • Spot
Exposure compensation ±5 (at 1/3 EV steps)
AE Bracketing ±5 (2, 3, 5, 7 frames at 1/3 EV, 2/3 EV, 1 EV, 2 EV steps)
WB Bracketing Yes
Videography features
Format MPEG-4, H.264, H.265
Modes
  • 4096 x 2160 @ 60p / 200 Mbps, MOV, H.265, Linear PCM
  • 4096 x 2160 @ 50p / 200 Mbps, MOV, H.265, Linear PCM
  • 4096 x 2160 @ 30p / 400 Mbps, MOV, H.265, Linear PCM
  • 4096 x 2160 @ 25p / 400 Mbps, MOV, H.265, Linear PCM
  • 4096 x 2160 @ 24p / 400 Mbps, MOV, H.265, Linear PCM
  • 4096 x 2160 @ 23.98p / 400 Mbps, MOV, H.265, Linear PCM
  • 3840 x 2160 @ 60p / 200 Mbps, MOV, H.265, Linear PCM
  • 3840 x 2160 @ 50p / 200 Mbps, MOV, H.265, Linear PCM
  • 3840 x 2160 @ 30p / 200 Mbps, MOV, H.265, Linear PCM
  • 3840 x 2160 @ 25p / 200 Mbps, MOV, H.265, Linear PCM
  • 3840 x 2160 @ 24p / 200 Mbps, MOV, H.265, Linear PCM
  • 3840 x 2160 @ 23.98p / 200 Mbps, MOV, H.265, Linear PCM
  • 1920 x 1080 @ 240p / 200 Mbps, MOV, H.265, Linear PCM
  • 1920 x 1080 @ 120p / 200 Mbps, MOV, H.265, Linear PCM
  • 1920 x 1080 @ 60p / 200 Mbps, MOV, H.265, Linear PCM
  • 1920 x 1080 @ 50p / 200 Mbps, MOV, H.265, Linear PCM
  • 1920 x 1080 @ 30p / 200 Mbps, MOV, H.265, Linear PCM
  • 1920 x 1080 @ 25p / 200 Mbps, MOV, H.265, Linear PCM
  • 1920 x 1080 @ 24p / 200 Mbps, MOV, H.265, Linear PCM
  • 1920 x 1080 @ 23.98p / 200 Mbps, MOV, H.265, Linear PCM
Microphone Stereo
Speaker Mono
Storage
Storage types Dual SD/SDHC/SDXC card slots (UHS-II supported)
Connectivity
USB USB 3.1 Gen 1 (5 GBit/sec)
USB charging Yes
HDMI Yes (micro-HDMI)
Microphone port Yes
Headphone port No
Wireless Built-In
Wireless notes 802.11b/g/n + Bluetooth
Remote control Yes (via smartphone or wired remote)
Physical
Environmentally sealed Yes
Battery Battery Pack
Battery description NP-W235 lithium-ion battery & charger
Battery Life (CIPA) 500
Weight (inc. batteries) 607 g (1.34 lb / 21.41 oz)
Dimensions 135 x 93 x 84 mm (5.31 x 3.66 x 3.31)
Other features
Orientation sensor Yes
Timelapse recording Yes
GPS None

Articles: Digital Photography Review (dpreview.com)

 
Comments Off on Fujifilm introduces X-T4 with in-body image stabilization and improved battery life

Posted in Uncategorized