RSS
 

Posts Tagged ‘lets’

Let’s Get Up Close with Extension Tubes

26 Jan

If you want to get up close to your subject, closer than you can by setting your lens to its minimum focusing distance, then extension tubes are an excellent way of doing so.

Extension tubes and close-up photography

When you turn the focusing ring of your lens away from infinity, the front element moves out from the lens body. The distance between the front element and the sensor (or film) plane is called extension. When your lens is set to its minimum focusing distance, the front element can move no further forward. You have reached the limit of the lens’s design.

An extension tube is a hollow tube that fits between your lens and camera body. It moves the lens further away, increasing the extension of the front element. In turn, this lets you move the lens closer to the subject, increasing magnification, and in some cases even matching the 1:1 magnification of a true macro lens.

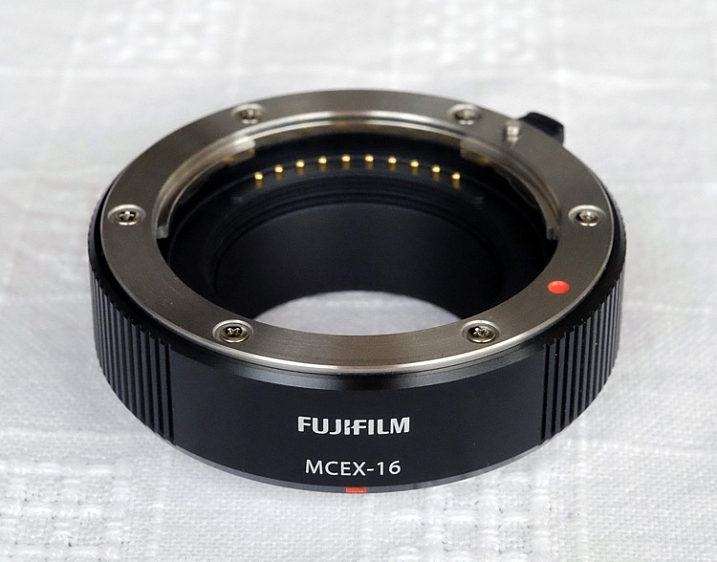
This is the Fujifilm MC-EX 16 extension tube that I use. The electrical contacts, that allow the lens and camera body to communicate, are visible at the back (more on the importance of this later).

Extension tubes and close-up photography

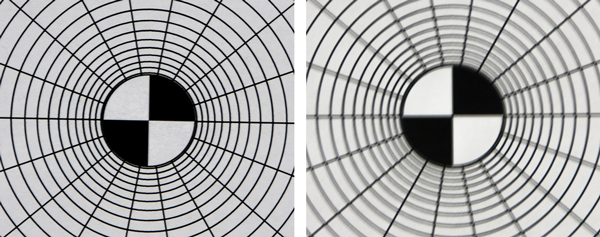
This is the Fujinon 35mm f/1.4 lens mounted to an X-Pro 1 camera. The distance between the front lens element and the sensor plane is the extension. This figure helps determine the closest point the lens can focus on (in this case 28cm), and subsequently the magnification.

Extension tubes and close-up photography

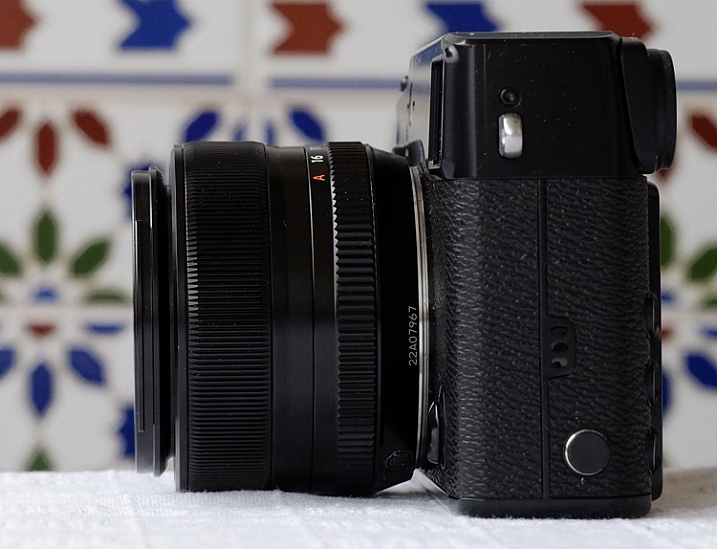
Below is the same lens with the MC-EX 16 extension tube added. You can see that the front element of the lens is now 16mm further away from the sensor plane. Now the lens can focus on a much closer point.

Extension tubes and close-up photography

Extension tubes versus macro lenses

Extension tubes are a great tool, but for the best possible optical quality and the most versatility you should choose a macro lens if you can. The reason for this is that increasing the extension of a non-macro lens means that you are using it outside the limits it is designed to work within. Macro lenses, on the other hand, are designed to give their peak optical performance at close focusing distances. They can also focus at infinity – whereas a lens fitted with an extension tube cannot.

The main benefit of extension tubes is that they are small and light. You can carry them around in case you need them, and leave your macro lens (if you have one) at home. They are ideal for anybody who travels a lot, or who wants to keep the weight of their camera bag down.

Cheap extension tubes versus good quality ones

You can buy inexpensive extension tubes from Amazon or eBay. These may look like a great deal but they break the electrical connection between your camera and the lens. If your lens has an electronically controlled aperture that means, you can’t stop the lens down. The camera also can’t record the aperture setting in the EXIF data.

Your camera will still work, and meter the subject to give you the correct exposure. But, given that depth of field at the widest aperture is incredibly narrow, and that you need to stop down to improve image quality, these cheap extension tubes are not of much practical use. They are only useful if you have a lens with a manual aperture ring.

The best ones to buy are those made by your camera manufacturer, or by a third party like Kenko or Vivitar, who make extension tubes that maintain the electronic connection between lens and camera. There is usually a choice of two sizes. The widest will get you closer, and the narrowest will come in useful when you don’t need to be quite so close. You may want to start off buying one or the other, but will probably end up buying both to cope with different situations.

Extension tubes and magnification

Extension tubes are most effective when used with lenses of focal lengths between 24-100mm. They are not so effective when used with telephoto lenses (for these, use a close-up lens). You can’t use an extension tube with some wide-angle lenses as it becomes impossible to focus with it fitted.

To see how much magnification an extension tube will give you with a specific lens, check the specifications on B&H Photo Video (United States) or Wex Photographic (UK). You may also be able to find the information on the manufacturer’s website. The instruction sheet that comes with the extension tubes also has this information, and you may be able to find a copy online.

There’s an easy formula for calculating how much extra magnification an extension tube will give you:

Increase in magnification = extension distance/lens focal length

For example, my Fujinon 35mm f1.4 lens has a magnification of 0.17x at its closest focusing distance of 28cm (I found this information in the spec sheet). Adding a 16mm extension tube means the increase in magnification is 0.45 (16/35), giving a total of 0.62x (0.45 + 0.17). This figure is a little academic, but it’s useful for evaluating whether you can add an extension tube to your lens and reach the 1:1 (1x) magnification, offered by most macro lenses.

Extension tubes in action

These photos show you how much difference an extension tube can make.

Extension tubes and close-up photography

This first image was taken with my 35mm lens. This is the closest I could get to the flowers.

Extension tubes and close-up photography

This was taken with the 35mm lens plus 16mm extension tube. Look at the difference.

Extension tubes and close-up photography

This photo was taken with a Canon 85mm lens fitted with a 12mm extension tube.

Extension tubes and close-up photography

This was taken with the same lens fitted with a 25mm extension tube. It shows the huge difference a different sized tube makes to the magnification.

Your turn

Do you own an extension tube? Which ones do you have and how useful are they? Let us know in the comments, it will be useful for other readers who are thinking about buying some.


Mastering PhotographyMastering Photography ebook by Andrew S. Gibson

My ebook Mastering Photography: A Beginner’s Guide to Using Digital Cameras teaches you how to take your camera off automatic so you can take control and start creating the photos you see in your mind’s eye. Click the link to learn more or buy.

googletag.cmd.push(function() {
tablet_slots.push( googletag.defineSlot( “/1005424/_dPSv4_tab-all-article-bottom_(300×250)”, [300, 250], “pb-ad-78623” ).addService( googletag.pubads() ) ); } );

googletag.cmd.push(function() {
mobile_slots.push( googletag.defineSlot( “/1005424/_dPSv4_mob-all-article-bottom_(300×250)”, [300, 250], “pb-ad-78158” ).addService( googletag.pubads() ) ); } );

The post Let’s Get Up Close with Extension Tubes by Andrew S. Gibson appeared first on Digital Photography School.


Digital Photography School

 
Comments Off on Let’s Get Up Close with Extension Tubes

Posted in Photography


Bookshop B&B: Novel Vacation Loft Lets You Run Storefront Below

09 Dec

[ By WebUrbanist in Boutique & Art Hotels & Travel. ]

scotland bookworms dream

If you have ever wanted to fully experience life as a bookseller in a small town by the sea, this quirky combination home-and-bookstore holiday rental may be just be the page-turner you need.

bookstore b and b

Located in Wigmore, Scotland, The Open Book is an independent retailer that lets interested parties both rent the flat above the store and oversee its operations during their stay. Guests inclined toward working vacations get to double as volunteers, performing all the duties of the shop owners, including opening, closing, shelf restocking and display design.

scotland bnb flat

It may not be a fun novelty for every type of traveler, but presents an opportunity well-suited for those of us who are bookworms, like to stay busy, learn new things and meet locals on getaways.

scotland vacation book store

At less than $ 50 USD per night for up to two guests, the work effectively subsidizes the stay, not to mention giving a more complete experience of the place.

bookstore scotland rental manager

With small bookshops closing up around the country (and the world), the owners wanted to bring more attention to their store and ask their guests to blog about and share their time as a store manager. People are also asked to stay for a minimum of a week, giving them time to learn the ropes and greet a variety of store visitors, from locals to fellow travelers.

Share on Facebook


[ By WebUrbanist in Boutique & Art Hotels & Travel. ]

[ WebUrbanist | Archives | Galleries | Privacy | TOS ]


WebUrbanist

 
Comments Off on Bookshop B&B: Novel Vacation Loft Lets You Run Storefront Below

Posted in Creativity


Don’t Lets Tart: 10 Odd & Unusual Pop-Tart Flavors

27 Sep

[ By Steve in Design & Products & Packaging. ]

pop-tarts-many2

Introduced in 1964, Kellogg’s Pop-Tarts have become a pop culture phenomenon boasting a host of odd & unusual flavors only a Nyan Cat could love.

pop-tarts-hello-kitty-1a

pop-tarts-hello-kitty-1b

Strawberry Pop-Tarts taste like strawberries, S’mores Pop-Tarts taste like S’mores, and Hello Kitty Pop-Tarts taste like Japan’s sweetest character cat, of course! Credit Flickr users Valent1ne Apogee and Jason Cosper (boogah) for the photos above.

pop-tarts-hello-kitty-1d

Hello Kitty Pop-Tarts featured “Meow-Berry” filling, whatever that is. Considering the pink frosting iss embedded with little Hello Kitty faces and red hair bows, the sickly sweet gooey red filling must be… noooo, let’s not go there! And ignore the chainsaw in Annellese Zemp‘s photo above as it has ZERO connection to the manufacturing of Hello Kitty Pop-Tarts. Yeah, that’s the ticket!

Scary Stuffed

pop-tarts-pumpkin-pie-2a

pop-tarts-pumpkin-pie-2b

Pop-Tarts may have been inspired by traditional English mince pies but does that mean every possible pie flavor works as a Pop-Tart filling? Whether it works or not, Kellogg’s is gonna give it a shot. Take Pumpkin Pie Pop-Tarts… you were expecting maybe Pumpkin Spice? No doubt those are on the way but for now (actually, autumn of 2013), harvest-flavor aficionados like Mike Mozart will have to feed their craving with Pumpkin Pie Pop-Tarts. Mike appears to be enjoying them but will he look so cheery after nomming all 16?

Patriotart

pop-tarts-american-idol-3a

pop-tarts-american-idol-3b

pop-tarts-american-idol-3c

Hmm, last time someone ate a flag (we’re lookin’ at you, Zoidberg) there was hell to pay. Such considerations didn’t seem to bother Kellogg’s and the producers of American Idol back in July of 2006, however. These limited edition Wild Strawberry-flavored and patriotically-frosted Pop-Tarts were promoted during the 2006 American Idol Tour. Judging from the crowd of snack-samplers above, free Pop-Tarts are the last thing America’s idle need.

Next Page – Click Below to Read More:
Dont Lets Tart 10 Odd Unusual Pop Tart Flavors

Share on Facebook


[ By Steve in Design & Products & Packaging. ]

[ WebUrbanist | Archives | Galleries | Privacy | TOS ]


WebUrbanist

 
Comments Off on Don’t Lets Tart: 10 Odd & Unusual Pop-Tart Flavors

Posted in Creativity


Let’s Decide Once and For All: Canon or Nikon?

20 Aug

Which is better? Canon or Nikon?

It feels like this debate’s been going on longer than the “chicken vs. the egg” one.

So we’re gonna help you decide–once and for all!–whether you belong on “Team Canon” or “Team Nikon.” (Spoiler alert: they’re both great so you’ll be a winner either way.)

Read a little about each camp and what makes them special. A decision won’t be far behind!

(…)
Read the rest of Let’s Decide Once and For All: Canon or Nikon? (604 words)


© Taylor for Photojojo, 2015. |
Permalink |
No comment |
Add to
del.icio.us

Post tags:


Photojojo

 
Comments Off on Let’s Decide Once and For All: Canon or Nikon?

Posted in Equipment


Modular, open-source Focal Camera lets you design your own SLR

18 Aug

Focal Camera is an open source project designed to teach participants about the inner workings of a camera. With access to a laser cutter, a supply of 3mm plywood and the directions provided, you can be well on your way to creating a camera of your own. Read more

Articles: Digital Photography Review (dpreview.com)

 
Comments Off on Modular, open-source Focal Camera lets you design your own SLR

Posted in Uncategorized


Updated Kodak Moments app lets you share, edit and print your images

04 Aug

An update to the Kodak Moments app makes it a one-stop-shop for editing, sharing and printing, eliminating the need for a separate app to send images to Kodak’s Picture Kiosks. Read more

Articles: Digital Photography Review (dpreview.com)

 
Comments Off on Updated Kodak Moments app lets you share, edit and print your images

Posted in Uncategorized


Shutterfly’s new TripPix app lets iPhone users order albums

13 Jun

Shutterfly has introduced TripPix, an app that turns photos snapped with an iPhone into physical albums. The app assembles 15 to 30 photos from a trip into a single album, which can be styled to reflect the kind of adventure they depict. Read more

Articles: Digital Photography Review (dpreview.com)

 
Comments Off on Shutterfly’s new TripPix app lets iPhone users order albums

Posted in Uncategorized


Lending a Hand: Selfie Arm Lets You Fake Your Friends

02 May

[ By Steph in Design & Products & Packaging. ]

selfie arm 5

Never mind that given its skin tone, this arm-shaped selfie stick kind of makes it look like you’re dragging a corpse around. Mounting your cell phone onto the end of it to shamelessly selfie away in public places might make you look ridiculous to bystanders while you’re doing it, but at least in the finished photos, you appear to be having a great time with a living companion.

selfie arm 4

selfie arm 3

Artists Aric Snee and Justin Crowe collaborated on the ‘Selfie Arm,’ which is exactly what it sounds like. Poking fun at the self-photography phenomenon and examining the relationships between humans and technology, the device is thoroughly tongue-in-cheek. Ten limited edition, signed copies of the prototype will be made.

selfie arm 2

selfie arm 1

Lightweight and portable thanks to its fiberglass construction, the Selfie Arm also makes for a conversation-starting accessory if you walk around with it poking out of your bag, so maybe it can actually help you meet a human companion who will take photos for you – no fake severed limbs required.

Share on Facebook


[ By Steph in Design & Products & Packaging. ]

[ WebUrbanist | Archives | Galleries | Privacy | TOS ]


WebUrbanist

 
Comments Off on Lending a Hand: Selfie Arm Lets You Fake Your Friends

Posted in Creativity


Is Your Tripod Sturdy Enough? Let’s Test it

12 Jan
If you are looking to take long exposure night shots like this 10 second exposure of downtown Marietta, Ohio, you'll need a quality tripod to give your camera a stable base.

If you are looking to take long exposure shots like this 10 second night image of downtown Marietta, Ohio, you’ll need a quality tripod to give your camera a stable base.

One of the most important pieces of equipment for a photographer to have access to is a sturdy tripod. You might be tempted to purchase just any tripod without regard to whether or not it is up to the job you are asking it to do, but a strong and stable tripod can be the difference between a great image and a blurry one.

Warning: a high-quality tripod is not cheap! If you want a really functionable tripod, be prepared to invest more than a few dollars. However, in this article we are going to look at some ways you can test the tripod you are currently using to see just how effective it is. To begin, let’s examine a couple of tips that can make any tripod a little more stable.

Tips for making your tripod stable

  • Tip #1 – If you are using your tripod for a long exposure, avoid extending the center column with the mount above the fulcrum.
  • Tip #2 – When setting the height of your tripod, make use of the thicker top sections of the legs before the thinner, less stable lower sections.
  • Tip #3 – If your tripod has different types of feet available, use the spiked feet to secure the ground for outdoor landscape shooting. When shooting indoors, use the rubber feet to prevent skidding on smooth flooring.
  • Tip#4 – When shooting outdoors on windy days, be sure to secure your camera strap. If the strap is blowing in the wind it will cause your tripod to move.

Many photographers can be observed with their cameras mounted to tripods extended beyond their intended specifications. You may have heard that your tripod should be strong enough to hold a bowling ball. While this sounds funny, it’s a good idea to have a tripod that is rated for more weight than the combined weight of your camera and largest lens. For example, a tripod having no movement with a mounted camera and a 28mm lens may allow unacceptable movement with the same camera and a 300mm or larger lens.

Regardless, even the best tripod will have some movement. Approximately 80% of the movement will most likely come from the head and the Quick Release mount, and very little actually from the tripod legs. There are many potential sources of vibrations, so let’s look at a series of tests that can help you determine if your tripod is up for the job you are giving it to do.

Test Method #1

Make a test pattern similar to the one below, or download the one I used here.

Create a test pattern similar to this one.

Create a test pattern similar to this one.

Mount your print on a stable object with no movement. It’s important that the print has no movement at all. Mount your camera and heaviest lens combo on your tripod. Set up your tripod close enough to the target so that it fills the frame.

What's wrong with this picture?  The center post is extended and the camera strap is hanging loose

This setup has some problems. Can you spot them? Refer to the tips above.

First, take a series of shots with a variety of different exposure speeds ranging for 1/100th of a second down to 1/2 a second. Use a remote or cable release to start the exposures. It’s also a good idea to use your mirror lockup feature to remove any camera vibration from the process.

After completing this series of exposures, open the images in your choice of image software and check your target for any doubled or blurry lines which would indicate that your camera was moving during the exposures. If the faster shutter speeds are sharper than the slower ones, your tripod is not stable enough to use for shooting at slower shutter speeds.

If your images show that you are getting movement during your exposures, the next step is to determine what part of you tripod is causing the problem.

Shrink your tripod to its smallest height and repeat the test. If the results are not better, then your problem may be caused by your tripod head.

Your problem could also be caused by your tripod’s leg locks, so test again with legs extended to different lengths, extending one, two or three sections and taking the same series of test shots.

Repeat the process indoors, outdoors, and in windy conditions or with other camera and lens combinations.

Test Method #2 – Multiple Exposures

Many digital cameras have a setting for taking multiple exposures. If yours does, set your camera to take two or three exposures. Again using the test pattern, shoot a series of different shutter speeds ranging from 1/100th down to 1/2 a second.

If your camera doesn’t have the multiple exposure feature, you can still use this method by simply taking two or three different images, then layering them over top of each other in Photoshop, and adjust the blending method of each layer so that all layers are visible. If your tripod is doing its job, all three images will be right on top of each other.

The image on the left was created with a three shot multiple exposure set with a  1/2 second exposure on each. The fairly sharp image indicates that this tripod is up to the task. The image on the right was created with the same setting as the one on the left with another tripod, if you preview looks like this your tripod is not doing its job.

Both of these image were created with a three shot multiple exposure with a 1/2 second exposure on each. The sharp image on the left indicates that this tripod is up to the task. The image on the right was created with another tripod. If your preview looks like this, your tripod is not doing its job.

Test Method #3 – Live View

Use the same test pattern as in the ones above. Focus your camera on the center of the target. Turn on Live View and zoom the preview to show the center of the target as large as possible.

Remove your hands from the camera and tripod and see if the target remains still in your preview.  If the target in your preview continues to move, your tripod is not providing a sturdy enough base for your camera to produce sharp images at a slow shutter speed.

Also in this method, try just touching and moving your camera strap. You may be surprised to see the preview move from just the slightest touch.

Test Results

If your tripod did not pass these tests, it is probably time to start looking for a better one. Be sure to check that the tripod is rated to support the weight of your camera and your largest/heaviest lens. If the tests show that your problem is in your tripod head, the solution might be as simple as replacing the head. If you have any other tips to enhance your tripod’s stability, please post in the comments below.

googletag.cmd.push(function() {
tablet_slots.push( googletag.defineSlot( “/1005424/_dPSv4_tab-all-article-bottom_(300×250)”, [300, 250], “pb-ad-78623” ).addService( googletag.pubads() ) ); } );

googletag.cmd.push(function() {
mobile_slots.push( googletag.defineSlot( “/1005424/_dPSv4_mob-all-article-bottom_(300×250)”, [300, 250], “pb-ad-78158” ).addService( googletag.pubads() ) ); } );

The post Is Your Tripod Sturdy Enough? Let’s Test it by Bruce Wunderlich appeared first on Digital Photography School.


Digital Photography School

 
Comments Off on Is Your Tripod Sturdy Enough? Let’s Test it

Posted in Photography


LensRentals’ new Keeper program lets you buy rental gear

04 Oct

U.S.-based LensRentals has announced an expansion to its photo equipment rental service that allows photographers to purchase the gear they’ve borrowed. This gives renters a try-before-you-buy option and lets those who have become enamored with their rental equipment keep it forever. Learn more

Articles: Digital Photography Review (dpreview.com)

 
Comments Off on LensRentals’ new Keeper program lets you buy rental gear

Posted in Uncategorized