RSS
 

Posts Tagged ‘lets’

Toy Photography Lets Hobbyists Work While They Play

11 Jan

Chris McVeigh didn’t reach paid photography through any of the usual routes. He didn’t study photography, didn’t work as an assistant and he didn’t even have photography as a goal. His background was in writing for technology magazines and providing illustrations and animation for online advertising. It was only when the economic downturn left him with less demand from his regular employers, and more free time for creative experimentation, that he turned towards picture-taking. His images have since become regular additions to Gizmodo, they’re sold on RedBubble and Society6, and Lucasfilms has even put one of his photos on the front page of StarWars.com.

His success has been helped by the fact that Chris skirted around the competition for landscape photographs and wedding shoots. He produces a nearly unique set of pictures that he calls “toy photography.” He creates sets out of Lego figures and uses them to illustrate scenes.

Chris’s interest in Lego started as suddenly as his interest in photography. Like most people, Chris had left playing with plastic bricks in his childhood. Some friends, though, bought him some Star Wars Lego sets for Christmas… which he then ignored for about a year before assembling them.

“When I did finally break open the boxes and put them together, it was like a spark ignited within me,” Chris recalls. “However, it would be another few years and a dozen Star Wars sets before I was really hooked again.”

At the same time, Chris was playing around on Flickr, creating a series of comical self-portraits as part of a daily photo challenge. That series built an audience, won plaudits and gave him the confidence to buy his first DSLR.

breakfast

Photography: Chris McVeigh

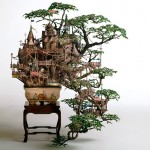
Each Set Takes Two to Three Weeks to Build

It wasn’t long before his growing interest in photography met the fun he was then having with Hasbro Star Wars figures. Lego, though, offered a more flexible platform, with parts that were interchangeable, allowing Chris to reuse pieces from any Lego theme from Batman to Harry Potter.

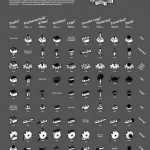
The props might be toys but creating the images isn’t child’s play. Chris usually has plenty of ideas but he starts designing using a Lego CAD app called Lego Digital Designer. That allows him to experiment with the build without spreading all the bricks in front of him. Once he’s happy with the design, he creates a test build in the real world then works to optimize the parts usage.

Some designs, he says, take as little as 24 hours but most require a development of two to three weeks before they’re ready to be photographed.

The shoot is a whole different challenge. Legos’s bricks are highly reflective, especially the darker colors, says Chris, so he has to be very careful about how he uses light and where he positions his panels. It’s no surprise that he typically builds and photographs new models just once a month at the moment, although he might produce a number of models concurrently and photograph them at the same time.

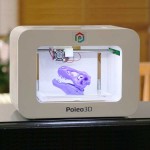
The result is a mixture of whimsy and smart photography. Scenes include a version of American Gothic, a reconstruction of Michael Jackson’s Thriller video (complete with dancing zombies) and a bowl of milk filled with floating stormtrooper heads. Reconstructions of early technology, including a Leica M9-P Hermes and a (sort of) working Polaroid Land Camera are popular too.

Chris’s intention when he began creating and photographing his models was little more than to enjoy some creative experimentation. But when he uploaded them to Flickr, the pictures continued to win attention, including from buyers.

“One of Gizmodo’s editors was a contact of mine on Flickr, and was impressed both with my capacity to design my own models and my ability to present those models with my photography,” Chris said. “So he contacted me through Flickr to see if I’d be interested in contributing to Gizmodo.”

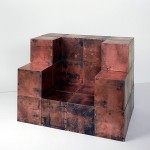
From Lego to Kozik’s Mongers Menthols

The technology website has published dozens of Chris’s pictures using them to illustrate articles about water pressure as well as explanations of the difference between GSM and CDMA. The site made a point of linking to Chris’s Web pages and even mentioned that he was able for commissioned work.

His work for Lucasfilms also came about as a result of his presence on Yahoo’s photo sharing site. Bonnie Burton, formally of the Official Star Wars blog, contacted Chris on Flickr after seeing his Star Wars action figure/chipmunk photography on Digg.

Chris isn’t the only photographer who has managed to make money setting up toys and taking their picture. Ryan Roberts paints with a slightly different canvas, using collectible figures from Japan and China’s urban vinyl toy culture that was popular in the 1990s. They might include the Kozik’s Mongers Menthols series that contained a smoking pile of poop, Domo’s Acid Sweeties, or Pete Fowler’s Monsterism.

“These figures went way beyond my childhood toys with so much color and attitude,” says Ryan on his website. “They were already tiny works of art by giant artists from other genres such as painting, illustration, silk screening, and street art.”

Ryan’s broader choice of figures gives his scenes a greater freedom of expression even if the models themselves are less familiar than the Lego characters used by Chris McVeigh. He sells his prints from his websites, has a DVD of toy-based shorts and markets a calendar of his images that costs $ 45.

What both these photographers have in common is the combination of a passion for a hobby — in this case a particular kind of children’s toy — and a knowledge of photography. Bring those two together and add the kind of photography-loving networking that can still be found on sites like Flickr and while you might not find yourself traveling down the usual route taken by professional photographers, you could well find yourself winning commissions, landing sales making some money doing a photo-based activity you love.


Photopreneur – Make Money Selling Your Photos

 
Comments Off on Toy Photography Lets Hobbyists Work While They Play

Posted in Equipment


Virtual Reality Nature: Helmet Lets Humans See the Forest Like Animals Do

05 Nov

[ By SA Rogers in Conceptual & Futuristic & Technology. ]

virtual-reality-forest-1

Dragonflies experience their brief lives on this planet 10 times faster than humans, and in 12 color wavelengths as compared to our three, a viewpoint that’s been impossible to comprehend prior to the arrival of virtual reality tech. Thanks to a project called ‘In the Eyes of the Animal’ by the creative studio Marshmallow Laser Feast, we can see the world the way super-sighted creatures do in a feat that’s being called ‘sense hacking.’

virtual-reality-forest-2

Aerial drone footage, CT scans and LiDAR remote sensing technology taken from the Grizedale forest in the UK gives the team 800 million data points upon which to render a hyper-rich environment in tandem with a real-time visual and audio engine. Visitors to the real, actual forest put on virtual reality headsets obscured with moss to take it all in.

virtual-reality-forest-3

virtual-reality-forest-4

virtual-reality-forest-5

“Visual engine generates and renders whole environment in realtime with certain generative elements which makes each experience unique,” explains Creative Applications Network, . “Visual engine communicates with 3D Audio Engine via OSC [OpenSound Control] to provide positional data as well as head tracking data from the Inertial sensors of the VR headset. The sound uses Binaural audio, a technique mimicking the natural functioning of the ear by creating an illusion of 3D space and movement around the head of a listener as immersive as reality can be.”

virtual-reality-forest-6

virtual-reality-forest-7

The result is an immersive experience at the intersection of science and digital art, and the images of the helmets in use in Grizedale Forest are pretty incredible, like something from a film. If you didn’t get a chance to see it yourself during the installation’s tour of festivals, you can watch the video to see an approximation of what it looks like.

Share on Facebook


[ By SA Rogers in Conceptual & Futuristic & Technology. ]

[ WebUrbanist | Archives | Galleries | Privacy | TOS ]


WebUrbanist

 
Comments Off on Virtual Reality Nature: Helmet Lets Humans See the Forest Like Animals Do

Posted in Creativity


Record Breaking: Magnetic Levitating Turntable Lets Vinyl Defy Gravity

23 Oct

[ By WebUrbanist in Technology & Vintage & Retro. ]

floating-record-turntable

Cool and clever trump common sense and normal physics in this levitating record turntable, which aims to bring a vintage technology into the future.

Mag-Lev Audio wants to push audio technology in a new (vertical) direction, creating an “uplifting experience of music” in the form of the world’s first floating record player.

floating-record-player

The device, the creators claim, not just about a look, but also the ability to “maintain the incredibly precise turning of the platter with sensor regulating software. Air is the smoothest medium with least amount of friction, which further elevates this project into a truly unique listening experience.”

record-player-feet

Feet support the spinning platter when it is not in use while stored-up power can bring the system to a comfortable stop and lift the needle in case of an outage (instead of it dropping the floating disc uncontrolled).

vinyl-with-leds

The makers boast the simplicity of the system: “pick a favorite record; turn the turntable on; move the tone arm into position; and lower the cueing lever; then let the smart-record player do the rest.”

hovering-turntable

night-light

hovering-disc-vinyl

A series of LED lights and digital displays lend the entire setup an air of cyberpunk futurism as well, reinforcing the ambient aesthetic created by the floating form of the disk. Whether this approach will take off remains to be seen, but the gadget has already raised enough money on Kickstarter to make it happen.

Share on Facebook


[ By WebUrbanist in Technology & Vintage & Retro. ]

[ WebUrbanist | Archives | Galleries | Privacy | TOS ]


WebUrbanist

 
Comments Off on Record Breaking: Magnetic Levitating Turntable Lets Vinyl Defy Gravity

Posted in Creativity


Kano Camera Kit lets anyone build and program their own camera

29 Sep

Kano, a maker of DIY educational tools, is seeking crowdfunding for a trio of DIY project kits, one of which is its new educational Camera Kit. The Camera Kit enables anyone to build a simple camera and then program it with various functions using drag-and-drop code, the goal being to impart an overall knowledge of how cameras and their related software work.

The camera is assembled from pre-made parts using an included instructional ‘storybook.’ DIYers can choose which lens they want to use — a macro, fisheye, or wide-angle — and can add both a flash and a trigger. The Camera Kit also includes a Tripwire Sensor which, when added, emits an infrared beam. If someone or something moves through the beam, the camera will snap a picture.

Various functions can be added via the programming software, including features like triggering photos via sound using an integrated microphone, adding real-time data to photos like the current weather, and more. The software also enables users to create their own photo filters.

Overall, the Camera Kit features the camera ‘brain,’ an LED ring flash, tripwire sensor, mode dial, lenses, viewfinder, battery, charging cable, tripod, lanyard, camera case, storybook and stickers.

The Camera Kit is one of three project kits Kano is seeking funding for on Kickstarter. As with the other two kits, the Camera Kit is offered as a $ 99 pledge, with estimated retail cost being $ 129.99. Kano anticipates shipping its Camera Kit to backers in March 2017.

Articles: Digital Photography Review (dpreview.com)

 
Comments Off on Kano Camera Kit lets anyone build and program their own camera

Posted in Uncategorized


Avast Photo Space lets you store more photos on your iPhone

18 Jun

Software maker Avast is known by most users for its mobile and desktop anti-virus products, but now the company has launched an app with a totally different use case. Avast Photo Space allows you to increase the number of pictures you can store on your iPhone by up to 7 times. 

It does so by reducing the resolution of the images that are stored on your device down to the resolution of the screen. At the same time, the app connects to your personal cloud service – currently Dropbox or Google Drive are supported –  where it stores the full-size versions. So you can always access the original files when needed, but still have a usable smaller image on your device. 

Avast Photo Space also comes with its own camera app which automatically transfers, optimizes and syncs your images right at the point of capture, for a totally seamless user experience. Given the iPhone does not offer any local storage expansion options the app sounds like a good idea for those users who are constantly on the verge of running out of photo storage space and don’t rely much on image magnification while viewing. Avast Photo Space is now available as a free download from the Apple App Store. 

Articles: Digital Photography Review (dpreview.com)

 
Comments Off on Avast Photo Space lets you store more photos on your iPhone

Posted in Uncategorized


Light Touch: Sensual Installation Lets Visitors Feel Luminescence

12 Jun

[ By WebUrbanist in Art & Installation & Sound. ]

light art shimmering walls

In a new light art installation dubbed Sense of Field, Tokyo artist Hitomi Sato lets visitors simultaneously see, touch and shape shimmers of light all on sides.

The immersive experience is facilitated by thousands of transparent tendrils extending from two walls opposite one another. Each visitor walking between them,touches bristles on both sides, creating waves of motion that can be both seen and felt.

light art hallway installation walls

Perspective matters: observers outside the installation see it all from another angle, experiencing the setup differently primarily as a function of gleaming luminosity. Once engaged through physical contact, sensations multiply as clothing and skin brush beads of heat and illumination.

light art installation tokyo

Of her work, the artist says that “when [she] sees the shimmer of light, images of various natural light comes to her mind. For example, ripples on the water’s surface, sunlight through the leaves of trees, rays from a break in the clouds, and the reflections on window’s glass.”

Share on Facebook


[ By WebUrbanist in Art & Installation & Sound. ]

[ WebUrbanist | Archives | Galleries | Privacy | TOS ]


WebUrbanist

 
Comments Off on Light Touch: Sensual Installation Lets Visitors Feel Luminescence

Posted in Creativity


To Process or Not To Process? Let’s Discuss

05 Jun
Processing a RAW file.

Processing a RAW file can allow a photographer to bring out the full range of tones in an image.

Often when I’m looking at photos in forums online, or interacting with photographers in person, inevitably someone will proudly claim that the image in questions is “Straight out of the camera”. Almost without fail, this leads to a huge discussion as to the merits of post-processing images, with those on the side of straight-out-of-the-camera images acting as if those photographers who process their images are somehow in the wrong, or are being deceptive.

There are merits to both sides, to be sure, but what’s amazing is how staunchly both sides defend their positions. At times the discussion becomes more heated than “Mac versus PC” or “Canon versus Nikon”. Having been on both sides of the debate, due to the nature of the work I’ve done in the past, I can understand both sides. However, I can also say that both sides can be somewhat misguided in their arguments at times.

Processing? NO!

Unprocessed sports image

Photojournalists covering sports or other news are often advised not to process images, and some news agencies outright forbid it.

Those who oppose any post-processing sometimes argue that it is a crutch, that they don’t need post-production to fix their images, because they get it right in camera. That said, there are plenty of reasons why you might not want to process your images, purity of the image aside.

In the photojournalism world, image manipulation beyond dodging and burning, contrast, and color correction, is a big no-no. Every few months a story shows up in the photo industry news websites that tell the sad tale of another photojournalist who lost his job or a contest because he or she removed or added an element from an image. In the photojournalism arena, this is understandable. Your job is to tell the story visually, and removing or adding elements in an image changes that story. So in that case, it’s best to keep the manipulation to a minimum. Some news agencies have forbidden their photographers from using the RAW format at this point, to reduce the chances that the images have been drastically altered. The goal here is truth, and while the photographer has already added their spin to it by making important compositional and exposure decisions at the time of capture, that’s where it should end.

Editor’s note: long time National Geographic and Magnum photographer Steve McCurry is under fire for this very issue right now. What are your thoughts on that, is he in the wrong or is it a witch hunt? 

Event Photography

Event photographers who shoot thousands of images in the course of a few hours often choose not to process images due to the amount of time it takes.

Another time where processing images is probably not a great idea is when you are covering large events. For instance, in a past life, I owned a studio that specialized in covering youth sports events, such as soccer and baseball tournaments. On the average Saturday afternoon, it was quite common for me to capture several thousand images on my own, and I often had a team of three or more photographers working for me! Speed is the key at these events, so it’s important that the images be sellable to the participants and their parents as soon as they are shot. This means exposure, white balance, contrast, and saturation must all be good straight from the camera. As soon as a game ended, those images were loaded immediately onto our server to be previewed by customers and participants. There was no time to adjust that many images individually.

Finally, there are those who simply prefer not to do that much work on a computer with their images. The act of capture satisfies their creative urges, and they are happy with their images.  There is nothing wrong with that. Some might say that working in this manner ensures their exposures are correct in every way when the image is made, which is certainly an admirable way of practicing the art of photography. This philosophy of course, also allows you to go out and do more photography, and spend less time on a computer.

Those who choose not to process get their images correct in camera, because to them there is no post-processing option. It helps them be better photographers at the time of capture, because they must pay attention to the details of the exposure, check their histogram, adjust white balance, and apply the correct picture style.

Post-Processing is Part of the Photographic Process

Processed Landscape Image.

Landscape photographers process RAW files in order to pull as many tones as possible out of the image, preserving shadow and highlight detail.

Often, when I hear the words “I get it right in camera,” it often sounds to me like “I don’t know how to use Photoshop.” True or not, for those on the side of post-processing, the photographic process doesn’t end at the press of the shutter button, in the same way it didn’t end for those of us who once shot film, then ventured into the darkroom to develop film and make prints. Those who have never been in the darkroom will likely never understand exactly how much manipulation could be achieved in the darkroom, from color and contrast adjustments, dodging and burning, to masking and photo compositing.

The truth is, there has NEVER been such a  thing as a “straight out of the camera” image.

(With possibly the exception of slides, but they can still be altered in the printing stage.)

Even for those today, who choose to not use Photoshop or other image processing applications, the image is far from being straight out of the camera. You’re simply letting your camera do the processing for you. When you choose a picture style, you’re telling your camera how to handle color, contrast, tone, and sharpness. You can create your own styles as well, manipulating color and contrast in camera to your own liking. Simply because the image wasn’t touched on a computer doesn’t mean it wasn’t processed, or manipulated. Knowing all of this, doesn’t it sound foolish to say that an image straight from the camera hasn’t been processed?

Let’s get this out of the way quickly: Post-processing is not a crutch. If I look at an image on the back of my camera and say “I’ll fix it later”, then it’s already a bad image, and no amount of processing is going to correct it. I am a staunch proponent of shooting RAW, for many reasons. As an avid landscape photographer, I know full well that the camera can have problems handling a scene with a lot of dynamic range, such as a sunset. I use optical filters on my lens to help with that, but there are still times when the image out of the camera fails to capture the image I saw with my eyes.

Close attention to the histogram is essential, ensuring that I have all of the tones I need to work with, careful not to clip highlights and shadows. This is very similar to Ansel Adams’ zone system. I know where objects in my scene should register on the histogram, and I adjust my exposure to ensure that’s what I get when I open Photoshop. As Ansel Adams once said, “Dodging and burning are steps to take care of mistakes God made in establishing tonal relationships.” The same is true for color correction.

This side-by-side comparison shows what is possible when processing a RAW file. On the left is the image straight from the camera, using the Standard picture style. On the right, the same image processed in Adobe Camera RAW.

This side-by-side comparison shows what is possible when processing a RAW file. On the left is the image straight from the camera, using the Standard picture style. On the right, the same image processed in Adobe Camera RAW.

As a landscape photo artist, I do not consider myself a documentarian. While I’m not personally a fan of compositing images together to create the finished piece, I do believe that all darkroom tools are on the table. This starts with RAW processing, and continues into Photoshop, where I will use adjustment layers, filters, and masks to bring the most out of my image. My intent is to bring out what I felt when I was at the scene, capturing the image. Very rarely, for me, does a camera do that without a little help from me.

Adobe Camera RAW

This is the tool palette in Adobe Camera RAW. Each slider is a separate control over the image, and each tab across the top represents another set of controls, enabling you to get the most out of the image.

Finally, and this is my biggest reason for shooting RAW when it is feasible, is the purity of the data. If you are capturing JPEGs straight out of the camera, the camera has already decided to throw away a good portion of the data you’ve captured. JPEGs are 8-bit files, across three color channels. For each of the three color channels (RGB) the camera is converting your image, at the time of capture, to 256 shades of gray per color, leaving your image with 16.7 million total possible colors. In addition, the image is compressed, and redundant data is discarded. This compression is lossy compression, and every time you open and do anything to your image, such as removing a dust spot, and then save it again, you are throwing away more data. Eventually, artifacts will appear in the image, ruining it and making it unusable.

Today’s RAW files are 14-bit files, meaning each color channel contains 16,384 shades of gray. This means 4 trillion total colors are available in the image. Issues such as banding and artifacting, which can arise when using JPEGS, are nearly nonexistent issues when editing a RAW file. I’ve seen JPEG banding in portraits where the skin tones change, and I’ve seen it happen in landscape images where the sky transitions from a vibrant blue to a pale orange at sunset. It can happen to any image. So even if I plan to do nothing to my image but remove a dust spot, it’s worth starting with a RAW file that requires some processing. Even if you oppose post-processing, it’s quite easy to apply a picture style the same way the camera does, and export a JPEG.

Processed Portrait

Portrait photographers often choose to process images to allow them to create a feeling about their subject, in addition to allowing them to retouch the image, and make their subject look their best.

Conclusions

Honestly, there’s no right or wrong way to work with your images. After all, a photographer’s work is very personal to them, and everyone chooses to work in their own way. When I can, I prefer processing my images and getting the most from the file. When the situation calls for it, I will shoot JPEG, knowing full well I won’t be able to make adjustments later, so I make sure it’s right when I push the shutter button.

What do you prefer, and why? Do you process or not?


Editor’s Note: This is one of a series of articles this week that are Open for Discussion. We want to get the conversation going, hear your voice and opinions and talk about some possibly controversial topics in photography. Let’s get it started here – do you agree or disagree with the points above? Do you have any others to add? Give us your thoughts below, and watch for more discussion topics each day this week.

See all the recent discussion topics here:

  • 7 Commonly Accepted Photography Beliefs Debunked
  • Is HDR dead? Some dPS Writer’s Thoughts on this Controversial Topic
  • How to Find your Personal Photographic Style
  • Why You May be Failing to Reach Your Potential as a Photographer

googletag.cmd.push(function() {
tablet_slots.push( googletag.defineSlot( “/1005424/_dPSv4_tab-all-article-bottom_(300×250)”, [300, 250], “pb-ad-78623” ).addService( googletag.pubads() ) ); } );

googletag.cmd.push(function() {
mobile_slots.push( googletag.defineSlot( “/1005424/_dPSv4_mob-all-article-bottom_(300×250)”, [300, 250], “pb-ad-78158” ).addService( googletag.pubads() ) ); } );

The post To Process or Not To Process? Let’s Discuss by Rick Berk appeared first on Digital Photography School.


Digital Photography School

 
Comments Off on To Process or Not To Process? Let’s Discuss

Posted in Photography


Let’s take a look: Canon PowerShot G16 iFixit disassembly guide

30 Apr

Canon PowerShot G16 iFixit disassembly guide

Before Sony ever put a 1″-type sensor in a compact, there was the Canon PowerShot G series. If you wanted extensive controls without all the weight of a DSLR, the G-series compacts were where you looked. The PowerShot G16 was the last in that line, sporting a 12MP 1/1.7″ sensor before Canon ushered in a series of 1″ compacts with a similar form factor.

The G16 may be gone from retailer’s shelves, but it is not forgotten. It’s also the subject of a recently published iFixit disassembly guide. The good people at iFixit publish product-specific disassembly guides, written to help common folk make simple repairs to their own electronic devices. They’re also an easy way to peek inside a modern digital camera without voiding your warranty. This week, we look inside the Canon PowerShot G16.

Canon PowerShot G16 iFixit disassembly guide

The first disassembly step (after taking the battery out, of course) is an easy one. The G16 offers an accessory attachment point around the lens, which is covered when not in use by a metal ring. Pressing the button on the front panel next to the lens frees the ring.

Canon PowerShot G16 iFixit disassembly guide

Next comes the removal of the screws. Many screws. Including this one hiding next to the viewfinder…

Canon PowerShot G16 iFixit disassembly guide

…And another tucked next to the ports. 

Canon PowerShot G16 iFixit disassembly guide

With the first round of screws removed the back chassis can be removed from the body, revealing just a peek at the motherboard. 

Canon PowerShot G16 iFixit disassembly guide

The front panel can also be carefully removed…

Canon PowerShot G16 iFixit disassembly guide

…And after removing another screw, the port cover is ready to go.

Canon PowerShot G16 iFixit disassembly guide

This ribbon cable on the back panel connects the buttons to the motherboard, and can be carefully removed.

Canon PowerShot G16 iFixit disassembly guide

The button circuit board comes free with the removal of a couple of tiny screws, revealing a cable connecting the motherboard to the LCD. Got your spudger handy?

Canon PowerShot G16 iFixit disassembly guide

In order to free the cables you’ll need to lift this little tab. A spudger is just the tool for the job.

Canon PowerShot G16 iFixit disassembly guide

And with that, the LCD is free.

Canon PowerShot G16 iFixit disassembly guide

The copper shield (likely for heat dissipation) can be removed. 

Canon PowerShot G16 iFixit disassembly guide

More screws are removed, freeing the viewfinder casing.

Canon PowerShot G16 iFixit disassembly guide

With the metal shield removed, the network of cables underneath is revealed. The ribbon highlighted here connects the top panel with the motherboard and will need to be removed from the motherboard with the trusty ol’ spudger.

Canon PowerShot G16 iFixit disassembly guide

The top panel is ready to go once it’s free of its connections to the motherboard. 

Canon PowerShot G16 iFixit disassembly guide

Lose a few more cable connections and the motherboard is ready for removal.

Canon PowerShot G16 iFixit disassembly guide

The front lens covering is next to go after the five screws connecting it to the front plate are removed.

Canon PowerShot G16 iFixit disassembly guide

At this point there’t not much camera left, and the lens module can be removed from the rest of the housing with one last screw removed.

Canon PowerShot G16 iFixit disassembly guide

But why stop at removing the lens? The viewfinder can be taken right off the top of the lens assembly.

Canon PowerShot G16 iFixit disassembly guide

A few more odd screws removed and that’s it – the Canon PowerShot G16 is reduced to its bare bones. 

Articles: Digital Photography Review (dpreview.com)

 
Comments Off on Let’s take a look: Canon PowerShot G16 iFixit disassembly guide

Posted in Uncategorized


Air Bonsai: Magnetic Levitation Kit Lets You Float Little Trees

21 Feb

[ By WebUrbanist in Design & Furniture & Decor. ]

floating air bonsai plant

Taking bonsai approaches to the next level, a Japanese company based out of Kyushu has raised over half a million dollars so far for its levitating (and rotating) tree system.

floating tree collection

The fauna in question span quite a range, from flowering plants to pine trees to mosses. The magnetic levitation tech supports up to 250 grams of whatever species you prefer (up to a few inches in width), powered via a simple AC adapter.

floating plant diy kit

floating tree demo

Of course, you can further decorate your little floating worlds however you like, with ceramic figures, lava rocks or other scene-setting touches.

floating bonsai tree system

The system comes as a DIY kit priced starting at around $ 200, depending on whether you wish to get both the mechanical system and a starter plant or just the technology portion. There are also both modern and traditional-looking, hand-crafted bases, depending on your aesthetic preferences.

Share on Facebook


[ By WebUrbanist in Design & Furniture & Decor. ]

[ WebUrbanist | Archives | Galleries | Privacy | TOS ]


WebUrbanist

 
Comments Off on Air Bonsai: Magnetic Levitation Kit Lets You Float Little Trees

Posted in Creativity


Mattel ThingMaker: New Device Lets Kids 3D-Print Their Own Toys

17 Feb

[ By WebUrbanist in Gadgets & Geekery & Technology. ]

mattel thingmaker

Toy-maker Mattel has announced a 3D printer with a novel application: a way for children to make their own custom toys using a simple digital interface. The app, designed by Autodesk, is easy to learn, fast to use and simple enough even younger kids can use it. The gadget itself is priced at $ 300.

3d home printer

The ThingMaker program comes with a number of templates and basic characters that can be customized in terms of color and texture, but also allows for from-scratch designs. Each design can be saved for future editing and printing as well, in standard formats that work with or beyond the printer.

3d custom toy printer

Finished objects are only one piece of the puzzle, however: the idea is to also allow for printing, connecting and assembling larger creations from smaller parts. Ball-and-socket joints can be easily included for attachment purposes, helping facilitate complex dolls and action figures. Eventually, Mattel may also facilitate combinations and accessories associated with existing branded toy lines, like Barbie and Hot Wheels.

3d printer interface

Various safety measures have been included to keep kids safe, from an automatically-locking door to a retractable print head. For liability reasons they are listing it as a device for kids ages 13 or older.

mattel device

“In today’s digital age, it’s more important than ever for families to transcend the digital world and make their ideas real,” said Aslan Appleman, senior director, at Mattel. “ThingMaker pushes the boundaries of imaginative play, giving families countless ways to customize their toys and let their creativity run wild.”

Share on Facebook


[ By WebUrbanist in Gadgets & Geekery & Technology. ]

[ WebUrbanist | Archives | Galleries | Privacy | TOS ]


WebUrbanist

 
Comments Off on Mattel ThingMaker: New Device Lets Kids 3D-Print Their Own Toys

Posted in Creativity