RSS
 

Posts Tagged ‘Lens’

Four Under-Used Tools in Lightroom’s Lens Correction Module

30 Aug

hacking photography, mike newton, architecture,

Almost every lens changes the way your image looks by warping it in some way. Each lens can create barrel distortion, vignetting at big apertures, chromatic aberration, and more.

Some lenses have more distortion than others. Let’s look at four tools in Lightroom’s lens correction module that are a lifesaver

1. The easy button – lens profile corrections in one click

Before lens corrections:

lens corrections, lightroom

Brick wall at 16mm, f/2.8, ISO 1250. You can see the ‘bulge’ in the middle because the horizontal lines are not parallel. Also notice the dark corner vignetting from shooting wide open at f/2.8

After one-click lens correction:

hacking photography, brick wall, lens correction, barrel distortion

Same settings as above but with lens profile correction applied. Note the parallel horizontal lines and no more dark corners.

I shot this wall on a 16-35mm f/2.8 lens at f/2.8 to illustrate the ‘bulge’ in the middle and vignetted corners. These are distortions from the Canon 16-35mm f/2.8L II lens.lightroom 5 lens profile corrections,

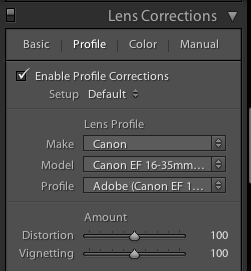
Lightroom is already loaded with profile corrections for this specific lens! Just click “enable profile corrections” in the “Profile” section of the Lens Correction module and Lightroom will fix the distortion for the lens you used!

Finding your lens profiles on older versions of Lightroom

As Lightroom keeps rolling out newer versions, it rolls out profiles from newly released lenses. If you are using Lightroom 3 from 2010 but have a lens that hit the market in 2012, Lightroom won’t have it in there.

You can go download Adobe Lens Profile Creator to look up your lenses, grab their profiles, and manually add them to Lightroom.

I use the profile corrections on almost all of my images

Unless you have a very specific reason to manually deal with it, I suggest that you just use Lightroom’s built-in profile corrections most of the time.

While you can certainly change all these lens corrections manually, in most cases it makes more sense to let Lightroom do the hard work for you.

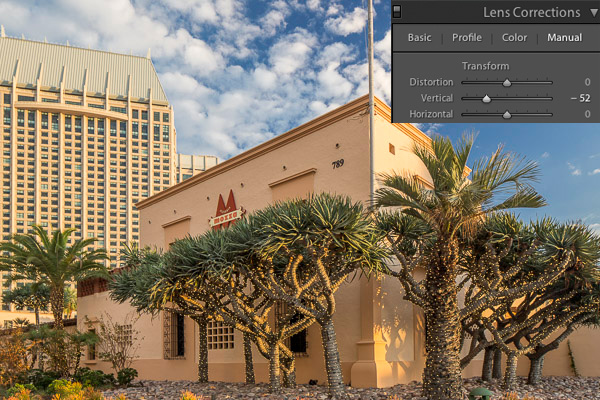
2. The vertical slider

Pizzeria Mozza San Diego, architecture photography, keystoning, hacking photography

The problem

I photographed this shot above for a commercial builder. Notice how the building in the back is falling over, and the one in front has vertical lines that aren’t parallel? Rather than repeat this excellent DPS article (Why are my Buildings Falling Over? A Short Guide to Perspective Distortion and Correction in Photography) that describes why this happens, I’ll show you how to correct it.

The solution

I pull the vertical slider to the left until the lines are parallel.

hacking photography, architecture photography, pizzeria mozza, lens correction, lightroom 5

Crop it

Notice anything weird? When you shift the vertical axis you lose some of the image. Architecture photographers use tilt-shift lenses to correct this in camera without losing any of the image.

Since I didn’t have one at the time, I corrected it in Lightroom by cropping the white part out.

tilt-shift, hacking photography,

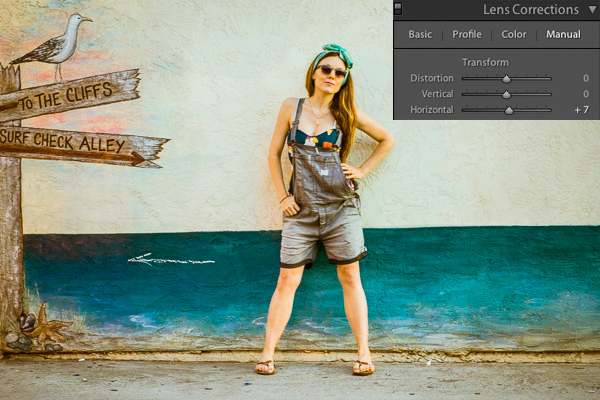
3. The horizontal slider

Sometimes you might be in a hurry and shoot a photo that needs to be slightly shifted horizontally in post. I did this during a fashion shoot.

Hacking Photography, model, horizontal shift

The problem

I took the photograph without realizing I was slightly positioned to the side of the wall vs. straight on. If you look closely, you can see the line where the wall hits the ground, and that it slightly angles from bottom left to top right.

The solution

Using the horizontal slider and shifting it slightly to the right will tilt this photo so the right side appears to come closer to the viewer and the left side moves further away from the viewer. The result is that now the photo is perfectly square with the wall and the line along the bottom is level.
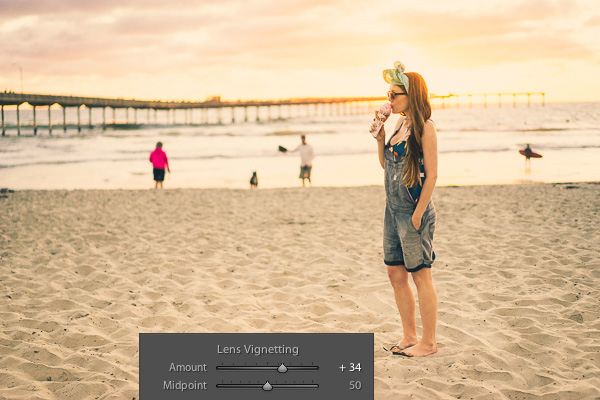
hacking photography, lens corrections

4. Vignette slider

The problem

When shooting at big apertures most lenses create some form of vignette, meaning dark corners in the photo. Sometimes these can be attractive, but sometimes you don’t want them.

I shot this photo at f/1.8. Do you see the dark corners? I want to remove those.

hacking photography

The solution

Simply pull the vignette slider in the Lens Correction manual module to the right to reduce a vignette.

vignette, hackingphotography.com

Vignettes are a matter of personal preference. I don’t think the first photo looks bad with the vignette, I just wanted it without it. You can use the vignette slider to create or enhance a vignette by pulling the slider to the left.

Pro tip: if you’ve cropped the image at all, you will want to use the post-crop vignetting tool in the “effects” dialog box. The vignette slider in the lens corrections module affects the original image size, regardless if you’ve cropped it.

If you want to see these tools in action, check out the video below:

I hope you found this helpful – happy editing!

The post Four Under-Used Tools in Lightroom’s Lens Correction Module by Mike Newton appeared first on Digital Photography School.


Digital Photography School

 
Comments Off on Four Under-Used Tools in Lightroom’s Lens Correction Module

Posted in Photography


Lensbaby announces availability of LM-10 Sweet Spot lens for mobile and Sweet 50 optic

21 Aug

Lensbaby has announced that its LM-10 Sweet Spot lens for mobile devices is available immediately through its online store and retailers worldwide. The LM-10 concept was unveiled back in April with a Kickstarter campaign that raised more than twice the amount needed to see the lens go into production. Alongside the LM-10, Lensbaby has also announced the Sweet 50 optic. The Sweet 50, a selective-focus 50mm lens, works with Lensbaby’s Optic Swap System and is also available now. Read more

Articles: Digital Photography Review (dpreview.com)

 
Comments Off on Lensbaby announces availability of LM-10 Sweet Spot lens for mobile and Sweet 50 optic

Posted in Uncategorized


New Sweet Spot Phone Lens from Lensbaby!

19 Aug

Extra photos for bloggers: 1, 2, 3

The “Sweet Spot” is more than an excellent name for a tiny pie shop or puppy massage spa … it’s exactly what you need to make your photos really stand out.

Meet the LM-10 Sweet Spot Phone Lens! With it, our pals at Lensbaby are bringing they’re years of creative lens making expertise to the phoneography game.

Stick a removable metal ring to your phone then attach the LM-10 via magnet to add brilliant blur and extra artsiness to your photos and videos.

The LM-10 sports on extra magnet on its end so you can snap on a second lens! Add a Photojojo Phone Lens for a bit of extra drama.

…and if you’re still thinking about those pies and puppies, the Lensbaby LM-10 will help you take more creative photos and videos of those too.

Find Your Sweet Spot
$ 70 at the Photojojo Shop


© Britta for Photojojo, 2014. |
Permalink |
No comment |
Add to
del.icio.us

Post tags:


Photojojo

 
Comments Off on New Sweet Spot Phone Lens from Lensbaby!

Posted in Equipment


Creating Swirly Bokeh with the Helios 44-2 lens

13 Aug

Hacking_Photography_Helios_44-2_Lens-0086

I recently bought a Sony A7 to compliment my Canon 6D DSLR. A friend convinced me that having small-form, full frame camera would be an entire different way of shooting. I value his opinion, so I picked one up. You can see how I used it in my last article:  when to trick your camera for the perfect exposure.

A New Love of Prime Lenses

I started off with a Sony 55mm f/1.8 and a 24-70mm f/2.8 lens that requires a Sony adapter. The 55mm shoots like a dream and is insanely light-weight.

The 24-70mm and adapter are super heavy and ridiculously front-heavy. It’s a great lens but after taking it out a few times, I concluded it wasn’t for me. I really enjoy having big apertures available for low light so I started looking for another prime lens.

A Lens Defect Leads to Awesome Bokeh

I was looking through photos on Flickr and noticed a few images in which the bokeh appeared to be swirling in a circular pattern. It was awesome and unlike anything I had ever seen!

I did some quick digging and found out this was called “swirly bokeh” and certain vintage lenses created this effect through a manufacturing defect. Well, this “defect” looked really cool to me and I wanted to incorporate it into my lens collection.

Meet the Helios 44-2 58mm f/2 Lens

sony a7, helios lens,

Sony A7 with Helios 44-2 58mm f/2.0 lens

I quickly found out that there is a cult following for a lens called a Helios 58mm f/2. This was a Russian-made lens that essentially tried to emulate a famous Zeiss one.

Several companies made these lenses over several decades, in the millions of units, so they aren’t exactly rare. This means they are really inexpensive because they are so common.

Where to Find the Helios 44-2 Lens

Out of the several models of these lenses, the Helios 44-2 model lens reportedly creates the “swirly bokeh” I was looking for. I did a quick search on Ebay and quickly found a ton of these for sale out of Russia and the Ukraine.

After looking at several of them I found one in excellent condition and ordered it for less than $ 50 including shipping. What a deal! I’ve seen plenty of people get even better deals on Ebay than I did.

Mounting it on the Sony A7 Camera

sony a7, helios lens, helios 44-2,

Mounting the Helios 44-2 to the Sony A7

These lenses were created for the Leica M-mount so I needed to get an M mount adapter for the Sony A7. I picked up a $ 10 Fotasy M42-NEX adapter which works perfectly.

It looks like a Franken-camera. I really dig how crazy this thing looks. Other photographers have stopped to ask what the heck this lens setup is.

Using Manual Focus and Manual Aperture Lenses

english setter, helios 44-2 lens,

The Sony A7 focus assist feature makes it easy to nail perfect focus each time.

I’ve never had a lens that was manual focus only, much less manual aperture. Instead of using a front or rear dial on the camera to choose your aperture, you grab a ring on the front of the lens to change it by twisting it to the left or right.

Some of you reading this are used to these type of lenses, but this was new to me.

Using the Manual Aperture Lens

While the aperture ring took some getting used to it really slowed my photo-taking process down. The aperture ring on the front of the lens reads 16 on the left, then 11, 8, 5.6, 4, 2.8, and 2 as you turn to the right. Simply twist the dial to change the aperture.

Manual Focus Rocks with the A7 and the Helios 44-2

Hacking_Photography_Helios_44-2_Lens-0431

Light pole in a Missouri truck stop parking lot surrounded by corn.

The standard challenge with manual focus is trying to eyeball the focus correctly. You might think your subject is in focus but you might be just an inch or two out of focus.

The A7 has focus assist (also called focus peaking) that lights up in-focus sharp details in red so you know what part of the image is in focus. This makes it so simple.

Taking a portrait? Twist the focus ring until a person’s eyes are rimmed in red and guarantee the eyes are sharp in focus. It’s so easy its almost like cheating!

Finally – the Swirly Bokeh

Hacking_Photography_Helios_44-2_Lens-0100

This unfocused image shows the popular swirly bokeh effect

I bought the lens right before a two-week trip to St. Louis, Missouri to visit family. It arrived the day before we left so it was ready to go right away. After a quick test shoot I decided I was going to shoot this Helios 58mm 44-2 exclusively for the entire trip.

Finding the swirly sweet spot

I took the lens into my in-laws yard to find out how best to find the swirly spot. When you shoot wide open at f/,2 close up to the subject, the background is a beautiful, buttery, soft bokeh.

flowers

This image was shot up close which caused the background to blur too much for the swirl I was looking for. I aimed up at a leaf that was a little further away, still shooting wide open at f/2.

It isn’t swirly bokeh yet, but it definitely has more shape to it. I’m getting closer.

branch bokeh

I took another shot with a subject at mid range, perhaps 4-5 feet away while still shooting wide open at f/2.

swirly bokeh, helios lens, helios 44-2

Can you start to see the swirl shape in the background? This photo showed me I’m getting closer. It seems that you need some decent distance from your subject, and you need some background that can fall into swirly bokeh in the distance.

I aimed up at a birdhouse about 8 feet away, which conveniently had a cute little toad in the lower peep hole and took the shot.

swirly bokeh, helios lens, helios 44-2

Success! Apparently you need a pretty good distance in the background so the little light spots and details can register into that swirl shape. I’m really in love with this Helios 44-2 lens.

The Helios 44-2 lens is fast with the f/2 aperture, weighs next to nothing, and was incredibly inexpensive at less than $ 50 including shipping. Even at very small apertures, it tops out at f/16, the lens puts out beautiful images.

Mississippi river,

The first of many manual focus prime lenses

I’ve had such a great time with this lens that I’m going to purchase more manual focus primes. The glass creates very unique images and I can’t wait to pick up my next one.

Have you ever mounted older lenses with your DLSR camera?

If so let me know what lens(es) you have in the comments below as I’m looking to try out even more. Share your images too please.

The post Creating Swirly Bokeh with the Helios 44-2 lens by Mike Newton appeared first on Digital Photography School.


Digital Photography School

 
Comments Off on Creating Swirly Bokeh with the Helios 44-2 lens

Posted in Photography


The Petzval Lens Reinvented

11 Aug

Extra photos for bloggers: 1, 2, 3

Your efforts to “make history” have been, uh, fun but haven’t achieved historical status yet. World’s Largest Pizza? Bold attempt.

Learn a few tips from the Petzval Lens, which found fame over 100 years ago and has now been reproduced to fit your modern camera

This brassy beauty is the modern day replica of the legendary Petzval lens first made in Austria back in 1840.

After painstaking studies, this lens has been crafted anew to fit your modern camera while remaining true to the original functionality and style.

The lens itself is beautiful and it takes even more stunning photos. The narrow depth of field gives your photos a swirly bokeh effect, useful for both portraits AND pizza photography.

Start Your Petzval (and Pizza) Adventure
$ 599 at the Photojojo Shop


© Britta for Photojojo, 2014. |
Permalink |
No comment |
Add to
del.icio.us

Post tags:


Photojojo

 
Comments Off on The Petzval Lens Reinvented

Posted in Equipment


Ricoh adds HD Pentax-DA645 28-45mm F4.5ED AW SR to medium format lens lineup

05 Aug

Ricoh adds a new lens to its 645 medium format lineup, the weather-resistant HD Pentax-DA645 28-45mm F4.5ED AW SR. Covering a 22-35.5mm equivalent range in full-frame terms, it uses 17 elements in 12 groups. It’s Pentax’s first optically stabilized lens, with SR Shake Reduction technology that claims to compensate for camera shake for an additional 3.5 stops. The lens is dust- and weather-resistant, becoming available in August for a price of $ 4,999.95/£3,399.99. Read more

Articles: Digital Photography Review (dpreview.com)

 
Comments Off on Ricoh adds HD Pentax-DA645 28-45mm F4.5ED AW SR to medium format lens lineup

Posted in Uncategorized


Lens Rentals Canada halts service citing ‘serious issues’ with Canada Post

01 Aug

Lens Rentals Canada has announced that it is temporarily not accepting new orders. A brief notice on lensrentalscanada.com cites ‘serious issues’ with Canada Post Corporation, and states that current orders will be shipped using Purolator Courier. An email that a reddit user claims was sent to him by Lens Rentals Canada is more to the point, stating that a Canada Post employee has stolen equipment in transit. No estimated timeframe has been given as to when orders will be accepted again. Read more

Articles: Digital Photography Review (dpreview.com)

 
Comments Off on Lens Rentals Canada halts service citing ‘serious issues’ with Canada Post

Posted in Uncategorized


Fujifilm updates X-mount lens roadmap through end of 2015

24 Jul

Fujifilm has updated the roadmap for its X-mount lenses up to the end of 2015. One extra lens has been added, while a second lens previously included has been formally named. The release order of three others has changed. The new models are the XF 90mm F2 R and XF 16mm F1.4 R, both of which are due by mid-2015. Read on to see the full roadmap and see the new release dates for the other upcoming lenses.

Articles: Digital Photography Review (dpreview.com)

 
Comments Off on Fujifilm updates X-mount lens roadmap through end of 2015

Posted in Uncategorized


LensRentals tests Lomography’s Petzval lens

11 Jul

We recently published a look at the Lomography Petzval lens, a modern version of a 19th century portrait lens. It’s a niche product and not something we typically cover, but an interesting adaptation of a classic design. Roger Cicala and the team at LensRentals went one step further – when a couple of copies rolled through the door, they subjected the lens to their usual optics tests. Why? Well, because why not? 

Articles: Digital Photography Review (dpreview.com)

 
Comments Off on LensRentals tests Lomography’s Petzval lens

Posted in Uncategorized


A look at the Lomography Petzval 85mm F2.2 lens

02 Jul

Lomography isn’t a company we’ve historically talked about much on DPReview; with its emphasis on low-fi, ‘shoot from the hip’ photography using plastic film cameras, it’s a long way from the typical interests of our readers. But last year the company came up with an interesting idea: to recreate a classic 19th century portrait lens for modern SLRs. The result is the Petzval 85mm F2.2, which is available now to fit Canon or Nikon SLRs. So what’s it like?

related news: Digital Photography Review (dpreview.com)

 
Comments Off on A look at the Lomography Petzval 85mm F2.2 lens

Posted in Uncategorized