RSS
 

Posts Tagged ‘Lens’

Canon announces EF 50mm F1.8 STM lens

11 May

Canon has announced its EF 50mm F1.8 STM lens, which uses a stepper motor for quieter and more responsive autofocus compared to its ‘Mark II’ predecessor. It also features a 7-blade circular aperture and minimum focus distance of 35cm – both improvements over the Mark II. This compact fifty is just 39mm long and weighs 160g, has a metal mount, and supports an optional integrated hood. Read more

Articles: Digital Photography Review (dpreview.com)

 
Comments Off on Canon announces EF 50mm F1.8 STM lens

Posted in Uncategorized


Contest – Win a Tamron 16-300mm Di II VC PZD Macro All-In-One Zoom Lens

05 May

ContestOver the last few years here at dPS, we’ve run very some very popular competitions with our partners to give away some of their great photographic products to lucky dPS readers.

We are lucky enough to be able to do it again this week.

For this contest, Tamron is giving away a Macro All-In-One Zoom Lens

Tamron 16 300mm Di II VC PZD Macro 750

Tamron 16-300mm Di II VC PZD Macro

This prize is designed to help every level of photographer create BETTER pictures. Tamron is the world’s most awarded photographic lens line. Here’s what you, our dPS reader, could win:

Tamron 16-300mm Di II VC PZD Macro – Retail Value $ 629
For canon, Nikon or Sony small-sensor cameras.

Learn a little more about Tamron here.

How to Win

To win this contest you need to:

  • Visit the lens information pages and learn more about the lens and its core use.
  • Leave a comment below and tell us WHY you’d like to win and HOW you would you utilize the lens. Please note: there is a limit of ONE entry per person.
  • Do this in the next 14 days and after May 20th, 2015, the team at dPS will choose the best answer and we will announce the winners in the following days.

The deadline to enter is May 19, 2015, Midnight PDT. Comments left after that date and time will not be considered.

Canon-Beach_ken-hubbard-resized.jpg

Photo by Ken Hubbad

By “best” – we’re looking for people who have an understanding of the lenses and how they will best suit their needs. So you’ll need to check out the product pages to put yourself in the best position to win.

There’s no need to write essay length comments to win – but we’re looking to hear what you like about the lens and how it would help your development as a photographer.

This competition is open to everyone, no matter where you live – but there is only one entry per person. To enter – simply leave your comment below.

tamron-logo.jpg

About Tamron

Disclaimer: Tamron is a paid partner of dPS.

googletag.cmd.push(function() {
tablet_slots.push( googletag.defineSlot( “/1005424/_dPSv4_tab-all-article-bottom_(300×250)”, [300, 250], “pb-ad-78623” ).addService( googletag.pubads() ) ); } );

googletag.cmd.push(function() {
mobile_slots.push( googletag.defineSlot( “/1005424/_dPSv4_mob-all-article-bottom_(300×250)”, [300, 250], “pb-ad-78158” ).addService( googletag.pubads() ) ); } );

The post Contest – Win a Tamron 16-300mm Di II VC PZD Macro All-In-One Zoom Lens by Darlene Hildebrandt appeared first on Digital Photography School.


Digital Photography School

 
Comments Off on Contest – Win a Tamron 16-300mm Di II VC PZD Macro All-In-One Zoom Lens

Posted in Photography


Lomography’s LC-A Minitar-1 Art Lens f/2.8 32mm lens available for pre-order

03 May

Lomography has introduced the LC-A Minitar-1 f/2.8 32mm to its ‘Art’ line of lenses. Like that of the original Lomo LC-A 35mm camera (and more recent LC-A+) the lens features a pancake design and Russian optics, aiming to preserve the ‘unique character of its vintage’ origins. The lens will be sold in a Leica M-mount, and is available for pre-order. Read more

Articles: Digital Photography Review (dpreview.com)

 
Comments Off on Lomography’s LC-A Minitar-1 Art Lens f/2.8 32mm lens available for pre-order

Posted in Uncategorized


Ansix introduces LensPacks: Rear lens caps with Velcro for bags

30 Apr

Ansix Engineering has taken to Kickstarter with its LensPacks, a rear lens cap backed with Velcro that can be attached to the inside of a camera bag. It’s designed to speed up lens changes – when a lens swap is necessary, the photographer can twist the current lens into the fixed lens cap, then twist a different lens off of another cap. Read more

Articles: Digital Photography Review (dpreview.com)

 
Comments Off on Ansix introduces LensPacks: Rear lens caps with Velcro for bags

Posted in Uncategorized


Massive $33,500 2450mm f/8 NASA lens surfaces on eBay

29 Apr

If $ 180,000 seems a bit steep for the Canon 1200mm f/5.6L lens B&H is currently offering in its used department, then perhaps this $ 33,500 NASA 2540mm f/8 lens on eBay sounds a bit more reasonable. That’s twice the focal length for a fifth of the price! Read more

Articles: Digital Photography Review (dpreview.com)

 
Comments Off on Massive $33,500 2450mm f/8 NASA lens surfaces on eBay

Posted in Uncategorized


Mitakon Speedmaster 85mm f/1.2 ‘dream’ portrait lens announced

18 Apr

Zhong Yi Optics has released information about an 85mm f/1.2 lens it intends to make available in May. The Mitakon Speedmaster 85mm f/1.2, which the company is calling ‘The Dream’, is aimed at still photographers as well as videographers, and has a covering circle suitable for full frame sensors. Click through for more information

Articles: Digital Photography Review (dpreview.com)

 
Comments Off on Mitakon Speedmaster 85mm f/1.2 ‘dream’ portrait lens announced

Posted in Uncategorized


Photographing Stars Using a Kit Lens

10 Apr

Pic 01 d5100 18mm f3 5 20sec iso1600

Looking at a starry sky while sitting in the open is always a soothing experience, but shooting those stars is a much better one. Have you seen those amazing starry skies and Milky Way photographs from professional photographers and wondered how to do this yourself but never tried it because you thought you did not have the proper equipment? Let me tell you, “You were wrong”.

If you own a normal DSLR camera and are interested in shooting stars (and the Milky Way), you can do this with your kit lens. I will explain the whole process step by step in the easiest possible way, so that even if you do not have much technical knowledge, you can understand and implement this method.

Basics of star photography

To get started, you need to have following points in mind:

  • A place away from the city lights. The less light pollution you have, the more chance of getting clear stars you will have.
  • A moonless night. Stars can also be shot on a full moon night, but the brighter the moon is, the more light pollution it creates, and the stars will not be as prominent.
  • A normal DSLR camera with a standard 18-55 mm kit lens.
  • A tripod

You can Google your surroundings for away from the city spots (Dark Sky) and moon phases at night. You should know beforehand in what direction, and at what time the moon is going to rise. That will help you a lot with composition of your images. A moonless night is always best to shoot stars.

Additionally, you can also use a compass app on your smartphone (for Android here) to locate the north star for star trails and you can also download an app called Star Chart (for iOS or for Android) or Google Sky just to give you an idea of which stars there are above you. Both of these apps also show you the direction of the Milky Way so you can directly shoot it and get amazing results.

These apps are pretty accurate, and with their help you can also see Mars, even with your naked eye (which I am sure you saw previously but were unable to differentiate it from stars). If you want to plan your shoot for future, or look for appropriate time sto shoot Milky Way in your location, you can download a desktop app Stellarium. Put in your coordinates and it will show you the direction of the Milky Way at a specific time, on a specific date of the year. Using this application, you can know exactly at what time of year, the brightest part of Milky Way will be above your location to shoot.

Pic 02 d5100 18mm f3 5 20sec iso1600

Camera settings

Now let’s get to the important part, camera settings. You will need to take control of your camera, keeping it in Manual mode. Change the mode to Manual and tune in the following settings.

Focal length: Set your focal length to the widest you have – e.g., 18 mm in the case of a kit lens. You can choose any focal length you want, but the more you zoom in (the longer the focal length is), the less stars you will be able to capture, and your optimum exposure time before star trails start to develop will also decrease (500 Rule).

Aperture: Setting your aperture to the widest option is key here – e.g., f/3.5 as in a kit lens. By using the widest the aperture, more light will enter through your lens giving you brighter stars and Milky Way.

Shutter speed: If you are only shooting stars and/or the Milky Way, set the shutter speed to 20 seconds or star trails will start to appear, giving the look of larger, unfocused stars. If you are wondering, why 20 seconds, here is the answer. Optimum exposure before you start getting star trails is calculated by dividing 500 by your focal length (also divide the answer by 1.5 if you are using cropped sensor.) So in the example of an 18mm lens on a cropped sensor – 500 divided by 18 = 27.78 divided by 1.5 = 18.52 (so roughly 20 seconds).

Pic 08 D5100 18mm f3 5 20sec ISO 1600 2

ISO: Start by keeping the ISO at 1600, and increase it later depending on your results. Keep in mind that greater the ISO, more noise there will be in your image. Although it does depend on signal to noise ratio of camera body you are using. High end or even new consumer camera bodies tend to produce less noise at higher ISOs, than do older ones, even three years old.

Shutter release: You need to have a shutter release (remote trigger) to avoid camera shake while shooting. If you don’t have a shutter release remote/cable, just use your camera;s 2-second or 10-second timer. That will minimize any blur in the picture due to camera shake.

It’s also best to switch OFF your “Vibration-Reduction” or “Image-Stabilization”, as the vibration of the motors can cause shake in the picture too.

Focusing the lens to infinity: Next, after putting up all these settings, the next most important thing left to do it focus your lens to infinity. As kit lens doesn’t have infinity marker on it, we will use hyper-focal distance values to focus the lens to infinity. Mount your camera and lens on a tripod, and focus it on any bright object far away at a distance of 20 feet or more. Point a flashlight towards camera from a distance of minimum 20 feet and focus on it if you are in the dark, and don’t have anything to focus. Once the lens is focused beyond 20 feet, its hyper-focal distance will project to infinity and your stars will be sharp. It will also help in getting anything in the foreground sharp too.

Don’t forget to switch your lens to M (Manual) after focusing, or else it will start to hunt for focus again when shutter is pressed.

If your lens is not focused to infinity, you will get the Milky Way but the stars will not be as sharp and will appear bigger. Same can happen if you go for a longer speed than required for not causing stars to produce trails. An example of these mistakes is here.

Pic 03 lens was not focused to infinity 2

Lens was not focused to infinity.

Pic 04 lens was not focused to infinity 2

Lens was not focused to infinity.

Pic 05 lens was not focused to infinity 2

Lens was not focused to infinity.

Recommendations:

It’s better to first sit in the dark for at least 15 minutes to let your eyes adjust with the surroundings. This will help you to see a lot of stars, and even the Milky Way with the naked eye and will also help you compose your images better. Enjoying your surroundings for a while is better than just starting to shoot as soon as you reach the site.

You are all set to shoot your own stars. With the help of kit lens you might not be able to get an award or feature your shot on 500px but yes, the shots will be very reasonable to make yourself happy, and impress your friends too. You could even try merging panoramas to get more of the Milky Way in your composition.

Pic 06 Panorama Stitch of 4shots 2

Post-processing:

The first part to better post-processing is RAW. Yes! always shoot in RAW as it will give you a lot of room for post-processing without affecting the quality. Secondly, some post-processing is always needed to get optimum results. You can find many tutorials on how to post process Milky Way images but the most elaborate one I found is from Hammad Iqbal Photography who also has a tutorial here on dPS on making star trails in Photoshop.

Star trails:

If you are satisfied with your shots, you can advance further to get star trails. Just locate the north star on the north pole using the Star Chart app and keep the north star (all stars rotate around this star) in your composition. For star trails, all camera settings will remain the same except that you can increase the shutter speed to 30 sec if you want.

You can go with faster shutter speeds (20 seconds or faster, if there are lights in the area and 30 seconds is overexposing). Keep the camera on continuous shooting mode and let it shoot as many exposures as it can shoot. The more pictures you will have, the more clear your star trails will be. Later, you can join all the exposures in Photoshop or use any star-trails software to create star trails. Alternately, you can take one stars shot and make star trails with it using HM Technique.

Pic 07 Star Trails A merge of 18 shots each at 30 sec

Pic 10 Star trail created in PS using HM Technique

Star trail created in PS using HM Technique

Pic 11 Fun in PS

Fun in Photoshop

Once you have nailed the Milky Way, try including foreground objects for better compositions.

Pic 09 D7000 18mm f3 5 20sec ISO 1600

Happy shooting, and keep me updated with your results. Let me know if you need any help.

googletag.cmd.push(function() {
tablet_slots.push( googletag.defineSlot( “/1005424/_dPSv4_tab-all-article-bottom_(300×250)”, [300, 250], “pb-ad-78623” ).addService( googletag.pubads() ) ); } );

googletag.cmd.push(function() {
mobile_slots.push( googletag.defineSlot( “/1005424/_dPSv4_mob-all-article-bottom_(300×250)”, [300, 250], “pb-ad-78158” ).addService( googletag.pubads() ) ); } );

The post Photographing Stars Using a Kit Lens by Adeel Gondal appeared first on Digital Photography School.


Digital Photography School

 
Comments Off on Photographing Stars Using a Kit Lens

Posted in Photography


How to Use a Wide-Angle Lens for People Photography

06 Apr

Wide-angle lenses are indispensable in travel photography. When I organize photo tours, I find that each and every trip has a storytelling component. Almost always, we as photographers, strive to not only describe a situation, but tell a tale, and when it’s about people, we want to tell the audience the story of the hero in the center of it. We want to draw the viewer in so far that they can sense it, breathing the very scents of the scene.

How to use wide angle H Fisch 1050

There is an ideal tool for this type of need; the wide-angle lens that normally ranges (on a full frame camera) from about 21mm to 35mm. It has a variety of advantages; you can get close to people, evoke a sense of immersion in the viewer, and get people and objects in focus with minimal effort.

I normally use FUJI X cameras which have APS-C sized sensors. As this sensor is smaller than full frame, if you want to translate the focal length of the lens from full frame (a size of sensor similar to that of 35mm film cameras), you will have to multiply it by 1.5 times. Thus an 18mm lens on full frame is LIKE a 27mm lens on a cropped sensor (18 x 1.5 = 27).

In this article, when I refer to a focal length, for example 24mm, I am referring to the length on full frame. A focal length of 24mm on a full frame camera will act like a 36mm on the Fuji ASP-C sensor.

How to use wide angle H Fisch 8638

The difficulty inherent in the wide-angle lens is that it forces you to be very conscious of the distortions it produces. When photographing people, it also requires you to get close to the subject, which can be uncomfortable for most amateurs.

If you are looking for the dream location to take the wide-angle lens for a spin, it’s India, specifically Benares. It’s a scenario full of detail, with dramatic first planes of foregrounds, colorful seconds, smells, activity, and noise. It’s a great big beautiful mess, and there are always extraordinarily attractive people to photograph.

With wide-angle, the typical range goes from 21mm to 35mm, although some photographers use up to 18mm when photographing people. The famous photo agency Reuters published its best photos of 2013, and if you read the blurb under each, you’ll see that 80% of them were taken with a 24mm wide-angle lens. With a quality prime 24mm lens, the distortion of the outside lines is not as much of an issue.

How to use wide angle H Fisch 9541

Between the photo tours I organize in India, Ethiopia, Thailand, and Cuba (among other places), I recognize that I have a special predilection for Varanasi. By what I can see in the data from my Adobe Lightroom software, is that 73% of the photos I take are done with a 18mm lens. I also use – despite the fact that it requires a lot of skill when dealing with people as subjects – a Zeiss 12mm, which is the equivalent of an 18mm on APS-C format.

It isn’t only that wide-angle lenses open the shot more, the viewer gets more information inside the frame, and the wide-angle lens allows for a much more natural view (it is argued among experts as to whether a 28mm or a 35mm is the most natural point of view).

How to use wide angle H Fisch 2159

Wide-angle has a series of advantages, but – as aforementioned – not without also presenting an inconvenience; it does have a great tendency to deform the outlines, like on images of people. Also, it does require a specific and honed technique to get the best photos from it. In the majority of cases you have to get close to the subject in order to get dramatic results, as well as getting a notable depth of field, and this is something that creates yet more issues for photographers who are not accustomed to getting up close and personal with people.

Now, let’s take a look at some of the characteristics of the wide-angle lens.

Wide-angle lens characteristics

Distortion of the point of view

A 24mm lens, if it is not used properly, will deform outlines and produce exaggerations. If the lens is not good quality, you will see a curvature in some parts of the photo instead of straight lines. In some type of photography this exaggeration of the lines is considered a creative argument and can add a dreamy look to a picture. This works fine from time to time, specially if you do not over do it.

How to use wide angle H Fisch 1054

The best approach to this possible issue is to be aware of the horizontal position of your camera and avoid, as much as possible, tilting it up or down. Having the camera on an horizontal plane parallel to the ground helps.

Distortion of the vertical axis

It is important to take your time situating the camera critically with respect to the vertical axis. This is why whenever I use a wide-angle lens I change my position (camera height) with respect to ground level. Using a wide-angle lens 50cm (19.7″) off the ground isn’t the same as being one meter (39″), or one meter eighty high (5.9 feet). I normally try a few levels to find the position that will give me the best angle, though I recognize that with practice you can understand this process before actually having to go through trial and error.

How to use wide angle H Fisch 3867

I am always very aware of at least one vertical line in a picture taken with a wide lens. It can be a street corner, a mast, a raised arm. The vertical reference can many times be the anchor, the basic reference of the picture, the nail of the whole image. The best way to ruin a good picture is to show a bent mast where the viewer clearly expects, and knows, that it should be straight and distortion has been created by your position taking the picture. On many modern cameras you can set your viewfinder to display a grid. This will allow you to see through the display and organize the lines of the whole set with the vertical and horizontal references that are visible.

High and low angle

How to use wide angle H Fisch 8064

A high camera angle consists of taking in the subject or the scene from top to bottom, situated on high ground from the objects you want to photograph. When using a low angle, you would be taking a photo from bottom to top from a point below what you want to photograph. As well as getting a more original point of view, a lot of times it is used as a technique to augment the distortion and highlight different parts of the subject. Honestly, I would use it with a lot of caution, here’s why:

If you have seen the movies of Orson Wells you will remember the scenes which evoke feelings of dreaminess – or sometimes nightmares. Wells loved to use the emphatic form made by shooting from a high angle far above the subject, and the low angle doing just the opposite. Anyone who has seen his movies knows perfectly how much distortion it produced, as he used it to create very specific environments. If you use extreme high and low angles, you will get this effect as well.

Depth of field, getting everything in focus

Depth of field is important if you want everything in focus. With an 18mm lens it’s difficult to get a photo that has shallow depth of field or less of the scene in focus. With an aperture of f/5.6, it will keep practically everything in focus from a distance of one meter (3.3 feet) to infinity. This makes it interesting and convenient if you want to take pictures without even focusing.

How to use wide angle H Fisch 6098

A lot of street photographers shoot this way – focus at two meters (6.6 feet) with an aperture of f/5.6. From there, you already know that if you keep a set distance from the subject, everything will be reasonably in focus. This can save you lots of time in situations were you do not have much time to focus properly or you find that your automatic focus behaves erratically.

The originality of the plane and of the frame

With an extreme wide-angle lens, once your eye is trained, you can offer a rather original vision of reality. In real life we do not see wider than 50mm. Going beyond this, 28mm, 24mm, 21mm, 18mmm, creates a kind of unreal feeling. Lines exaggerate their proximity or separation, the foreground seems tremendous (large) in relation to the background. The relative size of objects differs from what we normally sense. If we add to all this the depth of field characteristic and the possible distortions, we do have a creative weapon that should be used with great care! As much as we are surprised by an original point of view, we get bored by seeing to many wide-angle lens distortions.

How to use wide angle H Fisch

Proximity to the subject

This will give the viewer a strong feeling of being there, of immersion into the scene. In possibly half of the photographs that I take with a wide-angle lens, the distance to the subject is less than two meters (6.6 feet). In documentary style photography – not necessarily photographing landscapes – a wide-angle lens rewards closeness with a subject, as it results in a rather impressive image. Great photographs are done with a 18mm lens and have been made from a distance of less than one meter (3.3 feet) from the subject. This is typically done by getting the subject in the third of the frame and allowing the viewer to observe what is happening at the second plane. You should be specially aware of the way your lens behaves; the nearer the subject to the edge of the frame, the bigger optical distortion you will get. Also remember what has been said about the way to hold your camera to avoid distortion; vertical and horizontal axes as well as the tilting issue.

How to use wide angle H Fisch 0669

Many photographers feel uncomfortable getting this close. But, if you like photographing people, a wide-angle is an essential tool. The best you can do is get used to getting close to people, with a friendly manner and a smile.

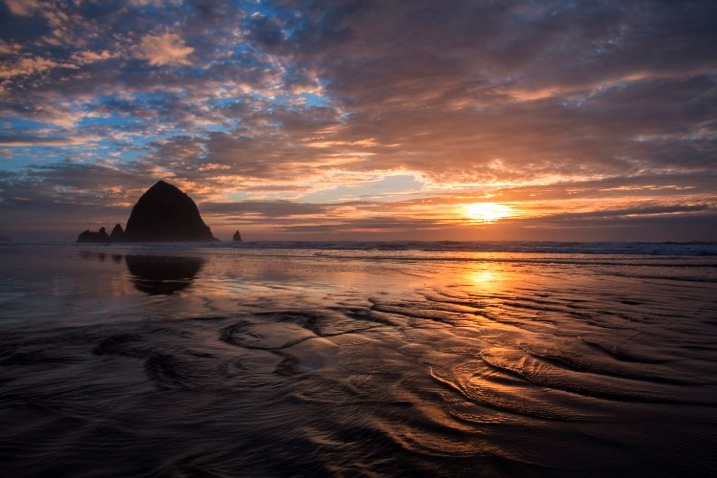
Landscape photographers do not always follow this proximity suggestion. Their use of the wide-angle is aimed more at obtaining an impressive depth of field, many times a spectacular symmetry and… searched distortion! You will see hundreds of pictures taken with a 15mm were the clouds follow a very characteristic pattern created by the distortion of the lens.

googletag.cmd.push(function() {
tablet_slots.push( googletag.defineSlot( “/1005424/_dPSv4_tab-all-article-bottom_(300×250)”, [300, 250], “pb-ad-78623” ).addService( googletag.pubads() ) ); } );

googletag.cmd.push(function() {
mobile_slots.push( googletag.defineSlot( “/1005424/_dPSv4_mob-all-article-bottom_(300×250)”, [300, 250], “pb-ad-78158” ).addService( googletag.pubads() ) ); } );

The post How to Use a Wide-Angle Lens for People Photography by Harry Fisch appeared first on Digital Photography School.


Digital Photography School

 
Comments Off on How to Use a Wide-Angle Lens for People Photography

Posted in Photography


Voigtlander releases price of forthcoming 10.5mm f/0.95 lens for Micro Four Thirds system

03 Apr

Premium optical brand Voigtländer has announced the price of the 10.5mm super wide angle lens that it first displayed at Photokina in September 2014. The Voigtländer Nokton 10.5mm f/0.95 is designed to be used with Micro Four Thirds cameras, and will be the fourth in the current line of f/0.95 lenses that the company offers. Read more

Articles: Digital Photography Review (dpreview.com)

 
Comments Off on Voigtlander releases price of forthcoming 10.5mm f/0.95 lens for Micro Four Thirds system

Posted in Uncategorized


Samyang and Rokinon formally introduce 100mm f2.8 macro lens

03 Apr

On March 27, Samyang and Rokinon teased a new lens on Facebook, saying that it would offer ‘immense focus and unparalleled features’. That lens was officially introduced today, and it’s a 100mm f2.8 Macro offering with 1:1 magnification and a 1ft. minimum focusing distance. Though it won’t be shipping until next month, the lens is available to pre-order from retailers now. Read more

Articles: Digital Photography Review (dpreview.com)

 
Comments Off on Samyang and Rokinon formally introduce 100mm f2.8 macro lens

Posted in Uncategorized