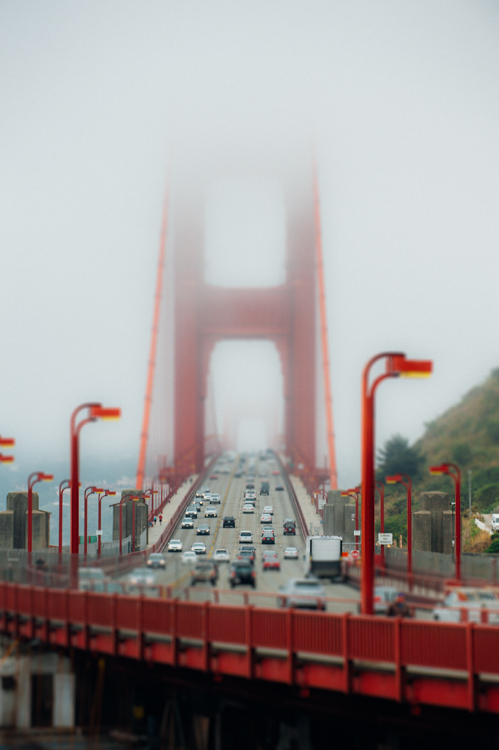
We’ve all at one point been enamoured by the effects produced by tilt-shift or PC (perspective control) lenses.
Even in wide-angle shots, the extremely narrow field of focus transforms the scene into a surreal miniature world. It can be hard to decipher whether it’s actually a close-up of a tiny model scene, or the result of the visual trickery that a tilt-shift lens can produce.

The tilt-shift effect can be used on more than city street scenes. Use your imagination and be creative!
Besides the nifty miniaturization effect, these high-end specialty lenses are imperative for professional architectural photography. Tilt-shift lenses are basically split into two, parallel to the lens, elements and enable you to tilt the front of the lens barrel in relation to the rear portion, or slide it parallel.
Without actually changing the physical location of the camera, these adjustments allow you to alter the perceived perspective. The most practical application of this effect is to eliminate certain types of distortion, especially the keystone effect.
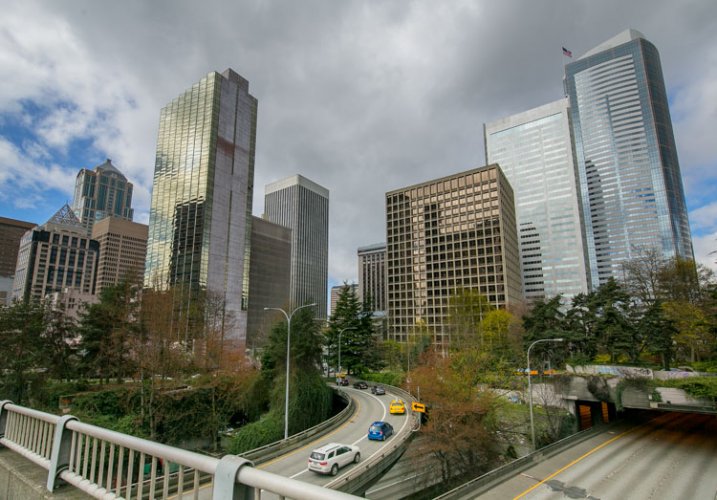
The keystone effect refers to the convergence of parallel lines which occurs when a camera’s sensor is not parallel to them. You have seen this distortion a million times when the camera was pointed upward at a tall building. It looks as if the building is about to fall over backwards, and it creates the illusion that it is wider at the bottom and continually narrows to the top. The same thing happens with horizontal lines but is often less noticeable, or detrimental to the image.
Although tilt-shift lenses have other practical uses, these are the two that can be replicated effectively in post-processing: creating a miniature effect, and fixing certain kinds of lens distortion.
Eliminating Converging Lines Distortion
Correcting lens distortion in Lightroom (LR) is fairly straightforward with a couple of considerations to keep in mind. I’ll use a night shot of the Petronas Tower in Kuala Lumpur, Malaysia as an example.
1. Straighten first.
If the image you are working with has a distinct horizontal or vertical line which you know to be level or plumb, use the Straighten tool located within the Crop tool (keyboard shortcut R) to align the image before making any lens corrections.
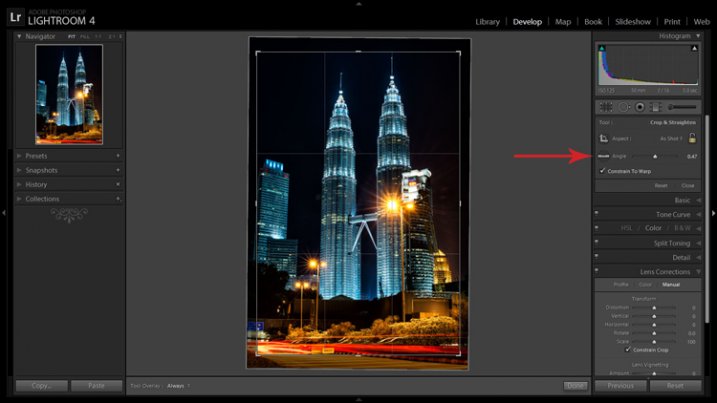
The Level tool can be found within the Crop panel beside the Align slider, or activated by holding CTRL key.
To align the image using a vertical line, it must be near the center of the image due to the distortion which you are about to fix. With the Crop tool active, you can either grab the Level tool located beside the Angle slider, or hold down the CTRL key and drag the cursor along the chosen line and LR will rotate the image to level or plumb.
Note: new in LR6 or LRCC is the Auto function of the crop tool which attempts to do this for you. Alternatively, the Rotate slider in Lens Corrections can be used with similar results.
2. Open the Lens Corrections panel and click on the Manual tab.

Distortion corrections are made in the Lens Corrections panel.
3. Check the Constrain Crop box.
Note: As is often the case in life, you don’t get something for nothing. When LR manipulates the image to fix these lines, it must also crop it. You can also crop it manually after you adjust the image, but it is easy to inadvertently leave a little gray strip somewhere along the edge of your image by not cropping it enough.
4. Adjust the sliders
There are several ways to adjust sliders: dragging the slider itself, clicking the name of the slider and using the +/- keys, clicking the value on the right of the slider and dragging the cursor left or right, clicking the value and entering the desire value or clicking the value and using the arrow keys to make micro adjustments. I recommend the latter for accuracy.
5. Show the grid
Hovering the mouse over any of the sliders will show a grid over the image to help guide your adjustment. For this image, a -18 compensation straightens the lines right up.
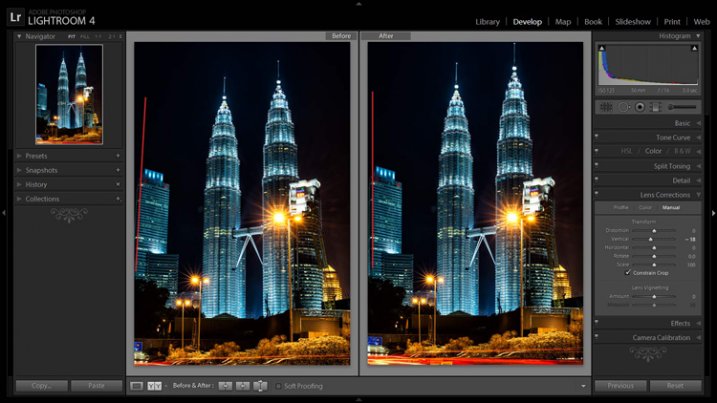
A before and after showing corrections for converging lines.
If you plan on shooting architecture and utilizing this feature instead of dropping $ 1,400 on a tilt-shift lens, it may benefit you to activate the crop tool (keyboard shortcut R) to get an idea of how much LR cropped your image. This will give you a point of reference while composing scenes in the future.
Creating a Miniaturization Effect
The tilt-shift effect of severely softening most of an image to isolate a small sharp strip can be simulated in post-processing very effectively. Although there are a couple of different ways to achieve this effect in Lightroom, I find the following to be the easiest and most effective.
The tilt-shift effect can add another level of interest to certain photographs.
Keep in mind that not every photo is a good candidate for this effect. You can find good advice about image selection in the article An Introduction to Tilt-Shift Photography.
1. Process the image as you normally would.
Boosting sharpening, contrast and saturation can help exaggerate the effect.
2. Activate and setup the Adjustment Brush (keyboard shortcut K).
Drag the Sharpening slider all the way down to -100. I also like to reduce Clarity which adds a bit of glow and exacerbates the effect.
3. Show the Mask Overlay box (keyboard shortcut O)
This will allow you to clearly see where the effect is being applied (shift+O will rotate through different mask colors, you may find red is better one image whereas green may work on another).
5. Adjust the brush settings
Setup such things as brush size, flow, etc. Spend a few minutes experimenting with different combinations of these settings to find what works best for your image. CTRL+Z (CMD+Z on Mac) is your friend here.
6. Blur most of the image less a small strip
Holding down the shift key while you click and drag the brush horizontally across your image will apply the effect in a straight line. The goal is to blur the entire image except for a small strip. Make one line across the upper boundary and one line across the lower boundary of the strip you wish to isolate. You can then release the shift key and paint in the remainder of the areas. The in focus strip should account for 20 per cent or less of the image area. If the strip is too big, the effect will be weak.
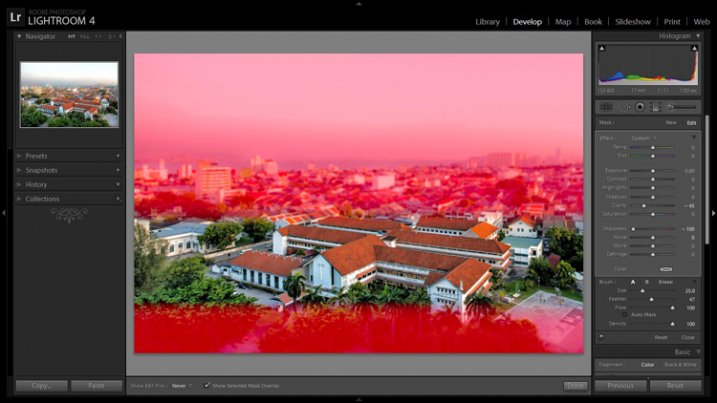
Holding down the shift key will keep the brush level to paint a straight line.
7. Repeat to increase the effect.
Repeating the previous step several times will compound the effect. To repeat the step, click on New at the top of the Adjustment Brush panel – this will remove the mask to reveal the most recently applied effects, and allow you to add a new pin (brush strokes) and repeat the process.
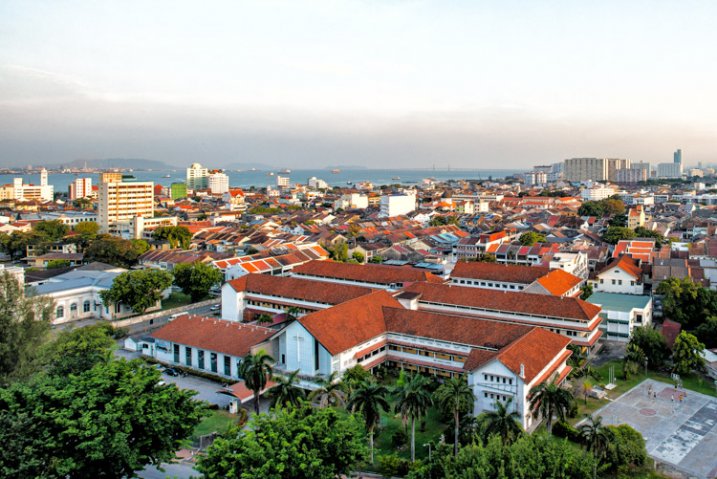
Before applying the effect to a photo of Penang, Malaysia.
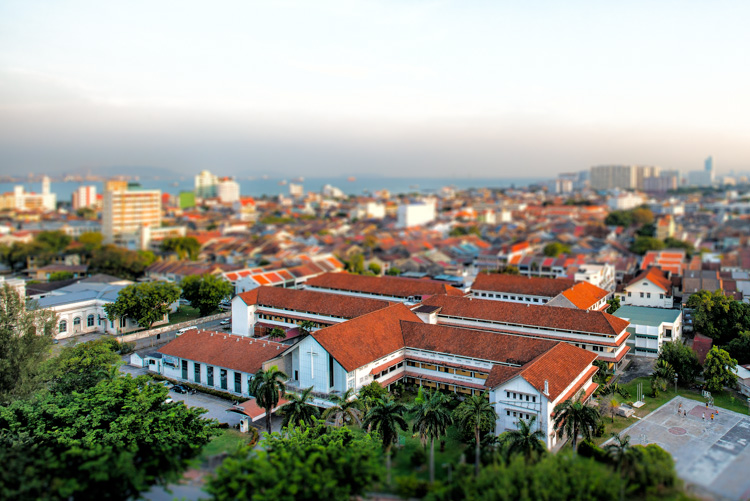
After application of the miniaturization effect.
The effect can also be applied using the Graduated Filter tool but I find it ends up blurring the entire image to some extent and is less effective.
This is a starting point from which to experiment with the effect. Everybody’s tastes differ, so although the general process will remain constant, go crazy with the other variables and see what happens!
googletag.cmd.push(function() {
tablet_slots.push( googletag.defineSlot( “/1005424/_dPSv4_tab-all-article-bottom_(300×250)”, [300, 250], “pb-ad-78623” ).addService( googletag.pubads() ) ); } );
googletag.cmd.push(function() {
mobile_slots.push( googletag.defineSlot( “/1005424/_dPSv4_mob-all-article-bottom_(300×250)”, [300, 250], “pb-ad-78158” ).addService( googletag.pubads() ) ); } );
The post How to Simulate Tilt-Shift Lens Effects Using Lightroom by Jeremie Schatz appeared first on Digital Photography School.

 so my website has both www.hasanodeh.com
 For those of you that didn’t win, Tamron has invited ALL dPS readers download their 2015 eBook Series!
.jpg")
.jpg")
.jpg")
.jpg")
.jpg")
.jpg")
.jpg")
.jpg")


You must be logged in to post a comment.