RSS
 

Posts Tagged ‘Lens’

Sigma 35mm f/1.4 Art Lens Review

02 Sep

When it comes to off-brand (or third party) camera gear, do you feel a bit skeptical? I was in the same boat for my entire photography career, choosing to invest exclusively in Nikon gear when I was a Nikon shooter, then all Canon when I switched over for the Canon 5D Mark III. “You get what you pay for” is what all of my photography colleagues would tell me, and I was an avid believer until this past summer when I invested in my first ever off-brand camera lens: the Sigma 35mm f/1.4.

Dubbed Sigma’s true flagship lens, the 35mm f/1.4 debuted in 2012 as the very first addition to the Art category, in Sigma’s newly announced lens categories. This shiny prime lens entered a crowded market in which Canon, Nikon, and Sony all have competitive offers, but Sigma’s version comes in at a fraction of the price, which is one of its most attractive features. So in this case, does the adage, “you get what you pay for” truly apply?

Sigma 35mm f/1.4 lens review

Let me preface this article by stating that this is the very first 35mm prime lens that I’ve owned, so I cannot make true comparisons between Sigma’s lens and that of other manufacturers, but I took it through several test runs to see how it held up. These were my findings.

Main Features

Sigma’s 35mm fixed lens is equipped with a fast f/1.4 maximum, and f/16 minimum aperture. It has quiet, quick Hypersonic Motor (HSM) focusing with manual override and a 0.3m (one foot) minimum focal distance – no image stabilization is included. The lens has mounts for all major DSLR camera types including Canon, Nikon, Sony, and Pentax, and it works on both full frame and APS-C (crop sensor) cameras. Out of the box, the lens comes with front and rear caps, a lens hood and a warranty and instruction guide, all packaged within a nicely padded, zippered nylon case. Brand new, this lens retails for $ 899, significantly less than other versions made by Canon and Nikon, which run upwards of $ 1,300.

Pros

Fast, accurate autofocusing speed

On the technical side of things, this lens performed impressively well. Even when shooting at f/1.4, all images produced by this lens were super sharp. Autofocusing speed was pretty fast and accurate, even when attempting to use this lens in an action setting like the concert below.

Sigma 35mm f/1.4 lens review

Little to no visible distortion

After spending some time with the Canon 24mm f/2.8 prime lens that produces quite a bit of barrel distortion, I was pleasantly surprised to find that the Sigma 35mm has pretty much no visible distortion. Although bear in mind that lens distortion can be easily fixed in post production using Photoshop’s lens Correction filter (or Lightroom’s Lens Correction panel).

Sigma 35mm f/1.4 lens review

Cons

Mostly plastic build

Perhaps the first thing that struck me about this lens when I first interacted with it what its sleek, yet mostly plastic build. Compared to Canon and Nikon versions that are made of a mix of metal and plastic, this mostly plastic Sigma lens felt like it may not hold up very well in the long run. The Sigma seems to live up to its Art lens designation with the feeling that this lens would hold up better being used for artistic purposes, more so than run and gun type of shooting.

Larger and heavier than Canon/Nikon equivalent

Despite being made of mostly plastic, the Sigma also feels pretty heavy (23.5 oz./ 665g), and it is indeed slightly heavier than its Nikon (21.2 oz / 600g) and Canon (20.5 oz. / 580g) equivalents.

Sigma 35mm f/1.4 lens review

Overall Take

While I loved capturing the world through a sharp 35mm prime lens, it was difficult to get over this lens’ size. The 35mm is known as a classic lens in photojournalism and street photography, and yet due to its size and plastic build, it was questionable if the Sigma 35mm f/1.4 could hold up well over time, especially in on-the-go style photography. As a result, I have to agree with my photography colleagues that you’d get what you pay for over time.

Investing in the more expensive Canon 35mm f/1.4 would be worth the extra expense ($ 899 for the Sigma, $ 1479 for the Canon) just because the L lens designation ensures a higher quality, more durable lens. As an additional option, the slower Canon 35mm f/2 comes with image stabilization and is priced lower at $ 599.99, so that may be a better budget option. And a final, even cheaper alternative might be to add 5mm to the lens focal length by going for the Canon 40mm f/2.8 pancake lens, the smallest and cheapest ($ 149 USD) of them all.

Basically, splurge for the Sigma 35mm f/1.4 and enjoy comparable, superior optics to the Canon and Nikon equivalents, but what you save in money might cost you later when testing the long-term durability of this lens.

Sigma 35mm f/1.4 lens review

googletag.cmd.push(function() {
tablet_slots.push( googletag.defineSlot( “/1005424/_dPSv4_tab-all-article-bottom_(300×250)”, [300, 250], “pb-ad-78623” ).addService( googletag.pubads() ) ); } );

googletag.cmd.push(function() {
mobile_slots.push( googletag.defineSlot( “/1005424/_dPSv4_mob-all-article-bottom_(300×250)”, [300, 250], “pb-ad-78158” ).addService( googletag.pubads() ) ); } );

The post Sigma 35mm f/1.4 Art Lens Review by Suzi Pratt appeared first on Digital Photography School.


Digital Photography School

 
Comments Off on Sigma 35mm f/1.4 Art Lens Review

Posted in Photography


Writer’s Favourite Lens – Nikon 24-70 mm F2.8

30 Aug

I’ve had the Nikon 24-70 mm f/2.8 lens for about three years now, and it is by far my most used lens, and really my go-to when I am heading out to take photos. It is mid-range when it comes to focal length, but for shooting most landscapes and architecture, it is nearly always enough. It is not a cheap lens ($ 1749 USD without VR, $ 2396 with VR), but it was a special treat, one I have to thank subsidies for. One year after getting a special payout I was able to afford this lens, just.

Nikon-24-70mm-favourite-lens-

Nikon-24-70mm lens

When I got the lens I was shooting cycling, both on the road and the track, and I was looking for a better lens to use rather than the cheap one I bought when I first started. This one seemed perfect. A good shorter, wide angle, and the focal length was almost a perfect match for my 80-200mm. I also thought I was going to start doing portraits and it seemed like the ideal lens.

favourite-lens-24-70mm-cole-0371

Portrait style photography

For personal reasons, I had to give up photographing cycling and never really got into portraits. It was something I never felt comfortable doing. I ended up concentrating more on architecture and landscape. This lens saw me through all that with its ability to be so versatile, I could really do anything with it.

Pros:

Lovely clear images

You notice it, you really do. If you’ve been shooting with a cheap lens, the moment you start taking photos with one of this quality, you will see the difference. There was something about how clear the images were; they seemed to shine. There is a clarity with the images, and if you get great conditions to take photos, such as a good day and good light, then it really shows in the images.

favourite-lens-24-70mm-cole-0366

Bay Crits racing

Fast lens

With the widest aperture being f/2.8, you know you have a fast lens, which means it gives you more choices. With the cycling, it meant I didn’t have to go to such a high ISO to be able to get photos inside the velodrome. I could still get great images that didn’t have a lot of grain/noise.

It is the same if you are doing astrophotography, as the f/2.8 means that you don’t need to have your ISO up as high, so you won’t get really grainy shots of the night sky.

Good size

The size works well for what I want, and what I am doing. I’m more of a wide angle person, but the extra length to 70mm is really fantastic, and gives me more options when I am out taking photos. It is, ultimately, the best of both worlds. I have the wide angle, but I can also zoom in a little bit.

favourite-lens-24-70mm-cole-0372

Rail Viaduct Malmsbury

Sometimes I wish it was a little longer, maybe to 100mm or 120mm, but it isn’t, so I have to compensate. I don’t often zoom right in on subjects, so it is rarely a problem.

Fits filters

Doing long exposures is something that I have spent a lot of time learning, and this lens is a great choice for this. The 77mm filter size means that I can use filters. I also have the 14-24mm lens, and not being able to put filters on that has been frustrating, but the 24-70mm still gives me the wide angle view, and the option of using filters.

favourite-lens-24-70mm-cole-0368

Long exposure of bay

Can photograph things close-up

One of the unexpected bonuses has been how close I can get to objects to take photos. Nowhere near as close as a macro, but very close nonetheless. It’s great when I’m out to be able to take close-up photos of objects that I see, like flowers, cakes, etc.

favourite-lens-24-70mm-cole-0370

Flowering gum

Versatility

This is one of those lenses that you know could photograph anything. I purchased the lens for portraits and cycling, but it soon became apparent that I could use it for almost anything I wanted to do. I now shoot landscapes and architecture primarily, and it has been great for doing both of those. The lens is very versatile, and I am confident that no matter what I need to shoot it will do a great job.

favourite-lens-24-70mm-cole-0369

Pier at bay

Cons:

Weight

There is no doubt that it is a heavy lens, weighing in at 1.98 lbs. (900 g). Most people are shocked at how heavy it is when they pick it up alone, or with my camera attached. It isn’t something I notice anymore. I have been using heavy cameras for quite a few years and it is just normal now. When I was still photographing cycling events, I would use two cameras, one with the wide angle, and the other with a telephoto lens. People asked me how I carried it all, and I said the two cameras helped balance me. You just get used to it.

If you are someone who has issues with their hands or arms, and find it hard to carry or use heavy objects, this wouldn’t be a good lens for you. You may find it too heavy to hold up to take photos. Don’t forget, it isn’t just about holding it up when shooting, it is also about carrying it around as well. I have to admit that often, at the end of the day, I’m very happy to put the camera down.

Price

It isn’t a cheap lens in any way, but quality always comes with a price tag. The lens is approximately USD $ 1800, but, if you are serious about your photography, it is worth it. I definitely think it was.

Finally

I wouldn’t go anywhere without my Nikon 24-70 mm f/2.8 now. It has been rained on, had the hot sun beaming on it, been sprayed with salt spray, it’s dirty, it’s well-used. You can be sure that it will always be in my camera bag, whether it is attached to my camera or not. I love using it, and am never disappointed with the images that I get from it.

Do you have a favorite lens? Tell us. Read about some other dPS writer’s favorite lenses here:

  • Writer’s Favorite Lens: Olympus Zuiko 12-40mm f/2.8
  • Writer’s Favorite Wildlife Lens – Tamron 150-600mm
  • Writer’s Favorite Lens: 50mm f/1.8
  • Writer’s Favorite Lens – The Canon 24-105mm f/4
  • Writer’s Favorite Lens – the Canon 40mm Pancake Lens
  • Writer’s Favorite Lens – the Tamron 18-270mm

googletag.cmd.push(function() {
tablet_slots.push( googletag.defineSlot( “/1005424/_dPSv4_tab-all-article-bottom_(300×250)”, [300, 250], “pb-ad-78623” ).addService( googletag.pubads() ) ); } );

googletag.cmd.push(function() {
mobile_slots.push( googletag.defineSlot( “/1005424/_dPSv4_mob-all-article-bottom_(300×250)”, [300, 250], “pb-ad-78158” ).addService( googletag.pubads() ) ); } );

The post Writer’s Favourite Lens – Nikon 24-70 mm F2.8 by Leanne Cole appeared first on Digital Photography School.


Digital Photography School

 
Comments Off on Writer’s Favourite Lens – Nikon 24-70 mm F2.8

Posted in Photography


Why Every Photographer Should Use a Manual Focus Lens

27 Aug

Your camera is smart. It has processors that are able to run algorithms, for near instantaneous adjustments to compensate for lighting conditions and changing environments. I’m a professional lens reviewer, and tend to complain if a lens/camera combination takes more than a split second to achieve accurate autofocus. But the reality is that most modern camera/lens combinations achieve accurate autofocus remarkably fast. Modern DSLRs can pretty much see in the dark, and still focus reasonably well with a near absence of light, and their performance at extremely high ISO settings is phenomenal.

Yes, your camera is most certainly smarter than your father’s, but the question is, are you a smarter photographer than your father?

Dustin Abbott DPS MF 15

Could it be that the wizardry of modern processors, sensors, and autofocus motors (AF) cocoon modern photographers from what actually happens in the process of taking photos? And, in doing so keep us from having to learn some of the essential basics of photography that could make us better? Here is why I think every photographer should spend some time with a manual focus only lens.

Aperture

A press release for a modern lens will say something like, “Nine rounded aperture blades.” That means next to nothing to most modern photographers for one simple reason – they will never see those blades. All they will ever see is the glass within the barrel of their lens. The reason for this is simple: lenses with an automatic iris aperture (the camera sets the aperture electronically), focus with the lens wide open (aperture blades withdrawn), and only stop down to the chosen aperture in the split second when that the shot is taken. It is pretty amazing how quickly this all happens, when you stop and think about it.

Most lenses produced for Canon EF mounts (excluding Samyang/Rokinon lenses along with a few non-mainstream models) have an auto iris aperture control. Even Zeiss manual focus lenses in Canon (ZE) mounts have automatic irises, and Samyang/Rokinon is retooling many of their lenses with AE versions with auto aperture control. Put simply, very few modern lenses in a Canon mount have an actual aperture ring. Nikon shooters get a few lenses with manual aperture rings (for some reason Zeiss lenses include one on Nikon [ZF] mounts.)

Auto aperture iris control is great for convenience. Just twist the dial on your camera (often in third stop increments) and select the aperture you want, or even let the camera choose it for you in an auto mode. It’s quick and painless.

The downside, of course, is that the actual significance of what is happening when that iris is opened wide or closed down is often lost upon modern photographers. We can talk about “stopping down” a lens or the advantage of a wide aperture prime, but until you have actually seen the difference in an aperture iris you won’t have a full sense of what that really means. Take a look at this series from the new Rokinon 50mm f/1.4.

When you actually see that aperture closing down you really get a sense of the difference between the f-stops and how much more light gathering there actually is at wide apertures. This series starts at f/1.4 and goes to f/8 – see how much difference the aperture size makes in the amount of light entering the camera?

Dustin Abbott DPS MF 8

Dustin Abbott DPS MF 9

Dustin Abbott DPS MF 10

Dustin Abbott DPS MF 11

Dustin Abbott DPS MF 12

Dustin Abbott DPS MF 13

Dustin Abbott DPS MF 14

My wife is an intelligent woman. She even has a pretty decent eye as a photographer, and has taken some great photos. But despite having been married to a gear guy since 1997, and having a hundred or so lenses going in and out of our house, she still to this day often gets confused about aperture. It can be confusing, as the logic (due to the way that f-stops often get reported) is backwards. Bigger numbers mean smaller apertures -and that seems backwards. There is no mistaking this with a manual focus lens with a manual aperture ring – you can physically see the aperture iris shrinking as you stop the lens down (choose a smaller aperture size – larger f-stop, like f/11 etc).

More photographers would get what aperture numbers really mean in terms of light gathering, if they physically saw the aperture blades close down or open in their lenses.

Light Gathering

Most cameras have a standard focusing screen, that does not show the true depth of field. This, added with the fact that the camera typically focuses with the lens wide opened, means that you often don’t get a sense of how much less light is available when the lens is stopped down (f/4-f/16, for example) or how much more is available at large apertures (f/1.2-f/2.8). Most DSLRs have a DOF (depth of field) preview button somewhere, but it is often in an obscure location and rarely gets used by many people. For this reason many photographers have never seen the true depth of field of any of their wide aperture lenses, or any other lens for that matters. This changes when you use a manual focus lens (particularly with a focus screen that shows true depth of field). More on this in a moment.

Yes, it is a pain when the viewfinder is quite dark when you have a manual aperture lens mounted and stopped down to, say, f/8. That’s the reason that modern lenses and cameras don’t show you this in your viewfinder. But it also means that you aren’t being forced to learn what f/8 really means in terms of light gathering. You also don’t see how much more light is available, or how much more shallow the depth of field is with a large aperture. You don’t really think about your aperture setting at the time of capture, resulting in a loss of creativity because your mind isn’t forced to visualize what aperture means to the shot.

But beyond this, manually selecting your aperture really helps you to mentally dial in the relationship between aperture and depth of field. The fact that you have to think about selecting the aperture, and see a difference in the viewfinder, in both the depth of field and the amount of light, helps you to realize how shallow depth of field shots (with a large aperture) and large depth of field shots (with a small aperture) are going to turn out. I have learned how to mentally visualize how depth of field is going to affect a scene so much more because of using manual aperture lenses. Here is a series from the Zeiss Planar T* 50mm f/1.4 lens. It starts at f/1.4, f/2, f/2.8, and then finally shows f/4. Notice the huge difference this makes to the degree in which the background is blurred.

Dustin Abbott DPS MF 1

Dustin Abbott DPS MF 2

Dustin Abbott DPS MF 3

Dustin Abbott DPS MF 4

The large aperture shots are much more attractive, and give a better three dimensional effect to the image. You probably won’t always shoot with manual focus lenses, but using one will help train your brain to visualize your shots more effectively and artistically.

Depth of Field and Focus

It is quite a revelation to use a wide aperture, manual focus prime, with a focusing screen like an EG-S that shows true depth of field. At close to medium distances you can actually watch focus travel from one thing to another, and subjects pop into focus. It really helps you think about storytelling as a part of your imagery. When you think about what you want in focus, it means that you have become intentional about what you want your viewer to see.

Many cameras have AF point spreads that are not wide enough to reach the edges of the frame. Manual focus lenses remove that limitation, and I am more likely to take an image with my subject in focus in an extreme corner when I use one. The rule of thirds for composition is a great starting tool, but sometimes rules are made to be broken. Take a look at this shot of a family games night. The cards are in the extreme bottom corner. Your eye goes there first, but then considers the whole out of focus scene beyond. Your brain allows you to mentally fill in the blanks, and image possibilities, rather than just a looking at a scene.

Dustin Abbott DPS MF 7

Many macro photographers have learned to choose to use manual focus at those very fine distances. It is often challenging to place an AF focus point right where you need it (particularly when using a tripod), but manually focusing allows you to simply focus until what you need to be in focus is sharp. I’ve heard a lot of people fuss over the focus speed of some macro lenses, including the amazing EF 100mm f/2.8L IS. All I can say is that you need to use a manual focus macro lens sometime. Using the Zeiss Makro-Planar in either a 50mm or 100mm focal length helps you to realize how much the macro range adds to the focus possibilities of such a lens. There are so many extra focus points! Using a manual focus macro lens will certainly help you appreciate the AF on macro lenses, and will also help you understand why the AF focus (distance) limiter switch is there and how to properly use it.

Dustin Abbott DPS MF 6

Dustin Abbott DPS MF 5

Learning to focus with a manual focus lens will help your mind to understand how to better use autofocus lenses (particularly those with focus limiters).

In Conclusion

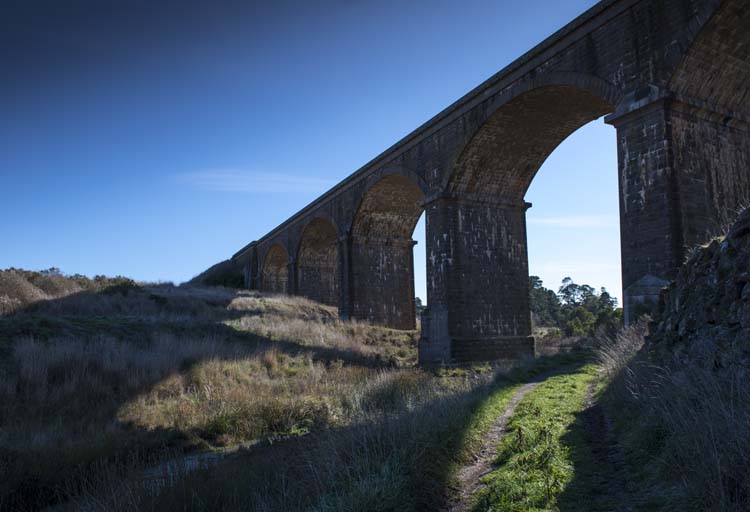
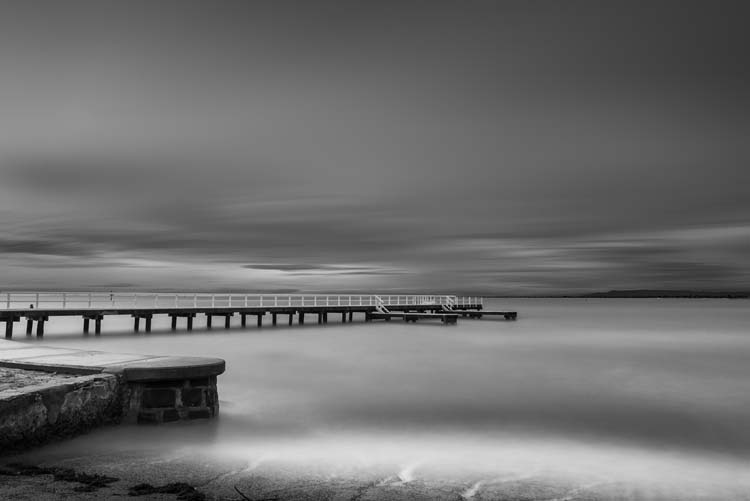
We live in a high-paced world. We want everything to be faster and easier. But great art is rarely created is rarely created in a rush. When I am shooting professional event work and weddings, I tend to use image stabilized, wide aperture, zoom lenses. They are big and heavy, but they are extremely flexible and deliver great results. I need speed in those situations, but some of my most creative shots in my catalogue have been taken with manual focus lenses. I slow down and become more creative. Some of my most critically acclaimed images have been taken with manual focus lenses, both inexpensive and expensive ones.

If you have been guilty of doing most of your photography in a rush, do yourself a favor a get yourself a manual focus lens (even a cheap one). If you want a cheap option, grab yourself an SMC Takumar 55mm f/1.8, and an adapter to your mount of choice. You can probably get a lens and an adapter for under $ 100. It takes some amazing pictures, and will open a world of appreciation for some of the lenses from another era. It will probably also make you a better photographer.

Even better is the SMC Takumar 50mm f/1.4, or if you want to use a value oriented modern manual focus lens, try one in your favorite focal length from Rokinon or Samyang (same thing, just rebranded lenses). You’ll find a number of reviews of different ones on my website. If you are willing to spend more and want the finest optics and image quality available, Carl Zeiss makes some of the best lenses period. They tend to be mostly manual focus, and I’ve had the privilege of using and reviewing many of them.

Once you learn how to take good pictures with a manual lens, shooting with your modern gear will seem easier than ever, and you might even use it more creatively. These are just a few reasons why every photographer should spend some time with a manual focus only lens.

googletag.cmd.push(function() {
tablet_slots.push( googletag.defineSlot( “/1005424/_dPSv4_tab-all-article-bottom_(300×250)”, [300, 250], “pb-ad-78623” ).addService( googletag.pubads() ) ); } );

googletag.cmd.push(function() {
mobile_slots.push( googletag.defineSlot( “/1005424/_dPSv4_mob-all-article-bottom_(300×250)”, [300, 250], “pb-ad-78158” ).addService( googletag.pubads() ) ); } );

The post Why Every Photographer Should Use a Manual Focus Lens by Dustin Abbott appeared first on Digital Photography School.


Digital Photography School

 
Comments Off on Why Every Photographer Should Use a Manual Focus Lens

Posted in Photography


Hoya HD3 lens filters claim to be 4x stronger than optical glass

27 Aug

Kenko Tokina USA recently announced the Hoya HD3 series UV and Circular Polarizer lens filters. According to the company, the filters are 4 times stronger than optical glass, and offer a 99.7 percent light transmission rate. Read more

Articles: Digital Photography Review (dpreview.com)

 
Comments Off on Hoya HD3 lens filters claim to be 4x stronger than optical glass

Posted in Uncategorized


Fujifilm X100T successor rumored to feature new lens

26 Aug

According to a source speaking with Fuji Rumors, the Fujifilm X100T’s successor will have a new lens. The present lineup of X100 cameras all feature the same fixed 23mm F2 lens, and if past announcement intervals are any indication, the X100 series may see an update just around the corner. Read more

Articles: Digital Photography Review (dpreview.com)

 
Comments Off on Fujifilm X100T successor rumored to feature new lens

Posted in Uncategorized


7 Tips to Help When You’re Stuck with Only a Prime Lens

23 Aug

As a photographer you must have flip-flopped back and forth between prime and zoom lenses. “Should I choose a prime today, or a zoom for its advantages?” If you have not done this for a purchase, you must at least have read the numerous articles which weigh the pros and cons of each. But what about when you are stuck with a lens that is not ideal for an event? For the sake of discussion and for this learning opportunity, let’s choose the 50mm prime lens, which is one of the most popular and affordable primes, and is made for every camera body known to man.

Canon-EF-50mm-f1.8-STM-Lens.jpg

If something comes up that is unexpected, that’s a good thing! Not ideal if you don’t have a long enough zoom or wide enough lens, BUT it could be worse. What if you didn’t even have your camera at all? So stay upbeat and realize with some ingenuity you can overcome the confines of being stuck with a prime lens.

As a personal note: This tutorial was inspired by a real event in Guatemala. I had chosen my 50mm for a walk-around lens as it is light, and I wasn’t expecting much as I went out to get a cup of coffee. Well, with a caffeine buzz I climbed a hill, and at the top an ancient Mayan ritual of sacrifice was being conducted for the dead. Maintaining cultural sensitivity I knew that it would be totally inappropriate to get my lens in their face. It was pertinent to maintain my distance for respect.

1. Use shallow depth of field

Prime lenses are known for being sharp, especially when you close down your f-stop. Yet when you are confined, or have limitations about how close you can get, or how agressive you can come across as a photographer, using your lens creatively is important. Thus, you may sacrifice some sharpness, add a little chromatic aberration (CA), etc., but you will also get a different style of shot from a lens that inherently has focal length limitations. Go for bokeh.

001 F1.4 landscape resized from Lightroom (750px)

2. Panorama for wider angles

Use panorama techniques to combine images later in post-processing. If you can’t get a wide angle view, make one. Yes the feeling of the final composition will not be exactly the same as a true wide angle, as your foreground and background compression will be greater, but you will be able to give a cinematic effect. Combining images is an easy way to encompass more into your scene when you are limited by your focal length.

006 Panorama resized 1

These two images were combined to show the whole event of the shaman and the fire along with the family members.

3. Shoot with the intention of cropping

Be conscious that cropping is available to you in post-processing. Don’t worry if a hand creeps into your frame, or there is a plastic bottle in the corner. If you consciously shoot for a crop to be performed later you can zoom-in on something specific. This again gives you flexibility and diversity. If you combine this with a shallow depth of field (suggestion number one) you will find that you can achieve a telephoto effect.

003 Crop Before resized

003 Crop After resized

This image was shot for a crop, so cutting off the top of the head is not a problem if you know you will crop in closer in post-processing.

4. B-roll footage

Get photos of activities, reactions, or environmental surroundings which will add to the narrative of the event. If you can’t get any closer, and you have pushed your boundaries of being discreet, then look up, down, and turn around. In film (movies), these are generally called B-roll shots, which helps to transition from one camera angle to another, while also telling the story.

004 B roll resized

The smoke rising up, into the sun, amongst the trees, gives a feeling of the environment around the ceremony.

5. Frame your subject with something in the foreground

Use a leaf, a stone or even another person to cut into the frame, which will both highlight your subject, by leading your eye to what you want the viewer to look at, and it will also create layers in the photograph. Layers add a sense of style and depth to your photography. Trying to use different techniques to create different perspective styles will really improve the overall quality of the group of photos you finally decide to keep.

005 Layer resized

The gravestone, then the grandmother, and finally the fire give layers to the photograph.

6. Use both horizontal and vertical photographs

Again this is about creating diversity in a final product. So turn the camera sideways and you definitely have a different style going for you. Some people get stuck in horizontal mode, or in vertical mode. This is a great opportunity to make a change of pace. When your eye sees a photo it follows a pattern, generally starting in the top left corner then moving, left to right (just as you read) looking for areas of light, contrast, lines, color and patterns. A vertical photo will automatically create a different reading experience to the photo. Or why not crop them into a square even?

002 Verical resized

A simple vertical photo changes the pattern during your final composition. Think both horizontally and vertically.

7. Just enjoy the event

See the event not only through your camera, but also with your own eyes. Experience the event, and it will not only give you great memories, but will allow you to feel the mood as well. Understanding the event will give you insight into what out-of-the-box shot may really highlight the event.

Summary

The general idea is to work with what you have, don’t lament what you left at home. If you do, you might just start lugging around simply too much gear to enjoy yourself. Think of how to diversify your perspectives. By confining yourself (in this instance, when confines are placed upon you) there is great opportunity to use your most advantageous feature… your creative brain!

For most people, photography is a hobby turned passion, and enjoying photography should really be priority one. Photography is always a game of tradeoffs, which can be simply exemplified by the basic lesson of the exposure triangle. By gaining one thing you lose another. So begin gaining something even when you are stuck with just a prime lens.

Maybe we could say, you are challenged to be better at what you love!

googletag.cmd.push(function() {
tablet_slots.push( googletag.defineSlot( “/1005424/_dPSv4_tab-all-article-bottom_(300×250)”, [300, 250], “pb-ad-78623” ).addService( googletag.pubads() ) ); } );

googletag.cmd.push(function() {
mobile_slots.push( googletag.defineSlot( “/1005424/_dPSv4_mob-all-article-bottom_(300×250)”, [300, 250], “pb-ad-78158” ).addService( googletag.pubads() ) ); } );

The post 7 Tips to Help When You’re Stuck with Only a Prime Lens by Branson Quenzer appeared first on Digital Photography School.


Digital Photography School

 
Comments Off on 7 Tips to Help When You’re Stuck with Only a Prime Lens

Posted in Photography


Nikon delays AF-S Nikkor 24-70mm f/2.8E ED VR lens until October

22 Aug

In a press release on its Japanese website, Nikon has announced that its new AF-S Nikkor 24-70mm F2.8E ED VR lens – announced earlier this month – is being delayed from its original shipping date of 27th August to October. No specific reason for the delay has been given, only that it is necessary to ‘satisfy the customer’. Click through for more information

Articles: Digital Photography Review (dpreview.com)

 
Comments Off on Nikon delays AF-S Nikkor 24-70mm f/2.8E ED VR lens until October

Posted in Uncategorized


Tips for Avoiding a Foggy Lens

20 Aug
Foggy lens article - example of clear shot taken once lens cleared

Taken at sunrise in the Florida Keys. Although this shot was okay, see below to see the similar shot taken a few minutes before with a foggy lens. I’m lucky I didn’t miss it entirely.

Has this happened to you?

  • You are on vacation at the beach. You decide to photograph the sunrise or sunset, so you grab your camera from your hotel room and head out. You get to the perfect spot to shoot, and look through the viewfinder at the beautiful sunrise/sunset – only to find that the lens is completely fogged over. You wipe away the condensation from the front of the lens, but it instantly comes right back. Every time.
  • Or perhaps you’re in your car, and you spot something you want to photograph. You pull over, hop out and set up the shot – only to find the same thing. The lens is fogged over, and every time you wipe it away, it comes right back. You miss the shot.

This happens all the time in coastal and tropical environments. Transferring the camera and lens from a cool, low-humidity location like your car or hotel room directly into a warmer, high-humidity environment causes condensation to form on the lens (on the front and back elements).

Making the problem even worse is that these humid environments are likely where you like to go on vacation/holiday, and that is when you tend to take the most pictures. So that means this problem ruins a lot of shots. It has happened to me many, many times.

Dealing with a Foggy Lens

So how do you fix this problem? Well, once it happens, there is no fix. There are a few things you can try, which will be addressed at the end of the article, but you just have to keep wiping off your lens, and waiting for it to acclimate. This can take a while. Sometimes it just takes a few minutes for the lens to acclimatize and stop fogging over, but other times it can take half an hour.

Example of picture taken with lens fogged due to condensation

Here is a similar shot to the one above, but this one was taken before the lens had a chance to acclimate to the warm, humid air outside my hotel.

Since you cannot fix it once it happens, you have to avoid the problem in the first place. How do you do that? You have to let your camera or lens acclimate ahead of time.

Obviously, you cannot just leave your camera bag laying around outside. You will need to let everything acclimate while keeping it safe. Here are some tips for decreasing the time necessary for your camera and lens to acclimate to the outside temperature and humidity while keeping it safe:

1. Keep the camera outside (but in a safe place)

If you have a secure hotel balcony, you might put your camera and lens out there to let them acclimate. You probably don’t want to leave them out there overnight though. Even putting aside any security concerns, the coastal environment is not friendly to electronics, and prolonged exposure isn’t great for your camera. You can, however, place the camera and lens out on the balcony or other secure place for a while, as you are preparing to go out. Leaving them outside for a half-hour or so ought to be sufficient.

If you are getting up early to shoot a sunrise, for example, you might place your camera and primary lens out there immediately after you wake up, and let them acclimate while you are getting ready to go. That will give them some time to acclimate.

2. Keep the camera in the trunk

When you are driving around, or heading to a place you plan to photograph, keep your camera and lenses in the trunk of your car. That will keep them out of the air conditioning, and allow them to acclimate to the outside temperature and humidity.

Sometimes, however, you want to keep your camera handy in case you come across a great shot. In that case, keep the AC off and roll the windows down. All you are doing is keeping your camera and lens out of the air conditioning so that they acclimate to the temperature and humidity outside.

3. Get them out of the bag

If you leave your camera and lens in a zipped-up camera bag, then the acclimation process will take exponentially longer. The camera bag, while certainly not air-tight, will prevent air flow and keep your camera and lens surrounded by cool, dry air. You don’t want that.

Instead, when you are acclimatizing the camera and lens – whether that be on the hotel balcony, in the trunk of your car, or some other place – keep them outside the camera bag.

Example of picture taken with lens fogged due to condensation.

Here is another shot taken immediately upon exiting my cool, dry hotel and entering the warm, humid air along the coast in the Florida Keys.

4. Remove the caps and filters

The place where you are likely to have the biggest problem with condensation, is the front of your lens. Therefore, that is the part you should spend the most time and effort acclimating. In doing so, take off any filters or lens caps that are on your lenses. You don’t want a UV filter and a lens cap keeping the warmer, more humid air from getting to the front of your lens and acclimating it to the conditions outside.

5. Keep a micro-fibre cloth handy

Once the condensation happens, you just have to ride it out until your camera and lens acclimate. At the same time, you should periodically wipe off the front of the lens. That way you can see if the condensation is going to return. If you are not wiping it off periodically, you won’t know.

In addition, if the situation is not too severe, you can wipe off the lens and then quickly snap off a shot or two before the lens starts fogging up again. That usually works after the acclimation process has been going on for a while.

Keep a micro-fibre cloth handy for this process. If you don’t have one, you’re going to have to use whatever is available to wipe off your lens – like your shirt (and I’d like to scoff at this notion, but I’ve been forced to resort to that many times). Buy a couple of clip-on micro-fibre cloths that come in little pouches. You can just clip one to your camera strap and you’ll always have it handy. That will also keep you from having to dig through your bag to find one (they always go to the bottom in a hard-to-reach corner).

6. Fix it in post-production?

A picture with any significant fogginess due to condensation is a goner. You will not be able to save it.

If the picture only has a minor amount of fogginess, however, there are some things you can do to try to clear it up. These are by no means sure-fire cures, but they will help a minor case of fogginess. Your first thought will probably be to increase the contrast and clarity in Lightroom or ACR. Those will work a little bit. A slightly stronger move is to take the photo into the LAB colorspace and perform the basic LAB color enhancement move. A fortunate side-effect of the color enhancement move is to remove a haze from the picture. Again, none of these tactics is a magic wand, but they can help.

Foggy lens article - example of clear shot taken once the lens had acclimated

So as to conclude on a positive note, here is a shot taken the same morning as the fogged picture above. The lens cleared in time to capture a great sunrise. Yet another reason to get there early!

Conclusion

Condensation is definitely a trap for the unwary. Light conditions change fast. Optimal conditions at sunrise and sunset are fleeting. You don’t want to be standing around waiting for the condensation on your lens to disappear and miss a shot.

Take steps to avoid the problem and acclimate your camera and lens ahead of time, while at the same time keeping everything safe. Do this either ahead of time, or while you are en route. Then make sure you are wiping off the front of your lens periodically, it will keep you from missing shots when the light is optimal.

Editor’s Note: I have encountered this situation many times. In Bangkok however I found that the image I took with the fog (below) had more feeling and impact than the ones I took after it cleared. So don’t stop shooting, you never know what you’ll get!

Darlene Hildebrandt

By Darlene Hildebrandt

googletag.cmd.push(function() {
tablet_slots.push( googletag.defineSlot( “/1005424/_dPSv4_tab-all-article-bottom_(300×250)”, [300, 250], “pb-ad-78623” ).addService( googletag.pubads() ) ); } );

googletag.cmd.push(function() {
mobile_slots.push( googletag.defineSlot( “/1005424/_dPSv4_mob-all-article-bottom_(300×250)”, [300, 250], “pb-ad-78158” ).addService( googletag.pubads() ) ); } );

The post Tips for Avoiding a Foggy Lens by Jim Hamel appeared first on Digital Photography School.


Digital Photography School

 
Comments Off on Tips for Avoiding a Foggy Lens

Posted in Photography


Samyang introduces new Xeen pro video lens series with interchangeable mounts

12 Aug

Korean lens brand Samyang has announced a new series of video lenses under the Xeen name. They feature wide apertures and resolution that the company says is aimed at users who shoot 4K and above footage. There will be 24mm, 50mm and 85mm focal lengths initially, and three more to follow next year. Read more

Articles: Digital Photography Review (dpreview.com)

 
Comments Off on Samyang introduces new Xeen pro video lens series with interchangeable mounts

Posted in Uncategorized


Olympus ‘Pro’ wideangle lens Field Test: Rock n’ Roll and Skateboards

11 Aug

In our latest Field Test we put Olympus’s new M.Zuiko Digital ED 8mm F1.8 Fisheye Pro and M.Zuiko Digital ED 7-14mm F2.8 Pro in the hands of DPReview writer Dan Bracaglia. Dan put them to the test in some of his natural environments: a rock concert, skate park, and a beach landscape at sunset. See video

Articles: Digital Photography Review (dpreview.com)

 
Comments Off on Olympus ‘Pro’ wideangle lens Field Test: Rock n’ Roll and Skateboards

Posted in Uncategorized