RSS
 

Posts Tagged ‘Lens’

Lensbaby Circular 180+ ultra-wide-angle GoPro lens launches on Kickstarter

25 May

Lensbaby has launched a Kickstarter campaign for the Lensbaby Circular 180+, a lens that attaches to a GoPro Hero’s waterproof housing. The Circular 180+ has an ultra-wide 185° field-of-view and features ‘tack sharp edge-to-edge focus,’ according to Lensbaby, as well as ‘intense depth’ and rugged construction.

The new lens is designed specifically for GoPro’s Hero action cameras, attaching to the waterproof housing with a mount that screws tightly into place. The lens housing is likewise waterproof with an IP68 standard rating, enabling it to handle ‘extended immersion’ to depths down to 3m/9.8ft. The lens is joined by a water-resistant mount, and there’s a waterproof add-on mount as well. Compatibility includes the GoPro Hero, Hero+, Hero+ LCD, and the current standard housing, which supports the Hero4 Silver and Black, Hero3+, and Hero3.

Lensbaby is seeking $ 30,000 in funding on Kickstarter, where the Circular 180+ lens is offered at various price points as low as $ 69. Backers are expected to receive their orders in August 2016, assuming the funding campaign is successful.

Via: Kickstarter

Articles: Digital Photography Review (dpreview.com)

 
Comments Off on Lensbaby Circular 180+ ultra-wide-angle GoPro lens launches on Kickstarter

Posted in Uncategorized


2016 Roundups: Fixed Prime Lens Cameras

25 May

The fixed lens camera market may be a bit niche, but it’s here that you’ll find some of the best cameras you can buy. Sensors ranging from APS-C to full-frame are designed to match their lenses, which cover ranges from 28-75mm equiv., so image quality is top-notch. 

This segment includes both pocketable models without viewfinders to ‘best worn over your shoulder’ cameras with unique or ultra-high-resolution EVFs. There’s a gigantic spread in pricing, as well. The Fujifilm X70 and Ricoh GR II can be had for under $ 700, while the Leica Q sells for nearly $ 4500.

For those who want to zoom with their feet,  here are the fixed-lens cameras we think are worth a look:

  • Fujifilm X70
  • Fujifilm X100T
  • Leica Q (Typ 116)
  • Ricoh GR II
  • Sigma dp Quattro series
  • Sony Cyber-shot DSC-RX1R II

Articles: Digital Photography Review (dpreview.com)

 
Comments Off on 2016 Roundups: Fixed Prime Lens Cameras

Posted in Uncategorized


2016 Roundup: Interchangeable Lens Cameras around $500

20 May

While they aren’t cameras that make headlines, one thing is for certain: entry-level interchangeable lens cameras sell by the truckload. The majority of them are stripped-down versions of their midrange siblings, with things like newer sensors, advanced autofocus systems, customizable controls and ‘premium’ build quality being left out. That doesn’t mean that these aren’t capable cameras – quite the contrary, actually.

All of these cameras – both mirrored and mirrorless – produce good image quality, offer respectable performance and can record Full HD video. The majority have Wi-Fi. Many of them are targeted toward beginners, with ‘help’ systems that point out the best settings to use for various shooting situations.

Those unfamiliar with DSLR and mirrorless cameras may be wondering what advantages and disadvantages each brings to the table. DSLRs are larger cameras, with a more ‘traditional’ shape and control layout, as well as an optical viewfinder. While they’re great for shooting stills, they’re not as well suited to video capture, and focusing using live view can be sluggish. Mirrorless cameras are typically smaller and are very capable video shooters, since live view focusing is much faster than most DSLRs. Two negatives about mirrorless cameras are that battery life isn’t nearly as good as a DSLR and – especially true in this class – they often lack a viewfinder.

Let’s take a look at several entry-level ILCs, with US MSRPs in the $ 500 region, kit lens included. 

  • Canon EOS M10
  • Canon EOS Rebel T6
  • Fujifilm X-A2
  • Nikon 1 J5
  • Nikon D3300
  • Olympus PEN E-PL7
  • Sony Alpha a5100

Articles: Digital Photography Review (dpreview.com)

 
Comments Off on 2016 Roundup: Interchangeable Lens Cameras around $500

Posted in Uncategorized


Go wide or go home: Voigtlander 15mm Super-Wide-Heliar lens gallery

18 May

Sony shooters took note in October when Voigtlander announced it would release three ultra-wide-angle primes for full-frame E-mount cameras. When we managed to borrow a 15mm F4.5 Super-Wide-Heliar for a few days, we handed it right over to DPR staffer and veteran landscape photographer Chris Williams. Read some quick impressions on the lens and take a look at a small selection of his images.


As a professional landscape photographer I’ve shot a number of wide-angle lenses and to say that I was impressed by the Voigtlander 15mm prime is a bit of an understatement. The lens excels in sharpness throughout the frame and maintains a high level of performance across nearly every aperture. Being that it is a super wide prime, it does suffer from barrel distortion (as most ultra and super wides do) but the amount of lens that you get for the money is impressive.

Chromatic aberration really only becomes apparent wide open where the corners also tend to soften up a bit. Overall the lens performed very well, so well in fact that I may pick one up for myself at some point.

The other really nice thing about the Voigtlander 15mm is that it accepts traditional screw on filters. The Tokina 16-28mm F2.8, Nikon 14-24mm F2.8 and the Canon 11-24mm F4L all require external filter systems like those designed by Fotodiox. The Voigtlander accepts standard 58mm threaded filters, which is rare for a prime (or even a zoom) this wide.

Articles: Digital Photography Review (dpreview.com)

 
Comments Off on Go wide or go home: Voigtlander 15mm Super-Wide-Heliar lens gallery

Posted in Uncategorized


Using a Wide-angle Lens with Wildlife for a New Perspective

18 May

With more and more budget telephoto lenses hitting the market, wildlife photography is becoming increasingly accessible. Consequently, you don’t have to look very far to see beautiful wildlife portraits, shot with a clean bokeh using a long lens. Close-ups like this definitely have their place, but this traditional form of wildlife photography is perhaps harder to achieve stand-out photos within nowadays.

But who said you had to use a telephoto lens for captivating wildlife photos? In nature photography, wide-angle lenses are traditionally associated with landscape photography. But by using a wide-angle lens with wildlife, you can incorporate the environment, and habitat of a species, into your photo. This is will add an entirely new perspective to your images, and it’s a really enjoyable technique to play with.

How Do You Do

Equipment you’ll need

While you can do wide-angle shots of wildlife using a camera trap system, I’m going to be looking at firing the shutter manually. So here are some pieces of equipment you’ll want to get hold of.

Joby Gorillapod

These three bendy tripods are extremely versatile, and allow you to position your camera in all sorts of places, whether that be wrapped around a tree, or precariously positioned on a rocky beach. This will help you to position your camera low to the ground, in the ideal position. Tripods rarely let you go to ground level, as they often have a neck or centre column. Plus, they’re very large when spread out to the ground. But make sure you buy the more heavy-duty of Joby’s offerings, as the cheaper versions will not cope with the weight of a DSLR.

Joby

Wireless release

You’ll definitely need some form of wireless trigger for your camera. You can’t press the shutter directly, as no animal will come near your camera if you’re sitting right behind it. Instead, get hold of some wireless releases from YongNuo. They are about $ 40 and work perfectly well. They are a radio based system, which do not require line of sight, and have they a range of up to 100 meters (supposedly).

Yongnuo

Setting up for the shot

You need to think about what you’re trying to convey in your photo. The best part about a wide-angle lens is the ability to include the habitat of your subject, so think about what are its key features. For me, red squirrels are a great subject for wide-angle photography. They live in British woodlands, so the obvious backdrop is a collection of trees.

Remotesquirrel2

Position the camera as low to the ground as possible; you want to make sure you are at or below eye-level of the animal. This really shifts the perspective of the shot. Remember that because you’re shooting wide (perhaps even as wide as 14mm), you’ll need to ensure your subject comes close enough to the lens, or it will appear too small.

To do this, you can use some form of bait. I will stress right away that live baiting is seen as extremely unethical in wildlife photography, and I strongly suggest you do not take this approach in any form of wildlife photography. If your subject is a carnivore, then you can collect road kill or other already dead animals to use as bait. But for me, squirrels are omnivores and they are very happy with a few hazelnuts to bring them close to the camera.

Remote High

Put your camera into aperture priority mode. Make sure you have your exposure compensation set to expose the scene properly, and any changes in light should be adjusted for by the camera automatically. Set your focus manually, predicting where the animal will turn up, and make sure to switch the camera’s autofocus off (otherwise it will attempt to refocus when you fire the shutter).

Now you can sit back and wait. Make sure you’re in range, but stay hidden. You can use a pop-up photography blind for this, and just be patient. Once an animal begins to approach, fire a test shot while it is still at a distance. This will help the animal get used to the sound of the shutter. For some animals a test shot won’t be appropriate, such as with birds that may fly away. If you’re lucky, your subject will realize that the camera means no harm, and happily sit and pose for your shot.

Things to be aware of

You should never put your photograph before the welfare of an animal. Period. There are no exceptions here, and to do otherwise is strongly condemned in the wildlife photography field. It therefore goes without saying that you should not perform this type of photography at the breeding site of an animal. If you shove a camera outside a bird’s nest, it will likely abandon it, and any chick in the nest will die. Disturbance like this never ends well.

Wide-angle photography handheld

There are some situations where you can hand-hold your camera and take wide-angle shots of wildlife. This is often the case for seabirds which nest on islands and cliff tops. These usually reside in wildlife reserves, and it is the case in the UK that you can walk around these reserves. Consequently, the animals are used to people and are completely unafraid. It’s therefore possible to get close enough. As long as your subject doesn’t show any signs of stress, then you are probably okay to approach.

Juvenile Shags

In conclusion

Wide-angle photography is great fun with wildlife. It feels just like Christmas, not knowing what you’re going to get until you go back and check the camera. Sometimes you’ll be bitterly disappointed at an out-of-focus image that had potential, but eventually you’ll come away with something you can be proud of.

googletag.cmd.push(function() {
tablet_slots.push( googletag.defineSlot( “/1005424/_dPSv4_tab-all-article-bottom_(300×250)”, [300, 250], “pb-ad-78623” ).addService( googletag.pubads() ) ); } );

googletag.cmd.push(function() {
mobile_slots.push( googletag.defineSlot( “/1005424/_dPSv4_mob-all-article-bottom_(300×250)”, [300, 250], “pb-ad-78158” ).addService( googletag.pubads() ) ); } );

The post Using a Wide-angle Lens with Wildlife for a New Perspective by Will Nicholls appeared first on Digital Photography School.


Digital Photography School

 
Comments Off on Using a Wide-angle Lens with Wildlife for a New Perspective

Posted in Photography


5 Advantages of Using a Fully Manual Lens

17 May

A Stroll in the Night DPS

Shooting with a manual lens centers your attention on the precise image you want to produce. Once you get the hang of shooting manual (here are two prior dPS tutorials: Tips for Using Legacy Lenses and Shooting in Full Manual and Why Every Photographer Should Use a Manual Focus Lens), you learn how to produce some pretty cool images that are easier to manage, than if you leave autofocus on, and that can make for some fun photography.

With all of the computing that’s in a modern autofocus lens, the camera and the lens often take the photo for you. Further, autofocus and shake reduction can actually work against your art. If you shoot frequently on autofocus, then you know the camera can easily focus on the wrong subject. This is particularly true in situations where the light varies greatly.

Potomac at Night DPS

Even when you turn off autofocus and go manual, the modern computer-driven lens can be cumbersome. It’s like turning off an automatic mode in a car and using paddles to shift gears. The experience is just not the same, things don’t work right. You want to step on the clutch, and shift through gears, feeling the engine with your right hand as you accelerate.

That’s how I feel about shooting manual. Your eye and hand drive the photo, rather the camera telling you how to drive.

Here are some of the cooler shots I’ve taken while photographing with manual lenses. They are listed from easiest to hardest. I hope you’ll enjoy some of these, too .

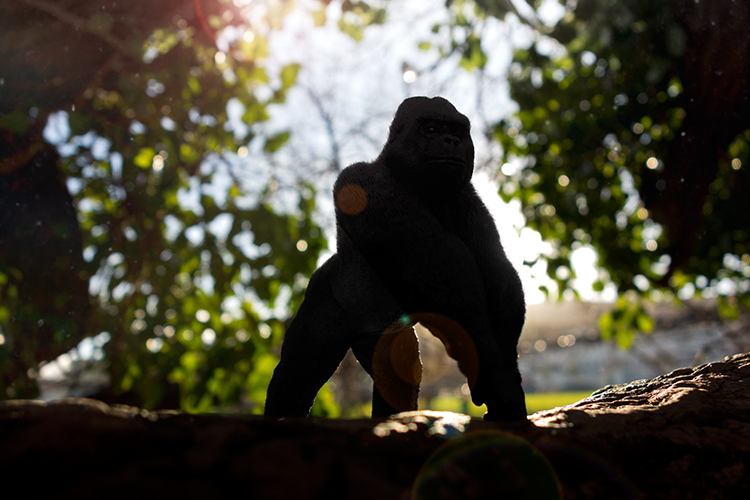
1) Nature shots that feature lots of bokeh

Purple Blossoms DPS

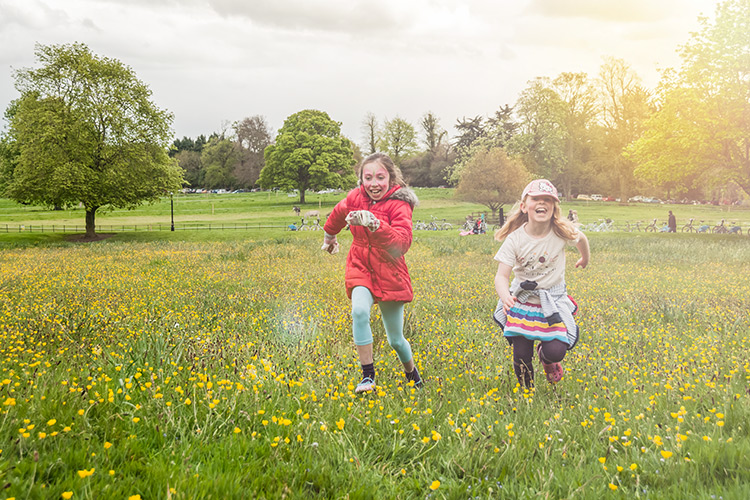
It’s spring and that means the world is filled with lots of colorful flowers, and blossoms to admire. Who doesn’t love photographing these beautiful subjects?

Because I live in a populous city, I shoot flowers with a wide-open aperture to create maximum bokeh. It allows me to blur many unwelcome background objects like cars, bikes, telephone polls, people, and even some buildings.

Manual is ideal for this kind of shot, as it is simplistic. I focus as closely as the lens permits, and set the aperture as wide as possible. I calibrate shutter speed to accommodate light and shadow differentials. The rest is easy as could be. I move myself and the camera to a position that frames the relatively still flower (wind not included) and capture the frame. The above crabtree blossoms shot is a classic example of this technique.

2) Spot focus street shots

Don t Fall Down DPS

Street photographers like to capture candid moments of human nature. Capturing cool street shots is hard. Personally, when I do shoot street photography, I tend to find a setting that I like, frame the shot, set my camera, then wait for the right person to come along. So perhaps I cheat a bit if you are a pure zen street photographer.

However, to get that shot, I love manual focus. I can set the focus based on the distance between the camera, and where I anticipate the subject will be. Autofocus often latches on to an object, and frankly sometimes the object is a little off from the spot I want to shoot. So I prefer to use manual focus, on the spot where I anticipate the subject will be.

This shot taken at the National Gallery of Art took about 10 minutes. I focused on the middle stair well and waited for the right person to come through. Unfortunately for me, a bus load of secondary school kids were there at first, but once they cleared out, things happened quickly.

3) Bright night shots

Ferris Wheel DPS

Some objects are brighter at night than others. The moon is a great example. So are ferris wheels, because they shed an enormous amount of light, often rendering all other light sources as dull or non-existent.

For some reason, in darker situations like this, the light meter in my Nikon D810 and the autofocus on some of my lenses, don’t synch well. At times autofocus doesn’t catch the subject at all, or worse, it focuses on the wrong object, like a street light in the background. So I almost always calibrate both focus and aperture manually, to get the sharpness and light just right.

Back to the ferris wheel in the image above. The image was shot with a Figmentum 35mm lens. Focus was easy, as the distance from the subject let me simply set the lens on infinity. But, the aperture required some manipulation, as I started off too bright, and had to close the aperture slightly. I actually shot this at ISO 100for 30 seconds at f5.6, which turned the water reflection into a crazy bokeh as it came closer to me.

4) Panning

Good Catch Panning DPS

Panning is one of the most difficult forms of photography, literally catching an object in motion, at a slower shutter speed. This creates fantastic blur behind the subject, while at the same time keeps the object in focus.

You pretty much need to shoot manual to pan well. Sure, you can lock in your moving target with autofocus and then pan, but really there’s so much that most cameras get wrong with autofocus. When I pan, I like to spot focus with manual. I understand where my subject will be from a distance perspective. I focus, then keep my hands on the focus dial to sharpen as necessary.

In the case of this photo with my dog, I shot it with an 85mm lens, so I set the focus on infinity and planted myself in the middle of a dog park. This fine pup was playing catch with her Dad and was quite happy about it. I caught this shot on her sixth catch.

5) Shutter drag

Shutter Drag DPS

Instagram Rock Star DPS

If you think manual panning produces some cool shots, try dragging the shutter. This is for low light situations where you basically have the same technique as panning, but now use a flash to freeze your subject in motion.

Generally speaking if you are in a low light situation, autofocus may be suspect anyway. That’s why I prefer shooting manually. I’ll confess. If there is an autofocus lens on my body, then I’ll use it to get the camera focused on or close to the subject, then go manual to finish the job.

This shot was also taken at the National Gallery of Art, and features the LED light tunnel between the East and West wings. If you are on Flickr or 500 Pixels, you see a great photo of this every week or two. I decided to play double jeopardy with this shot and rode the conveyer belt while I shot the pic, so not only were the lights and the subject moving, but I was also moving at the same speed as the belt. The exposure was 1/4 of a second, with on-camera flash.

What are your favorite manual shots?

googletag.cmd.push(function() {
tablet_slots.push( googletag.defineSlot( “/1005424/_dPSv4_tab-all-article-bottom_(300×250)”, [300, 250], “pb-ad-78623” ).addService( googletag.pubads() ) ); } );

googletag.cmd.push(function() {
mobile_slots.push( googletag.defineSlot( “/1005424/_dPSv4_mob-all-article-bottom_(300×250)”, [300, 250], “pb-ad-78158” ).addService( googletag.pubads() ) ); } );

The post 5 Advantages of Using a Fully Manual Lens by Geoff Livingston appeared first on Digital Photography School.


Digital Photography School

 
Comments Off on 5 Advantages of Using a Fully Manual Lens

Posted in Photography


2016 Roundup: Interchangeable Lens Cameras $800-1200

16 May

These days, many (if not most) consumers are likely to shop based on price and capability, rather than according to whether a certain model contains a mirror, or not. We think this is a good thing; with all the increased competition, cameras are improving more and at a faster rate than ever before. From the gear perspective, it’s certainly an exciting time to be a photographer.

In this category, you’ll find both mirrorless and DSLR cameras that are highly capable under a variety of shooting situations, offer built-in high-spec viewfinders – either optical and electronic – and an extensive array of external controls. The biggest differences in performance tend to come down to autofocus sophistication and video capability, but neither of those is dictated by the presence or lack of mirror.

The contenders are:

  • Canon EOS 80D
  • Canon EOS Rebel T6s
  • Nikon D7200
  • Olympus OM-D E-M5 II
  • Panasonic Lumix DMC-GX8
  • Pentax K-3 II
  • Sony Alpha a77 II
  • Sony Alpha a6300

Most of the camera in this roundup are built around either Four Thirds or APS-C sensors. Sensor size plays a large part in determining the image quality a camera is ultimately capable of and, in general, the larger a camera’s sensor, the better the image quality and the more control you have over depth-of-field. APS-C sensors are larger than Four Thirds chips, but the differences are rarely huge. 

Of course, the sensor sizes and image quality of these cameras are not the only thing that varies; the feature sets and performance of each camera are also quite different across the board. Within this category you’ll find weather-sealed cameras, cameras that can capture 4K video, cameras that can shoot bursts at incredibly high speeds with autofocus, and cameras that are simply well-balanced all-rounders. Which one should you buy? Read on to find out…

Articles: Digital Photography Review (dpreview.com)

 
Comments Off on 2016 Roundup: Interchangeable Lens Cameras $800-1200

Posted in Uncategorized


2016 Roundup: Interchangeable Lens Cameras $500-800

10 May

The $ 500-800 category (based on US MSRP) features quite a few strong offerings, some of which should satisfy first-time camera buyers with easy-to-use interfaces and point-and-shoot style functionality. Others are aimed more at seasoned-enthusiasts, offering direct manual controls and high-end features.

At this price point, all of the cameras use either Four Thirds or larger APS-C-sized sensors and all can shoot Raw. And while a larger sensor can mean the potential for better image quality and more control over depth-of-field, the difference in size between APS-C and Four Thirds is not enormous. As such, small differences notwithstanding, the vast majority of cameras in this roundup have what we would consider to be very good image quality.

All of the cameras in this selection are reasonably small in size (compared to pricier ILCs), but the number and arrangement of control points, grip size, build quality and weight all vary quite a bit. As do the inclusion of features like like 4K video capture and in-body image stabilization.

Let’s take a look at the currently available interchangeable lens cameras that fall into the $ 500-800 price range (give or take).

  • Canon EOS M3
  • Canon EOS Rebel SL1
  • Canon EOS Rebel T6i
  • Fujifilm X-T10
  • Nikon D3300
  • Nikon D5500
  • Olympus OM-D E-M10 II
  • Panasonic Lumix DMC-G7
  • Panasonic Lumix DMC-GX85
  • Pentax K-S2
  • Sony Alpha a6000

Articles: Digital Photography Review (dpreview.com)

 
Comments Off on 2016 Roundup: Interchangeable Lens Cameras $500-800

Posted in Uncategorized


Sigma 30mm f/1.4 DC HSM Art Lens Review

08 May

The world of camera lenses can be separated into two main groups: zooms and primes. Prime lenses are those which have a fixed focal length, meaning that they don’t zoom in and out. Once upon a time there were only primes. With the advent of zoom lenses photographers no longer had to rely on just their feet in order to get achieve the desired composition. This versatility brought with it a trade-off. Zoom lenses have more moving parts and components, which adds weight and reduces the speed of the lens, along with sharpness. Optically, primes are generally much faster and sharper than zoom lenses but limit the shooter to only one focal length, which can be off-putting to some.

But times change. Today we see a new generation of photographers realizing the merits of shooting with prime lenses. This paradigm shift is reflected by lens manufacturers who are beginning to produce more prime lenses for a hungry new market.

Sigma 2

The 30mm f/1.4 DC HSM Art lens from Sigma is among one of these that is meant be an all-purpose fast prime, for those needing a lens with excellent sharpness and great low light capabilities. I put the Sigma 30mm f/1.4 through its paces and have a feeling you will be well pleased.

Build Quality

Sigma 4

Being part of Sigma’s well regarded Art line of lenses, I expected the 30mm to be highly refined and well-built; it did not disappoint in this area. It’s manufactured from the same thermally stable composite (TSC) which is incredibly metallic in its heft and appearance. The entire lens looks very smooth and professional, with all markings and indicators being commendably well executed. The focusing ring has that perfect feel of silk when it’s turned. It moves very smoothly, being neither overly tight, nor too loose. The travel from minimum focus distance to infinity is just right, and it still leaves a lot of cushion for focusing accurately when in manual mode. The AF/Manual switch is ideally placed for no-look operation, and is very crisp when it is clicked from one to the other.

Sigma 5

Sigma 3

Included in the package is also a great looking lens hood which causes a bit of deception when attached because it makes the lens appear markedly larger than it actually is in reality. But it does a superb job of reducing the amount of contrast-robbing peripheral light from making its way to the lens’s front element. Overall, the quality of workmanship displayed in the 30mm is outstanding. It feels very well balanced when mounted to the camera (Canon 7D).

Sigma 1

It leans towards the robust side in terms of weight for a normal (close to the naked eye’s field of view) prime lens at 15.3 ounces (434g), but it is by no means clunky or difficult to shoulder for long periods. Here we see the Sigma 30mm f/1.4 compared to another prime work horse, the Canon 50mm f/1.4.

Canon Sigma

With the lens hood reversed for storage, it’s easy to see just how compact this lens really is in the hand.

Sigma in hand

Here are the official lens specifications and element array provided via Sigma USA.

Sigma 30 Specs


Image Quality

The Sigma 30mm f/1.4 is quite the beast, photographically speaking. The 30mm focal range is very close to what could be considered wide angle, yet it shows no perceivable distortions at the corners. The bokeh is absolutely beautiful; the nine curved aperture blades produce an incredibly smooth, nearly dream-like, background blur when shooting at wide apertures. Some portraits today are being shot with alarmingly short focal lengths with very positive results. This lens would serve that purpose well, and offers richly vibrant colors across the entire aperture range. This great color rendition will make for a love at first sight situation with landscape photographers also. If you shoot a lot of nightscapes this lens will appeal to you as well. Of course the f/1.4 aperture capability makes for great low light work, but the coma was found to be very low likewise. This means all your great shots of the night sky will be produced clearly, with little distortion of those small points of starlight.

The autofocusing of the Sigma 30mm f/1.4 is also a point of praise. Focusing was very fast and accurate, and very quiet. It’s great to see a prime lens with AF that is on par with its other features. While manual focusing is always a good idea, the benefit of a high-performing autofocusing mechanism can’t be understated when shooting at the wide open apertures which this lens is capable of achieving.

This brings us to one of the only two downsides thus far found in the 30mm; its sharpness at small and large apertures. It is certainly not uncommon to see a marginal reduction in sharpness when approaching minimum and maximum apertures, from even the most highly prized lenses. From f/2.2 through to f/11, the sharpness of this lens is wonderful. Anything smaller than f/11 or wider than f/2.2 however, saw a significant drop in overall sharpness in my tests. Happily though, that leaves an enormous range of possibilities for optimal image sharpness, and in my opinion, should not diminish the respect this lens deserves.

Here are some sample images to demonstrate the corner sharpness over a range of apertures from f/1.4 through to f/16. The first picture is for reference to the 1:1 magnification applied to the samples.

Corner 1 to 1

And now for the samples:

F 1 4

F 2

F 2 8


F 5 6

F 8

F 11

F 16

The other downside is relatively noticeable chromatic aberrations at wide apertures. Of course this is to be expected, but it bears mentioning nonetheless. For a lens of this quality the chromatic aberration is a little more than expected when the lens is wide open at f/1.4. These aberrations drop extremely quickly past f/1.8 and diminish completely around f/2.2.

Even at their most noticeable, Lightroom handled the fringing easily in post-processing. Much like the sharpness issue, for most shooters, the chromatic aberrations shouldn’t be a concern, or at the very least should be manageable.

The 30mm F1.4 DC HSM | Art is a terrific lens, despite any marginal concerns with sharpness and aberrations. It performs quite well across a wide range of situations, and will be a great addition to those looking for a low light prime lens with low distortion. Astro photographers will love it for its low coma and sweeping perspective, and landscapers will be drawn to its wonderful color rendition. Even street photographers would be elated to have this lens in their bag due to its incredible bokeh.

Here are a few real world sample images which were shot with the Sigma 30mm F1.4 DC HSM | Art lens, mounted to a Canon 7D, processed in Adobe Lightroom CC.

Sigma 30 Sample 1

Sigma 30 Sample 2

Sigma 30 Sample 3

Sigma 30 Sample 4

Sigma 30 Sample 5

Sigma 30 Sample 6

I would recommend this lens to virtually anyone who needs a sturdy low light prime lens. It fits a myriad of circumstances when high grade professional quality photographs are needed. When shooting at common apertures it is an incredible value for a prime lens at this price point.

googletag.cmd.push(function() {
tablet_slots.push( googletag.defineSlot( “/1005424/_dPSv4_tab-all-article-bottom_(300×250)”, [300, 250], “pb-ad-78623” ).addService( googletag.pubads() ) ); } );

googletag.cmd.push(function() {
mobile_slots.push( googletag.defineSlot( “/1005424/_dPSv4_mob-all-article-bottom_(300×250)”, [300, 250], “pb-ad-78158” ).addService( googletag.pubads() ) ); } );

The post Sigma 30mm f/1.4 DC HSM Art Lens Review by Adam Welch appeared first on Digital Photography School.


Digital Photography School

 
Comments Off on Sigma 30mm f/1.4 DC HSM Art Lens Review

Posted in Photography


Creating a Lens Flare Effect and Dust Particles in Photoshop

07 May

This article isn’t about how to magically transform your images using Photoshop. The real magic of Photoshop is trying to convince the viewer that no effects were added at all, and that the image was captured in camera. Photoshop can add that little extra to your imagery. Conversely, it can also ruin an image if it’s overdone.

I shoot to capture the best possible image as I can get at the time, but more often than not, time is not on my side. If I am shooting for a client, time is money. Deadlines and strict schedules are uppermost when dealing with a client. When shooting outdoors, I am dealing with natural light which is constantly changing and weather conditions, which may force me to shoot faster or abandon the shoot completely.

So, when I get to look at my image(s) on the computer, I take the time to critically review them. As I shoot RAW, I need to apply basic post-processing to all my images. In some cases, I may need to add an extra enhancement, but that will depend on the image and what I need it to say.

Gorilla-with-lens-flare-and-dust-particles

Lens Flare and dust particles added using Photoshop

This is the power of post editing. To be able to add an enhancement to the image, to give it that extra drama or a desired effect that you wanted to convey in your image in the first place. It can be as subtle as adding dust particles, or a bit more dramatic such as a lens flare effect. Both of these effects, whether you use one or both together, can add that little bit of oomph!

When applying any Photoshop effects, It’s not just about technique, although the know-how is important, but it is the application which is key:

  • How to execute the technique – different methods to achieve the same end result
  • When to use it – some images suit this technique over others
  • By how much?
Before

Before

After

After

The above may sound quite obvious and fundamental, but I can’t stress it enough, especially if you are new to creating effects in Photoshop.

  • HOW = the technique. I will demonstrate how to create a lens flare effect non-destructively in Photoshop using the Lens Flare filter. I will also describe how to create your own simple custom dust particle brush. Plus, I’ll show you my own unique in-camera method to capture dust particles.
  • WHEN = you deciding if this technique will work on the particular image in question. Just because you know how to use a technique doesn’t mean you have to apply it to every image. Yes, by all means practice on your images until you have refined the process.
  • HOW MUCH = knowing how little of the technique to apply – less is more. Don’t be afraid to reduce the opacity on the layer that you have applied the technique on.

This is where beginners can get carried away when learning post-processing techniques in Photoshop, for the first time. As tempting as it is, you want to show off your new skill and see the effect on your image in a dramatic way, try and keep it subtle.

What is Lens Flare?

Flare is particularly caused by a very bright light sources either in the image – which produces visible artifacts – or shining into the lens but not in the image – which produces a haze. Most commonly, this occurs when shooting into the sun (when the sun is in frame or the lens is pointed in the direction of the sun), and is reduced by using a lens hood or other shade. – as seen in Wikipedia

If applied well, the lens flare effect really does convey that good-feeling summer shot.

The Lens Flare Filter in Photoshop

Filter-render-lens-flare

The Lens Flare filter is found under Filter > Render > Lens Flare.

The Lens Flare is found under Filter>Render>Lens Flare. However, this doesn’t work in the same way as an Adjustment Layer, as in non-destructively. The effect works directly on the image itself. It also won’t work on an empty layer. So, create a new layer above the image and fill it with black. Change the blend mode to Screen. Go up to the Menu Bar and go to Filter > Render > Lens Flare.

As you can see in the image below, a small pop up dialog box appears with a preview window, and shows the four different types of lens flare available. Click inside the preview window to move the Lens Flare to whatever position you want.

Filter-render-lens-flare

The Lens Flare dialog box.

50-300mm-zoom-lens-flare

This is the 50-300mm zoom Lens Flare effect on a layer filled with Black.

105m-prime-lens-flare

This is the 105mm Lens Flare effect on a layer filled with Black.

Becky-and-Amy-with-lens-flare-applied

Lens flare applied

Tip: To get a more precise position for the lens flare, bring up the Info Panel, and move your cursor over the spot on your image where you want the flare to be positioned. The x and y coordinates tell you the exact position in pixels. When you have the Lens Flare dialog box open, click on the preview window while holding down the Alt/Option button, and the precise Flare Center dialog box appears. Type in the x and y coordinates and click OK.

Gorilla-precise-flare-center

The precise Flare Center dialog box appears when you click on the preview window of the Lens Flare while holding down the Alt key on a Mac (Option on PC).

How to create your own custom dust particle brush in Photoshop

To create your own custom dust particle brush in Photoshop is relatively simple. Open a new document in Photoshop, I made mine 800×800 pixels on a white background, set the dpi to 240 or 300. Use a small brush, hardness set to 25%, and use the color black. Create random small dots on the canvas. Not too many. Go up to the Menu Bar > Edit > Define Brush Preset. Type the name of your new brush and click OK.

creating-new-document-custom-dust-particle-brush

Create a new document with a white background 800px x 800px.

naming-dust-particle-custom-brush

Go to Edit > Define Brush Preset and name your new custom brush.

Before you start using your brush, you need to change a few properties of the brush so that it behaves like dust particles. Go up to Window > Brush. This brings up the brush dialog box. Use the following brush settings (see below screenshots also) Change the spacing to 100%, click on the Shape Dynamics box and move the Size Jitter and the Angle Jitter sliders to 100%. Next click on the Scattering tick box. I moved the Scatter slider over to 500%. Tick on Both Axes. Keep the Count Jitter at 2.

custom-brush-settings

Create a new blank layer over your image and fill it with black. Using the custom brush, set to white, start creating dust particles across the canvas. Change the blend mode to Screen and now you can see the dust particles as white specks. Add some Gaussian Blur and reduce the opacity down to around 75%. You can always add a new layer to build up the effect too.

Dust-particles-with-custom-brush

How to create dust particles in-camera

I have to admit, this technique made me smile. I had been wracking my brains for a while for a possible solution to capture dust in-camera. The other morning, I got up early, as usual, to get my girls off to school. I looked out the kitchen window, the skyline was a lovely orange from the sun.

I then noticed all the specks (dirt) on the window and I had an eureka moment, I grabbed my camera and I focused on the specks using an aperture f/4. I also underexposed it by two stops. I wanted the specks to show through a dark background. I brought this image into Photoshop and applied a Levels Curve Adjustment to darken the image even more. I placed this image on the photo of the Gorilla. I then changed the blend mode to screen. I added some Gaussian Blur and reduced the opacity. Not bad for what is essentially dirt on a window.

Dust-particles-on-a-window

Dust and dirt particles on a window.

small-toy-plastic-gorilla

The image of the Gorilla without the Lens Flare effect and dust particles.

zoomed-in-dust-particles

Zoomed in area to show the dust particles I took of my own window!

Disclaimer: I had to persist with dirty windows for weeks in the name of photography. That’s my story and I am sticking with it!

Have you got a technique for creating your own flare or dust particles in Photoshop? If so, please share in the comments below.

googletag.cmd.push(function() {
tablet_slots.push( googletag.defineSlot( “/1005424/_dPSv4_tab-all-article-bottom_(300×250)”, [300, 250], “pb-ad-78623” ).addService( googletag.pubads() ) ); } );

googletag.cmd.push(function() {
mobile_slots.push( googletag.defineSlot( “/1005424/_dPSv4_mob-all-article-bottom_(300×250)”, [300, 250], “pb-ad-78158” ).addService( googletag.pubads() ) ); } );

The post Creating a Lens Flare Effect and Dust Particles in Photoshop by Sarah Hipwell appeared first on Digital Photography School.


Digital Photography School

 
Comments Off on Creating a Lens Flare Effect and Dust Particles in Photoshop

Posted in Photography