RSS
 

Posts Tagged ‘Landscape’

Behind The Scenes of Three of My Most Popular Landscape Photos

26 Sep

In the following post I’m not going to remind you again that you need to bring your tripod with you. I’m not here to warn you that weather is unpredictable and you should check the latest forecast before heading out the door.

Nope this post won’t cover the fact that you should bring a flashlight and a few other miscellaneous tools just in case something goes wrong. And of course I won’t be telling you that you should tell someone where you’re going and when you’ll be back incase you do get lost, hurt or otherwise incapacitated and need help getting home.

Instead of rehashing the basics or providing some motivational tips to get you off the couch I’m going to show you three ‘behind the camera’ photographs that I took with my iPhone, share the final shot, and talk a bit about how I made each image.

Sound good? Okay let’s start!

First Up – A Small Cascade Near Trap Falls in Ashby MA

IMG_1902

As you can see the camera was positioned as close to the water as I could comfortably get it – one wrong move and it’s all over for me and my love of photography.

So does the fear of putting my camera in the drink stop me from attempting to grab a photograph? Not in the least!

p1637190443-4-650x365

This shot was something I saw from 100 yards up the bank of the river. I noticed the cascade and knew that it’d be the perfect place to set up my D7000 and Tokina 11-16mm, but how was I going to get into the middle of the river?

As I got closer to the scene I noticed that there were a few wet stones no larger than an iPad leading out into the middle of the river – right where I wanted to be. All I needed was a little balance and some luck and both my camera and I would make it back to the shore dry and one ‘keeper’ richer.

Standing on a rock in the middle of the river the size of an iPad is no easy task and trying to fiddle with camera settings and frame a shot doesn’t make it any easier. I used the Manfrotto’s center-column design, which allows you to swing the center column out so that it is parallel to the ground, to get as close to the water as I could, and I used the live view feature on my DSLR to frame the shot and achieve perfect focus.

After taking a few test shots and fine tuning my exposure I settled on the following settings for the shot: ISO 100, 11mm, f/14, 13.0 seconds. (Note: There is also an ND filter in play here which allows for the longer exposure time).

Next Up – A Stunning Sunset at Stony Brook in Norfolk MA

IMG_1713

Okay so this photograph probably isn’t even close to as dramatic as the one above, but it is still able to show you a bit about my thought process when capturing photographs. I could have photographed this scene further back from a nice easily accessible lookout, but I clambered over rocks and got as close to the shore as I could.

By positioning the camera on the tripod I was freely able to adjust the settings and fine tune the exposure and composition of the shot. The settings I used here were: ISO 100, 36mm, f/10, 1/160.

sunset at stony brook

Finally – Capturing Lightning Out Of My Window

Here in south eastern New England we don’t get all that many storms and due to the tall trees and densely populated urban areas it’s not easy to get a clear view of the sky when they do occur.

After hearing my phone alert me to a sever thunderstorm watch that was in effect until well after dark and a quick look at the radar confirmed that it looked like it would pan out. I quickly decided to get a plan together to capture my first lightning bolts as a photographer.

IMG_1571

With a couple hours of notice I was able to get really creative with my set up. I found a piece of cardboard and some duct tape to make a makeshift shelter for my room and the rest of my camera. I knew I wanted to open the window and the screen to get as clear a sight line as possible, but I didn’t want the rain or mosquitos to get into the house. (If you’re curious I finished sealing the cardboard after I took this photo).

I made sure to set my focus while I still had daylight to work with as it would get difficult to do so when darkness hit. I used my ND filter to lengthen the shutter speed which would hopefully allow me better chances to capture bolts of lightning and locked down my settings as follows: ISO 100, 13mm, f/9.0, 20.0 seconds.

Once everything was set up all that was left to do was wait for the storm to get close. As soon as I heard the first crack of thunder I set the Nikon’s intervolometer to capture an image every 25 seconds for about an hour or so, turned out all the lights in my house, and went to bed.

A few hours later, after the storm had long passed, I woke up curious to see if my trap had worked. The end result was a handful of lightning bolts frozen in time – this is one of my favorites.

lightning photo

Do you have any behind the scenes stories to share?

Tell us about how you captured one of your favorite shots in the comments below!


Post originally from: Digital Photography Tips.

Check out our more Photography Tips at Photography Tips for Beginners, Portrait Photography Tips and Wedding Photography Tips.

Behind The Scenes of Three of My Most Popular Landscape Photos


Digital Photography School

 
Comments Off on Behind The Scenes of Three of My Most Popular Landscape Photos

Posted in Photography


Zooming In: Using Telephotos In Landscape Photography

12 Sep
This shot of the Blue Ridge Mountains was taken with an EOS 5D Mark III and EF 70-200 f/2.8L IS II lens at 200mm. The telephoto nature of the lens compresses the distance between the ridges, creating a flat, graphic look with shades of blue created by the mountains and mist in the valleys. Exposure is 1/3", f/16, ISO 400.

This shot of the Blue Ridge Mountains was taken with an EOS 5D Mark III and EF 70-200 f/2.8L IS II lens at 200mm. The telephoto nature of the lens compresses the distance between the ridges, creating a flat, graphic look with shades of blue created by the mountains and mist in the valleys. Exposure is 1/3″, f/16, ISO 400.

This shot of a lone pine on the side of a cliff was taken from Glacier Point at sunset. Using a 400mm lens allowed me isolate the tree being kissed by sunlight while the background behind went dark. I used an EOS 5D Mark II with EF 100-400mm L lens at 400mm. Exposure was 1/60 f/8, ISO 100.

This shot of a lone pine on the side of a cliff was taken from Glacier Point at sunset. Using a 400mm lens allowed me isolate the tree being kissed by sunlight while the background behind went dark. I used an EOS 5D Mark II with EF 100-400mm L lens at 400mm. Exposure was 1/60 f/8, ISO 100.

If you’re anything like me, when presented with a beautiful landscape, your first instinct is to reach for the wide angle lenses and take it all in. And there’s no doubt about it- wide angle lenses can excel in those situations. But don’t neglect the telephoto lenses in your bag when you find yourself faced with nature’s beauty. Telephoto lenses can create shots that are every bit as breathtaking as their wide angled brethren.

Telephoto lenses, first and foremost, can allow you to isolate an area of the view you are shooting, because a telephoto sees a narrower angle of view than do wide angle lenses. Because of this narrower angle of view, telephotos also help normalize the size of near objects in relation to faraway objects. With wide angle lenses,  when you fill the frame with a near object, it will appear much larger than a similar sized object placed further away.  With telephoto lenses, near objects and far objects will appear to be similar in size, because telephoto lenses normalize the size and distance when comparing the two objects.  The downside to this is that the scene can then appear to be static and flat.There are cases where the flatness can be used to advantage, for instance creating graphic images  using the lines and colors of the landscape.

Telephoto lenses appear to compress distance, so two objects relatively far apart will appear to be very near to each other.  This is helpful when trying to enhance the density of a subject, such as a field of flowers.  Flowers will appear to be stacked right next to each other, even though they may be several feet apart.  This can be used to great advantage for creative textures and patterns.

Often, when I’m trying to divide the space in my bag, a friend will ask why I need a telephoto lens when I’m planning to shoot landscapes.  This is why.  I may not use it every time, but when I do get an opportunity use a telephoto lens in a landscape situation, I like to be able to take advantage of it.


This shot, taken with an EOS 5D Mark III and EF 70-300 f/4-5.6L, shows how you can isolate one area of a landscape, here focusing on Bridal Veil Falls in Yosemite National Park.

This shot, taken with an EOS 5D Mark III and EF 70-300 f/4-5.6L, shows how you can isolate one area of a landscape, here focusing on Bridal Veil Falls in Yosemite National Park.

This shot of the Alaska Range was taken from Denali Highway using an EOS-1Ds Mark III and EF 70-200 f/2.8L IS II. The telephoto lens compresses the distance between the foothills and the mountains, making them appear to be right next to each other.

This shot of the Alaska Range was taken from Denali Highway using an EOS-1Ds Mark III and EF 70-200 f/2.8L IS II. The telephoto lens compresses the distance between the foothills and the mountains, making them appear to be right next to each other.


Post originally from: Digital Photography Tips.

Check out our more Photography Tips at Photography Tips for Beginners, Portrait Photography Tips and Wedding Photography Tips.

Zooming In: Using Telephotos In Landscape Photography


Digital Photography School

 
Comments Off on Zooming In: Using Telephotos In Landscape Photography

Posted in Photography


4 Quick Tips to Notice the Supporting Cast of Your Landscape Scene

22 Aug

Recently I took a stroll through my photo archives as a way of bench-marking my progress as a photographer and something dawned on me – I’ve begun to overcome a very troublesome disorder for photographers known as Single Subject Blindness.

Single Subject Blindness

Have You Ever…

Come home from photographing something spectacular only to have ever photograph you upload be of that one spectacular subject? I mean there’s nothing wrong with this problem – after all you are still getting a photograph of one spectacular subject, but could you have gotten more? Done something else? Seen the scene differently?

So when you think back to some of your recent photo adventures – Have you ever photographed a dramatic sunset and walked away with photographs of only the sunset? Have you ever hiked deep into a forest to photograph a waterfall to walk away with only photographs of the waterfall itself? This is what I’m calling single subject blindness and it is something I’d like to mention today and talk about how I avoid it.

Thin Ice

There’s Nothing Wrong With Main Characters – But They Aren’t The Full Story

I do want to mention that there’s nothing wrong with capturing the main characters of your scene, the sunset, the waterfall, the expansive mountain range etc, but I do think that if that’s all you’re photographing when you go out on a shoot you’re missing a big part of the scene around you – the supporting cast!

I’ve done this myself for many years – I’ll get caught up in a scene and return to my computer to see what I’ve captured only to find every photo looks the same. Lately I’ve begun to catch myself doing it in the field and I’ve found a couple of ways to break the habit.

It’s not easy though – The thing is just like in the movies, a great book, or a dramatic play the main characters draw your attention, and keep it. The supporting cast is there to move the story along, but not necessarily be the story – however, they can make for very compelling and interesting subjects when isolated and taken separately. So while we can still photograph our main subjects I think it’s also important to find ways to steer our focus from the obvious subjects to those which are more subtle.

So How Do You Steer Your Focus?

There’s no denying that it’s hard to ignore the main character of your photo shoot – after all many times it’s the reason where there in the first place. If you want to have a chance to photograph the supporting cast of your scene you have to find the strength to divert your focus, even if only for a moment, from that main event. Here are four quick tips that I use to get myself noticing the smaller details of a scene – if you can think of more tricks leave them in the comments below!

Supporting Cast

4 Quick Tips to Notice the Supporting Cast of Your Scene

  1. Step back – It’s no secret that stepping back from you camera from time to time can be a huge benefit in improving your photography. It can help you see the entire scene as a whole, it can help you see different compositions of the subject you’re photograph, and yes it can even allow you to find and isolate the supporting cast of your scene which you might have otherwise missed with your eye glued to the viewfinder. 
  2. Close Your Eyes – Take a minute or two and close your eyes. I love doing this when I’m in the middle of no where, sometimes I’ll even spin myself in a couple circles and really try to disorientate myself (make sure you can find your way home before you try this though). The reason this works is because it causes you to really focus in on your location when you open your eyes to find your bearings. You’ll have a new view of your surroundings and this will help you see something that you didn’t notice before.
  3. Don’t Get Caught Up – I once woke up an hour before dawn in the middle of winter after a snow storm and drove to a frozen lake to photograph sunrise. I took nearly 150 shots during the 45 minutes I was there and ended up with one photograph – the one of the dock above. Of the photographs I took 95% of them looked exactly like the one above. I was cold, tired and very disappointed I didn’t make an effort to photograph other subjects during that shoot, but realized it wasn’t that I didn’t make an effort it was simply that I was caught up in photographing one subject instead of diverting my attention to other smaller details in the scene before me.
  4. Set an Alarm – If you know you’ll have a problem with number three try setting a timer. Allow yourself only a predetermined amount of time to get the shot you want from your main subject, and then once that time is up, spend the rest of your shoot looking for interesting supporting characters. This tip works wonders and it has a two fold effect – one due to the time crunch to capture the shot of your main subject you’ll find yourself working harder to get the shot you want in as short amount of time as possible, two it gets you looking for other interesting details in the scene you’re photographing.

Have You Ever Been Afflicted With Single Subject Blindness? What have You Done to Fix It?

I’d love to hear your own take on this and what you’ve done to avoid the problem in the comments below!

Post originally from: Digital Photography Tips.

Check out our more Photography Tips at Photography Tips for Beginners, Portrait Photography Tips and Wedding Photography Tips.

4 Quick Tips to Notice the Supporting Cast of Your Landscape Scene


Digital Photography School

 
Comments Off on 4 Quick Tips to Notice the Supporting Cast of Your Landscape Scene

Posted in Photography


The Intrepid Landscape Photographer’s Guide to Bag Packing

16 Aug

Landscape photography is a lot like fishing: There are good days and there are bad days…sometimes the weather isn’t on your side…. Other times it is…. You can wait around for hours and come away with nothing, or sometimes you end up with too much to carry! One thing is definitely certain: The better prepared your kit is prior to Continue Reading

The post The Intrepid Landscape Photographer’s Guide to Bag Packing appeared first on Photodoto.


Photodoto

 
Comments Off on The Intrepid Landscape Photographer’s Guide to Bag Packing

Posted in Photography


3 Steps to Gorgeous Landscape Images

01 Aug

A Guest Contribution by Todd Sisson – author of our brand new Landscape Photography eBook (currently 33% off).

During the writing of Digital Photography School’s latest eBook, Living Landscapes, I was forced to do some heavy thinking about how I approach creative landscape composition in the field. At this juncture, it is important to note that I avoid heavy thinking at all costs. Thinking truly is the hardest work, especially when you are attempting to simplify a process that is almost instinctual to you.

However, my fear of hard thinking is eclipsed by my fear of Editorial wrath, so I set aside a day, dusted off a tantric chants CD and retired to my sweat-lodge teepee for some quality time with sub-conscious me. Thirteen hours later I emerged, 12 kg lighter and armed with two revelations, the first; I approach landscape composition as a three step process. The second; my sub-conscious is a freaky place that is best avoided in the future.

Luckily for you, it is the brief overview of the first revelation that I shall share with you here today; the three component steps to creating a successful landscape image:

  • Choose a subject
  • Find the right light
  • Create a composition

NZ NO Pataua South 4 1

Successful landscape images result from a combination of interesting subject matter, quality light and a strong composition. This particular image nicely illustrates the point that you don’t need towering mountain peaks, blazing sunsets and extraordinary foreground features to make a pleasing image.

Choosing a Great Subject

Not everything in nature is destined to make a great photo. It is our job as a photographer to sort the wheat from the chaff and identify subject matter that will translate beautifully into the two dimensional constraints of the photographic medium.

To my mind, the best landscape subjects convey visual themes such as ‘energy’, ‘grandeur’ and ‘tranquility’ to the viewer. Mountains, bodies of water and coastlines all make happy hunting grounds for photographers because, as viewers, we instinctively know how to interpret these scenes. We sub-consciously know that a snow covered mountain peak must be big, or that a wave crashing on rocks is imparting large amounts of energy, and we know, without thinking, that a reflection on a pond occurs only under calm conditions. In short, we can easily ‘read’ these types of photograph.

NZ WA Lake Wanaka Willow Reflection 01

The best photographic subjects communicate multiple visual themes and have a very broad appeal as a result. To me this scene speaks of tranquility (reflections), natural change (Fall color and the building cloud cover) and stoicism (the lone tree clinging to life on the outer limits of it’s natural environment). You may ‘read’ this scene quite differently depending upon your outlook on life – for example, a hardcore environmentalist may see no more than an introduced species of tree clogging a lake that has been flooded by unsustainable farming practices in the lake’s headwaters. Photography, and life for that matter, is a very subjective affair…

You don’t need to travel to Nepal (or New Zealand, for that matter, to find great photographic fodder. Sure, it is lot easier to make interesting landscape images when surrounded by Tolkien-esque mountains but subjects don’t need to be grand in scale to make great images, they just need to be visually interesting. Learn to seek form, patterns or color in a scene and you may well find a subject from which to create a landscape image.

Sisson Wanaka 29

To me, this is a visually interesting image despite the absence of towering mountains, lightning bolts and grazing Unicorns. I was initially drawn by the beautiful evening pastels and the earth shadow (the blue line in the sky near the horizon) but I needed something to ‘anchor’ the shot. The strong geometric pattern and form of the Spaniard grass created a terrific foreground element for the composition. By getting low and getting close an ultrawide lens the grass gains ‘visual weight’ – compare it to the nearly identical grasses a couple of yards back.

Seek the Right Light

I would happily argue that great light is the single most important element in a successful landscape image. In fact, I dedicated a significant number of ePages in Living Landscapes to doing just that. Great light is truly transformative.

Fortunately, seeking great light doesn’t entail shooting only Ferrari-red sunsets. In fact, I will pull out the camera in almost any light if it complements a scene. The skill is learning to judge what constitutes the best possible lighting conditions for a given location – this is where you have to practice the art of observation and pre-visualization to judge how the sun will play out during the course of the day. I use digital tools to assist in this process, namely Focalware, which is a nifty little app that shows the arc of the sun and moon throughout the day with freakish accuracy.

Before after

Great light is transformative. In Living Landscapes I detail the many steps and decisions that led from the scouting shot on the left to several portfolio-grade images of this scene.

Create a Composition

Composition is where it all comes together artistically. You may have lined up an amazing subject and be blessed with a veritable pyrotechnics show in the sky but if you combine these in a dreary, sloppy and uninspiring composition all is wasted.

I personally divide landscape compositions into two broad (and absolutely unscientifically defined) categories;

  • Dynamic landscape compositions
  • Static landscape compositions

Dynamic compositions are the show ponies of the landscape photography world. They employ a suite of visual ploys to imbue an image with an almost 3-D feel and/or impart a sense of dynamic energy. Dynamic compositions used to be difficult to create in ye olde film days but the learning curve is vastly accelerated by the digital workflow and easy access to educational information such as this dPS blog post written by yours truly.

NZ CO cathedral cove 6

Show pony. Dynamic compositions employ techniques such as leading lines, motion blur and vivid colors to draw the viewer’s attention into the frame.

Static compositions subscribe to a more traditional photographic aesthetic and, I feel, are more faithful to the two-dimensional constraints of the art form – most of Ansel Adams’ images would be considered static as opposed to dynamic compositions. I have a personal preference for beautifully executed static compositions – probably because I am fairly ancient, in internet years at least…

Static compositions rely upon a more subtle repertoire of visual techniques to achieve a sense of drama. Successful static compositions use a combination of layers, contrast, texture, form, localized lighting and color to engage the viewer.

NZ WR Sunset Sheep

No place for show ponies. Static compositions such as this rely upon layers of visual interest, form and spot lighting to succeed.

Mixing it Up

It is important to note that there is no particular order for executing these three steps. I will often stumble across great light (always it seems when driving with a car full of tired & hungry kids ) and then have to find a subject and a composition to capitalize upon the situation. This is, of course, where strong craft and technical skills kick in – readers of Living Landscapes will know that I promote a policy of keeping it simple with regards to camera settings and technical considerations, this allows me to work fast and seek out compositions – even while being bombarded with requests for snacks from the back seat!

Todd & Sarah Sisson are full-time landscape photographers based in Central Otago New Zealand.

Their work can be found as fine art prints & canvas prints at www.sisson.co.nz  They can be found on Facebook, Google Plus and Twitter.

Post originally from: Digital Photography Tips.

Check out our more Photography Tips at Photography Tips for Beginners, Portrait Photography Tips and Wedding Photography Tips.

3 Steps to Gorgeous Landscape Images


Digital Photography School

 
Comments Off on 3 Steps to Gorgeous Landscape Images

Posted in Photography


Living Landscapes: A Guide to Stunning Landscape Photography

24 Jul

Landscapes coverToday I’m very excited to announce the launch of an eBook that we’ve been working on all year at dPS HQ. It is called Living Landscapes: A Guide to Stunning Landscape Photography – an eBook authored by New Zealand Landscape Photographers Todd and Sarah Sisson.

The eBook We Just Had to Release

Before this release we’ve built up a library of 12 dPS eBooks but the one request we keep getting from readers has been for a Landscape Photography guide.

I’ve long wanted to publish one as Landscape Photography was my own first love but have been waiting for just the right photographer to author the eBook.

I’m glad I waited because at the beginning of last year I stumbled on a Google Hangout with Trey Ratcliff which Todd Sisson. I was impressed with Todd for a couple of reasons.

Firstly his photos were gorgeous – I got lost for a good hour or so looking through his portfolio.

Secondly Todd was a great communicator. He was funny, personal and even on that short Google Hangout I learned a thing or two about shooting landscapes.

Todd and I began to talk about a potential collaboration on this eBook last year and as a result of that initial conversation he guest posted here on dPS with a post called Composing Dynamic Landscape Images. That post was our 3rd most popular post on the site in 2012 and helped hundreds of thousands of people improve their Landscape photography.

This showed us the need for a more comprehensive guide to shooting landscapes and so Todd – and his wife Sarah who is also an accomplished landscape photographer – began to work on creating this guide.

Informative and Inspiring – You’ll Love It!

The result is a gorgeous eBook filled with some amazing photography – it is going to inspire you – but also some really practical tips from Todd and Sarah.

They write this guide in a very down to earth and personal way which will be accessible to those just starting out but also helpful to those who’ve been shooting landscapes for years.

What You’ll Discover in this 130+ page eBook

Here’s some of what you’ll find in Living Landscapes:

  • How to simplify the process of making engaging and technically proficient landscape images.
  • How to overcome the unique challenges that landscape photography presents.
  • The 4 landscape fundamentals that turn bland into beautiful.
  • Workshops and guided tours of some amazing landscape images.
  • A straight forward explanation of the gear you need.
  • Landscape specific post-processing techniques.
  • Advanced tips and techniques specific to the following landscape photography topics: mountains, water, bush and forest, black and white and panoramic stitching.

Grab Your Copy Today and Save 33%

I LOVE this eBook and am so excited to practice what I picked up in it in an upcoming family trip. I’m also looking forward to seeing the images that our readers take as a result of reading this eBook.

Living Landscapes is available for you to purchase and download right now at the special Early Bird Price of $ 19.99 – a 33% discount on it’s regular price.

Want more information about this eBook? Get the Full Lowdown Here. Or grab your copy by hitting the ‘download it now’ button below.

download_it_now_landscapes

// < ![CDATA[ // < ![CDATA[ // < ![CDATA[ // < ![CDATA[ // < ![CDATA[ // < ![CDATA[ function EJEJC_lc(th) { return false; } // ]]>

Post originally from: Digital Photography Tips.

Check out our more Photography Tips at Photography Tips for Beginners, Portrait Photography Tips and Wedding Photography Tips.

Living Landscapes: A Guide to Stunning Landscape Photography


Digital Photography School

 
Comments Off on Living Landscapes: A Guide to Stunning Landscape Photography

Posted in Photography


Composing Dynamic Landscape Images

18 Jul

A Guest Post by Todd Sisson from www.sisson.co.nz.

As a landscape photographer I am constantly seeking that next X-factor shot – an image that leaps from the screen or page and demands the viewer’s attention – preferably attention of the favourable variety.

If you spend an hour or two on a photosharing site like Flickr viewing landscape images in un- curated groups you will note that a very small percentage of the total image population stands out from the crowd.

However, if you view a carefully curated collection of top-shelf landscape images you will probably start to notice some themes appearing. Certain visual cues and devices appear across multiple images – there will often be subtle commonalities between these attention hogging photos.

In many instances these images will possess the qualities of what I consider a dynamic landscape image.

What is a Dynamic Landscape Image?

Summer Storm, Queenstown New Zealand. An example of a dynamic landscape image. To maximise the number of dynamic elements in this image I locked this composition off in the field and shot multiple images. The best of about five wave-action frames were then blended together to form the final image.

There is no dictionary entry that defines a Dynamic Landscape Image* – heck, there’s not even a Wikipedia entry – so it is a somewhat personal interpretation.

To my mind, a dynamic landscape image is one that in some way conveys the energy and scale of the natural world. Dynamic images also often seek to breach the confines of their 2D medium by inferring a sense of depth – many truly dynamic image have an almost 3D quality about them.

*As far as I am aware, the term Dynamic Landscape was first popularised by the late Galen Rowell – one of the most influential American landscape photographers of his generation. Rowell used the term to demarcate his work from the somewhat literal colour landscape photography that dominated the early 1970′s. Although he was certainly not the only photographer employing these principles in his work, he appears to have been an excellent self-promoter and the term is somewhat synonymous with his name.

Dynamic Composition

Composition is the backbone of all great photos – dynamic or otherwise – but it is essential in the creation of a truly strong landscape image.

I feel that the goal of a successful composition is to draw the eye into image and hold it there for as long as possible – which is seemingly, a maximum 15 milliseconds these days*. The following image is an example of an image that I feel achieves this objective.

Sunrise Over The Moeraki Boulders, Otago New Zealand. Seascapes lend themselves to the creation of dynamic landscape images.

This image combines all of the elements that I feel comprise a Dynamic Landscape Image:

  • Leading or converging lines
  • Interesting perspective
  • Visually interesting foreground elements
  • Visually interesting mid-ground & background elements
  • Vivid colour or incredible light
  • Vision-locking tonal control
  • Suggestion of movement

It is important to note that not all dynamic landscape images possess all of these factors. In fact, it is depressingly rare to have it all come together in one moment. It must also be stated that what follows is not a recipe for creating great images. Photography can only be practised as an art when personal interpretation is injected into the process – only use this information as a guideline for evolving your own images.

So let’s have a very quick look at each of these Dynamic Landscape factors.

Leading Lines & Converging Lines

One of the simplest ways to draw a viewer’s attention into an image is to use converging or leading lines. Converging lines have been used by painters for centuries to create the illusion of depth within a 2 dimensional medium.

This is why photos of wharves, roads, and rivers make such successful photographic subjects. Although many consider such subjects to be cliches, I strongly council my workshop students to shoot them heavily to build an awareness of the power of a line in an image.

Leading lines not only draw attention into the image, they can also help to hold the eye within the confines of the image.

Check out the crudely overlaid wharf image below combines the strong converging lines of the wharf with secondary supporting lines in the water, hills and clouds.

Look for these lines whenever you are shooting – they are almost everywhere.

The Wharf at Frankton, Queenstown New Zealand. Shoot ‘cliched’ subjects like wharves and roads until it hurts a little. The pain is just your visual muscles growing stronger. Shooting man-made lines will teach you to look for more subtle lines in nature.

Although the wharf is the primary leading line device in this image there are a number of leading lines present in the water, hills and clouds. The darker reflected lines in the water help hold the eye in the central region of the frame.

Interesting Perspective

As a photographer you are an artist not a forensic documentarian. You get paid the mega-bucks and live the champagne lifestyle to show your audience something a little different – that is your raison d’être.

Hence I rarely find myself shooting at my natural standing position. For some reason, compositions seem to get more dynamic the closer you are to the ground/mud/ snow/ice-encrusted cow turd – it’s just the way it is.

This is especially apparent when using an ultra-wide lens. Subject matter becomes incredibly diminutive and interesting leading lines really lose their visual power when viewed from 5 or 6 feet high – so try getting uncomfortably close and low.

Aim high also. Look for ways to gain elevation to find that privileged viewpoint – I find that this often works really well when shooting telephoto lengths for some reason. Try scrambling up banks, standing on cars and sitting on your wife’s/husband’s shoulders (sans tripod) in an effort to find an interesting perspective.

Paddock Bay, Lake Wanaka New Zealand. Getting uncomfortably low in this instance dramatically altered the perceived form of the rock on the lower right of the frame. B y moving about I was able to create the satisfying impression of the rock 'interlocking' with the reflection. Note the strong leading line formed here also.

Foreground Elements

I believe that a dynamic image almost always possesses a strong foreground element, or elements, that complement the greater scene.

Take a sunset/sunrise for example. Sure, spectacular light makes for great images, but personally photos that contain nothing but vast expanses of super-saucy red clouds do little to engage me as a viewer.

The best dynamic images typically have a strong point of interest in the lower half, or foreground. This is your visual entree into an image. If your foreground element happens to include leading lines you are quite possibly onto the much vaunted money-shot.

Lupin(e)s, Fiordland New Zealand. Yeah, this is cheating – foreground elements don’t come much easier than this. That aside, keen observers will note the subtle converging lines formed out of the lupin pattern. This was accentuated by deliberately placing a bloom in each corner and leaving a little empty space at the bottom of the frame. Sunstars make an exceptional background element (segues niftily to my next point)

Visually interesting Background Elements

I often compose back to front. Firstly I will find the subject of my image, say a spectacular sunset playing out on mountains, and then I will run around like a deranged prison escapee in search of a foreground element to complement the background.

It is very much a balancing act – defining who or what element gets to play the lead role in your composition. Ideally the background is where the eye should gravitate to and the foreground should pick up a gong for best supporting actor.

Milford Sound, Fiordland New Zealand. The star of this image is the dramatic light playing out in the clouds over the eye- catching form of Mitre Peak – the foreground & mid ground elements are critical supporting parts of the whole composition but don't hog the lime-light.

Unusually, I didn’t scramble to find a foreground element for this image – I staggered. Four minutes earlier I had been happily sleeping in the back of my truck – my alarm went off and I saw this – panic ensued….

Vivid Colour or Incredible Light

By now it should be obvious that I have some un-checked colour-dependancy issues. I love colour*, especially natural light shows. However, I feel that vivid colour needs to be kept in balance and be a part of the overall composition. Too often I see images that rely solely upon dollops of super- saturated colour.

For a dynamic landscape image to work, balance must prevail. Hence I attempt to avoid filling the frame with too much colour (yes, there is such a thing – see below).

*I am even partial to the American version – colour.

Sunrise from Mt Taranaki / Egmont, New Zealand. In this image the main act was the rapidly dissipating beams of sunrise goodness and the rich colour in the clouds. Lens choice and composition mean that the sunrise colour is just one component of the image. I often like to keep dark forms in my images (anathema to the HDR readers amongst you) as a counterpoint to the extreme lightness of a sunset/sunrise. I find the dark hills here quite mysterious in contrast to the sunstar and clouds.

Too much colour. This was one of the most intense sunrises that I have ever witnessed. I should have just sat and enjoyed it – this is just too much colour for my tastes – it looks un-realistic. This shot has actually been partially de-saturated in an effort to tame the colour.

Vision-locking Tonal Control

I am tempted to trademark this term – it sounds like a mind-control experiment deployed by shady branches of the US intelligence community.

Basically all I am referring to is the phenomenon of vignetting.

The eye is drawn towards lightness within an image, particularly near the centre of frame. Furthermore, the eye is restrained by darkness at the edges of the frame.

When employed deftly, the viewer’s eye is gently drawn into the image by lightness and held there by the darker edges of the image.

Look at all of the images above and you will see this technique in use. Often this happens in- camera just by virtue of the composition and through use of ND grad filters. However, I will often darken the top edge of an image in post and even add a subtle vignette as the last thing I do. Weird Cloud formation & Road to Nowhere. Alexandra New Zealand. In order to achieve vision-lock here I painted in a brighter layer near the central portion of the image. A little vignetting was added to further enhance the effect.

Suggested Motion

Suggested motion, by way of blur or frozen motion is not always an achievable, or desirable, element to utilise within an image – but it can add another layer of dynamism to a composition.

Don’t just get locked into shooting long exposures either – frozen, or partially-frozen motion can convey movement just as well as a long exposure in some circumstances (see the first image, Summer Storm, for an example of this).

Moeraki Boulder, Otago New Zealand. Long Exposure motion blur creates a dynamic tension between the static boulder and the relentless sea. Note the other dynamic ingredients added to this image – interesting perspective, use of colour, vision-lock, foreground/background interest.

Can Dynamic Landscape Images be B&W?

Absolutely. There are many thousands of truly incredible B&W dynamic landscape images. No style renders texture and contrast better than B&W – at it’s best it is magnificent.

In order to compensate for their ‘lost’ colour Black & Whiters will often apply industrial grade quantities of Vision Locking Tonal Control (that’s why vignette sliders to go -100) and rely heavily upon strong graphical elements such as leading lines (you will find a lot of B&W photos of wharves and sewerage pipes heading out to sea).

I would show you an example of this, but I am mono-challenged. If you want to see B&W Dynamic landscapes at their best check out the work of Mitch Dobrowner & Hengki Koentjoro.

So Are All Good Landscape Images ‘Dynamic’?

Not at all. Stunning images can be made by avoiding almost all of the techniques that I have just espoused in this essay. Dynamic Landscape composition is just one style of landscape photography.

In fact, many of my favourite images by others are beautifully composed static, flat compositions. These ‘static’ images respectfully comply with the two dimensional constraints of the photographic medium and rely upon a separate set of visual devices in order to ‘succeed’.

If they will have me back here at DPS, these static landscapes will be the topic of my next blog post.

Todd & Sarah Sisson are full-time landscape photographers based in Central Otago New Zealand.

Their work can be found as fine art prints & canvas prints at www.sisson.co.nz Todd also offers private and group photographic tuition. They can be found on facebook, Google Plus and twitter.

Post originally from: Digital Photography Tips.

Check out our more Photography Tips at Photography Tips for Beginners, Portrait Photography Tips and Wedding Photography Tips.

Composing Dynamic Landscape Images


Digital Photography School

 
Comments Off on Composing Dynamic Landscape Images

Posted in Photography


6 Accessories to help you Improve your Landscape Photography

15 Jul

At the most basic level, all that you need to take landscape photographs is a camera and a location.  One of the reasons that landscape photography is so popular is that it is so accessible, without the necessity for the newest camera bodies or most expensive lenses.  You can pick up any entry-level DSLR and kit lens and be able to make great landscape images.

However, there are a few extra tools that, if included in your camera bag, will help you improve your landscape photography in terms of both your technique and resulting images.  Below is a selection of accessories that serious landscape photographers do not leave home without and the majority are cheaper than a basic kit lens.

1. Tripod

This has the potential to be the most expensive item on this list, but it is probably the most crucial accessory for every landscape photographer.  They come in all weights and sizes, and therefore costs, however a tripod can be key to ensuring you can capture sharp landscape images.  A lot of landscape photographs are captured at the beginning and end of the day, under low light conditions, meaning that it is not always possible to handhold the camera and still achieve shake-free images.  Also, a tripod is a good way of becoming more methodical in your approach to composing your landscape images, forcing you to slow down and critically assess the view through your viewfinder

2. Graduated ND Filters

Graduated neutral density (ND) filters are crucial for balancing the exposure between bright sky and dark land, overcoming the limited dynamic range of most DSLR sensors.  Generally, half of the filter is darker to reduce the amount of light allowed though across half of the frame.  Without them, if you expose for the sky the land will be in silhouette or if you expose for the land, the sky will be blown out.  You can use exposure bracketing to overcome this, however that will then require more time spent in front of a computer blending the multiple exposures.  Using graduated ND filters allows you to capture both the sky and land, correctly exposed, in one shot.

ND Grad fitlers

Graduated neutral density filters.  A ‘hard’ grad is shown on the left, a ‘soft’ grad is shown on the right.

Check out this recent article on the basics of choosing, buying and using graduated ND filters.

3. Hot shoe spirit level

Probably the cheapest accessory on this list, but a valuable tool none the less.  Just slide the spirit level in to the hot shoe to help ensure your horizons are perfectly level.  Some of the latest cameras now come with in-built level gauges, however they struggle to match the fidelity of an actual spirit level.

Hot-shoe spirit level

A three-axis hot shoe spirit level

4. Remote Shutter Release

A remote shutter release allows you to release the shutter, when your camera is on a tripod, without touching the camera and introducing any movement.  Also, as these remotes allow you to lock the shutter open, they are very useful if you want to make exposures over 30 seconds, using ‘bulb mode’.  In some instances, the remotes also have a digital display telling you how long the shutter has been open or a programmable timer mode so you can define the exposure length before taking the shot.

remote shutter release

Remote shutter release – if you avoid the official accessories from the big brands, you can find these relatively cheap on eBay.

5. Neutral Density Filters

Similar to the graduated filters mentioned above, however in this instance, the entire filter is of uniform density, meaning that light is blocked out across the entire frame.  You can get them 1-stop, 2-stop or 3-stop densities if you want to marginally slow the shutter speed for shooting waterfalls or introducing some movement, or you can get them as dense as 10-stops for seriously long shutter speeds.

10 stop neutral density filter

An example of the use of a 10-stop neutral density filter to achieve a long exposure time of 5 minutes

6. Polarising filters

Polarising filters are often used to increase the saturation of blue skies, however they are more useful in suppressing reflections from non-metallic objects, such as foliage or water.  This helps to increase the saturation of foliage, even on overcast days, and remove glare from the surface of any water in the scene, revealing detail below the waters surface.  An invaluable tool when shooting landscape scenes that include water.

Effect os using a polarising filter

A polarising filter was used to reveal the detail in the stones beneath the surface of the heavily reflective lake

The items above could almost be considered the essentials to go along with your camera and lens.  There are options that cater to all budgets meaning that you can build your self an effective landscape photographers toolbox without breaking the bank, and once you start using them, you will find you can exert much greater creative control over your landscape photography, and improve the images you make.

Post originally from: Digital Photography Tips.

Check out our more Photography Tips at Photography Tips for Beginners, Portrait Photography Tips and Wedding Photography Tips.

6 Accessories to help you Improve your Landscape Photography


Digital Photography School

 
Comments Off on 6 Accessories to help you Improve your Landscape Photography

Posted in Photography


4 Essential Ingredients for Great Landscape Photographs

27 Jun

When you are out in the field and you’re not sure if your the image you are making is any good, go through this quick mental checklist to see if your image contains these four essential ingredients.

1. Good Light

Light is by far the most important element of a landscape photograph. A photograph of a stunning location taken in harsh mid-day light will fall flat. A photograph of a boring location taken at that perfect moment when the light is magical will turn into a unique and memorable photograph.

I don’t actually believe that there is any kind of light that is inherently bad. You just have to know what to do with the light conditions that you are given.

Driftwood Beach on Jekyll Island, Georgia, USA, by Anne McKinnell.

Driftwood Beach on Jekyll Island, Georgia, USA.

The golden hour light of sunrise and sunset are usually a favourite time for photographers. My favourite time is the blue hour: twilight. It’s hard to go wrong with these two types of light.

When you have a day with bright harsh sunlight, take advantage of the opportunity to look for interesting shadows.

The white sky of an overcast day is an excellent time to photograph close-ups.

And what about those stormy days? Those can be the best of all with the dramatic clouds that accompany a storm.

2. Main Subject

The next thing is to make sure you have a main subject. That may sound pretty obvious but keep it in mind. You may find yourself, as I sometimes do, making an image of some general landscape without a clear subject. It’s just some land with some trees and maybe some water. You need to decide what the subject is and that will help you make an image that is more compelling.

Little Finland, Nevada, USA, by Anne McKinnell.

Little Finland, Nevada, USA.

When I get to a location I like to think of what it is about that place that grabbed my attention and I make that the main subject. That’s not to say you cannot then turn your attention to another main subject later, but if you have too many subjects in your scene, none of them with be the main subject and your image will be too general to be interesting.

While we’re thinking about the main subject, what is it about that subject that you like? Having descriptive words in your head when you are making an image will help you focus and bring that description into the image. What is it about the lake you like? Is it the reflection? The shape? The peacefulness? How it is so clear you can see the bottom? Not only will this help you convey meaning in your image, but it will help you write about it later.

3. Clean Background

Just as important as the main subject is what is behind it.

Clutter and distracting elements can ruin an otherwise good image. This is where perspective becomes important. You must find an angle to photograph your subject so there are no distracting elements in the background. That can mean getting up high and shooting down on your subject so the background is filled with only one texture, or getting low and shooting upwards so the background is filled with only sky.

Try to isolate your subject and simplify the image as much as possible.

Steptoe Butte in the Palouse Hills of Washington, USA, by Anne McKinnell.

Steptoe Butte in the Palouse Hills of Washington, USA.

4. Interesting Composition

I like to think of photography as the opposite of painting. Painters start with a blank canvas and start adding things to it, whereas photographers are presented with a scene full of details and must start eliminating things from it until it contains only the most important elements of the scene. Then, those elements must be arranged to create an interesting graphic design.

Remember the building blocks of composition that you can rely on to create interesting graphic designs:

  • lines
  • curves
  • textures
  • patterns
  • shapes
  • colours
  • frames

The “trick,” if there is one, is to make all four of these things come together. It will take patience, perseverance, and a little luck.

Post originally from: Digital Photography Tips.

Check out our more Photography Tips at Photography Tips for Beginners, Portrait Photography Tips and Wedding Photography Tips.

4 Essential Ingredients for Great Landscape Photographs


Digital Photography School

 
Comments Off on 4 Essential Ingredients for Great Landscape Photographs

Posted in Photography


Using Water to Lighten Landscape Photos

17 May

Water-Landscape
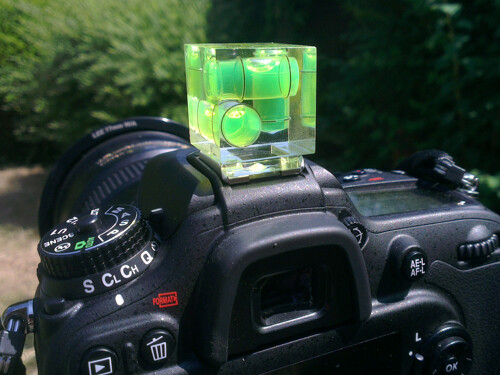
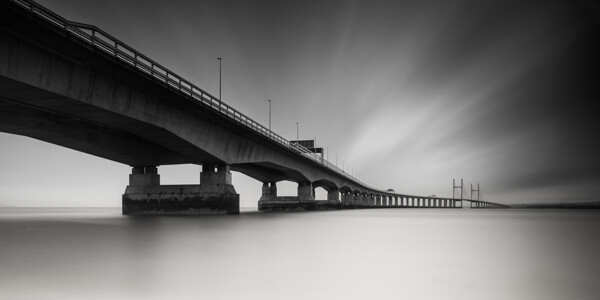
Photo by peter bowers

Most Pro landscape photographers recommend shooting either at (or around) dawn or dusk in order to capture their scene in the ‘golden hours’ when the light is at it’s best (in fact some will rarely shoot at any other time of day).

However, one of the problems associated with shooting at this time of day is that while the sky will often have enough light in it the foreground of your images can sometimes end up being a little underexposed and featureless.

One way to get around underexposed foregrounds is to include water in that area of your shot and to get it reflecting light from the sky.

This is a particularly effective technique at sunrise or sunset when there’s color and interesting cloud formations in the sky (and reflections in the water).

It may take a little experimentation with different positions to shoot from in order to get the right part of the sky in the reflections but with a little trial and error the effect can be quite stunning and a much brighter and more balanced image.

Even if you don’t get perfect reflections the light coming from the water can help balance the shot and help you overcome underexposed foregrounds.

Landscape-WaterPhoto by IrenaS

Landscape
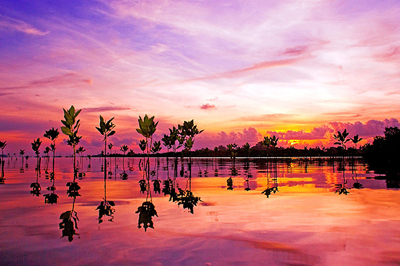
Photo by Bram & Vera

Post originally from: Digital Photography Tips.

Check out our more Photography Tips at Photography Tips for Beginners, Portrait Photography Tips and Wedding Photography Tips.

Using Water to Lighten Landscape Photos


Digital Photography School

 
Comments Off on Using Water to Lighten Landscape Photos

Posted in Photography