RSS
 

Posts Tagged ‘Landscape’

Landscape Photography and Hyperfocal Distance

20 Feb

Salinas Grandes, Argentina

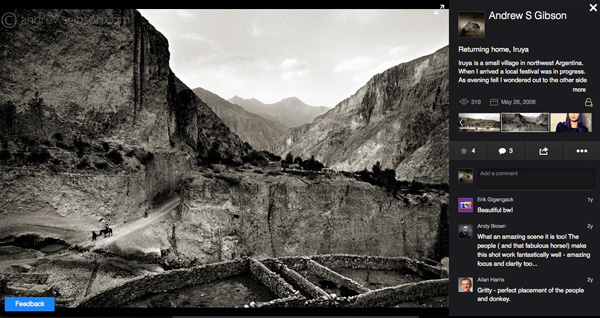
I can remember when autofocus was relatively new and many photographers distrusted it. Now it’s the other way around – autofocus has become so good and so ubiquitous that manual focus lenses are a rarity. It’s easy to forget that sometimes it’s better to turn it off and use manual focus instead.

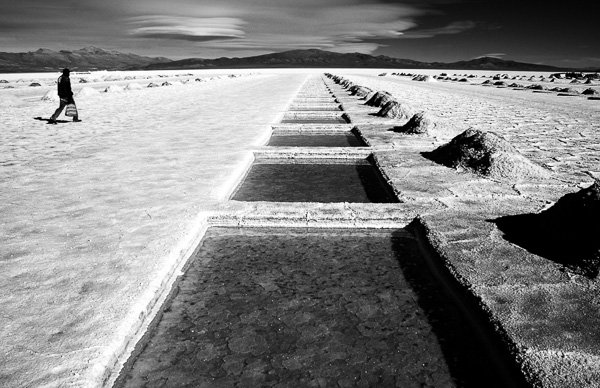
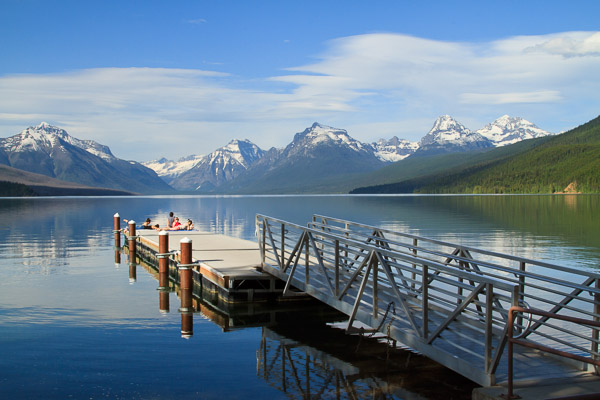
A good example of this is when you use a wide-angle lens to take a landscape photo. In this situation, you probably want to record the entire scene as sharply as possible. But how do you do this when the nearest part of the scene may be only centimetres (less than an inch) from your camera?

The answer is that you need to understand depth of field and be willing to take control and decide exactly where you want to focus the lens, rather than leave it up to the camera.

What is depth of field?

Depth of field is the area either side of the point of focus that appears to be sharp. The amount of depth of field depends partly on camera settings (the focal length of the lens and the aperture) and partly upon other factors such as the size of the photo and the eye of viewer. Sharpness is subjective – what might appear to be sharp to one person may not appear so to another. Keep this point in mind as we progress through the article.

Hyperfocal distance diagram

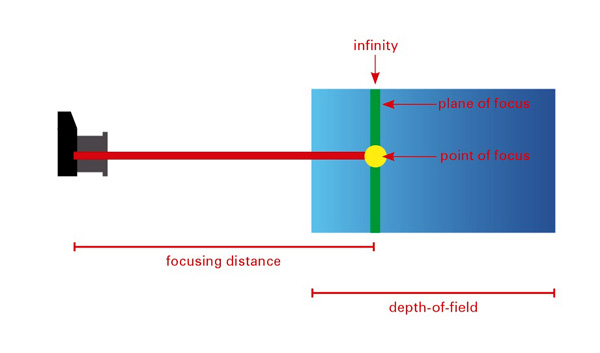
This diagram shows the depth of field when you focus on infinity. You can see that most of the zone of sharpness (another term used to describe the areas that are in focus) extends beyond the point of focus and is effectively wasted.

Depth of field in action

The best way to understand how depth of field works is with a practical example. Imagine that you are using a 24mm lens (or a zoom lens set to 24mm) on an APS-C camera focused on a point exactly one metre (3.3′) from the camera. You want a nice sharp image so you have set the aperture to f/11 (the sharpest aperture settings on most lenses are f/8 and f/11). In this case everything between around 73cm (28.75″) and 157cm (5’1″) will be sharp.

Hyperfocal distance diagram

This is what happens if you focus too closely to the camera. You will get the area around the point of focus sharp, but anything close to the horizon will not be sharp.

In reality, what is happening is that anything one metre (3.3′) from the camera (the point the lens is focused on) is sharp, and then everything either side gradually becomes less so until it reaches the point where it no longer appears to be in focus to the human eye.

Where did I get the above figures from? I used the depth of field calculator at DOF Master and selected EOS 7D as the camera. The camera is important as depth of field as affected by sensor size, as well as lens focal length and aperture.

We have already seen that focusing on infinity effectively wastes depth hyof field. You’ll get a better result using the hyperfocal distance.

What is hyperfocal distance?

The depth of field calculator throws up another figure – the hyperfocal distance. This is the closest point at which you can focus the lens at this focal length and aperture settings, and still keep everything from the focusing point to infinity in focus.

In this example the hyperfocal distance is 2.7m (8’11″). Focus on this point and everything from 1.34 metres (4’5″) to infinity is in focus. That maximizes depth of field and helps you get the entire scene sharp.

Hyperfocal distance diagram

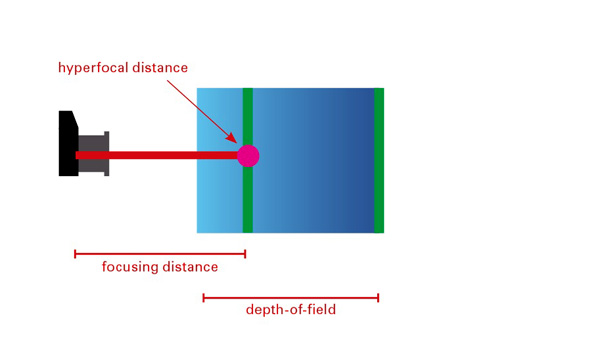
This diagram shows what happens when you focus on the hyperfocal distance. Depth-of-field is maximised, helping you to create a sharp image.

Note that the near focus point (1.34 metres or 4’5″) is half the hyperfocal distance of 2.7 metres (8’11″). This ratio holds true no matter the hyperfocal distance of your lens, aperture and sensor size combination.

Hyperfocal distance in action

The easiest way to use the hyperfocal distance is to print out or photocopy some hyperfocal distance tables to take with you on a shoot (the DOF Master website has tables you can print out here).

Alternatively, there are several smartphone apps that will perform the calculations for you such as these (do a search for DOF or hyperfocal distance, there are plenty of others)

  • Simple DoF
  • DOF Master
  • Tack Sharp
  • DoF Viewer
  • Digital Photo Calculator

Once you have the information, you need a lens with a depth of field scale on the barrel to tell you the distance at which the lens is focused. Many lenses have these, but some don’t (including lots of kit and pancake lenses). Distance scales aren’t precise, so be prepared to work with approximate measurements.

Canon lens with distance scale

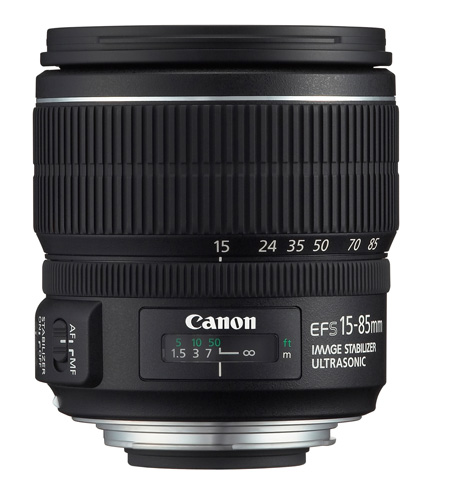
An example of a lens with a distance scale.

Canon lens without distance scale

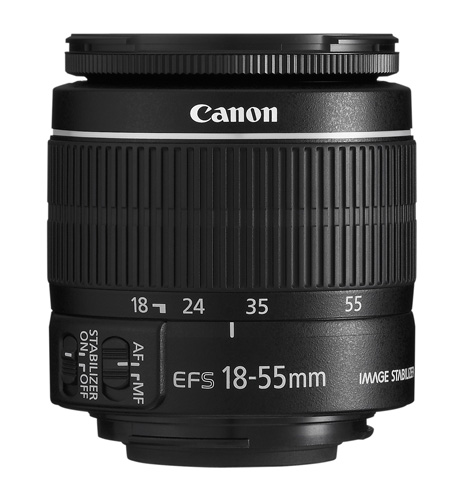
A lens without a distance scale.

If your lens doesn’t have a distance scale, your only option is to guess the distance (or use a tape measure!). Luckily, it’s not hard to guess distances. In the above example, you would know that focussing on a point around 3 metres (approx. 10′) from the camera will maximize depth of field, so it’s not that hard to make a guess.

After you have taken a photo you can double check sharpness by playing it back on the camera’s LCD screen and enlarging it as much as you can. The usefulness of this depends on the clarity and size of your LCD screen, but you should be able to tell if the parts of the scene closest to you are unsharp. You will only really know for sure once you get home and look at the photo on your monitor, but checking the LCD screen reveals any major errors in your calculations.

Given all the variables and potential for mistakes, one way to apply hyperfocal distance is to use the calculations for one aperture setting (e.g. f/8) but set the camera to a smaller aperture (such as f/11). This gives you margin for error.

Notes on using hyperfocal distance

A couple of things to be aware of:

First, the depth of field calculations in this article are based on something called the circle of confusion. This is the maximum size at which an out of focus dot appears to be sharp to the human eye. Circles of confusion are necessary because they form the basis of depth of field calculations. Each camera and lens manufacturer makes its own judgement as to which size circle of confusion they will use for their calculations. That means the figures in depth of field calculations and hyperfocal distance tables vary according to the circle of confusion size the figures are based on.

If you didn’t understand that, don’t worry. This video explains it perfectly:

Second, you will often read that depth of field extends 1/3 in front and 2/3 behind the point being focused on. This isn’t true. Focus on something close to the camera and the split is closer to 50/50. Focus on something far away from the camera and the split may be 10/90. Advice that you should focus 1/3 of the way into the scene to maximize depth of field is well intended, but inaccurate.

More reading on this topic at Getting Landscapes Sharp: Hyperfocal Distances and Aperture Selection


Understanding Lenses ebooks

Understanding Lenses ebooksMy ebooks Understanding Lenses Part I and Understanding Lenses Part II will help Canon EOS owners decide what lenses to buy for their cameras. They are both filled with lots of tips to getting the most out of your Canon lenses. Click the links to learn more.

The post Landscape Photography and Hyperfocal Distance by Andrew S. Gibson appeared first on Digital Photography School.


Digital Photography School

 
Comments Off on Landscape Photography and Hyperfocal Distance

Posted in Photography


10 Most Common Mistakes in Landscape Photography – and How to Overcome Them

04 Feb

If you’re serious about landscape photography, it won’t take you very long to realize the fundamental problem of the craft: not every landscape that catches your eye will easily translate into a compelling photograph.

When we experience a place, the smells, sounds, the warmth or chill in the air, and our own emotions combine to give us an overall impression. Our job as photographers is translate that overall impression into a photograph.

Every landscape photo needs to be carefully crafted with the final image in mind.

Devil's Cornfield, Death Valley National Park, California, by Anne McKinnell

There are many problems we run into along the way that can prevent our overall impression of a scene from shining through in the final image. The following are the most common traps to expect, and how you can avoid them.

1. Crooked Horizons

Most landscape photos will feature the horizon – a dead giveaway to the picture’s overall perspective. That means that if the line dividing land and sky is not perfectly straight across, the whole picture looks totally out of whack. There are a few ways to make sure your horizon squares up right:

  • Grid Overlay
    On most DSLRs (and some compact cameras), you can overlay a grid on either your viewfinder, your live view screen, or both. Align your horizon with one of these lines.
  • Electronic Horizon
    Newer, higher-end cameras often have a built-in electronic level. When turned on, it will gauge the camera’s position in space and tell you when it is evenly aligned.
  • Bubble Levels
    Some cameras have a bubble level attached and some tripods will have one as well. If you don’t have one built into your gear, you can purchase one that affixes onto the camera’s hot shoe. Just like a spirit level in construction, this will help you straighten your camera out.
  • Post-Processing
    If all else fails, every major photo editing software will feature a “straighten” tool which allows you to draw a line tracing the horizon. Using this, the program will automatically crop the image on an angle to make sure that the line is perfectly horizontal.

2. Eye-level Perspective

Most people photograph from an eye-level standing position producing photos that look as you would expect to see things if you were there. For a more interesting composition, try climbing on top of something, or getting close to the ground to achieve a different point of view.

3. Empty Skies

Without clouds, birds, or some other interesting feature, empty skies can turn out pretty flat and boring in a photo. Try to compose your picture with something interesting in the sky. If there is nothing interesting to show, raise your horizon line to the top third of the image to minimize how much space the sky occupies in the frame.

Pine Glades Lake, Everglades National Park, Florida, by Anne McKinnell

4. Hand Shake Blur

A blurry photograph loses almost all of its impact. Either use a tripod or use a fast shutter speed combined with image stabilization.

When it comes to landscapes, securing your camera onto a sturdy tripod will always yield better results. Even if you’re using short exposures, a tripod will allow you to compose your shot more precisely and lock its position into place while you shoot.

5. No Focal Point

Skies and mountains are lovely, but a picture can’t be all background. Your photo needs a focal point to hold the viewer’s interest. This can be anything – an interesting tree, a boat, a pier, a log – but no landscape photo is complete without a main subject.

Fisherman at Fort DeSoto, Florida, by Anne McKinnell

6. Cluttered Backgrounds

The opposite also applies – be careful not to focus too much on the subject and forget about how the background comes together. Pay attention to what is behind your main subject. If the background elements don’t add to the composition remove them if possible. Be careful that you have separation between each element, and don’t let them visually blend together (ie. two or more trees merging into a greenish blob). This is especially problematic when the objects are backlit or silhouetted.

7. Poor Lighting

When you rely on the sun to light your shots, you’ll find that some days the weather just doesn’t cooperate. Grey, cloudy days will give you muted, washed-out colours and not much in the way of shadows or contrast. Extremely sunny days might do just the opposite. Carefully consider the lighting conditions on your scene before you decide how to approach it.

  • If the sun is out, position it to one side of the camera to take advantage of the shadows and textures created by sidelight.
  • If the sun is in front of the lens, your scene will be backlit and you can make some dramatic silhouettes.
  • If the sun is behind you photographing the scene will be more difficult because the direct light will make the scene appear flat. Consider changing direction.
  • If there is no sun and the sky is white, use the soft lighting conditions to make close-ups.

Rainbow Rock, Valley of Fire, Nevada, by Anne McKinnell

8. Underexposing

If the sky is overly bright (say, in the middle of the day), it can confuse the camera’s light meter, which will try to compensate by underexposing the rest of the image, resulting in a dark foreground. If this happens, use the exposure compensation to turn up the brightness, but not so much that the sky becomes blown out (turns white).

If you’re having this problem, try re-composing your image to include a darker area of the sky. This type of scene is a good time to use a graduated neutral density filter. These filters are dark on the top and clear on the bottom. You place it in front of your lens to darken the top half of the image and even out the exposure.

9. Hot Spots and Blown Out Highlights

It’s not just the sky that can blow out, though – a hot sun can cause glare on many surfaces. Watch your scene for bright spots caused by reflections or excess sunlight. Most cameras have a “highlight warning” viewing mode on the image preview which will show any pixels that have turned pure white. If you have blown out highlights, use the exposure compensation to reduce the exposure slightly until they are gone.

10. Lack of Dimension

Even though a photo is a two-dimensional image, a strong landscape composition gives the illusion of depth. When you’re setting up your shot, make sure to populate the frame in the foreground, mid-ground, and background.

Lake McDonald, Glacier National Park, Montana, by Anne McKinnell

When you are learning photography it can be hard to critique your own work and understand how to improve. After your next photo shoot, examine your images for these problems so you can avoid them next time. Looking at each of your images with a critical eye and considering how they could be improved will quickly improve your artistic eye and make you a better photographer.

The post 10 Most Common Mistakes in Landscape Photography – and How to Overcome Them by Anne McKinnell appeared first on Digital Photography School.


Digital Photography School

 
Comments Off on 10 Most Common Mistakes in Landscape Photography – and How to Overcome Them

Posted in Photography


Essential Gear for the Landscape Photographer

03 Feb

Essential gear landscape photographer 06

A great landscape photo can capture the imagination and inspire the soul. It brings a static scene to life and reminds us why we’re drawn to nature’s cathedrals. And while you can clearly envision the kind of picture you’d like to make of your favorite vista, what may not be as clear is the gear that is essential to taking a great landscape photograph. So, let’s talk about that.

My list of essential gear for the landscape photographer . . .

What is the must-have equipment for capturing awesome landscape photos?

Camera body

We’ll begin with your camera body. Any camera will do for making a shot to share on Facebook. But to elevate your landscape game to the next level, it is essential to use a camera body that allows you to get off Auto and start shooting in Aperture Priority.

One of the keys to a great landscape photo is having tack sharp focus throughout your depth of field. In other words, everything from the leaf in the foreground to the distant mountain range should be in clear focus. To achieve this, you need to shoot at a focal ratio offering great depth of field. Shooting in aperture priority allows you to choose the right focal ratio for the scene. Something in the range of f/8 to f/16 should produce images with good depth of field and crisp focus throughout.

Another setting you’ll be able to select in Aperture Priority is ISO. This is the sensitivity of your camera’s sensor to light. Shooting with a low ISO delivers cleaner images having less noise or graininess. For better landscapes, try to shoot as close to your camera’s base ISO (100 or 200) as possible.

The combination of a large focal ratio (f/8 or higher) and a low ISO (100 or 200) means longer exposures will be needed to make a good image. If you shoot landscapes at midday when the sun is high in the sky, there is more than enough ambient light to make a good image with very short exposures. But truly dramatic landscapes, the kind you’re after, are typically captured in very different lighting conditions.

Essential gear landscape photographer 02

Many great landscape photos are taken during the golden hour; that all-too-brief window of time at sunrise or sunset when dramatic lighting paints the scene. Cloudy skies also add an element of drama which can transform a so-so view into a stunning image. Under such conditions, the available light is much lower and this creates the need for our next piece of essential kit: a photographic tripod.

Tripod

A tripod provides a stable platform for your digital camera. It allows you to take the time to carefully compose a shot and then lock down your camera in that position. Since you’ll be shooting in low light conditions, using a large focal ratio and low ISO, the length of the exposure needed to capture the scene will be fairly long. Too long to steadily handhold the camera. Mounting your camera on a tripod will keep it steady during very long exposures that record amazing detail.

Essential gear landscape photographer 05

Lenses

Of course, one of the most important pieces of equipment for a photographer is the lens through which a scene is captured. For landscape photography, your most versatile lens will be a wide angle. These are short focal length lenses that deliver wide, true fields of view. That wide field of view allows greater flexibility in composing a shot encompassing the full grandeur of a landscape. I recommend a minimum focal length of 12mm for APS-C bodies (cropped sensor) and 18mm for full-frame cameras.

Fortunately for your wallet, this does not need to be a fast lens which are designed to have focal ratios of f/2.8 or faster. They are consider fast because their large apertures collect enough light to keep exposures brief, even in low light conditions. Large apertures demand a large front lens element, which comes at a steep price. And while the performance can be well worth the investment, many photographers simply don’t have room in their budgets for such a purchase. Since you’ll be shooting at f/8 or greater, a lens with a maximum focal ratio of f/4 should more than meet your needs.

Essential gear landscape photographer 04

Filters

Let’s talk briefly about filters. They can be a great tool for the landscape photographer. Among the most useful are graduated neutral density (GND) filters and variable polarizing filters. However, as useful as filters can be, I don’t consider them essential gear. In the right lighting, filters are unnecessary. In situations where a GND filter would be of use, it’s often possible to compensate for significant differences in brightness in your photo editing software of choice. In short, filters are useful but not absolutely necessary.

Essential gear landscape photographer 01

Yourself

The last piece of essential gear we’ll discuss is, you. Your eye for composition is the most important asset in your photographer’s tool kit. Your ability to recognize good light is essential. If you look at a scene and your inner voice is saying, “Ooh, that’s cool,” that’s a good sign the lighting is outstanding. Listen to that inner voice, stop and compose a shot.

Walk around the scene. Look for a foreground element to include in the composition. One of the biggest challenges of landscape photography is conveying a sense of scale. Including a foreground element helps immensely. A bush, leaf, rock or person provides a sense of scale for the rest of the image. It also helps simplify the scene, making the resulting image more approachable to the viewer.

Essential gear landscape photographer 03

Summary

With a keen eye for composition, a camera body allowing you to shoot in Aperture Priority, a solid tripod and a sharp wide angle lens, you can take your landscape photography to the next level. Your images will convey the magic you felt while standing amidst a grand scene. The resulting “oohs” and “aahs” will be the reward feeding your satisfaction as a landscape photographer.
Now, get out there and shoot some great landscapes!

The post Essential Gear for the Landscape Photographer by Bill Ferris appeared first on Digital Photography School.


Digital Photography School

 
Comments Off on Essential Gear for the Landscape Photographer

Posted in Photography


5 Tips for Better Long Exposure Landscape Photography

03 Jan

David’s Long Exposure and DoF eBook Long Exposure and Shooting Shallow DoF eBook Bundle (Long Exposure comes with Lightroom Presets) is currently 43% OFF at SnapnDeals – grab it now! (only until January 16th AUS time)

Even if you are an experienced landscape photographer you will know there is lots to consider when approaching the area of long exposure, landscape photography.

The following five tips are just some of the things I have learned, (often the hard way) on my own journey with landscape photography and I hope you are able to take advantage of them and apply them in your own work.

Long exposure landscape photography 05

5 Tips for Better Long Exposure Landscape Photography

1 – Consider the scene without the camera

When arriving at a location you may find yourself rushing to your camera bag in haste to set up your gear. With long exposure photography your mind can often be busy doing the math, calculating exposure times, juggling tripods and fiddling with filters.

Take your time and behold the scene, forget you are capturing a long exposure image and get the framing right. I use the Lee filter system on my Fuji X cameras, which is easy to attach and remove the Neutral Density (ND) filter to the camera between shots. I often remove the filter and capture shorter exposure images to review on the LCD screen. If these images don’t look good there is little chance of the long exposure version looking look.

Don’t be fixated on getting the water looking smooth; instead fixate on framing the water in the photograph to create contrast and make the scene visually interesting.

Long exposure landscape photography 04

2 – Maximize your images with morning or evening light

If you are using an ND10 filter you will know how brilliant they are at stopping light from reaching the camera sensor. Although, theoretically it is possible to capture long exposure images even during the sunniest part of the day, it generally isn’t the best time to shoot.

Prioritize the late evening or early morning for capturing long exposure images so you don’t rely on the ND filter doing all the work. You will find you have much more creative control and will capture more atmospheric images by shooting at the extremes of the day.

Long exposure landscape photography 02

If you are shooting the ocean, then the second part of this tip is to research tide times. I’ve ventured out on more than one occasion to shoot a jetty to find it would be hours before the tide was in. There are various services online that will tell you high and low tide times for your specific area.

3 – Use the rule of thirds

As with the first tip I really recommend that you spend time studying your location. Imagine your image as three separate layers. The top and bottom layers need to contain something of visual interest with the middle layer tending to be the smoothed out water. Sandwiching of the smooth water between foreground and background detail can add a real sense of drama to a long exposure scene.

Long exposure landscape photography 06

4 – Keep your gear clean

Having the camera shutter open for long durations means any dust or dirt on your lens or filter has a greater opportunity to impact on your image. Your post-production software (such as Adobe Lightroom) will go some way to automatically clean up dust but quite often larger spots are visible in long exposure images that wouldn’t be obvious in normal conditions. Having a lens cloth handy and cleaning the filter (both sides) in-between shots can result in less post-production work later on.

5 – Enhance in post-production

When it comes to postproduction processing for long exposure photography I recommend focusing on three areas. Initially you should correct any colour cast created by the ND filter. This is a relatively simple process; in Lightroom use the ‘temperature’ slider to warm the image to a more natural hue.

You should then zoom in and check for any dust spots, these are generally more obvious in the highlights, such as the skyline. Use the Spot Removal tool (Shortcut Q) to remove these blemishes easily.

Long exposure landscape photography 01

Finally my top tip is to use the graduated filter tool in Lightroom 5 (shortcut M) to soften the water. You can do this by clicking on the horizon and dragging to the base of the water. Once you have created the filter you can then soften the smooth water by reducing the level of ‘Clarity’. You can also do the opposite of this technique to increase the ‘clarity’ of your skyline.

Long exposure landscape photography 03

Summary

These five tips, I hope will go some way to improve how you approach long exposure photography, but the most important thing to remember is to relax. There is something ultimately therapeutic about the experience of capturing long exposure images of landscapes, moving water or the night sky, isn’t that what the creative process is all about?


long-exposure-bookcover-250David’s Long Exposure and DoF eBook Long Exposure and Shooting Shallow DoF eBook Bundle (Long Exposure comes with Lightroom Presets) is currently 43% OFF at SnapnDeals – grab it now! (only until January 16th AUS time) 

The post 5 Tips for Better Long Exposure Landscape Photography by David Cleland appeared first on Digital Photography School.


Digital Photography School

 
Comments Off on 5 Tips for Better Long Exposure Landscape Photography

Posted in Photography


So you Want to Shoot Landscapes? [Top 12 dPS Landscape articles from 2013]

27 Dec

Landscape photography is always a popular topic here on dPS. Who doesn’t a great mountain scenic image, or a shot of the rolling waves on the ocean?

Image by Todd Sisson – author of our Living Landscape Photography eBook

In this, the first of our “Best of 2013” series are 12 of the top landscape articles from 2013. In no particular order:

  1. 11 surefire tips for improving your landscape photography
  2. Composing dynamic landscape images
  3. Getting landscapes sharp: focus stacking
  4. Getting landscapes sharp using hyperfocal distance and aperture selection
  5. 4 rules of composition for landscape photography
  6. 4 essential ingredients for great landscape photographs
  7. 3 reasons to shoot vertical aspect landscapes and 6 tips on how to shoot them
  8. 3 steps to gorgeous landscape images
  9. How to shoot landscapes at sunset
  10. Tips for shooting landscapes with a telephoto lens
  11. Wide angle lenses and the landscape
  12. Include the foreground for dramatic landscapes

For even more information on landscapes pick our popular ebook Living Landscapes.

The post So you Want to Shoot Landscapes? [Top 12 dPS Landscape articles from 2013] by Darlene Hildebrandt appeared first on Digital Photography School.


Digital Photography School

 
Comments Off on So you Want to Shoot Landscapes? [Top 12 dPS Landscape articles from 2013]

Posted in Photography


Encyclopedic Landscape: Artist Carves 24-Volume Book Set

25 Dec

[ By WebUrbanist in Art & Sculpture & Craft. ]

book landscape encyclopedia set

In his most voluminous undertaking to date, this book artist bids farewell to the long legacy of printed Encyclopedia Britannica sets with a mountainous tribute to their 244 years of history.

book landscape 24 volumes

book landscape design detail

book landscape close up

Guy Laramée, book artist and author of this piece titled Adieu (French for goodbye), has done similar works at smaller scale, sometimes carved into single books and other times made from whole sets or entire series. A range of fascinating examples can be seen below and certain pieces are available for purchase from the Foster/White Gallery.

book art carved cavern

book art cave inside

book art mountain landscape

book art landscape detail

The act of gouging into a book seems almost violent, making the idyllic and often nature-centric compositions this artist creates via that destruction seem strikingly peaceful by contrast.

Next Page – Click Below to Read More:
Encyclopedic Landscape Artist Carves 24 Volume Book Set

Share on Facebook


[ By WebUrbanist in Art & Sculpture & Craft. ]

[ WebUrbanist | Archives | Galleries | Privacy | TOS ]


WebUrbanist

 
Comments Off on Encyclopedic Landscape: Artist Carves 24-Volume Book Set

Posted in Creativity


Grab Our Best Selling Landscape Photography eBook for $7 – Today Only

19 Dec

On the seventh day of Christmas dPS gave to me …

The biggest discount on the sale on our biggest-selling eBook of the year!

Living Landscapes today is yours for just $ 7. Grab it here.

Landscapes cover

When we released it earlier this year Living Landscapes sold like hotcakes.

Not only that – the feedback we’ve received from readers and reviewers has been phenomenal.

We’re going to let this eBook and price stand for itself and simply say … If you like taking landscape photos – Don’t miss this one!

Get It by itself or Bundle it With 4 More Great eBooks from Jay Patel

Now if you’re really wanting to take your outdoor photography to the next level then you’ll want to check out this 2nd deal today because you can also get Living Landscapes bundled together with world renowned photographer Jay Patels’ workflow series.

NewImage

This collection of 5 books will transform your outdoor photography.

In this bundle you get Living Landscapes plus:

  • The Workflow Series: Coastlines
  • The Workflow Series: Waterfalls
  • The Workflow Series: Mountains
  • The Workflow Series: Details and Macro

All for just $ 24.99 — that’s $ 5 a book!

Day 7 of the dPS 12 days of Christmas is going to be big. Do not miss out.

Whether you’re just getting Living Landscapes or you want the full bundle of 5 eBooks – Grab them here fast because this deal is available today only.

The post Grab Our Best Selling Landscape Photography eBook for $ 7 – Today Only by Darren Rowse appeared first on Digital Photography School.


Digital Photography School

 
Comments Off on Grab Our Best Selling Landscape Photography eBook for $7 – Today Only

Posted in Photography


Tips for Landscape Photography in Exotic Places

11 Dec

The Exotic Landscape

Landscape photography is difficult. If you live in a location that lacks spectacular landscapes, or you just fancy going somewhere new, travelling to a new location – especially a beautiful one – may seem like the solution. A few days ,or a week, in a national park or other beautiful spot with your tripod and camera sounds like a great way to create some wonderful new images. What could go wrong?

Actually, plenty. The weather (and consequently the light) might not do what you want. If you are shooting by the sea, the timing of the tides may not be conducive to taking great photos. You may not have time to find the best places to take photos, and be able to get on location when the light is at its best.

I wrote more about that, and the advantages that concentrating on your local landscapes here, in my article The Intimate Landscape – 5 Tips for Better Landscape Photography.

Does that mean you should give up the idea of travel altogether? Of course not. Travel broadens the mind and provides fantastic new photo opportunities. It’s also a lot of fun. But because time is tight when you are travelling, you need to plan well to make the most of the opportunities that come your way. I’m going to show you how in this article.

Do your research before you leave

Research is very important. If your visit is brief, you’re going to be under time pressure. The more preparation you do, the better prepared you will be.

1. Use Flickr and 500px

The Exotic Landscape

Get on both of these websites (Flickr and 500px are both free to join) and search for photos taken in the place that you are going. The results will give you a great idea of the potential of that location. You might also find some new spots, away from the ones that everybody else seems to photograph.

If you are going to a coastal location, try and figure out how the changing tides affect the composition of the images you see. Some places are at their best at high tide, and others are at low tide. If this is the case, do an online search for tide tables. If the best photo opportunities are at low tide, for example, then the ideal time to travel there is when low tide coincides with sunset or sunrise, so you can take advantage of the golden hour and twilight.

Got a question about an image? Why not send the photographer a message and ask for their advice? Not everybody will reply, but you may receive invaluable advice from those that do.

2. The Photographer’s Ephemeris

The Exotic Landscape

When you are looking at other people’s photos, bear in mind that the light, and the direction it comes from as the sun rises and sets, changes during the year. There’s an easy way to calculate where the sun will rise and set in any given location, at any time of the year. Simply download The Photographer’s Ephemeris – this application will do the calculations for you. It’s free for Windows and Mac OS X; ideal for research before you go, and you can buy apps for smart phones and tablets; useful if you may need to use it while out in the field.

3. Check the weather forecast

The Exotic Landscape

It sounds almost too obvious to mention here, but it’s important to check the weather forecast before you go. Most trips are booked ahead of time, but long range forecasts are only accurate a few days in advance. Checking the forecast helps you prepare.

What if the forecast is for rain and cloudy skies? Then you need to work out how you are going to cope with that (for example, you could work in black and white, or concentrate on creating evocative images showing the background blurred out by the rain). If rain is forecast, make sure you have a waterproof camera bag to protect your gear and lens cleaning tissues or cloths to clean water off your front lens element. A cover to protect the camera is also a good idea (you can buy them from Amazon or BH Photo & Video).

4. Take minimal gear

Think about the gear you need to take. It’s a personal choice, but the trick is to find the balance between taking enough lenses and accessories to create great images, but not carry so much that you are so worn out when you arrive at your destination that you are too tired to take photos. For example, on a recent trip I took my 17-40mm wide-angle zoom and an 85mm prime lens (plus cable releases, filters etc). That’s it – because of my preparation I knew that I wouldn’t need anything else.

Tripods are tricky. You need to compromise between weight and stability, not always easy. If you need to buy one, this article (How to Buy a Tripod) covers the factors you should consider.

Don’t forget personal items, such as protective clothing, rain coats, food, wather etc. They all add weight to your load.

5. Be flexible

Good planning gives you a great head start, but don’t be afraid to change plans when you’re on location if you learn something new. Use local knowledge to your advantage. Why not ask the person you deal with in your accommodation, the best places to take photos? You might see postcards, or a local photo book in a shop, that show you new places to take photos. The weather may do something unexpected. Don’t get so locked into your plans that you are unable to see fresh opportunities.

Above all – have fun. Enjoy yourself and create some beautiful images.

Mastering Photography

Mastering Photography

My ebook Mastering Photography: A Beginner’s Guide to Using Digital Cameras introduces you to photography and helps you make the most out of your digital cameras. It covers concepts such as lighting and composition as well as the camera settings you need to take landscape photos like the ones in this article.

Post originally from: Digital Photography Tips.

Check out our more Photography Tips at Photography Tips for Beginners, Portrait Photography Tips and Wedding Photography Tips.

Tips for Landscape Photography in Exotic Places

The post Tips for Landscape Photography in Exotic Places by Andrew Gibson appeared first on Digital Photography School.


Digital Photography School

 
Comments Off on Tips for Landscape Photography in Exotic Places

Posted in Photography


Resources for Better Landscape Photography

09 Dec

Just a quick post to give you a few places to look for tips on doing better landscape photography.  Links to a few recent articles, and a couple of ebooks for you to check out..

Ebooks

On sale now 50% off (expires December 15th, 2013)

Landscape Photography – The Entire eBook Collection

This eBook collection has been a really strong seller over at our sister site – SnapnDeals. It’s six landscape eBooks at a great price.

1385693865783537786

Also don’t forget to check out our own best selling Landscapes eBook – Living Landscapes – which launched earlier this year.

Living Landscapes – a Guide to Stunning Landscape Photography

Some recent articles about landscape photography:

  • The Intimate Landscape – 5 Tips for Better Landscape Photography
  • Wide Angle Lenses and the Landscape
  • A Day at the Beach – Seaside Landscapes
  • How to Shoot Landscapes at Sunset 
  • Composing Dynamic Landscape Images
  • 4 Essential Ingredients for Great Landscape Photographs

Do you have some other good sources? Share in the comments below – or share your landscape images!

Post originally from: Digital Photography Tips.

Check out our more Photography Tips at Photography Tips for Beginners, Portrait Photography Tips and Wedding Photography Tips.

Resources for Better Landscape Photography

The post Resources for Better Landscape Photography by Darlene Hildebrandt appeared first on Digital Photography School.


Digital Photography School

 
Comments Off on Resources for Better Landscape Photography

Posted in Photography


The Intimate Landscape – 5 Tips for Better Landscape Photography

28 Nov

Landscape photograph

A few weeks ago I spent seven days travelling across the northern tip of New Zealand’s South Island. Anybody who has been here knows that it is a beautiful place. I often come across remarks by photographers referencing New Zealand as a destination on their list of dream places to go to. Who can blame them? It’s a spectacular country, with beautiful landscapes.

However, the road trip brought home something of interest to all landscape photographers – landscape photography is hard. Really hard.

Not only do you need a beautiful location, but you are also relying on the weather and light to be conducive to the type of photo you want to take. If it isn’t, there may not be time on a short trip to wait for the ideal conditions.

It’s also a challenge to find an original way to photograph the landscape. Many other landscape photographers have been there before you. It’s difficult to create something new in a short space of time. Here are a few tips to help you do better landscape photography.

Split Apple rock, near Abel Tasman national park. I like this photo, but is it original? Not really – it’s a popular landmark and has been photographed by hundreds of photographers. It’s very difficult to create something new here.

Split Apple rock, near Abel Tasman national park. I like this photo, but is it original? Not really – it’s a popular landmark and has been photographed by hundreds of photographers. It’s very difficult to create something new here.

#1 Local knowledge

While there are ways to help ensure that you get the most out of a trip away (watch for those tips in an upcoming future article) today I want to make the point that one of the biggest advantages any landscape photographer has is intimacy with the landscape.

Intimacy comes from a deep knowledge of ,and a connection with the landscape. It’s an appreciation of the people that live there and the history of the location, plus an understanding of how the landscape changes through the seasons. People who have an intimate relationship with a region usually live there, or visit often. They are not passing through (like I was on the South Island). They know the best places to take photos, and when the light, seasons and weather are most likely to align to create the best results.

If you are struggling to find ways to photograph your local landscape, maybe it’s time to come at it from a different perspective. How can you turn your familiarity with your local landscape into an advantage?

Let me give you some practical examples. I live in Wellington, a city at the southern end of New Zealand’s North Island. I’ve never thought of it as a great location for landscape photography. Relatively speaking, it doesn’t have the spectacular landscapes of the South Island, nor the sub-tropical bush or white sand beaches of the northern half of the North Island. However, I’ve found other ways to incorporate the landscape in my photos.

Landscape photograph

#2 Long exposure and night photography

I know some good locations for these, including places that I would never have found on a short visit. The coastline south of the city has some beautiful, rugged locations. Walking along the sea front during all four seasons has given me an appreciation of how beautiful and changeable it is. The light and landscape change with the seasons and the weather, and I’d never understand that if I didn’t live here. Best of all, once I’ve found a location, I can wait out periods of inclement weather and return when the light is best to take advantage of it.

The benefit of these techniques is that they help you create photos with a very different look to what many photographers will take.

Example from another photographer

I recently came across the work of Mark Gee, another Wellington resident. He’s rather good at night photography. Most of his photos are taken in the local area and show an intimacy with the landscape that only comes with local knowledge and time.

Landscape photograph

#3 Try some special techniques

Painting with light and steel wool spinning are two that come to mind. The lack of spectacular landscapes has pushed me off into different directions as I look for more ways to make the most of the scenery we do have here. Mark Gee’s work has inspired me to try some night photography, and that ties in neatly with these techniques. Again, the freedom to return to the locations I want to use when the sky is clear and there is no wind is priceless.

If you are looking for original ways to photograph your local landscape, perhaps either of these techniques will help!

Portrait in the landscape

#4 Portraits

I take most of my portraits outside, using my favourite locations as backdrops. Sometimes a certain location may not be great for landscape photography, but it is ideal for taking portraits. The local landscape has become a part of my portrait work, and my style. If I lived somewhere else, my portraits would have a different feel to them.

How can you incorporate your local landscape in portraits?

Are there any other ways to utilize the local landscape?

#5 Use storytelling

There’s one way I can think of – tell a story. Perhaps there is the potential for a documentary project in your area. Stories are inevitably about people, so think about how local people interact with, or depend on the local landscape. For instance, activities such as running, sea kayaking, cycling, surfing and wind-surfing are all popular here in Wellington. Any one of those could make an interesting documentary project.

Or something more simple, such as Nathan Wirth’s seascapes with a Buddha.

What options do you have in your local area?

Ultimately, all these ideas are about the same thing: going deep and exploring your relationship with your local landscape in a way that isn’t possible on a brief visit. It’s the same reason that National Geographic photographers go away on assignment for months at a time. Intimacy with your subject and time produce a depth of coverage that you can’t get any other way.

Mastering Photography – additional learning

il-06

My ebook Mastering Photography: A Beginner’s Guide to Using Digital Cameras introduces you to photography and helps you make the most out of your digital cameras. It covers concepts such as lighting and composition as well as the camera settings you need to take landscape photos like the ones in this article.

Post originally from: Digital Photography Tips.

Check out our more Photography Tips at Photography Tips for Beginners, Portrait Photography Tips and Wedding Photography Tips.

The Intimate Landscape – 5 Tips for Better Landscape Photography

The post The Intimate Landscape – 5 Tips for Better Landscape Photography by Andrew Gibson appeared first on Digital Photography School.


Digital Photography School

 
Comments Off on The Intimate Landscape – 5 Tips for Better Landscape Photography

Posted in Photography