RSS
 

Posts Tagged ‘Landscape’

Six Tips For Using Filters to Improve Your Landscape Photos

05 Oct

One of the secrets to good landscape photography is the way in which you capture various elements of the scene. Sure, you can let your camera do the heavy lifting and figure out the exposure. But a landscape photo doesn’t have to be a literal interpretation of what you see, or of what your camera sees when left to its own devices. While post-processing can help make adjustments to an image so that it’s less literal than what you saw, making certain adjustments at the time of capture is more important, giving you something special to work with when the time comes to edit the image in post. Using filters such as polarizers, neutral density, and graduated neutral density filters can help you capture the scene in more creative ways. These tips for using filters can help you start making these adjustments and creating more dynamic images.

Filter Tips

The following tips can help you start making these adjustments and creating more dynamic images.

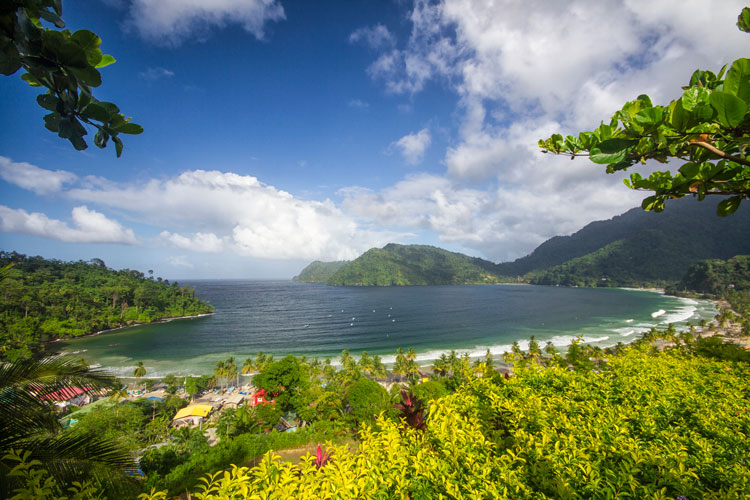
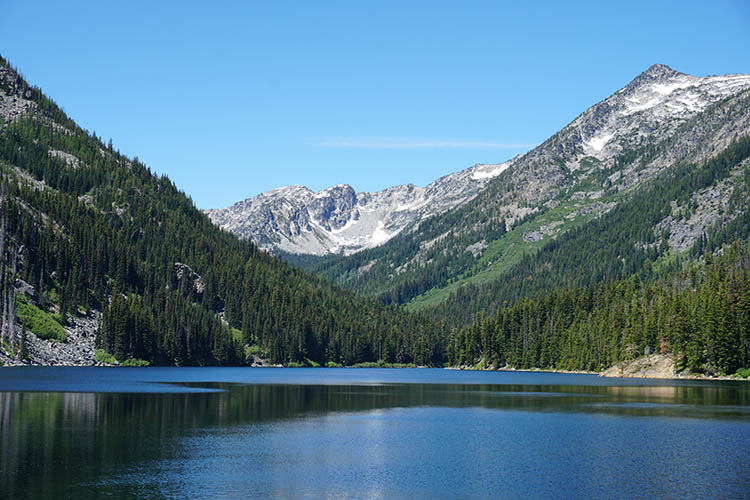
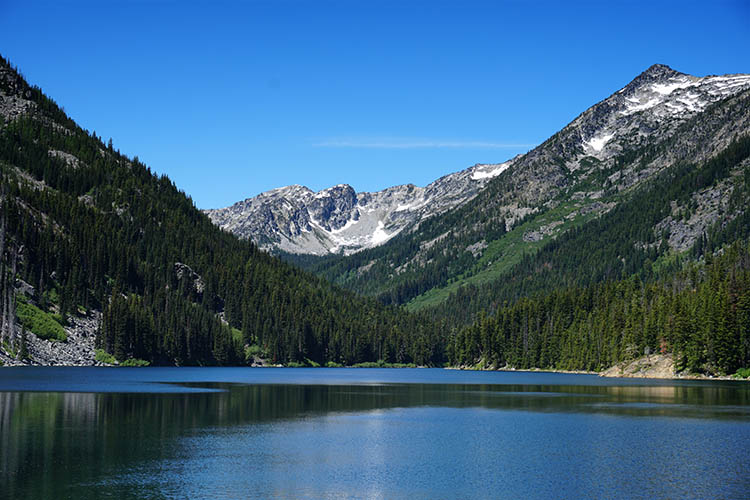
1 – Use a polarizer to improve the sky

Using filters - a polarizer to reduce haze in an image.

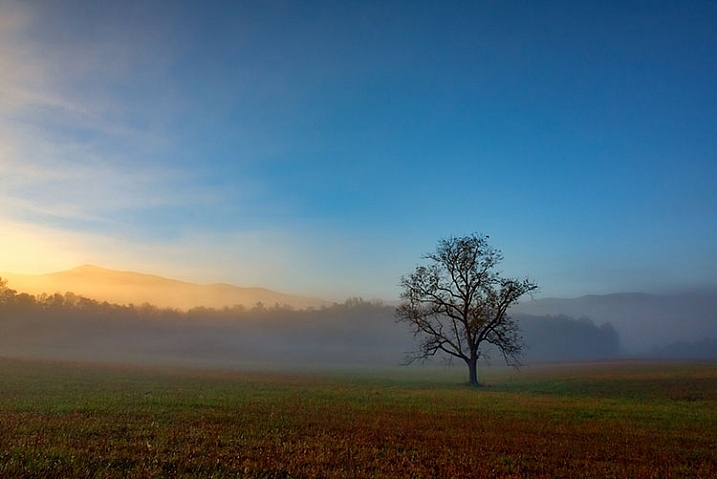
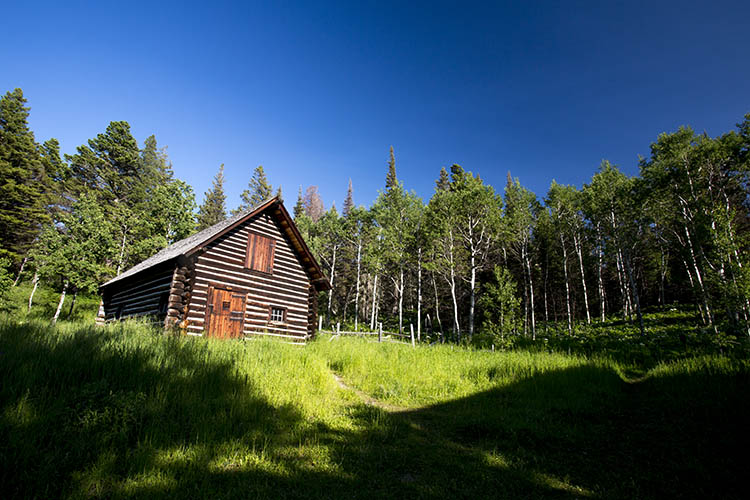
A polarizer cut through the morning mist to reveal blue sky in this shot of Great Smoky Mountains National Park.

I believe every photographer should have a polarizing filter in their camera bag because of how useful they can be. Polarizers work by filtering out light that is reflected directly toward the camera at specific angles. When photographing a landscape with a blue sky, haze can occasionally cause the sky to be less vibrant. Using a polarizer, you can minimize the haze and reveal the true blue of the sky. This will work best when aiming the camera at a 90° angle from the sun; in other words, with the sun to your side.

By rotating the polarizing filter while composing your shot, you can see the effect the filter will have. Be sure you don’t go too far. It is possible to over polarize the scene, creating a darker blue splotch in the sky that will make the use of the filter obvious and the image appear unnatural. This is especially possible with ultra-wide angle lenses that take in a huge expanse of the sky. In the image above, a polarizer was used to reduce the amount of morning mist in the valley and show the blue sky behind the mist.

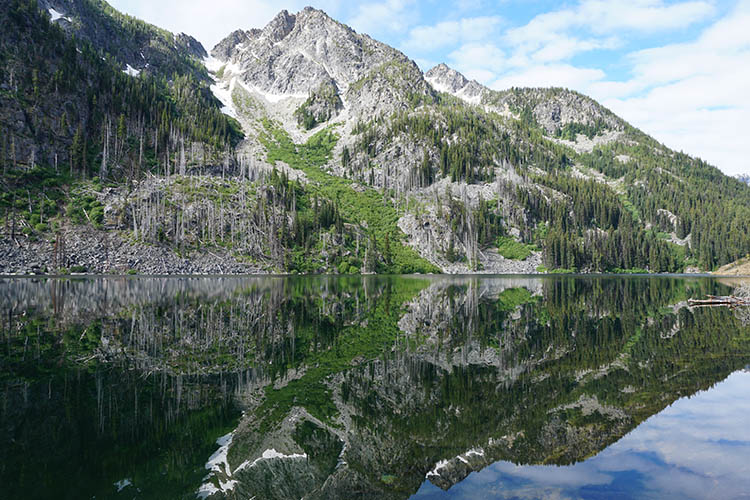
2 – Use a polarizer to reveal what’s underneath the water

Using filters - a polarizer cut down on reflections on the water's surface.

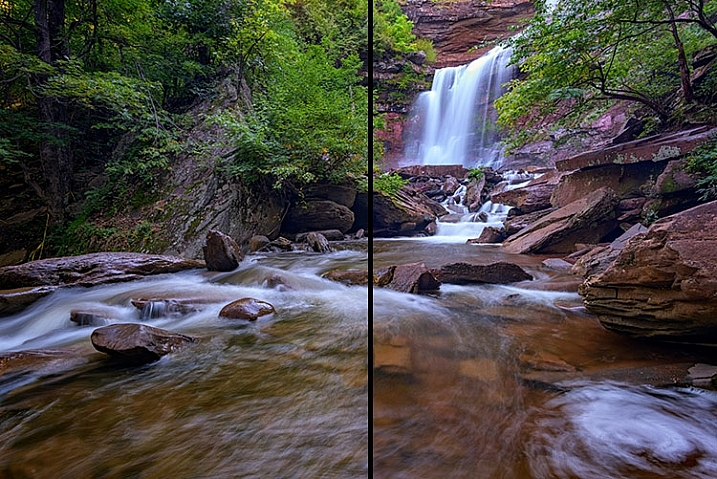
A polarizer can reduce reflections on the surface of the water to allow you see what’s beneath the surface, and add visual interest to a scene.

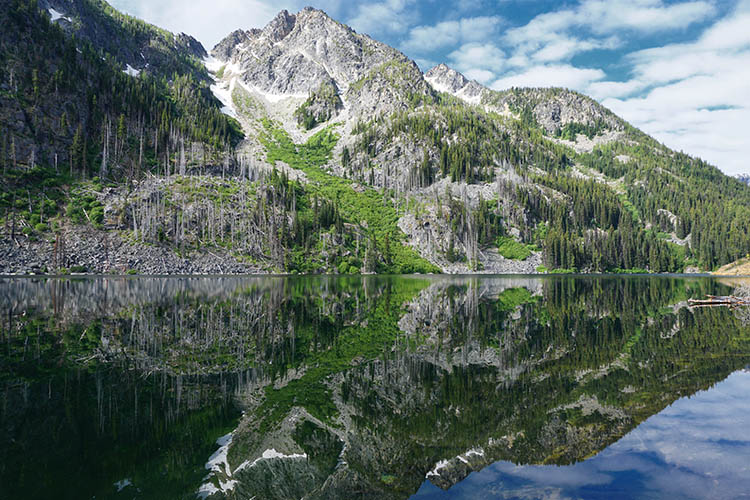
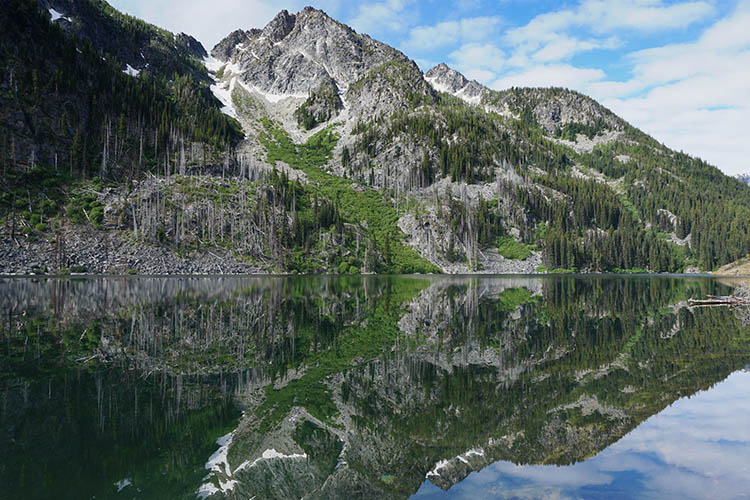
Often when photographing a stream or lake, the light may reflect off the water’s surface to such a degree that it’s impossible to see what’s below. However, there may be times when there is something of interest underneath the surface, such as rocks, fish, or logs from fallen trees. Using a polarizer, you can reveal as much or as little of what’s beneath the surface by eliminating the reflecting light.

It doesn’t have to be all or nothing either. You can nuance the effect by rotating the filter just a little bit, to retain some reflecting light while still seeing beneath the surface. In the image above, on the left, no polarizer was used and the reflected light prevents you from seeing below the water’s surface. On the right, a polarizer was used to reduce the reflected light on the water’s surface, allowing you to see the rocks beneath the surface.

3 – Use a polarizer to reduce reflections on wet rocks

using filters - Photographing wet rocks

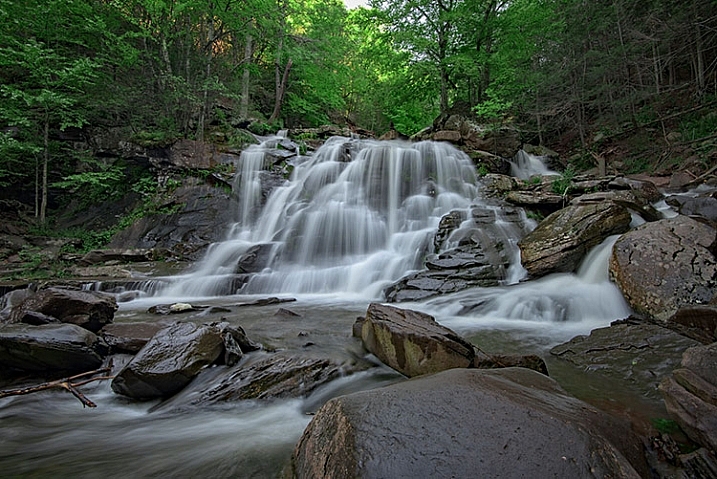
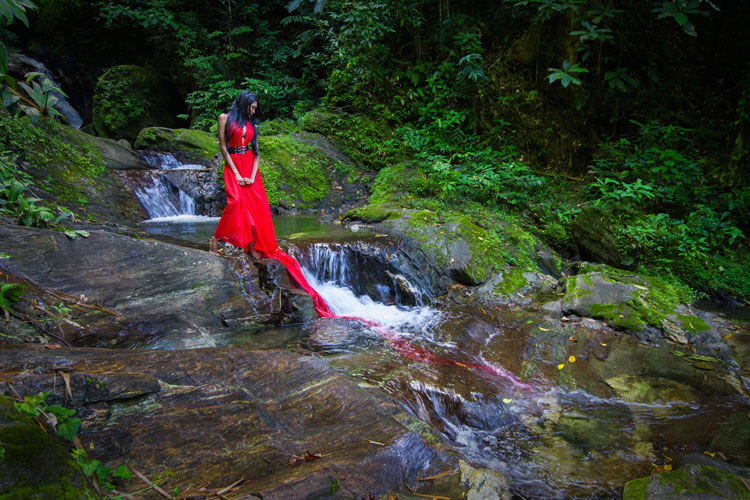
In this image, light reflects off of the wet rocks by the waterfall.

using filters - A polarizer can reduce the reflected light from wet rocks.

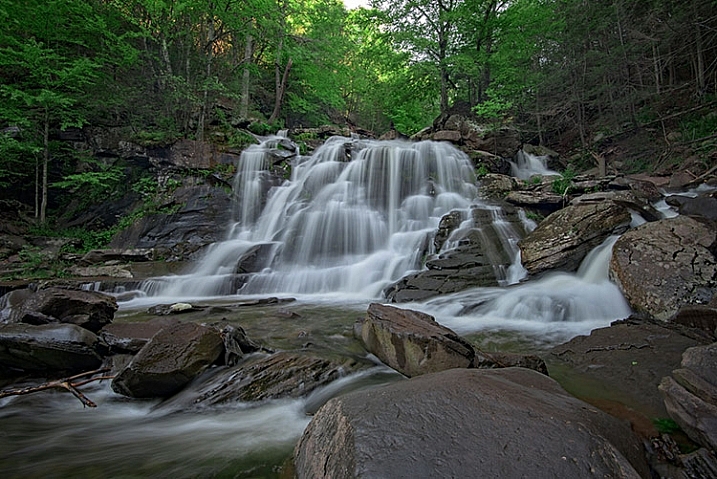
In this image, a polarizer was used to reduce the reflected light from the wet rocks.

When photographing a waterfall, where there are generally a lot of wet rocks, light can reflect off of them, making them appear shiny. On occasion, that reflected light may be so strong that it detracts from the image. Using a polarizer can reduce the reflected light and reveal more detail in the rocks, adding interest to the image.

As with the water reflections discussed above, you can nuance the effect by rotating the filter to get the right balance of reflected light and detail underneath. In the images above, you can see how the highlights on the rocks can be reduced if desired by using a polarizing filter. Again, by rotating the filter as you look through the viewfinder, or on the live view screen, you can watch the effect happen and adjust it to your liking.

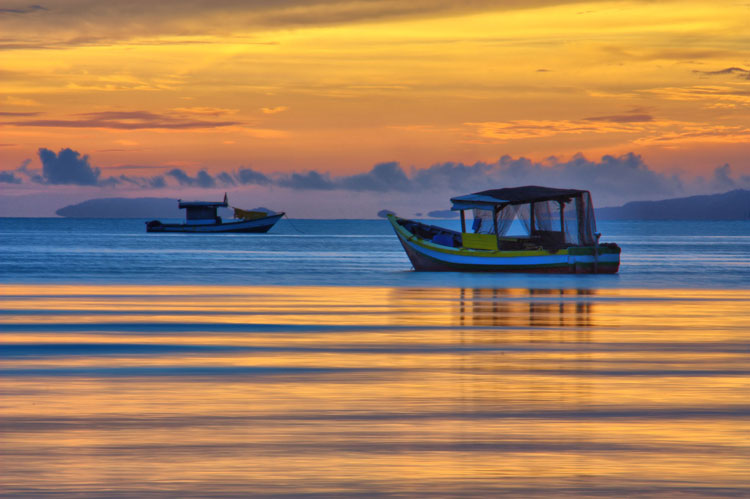
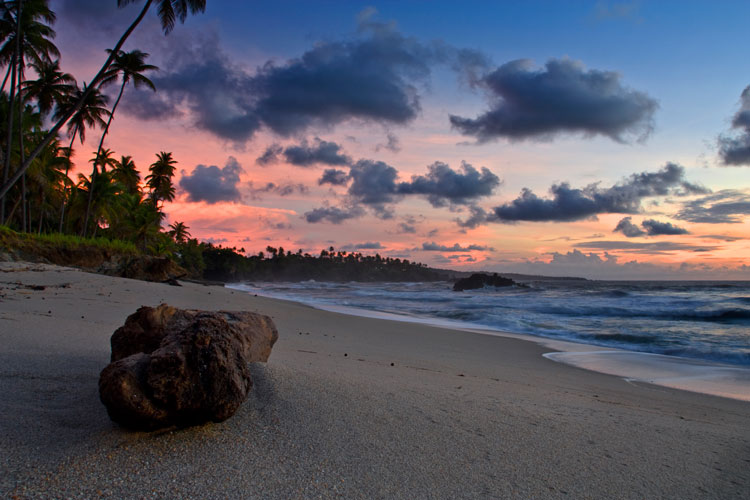
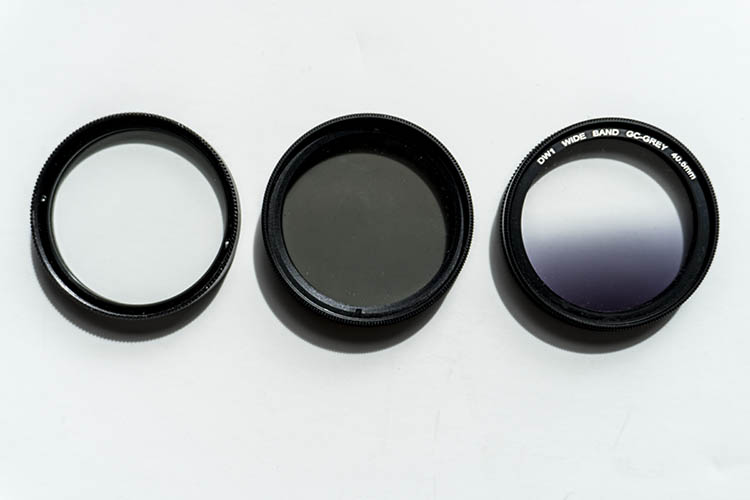
4 – Use Graduated Neutral Density Filters to darken the sky

Using filters - graduated neutral density filters for a better sky.

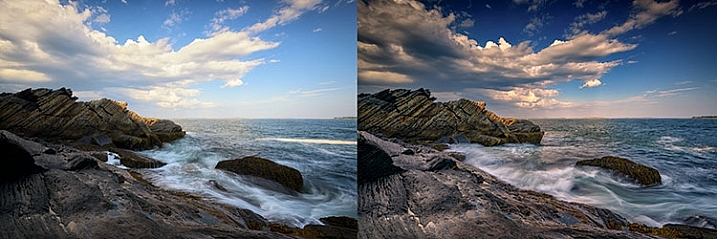
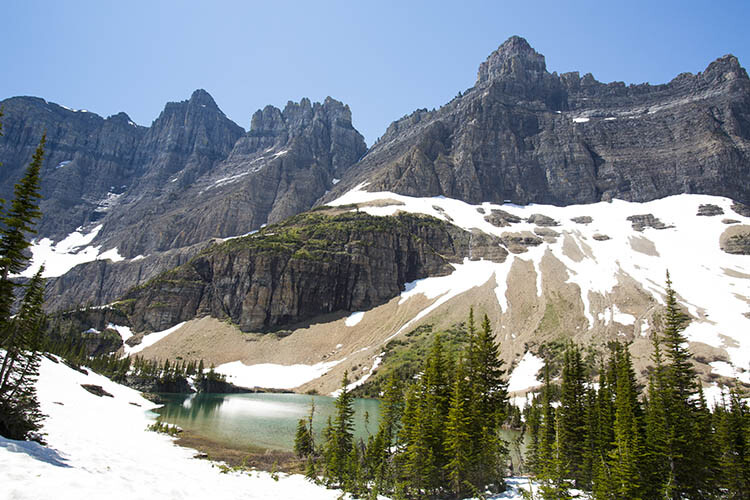
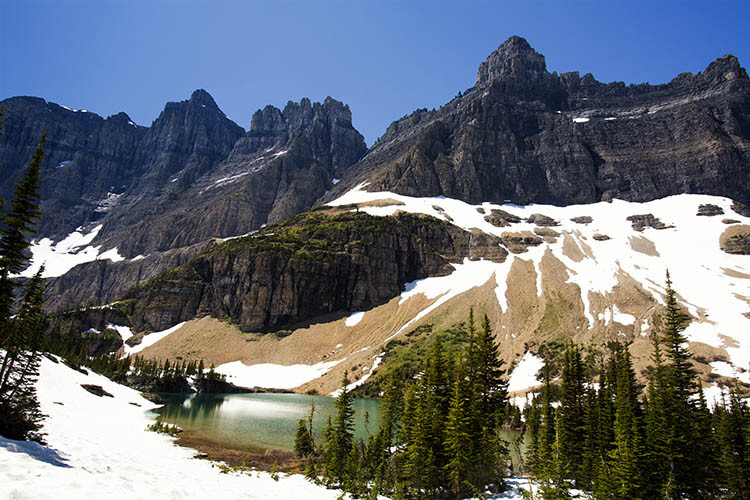
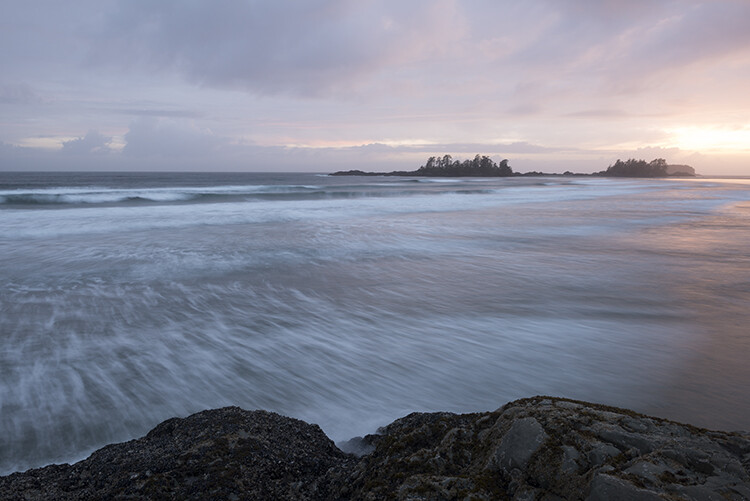
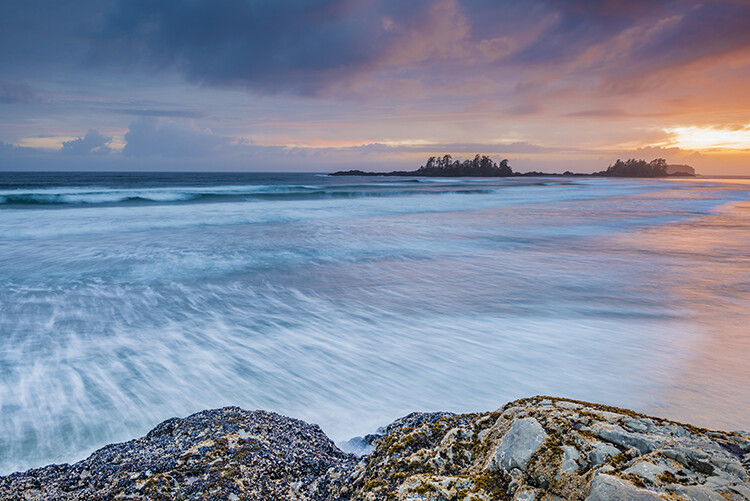
The difference when using a graduated neutral density filter can be very apparent, as seen in the comparison of these two images.

When photographing the landscape, especially at sunrise or sunset, there is often a high amount of contrast between the sky and the foreground. That forces you to make exposure choices to determine what will be exposed properly. While digital cameras are much improved with regards to dynamic range in recent years, nature can still push your camera to its limits in terms of how much can be captured in a single image.

Graduated neutral density filters can help to reduce the dynamic range of an image, by darkening the brighter areas, like the sky, so that it falls within the range of what the camera can capture. Use Live View on your camera to see the positioning of the filter over the lens, especially when using a hard-edged ND graduated filter. Watch the way the foreground exposure changes in relation to the sky, as it is possible to overdo a good thing. If the sky gets too dark in relation to the foreground, try a less dense filter, for instance, a 2-stop ND grad rather than a 3-stop grad. Above, the image on the left was taken without the use of a graduated neutral density filter. On the right, a 3-stop,

Above, the image on the left was taken without the use of a graduated neutral density filter. On the right, a 3-stop, soft-edged graduated neutral density filter was used to darken the sky. Notice it also has the effect of brightening the foreground in relation to the sky, bringing out more detail in the darker area in the bottom left.

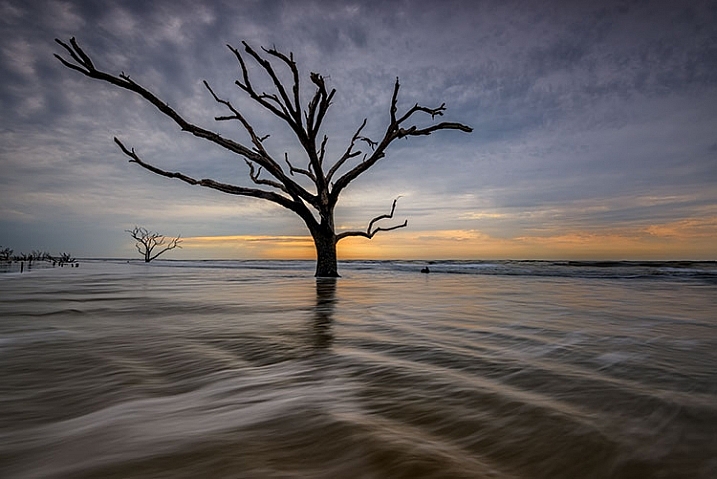
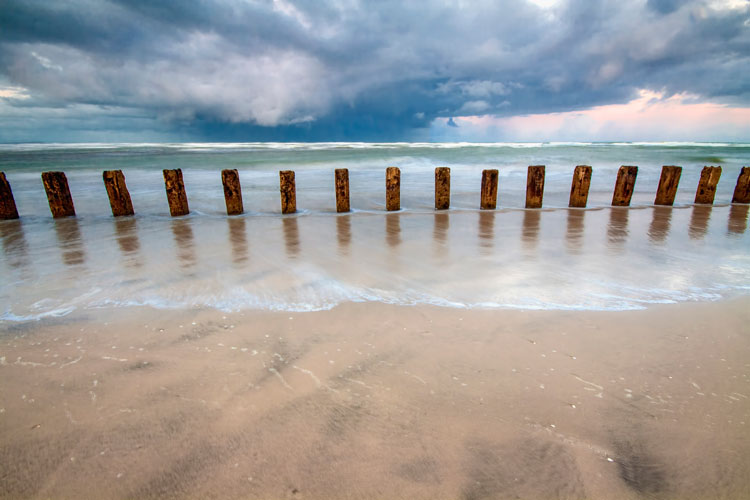
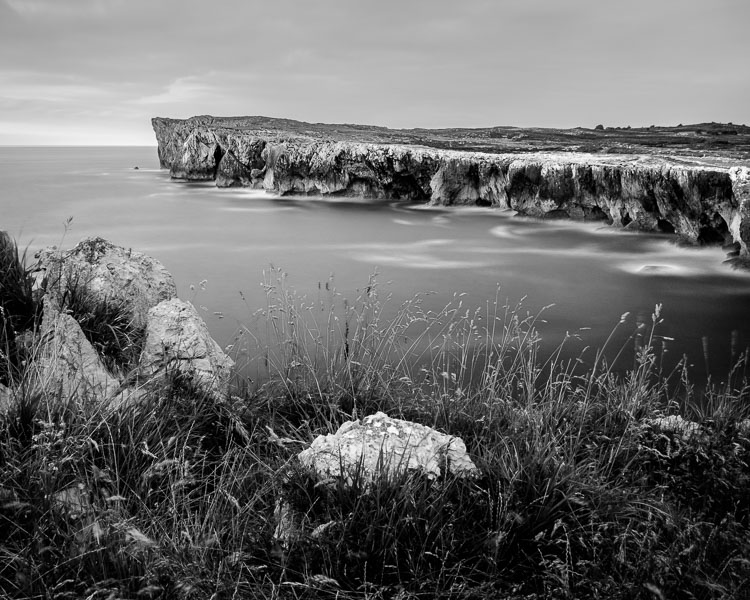
5 – Control the motion of water

Using filters - an ND filter to control the motion of water.

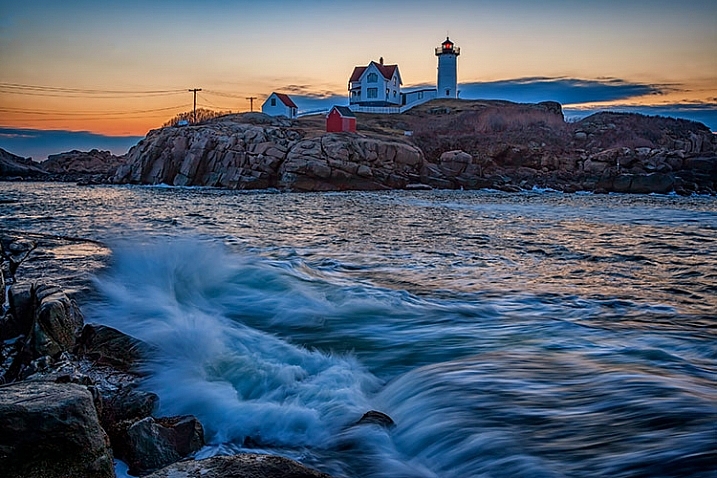
A neutral density filter can be used to help capture the motion of water in a scene.

Because of its nature, moving water is often the most dynamic part of an image. You can create a different mood simply by changing the way you capture water. Longer exposures tend to be more calm and peaceful, while shorter exposures can capture the violence of a crashing wave, or the power of a river going over the falls.

Since shutter speed controls the effect of motion, by using neutral density filters you can evoke both moods by limiting the amount of light that enters your lens. Thus, you can adjust the shutter speed to give you the effect of motion that you want. You may not need a filter for faster shutter speeds, but if it’s a bright day and you want to slow things down, you’ll need a neutral density filter to do that.

Using a 3-stop ND filter is usually fine for waterfalls to slow them down just enough to get a nice creamy look to the falls, but when capturing waves on the ocean, it may not be enough to get the effect you need. Sometimes four or even five stops of neutral density is needed to get the exposure you need to slow it down to capture water the way you want. Adding a 10-stop neutral density filter will allow you to slow down your shutter speed to a minute or more, eliminating waves completely, creating a calm scene that feels quiet and peaceful as opposed to the crashing waves pounding the rocks or beach.

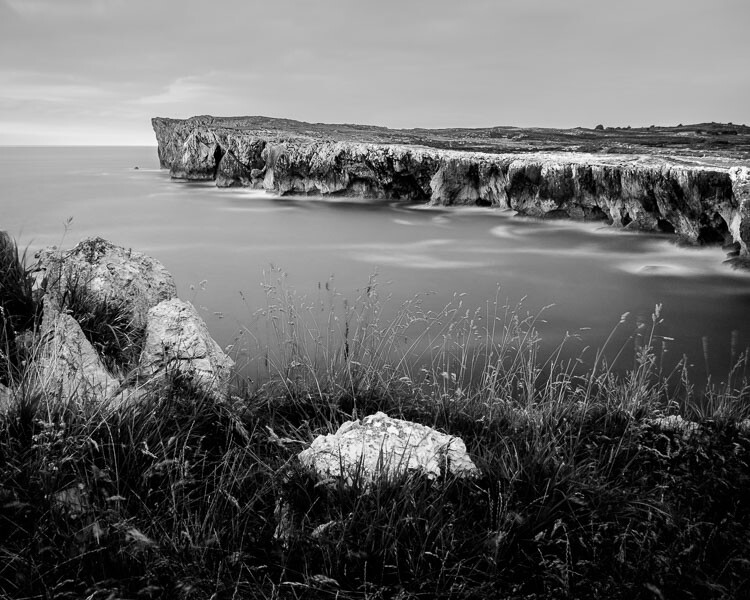
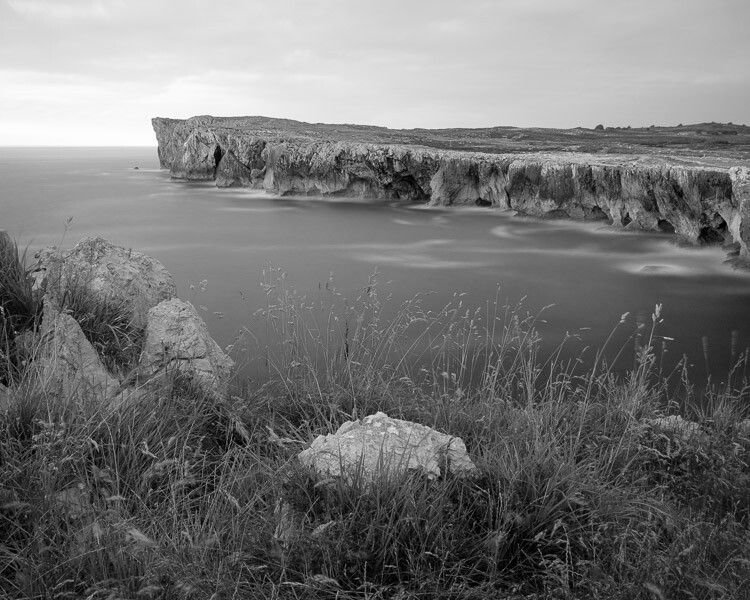
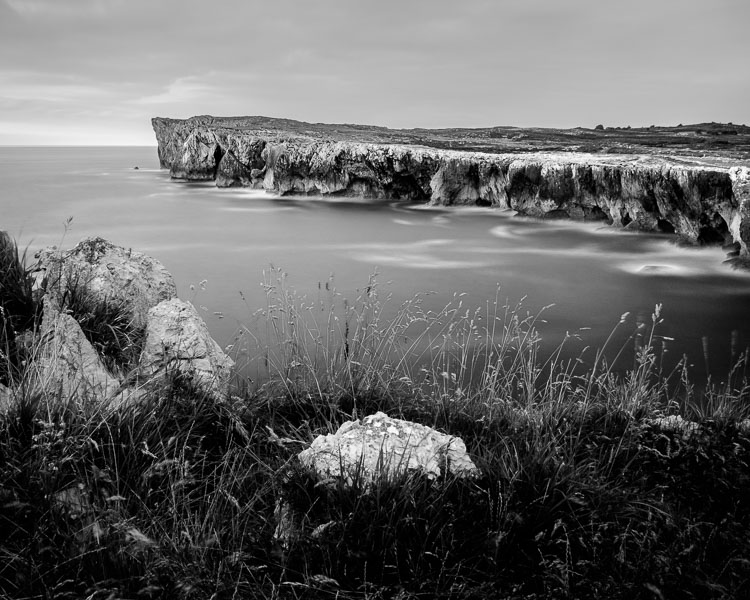
In the image above, a 3-stop neutral density filter was used to slow down the exposure just enough to allow the water’s motion to be captured as it crashed on the rocks. In the image below, a 10-stop neutral density filter was used to slow down the exposure further, to a full 2-minutes, creating smooth water and a calmer looking scene.

Using filters - a 10-stop ND filter to smooth water during a long exposure.

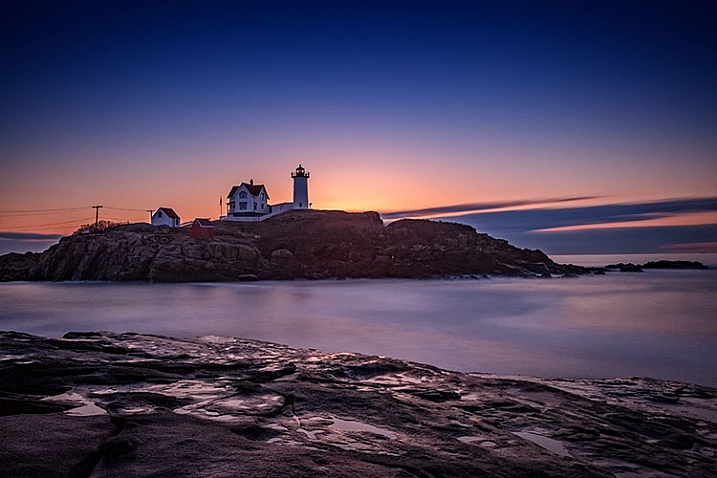
Using a 10-stop ND filter, you can make water appear calm by using a long exposure. This is a two-minute exposure.

6 – Create motion in clouds

Using filters - Clouds appear as normal when no ND filter is used.

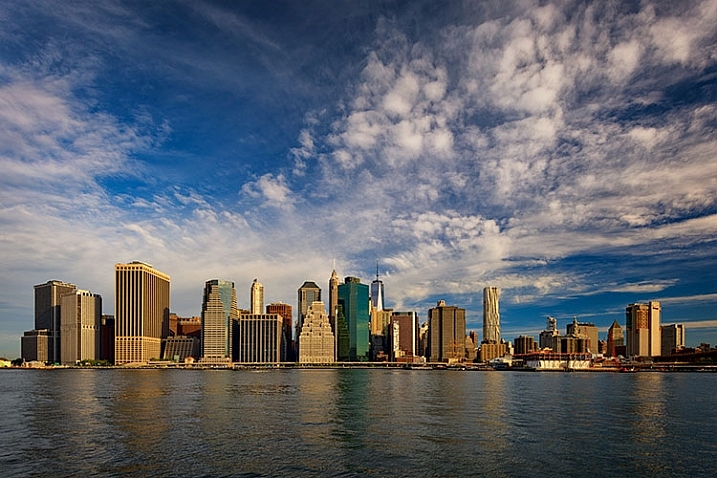
When no neutral density filter is used, clouds are captured as we see them.

Using filters - a 10-stop ND filter to achieve a slower shutter speed of 60 seconds, I was able to capture the motion of the clouds as they passed over New York City.

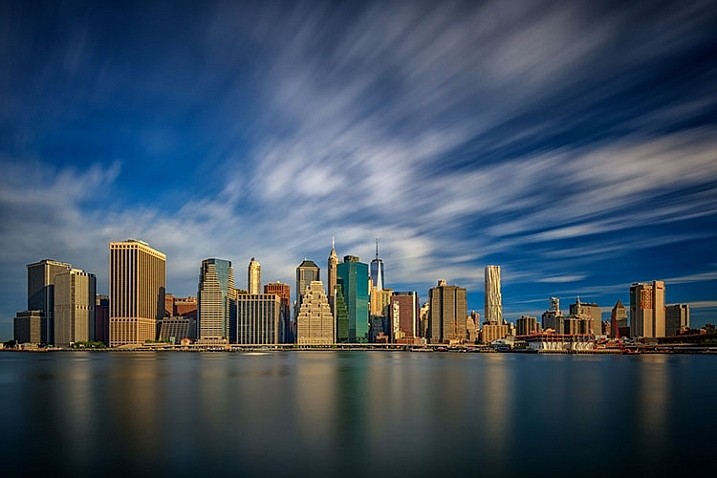
Using a 10-stop ND filter to achieve a slower shutter speed of 60 seconds, I was able to capture the motion of the clouds as they passed over New York City.

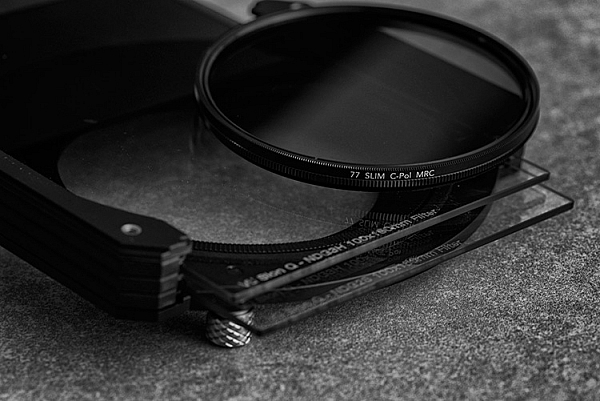
As a landscape photographer, clouds are often the focus of an image or at least a strong component in the composition. Clouds add depth and drama to a good landscape, creating background interest. But you can also manipulate the clouds to your creative advantage as well, capturing their movement and blurring them to create a sense of flight and speed in your scene. By using a strong neutral density filter, such as Lee’s Big Stopper 10-stop ND filter or Vü Filter’s 10-stop offering, you can slow down your shutter speed to allow the motion of the clouds to be captured.

The proper shutter speed to capture cloud movement will vary, depending on how fast the clouds are moving. The longer the exposure, the more movement you will capture. An exposure of 30 seconds to one minute for fast moving clouds, such as in the image above, will result in a motion blur where the clouds still resemble clouds. An exposure of two or three minutes will result in the clouds becoming streaks of color across the sky, unrecognizable as clouds anymore.

Conclusion

One of the complaints I hear about using filters is that it takes too much time to put them on the lens, or it slows you down. I prefer to think of it as being deliberate about the shot I am trying to capture, and making sure that my camera captures exactly what I want.

Do you use filters? What’s your favorite technique using on-camera filters? Please share in the comments below.

googletag.cmd.push(function() {
tablet_slots.push( googletag.defineSlot( “/1005424/_dPSv4_tab-all-article-bottom_(300×250)”, [300, 250], “pb-ad-78623” ).addService( googletag.pubads() ) ); } );

googletag.cmd.push(function() {
mobile_slots.push( googletag.defineSlot( “/1005424/_dPSv4_mob-all-article-bottom_(300×250)”, [300, 250], “pb-ad-78158” ).addService( googletag.pubads() ) ); } );

The post Six Tips For Using Filters to Improve Your Landscape Photos by Rick Berk appeared first on Digital Photography School.


Digital Photography School

 
Comments Off on Six Tips For Using Filters to Improve Your Landscape Photos

Posted in Photography


5 Tried and True Landscape Photography Tips used by the Pros

02 Oct

Have you ever found yourself wondering how do the professionals (pros) consistently turn out amazing photos day after day, year after year and what are some of their secrets? So besides knowing their camera like their best friend, what are some of the things that the pros do? Here are some tried and true landscape photography tips used by the pros.

DesertStorm Landscape Photography Tips used by the Pros

1. Experimentation

Experimenting is one of the best ways to shake yourself up out of the doldrums and yes even pros use it to get their creative juices flowing.

Try photographing something totally outside your comfort zone or even a different subcategory within your preferred genre. If landscape photography is your thing, you are probably already a master of the golden hours (sunrise and sunset). So experimentation can start with shooting a nightscape or even a long exposure in the middle of the day.

Note: I would highly advise against experimenting at someone’s wedding!

Night Sky Landscape Photography Tips used by the Pros

How about introducing a human element into your landscape and allowing them to be a part of the story? Experimenting keeps you on the learning path and when you learn, you grow as a photographer. It is about challenging yourself to do something different and pushing your boundaries.

Landscape Model Landscape Photography Tips used by the Pros

2. Making it your own

Many places on your photography list have already been captured hundreds of times. That thought can make you throw your hands up in the air and decide you may as well just recreate it. Before you think of recreating, try to showcase it differently. What else can you do? Is there another foreground element you can add or take away? One of the things that make pro’s work stand out from the rest, is their perspective and ability to make a place seem like you are seeing it for the first time.

Maracas Bay, Trinidad - landscape photography tips from the pros

While it’s not always easy to create something unique and new, your originality is one of the things that will set you apart. Can you get a different angle, add or detract an element when composing, or shoot it differently (e.g. with light trails or multiple exposures)? How about getting off the trail and the popular view areas and charting your own course to find another perspective? There is no problem in finding inspiration in someone else’s work, but at all times keep in mind that you want your work to stand out

There is no problem in finding inspiration in someone else’s work. But keep in mind that you want your work to stand out, as your own.

Guardians - landscape photography tips from the pros

3. Tell a story

Someone said that “being a good photographer does not necessarily translate into being a good storyteller.” Being able to evoke the emotions of your audience should always be a goal, though. Keep in mind that the purpose of your photo story is to interest, instruct, or amuse your audience.

Decide how you want the image to affect them and then how to achieve that goal. Is your story going to be in black and white or infrared? Is it going to be realistic or abstract? Pros use different styles of photography to keep producing interesting stories consistently.

Boat Friends - landscape photography tips from pros

4. Less can be more

In landscape photography, being more selective with the views you present tells a more effective story, so pros understand the power of good composition (a vast topic all on its own). One of the rules of good composition is that your image should contain just enough detail. In landscape photography you do not have the luxury of physically moving things around, so you must arrange the elements of an image by changing your position. This also helps with finding the most flattering view, or one that tells a different story.

Ocean Sunrise landscape photography tips from pros

Choosing the important elements in your photo to highlight helps you decide what to include in the frame and what to leave out. Make your subject dominate by accentuating it with one or few related elements, remembering to declutter as much as you can. As a general rule, if an element in your image doesn’t enhance the subject, it may be detracting from it.

Lily Pond - landscape photography tips from pros

 5. Know your post-processing

Ideally, you want to get the shot right in-camera and eliminate or minimize your post-processing. With so many features and settings on DSLRs now, it is possible to produce the image you want. If this does not materialize, then you need the ability to do basic adjustments. These include changes to color and contrast, exposure adjustments, straightening, and cropping.

Check out these dPS articles for tips on processing:

  • How Cropping in Post-Production Can Improve Composition
  • 4 Key Lightroom Sliders That Will Supercharge Your Photos
  • How to Enhance Urban Night Photographs Using Luminosity Masks in Photoshop
  • 3 Fun Ways to Enhance Your Landscape Images in Photoshop

Glass Bottomed Boat -  landscape photography tips from pros

Pros know the importance of post-processing. That is one of the main reasons they shoot in RAW to capture all the uncompressed image data, which leads to higher quality images in the end.

Post-processing can also add that unique element of you. Decide if the shot you took is what you wanted to achieve or you can choose to adjust elements until you get the image you want to present. Digital photography has made it easier to post-process than the dark rooms of yesteryear but it also makes it easier to  go overboard easily. So determine your vision for the final image and learn to execute it properly so you produce an image that represents you.

South Beach -  landscape photography tips from pros

Conclusion

These are just a few of the things to keep in the back of your mind when you are creating images. Staying consistent means staying creative or constantly challenging yourself to try something different or learn something new. When you get to your location, think about how you can make the image your own. There is nothing more amazing than producing a piece that someone can identify as yours even before they confirm you did it. Share with us how else you stay consistent when shooting.

When you get to your location, think about how you can make the image your own. There is nothing more amazing than producing a piece that someone can identify as yours even before they confirm you did it. Share with us how else you stay consistent when shooting and any other landscape photography tips you have learned.

googletag.cmd.push(function() {
tablet_slots.push( googletag.defineSlot( “/1005424/_dPSv4_tab-all-article-bottom_(300×250)”, [300, 250], “pb-ad-78623” ).addService( googletag.pubads() ) ); } );

googletag.cmd.push(function() {
mobile_slots.push( googletag.defineSlot( “/1005424/_dPSv4_mob-all-article-bottom_(300×250)”, [300, 250], “pb-ad-78158” ).addService( googletag.pubads() ) ); } );

The post 5 Tried and True Landscape Photography Tips used by the Pros by Nisha Ramroop appeared first on Digital Photography School.


Digital Photography School

 
Comments Off on 5 Tried and True Landscape Photography Tips used by the Pros

Posted in Photography


Top 5 Nik Collection Filters to Improve Your Landscape Photos

25 Sep

One of the best image editing programs available right now happens to be free. The Nik Collection by Google is a desktop photo editing software that was recently declared free of charge earlier this year. Today, the Nik Collection makes available over 55 filters that do everything from old camera and film simulation, to image sharpening, noise reduction, and basic retouching and correcting of photos. Of these many filters, there are 5 within the Color Efex Pro 4 toolset  that are particularly useful for landscape photos. This article will highlight these essential filters and why they are so valuable.

Nik Collection Color Efex Pro free photo editing software

Note that all tools and filters within the Nik Collection contain certain points that can be individually controlled to apply the filter effect as little, or as much, as you desire. You can also add the effects of several different filters, so be sure to play around with as many as possible to achieve the look you’re after.

#1 – Pro Contrast Filter

Have a photo that needs higher levels of contrast without sacrificing detail? The Nik Pro Contrast filter tackles this problem with three filter settings that you can tinker with.

  1. Correct Color Cast reduces any inherent color cast in an image, such as the orange hue the sunrise casts onto the water below.
  2. Correct Contrast offers general contrast adjustment.
  3. Dynamic Contrast delivers the most pop by boosting contrast in flat areas of the photo. The latter feature is also demonstrated in the Polarization After photo below.
Nik - Pro Contrast 1

Before

Nik - Pro Contrast 2

After – with the Pro Contrast filter applied

Nik - Pro Contrast

#2 – Polarization Filter

For landscape photographers, the circular polarizer is a must-have glass filter that enhances blue skies and reduces water glare. It is often said that the effects of a polarizer can’t be replicated in post-production. But Color Efex Pro 4 offers a pretty impressive Polarization effect that can be applied to any photo, even if it was taken without a glass circular polarizer.

There are two Polarization filter settings that can be tweaked: Rotate, which simulates the effect of physically rotating the glass filter in front of your lens, and Strength, which controls how much of the filter effect is applied.

Nik - Polarizer 1

Before

Nik - Polarizer 2

After – with Polarization and Pro Contrast filters applied.

Nik - Polarizer

#3 – Skylight Filter

This handy filter simulates a glass warming filter by removing any blue color cast and applying a warming effect to your photo. Control the strength of the filter to determine how much warmth is added.

Nik - Skylight 1

Before

Nik - Skylight 2

After – with Skylight filter applied

Nik - Skylight

#4 – Graduated Neutral Density Filter

Similar to the glass circular polarizer, the graduated neutral density filter is a staple among landscape photographers as it helps lighten or darken just a portion of an image. Think about a landscape with perfectly balanced land and blown out sky. That is a job for the graduated neutral density filter.

There are five different settings to play with for this filter. Upper and Lower Tonality let you adjust the brightness of the top and bottom portions of the image, Vertical Shift controls the placement of the filter’s horizon, while Rotation adjusts the angle of the horizon filter. Finally, Blend helps integrate the filter effect in a more natural way.

Nik - ND Grad 1

Before

Nik - ND Grad 2

After – with Graduated Neutral Density filter applied.

Nik - ND Grad

#5 – Reflector Efex

Nik - Reflector FX 1

Before

The reflector is a favorite photographer’s tool that has also been simulated by a Color Efex Pro 4 filter. Use this filter to control light in your image and open up shadows.

The Method setting allows you to choose from Gold (warm), Soft Gold (milder warm), and Silver (neutral) lighting colors. Light Intensity controls the amount of reflector light added, Light Falloff controls the abruptness of the lighting effect falloff, while Position controls where the falloff starts. Finally, Source Direction lets you choose where the reflector effect begins.

Nik - Reflector FX 2

After – with Reflector Efex Soft Gold filter applied.

Nik - Reflector FX

Over to you

There you have it! Five handy filters within the Nik Collection’s Color Efex Pro. It’s again worth noting that there are many more filters within the software, and each can add as subtle or dramatic an effect as you desire. At the very least, this photo editing software is available for free, so it’s worth trying out if you haven’t already.

What are your most used filters within the Nik Collection for your landscape photos? Let me know in the comments below.

googletag.cmd.push(function() {
tablet_slots.push( googletag.defineSlot( “/1005424/_dPSv4_tab-all-article-bottom_(300×250)”, [300, 250], “pb-ad-78623” ).addService( googletag.pubads() ) ); } );

googletag.cmd.push(function() {
mobile_slots.push( googletag.defineSlot( “/1005424/_dPSv4_mob-all-article-bottom_(300×250)”, [300, 250], “pb-ad-78158” ).addService( googletag.pubads() ) ); } );

The post Top 5 Nik Collection Filters to Improve Your Landscape Photos by Suzi Pratt appeared first on Digital Photography School.


Digital Photography School

 
Comments Off on Top 5 Nik Collection Filters to Improve Your Landscape Photos

Posted in Photography


How to Process a Black and White Landscape Photo Using Lightroom

20 Sep

The process of converting a color landscape photo into a black and white image using Lightroom goes beyond changing the treatment to black and white. That’s just the start. From there you have to tweak and refine, using all tools that Lightroom gives you, to craft an image that matches the vision you carry in your mind.

Black & white landscape in Lightroom

A good way of showing you how this works is to take you step by step through the process that I use when converting a landscape photo to black and white in Lightroom. You’ll see the techniques that I use. and more importantly, the reasoning behind them. This should give you the insight you need to use these tools on your own images.

1. Make sure you have a good image for black and white

The first step is to make sure that you are working with a photo that suits a black and white treatment. Good black and white photos have strong composition that make use of texture, line and tonal contrast.

It’s a good idea to convert only your best landscape photos to black and white. It will take you some time to convert a photo, so why waste it on anything less than your best work?

2. Prepare the color photo

First, open your photo in Lightroom’s Develop module. Then, I do two things before converting a color landscape photo to black and white.

  1. Use the Spot Removal tool to get rid of any dust spots.
  2. Set White Balance to Auto so that the color balance of the photo is more or less neutral. Photos with strong color casts are harder to successfully convert to black and white.

If you are converting a photo that you have already processed in color it’s a good idea to make a Virtual Copy and work on that. This way you don’t lose the work you have done on the original color version.

Black & white landscape in Lightroom

Here’s the color photo that I am going to convert to black and white.

3. Analyze your photo

This takes practice and becomes easier the more you convert photos to black and white. The idea is to make some big picture decisions about what you want to achieve with your conversion. With my photo I can see that:

  • The sky is too bright, and I would like to make it darker.
  • The distant cliffs have beautiful texture that I would like to bring out
  • So do the grass and stones in the foreground.
  • The sea and sky are smooth, creating a visual contrast against the heavily textured parts of the photo.
  • There is good tonal contrast between the grass and stones in the foreground.

This analysis helps me set some goals for the conversion.

4. Convert the image to black and white

There are three ways to convert the photo to black and white using Lightroom. They all do the same thing, so it doesn’t matter which of these methods you use:

  1. Set Treatment to Black & White in the Basic Panel.
  2. Use the keyboard shortcut; V .
  3. Click on B&W in the HSL/Color/B&W panel.

The conversion is likely to look quite flat. That’s okay – it’s easy to add some contrast.

Black & white landscape in Lightroom

Now go to the B&W tab in the HSL / Color / B&W panel. It will look like one of the these two examples below depending on your Preference settings in Lightroom:

Black & white landscape in Lightroom

If you go to the Presets tab in Preferences (see below) you’ll see a tick box titled Apply auto mix when first converting to black and white. If this is unchecked, all the sliders will be zeroed, as in the screenshot on the left (above). If it is ticked, Lightroom takes a guess at what settings to use to make a good conversion and you’ll see something like the screenshot on the right (above).

Black & white landscape in Lightroom

My preference is to leave the box unticked.

When I convert the image to black and white I go to the HSL / Color / B&W panel and click the Auto button at the bottom of the B&W tab. If I like the result, I leave it there. If I don’t, I use the undo command (Ctrl-Z on a PC, Cmd-Z on a Mac) to undo it.

In this case, I liked the result of pressing the Auto button, so I left the settings as they were. I rarely do any work more than this in the HSL / Color / B&W panel.

Black & white landscape in Lightroom

5. Basic panel adjustments

Now it’s time to make some global adjustments in the Basic panel. Global adjustments are those that apply to the entire image.

The image is flat so the first step is to increase contrast.

Going back to the analysis I did earlier, I can see that I want to emphasize the textures in the photo. Clarity is the ideal tool for this. Increasing Clarity also increases contrast. You should adjust both Clarity and Contrast sliders to get the best overall effect, without overdoing it. You can also use the Highlights and Shadows sliders to adjust the brightness of the lightest and darkest tones in the image individually.

In the end I set Contrast to +40, Clarity to +60, Shadows to -13 and Highlights to -49. Remember that every image is different, and that these settings only apply to this one.

Black & white landscape in Lightroom

6. Make local adjustments.

Now it’s time to make some local adjustments. Local adjustments are those that just affect part of the image. Lightroom gives you three tools to do this – the Radial filter, the Graduated filter and the Adjustment Brush.

I want to make the sky darker in this photo, so I will do that with a Graduated filter. This screenshot shows the location of the Graduated filter (the area affected by the local adjustment is shown in red).

Black & white landscape in Lightroom

I used the brush to erase part of the Graduated filter so that the sea and cliffs weren’t affected.

Black & white landscape in Lightroom

I set Exposure to -0.70, Contrast to -100 and Highlights to -100. Again, the settings required depend on your photo.

My aim here was to make the clouds darker and reduce the contrast so that they appeared smoother. The contrast in this image is in the cliffs, the sea and the foreground, not the sky. Less contrast in the sky means that it won’t compete with those areas for attention.

Black & white landscape in Lightroom

The next local adjustment is on the cliffs in the background. I used the Adjustment Brush for this. Here’s the area affected by the local adjustment (shown in red again).

Black & white landscape in Lightroom

I set Clarity to +86 and Shadows to +16.

Black & white landscape in Lightroom

You may remember that in my analysis I decided that I wanted to make the foreground darker to emphasize the tonal contrast between the grass and the rocks. I’m going to use the Adjustment Brush for this as well.

First, I added an Adjustment Brush to make the grass darker. Here’s the area affected (shown in red).

Black & white landscape in Lightroom

I set Highlights to -64, Shadows to -48.

Black & white landscape in Lightroom

That left a light patch in the bottom left corner, and a dark patch under the stone in the center. I used the Adjustment Brush two more times, to make the light patch darker and the dark bit lighter, creating a more even tone across the bottom of the image.

Then I used the Adjustment Brush on the stones, with a Clarity adjustment to bring out the texture. Below is the result of all those adjustments.

Black & white landscape in Lightroom

Next I used the Adjustment Brush again and selected the sea and the sky.

Black & white landscape in Lightroom

Then I set Contrast to -41 and Clarity to -25. The idea was to remove some of the contrast and texture from these areas, to emphasize the smoothness and lack of texture and set up a stronger visual contrast against the heavily textured cliffs and foreground.

Black & white landscape in Lightroom

That’s it. The final image could certainly be refined a little further, but it’s important to pick a point at which to stop so that you don’t spend too much time on the conversion. Where this point is depends on how much of a perfectionist you are, and how much time you are willing to devote to a single image.

Here’s the initial black and white conversion and the final result together so you can see the difference more clearly.

Black & white landscape in Lightroom

Original color image.

Black & white landscape in Lightroom

First version of black and white conversion.

Black & white landscape in Lightroom

Final image.

There are lots of ways you can convert landscape photos to black and white in Lightroom. I’ve only touched on the topic here, so if you have anything to add please let us know in the comments.


Mastering Lightroom

If you want to know more about processing black & white photo in Lightroom then please check out my ebook Mastering Lightroom: Book Three – Black & White.

googletag.cmd.push(function() {
tablet_slots.push( googletag.defineSlot( “/1005424/_dPSv4_tab-all-article-bottom_(300×250)”, [300, 250], “pb-ad-78623” ).addService( googletag.pubads() ) ); } );

googletag.cmd.push(function() {
mobile_slots.push( googletag.defineSlot( “/1005424/_dPSv4_mob-all-article-bottom_(300×250)”, [300, 250], “pb-ad-78158” ).addService( googletag.pubads() ) ); } );

The post How to Process a Black and White Landscape Photo Using Lightroom by Andrew S. Gibson appeared first on Digital Photography School.


Digital Photography School

 
Comments Off on How to Process a Black and White Landscape Photo Using Lightroom

Posted in Photography


6 Tips for Planning the Perfect Landscape Photo Shoot

15 Sep

How many times have you shown your pictures to someone and said, ”You should have seen that sunset in person to understand how magic it was!” We can make many excuses as to why the photo doesn’t look the same, complaining about our equipment, settings or post-production, but let’s face reality, maybe there was something wrong with our landscape photo!

Before you open Photoshop, and even before you press the shutter button, you need to plan the kind of image you want to create. Planning plays a key role in landscape photography. Here are some things that are useful to think about if you want to capture the perfect light and transmit some feelings with your images.

Tip 1: Check the weather forecast

landscape photography

Calton Hill – Edinburgh, Scotland

Landscape photography is one of the most difficult genres, or at least among the most unpredictable, as you don’t have any control over the weather at the scene.

What kind of atmosphere do you want to create with your image? The weather can completely transform a landscape, so think carefully about what mood you want to evoke. If you want to create a bright, cheerful image you might already know that a blue sky with fluffy white clouds would be better than a flat blue sky, or even worse a grey one.

So, before you drive for two hours and you arrive to see is a dull landscape, use the only weapon at your disposal: the weather forecast.

Tip 2: Choose the right time of the day and year

The perfect weather condition alone is useless without proper light. In landscape photography, the light is given by the position of the sun in the sky in relation to your subject. Fortunately, this is something more predictable than the weather. Calculate where the sun will be at particular times of day, and it will be easier for you to foresee how the scene will be illuminated. Again, think about the atmosphere you want to create. Light and peaceful? Dark and moody? Are there any particular landmarks you want to highlight? The answer to these questions will inform where you want your light to be, and consequently what time of day to shoot.

landscape photograph Groningen, Netherlands

Groningen, Netherlands

Bear in mind that the sun’s position doesn’t change only during the day, but also throughout the year. As a result, in one year there are many different lighting conditions for the same place. It would be a shame not to use them to your advantage. You can use many websites and apps for this; the one that I use the most is PhotoPills, which is very well outlined in this article.

Tip 3: Be inspired by other photographers

When you plan your holiday, after booking the tickets and the hotel, you may buy a travel guide with detailed information about the location. Like where to go and what to eat, to make sure you won’t miss anything. Or you might just ask some friends who have been there before. In both cases, you’re relying on someone who went there before you, and who therefore knows what’s worthwhile to visit, or what’s a good typical (local) dish to try.

Even if you can’t do exactly the same thing with photography, you can get pretty close, thanks to the multitude of photography websites and social networks full of pictures from all over the world. The ones I personally use most of the time are; Google Images, 500px, Instagram, Flickr, and Pinterest. Obviously, the list doesn’t end here.

Feel free to use whatever sites you want, as long as you do it. It doesn’t matter if the picture isn’t the best quality, after all, you don’t want to copy it, but you’re just looking for some inspiration

landscape photograph Zaanse Schaans, Netherlands

Zaanse Schaans, Netherlands

Tip 4: Enjoy the place and get familiar with it

When arriving somewhere, especially if it’s for the first time, it’s really tempting to take your camera and shoot whatever you see! This isn’t wrong in itself, but remember you’ll probably take dozens of nice pictures and lose the opportunity to take that single outstanding one. Because when the moment comes you’ll be tired of taking other pictures, or even worse, the battery is dead. (By the way, do you have a spare battery, don’t you?)

It’s better to be patient and spend more time exploring your location and the surrounding area. This way you are more likely to discover some interesting spots, hopefully different from the classic ones. You can use your smartphone for your normal tourist pictures, so don’t worry about anything but composition. This way, you can enjoy the place where you are, instead of spending all the time behind your camera. After all, landscape photography should be the happy ending of a good day outside, not the only reason for being there.

landscape photograph Land’s end - Cornwall, England

Land’s end – Cornwall, England

Tip 5: Use both golden and blue hours wisely

I’m sure you already know what the golden hour is: the time of the day around dawn and dusk when the sun gives its best warm light and long soft shadows. Hence the adjective golden. Many photographers, including me for a while, consider it as solely the right moment for obtaining good photos. This is wrong, because there is another one, called blue hour, which occurs just before the golden hour at sunrise, and just after sunset.

As you can imagine from the name, its particularity is in the blue colour of the sky, not warm anymore and not totally dark like in the middle of the night. It is very effective for urban landscapes, because it emphasizes artificial lights that wouldn’t be as visible during the golden hour. Furthermore, since the sky is not totally dark, you’ll have a better contrast with the warmer colours of the city, which will add drama to your picture.

landscape photography Manarola - Liguria, Italy

Manarola – Liguria, Italy

Tip 6: Take location related issues into account

So, you’ve planned your shoot by choosing the right day, with good weather and explored the place properly. Is that all?

Almost… There’s still something to be considered and it depends on the place. For example, in the case that you want to photograph a coastline, you will need to consider tides. It can be useful for composition purposes, but most importantly it’s for your personal safety. Tides in the ocean are really rapid and wide, and in some cases, it could be difficult (if not impossible) to escape from the waves if you decided to shoot from the rocks along the shore, with a rocky wall behind you.

In the case of very famous landmarks, a common issue is that it will be full of other photographers and tourists that want the same shot as you. This can obviously create problems for your composition, or you won’t have enough space for your tripod. So, try to be in that place before it gets too busy. This not only reduces the risk of finding other photographers who have decided to photograph from your same spot, it also permits you to slow down and avoid making mistakes.

landscape photography London, England

London, England

Conclusions

When I started taking pictures several years ago, I didn’t have anything in my mind other than to take pictures of what I liked. But looking at other photographer’s work I realized that I was missing something. In my opinion, proper planning is the most important thing that I could have learned.

Obviously learning new techniques is useful, but it’s the most obvious. Planning is often underestimated, but it can really help you to go somewhere already having a picture in mind. If this isn’t the case, remember again: landscape photography is just the happy ending, you can still enjoy the place!

Do you have any other tips for planning your landscape photography shoots? I’d love if you shared them in the comments below as well as your images.

googletag.cmd.push(function() {
tablet_slots.push( googletag.defineSlot( “/1005424/_dPSv4_tab-all-article-bottom_(300×250)”, [300, 250], “pb-ad-78623” ).addService( googletag.pubads() ) ); } );

googletag.cmd.push(function() {
mobile_slots.push( googletag.defineSlot( “/1005424/_dPSv4_mob-all-article-bottom_(300×250)”, [300, 250], “pb-ad-78158” ).addService( googletag.pubads() ) ); } );

The post 6 Tips for Planning the Perfect Landscape Photo Shoot by Luigi Trevisi appeared first on Digital Photography School.


Digital Photography School

 
Comments Off on 6 Tips for Planning the Perfect Landscape Photo Shoot

Posted in Photography


One week left to enter the USA Landscape Photographer of the Year Competition!

11 Sep

$ (document).ready(function() { SampleGalleryV2({“containerId”:”embeddedSampleGallery_3908548057″,”galleryId”:”3908548057″,”isEmbeddedWidget”:true,”standalone”:false,”selectedImageIndex”:0,”startInCommentsView”:false,”isMobile”:false}) });

There’s just a week left to enter the 2016 USA Landscape Photographer of the Year Competition! 

The USA Landscape Photographer of the Year Competition was founded in 2013 by Charlie Waite, one of the world’s most respected landscape photographers, and this year, the competition is bigger than ever. With a top prize of $ 15,000, the contest spans five main categories, ‘Environmental Value’, ‘My USA’, ‘Black & White’, ‘Classic View’, and ‘Urban’.

In addition to these five categories, DPReview is partnering with the competition to create a new award – ‘Life in the Landscape’, which will be judged by DPReview’s editors and writers. An additional special award, ‘Wild Landscape’ is sponsored by Future Publishing.

The competition is divided into two main classes – the USA Landscape Photographer of the Year Award and the Young USA Landscape Photographer of the Year Award. To enter Young USA Landscape Photographer of the Year, you must be 18 or under on the closing date of September 15, 2016. There are 7 categories within each of the two classes and up to 20 images may be entered across some or all of these categories, and photographers can enter the same image in more than one category and / or special award.

To enter a single image costs $ 10, while $ 30 allows you to enter up to 5 images, and $ 45 allows you to enter up to 20 images. Entrants for the Young USA Photographer of the Year Award pay a flat fee of $ 10 for up to 20 images.

The deadline for entry is September 15th. 

Enter the competition

Articles: Digital Photography Review (dpreview.com)

 
Comments Off on One week left to enter the USA Landscape Photographer of the Year Competition!

Posted in Uncategorized


Interview: Landscape photography master Charlie Waite

07 Sep
Grand Canyon Lighting by Grant Ordelheide. Winner of the ‘My USA’ category in the 2015 USA Landscape Photographer of the Year Award.

Founded in 2006, the annual UK Landscape Photographer of the Year Award has become one of the most prestigious photo contests in the world. 2016 marks the third year of a USA-specific competition, open to entrants from all over the world to showcase inspirational images taken in the United States.

As the deadline for the 2016 USA Landscape Photographer of the Year Award approaches, we spoke to its founder, renowned landscape photographer Charlie Waite about his life and career, and his hopes for the contest.


You’re one of the best-known names in landscape photography – how did you get started?

Well originally, I was an actor. I was rather a mediocre actor for 12 years, and I photographed a lot of actors for their publicity and so on. My wife was in television, and in the 1970s she was filming down in Devon. One day I was watching her filming and I wondered off into the Devon landscape with my camera and I just found myself responding to the landscape.

Back in London my wife and I went to look at a house we were thinking of buying and the guy who was selling it asked me what I did, and I said I was a landscape photographer, which was a complete untruth.

 Loch Indaal, Scotland. Photograph by Charlie Waite, used with permission.

It turns out he was in charge of the illustrated books department at a publisher and he said ‘can I look at your portfolio?’ so over the weekend I enlarged the pictures that I’d made, showed them to him and he commissioned me to do a book.

So I went from being an out of work actor to a photographer. And it just rolled on after that.

What inspired you to continue and make a career out of landscape photography?

I felt spiritually enriched. I knew that a deep engagement with the landscape was really good for me, and really elevated me as a person and calmed me. I found that landscape photography leveled me. Fully engaging with my surroundings. A lot of people think that landscape photography has nothing to do with emotions, it’s just craft, and skill, and finding the right light and everything else but it settles me and I’m very enriched by it. I’m more in love with photography now than I ever have been before.

 Amish country, Pennsylvania, USA. Photograph by Charlie Waite, used with permission.

What’s your favorite location?

In my heart I want to say the UK, and I think in joint second place would be the USA and France. I like to call France the most undiscovered country in Europe. It’s so quiet there.

 Autoire, France. Photograph by Charlie Waite, used with permission.

What lead you to create the Landscape Photographer of the Year programs?

I didn’t think there were many people out there who loved landscape photography as much as I did. I’ve always thought that if it elevated me it could elevate other people. I hate the word ‘evangelist’, but I felt sort of evangelical, and I wanted to say ‘come on let’s get together’. I love being in the company of other photographers, and I thought we could all get together and do a good thing, and bring landscape photography to a wider audience. And the competition really has done that.

It’s brilliant to go to the annual winners’ exhibitions, with 30 or 40,000 people visiting, and seeing the pleasure they get from the images. They’re moved by the eye and the craft of the photographer that made the images. I call a photograph a production. It’s not something you ’take’.

Dancing Trees, by Paul Leatherbury. Winner of the ‘Classic View’ category of the 2015 USA Landscape Photographer of the Year Award.

I love the US, I’ve traveled there a lot, so I thought it was a natural thing to start a US version of the competition, which we’ve been running in the UK since 2006. It’s been really fun bringing it all together. I wasn’t very good at school, I wasn’t a very good actor, and I wanted to do something that might mean something to people. And that’s what drives me on. There are some great photographers out there.

My dream – what I really want to happen, is – do you remember the series ‘Earth From Above? I cannot believe what a grand, far-reaching tour that exhibition had. And what I would love to do is to take the Landscape Photographer of the Year Award in the US and UK and take the exhibition around the world. And say ‘this is what America looks like, in the eyes of some of the word’s best landscape photographers’.

Hourglass, by Ted Gore. Overall winner of the 2015 USA Landscape Photographer of the Year Award.

Is there anyone who’s come through the Landscape Photographer of the Year Awards in previous years who’s gone on to make a career out of landscape photography?

I think they all have. It’s elevated the winners hugely. It’s an amazing label, to be Landscape Photographer of the Year.

What advice would you give to an aspiring landscape photographer?

Find your signature and specialize. Don’t be a jack of all trades. Find your way of seeing. And be memorable for your particular way of seeing. I was given that advice, and it’s a bumpy ride, like acting. It’s really not easy. It’s precarious and insecure, but there are many different ways of seeing, and many ways that are still to be found. Make your images have meaning. And practise.

Click here to submit entries to the 2016 USA Landscape Photographer of the Year Award


Charlie Waite is a renowned landscape photographer and founder of Landscape Photographer of the Year Award competitions in the UK and USA.

Articles: Digital Photography Review (dpreview.com)

 
Comments Off on Interview: Landscape photography master Charlie Waite

Posted in Uncategorized


Circular Polarizers Versus Graduated Neutral Density Filters for Landscape Photography

22 Aug

Whether you’re a professional or hobby photographer, odds are you’ve come across a beautiful, scenic landscape, that you absolutely had to photograph. Unless you’re an experienced landscape photographer, there’s a good chance the color in that photo wasn’t as saturated, or balanced as you were expecting. That’s because there’s generally a wide disparity in the dynamic range between the foreground and background of landscapes, as well as between the upper (sky) and lower (earth) halves of the frame. Thanks to a couple of lens filters, this hurdle can easily be overcome without having to spend hours of post-processing in Photoshop.

Drop-in and screw-in filters

What are lens filters?

Lens filters are lightweight pieces of glass that screw onto the front of most camera lenses (or drop-in using a holder system) in order to offer additional protection of your lens while also improving image quality. There are a variety of filter sizes that must match up to the size of the thread on your camera lens, so it is very important to make sure you get the correct size for the lens you plan to use it on (tip look on the back of your lens cap).

In addition to varying sizes, lens filters can also serve several different purposes. Most basic lens filters are ultra-violet (UV) reducing filters (also known as haze filters) that come with an anti-reflective coating to cut through the effects of atmospheric haze, thereby improving overall image quality. Besides UV/haze filters, there are two others that are particularly useful for landscape and outdoor photography – polarizers and graduated neutral density filters.

From left to right: A clear UV filter, a polarizing filter, and a Graduated Neutral Density filter.

From left to right: A clear UV filter, a polarizing filter, and a Graduated Neutral Density filter.

What is a polarizing filter?

The next filter we’ll discuss is the polarizing (usually circular) filter, which attaches to the front of a lens and can be spun around to produce varying degrees of saturation throughout an image. This quality of the polarizing filter is important to pay attention to, because it’s easy to produce uneven shades of saturation if the polarizer is even slightly off, such as in the example below.

Circular polarizer versus ND grad filter

Landscape photo with uneven polarization. Notice how the sky is very uneven in color.

Sony a6300 camera with bare kit lens - no filter applied. UV and Polarizing filters on the table.

Sony a6300 camera with bare kit lens – no filter applied. UV and Polarizing filters on the table.

Polarizing filters do two things: first, they help reduce glare or reflections cast by non-metallic reflective surfaces such as glass or water. Second, they saturates colors and enhances image clarity by reducing the overall exposure of an image. The benefits of the polarizing filters are best seen when you are shooting at a 90-degree angle to the sun.

Take a look at the landscape photo below that was taken with no filter, the colors are muted and not very exciting. However, once the polarizing filter is added, you can see a huge boost in overall color saturation. It’s a pretty dramatic difference without even post-processing the photo.

Circular polarizer versus ND grad filter

Landscape photo with no filter.

Circular polarizer versus ND grad filter

Landscape photo with a circular polarizing filter. Notice how overall the colors are intensified.

What is a neutral density filter?

Another effective filter for landscape photography is a neutral density (ND) filter, which reduces the overall exposure of an image. ND filters are uniformly dark in color and they come in different strengths depending on density.

The best use of ND filters is in situations where you wish to use a long exposure or wide aperture to capture an image, without risking overexposure. Some example scenarios when a ND filter would be effective include:

  • Producing a smooth, blurred movement of water in a waterfall, lake, or the sea.
  • Blurring moving subjects to convey movement or motion (such as panning).
  • Reducing diffraction by using a large aperture.
  • Shooting with a shallow depth of field in bright lighting.

What is a graduated neutral density filter?

ND filters also come in a graduated form, also known as a split ND filter. The top half of the filter appears dark, while the bottom half is clear. Similar to the circular polarizer, the graduated ND filter can also be spun around to produce varying degrees of saturation, so it’s important to be careful when using it to avoid unevenly saturating your image.

The best scenarios for a graduated ND filter to shine are when you wish to reduce light, or darken just part of your image. Think landscape photos where the earth is balanced, but the sky is blown out. This would be an ideal time to use a graduated ND filter to darken the sky.

Circular polarizer versus ND grad filter

The above landscape photo with a soft edge ND grad filter. Notice how the sky is darker and more saturated, while the water hasn’t changed.

There are two types of ND grad filters: hard edge, and soft edge. You’ll want to use a hard edge filter when the light and dark sections are very clearly separated, while a soft edge filter is best used when the light and dark sections are not distinctly separated.

Circular polarizer versus ND grad filter

Landscape photo with no filter.

Circular polarizer versus ND grad filter

Landscape photo with a circular polarizer.

Circular polarizer versus ND grad filter

Landscape photo with a graduated ND filter.

Over to you

Do you use polarizers or neutral density filters with frequency in your photography? Please share your thoughts and images in the comments below.

googletag.cmd.push(function() {
tablet_slots.push( googletag.defineSlot( “/1005424/_dPSv4_tab-all-article-bottom_(300×250)”, [300, 250], “pb-ad-78623” ).addService( googletag.pubads() ) ); } );

googletag.cmd.push(function() {
mobile_slots.push( googletag.defineSlot( “/1005424/_dPSv4_mob-all-article-bottom_(300×250)”, [300, 250], “pb-ad-78158” ).addService( googletag.pubads() ) ); } );

The post Circular Polarizers Versus Graduated Neutral Density Filters for Landscape Photography by Suzi Pratt appeared first on Digital Photography School.


Digital Photography School

 
Comments Off on Circular Polarizers Versus Graduated Neutral Density Filters for Landscape Photography

Posted in Photography


How to Use Adobe Camera Raw and Photoshop to Make Your Landscape Images Pop

02 Aug

Photoshop is a wonderful tool if it is used correctly. Yes, there is a way to use it right. The basic idea is that if someone can see the adjustments you have made to your image, that’s not so good.

Think of Photoshop as your own personal darkroom. During the film era, some photographers had black and white darkrooms in their homes. That way, they could control the complete process of making the image. Very few had colour darkrooms, as that was far more complicated and costly. Nowadays, we have a fully functional colour darkroom loaded onto our computers (even our iPads), it’s called Photoshop or Lightroom (which is not named that by mistake, it is the opposite of darkroom). If you have Photoshop or Lightroom, you have a very powerful tool with which to edit your images.

Before

Before

After

After

Making your images POP!

What does it mean to make your images pop? It can mean a number of things, but mostly it means to have more colour, contrast, and look more dramatic. As always, it implies that you have a good image to start with. Trying to make an average image pop, is not what this is about. Make sure you start off with a good image out of camera, then go through these steps in order.

Shoot in RAW

Shooting in RAW is a good start. I know, you may not want to shoot in RAW because the file sizes are so big, or you don’t really see the benefits, but RAW really does make a difference. Firstly, you are working with a full uncompressed file of data. A JPEG image has already had adjustments make in camera to compress it to that file size. Some information has already been discarded, which means you are working with less image information, which in turn means you have less flexibility in the editing process. Of course, RAW is only useful if you are going to spend time editing your images in Photoshop or Lightroom.

Let’s assume that you are going to edit and you have shot in RAW, open your image up in Photoshop and you will see the Adobe Camera Raw (ACR) Editor open. The ACR editor is a really powerful tool. The latest updates have made the ACR editor in Photoshop almost a separate image editing tool, it’s that powerful. As it opens, you will see a selection of tools on the right hand side, mostly sliders such as: White Balance, Tint, Exposure, Contrast, Highlights, Shadows, Whites, Blacks, Clarity, Vibrance and Saturation.

Camera Raw Editor in Photoshop CC

The camera raw editor has some very powerful adjustment tools. The next few steps will be done mostly in the RAW editor, then the image will be opened in Photoshop, and edited further. Many of these edits are very similar in the Lightroom Develop module, so you can make these same adjustments there as well.

The Camera Raw Editor in Adobe Photoshop CC

Close up of the basic RAW editor sliders

Making adjustments in the RAW editor

  • Temperature – Start off by taking a look at the colour in your scene. You can adjust the temperature to make the colour of the scene warmer (slide towards yellow) or cooler (slide towards blue). This can be used to correct a colour cast, or to add some drama to your image. In this scene, I chose to move toward the warmer side.
  • Exposure – Take a look at your exposure, the image might be a little dark, or maybe a little bright. Slide the exposure slider to adjust this.
  • Contrast – Adjust the contrast to make sure that the dark areas of the image are dark enough, but don’t lose details here.
  • Highlights – In this image, the red indicator in the highlights shows me where there is very little detail. To compensate for this, slide the highlights slider to the left. If your highlights are underexposed, slide this slider to the right, but be sure not to overexpose your highlights.
  • Shadows – The shadows slider can help you bring back details in the shadows or darken them a little. Be careful not to overdo this slider as your shadows may look noisy (or your image can take on an “HDR” look) if you push this too hard.
  • Whites – This slider adjusts any pixels in the image that are white or partially highlighted.
  • Blacks – This slider will adjust any pixels that are black.
  • Clarity – The clarity slider adjusts contrasts in the midtones. This can really add some structure to your image, but be careful not to overdo it.
  • Vibrance – This slider will adjust any pixels that are not saturated. This is a good place to start to add some subtle pop to your scene.
  • Saturation – This slider will adjust all pixels by saturating or desaturating them.

Basic adjustments in Camera RAW

HSL adjustments tab

This tab has three different tools under it, namely: Hue, Saturation, and Luminance (HSL). These adjustments will make changes based on the colour channels in your image. For example, if you click on the saturation tab, you can make the reds in your image more or less saturated, the same is true for the oranges and all the way through the colour channels. You can also make certain colours brighter, by using the luminance tab. In this image, I wanted to saturate the reds, yellows, and oranges, as well as some of the blues.

HSL tab adjustments

Graduated Filter in Camera Raw

Much like using one on your camera in the field, you can add a graduated filter in Camera Raw. The beauty about doing this in Photoshop is that you can make some very fine tuned adjustments to your image, depending on how you position the Graduated Filter tool.

Click on the Graduated Filter icon at the top of the screen, and the you will see a whole new dialogue box with very similar functions to the basic Camera Raw Module. The difference here is that you will click and drag the filter down on your image to select the sky. You can also click and drag up from the bottom to select the foreground. I will do both (theGraduated Filter applies to the image from the edge inward).

Starting at the top, I click and drag the filter to just over midway through my image. That limits the effect to the top half. This filter is graduated, so the effect will be properly blended, and you won’t see a hard line where the filter ends (the more you drag it the wider the blend area, you can also adjust that after). I make some adjustments and you can see the difference they made to the sky. Once you are finished with one filter, click on New (at the top of the adjustment box) and repeat the process, but drag up from the bottom this time to make adjustments to the foreground. Once you have made the final adjustments, you can click open image at the bottom of the Camera Raw box to open your image into Photoshop.

Graduated Filter icon highlighted

One key adjustment that needs to mentioned here is the Dehaze tool. The Dehaze tool does exactly what it says, it removes haze and creates better contrast. Use it carefully, it is easy to go too far with it, and your image may suffer as a result. It is a really useful tool for landscapes and seascapes, as there is often some haze in the images, as there was in mine. Using it lightly has removed the haze and made the image better overall.

You will notice it is part of the Graduated Filter tool, and there is also a Dehaze function in the effects tab of the Camera Raw Editor. It is up to you when you use it, but be aware that if you use it without a selection, it will apply the effect universally to your entire image. Using it here in the Graduated Filter tool means you can have better control over how it affects your image.

Click and drag the Graduated Filter from the top down to select the sky. Then select with adjustments you want to apply.

Selecting the foreground by dragging from the bottom up.

Open your image in Photoshop

After you have made your adjustments in Camera Raw, the final touches can be applied in Adobe Photoshop. Once again, the sky and the foreground in this image are going to look different, and will need different adjustments.

To make a softer selection of the sky, click on the quick mask tool at the bottom of the left hand side toolbar in Photoshop. You can then use a soft brush to paint in a selection of the sky as a mask. Once you are happy with the selection (see red mask) click on the quick mask tool again to activate that selection. There is one tricky thing to note about the quick mask tool, the mask means that you are selecting everything that is NOT red. So, when you click on the quick mask tool, you will see the marching ants around the bottom portion of the image and not the red area. This is good, because you can toggle between the two areas very easily and make adjustments to each selection.

First of all, make the necessary adjustments to the foreground using Levels. In this image, I wanted to make the foreground a bit brighter, so I popped up the highlights a little. From there I selected the inverse (i.e. the sky). You can do this by holding down CMD>SHIFT>I together. This will toggle your selection from the foreground to the background.

Red indicates the area that will be masked

Screen Shot 2016-07-05 at 3.28.52 PM

The marching ants show where the current selection is in the foreground.

Screen Shot 2016-07-05 at 3.29.56 PM

Making levels adjustments to the foreground

Screen Shot 2016-07-05 at 3.30.24 PM

CMD>SHIFT>I will toggle the selection, here the sky is being selected and levels is being used to adjust the sky

Use Hue and Saturation to make final colour adjustments

You can use the toggle function (CMD>SHIFT>I) to select the sky and foreground interchangeably. Once you have your selection, choose a tool to make adjustments, and the changes will only be made to the area that is selected. In this example I have used the Hue and Saturation function to make further enhancements to the image. I am again making adjustments by each channel. This gives me great control over what colour ranges need to be saturated, and perhaps desaturate others that are a little over done. Go through each channel and make the necessary adjustments.

Screen Shot 2016-07-05 at 3.30.53 PM

Use Hue and Saturation to make final colour adjustments

Once you are done, you can then sharpen your image as you see fit and save it to be printed. The steps outlined above will help you make any image look better. If done correctly, your images will have the pop and drama that you are looking for.

Give it a try, once you know the process, these adjustments can be done really quickly.

After

Final image

Please share your images and thoughts on the comments section below.

googletag.cmd.push(function() {
tablet_slots.push( googletag.defineSlot( “/1005424/_dPSv4_tab-all-article-bottom_(300×250)”, [300, 250], “pb-ad-78623” ).addService( googletag.pubads() ) ); } );

googletag.cmd.push(function() {
mobile_slots.push( googletag.defineSlot( “/1005424/_dPSv4_mob-all-article-bottom_(300×250)”, [300, 250], “pb-ad-78158” ).addService( googletag.pubads() ) ); } );

The post How to Use Adobe Camera Raw and Photoshop to Make Your Landscape Images Pop by Barry J Brady appeared first on Digital Photography School.


Digital Photography School

 
Comments Off on How to Use Adobe Camera Raw and Photoshop to Make Your Landscape Images Pop

Posted in Photography


Tips for Processing Landscape Photos – from Basic Edits to Artistic Interpretation

20 Jul

All professional, and many hobbyist photographers, post-process their photos. There are various reasons why you want to edit your photos, besides the fact RAW files need some level of processing, including:

  • To fix minor errors made when you took the image.
  • To make the image look more like you envisioned when you took it.
  • To add your artistic touch to the image.
  • Because image editing is fun, and is an important part of photography.

Sunrise 0

Landscape photography is often about being in the right spot at the right time. This is not always possible, so a little post-processing might help. “Why make it when you can fake it” seems to have become more and more common.

One question often raised, is how much editing you can do before you have over-processed your photo. Too much and your photo no longer represents the reality of the landscape.

It’s subjective how much editing is acceptable. Some argue the editing has gone way too far and is destroying photography. Others put their heart and soul into image editing. They try to get the most out of every detail in the photo, and to make their personal interpretation.

Landscape photographers are not photojournalists documenting reality. As such there should be plenty of room for an artistic interpretation of landscape photos. In the rest of this article, I’m going to discuss different levels of editing, using one of my own landscape photos as an example.

1. The leave as is approach – no editing

The easiest method is to save your files as JPG and do no editing at all. If you don’t want to buy an image editing software, or you simply don’t care to spend time on post-processing, that’s fine. It’s your decision. You can still enjoy the time you spend out in nature taking photos.

Obviously, with this approach, nobody can accuse your photos of not being real. But unless you learn some basic editing skills and post-process your images, you’re likely not to be regarded as a serious photographer.

Hardly any of the images with most likes on social media and photo sharing sites are unedited. In digital photography capturing the photo is just half the work, the rest is about post-processing techniques.

Sunrise 1

2. Basic editing

In my image (above), I realized I was sloppy with the composition when I took it. I had to fix this. Often one adjustment leads to another. Let’s go through the different steps I applied to this image.

The image above is the untouched RAW file straight out of the camera. Some photographers are happy with this result, and leave it there. After a closer look, I found there were several other things with the image I could improve. Because it’s a RAW file, I knew there was a lot of image data to work with.

Basic editing is supposed to enhance what’s already in the photo, not fix what is wrong. Ideally, you should get the shot as technically correct as possible in the camera. One nice thing about digital photography is how easy it is to make small adjustments after the shot. If you fail on the exposure or the horizon is not perfectly straight, no problem, you can fix it

Levelling a tilted horizon and verticals, cropping, and dust spot removal

capture-2b
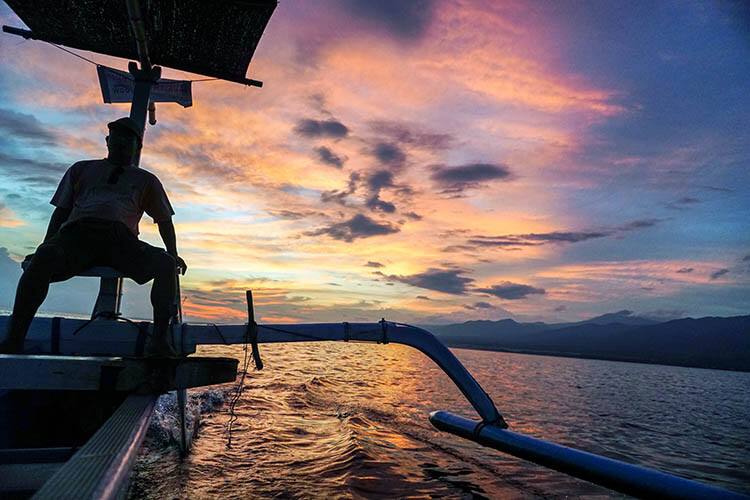
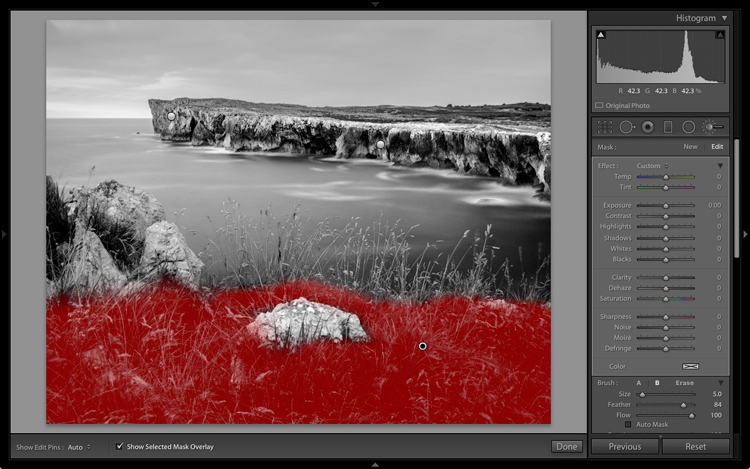
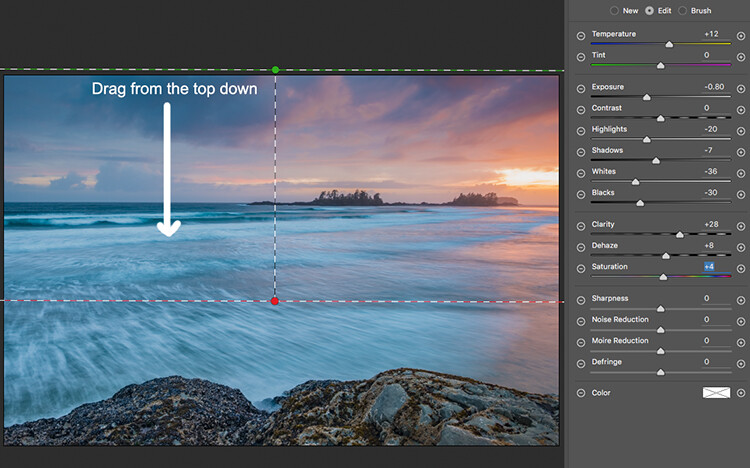
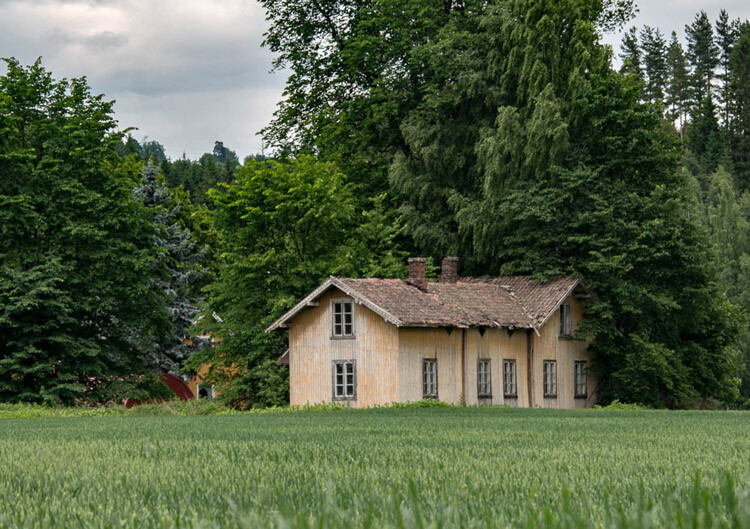
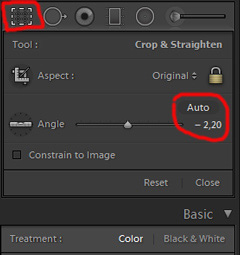
While you edit, you can make simple adjustments to your composition, like levelling the horizon and cropping. By cropping, you can tighten the composition, and to some extent “move” elements, so they align according to the rule of thirds or golden mean.

In the photo below I have levelled the trees, as they were leaning slightly to the right. I did not notice that when I took the photo. Most photographers will not question if levelling the horizon, cropping, and removing dust spots are acceptable image editing. It’s part of the workflow.

Sunrise 2

Adjusting the White Balance (WB)

I took this image an early morning, at sunrise. The reflections from the clear blue sky gave the scene an overall blue color cast. At the computer, I remembered the scene as being warmer. Warmer is perceived as more pleasing. I could be wrong, because who remembers exactly what colors a scene had at the time they took the image?

Photographers often claim they edit their photos to represent how they saw the scene. It is probably more correct to say they edit their photos the way they wish they saw the scene.

capture-3b
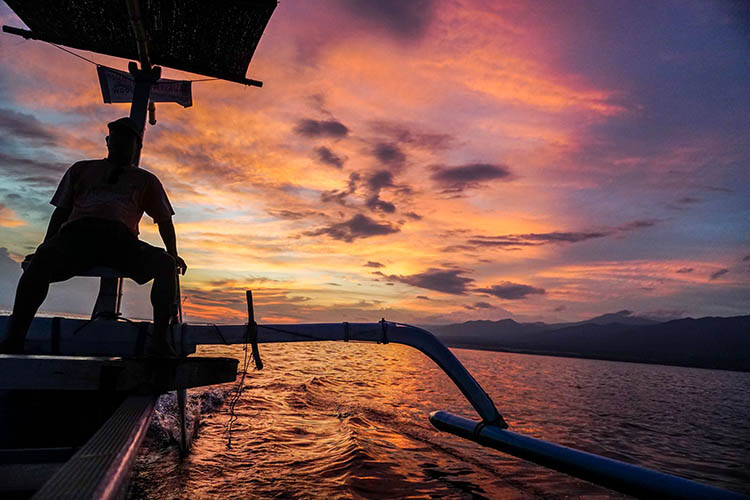
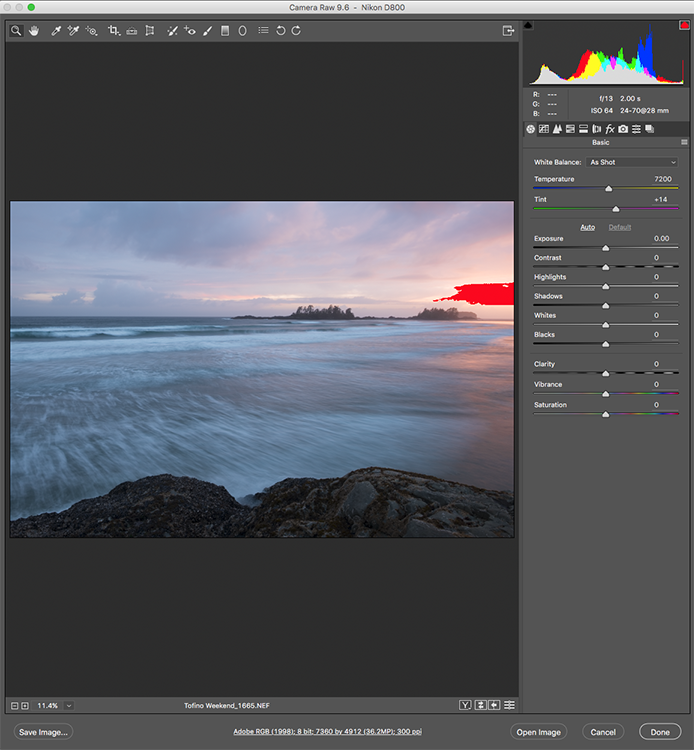
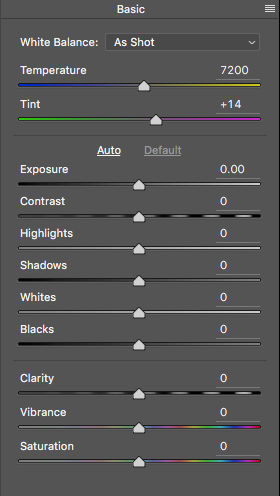
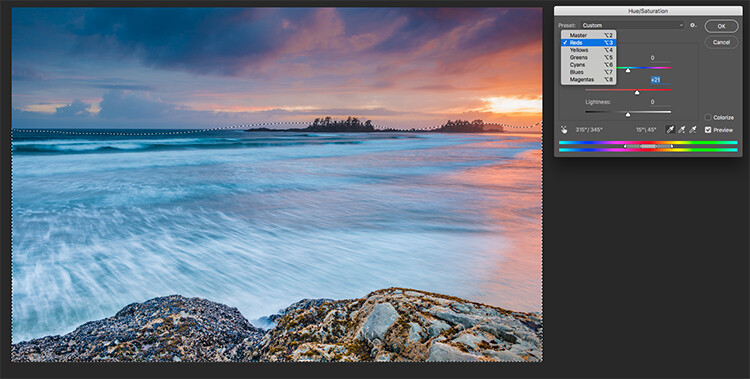
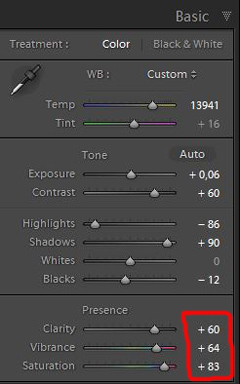
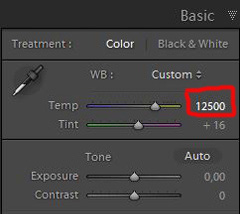
So I decided I wanted my image to have a warmer color tone. I adjusted the White Balance by adding more yellow.

I could have achieved something similar by setting the camera White Balance to the Cloudy preset, at the time I took the image. Changing the White Balance after the shot is another advantage when you shoot your files as RAW. Either way, the result is altered, and to some extent, the reality is changed.

Although the significant impact changing the White Balance can have on an image, it is usually accepted as part of the post-processing workflow.

Sunrise 3

Increasing Exposure and Contrast

Because no adjustments are made to the RAW files in camera, the images look unfinished when you open them up on your computer. The preview on the LCD is an embedded JPG version of the photo, which often looks much better.

capture-4b
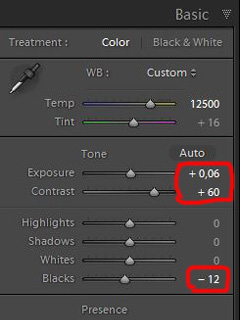
Even with modern digital cameras you don’t always hit spot on with the exposure. If you don’t get it right in-camera, with RAW files you can easily correct the exposure one two stops when post-processing.

My image is no exception, it looks flat, and needs a few more adjustments. So I increased the contrast slightly. When you increase contrast, the image tends to get a little darker. To compensate for this, I had to increase the exposure a tiny bit. You can see the result so far below.

Sunrise 4

Decreasing Highlights and increasing Shadows

capture-5b
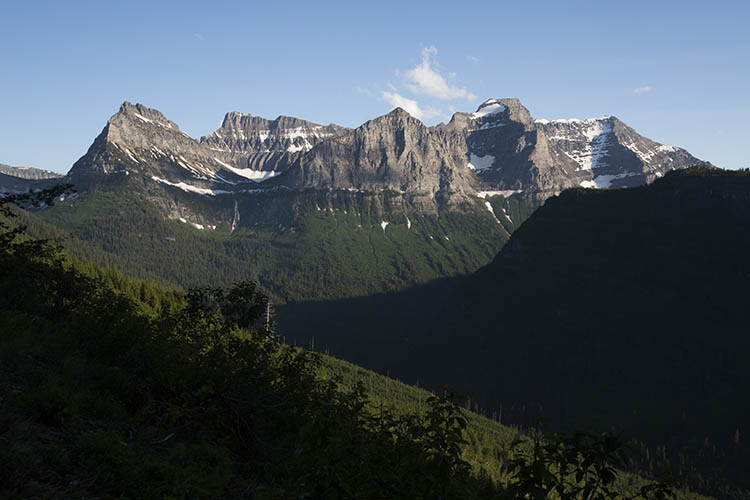
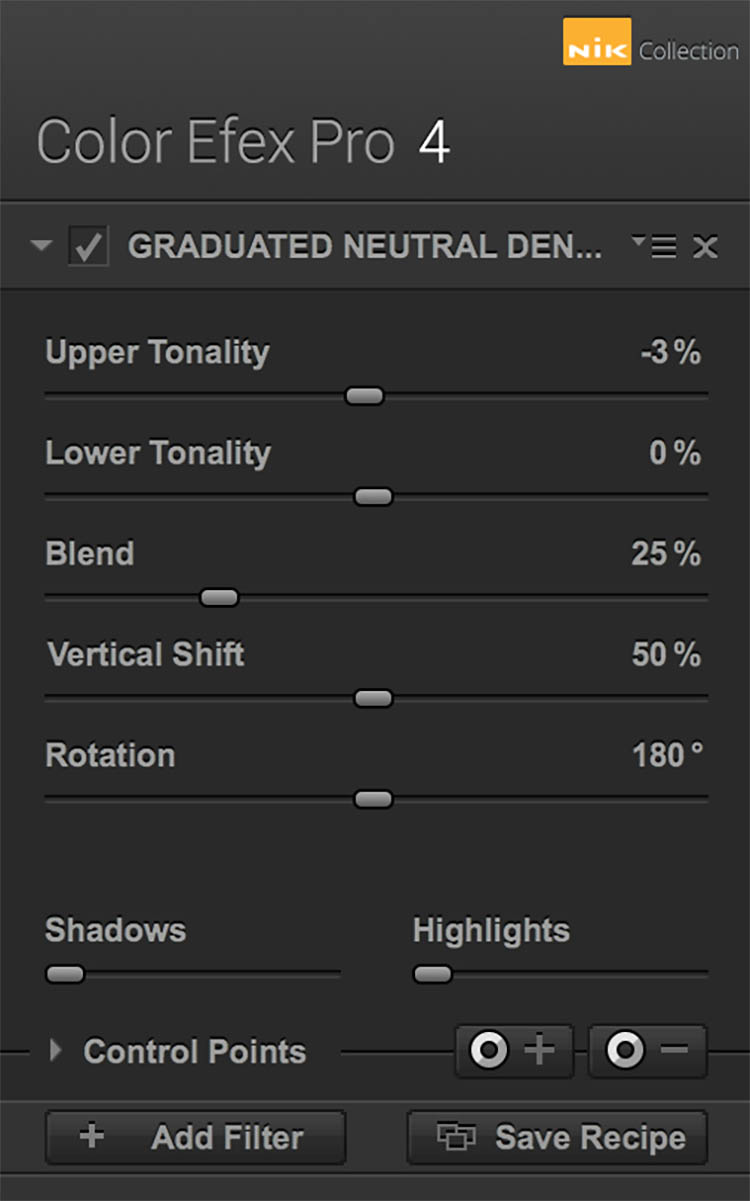
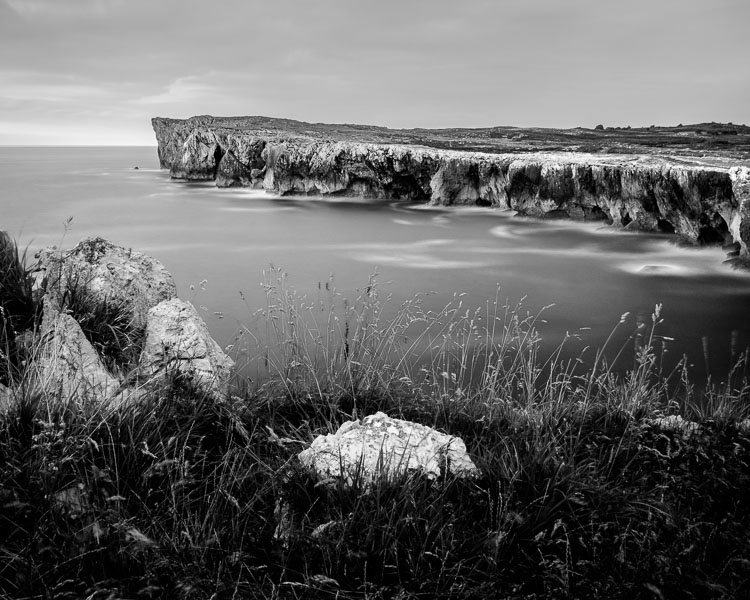
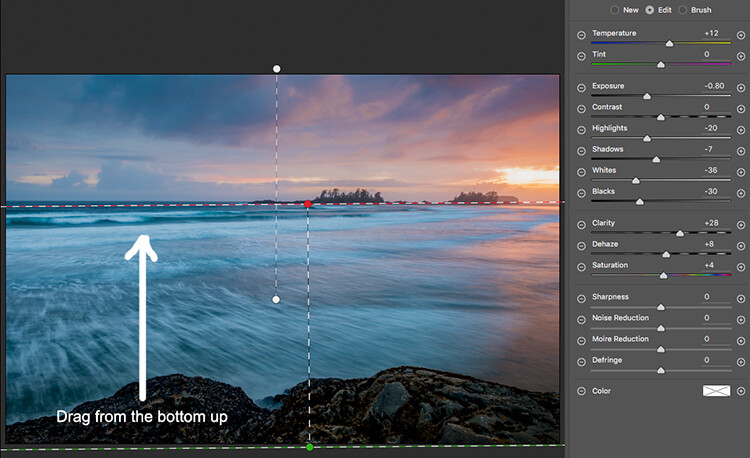
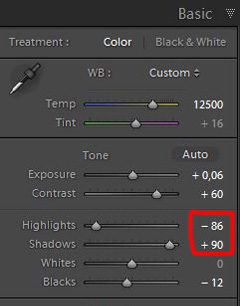
One more thing that bothered me was the black chunk of trees to the far right. The trees have now become too dark with no details in the shadows. I fixed this by increasing the shadows slightly. I also lowered the highlights a little to bring out more of the texture in the ice. In the version below the trees to the right are no longer completely black.

With these last adjustments, the image starts to look pretty decent. So far so good. All of the edits I have done until now are within what most photographers will find acceptable.

Sunrise 5

3. Beyond basic editing

Oversaturated colors

Photos with saturated and vibrant colors are eye catching. If you want attention when you post your images on social media sites, it’s a good idea to boost the colors first.capture-6

At this stage, it was attempting to make the sunrise more beautiful. To me, it was already an awesome winter morning sunrise. But I felt I could make it even better – with some over-processing.

I did this simply by increasing vibrance and saturation significantly. The image now has an entirely different feel. To me, it looks fake. But I bet this version would have received more attention on my social media sites if I posted both versions there. I have seen this happen with some of my other images before.

With this level of editing, the discussions start as to whether or not the image represents a realistic landscape. It can be your artistic interpretation of the scene, but to me it’s not authentic anymore.

Sunrise 6

4. Photo editing artistically

Adding texture for a complete different look

In the next image I have used my artistic freedom as a photographer and artist. I blended in a couple of texture layers and photo filters with the original image. By using textures properly, you can create some interesting effects on your images.

If this is a realistic landscape photo or not, is no longer a relevant question. It’s not, nor is it supposed to be. But you can discuss whether or not you like this style. While all the previous edits were made in Lightroom, the last two versions were made in Photoshop, as Lightroom doesn’t have the layers function which is needed.

Sunrise 7

Composite of several images makes this surreal piece

The last version of my image is a composite. Only a few elements are left from the original, but you can tell it’s still there. The result is so extreme that nobody can blame you for faking a realistic landscape image. Everybody know this is a creative piece of art. Again it’s very subjective whether like the style or not. Compositing is a whole new level of photo editing, it’s not for everyone.

When you create composites, you need many of the same skills as when you photograph. For a balanced composite, you must know about composition techniques and how to deal with light and shadows, as well as colors.

Sunrise 8

Conclusion

With digital photography it’s possible to create the image you want. Your imagination and skills are your only limitations. The general trend is bold and vivid colors get a lot of attention, at least among some photographers. Whether you want to follow this trend or not, is your decision. The fact is that more of the images you see online look similar, due to the same post-processing techniques. It’s getting harder to be recognized online unless you make something different.

As a landscape photographers you have a few challenge to tackle because the elements of nature are limiting. Light and weather conditions might not be as you wish when you’re at your dream scene. Maybe you never come back to the same spot again. In such a situation it’s tempting to fix the light (slightly) in post-production. In other words, to fake reality like I did with the oversaturated image.

ICM_forest_original_edit

Original edit

ICM_forest_creative_edit

Creative edit

Photography is art, so it’s not wrong if you choose to do so, but be open with what you have done. Don’t pretend you experienced the sunrise of your life if you didn’t. In the end, it’s up to you what you’re comfortable with. Nobody can take away your creative vision.

You can do more advanced editing in Lightroom than I have shown in this tutorial. In Photoshop however the possibilities are endless. You can manipulate, remove, and add content to your images. With such drastic steps, you’re not only altering the reality, but you’re cheating. That’s if you claim your photo is real.

Now it’s your turn. What’s your opinion about how much you can edit landscape photos? Please share your thoughts in the comments below.

Original edit

Original edit

Creative edit

Creative edit

This week we are doing a series of articles to help you do better nature photography. See previous articles here:

  • 3 Habits Every Outdoor Photographer Should Develop to Avoid Missing Shots
  • 5 Tips for Better Nature Photography
  • 27 Serene Images of the Natural World
  • Weekly Photography Challenge – Nature
  • 10 Ideas for Photographing Nature in your Backyard
  • 6 Tips for Capturing Character and Personality in Wildlife Photography
  • 5 Tips for Setting the Focus in Your Landscape Photography
  • 7 Tips for Better Marine Wildlife Photography

googletag.cmd.push(function() {
tablet_slots.push( googletag.defineSlot( “/1005424/_dPSv4_tab-all-article-bottom_(300×250)”, [300, 250], “pb-ad-78623” ).addService( googletag.pubads() ) ); } );

googletag.cmd.push(function() {
mobile_slots.push( googletag.defineSlot( “/1005424/_dPSv4_mob-all-article-bottom_(300×250)”, [300, 250], “pb-ad-78158” ).addService( googletag.pubads() ) ); } );

The post Tips for Processing Landscape Photos – from Basic Edits to Artistic Interpretation by Kim Rormark appeared first on Digital Photography School.


Digital Photography School

 
Comments Off on Tips for Processing Landscape Photos – from Basic Edits to Artistic Interpretation

Posted in Photography