RSS
 

Posts Tagged ‘improve’

10 Ways to Improve your Vacation Photos

09 Mar

dPS-Detail

This has probably happened to all of us. We’ve just come back from an exciting trip and want to share all the wonderful moments with our friends and family. But after a brief moment we seem to be the only ones still enjoying the picture-show. Everyone else has quickly lost interest.

So what can we do to stop putting people to sleep with our vacation photos?

Here are some tips to help you take vacation photos that everybody will love. It’s easier than you might think, and it definitely doesn’t require expensive equipment. Keeping in mind some basic rules, you can take stunning images even with your mobile phone.

Let me take you to Paris and show you how with these 10 ways to improve your vacation photos:

#1 – Don’t rush – take your time

It often happens that you get to a beautiful place and start photographing right away. But wait. Unless it’s a sunset or fast moving group of people, nothing is going to run away from you. Instead take your time to wander around a little bit sucking up the atmosphere.

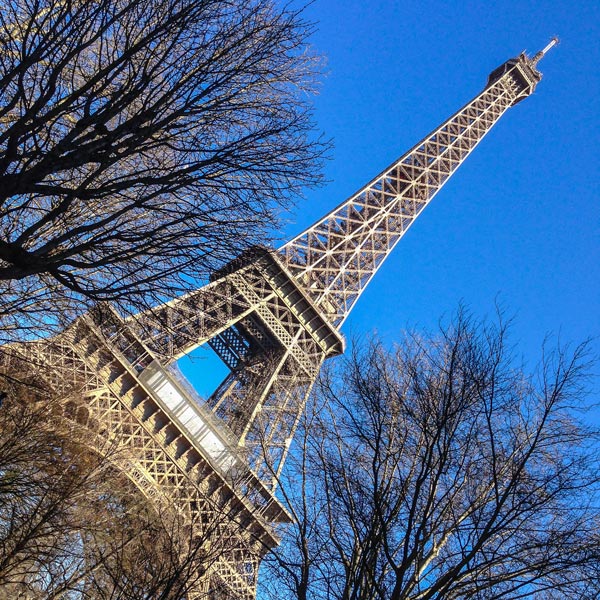
Here’s an example. Last month I went to Paris. When I got off the metro and the Eiffel Tower appeared, I was immediately tempted to take a picture. Actually everybody around me started shooting right away.

I decided to stroll around first. In my mind I was framing, but I left my camera in the bag. This slow approach helped me to get a feeling for the place and to figure out what it was that I wanted to capture.

#2 – Reflections

Avoid the obvious. When everybody is looking in one direction, look the other way. You may be surprised what you’ll find: impressive reflections, for example.

This is a great way to show a familiar sight in a new light – such as the Eiffel Tower. The giant monument can be seen from almost every point in downtown Paris. It is reflected in car windows or in water puddles at night.

The distortions add a sense of humour or even mysteriousness. Those viewing the image can quickly identify what’s in the photo, yet the unfamiliar perspective puzzles them.

DPS Reflection 2

#3 – Tilt your camera

When taking a picture of a sunset, the horizon should be straight. But when it comes to buildings, it’s perfectly all right to tilt your camera to create a new angle. Don’t be afraid, not everything has to be placed perfectly aligned in the center of the frame.

Just don’t do it part way. If you opt for an uncommon perspective, do it all the way. That is to say let the observer understand that you tilted the camera on purpose, and that the building is not accidentally inclined either to the left or right.

dPS-Tilted-Camera

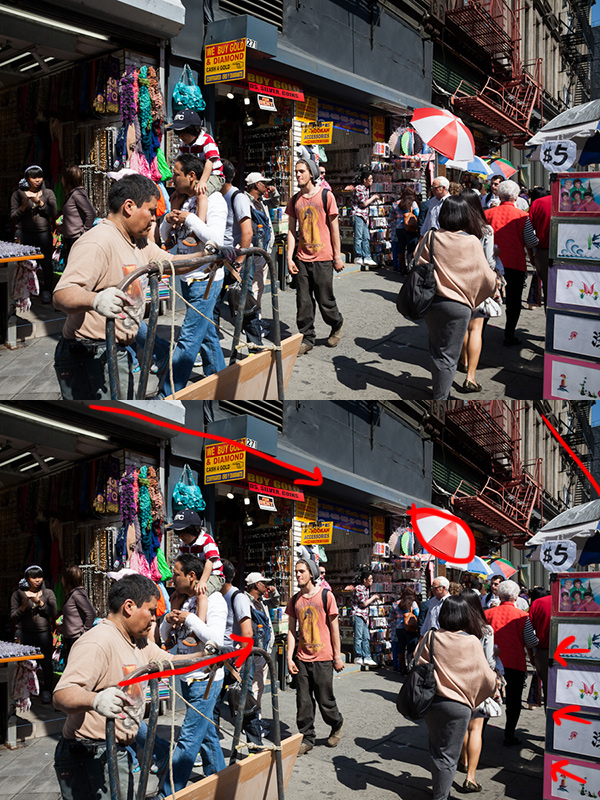
#4 – Incorporate the surroundings

dPS-Surroundings

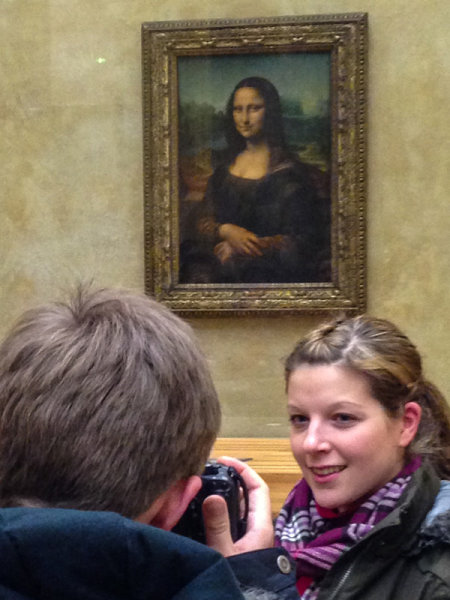
When sightseeing we are never alone. There will always be other tourists around. Thus getting a clear shot with no one in the picture is often impossible. What you can do instead is to incorporate other people into your composition.

It’s actually quite a lot of fun to photograph other people taking pictures. You add another story and layer to your images: a picture within a picture.

#5 – Frame within a frame

Holes, doorways or windows are perfect elements to use as other frames within the frame of your camera. This way you can add another dimension and more depth to your images making them appear almost three-dimensional.

But, that’s not all. Light shining through a window with its reflections and shadows is visually pleasant. And peaking through a window subconsciously suggests some mystery and being able to witness something from a hidden point of view that maybe wasn’t meant for our eyes to see.
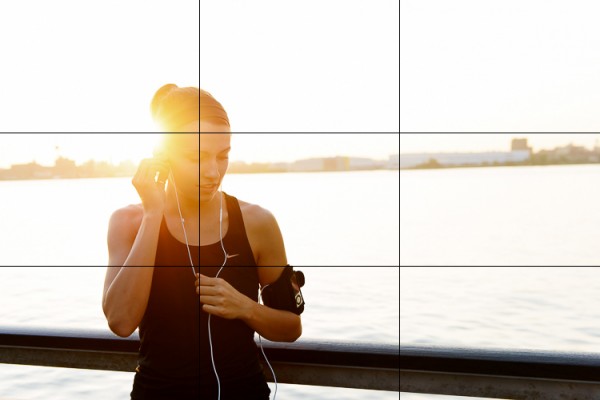
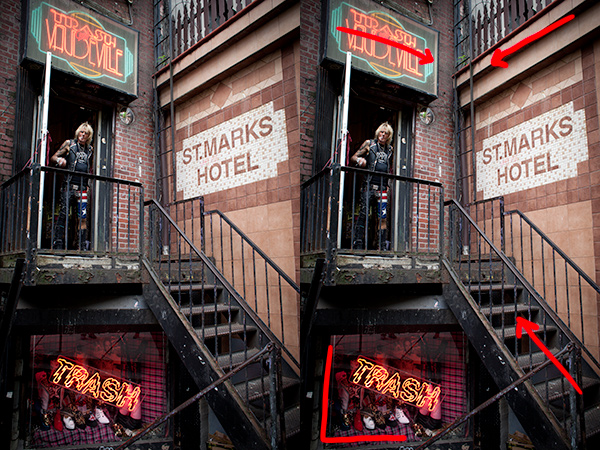
DPS Frame 1

#6 – Geometry

Look out for lines and patterns that can be used to lead the eye of the observer and make your picture more dynamic, like this winding staircase (below), for example. The eye gets hooked on the left top corner and follows the stair railing as it curls towards the center on the right.

DPS Geometry

Lines are a simple, yet very powerful tool, of photographic composition that make images more interesting and engaging.

#7 – Light

Photography is painting with light. So the quality of light is very important. Bright sunlight at noon, with its harsh shadows, is different from the soft tones of a sunset. Be aware of the different emotions that can be evoked by light and use it as a tool to create strong effects.

With backlighting you can create interesting silhouettes, for example, as can be observed in this image of a monument (below). The foreground is heavily underexposed. There are no details in the monument or the tree. Everything is stripped down to its basic shape and form, yet still allowing you to identify at first glimpse what kind of scenery is documented in the image.
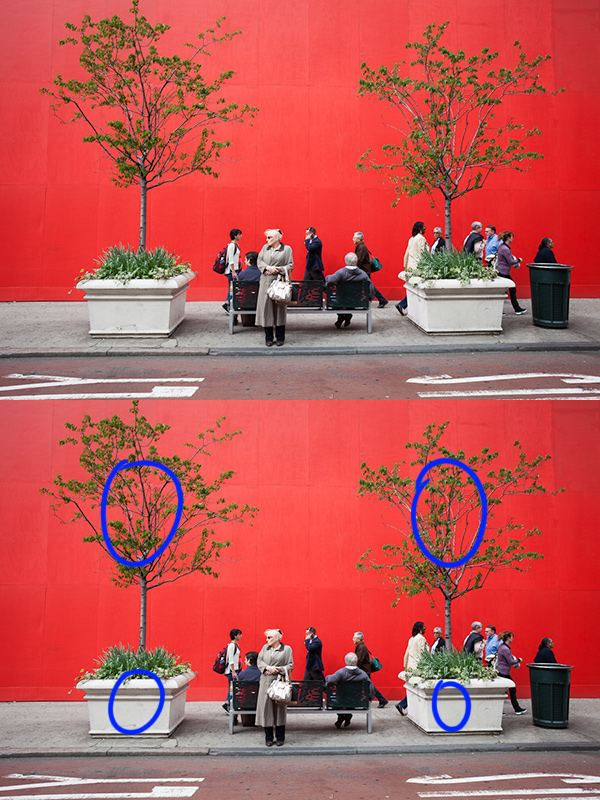
DPS Light

#8 – Clean frames

One common mistake is to incorporate too many elements in one frame. A panoramic shot is great to give an overview of a place. But in general it’s more effective to clean up your photos. Keep it simple.

Simplicity of the frame helps the human mind to better process the information – faster and more efficient than if the observer is confronted with an overloaded image.

Ask yourself: What do I want to say with this picture? Then throw out all the elements that are not important to the statement you wish to express.

dPS-Clean-Framing-2

#9 – Details

Zoom in. Sometimes it’s difficult to capture everything that’s unfolding in front of you. When I was standing in front of the castle of Versailles I was overwhelmed by its pure magnitude. The big courtyard leading up to the main entrance, and the impressive long stretched building in the back. What to make of a situation like that photographically?

A good way to resolve a panorama like that is to focus on details. As hard as I tried I couldn’t get a clean shot of the golden gate and the castle. There were either some other tourists taking picture or all the elements were overlapping each other.

DPS Detail

#10 – Be playful

How many pictures do you have standing rigid in front of an important building, or beautiful landscape? There’s nothing wrong with the typical “I-have-been-there” shot. But it’s more fun to spice it up a little bit.

Interact with your surroundings, create unusual perspectives and use your imagination. Not just you, but your friends and family back home will also enjoy looking at your next vacation pictures.

DPS Playful

Do you have other tips for better vacation photos? If so please share in the comments below.

Want more travel photography tips? Look here:

  • How to Capture the Essence of a Place – Travel Photography Tips
  • Transcending Travel a dPS ebook
  • 6 Tips for Photographing People When Travelling

The post 10 Ways to Improve your Vacation Photos by Kai Behrmann appeared first on Digital Photography School.


Digital Photography School

 
Comments Off on 10 Ways to Improve your Vacation Photos

Posted in Photography


10 Ways to Improve Your Travel Photography Portraits

05 Mar

Last year I travelled all across South East Asia – a trip which not only expanded my personal horizon, but also helped to immensely improve my photography. At the beginning of my trip, my biggest struggle was taking good portraits. The problem wasn’t the lack of opportunities; I encountered incredible and the utmost photogenic scenes around almost every corner. Instead, it was that I just felt too shy or not confident enough to get close to my subject.

I had lots of excuses which might sound familiar to you: “I don’t want to disturb the moment”, “I don’t want to intrude on people’s privacy” or “It’s just a game of luck and chance anyhow”. It was frustrating and I knew that, despite all of the excuses, this was something I really had to work on. By lots or trial and error, and the help of some amazing photographers I met on the way, I gained some important insights on how to bring my people photography to a whole new level. I want to share these and hopefully help you overcome that awkward feeling and false reservation you have when photographing people.

Travel Photography Portraits 01

10 Ways to Improve Your Travel Photography Portraits

#1 Be ready

This is very basic and obvious, but so important. People photography is about brief moments, a glimpse which is normally not replicable. You are not doing landscape photography which leaves you with all the time you need. So have your lens cap off, have your camera switched on, be prepared to adjust settings and BE READY.

Travel Photography Portraits 06

Being ready to capture that one, special moment

#2 Get close

If you are unhappy with your portraits or if they looks boring, it is probably because you are too far away. I know it feels awkward to get really close to someone you don’t know, especially in a foreign country. It seems so much easier to break out your big lens, zoom in and just click away, hoping that your subject won’t notice you. Unfortunately this won’t work.

If you want to have crisp, sharp and extraordinary images which tell a story and leave your audience in astonishment, you have to overcome your shyness and get close. This will help to add more details on your subject’s face, increase sharpness and focus on only one or two elements. The viewer will automatically understand more about your image. Moreover, getting close will put you in control of things: the lighting, the background, the composition and the depth of field. These factors are so vital for a good portrait and so much easier to adjust when you are close to your subject.

Travel Photography Portraits escapology 11

Get close to your subject to control your image

#3 Practice approaching people

Travel Photography Portraits escapology 01

Learning to approach people with the right attitude – the secret of good portraits

You might think “That sounds great, but how do I get close to people?” This leads us to the biggest challenge in people photography, which has nothing to do with photography itself: dealing with people. Are you comfortable walking up to strangers, making small talk, then asking, “Can I take your picture?”

If not, the good news is, it’s something you can practice just like everything else in photography. It is all about your attitude and how you approach people. Get in contact, have a positive attitude, talk, and most importantly smile. Don’t be afraid of intruding on people’s privacy. Particularly in South East Asia the concept of privacy is totally different from ours in the West. Approaching strangers and asking very personal questions is considered perfectly normal. Open yourself and people naturally respond in the same manner. In short, don’t be shy, adapt to the local culture, get to know people, make friends and you will take better pictures.

#4 Learn the basics of the local language

How do you approach people if you don’t speak their language? I will let you in on a secret. It’s actually even easier to approach people if you DON’T speak the same language. It’s a great place to start since it is then not so much about WHAT you speak, but HOW you speak and the energy you give off. Learning a few words and phrases in the local language will go a long way to helping you approach people, and it doesn’t take much effort to learn. From my personal experience the six most important phrases you should learn beforehand are:

  • Hello, how are you?
  • My name is …?
  • I am from …?
  • What is your name?
  • Thank you!
  • Beautiful!

The last one will put a big smile on people’s faces after you have taken that nice portrait and show it to them. Get a small phrasebook. You can look up phrases when you need them or practice on longer bus rides. Ask your receptionist, taxi driver or local travel agent how to pronounce words. Don’t be afraid to make mistakes. It’s fun and will not only help to approach people, but also make your whole travel experience so much more worthwhile.

Travel Photography Portraits escapology 12

Knowing a few phrases in the local language can go a long way

#5 Smile – smile a lot!

Even if you don’t know any words or phrases, make sure to smile. A smile can go such a long way. If you are grumpy and angry because you are not getting your shots right, it will put people off and no one will want to go near you, and definitely won’t want to get their picture taken by you. When you come home from a photo walk, your mouth and cheeks should hurt from all the smiling.

Travel Photography Portraits 05

A smile can go a long way

#6 Take your time

Once you have made contact and established a good vibe, it is time to take your picture. Take advantage of all the “work” you have put in and take your time. It would be a shame to just hectically click away once or twice now. Be calm, think about the light, about what you want to emphasize (the eyes, the hands or the person itself) and about the background.

Since you are close to your subject now, you can control all of these things. Take a deep breath and try a couple of shots, maybe switch angles and try different things. By doing this, you will notice that your subject will also become more relaxed and get used to the camera. There is no need to rush. A rushed photo is usually never a good one.

Travel Photography Portraits 04

Waiting for the right moment is usually worth it

#7 Get moving

Reality can be quiet boring. There might be things in your scene that are boring or disturbing. We already talked about taking your time. Make use of it and arrange the scene to your needs, change angles, get moving. Don’t be lazy. You can eliminate things or include things just by moving around a little bit. Don’t just rely on the zoom.

Travel Photography Portraits 07

Move to create the image you had in mind

#8 Get a 50mm lens

What helped me to counter my laziness and actually get moving was the purchase of a 50mm prime lens. If you don’t have one in your bag yet, buy one. It is the one piece of equipment that boosted my creativity and the quality of my images almost instantly. You will not only learn to move more but also open your eye for new perspectives.

Travel Photography Portraits escapology 03

A 50mm lens to boost your creativity – give it a try

#9 Start with kids and people that are doing something

If you feel shy but are still willing to practice approaching people and getting close, start off with photographing kids and people that are doing something. Kids are easy to photograph. They usually love getting their picture taken, posing and never get bored doing so. I found it very rewarding in Asia but would suggest taking a more cautious approach in Western societies. Please always ask the parents first.

Shoot in busy areas or settings. People that are doing nothing will surely be looking at you. People that are doing something, can’t be bothered to look at you. When they are busy with their task, they will not care about you taking pictures. Look for traditional workshops or handicraft businesses. They usually make for great picture taking opportunities.

Travel Photography Portraits escapology 15

Occupied with traditional crafts – great picture opportunities

#10 Get out of the touristy areas

The touristic hubs are usually far from the country’s reality. At the same, time getting off the beaten track is usually not so difficult. Sometimes it just takes 15 minutes to find yourself in a small, local village. This is where you want to be as a photographer. You will meet real people who aren’t out to sell things. You will have more chances to interact, to practice your newly acquired language skills and take more authentic photographs. At the same time it will make for a much better travel experience than sticking to the “Lonely Planet Path”.

Travel Photography Portraits escapology 09

Hosted by monks in a monastery in Myanmar. No tour, no guide

All of this takes a little getting used to and practicing along the way. But it’s worth it. Please don’t just jam your camera in people’s faces when traveling abroad. It’s not nice and the pictures won’t be either. Take your time to interact with people, open up, get close and don’t forget to smile. This will make for great experiences, unforgettable memories and even better pictures.

Please share some of your favourite people photos with us in the comments and if you have another tips for photographing people, we’d love to hear them.

For more articles on travel and people photography check out these:

  • 6 Tips for Photographing People When Travelling
  • 5 Reasons Why Having People in Your Photos is a Good Thing
  • The Rewards of Photographing People When You Travel

The post 10 Ways to Improve Your Travel Photography Portraits by Philipp Dukatz appeared first on Digital Photography School.


Digital Photography School

 
Comments Off on 10 Ways to Improve Your Travel Photography Portraits

Posted in Photography


How to Simplify and Improve Composition with Normal or Long Lenses

28 Feb

Telephoto lenses and composition

Andrew S. Gibson is the author of Understanding Lenses Part II: A Guide to Canon Normal & Telephoto Lenses, special deal on now 40% off at Snapndeals for a limited time only.

Wide-Angle Lenses

A potential issue with wide-angle lenses is that you try to include too much information in the frame. It takes real skill to create a strong composition with lenses that have a wide field-of-view. It is easier with normal and telephoto lenses, because you can utilise their narrow field-of-view to compose strong yet simple images with little in the background to distract the viewer.

Let’s take a look at how that works:

Field-of-view diagram

Angle of view from a wide-angle lens (left) and long lens (right)

This diagram shows the difference in field-of-view between a wide-angle lens (left) and a telephoto lens (right). You can think of a wide-angle lens as a lens of inclusion: it enables you to fit a lot of the scene in a photo. You can get close to the subject and still fit in a lot of the background.

The telephoto lens is a lens of exclusion. You don’t get so close to your subject and there is less in the background.

Here are a couple of examples:

Portrait taken with wide angle lens

I took this portrait using a wide-angle lens (24mm on a full-frame camera). I was able to get fairly close to the model and still include a lot of the background.

Portrait taken with telephoto lens

This portrait was taken using a short telephoto lens (85mm on a full-frame camera). I was able to get in close and exclude most of the background. The effect is emphasized by placing the model against a dark background.

This effect seems to kick in at around 50mm on a full-frame camera (the equivalents are 35mm on an APS-C camera, and 25mm with the micro-four thirds format). Here’s a photo taken with a 50mm lens on a full-frame camera to illustrate:

Photo taken with a normal lens

This means that you can use this technique to simplify composition even if the only lens you have is a kit lens. Just set it to the longest focal length and move in closer to your subject.

There are other ways to simplify composition – you can’t rely just on focal length:

  1. Pay attention to the background. Does it contain bright highlights or anything else that pulls attention away from the subject?
  2. Are the colours in your photo harmonious? If the colours don’t work well together this can also weaken the composition.
  3. Experiment with depth-of-field. Using a wide aperture helps simplify composition by throwing the background out of focus. This works best with prime lenses as they have wider apertures than most zooms.
  4. Move in as close as you can to the subject. One of my favourite techniques is to use a close-up lens (it’s called a lens but looks like a filter and screws to the front of your lenses the same way) to reduce the minimum focusing distance of my 85mm lens and get in really close. Another benefit is that depth-of-field becomes narrower in close up photography, helping create images with beautiful bokeh.

Here’s an example taken with an 85mm lens fitted with a Canon 500D close-up lens:

Photo taken with 85mm lens plus close-up lens

What are your thoughts? Do you use normal or telephoto lenses to simplify composition the same way? What are your favourite focal lengths? Let us know in the comments.


Understanding Lenses Part II: A Guide to Canon Normal & Telephoto Lenses

Understanding Lenses ebookMy ebook Understanding Lenses Part II will teach you how to get the most out of Canon’s normal and telephoto lenses. It contains a buying guide, takes a deep look at aperture and bokeh, and shows you how to focus accurately with telephoto lenses. It’s now 40% off at Snapndeals for a limited time only.

The post How to Simplify and Improve Composition with Normal or Long Lenses by Andrew S. Gibson appeared first on Digital Photography School.


Digital Photography School

 
Comments Off on How to Simplify and Improve Composition with Normal or Long Lenses

Posted in Photography


Improve Your Black-and-White Photography Skills

11 Dec

In today’s world of digital, taking pictures in black-and-white is something of a lost art form. Color is the dominant way to go, which is something of a pity. While color photography naturally provides a far wider range of shade, a big portion of the appeal of black-and-white photography is the relatively subdued monochromatic character. Still seen as the purest Continue Reading

The post Improve Your Black-and-White Photography Skills appeared first on Photodoto.


Photodoto

 
Comments Off on Improve Your Black-and-White Photography Skills

Posted in Photography


Use Lightroom Collections to Improve your Workflow

16 Oct

Using Lightroom Collections

The main benefit of Lightroom’s Library module is that it gives you the tools you need to get organised and speed up your workflow. The end result is that you can spend more time in the Develop module – the place where you creatively process your photos.

The best way to get organised is by using Collections and Collection Sets. There seem to be as many ways of using Collections as there are photographers. I’m going to look at two in this article. The first uses Collections, and the second Smart Collections. Together they will give you an insight into how you can use Collections to improve your workflow.

Why use Collections?

You may be wondering why you should use Collections in Lightroom instead of the Folders panel. Here’s why:

1. The Folders panel is only available in the Library module.

The Collections panel is accessible from every module. Adobe wants you to use the Collections panel as it is the most practical way to organise your images.

2. Collections and Collection Sets give you far more freedom than the Folders panel.

The contents of the Folders panel mirrors the file structure of your hard drive. Let’s say you take a photo of a friend called Amy in Hong Kong. In the Folders panel, that photo can only exist in one place – the physical folder where it has been saved on your hard drive.

However, the same file can be stored in as many Collections as you like. It could be part of a Collection called ‘Amy’, another called ‘Hong Kong’, perhaps another called ‘Favourite photos’. There is no limit to the number of Collections you can add it to.

It’s a little like using Playlists in iTunes. You can add a song to as many Playlists as you like. It’s the same in Lightroom with photos and Collections.

Organise your images

Hopefully you’re now beginning to see just how flexible and convenient Collections are. Now let’s take a look at how you can use them to organise your images.

Other photographers’ methods

When it comes to learning how to use Lightroom, don’t feel that you have to figure everything out yourself. There are plenty of outstanding websites dedicated to using Lightroom, and lots of photographers who share the way they work for others to use. There’s no need to re-invent the wheel – just find a way that works for you and tweak it to suit your needs.

In that spirit, I’m going to look at two methods for using Collections I learnt from other photographers.

Technique 1: Using multiple Collections

Using Lightroom Collections

This technique is based on a method I read about on Scott Kelby’s blog. I like it because it’s simple, and the easiest way that I’ve found to narrow down the images you take in a shoot to the ones that you want to process. The quicker you can do that, the sooner you can move on to the Develop module. Here’s a brief description of how it works:

  • Create a Collection Set and give it a name relevant to the shoot (i.e. the name of the place where the photos were taken, or the person in the photos etc.)
  • Create three Collections inside that Collection Set. Name them Full Shoot, Picks and Selects.
  • Send all the photos from the shoot to the Full Shoot Collection.
  • Flag your favourite photos from the Full Shoot Collection and send them to the Picks Collection. You don’t have to be really selective at this stage. You’re eliminating the worst images rather than picking the best.
  • Use flags to mark your best photos from the Picks Collection and send them to the Selects Collection. This is where you get really picky – the aim is to select only the very best photos from the shoot, the ones you intend to process.

Of course, you can adapt this to you own needs. If you don’t take many photos during a shoot, you may only need two Collections to narrow them down. On the other hand, if you want to convert some of your photos to black and white, you could create an additional Collection to hold those images.

Using Lightroom Collections

As you can see, I ended up creating five Collections for the above shoot.

The process is outlined in full here.

Technique 2: Using Smart Collections

Using Lightroom Collections

The previous technique relies on you adding photos to each Collection manually. But it’s also possible to use Smart Collections that Lightroom populates automatically. Photographer Rob Knight has the following system:

  • Create a Collection Set – give it a relevant name (in Rob’s example he uses ‘Landscape’).
  • Create two Smart Collections inside the Collection Set. Rob names his ‘Landscape picks’ and ‘Landscape stars’. All he has done here is add the words ‘picks’ and ‘stars’ to the name of his Collection Set. The article (link below) explains what rules to set.
  • Go to the Folder containing the images, and flag the best as picks. They are sent automatically to the ‘Landscape picks’ Smart Collection.
  • Go to the ‘Landscape Picks’ Smart Collection and give the best images a one star rating. Lightroom adds them to the ‘Landscape stars’ Smart Collection. This Smart Collection contains the best images from the shoot.

You can read about it  here.

Over to you

If you have an interesting way to use Collections yourself, then why not leave a comment? I would love it if readers could share some of their ideas – I’m also curious to see how other people use Collections.

Mastering Lightroom Book One: The Library Module

Using Lightroom Collections

My latest ebook Mastering Lightroom Book One: The Library Module is a complete guide to using Lightroom’s Library module to import, organise and search your photo files. You’ll learn how to tame your growing photo collection using Collections and Collection Sets, and how to save time so you can spend more time in the Develop module processing your photos.

Post originally from: Digital Photography Tips.

Check out our more Photography Tips at Photography Tips for Beginners, Portrait Photography Tips and Wedding Photography Tips.

Use Lightroom Collections to Improve your Workflow

The post Use Lightroom Collections to Improve your Workflow by Andrew Gibson appeared first on Digital Photography School.


Digital Photography School

 
Comments Off on Use Lightroom Collections to Improve your Workflow

Posted in Photography


3 Ways to Improve Your Images With Composition

16 Aug

Along with lighting, subject, perspective, composition is one of the fundamental tools to creating better images. It’s one of the easier ones to begin applying to your own photography as well. Here are a few tips on improving your composition, with examples from a recent fitness photo shoot.

Rule of Thirds

You’ve probably heard this one beat to death, but the rule of thirds is one of the fundamental keys in creating stronger compositions. It involves dividing an image into nine equal grids at the thirds. By placing your subject on the line of a third, or at the intersection of two thirds you’re following your eyes’ natural focus. We find photographs with the subject on one of these thirds simply more pleasing.

Take the below image for example, where this woman is placed on the left third line with the focus of her head near the top left third as well. It creates a more pleasing composition and gives the eye plenty of space to wander in the frame.

RuleofThirds

The rule of thirds isn’t a hard and fast rule and it’s often broken to great success, but that’s a topic you can find in many other posts. It’s a great starting point though to create stronger compositions.

1. Second Point of Interest

Applying the rule of thirds, you can now try adding a second point of interest into your images. Adding a secondary point, whether it’s out of focus in the background or in focus with a deep aperture landscape, gives your image a natural viewing progression. Your eye starts at the first focal subject and then moves along to the second.  Not only does this create more interest in your image, it can help reinforce a theme or perspective.

In this fitness image, the woman tying her shoe and preparing for a run is the clear focus of the image. Introducing a second runner in the background now creates another place for the eye to follow through the image. At the same time the “running” theme has been reinforced. Additional factors in leading the eye are; her gaze into the open space of the image, and the leading lines of the banister and concrete blocks.

MDP_5148-Edit

2. Room for Copy Space

If you ever have aspirations to shoot for advertising agencies and many editorials, learning to leave room for copy space is a must. Copy space is the negative area in an image where a brand will place their tag line, logo or product/information. Generally you want this negative space to not be too busy, so that the copy pops out. The effect can be achieved often by using a shallow focus in your images, or by simple ensuring there is a space without too much “busy-ness” in it. A nice open sky often works great in this regard.

In this shot there’s some clear head space in front of the two runners that works great for copy. An important thing to keep in mind though if you do end up applying these principles for a client, is how the images will be placed in publication. Will they be on a poster or against a store wall? Or across the pages of a magazine? This particular image might not work well across a double page spread, as it places the subjects’ heads right where the crease would be. Against a store wall it would work just fine. These are important placement ideas to keep in mind with copy space.

MDP_5190-Edit

3. Bringing It All Together

When you bring all three of these compositional elements into mind you can create a great image that not only holds interest, but appeals to the creative people who hire photographers (always a big plus). The image below is an example when all three work together. The subject is at one of the third grid lines, there’s a secondary point of interest in the background and room has been left below for copy space. When you keep all three elements in mind you’ll be on your way to creating stronger compositions.

EveryDayRun2

Post originally from: Digital Photography Tips.

Check out our more Photography Tips at Photography Tips for Beginners, Portrait Photography Tips and Wedding Photography Tips.

3 Ways to Improve Your Images With Composition


Digital Photography School

 
Comments Off on 3 Ways to Improve Your Images With Composition

Posted in Photography


6 Accessories to help you Improve your Landscape Photography

15 Jul

At the most basic level, all that you need to take landscape photographs is a camera and a location.  One of the reasons that landscape photography is so popular is that it is so accessible, without the necessity for the newest camera bodies or most expensive lenses.  You can pick up any entry-level DSLR and kit lens and be able to make great landscape images.

However, there are a few extra tools that, if included in your camera bag, will help you improve your landscape photography in terms of both your technique and resulting images.  Below is a selection of accessories that serious landscape photographers do not leave home without and the majority are cheaper than a basic kit lens.

1. Tripod

This has the potential to be the most expensive item on this list, but it is probably the most crucial accessory for every landscape photographer.  They come in all weights and sizes, and therefore costs, however a tripod can be key to ensuring you can capture sharp landscape images.  A lot of landscape photographs are captured at the beginning and end of the day, under low light conditions, meaning that it is not always possible to handhold the camera and still achieve shake-free images.  Also, a tripod is a good way of becoming more methodical in your approach to composing your landscape images, forcing you to slow down and critically assess the view through your viewfinder

2. Graduated ND Filters

Graduated neutral density (ND) filters are crucial for balancing the exposure between bright sky and dark land, overcoming the limited dynamic range of most DSLR sensors.  Generally, half of the filter is darker to reduce the amount of light allowed though across half of the frame.  Without them, if you expose for the sky the land will be in silhouette or if you expose for the land, the sky will be blown out.  You can use exposure bracketing to overcome this, however that will then require more time spent in front of a computer blending the multiple exposures.  Using graduated ND filters allows you to capture both the sky and land, correctly exposed, in one shot.

ND Grad fitlers

Graduated neutral density filters.  A ‘hard’ grad is shown on the left, a ‘soft’ grad is shown on the right.

Check out this recent article on the basics of choosing, buying and using graduated ND filters.

3. Hot shoe spirit level

Probably the cheapest accessory on this list, but a valuable tool none the less.  Just slide the spirit level in to the hot shoe to help ensure your horizons are perfectly level.  Some of the latest cameras now come with in-built level gauges, however they struggle to match the fidelity of an actual spirit level.

Hot-shoe spirit level

A three-axis hot shoe spirit level

4. Remote Shutter Release

A remote shutter release allows you to release the shutter, when your camera is on a tripod, without touching the camera and introducing any movement.  Also, as these remotes allow you to lock the shutter open, they are very useful if you want to make exposures over 30 seconds, using ‘bulb mode’.  In some instances, the remotes also have a digital display telling you how long the shutter has been open or a programmable timer mode so you can define the exposure length before taking the shot.

remote shutter release

Remote shutter release – if you avoid the official accessories from the big brands, you can find these relatively cheap on eBay.

5. Neutral Density Filters

Similar to the graduated filters mentioned above, however in this instance, the entire filter is of uniform density, meaning that light is blocked out across the entire frame.  You can get them 1-stop, 2-stop or 3-stop densities if you want to marginally slow the shutter speed for shooting waterfalls or introducing some movement, or you can get them as dense as 10-stops for seriously long shutter speeds.

10 stop neutral density filter

An example of the use of a 10-stop neutral density filter to achieve a long exposure time of 5 minutes

6. Polarising filters

Polarising filters are often used to increase the saturation of blue skies, however they are more useful in suppressing reflections from non-metallic objects, such as foliage or water.  This helps to increase the saturation of foliage, even on overcast days, and remove glare from the surface of any water in the scene, revealing detail below the waters surface.  An invaluable tool when shooting landscape scenes that include water.

Effect os using a polarising filter

A polarising filter was used to reveal the detail in the stones beneath the surface of the heavily reflective lake

The items above could almost be considered the essentials to go along with your camera and lens.  There are options that cater to all budgets meaning that you can build your self an effective landscape photographers toolbox without breaking the bank, and once you start using them, you will find you can exert much greater creative control over your landscape photography, and improve the images you make.

Post originally from: Digital Photography Tips.

Check out our more Photography Tips at Photography Tips for Beginners, Portrait Photography Tips and Wedding Photography Tips.

6 Accessories to help you Improve your Landscape Photography


Digital Photography School

 
Comments Off on 6 Accessories to help you Improve your Landscape Photography

Posted in Photography


How To Improve an Image with 2 Steps in Photoshop Using Screen Mode

03 Jul

A Guest Post by Sergey Sus/

Before after

Wanted to share a very simple way for improving a photo without having to change the exposure. I use this method quite often and sometimes even after adjusting exposure.

The image is of a small hillside town in North California called Sausalito taken while on vacation.

Here the SOOC (straight out of the camera) image before any adjustments are applied or any cropping. It is just a bit under exposed and very flat looking.

Img sooc

Certainly there are many ways to brighten a photo in Photoshop like using Curves, Levels or Shadow layers. For this tutorial, we will be using a duplicate layer and then change the overlay to Screen mode to brighten up and give it a bit of a punch. I’ve seen many professional photo retouchers use this technique on both landscape and portrait photography as a starting point for retouching. This method works really well on jpgs as well!

1. Open image in Photoshop. Then duplicate layer by pressing Ctrl+J (Win) / Command+J (Mac)

Img dup layer

2. Change blend mode to Screen and and then set Opacity to 50%.

Img screen

Starting out with Opacity set to 50% and adjusting the slider for more or less brightness. For this image the opacity is about right at 50% for my eyes. See how this new layer in Screen mode added a subtle contrast and brightness.

Img ps screen

Give this technique a try even if the image is not under exposed as it will brighten up overall highlights and will slightly increase perceived contrast. Make sure to experiment with different opacity values for different looks. Here is the final image cropped and with a bit more processing – how I remember Sausalito looking that day.

Img final

Let me know in the comments how this has worked for you or if you have questions.

Sergey Sus is a Los Angeles based photographer telling telling real stories, individual, professional and family. Problem solver, artist and teacher. His work can be found on http://www.sergeys.us/.

Post originally from: Digital Photography Tips.

Check out our more Photography Tips at Photography Tips for Beginners, Portrait Photography Tips and Wedding Photography Tips.

How To Improve an Image with 2 Steps in Photoshop Using Screen Mode


Digital Photography School

 
Comments Off on How To Improve an Image with 2 Steps in Photoshop Using Screen Mode

Posted in Photography


The Basics of Using ND Grads to Improve Your Landscapes

02 Jul
For this image, I used a 4-stop hard-edged ND grad to hold back the sky.  I also used a 5-stop ND filter to slow the exposure enough to get the water silky smooth. 6 seconds, f/16, ISO 100. EOS 5D Mark III with EF 16-35mm f/2.8L II.

For this image, I used a 4-stop hard-edged ND grad to hold back the sky. I also used a 5-stop ND filter to slow the exposure enough to get the water silky smooth. 6 seconds, f/16, ISO 100. EOS 5D Mark III with EF 16-35mm f/2.8L II.

As I’ve written before, the hardest part of landscape photography is retaining detail in a bright sky with a darker foreground.  There are several ways to deal with this issue. The newest ways involve various post-processing techniques in Photoshop or Lightroom, or using High Dynamic Range photography to blend several exposures together, retaining both shadow and highlight detail from these exposures.  There is nothing wrong with these techniques, and in fact there are times where these may be the best method for keeping detail in the sky. There are issues with both blending and HDR.  HDR tends to have a very processed look to it when not done well, and blending takes time to do well. I am not one who likes to spend much time in Photoshop with my images.  In addition, you still need to be sure that you somehow capture enough information in the sky that you are not simply darkening down white pixels.

On the left is a 2-stop, hard-edged ND grad.  On the right is a soft-edged 2-stop ND grad.

On the left is a 2-stop, hard-edged ND grad. On the right is a soft-edged 2-stop ND grad.

To ensure you’re capturing enough detail, the use of graduated neutral density filters is needed. Graduated Neutral Density Filters (ND grads, for short), are pieces of glass or photographic resin that are half clear, and gradually gets darker as it moves to the other end.  This darkening begins in the middle of the piece of glass.  First of all, these filters come in two forms.  The first of which is a typical screw-on filter that screws onto the front of the lens. While this style is fine for polarizers or skylight filters, it’s problematic for ND grads, because the horizon can’t be repositioned.  The other way these filters come is in 4×5 or 4×6 inch glass or resin.  These pieces of glass are then placed in holders, and the horizon can be repositioned as needed. The biggest advantage these filters have over the screw-in kind is the fact that they allow you freedom of composition to put the horizon where you want.   The most popular holders and systems for this type of filter are the Cokin systems, which come in various sizes, and the Lee system, which typically accepts a 4″ wide filter.  The Cokin systems tend to be a bit cheaper both in terms of cost of the holder and cost of the filters.  The Lee system is a bit more expensive on both fronts.

Once you’ve decided on which system to use, there is then the choice of which ND grads to choose. There are several companies that manufacture these filters, from  Cokin for their systems, to Lee, to to Formatt Hi Tech, to Schneider Optics, among others.  The prices vary, depending on whether you’re buying photographic resin or glass.  Resin filters tend to be cheaper while glass is most expensive. Resin doesn’t break when dropped but can scratch more easily than glass does. ND grads are available in various densities, including  2 stops, 3 stops, and 4 stops.

The selection doesn’t stop there, however. In addition to choosing which density you need, you also must choose how gradual the density is. Graduated neutral density filters come in both hard-edge and soft-edge graduations.   You would use hard-edge filters when you have a clear horizon and no object in the foreground intersects it.  You would use soft-edged filters when there is an object that intersects the horizon.  Soft-edge filters have a much smoother gradation, which allows it to look more natural when used in a photo.  A hard-edged filter will create a more definitive line between light and dark in the image.

These filters have become some of the most important tools in my bag when creating landscape photos. If you’re just starting out, get an inexpensive set of filters- there is no “one size fits all” to ND grads.   However, if you can only start with one, I’d suggest a soft-edged three stop ND grad. The hard-edged can be limiting at times, and two stops never seems to be enough on its own.  I often stack ND grads to get the effect I’m looking for.

Happy shooting!

Because Haystack Rock stood above the horizon line, and was quite a bit darker than the sky behind it, I had to use a 3-stop, soft-edged ND grad filter here. 1/20, f/16, ISO 100. EOS 5D Mark III with EF 16-35mm f/2.8L II.

Because Haystack Rock stood above the horizon line, and was quite a bit darker than the sky behind it, I had to use a 3-stop, soft-edged ND grad filter here. 1/20, f/16, ISO 100. EOS 5D Mark III with EF 16-35mm f/2.8L II.

Post originally from: Digital Photography Tips.

Check out our more Photography Tips at Photography Tips for Beginners, Portrait Photography Tips and Wedding Photography Tips.

The Basics of Using ND Grads to Improve Your Landscapes


Digital Photography School

 
Comments Off on The Basics of Using ND Grads to Improve Your Landscapes

Posted in Photography


How to Improve the Balance of your Photos by Paying Attention to the Corners

12 Jun

Balance is a very important aspect in photography. If you are aiming to create a balanced photo, then there is one key that is often overlooked.

The corners of an image.

Our eyes have a natural tendency to want to dart off of the sides of a photograph when we look at it and so, when we can, we need to use the edges to fight this natural urge.  Putting elements in the corners will stop the eyes so that they move back into the scene.

When you are framing a photograph look into each corner to see what is there.  It can often help to cut off elements.  A hint of a stair, window, or tree branches will simultaneously make us feel like the full element is there while still grounding the photo and pushing our eyes back into the middle.

If you’ve noticed why some photographs feel balanced and some don’t and can’t tell why, the corners are often the reason.

Here are 5 examples to look at.

Jimmy Webb, Trash and Vaudeville

The corner lines all lead the eyes to the middle, except the lower left corner, which adds another level of interest but still eventually pushes the eyes back into the photo.

Flat, East Village

Notice on the top how you only need a tiny area in the corners to provide balance.  You can see how this effect applies to the elements on the top and left and right sides of the photo as well.

5 Canal Street, Chinatown

The lines all push the eyes into the scene.  Notice how there are two ‘corners’ providing balance on the top right.

Shipping Docks, Cortlandt Alley

Red Wall, Midtown

The ‘corner’ elements don’t have to be at the very edge.  They can be further away from it.  They just have to provide the feeling of balance.


Post originally from: Digital Photography Tips.

Check out our more Photography Tips at Photography Tips for Beginners, Portrait Photography Tips and Wedding Photography Tips.

How to Improve the Balance of your Photos by Paying Attention to the Corners


Digital Photography School

 
Comments Off on How to Improve the Balance of your Photos by Paying Attention to the Corners

Posted in Photography