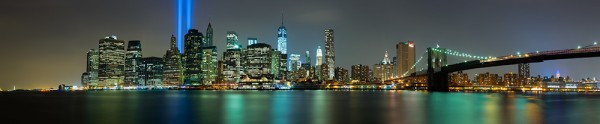
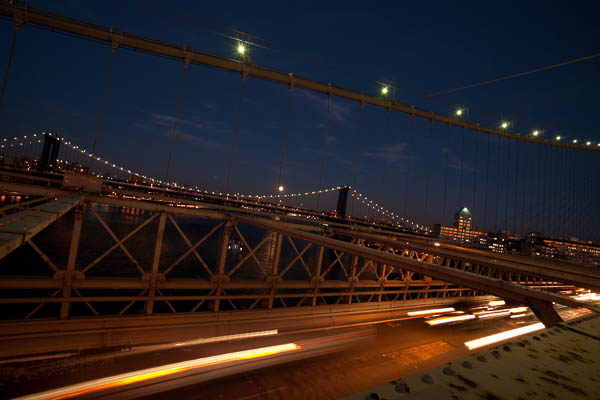
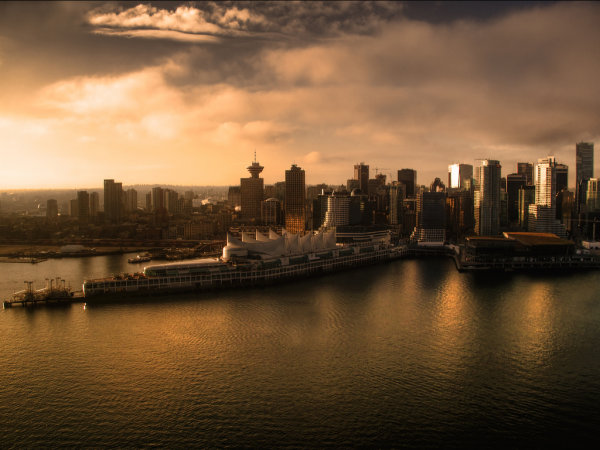
For this image I decided I wanted to cover all of Lower Manhattan from the Statue of Liberty (far left) to the Empire State Building (far right, under the Brooklyn Bride, colored red, white and blue. I was using a Canon EOS 5D Mark III. My EF 24-70 f/2.8L II at 70mm covered the skyline and water with some sky vertically, so I positioned the camera vertically and proceeded to take 9 shots, moving the camera by turning the tripod head on it’s rotating base. I overlapped portions of each frame so Photoshop would have a point of reference when stitching. Each of the nine exposures was taken at ISO 200, 90 seconds, at f/16. If printed at it’s native resolution at 300 dpi, it would measure 18.39 inches by 88.25 inches. My photo lab maxes out at 108″, which it says it can print this image to.
Several months ago I was asked by a potential client if I had any images that were capable of being printed very large- up to 20 feet across! It pained me to explain that, no, based on my camera’s resolution, I did not have any images capable of being printed that large. I had never gotten into doing many stitched panoramas or other prints, and couldn’t afford a Gigapan or other panorama photography tool. For the most part, I’d had no call for it in my daily business. Generally, when shooting landscapes, I think in terms of one frame, and fill it with my composition. This has worked well for the most part, as long as I didn’t want to print much larger than around 48″ inches across. Suddenly, however, I had a desire to go much larger.
This past week in the United States, we commemorated the 12th anniversary of the September 11th terrorist attacks. Every year New York City remembers the victims with a tribute in light- two columns of light representing the fallen towers of the World Trade Center. It seemed a perfect opportunity to start playing with panoramics, especially since one of the images the aforementioned client wanted was a skyline shot of New York City.
The general rule of thumb for printing on standard inkjet printers is to print at 300 dpi. To find out how large you can print an image, simply take the pixel dimensions and divide by 300. From a camera such as the EOS 5D Mark III, that means an image of 5760 x 3840 pixels can be printed at about 12.8 inches by 19.2 inches. It is true, using various resizing techniques you can print larger. I have on many occasions. But to get to the extreme sizes beyond approximately 48″, you’ll need to start combining images by stitching them together.
There are currently a few automated panoramic photo options on the market, including Gigapan’s and Panogear’s. Both can be somewhat pricey. But just because you don’t have these nice accessories does not mean you can’t make stunning panoramic images. A tripod is helpful, but not completely necessary if you can handhold the shutter speed your camera is set to. A tripod is helpful for locking your camera in place from shot to shot. The reason a tripod is helpful is that if your tripod head has markings for panoramics on the base, you can use these for reference when repositioning the camera for each shot. More on that in a bit. Another helpful tool is an L bracket. This will help you position your camera vertically if desired to shoot verticals to stitch the final piece. L brackets can be purchased from several manufacturers and are usually camera-specific. Acratech makes a universal L bracket with a quick release that any camera can attach to using an Arca-Swiss style plate.
You’ll want to start by defining your image in your mind. Where does it start, where does it end? Then, how far up does the image go, and how far down? can you cover the up and down with one vertical? Or would you be better off shooting two rows of images. Or more? Keep in mind when planning that you’ll want to shoot with some extra area around the image to leave room for cropping if needed. You’ll also want to make sure you leave some overlap in each shot so the stitching software can find a point of reference to see where the next shot goes. I used Photoshop for these, but there are other programs out there. Feel free to suggest your favorite in the comments below.
For the first image in this article, I wanted to shoot the Lower Manhattan skyline, from the Statue of Liberty to the Empire State Building. I had a 24-70mm lens, and at 70mm I covered exactly what I wanted, from top to bottom, with a vertical shot. I took 9 shots in that orientation, while rotating the tripod head incrementally until I got my last shot.
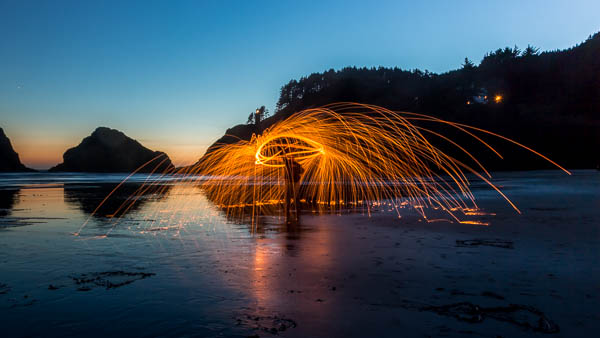
For the second shot in this article, there was a more prominent foreground element, the pilings from the old pier. I decided to do this one in a horizontal orientation, using two rows of three shots. This was again taken using the 24-70mm lens, at 70mm. I shot this one starting at the far right, shooting in columns- upper right, lower right, lower center, upper center, upper left, lower left. I used the playback feature on the camera to check my reference points. Again I stitched it using Photoshop’s Photomerge feature.
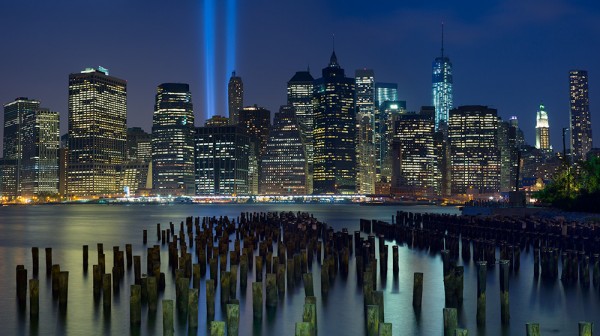
This shot was six horizontal shots stitched together. Because of the overlap, the 3 shots across and 2 up and down will not add up to the full resolution of the individual images simply put together. This image came together at 10,531 pixels by 5904 pixels. At 300 DPI the file can be printed at 19.68 inches by 35.1 inches. My lab, however, tells me they can print this image up to 8 feet wide. They are not using inkjet printers and thus are not subject to the same parameters. The same still holds true however. The larger the file, the larger it can be printed.
I have not yet heard anyone say that any photo stitching program is perfect. There will be errors in stitching. A misplaced post, a skewed building. To correct these, I simply opened the source file and added it to the stitched file on a new layer. Then I created a layer mask to show only the area I wanted shown, which would correct the issue.
For your exposure, you’ll need to be in manual mode. You need the exposure to be uniform across the image. If you leave your camera in any auto mode where the camera helps set the exposure, you run the risk of your exposures varying. For the first image in this article, my exposure was 90 seconds at f/16, ISO 200 for each image. This is important, particularly when photographing the area around the statue of liberty which had huge dark areas. In auto mode, the camera will try to brighten these areas, which will cause problems when the stitching if the skies or water don’t match from shot to shot. In the interest of full disclosure, I made this mistake myself with the second image, the six-shot stitch. I shot in aperture priority and there was a variation of plus or minus 2/3 of a stop from shot to shot. This caused all kinds of headaches in my first attempt at stitching. I was able to correct this by reproccessing the RAW files with an exposure adjustment to match the exposures. In addition, if your camera has a feature for vignette correction, such as Canon’s Peripheral Illumination Correction, turn it on. This will even out the exposure so there are no dark areas in the corners, which can be difficult to correct later on.
I’ve toyed with stitching panoramics before, but never seriously. This is one of my first attempts at a serious pano. It’s well worth exploring more in the future. I might even start saving for a new piece of equipment just for that purpose!
Post originally from: Digital Photography Tips.
Check out our more Photography Tips at Photography Tips for Beginners, Portrait Photography Tips and Wedding Photography Tips.
Stitching Images For Larger Prints

Digital Photography School


You must be logged in to post a comment.