RSS
 

Posts Tagged ‘Images’

Using Sun Flares and Starbursts to Create Stunning Images

02 Dec

This is a guest post by Katie McEnaney

An Introduction to Sun Flares and Starbursts

A sun flare or starburst is an incredibly cool photographic technique and one that is easy to achieve without any special post-processing or editing tricks. You will be amazed at the effects you can create by learning a few simple settings and knowing the proper situations for taking beautiful sun flare and starburst photographs.

McEnaney sunflare vertical tree

How to Shoot Sun Flares and Starbursts

It is possible to obtain sun flare and starburst images with a point and shoot camera, but for more reliable results, you will want to use a DSLR or interchangeable lens camera with adjustable aperture. A UV filter on your lens is suggested to protect your camera’s sensor, as you will be shooting directly into the sun when capturing sun flares. Stability is critical for capturing starbursts, so a sturdy tripod and remote shutter release are recommended.

The technique for shooting successful sun flares and starbursts is to use a narrow aperture such as f/22 and a relatively wide focal length like 18 mm. With a narrow aperture, the blades inside your lens close down to create a very small opening for light to pass through. This narrow opening creates a slight diffraction or bending of the light, which causes a point source of light (described below) to become a starburst shape when it hits and is recorded by the camera’s sensor. Different lenses are built with different numbers of blades: the more blades, the greater the number of points on the flare or starburst. The wider the focal length also contributes to the size of the starburst shape, as a wider focal length can create a larger starburst.

For settings, you want to start by shooting in Aperture priority (Av for Canon or A for Nikon) mode and setting your aperture to f/22. You also want to shoot at a fairly low ISO, around 100-200, to avoid the increased noise of higher ISO values. The camera will then choose the shutter speed. If the final image turns out too dark or too light, you can switch to shooting in Manual mode, dial in the same settings, and then slightly increase the shutter speed for a lighter picture or decrease the shutter speed for a darker picture.

McEnaney Capitol night starbursts

In lower light situations, your shutter speed may become so slow that you need a tripod to ensure a steady shot. (The general rule of thumb is that you should be able to successfully hand-hold a shot at a shutter speed of 1 over the focal length of the lens. For example, you should be able to hand-hold a shot with an 18 mm lens at 1/18th of a second or faster or a 50 mm lens at 1/50th of a second or faster.) If you are photographing starbursts after dark, then your shutter speeds will generally be slow enough to require a tripod or other stable surface. The alternative option would be to start increasing your ISO, which will also increase the noise in the final image.

Along with the tripod, a remote shutter release (corded or wireless) is helpful to avoid shaking the camera when pressing the shutter button. If you do not have a remote, you can set the 2-second or 10-second timer on your camera instead. A remote shutter release also allows you to use the Bulb setting on your camera to get shutter speeds longer than 30 seconds.

Timing and Strategies for Sun Flares and Starbursts

Sunbursts and starbursts are created from small point sources of light, rather than larger dispersed or diffused light sources. A point source is one where light is emanating from a singular location: a bulb in a street lamp, a car headlight, a direct flashlight, even strings of holiday lights. A dispersed light source is one where light is emanating from a broader location: a frosted light bulb, an overhead florescent light panel, or the tubes of a neon sign. A diffused light source is one where the location of the light is very spread out or difficult to detect: the sun in an overcast sky, large studio lights with diffusers or softboxes, or light bounced off a large surface or reflector.

McEnaney sunrise sunflare

The sun is not generally a point source of light, as it is often too bright and overwhelming to create a sun flare. So, the best time to capture sun flares is when the sun is low in the sky, either in the early morning or late afternoon. The winter season is ideal for sun flares, as the sun is lower in the sky for longer periods of the day.

sun flare and starburst photo

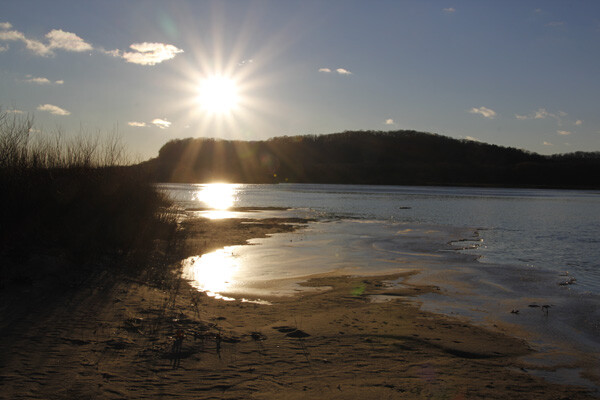
Once you have the right time of day, the second step for creating a sun flare is to position the sun in your composition so that it is partially obscured behind another object, such as a tree or the edge of a building. Even at low angles, the sun can still be so bright that it will overwhelm your scene and create large bright patches rather than a starburst shape. Partially obscuring the sun also serves to amplify the effect of the narrow aperture. Position the camera so that the sun is directly behind the object and determine your final composition. Then, move the camera slightly until the sun is just beginning to peak out from behind the object and take the picture.

McEnaney sunflare two trees

To create starbursts at night, you need to find suitable point sources of light. Street lamps and strings of lights work well. Because these sources are not as overpowering as the sun, you do not need to partially obscure them. This gives you a wider range of compositional choices. You can also combine multiple point sources of light to create an entire collection of starbursts in a single image. Moving lights will be rendered as blurs or light trails, while stationary lights will become starbursts.

McEnaney traffic trails

Composing with Sun Flares and Starbursts

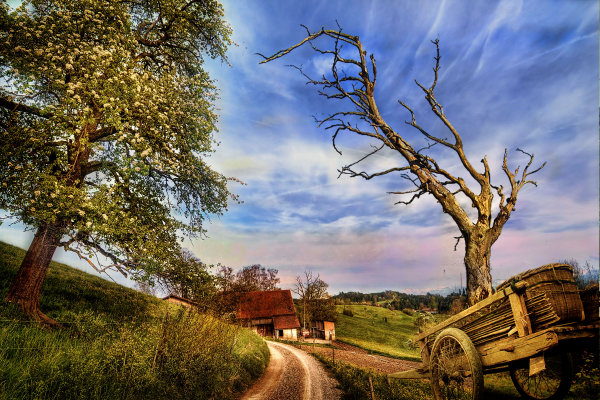
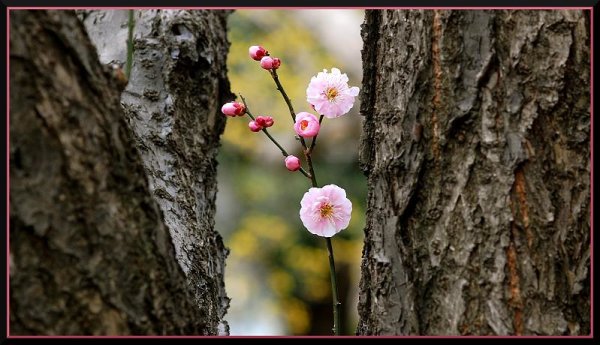
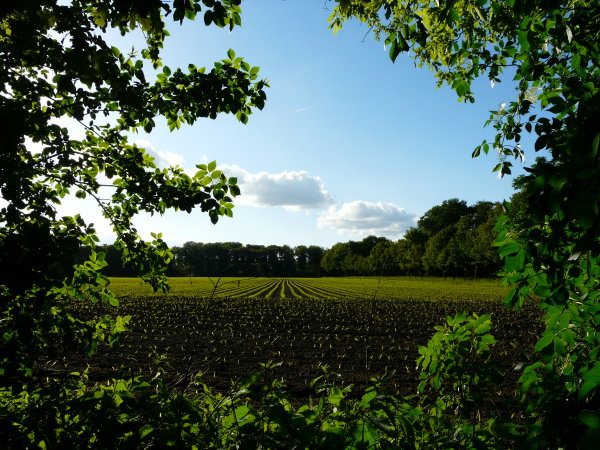
Be willing to be patient and experiment with your compositions and angles for sun flares. Slight differences in the angle of the sun and the amount of sunlight streaming in can make a big difference in your final image. The two images below were taken of the same tree, two minutes apart. The only compositional difference was backing up several feet for the second image, so that the sun was only barely obscured by leaves rather than partially blocked by the trunk.

McEnaney sunflare compare

Once you have mastered the single flare, you can step up the challenge and capture multiple sun flares in a single image. An easy way to do this is to use reflected light. Light reflecting off several points or different surfaces can create multiple individual point sources. Look for situations where sunlight is bouncing off water, vehicles, or other reflective surfaces. In this goodbye photograph of my old car, the multiple flares were created by the sunlight bouncing off the dents and divots of the hail damage on the hood (bonnet) of the car.

McEnaney car sunflares

Starbursts are a great effect to use with holiday lights. Each individual light is a point source and can be rendered as its own starburst. The starburst look adds an extra sparkle to your holiday images, but you can use strings of white or colored lights to add starbursts to any kind of subject you choose.

McEnaney holiday starbursts

For cityscape starbursts, seek out locations with congregations of street lights or other point sources of light. The blue hour (the approximate hour before sunrise or after sunset) is an ideal time to photograph lights outside, as the deep blue colors in the sky set off the scene. Your camera will record these blue colors for a short time even after they are no longer visible to your eyes.

McEnaney starbursts water

Now that you know the basic idea behind sun flares and starbursts, you will start seeing opportunities everywhere. Get your f/22 aperture ready, and get out there!


Katie McEnaney is an educator and photographer from Madison, Wisconsin. Read more tips on her blog, Boost Your Photography, and connect with her on Google+, Twitter @archaeofrog, and Flickr. Her first eBook, Boost Your Photography: Learn Your DSLR, will be available soon on Amazon.

Post originally from: Digital Photography Tips.

Check out our more Photography Tips at Photography Tips for Beginners, Portrait Photography Tips and Wedding Photography Tips.

Using Sun Flares and Starbursts to Create Stunning Images

The post Using Sun Flares and Starbursts to Create Stunning Images by Guest Contributor appeared first on Digital Photography School.


Digital Photography School

 
Comments Off on Using Sun Flares and Starbursts to Create Stunning Images

Posted in Photography


25 Images Using Framing in Composition – Weekly Inspiration

30 Nov


By lagusa

Framing in composition

This week I want to showcase some images that use framing in composition to create a successful image. It is one of the most difficult elements to master, but one of the most important in terms of create depth in your images. In a nutshell this is what frame is all about:

  • adding a foreground object into your scene that frames, or helps highlight your subject
  • sometimes involve stepping back from your original composition and looking for elements to use as a frame
  • usually using a shallow depth of field to put the foreground, framing element out of focus
  • the frame is there to set the scene, and draw the viewer into the image

Enjoy!

By Eva Ekeblad

By Mayr

By B Gilmour

By Paul

By Brian Smithson

By Judy van der Velden

By Les Bessant

By myheimu

By Katerina Zaitsava

By Moreno Berti

By gwynydd michael

By Danushka Senadheera

By Tarik Browne

By Sid Das

By Sue Hasker

By Freaktography Urban Exploration and Photography

By Edward Simpson

By Chris Beckett

By Hersson Piratoba

By Tom Parnell

By Roberto Saltori

By Kevin Labianco


By Jan Maklak

By Nina Matthews


Post originally from: Digital Photography Tips.

Check out our more Photography Tips at Photography Tips for Beginners, Portrait Photography Tips and Wedding Photography Tips.

25 Images Using Framing in Composition – Weekly Inspiration

The post 25 Images Using Framing in Composition – Weekly Inspiration by Darlene Hildebrandt appeared first on Digital Photography School.


Digital Photography School

 
Comments Off on 25 Images Using Framing in Composition – Weekly Inspiration

Posted in Photography


Comparing Images with Lightroom 5’s Survey View

26 Nov

Using Survey View

Andrew S. Gibson is the author of Mastering Lightroom Book One: The Library Module, on offer now at SnapnDeals for a limited time.

‘Working the subject’ is an expression often used in photography to describe the process of taking a series of photos of the same subject. The idea is to work your way closer to the ‘perfect’ photo (if there is such a thing) by varying the camera angle, focal length, point-of-view and other factors. As part of the editing process it’s the photographer’s job to select the best images to process. In the old days this meant poring over a lightbox or contact sheet with a loupe. Some people still do it this way, but most of us work with digital images. One of the benefits of this is that software like Lightroom makes it very easy to view images side-by-side and organize the keepers into a “Collection” for processing.

When I use Lightroom’s Library Module to cull my photos, I start off in Grid View and then use either Compare View or Survey View to compare similar images. The previous article in this series showed you how to use Compare View, and today I’m going to take a look at Survey View.

Compare or Survey View – which one to use?

What’s the difference between the two? The main difference is that you can only compare two images at one time in Compare View, but as many as you want in Survey View. Here’s an example:

Using Survey View

To arrive at this view I selected five images in Grid View and used the ‘N’ keyboard shortcut to go to Survey View. Lightroom arranges the images in the way that fits the screen space best so you can look at them all together. A little common sense is required here – Lightroom will try and squeeze as many photos as you select into the one screen, but the thumbnails will soon become too small to be of any practical use. The practical limit is probably somewhere between eight and 20 images, depending on your monitor size.

Using Survey View

The ‘most selected’ image is displayed with a white border, and if you have assigned a flag, star rating or colour label it is displayed underneath. These also appear in the Toolbar at the bottom of the screen (press ‘T’ to reveal the Toolbar if you don’t see it):

If you hover over one of the images you can assign a flag, star rating or colour label by clicking one of the icons displayed underneath (you can also do this in the Toolbar). You’ll also see a white X in a black square in the bottom right-hand corner of the image. Click this to remove the image from the selection. Lightroom removes it from the screen when you do so, and the remaining images rearrange themselves. If you click the X by mistake, press Ctrl-Z (PC) or Cmd-Z (Mac) to bring the de-selected photo back.

Using Survey View

What do you do once you’ve decided which images are keepers? I find the simplest approach is to flag each image that I want to process, and send them to a new Collection (see my article Use Lightroom Collections to Improve Your Workflow for more information on this).

Another useful feature of Survey View is that you can press the Space bar whenever you like to view the most selected image in Loupe View – useful if you want to see it in a larger size or zoom in to check for fine detail such as accurate focusing. Simple press the Esc key or use the ‘N’ key shortcut to return to Survey View.

Mastering Lightroom

Using Survey View

My latest ebook Mastering Lightroom Book One: The Library Module is a complete guide to using Lightroom’s Library module to import, organize and search your photo files. You’ll learn how to tame your growing photo collection using Collections and Collection Sets, and how to save time so you can spend more time in the Develop module processing your photos. It’s available now over at Snapndeals, for a special price for a limited period.

Post originally from: Digital Photography Tips.

Check out our more Photography Tips at Photography Tips for Beginners, Portrait Photography Tips and Wedding Photography Tips.

Comparing Images with Lightroom 5’s Survey View

The post Comparing Images with Lightroom 5’s Survey View by Andrew Gibson appeared first on Digital Photography School.


Digital Photography School

 
Comments Off on Comparing Images with Lightroom 5’s Survey View

Posted in Photography


Nostalgic images combine miniatures and real-life backdrops

26 Nov

8.jpg

Michael Paul Smith’s photos look like snapshots of classic cars. In reality, they’re clever creations that use forced perspective to combine miniatures and real-world backdrops in an utterly convincing final product. His miniatures live in a fictional U.S. town called Elgin Park, a place populated with vintage cars and the trappings of everyday life in the 1950’s and 1960’s. See gallery

News: Digital Photography Review (dpreview.com)

 
Comments Off on Nostalgic images combine miniatures and real-life backdrops

Posted in Uncategorized


How to Find Your Best Images With Lightroom 5’s Compare View

15 Nov

Using Lightroom 5's Compare View

For decades photographers have faced the question of how to determine which of their images are the best. I’ve been through it all, from squinting at 35mm slides through a loupe on a lightbox, to creating contact sheets from negatives and marking the best with a red marker, to scanning negatives and slides through to the modern version of looking at Raw files on the camera’s LCD screen or in the various programs I have used over the last few years. Of those, there’s no doubt that Lightroom is one of the best for the task of comparing images and selecting the best ones.

Compare View

The tool I use for comparing images in Lightroom is the aptly named Compare View (I also use Survey View, to be covered in a future article).

To get the most out of Compare View, you should use Collections to organise your images, and Grid View to view thumbnails. Click the links to learn more about both.

Using Lightroom 5's Compare View

Grid View is the starting point for using Compare View. Select the images that you want to compare. It may be just two, or you may want to compare more. In this example (above) I selected five images.

Using Lightroom 5's Compare View

The first image that you select is, in Lightroom terminology, the most selected image. It is surrounded by a lighter frame than the other selected photos. In the screenshot above the photo on the left is the most selected.

Using Lightroom 5's Compare View

Images selected, press ‘C’ on your keyboard to go to Compare View. The most selected image is displayed on the left. Lightroom calls this photo the Select. The next image in the selection is displayed on the right. This one is called the Candidate.

The idea is to compare the Select with the rest of the images in the selection. Test it out by using the left- and right-arrow keys on your keyboard. If your selection contains more than two images, Lightroom cycles through the remainder of the selection, displaying each image as a Candidate.

Compare View icons

The icons along the bottom of the window in Compare View help you tell Lightroom what to do with either the Select or Candidate images. The first set is located underneath each photo:

Using Lightroom 5's Compare View

1. Click on these icons to flag the photo as a Pick (left) or a Reject (right).

2. Click on these dots to give the photo a Star rating.

3. Click on the faint grey square to apply a Colour label.

4. Click on the X to deselect the photo. Lightroom removes it from Compare View when you do this.

The icons change to indicate the updated status of the image.

If the photo changes when you click any of these options, it is because you have the Auto Advance option ticked. Turn Auto Advance off by going to Photo > Auto Advance. I find it easiest to use Compare View with Auto Advance disabled.

The Toolbar icons

The rest of the icons are displayed in the Toolbar at the bottom of the Compare View window (press ‘T’ on your keyboard to reveal the Toolbar if you don’t see it).

Using Lightroom 5's Compare View

This indicates that you are in Compare View. From left to right, these icons show Grid View (G), Loupe View (E), Compare View (C) and Survey View (N). You can switch between these modes by clicking on the icon or using the keyboard shortcuts (indicated in brackets).

Using Lightroom 5's Compare View

With the padlock icon in the locked position (above) you can zoom into both the Select and Candidate image simultaneously by clicking once on either one. The magnification is set by the Zoom slider and both images move in tandem with the hand tool. This is useful for comparing two near identical images for fine detail such as accurate focusing or noise.

Using Lightroom 5's Compare View

With the padlock icon in the unlocked position you can zoom into either image without affecting the other. Press the Sync button at any time to bring the second image into sync with the first.

Using Lightroom 5's Compare View

These icons are perhaps the most important in Compare View, as they help you navigate around the images in the selection.

The two arrows on the right are straightforward. Click on them to navigate through the selection, just like you did with the arrow keys earlier.

The Swap button (X|Y with two arrows) tells Lightroom to swap the Candidate and Select images. Use it when you decide that the Candidate is the strongest image in the selection, and you want to compare it to the others.

The Make Select button (X|Y with one arrow) tells Lightroom to turn the Candidate image into the Select. The Select is removed from the display, and the next image in the selection becomes the new Candidate.

Using Lightroom 5's Compare View

If you press the Done button Lightroom takes you to the Loupe View and displays the Select image. Alternatively, you can use the ‘G’ shortcut to return to Grid View.

Click the White arrow icon to add or remove icons from the Toolbar.

Putting it together

The main purpose of Compare view is to let you compare similar image so that you can decide which ones you want to process in the Develop module (you can also use it to compare photos that you have processed, or partly processed in the Develop module – but that’s another topic). Use the arrow keys to cycle through the images in your selection, and the Swap and Make Select buttons to compare different images. If this is new to you, it won’t take much practice before you settle into a rhythm. You’ll be pleasantly surprised at how quickly you can work you way through even hundreds of images using Compare View.

While some photographers use Star ratings and Colour labels to help organise their images, by far the simplest method is to use Flags. If you decide to process an image, click the grey flag icon underneath the photo (it’s on the left) to flag it as a Pick. If decide not to process it, leave it unpicked. Then, when you have finished, all you have to do is return to Grid View and choose the Flagged option in the Filter bar to remove the unwanted images from view. Then go to Edit > Select all to select all the flagged images and send them to a new Collection containing only the images that you want to process in the Develop module (using Collections to organise your images is covered in this article).

Mastering Lightroom Book One: The Library Module

Using Lightroom 5's Compare View

My latest ebook Mastering Lightroom Book One: The Library Module is a complete guide to using Lightroom’s Library module to import, organise and search your photo files. You’ll learn how to tame your growing photo collection using Collections and Collection Sets, and how to save time so you can spend more time in the Develop module processing your photos.

Post originally from: Digital Photography Tips.

Check out our more Photography Tips at Photography Tips for Beginners, Portrait Photography Tips and Wedding Photography Tips.

How to Find Your Best Images With Lightroom 5’s Compare View

The post How to Find Your Best Images With Lightroom 5’s Compare View by Andrew Gibson appeared first on Digital Photography School.


Digital Photography School

 
Comments Off on How to Find Your Best Images With Lightroom 5’s Compare View

Posted in Photography


57 Fabulous Bird Images

13 Nov

By John&Fish

Birds provide a wonderful opportunity for photographers to practice their skills. So today we thought we’d put together a bit of an image collection that feature them in the hope of inspiring some of you to get out and photograph some of our feathered friends (if you do take some great bird photos please share them in comments below). Click each image to find out more about the author and see it at full resolution.

By John&Fish

Looking for a little instruction in bird photography? Check out these tutorials in our archives:

  • 8 Tips for Photographing Birds
  • Backyard Bird Photography Tips
  • An Introduction to Bird Photography
  • How to Photograph Birds
  • Bird Photography Near Feeders
  • Introduction to Bird Photography

By Vinoth Chandar

By John&Fish

By John&Fish

By Keith Williams

By Pörrö

By Isidro Vila Verde

By Valerie

By John&Fish

By John&Fish

By John&Fish

By David

By Jes

By Art G.

By StormPetrel1

By Steve Wilson – over 2 million views Thanks !!

By Victor Alvarez

By Tambako The Jaguar

By Hamed Saber

By Matthew Paulson

By Ian Kirk

By David Cook

By Pedro Szekely

By John&Fish

By Anne Fröhlich

By Danny Perez Photography

By Dario Sanches

By Gonzalo G. Useta

By Steve Wilson – over 2 million views Thanks !!

By Andy Morffew

By John&Fish

By John&Fish

By dogwatcher

By John&Fish

By Takashi Hososhima

By Christopher Michel

By Tambako The Jaguar

By Dawn Vornholt

By Dario Sanches

By Dario Sanches

By John&Fish

By John&Fish

By Jayanth Sharma

By Englishpointers (Hate Sleep Apneoa)

By Eduardo Amorim

By Cloudtail

By Zanthia


By Tarique Sani


By John&Fish

By Isidro Vila Verde

By John&Fish

By Ibrahim Iujaz

By Lip Kee

By Krystian Olszanski

By Valerie

By Stuart Williams

Inspired? Check out these tutorials on photographing birds:

  • 8 Tips for Photographing Birds
  • Backyard Bird Photography Tips
  • An Introduction to Bird Photography
  • How to Photograph Birds
  • Bird Photography Near Feeders
  • Introduction to Bird Photography

Post originally from: Digital Photography Tips.

Check out our more Photography Tips at Photography Tips for Beginners, Portrait Photography Tips and Wedding Photography Tips.

57 Fabulous Bird Images

The post 57 Fabulous Bird Images by Darren Rowse appeared first on Digital Photography School.


Digital Photography School

 
Comments Off on 57 Fabulous Bird Images

Posted in Photography


Sample Gallery: LG G2 smartphone images

08 Nov

product1.jpg

We could hardly wait to get our hands on LG’s newest G2 smartphone to try shooting with its 13MP Optical Image Stabilization camera and huge 5.2-inch IPS LCD display. There’s plenty of exciting specs, but how does it translate to photographs? See our first sample gallery of images on connect.dpreview.com.

News: Digital Photography Review (dpreview.com)

 
Comments Off on Sample Gallery: LG G2 smartphone images

Posted in Uncategorized


Stunning images of things invisible to the naked eye

01 Nov

Entry_25002_Egmond_Chaetoceros_debilis.jpg

A close up of a corkscrew-shaped plankton, a look into a weaver spider’s abdomen, and a microscopic view of a mouse’s spine are among the winners of this year’s Nikon Small World Photomicrography Competition. Dutch photographer Wim van Egmond took top prize for his Chaetoceros debilis (marine diatom) image. See gallery

News: Digital Photography Review (dpreview.com)

 
Comments Off on Stunning images of things invisible to the naked eye

Posted in Uncategorized


Niki Feijen’s haunting images of abandoned houses

26 Oct

article-2316987-198AAE66000005DC-624_964x634.jpg

Dutch photographer and urban exploration specialist Niki Feijen goes behind “do not enter” signs on dilapidated houses to document furniture, clothes, and other ornaments left behind by their former owners. His eerie HDR images reveal remnants of life in rooms across western Europe that are now left to decay. Frozen in time, it’s hard not to imagine the people that once occupied the spaces. See gallery

News: Digital Photography Review (dpreview.com)

 
Comments Off on Niki Feijen’s haunting images of abandoned houses

Posted in Uncategorized


Anticipating Great Images

24 Oct

A contribution by Dan Bailey – author of the eBook Zen Photographer (currently 13% off at SnapnDeals here).

What if you could predict the future? Wouldn’t that make you a much better photographer?

Think about it: Photography is largely about capturing the moment. Not just any moment, though. We’re talking that singular instant when light, expression, movement and environment all converge in one significant fraction of a second. That’s when the dirt’s flying, the action’s peaking and that ray of golden sunlight is turning your subject into a hero. If you knew exactly when that moment of truth was going to happen, you’d be a true camera master.

S308665

Of course, most of us don’t have psychic abilities, but we do possess a minor form of clairvoyance that allows us to see into the future. It’s called anticipation.

In photography, looking into the future involves imagining with high probability how the scene will play out in a time that’s later than “right now.” It’s seeing a convergence of light, moment and subject in your mind that might happen, and then working backwards to make it happen.

Most great images some form of of anticipation, whether it’s noticing how the light will hit your subject in a few minutes, paying attention to how your subject and background will look when lined up as a two-dimensional image, or recognizing when and where the height of action of expression might occur.

AK BIK DNL 00340

You may not be able to predict exactly how the future will play out, but by gauging the scene and all of the elements in your immediate surroundings, you can get a pretty good idea of what’s likely to happen, and in the world of image making, that’s as good as gold.

Once you have that information, you can then put yourself in the optimum location, direct your subjects as needed, and set your gear accordingly in order to nail the shot that you now have in your mind. This is active image making, and it’s almost always more effective than trying to grab a shot that’s already started to unfold.

Let’s say you’re shooting a trail runner. With one eye, you watch the runner follow a certain path through the landscape. With the other, you’re, you’re looking for something that might make for a compelling background, all the while, checking the position of the sun.

TRN AK 2372

When you see a potential convergence, you move to the ideal vantage point that will let you capture the scene in the most powerful way, figure out the technical details, such as lens choice, exposure mode, EV compensation, and then wait for the right moment. When the runner reaches the right spot, you press the shutter and nail the shot.

You didn’t just stand there and snap away, hoping for something good, though. That would be passive. You got the shot because you used your imagination and anticipated a potentially great image before it actually came together. You took an active part in the image making process. You looked. You imagined. You reacted, and maybe even sprinted with your backpack full of camera gear over rough terrain so that you could get to the right vantage point. Active image making.

I call this thinking and acting geometrically, and it’s a process that’s hard wired into our brains. We use these skills whenever we get behind the wheel of a car, or when navigating a stressful situation. In traffic, they keep you alive. In photography, they keep you tuned into all the elements of your scene.

So the next time you’re out shooting, look into the future. Imagine a great image, anticipate how your scene might play out, and then work geometrically and bring the shot to life.

For more creative insight like this, be sure and check out my brand new ebook, ZEN PHOTOGRAPHER: Turning Your Passion into Focus (13% off for the next few days at SnapnDeals).

Dan Bailey is a full time professional outdoor, adventure and travel photographer based in Alaska. When he’s not off exploring in the mountains, writing about photography, or flying his little yellow bush plane, he can sometimes be found lurking in the forums right here at DPS. Check out his blog and find him on Facebook and Google+.

Post originally from: Digital Photography Tips.

Check out our more Photography Tips at Photography Tips for Beginners, Portrait Photography Tips and Wedding Photography Tips.

Anticipating Great Images

The post Anticipating Great Images by Guest Contributor appeared first on Digital Photography School.


Digital Photography School

 
Comments Off on Anticipating Great Images

Posted in Photography