RSS
 

Posts Tagged ‘Images’

3 Easy Steps Using Photoshop to Making your Images POP

06 Jun

Image Post Processing Techniques

Having taught in-depth image post-processing workshops for Photoshop users, I’ve found that three of the simplest techniques are the ones that people love the most. These are quick and easy tricks that work for most image processing situations.

If you’ve got your exposure, aperture, focus and white balance all correct during shooting, you’ve got all that you need for a great image, but with these three easy steps using Photoshop we’ll add some serious POP to the colour, contrast and sharpness of your images.

I’m going to assume that you’ve already corrected your image in Adobe Camera Raw to fix any blown out highlights and shadow detail. This can sometimes leave you with a low contrast image that lacks lustre. HDR users will often find that a full HDR image lacks some punch once it has all the dynamic range fixed for highlights and shadows. Here’s how to add some pizazz to images.

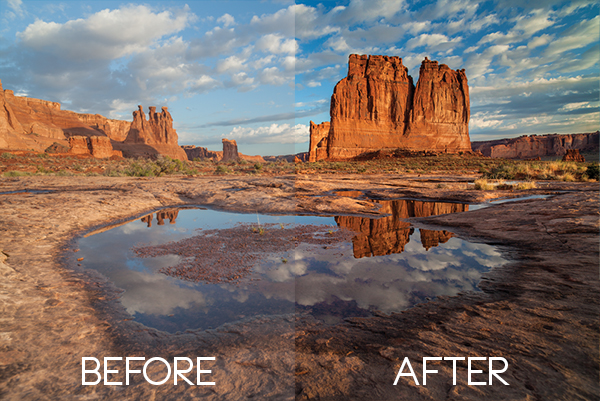
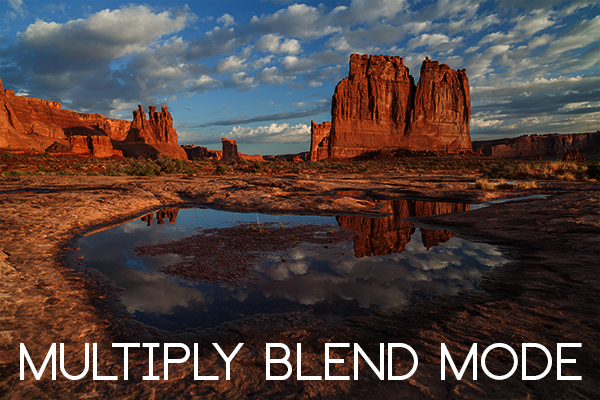
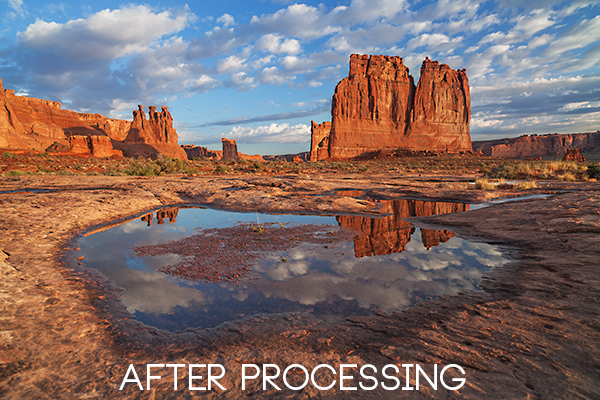
I’ll start with a RAW file from last year’s trip to Moab, Utah.

Unprocessed RAW file

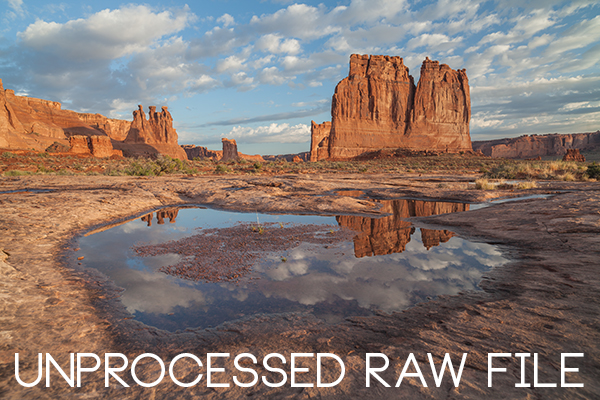
I was more than happy to get this shot of Courthouse Towers in Moab, Utah but the RAW file was total Blandsville.

Step 1 – Make Those Colours POP

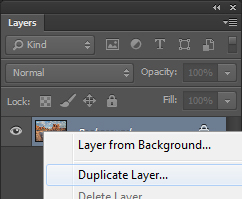
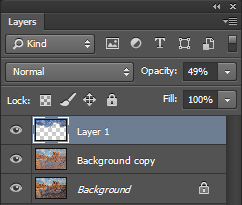
Open the image in Adobe Photoshop. With the image on the background layer of Photoshop, right click on the layer (in the layer window) and choose ‘Duplicate Layer’ (see screenshot below left).

Duplicate Layer Multiply Layer

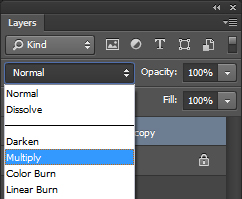
Now click on the newly duplicated layer and change the blend mode to ‘Multiply’ (see screenshot above right).

Multiply Blend Mode

Right away you’ll notice that all of the colours are more striking and the contrast is extreme. It’s also way too dark so we’ll fix that next.

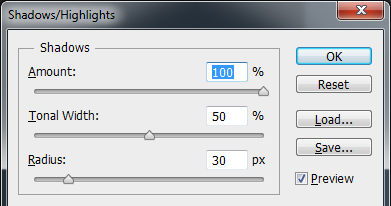
Next go to Image > Adjustments > Shadows/Highlights and drag the shadows slider all the way to right then hit OK (see screenshot below left).

Photoshop Shadows / Highlights Photoshop Layer Opacity

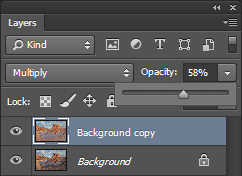
By doing this, you’ll reduce the darker parts of the image ONLY in the duplicated layer. It’s still a little too dark, so in the layers window reduce the opacity of the duplicated layer until it’s at about 58% (see screenshot above right). This percentage will be different for all of your images so use your judgement and don’t overdo it. Usually I find that a setting of 28% works best in most cases.

Step 2 – Selectively Boost Colours and Brighten

I think that some of the colors need a little encouragement. For this example you want to boost the blue sky so combine the two layers that you’ve been working on so that you can make changes to that. You can do this ‘none destructively’ by pressing ctrl+alt+shift+e which will now combine the two layers you have selected, and create a new layer from those. The original layers are still intact underneath this new one.

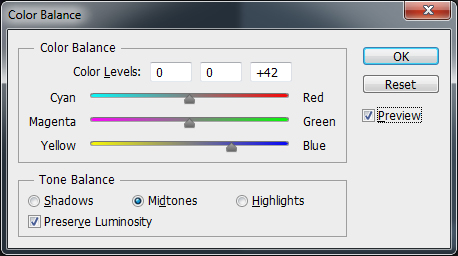
Next, go to Image > Adjustments > Color Balance > and bring up the RGB sliders. As I mentioned earlier, you’re going to be boosting the blues in my sky so click on ‘mid-tones’ and then pull the blue slider up to about +42.

Photoshop Color Balance

Boosted Blue Midtones

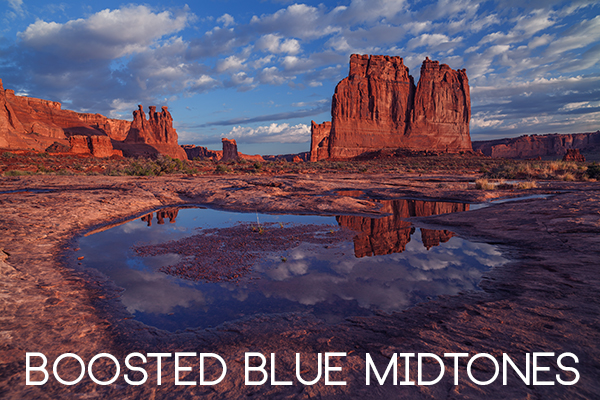
Ooooh, now that sky is looking vibrant but I’m not too sure about boosting the blues in the land area. Let’s fix that by erasing the land in this blue layer so that the layer underneath is revealed, where the blue mid-tones have not been boosted. You can also do this with ‘layer masks’ but this method is much easier to understand.

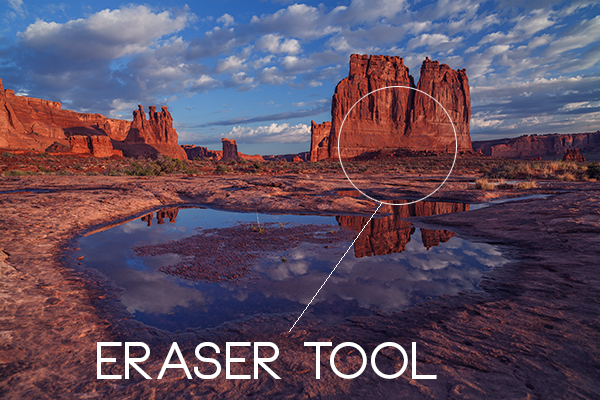
Do this with the eraser tool and select a brush size that fits inside the land area of the image. In the layer with the boosted blue mid-tones, erase a large area of land at first and then choose a smaller brush size for tighter control. To do this, simply click inside the layer you want to erase. The settings below show a brush size of 1053 pixels and a hardness of 0% which gives a soft, feathered edge.

Photoshop Easer Tool

Erase Bruash Tool

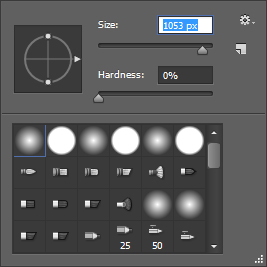
Click in the area you’d like to erase to reveal the layer beneath. In this case the layer beneath won’t have the boosted blue mid-tones that you want only in the sky.

Now you’ve managed to selectively boost the blue colour in the sky without ruining other parts of the image that didn’t need that blue boost. Here is an image of how the ‘sky’ layer looks after the land has been erased out, and below you can see how it looks in the layers panel.

Erased Land

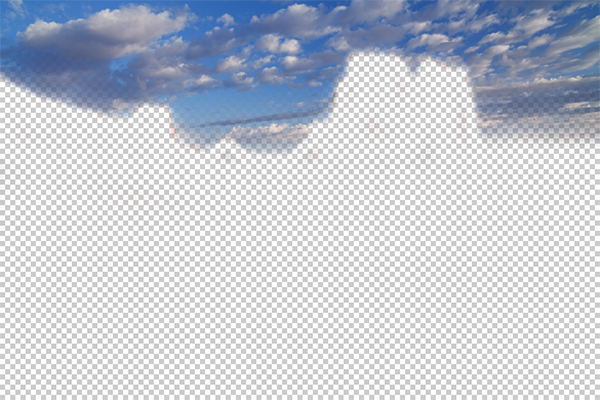
This is what’s left of the ‘boosted blues’ layer. The layers under it are temporarily switched off so that you can see the isolated sky.

Photoshop Layers Palette

Layers panel showing the partially erased boosted blue sky layer

Notice that the opacity of the sky layer has been reduced to 49% so the effect is more subtle when laid over the top of the lower two layers. Again, you’ll need to use your own judgement for your own images as they won’t all be the same. Maybe you have red clouds and would like to boost the red highlights? You can do this procedure multiple times with multiple layers to tweak the colours selectively. There are more accurate ways to do this but if you’re new to Photoshop, this is the easiest method to understand and has hardly any learning curve.

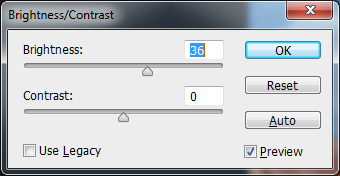
Lastly, all this tweaking has made the image a little too dark so a boost the overall brightness by 36 has been done.

Photoshop Brightness

Step 3 – Let’s Resize and Get Sharp

Sharpening is often something that I leave to the end of my image processing, depending on the medium I’m using to display the image. I’ll use different sharpening settings for a high resolution print than I will for the web, so it’s always a good idea to save an ‘unsharpened’ version of your processed image for safe keeping.

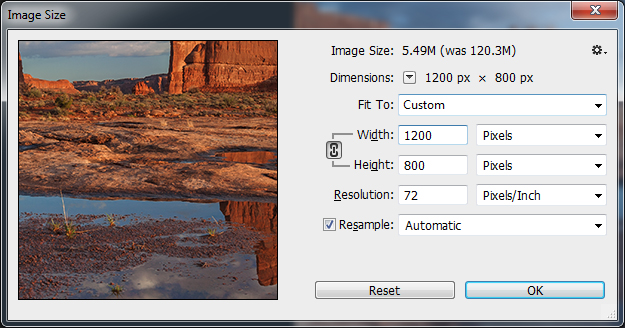
Assuming that you wish to display your images online, here are some fairly universal sharpening settings that I use for sharing my images online. Before we sharpen, let’s flatten and resize our image for the web. You can decide how large your image should display on screens but for the purposes of this tutorial let’s go with 1200 pixels wide.

Go to Layer > Flatten Image so that you’re now just dealing with one complete layer that has all of the changes. Next go to Image > Image Size and tell Photoshop that you’d like your image to have a resolution of 72 dpi which is standard for web images. Next, specify the width by entering 1200 pixels in the ‘width’ window. The height should auto adjust if you have ‘constrain proportions’ checked by default (the little chain icon).

Photoshop Image Resize

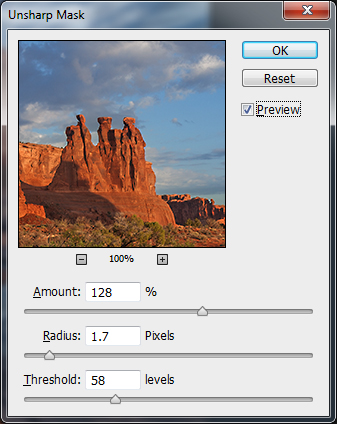
Next open the Filter > Sharpen> Unsharp Mask tool.

Use some fairly safe sharpen settings for web so that you don’t over it. It’s worth noting that ‘sharpening’ deserves an article as a separate topic but for now these basic settings should get you going. Try: Amount > 128%, Radius > 1.7 pixels and Threshold > 58 Levels.

Photoshop Unsharp Mask

The Final Result

POP! There you go, three easy steps an you’ve now got an image with plenty of punch. There are many different ways to achieve the same results, but for this tutorial, I wanted to give you an easy to understand process to introduce you to some of Photoshops most powerful tools. Try these three simple techniques for your image post-processing and let me know it works out for you.

After Processing

IMPORTANT NOTE: Backup your files before editing or saving your edits.

The post 3 Easy Steps Using Photoshop to Making your Images POP by Gavin Hardcastle appeared first on Digital Photography School.


Digital Photography School

 
Comments Off on 3 Easy Steps Using Photoshop to Making your Images POP

Posted in Photography


Step By Step How to Make Panoramic HDR Images

03 Jun
Panoramic HDR image of Coal Harbour - Vancouver BC

Panoramic HDR image of Coal Harbour – Vancouver, Canada

I am convinced that digital photography has changed so many aspects of photography forever.  HDR and photo stitching are just two of those aspects. In the film era you could achieve a lot in the darkroom with blending, dodging and burning, but not to the extent that HDR allows us to achieve now. Photostitching has also allowed us to produce images that were not possible a few years ago. In the days of film, panoramic images were possible, but required a camera made for that purpose, nowadays we can shoot panoramic shots with any digital camera, they can even be shot using an iPhone. So the merging (excuse the pun) of the HDR and Photostitching was inevitable.

This process is a little time consuming and needs to be planned beforehand, but the results can be really spectacular and make your images very dramatic. This article will give you a starting point into exploring the world of bringing HDR and Photostitching together.

What is a panoramic HDR image?

A panoramic HDR is quite simply a series of HDR images that have been stitched together using photo stitching software. It is an image comprised of any number of images, sometimes up to 60, depending on how you plan your shots. Sounds complicated right? It’s really not. If you follow a simple plan, it’s actually pretty easy. It is all in having the correct workflow, so here it is.

The panoramic HDR workflow outlined

The quick process we will be running through is as follows:

  1. Plan and shoot your HDR and panoramic images
  2. Edit your HDR images
  3. Stitch your HDR images together
  4. Edit the final image in Lightroom or Photoshop

That’s it, simple and we will do it in small steps, so it is easy to follow.

Step 1 – plan and shoot your HDR and panoramic images

HDR Images

I have written Getting Real with HDR – a Step by Step Tutorial for Realistic Looking HDR. Take a look at that if you need a refresher on how to get your HDR images into good shape. Normally, when you shoot an HDR image, you will be using between three and seven images of the same scene to create the HDR. In panoramic HDR shots, you will repeat that HDR shot across the scene for five to seven shots that will capture the panoramic. The key point to remember when shooting a panoramic image is your subject matter. Choose a scene that works in the panoramic format; i.e. a seascape, mountain range, forest or a cityscape from a distance. If you are too far away from your subject, the stitched photo may lack impact, so choose your scene with that in mind.

Panoramic Images

Of course, it’s up to you how many images you want to shoot for your HDR shots. In the example shot at the top of the article, I used three shots per HDR set and used a total of seven images to capture the scene panoramically. Keep in mind that you may want anywhere between three to seven shots per HDR image and use as many images as you need to capture the scene.

Here is a visual breakdown on how this shot worked. I have broken the shots I took into sets. Each set consists of three HDR images. So, Set #1 consists of three HDR images, Set #2 consists of three HDR images. Set 1 and Set 2 overlap by 30%. Set 2 and Set 3 overlap by 30% as well, and so on.

HDR sets and flow for the image of coal harbour. Note the overlaps

HDR sets and flow for the image of coal harbour. Note the overlaps

What you will notice is that you must take your HDR images and complete the set before moving your camera for the next set. This ensures that you will get the best possible HDR shots, and that they will blend properly. Once you have your HDR shots done on Set #1, move your camera over to frame and shoot Set #2. With panoramic photography, you must overlap your images by at least 30%. It’s not necessary to overlap much more than this, but less than 30% could cause the software to struggle to find linking points in the images. If you have a scene that has lots of detail in it, 30% will be good, if you have a scene that is not very detailed (let’s say a beach scene with sand, water and sky) you may need to overlap more to make sure that the photos can stitch. Continue this process until you have captured your scene in the sets you have decided on.

Some quick tips to remember when you shoot Panoramic HDR images

1. Choose a preset white balance setting that works well for the scene, avoid using auto white balance. If you use auto white balance (AWB), your overall colours in the scene may change as you shoot your panoramic and this could cause some unusual colour  shifts in your image
2. Keep your aperture between f/8 and f/11. Once you have chosen your aperture, don’t change it throughout the sets.
3. Use a tripod to make sure that your images are sharp. Also, as you move the camera onto the next set, be sure to overlap by 30%.
4. Be sure not to allow the camera to move up or down as you shoot the images. If it does, the result will be that the images might stitch but the resulting shot will be dropping down or sweeping up and you may not be able to get it right afterwards.
5. The best idea is to use a tripod and keep the focal plane as flat as possible, to avoid distortion, particularly with a wide angle lens.

Step 2 – edit your HDR images

Edit your images by set. Start with Set #1 and take them into an HDR product such as Photomatix Pro. You could used Photoshop too, but my preference is Photomatix Pro. For more details on making your HDR images, take a look at my HDR article to get into the details of the editing process in Photomatix.

Save each set and name them chronologically. I will name my images as follows: SCENENAME – HDR PANO 1, SCENENAME – HDR PANO 2 etc. Once you have taken all your sets through the HDR process and named them in order, the photostitching part is pretty easy.

Step 3 – stitch your HDR images together

For the photostitching part of this process, you can use the photo stitching function in Photoshop or any other photo stitching tool of your choice. I have used Photoshop in the past and it works well, but for more complex stitching I find that Autopano Pro works extremely well. It has been rated as one of the best stitching packages available. I have used it to stitch some pretty crazy panos together and almost anything I have thrown at it, it has been able to process.

Lets look at how this process works in Autopano Pro:

  1. Open Autopano Pro and on the first screen that you see, click on the second icon from the left to select your images to be stitched
  2. Navigate to the HDR images that you have processed and select them
  3. Click on “detect” on the top left hand side of the screen
  4. Autopano will now scan your images and do a preliminary stitch, this preview stitched image will be displayed on the right hand side of the screen that is open. This process may take a few minutes.
  5. Once the preview image is displaying, click on the “edit” button (Right hand side of the screen) this will open the image in the Autopano edit screen
  6. There are a number of options here, below is a high level overview of the most important functions
Autopano Pro - Images selected for the pano stitch on the left and a preview of the stitched image on the right

Autopano Pro – images selected for the pano stitch on the left and a preview of the stitched image on the right

Autopano edit screen with preview of stitched image

Autopano edit screen with preview of stitched image

Autopano functions on the edit screen:

Autopano has a number of options you can use to render your panoramic image. These projections help with distortion and skewing. Below is an explanation of the most commonly used projections.

  • Spherical – the spherical function allows any panorama to be assembled. It is a commonly used function for building panoramic images.
  • Planar or rectilinear projection – this is a good choice if the angle is low, It’s recommended for architectural shots because it is the only mode that does not curve lines that are deemed to be straight lines. Sometimes if the angles are too extreme there may be a loss of sharpness, so be aware of this.
  • Cylindrical projection – this projection can be used up to 360° (horizontally).
  • Mercator projection – the mercator projection can also be used up to 360° (horizontally). The effect of stretching up and down the image may seem to become distorted.

The key factor in choosing a projection is in how the projection affects your image visually. Does it work for the subject matter? Does the image look correct? Ask yourself these questions as you experiment with the projections.

Once you are happy with your projection and the way the image looks, you can now save the image to a folder on your computer.

Choose the projection that works best for your image

Choose the projection that works best for your image

Rendering

Render screen and options

Render screen and options

This is the process of saving your panorama.It is called rendering because the software needs to perform the final stitching and edits to your image. On the rendering screen, you will need to take note of the following:

Interpolator – the interpolator is the method used to assemble the pixels of your panoramic image  and will determine the quality and sharpness of your image. There are a few different options here, but the most commonly used options is Bicubic. The other options are useful for advanced stitching.

Blending settings – the purpose of the blending settings is to allow the combining of the overlapped sections of your panoramic to look smooth and seamless. You will notice  the following presets:

  • Simple – this is fast, but it is possible that defects are seen where the areas overlap
  • Anti-ghost – conserve the image’s strong characteristics (stops, lines, curves) when mixing while automatically removing objects that have moved
  • Exposure Fusion – to be used if the panorama was created with a bracket shoot. Keeps the best of different exposures.
  • HDR output – to be used by users who wish to create a “.hdr” format file in order to create post-production or special effects. Don’t use this on these images as they have already been processed as HDR images.
  • Custom – this is enabled when you manually change the parameters and they no longer correspond to a profile.

On the advanced settings, I generally leave that on the default.

Format

This section allows you to determine what the format in which you want your image to be saved. The two formats I use most are TIFF and JPEG. TIFF is an uncompressed file (which means all the information is still in the file, this is great if you are planning to print the image out large) The downside to TIFF is that the files are big. JPEG is a compressed format, that means that some image information has been discarded, the quality will still look the same to the naked eye, but if you print a JPEG image up really big, you may notice some image degradation. Depending on your final output and your space constraints you can choose the format that works best for you. Take the quality up to 12 and set the DPI to 300. This will ensure that you have the best quality image saved.

Output

On this screen, the software needs to know where to save your panoramic and what you want to call it. Choose your destination folder and name the file. Once this is done (it sounds more complicated than it is) click on the render button and the software will begin rendering your image. Depending on the size of the files being stitched, this rendering process can take a few minutes. Once complete, a screen will pop up to let you know that the image is now rendered.

4. Edit the final image in Lightroom or Photoshop

Your image is now stitched together, but the final step in the process is to edit the image in your choice of image editor (Lightroom, Photoshop, Gimp or any other) You will want to follow the basic workflow I outlined in a previous article.  Once that is done, you will now have a fantastic Panoramic HDR image. Not too many photographers attempt these images as they take some time to get right, but the results can be spectacular. Give this a try, let me know where you struggled or any insights you had during the process, above all go out and have fun with it!

Panoramic HDR image of Coal Harbour - Vancouver BC

Panoramic HDR image of Coal Harbour – Vancouver BC

The post Step By Step How to Make Panoramic HDR Images by Barry J Brady appeared first on Digital Photography School.


Digital Photography School

 
Comments Off on Step By Step How to Make Panoramic HDR Images

Posted in Photography


Sony Cybershot DSC-RX100 M3 : real world sample images

01 Jun

gallery_icon.jpg

As soon as it emerged from our studio we went straight out shooting with the RX100 III, to give an idea of the results it gives. We’ll be adding video and more samples over the coming days but this initial gallery aims to show a range of the camera’s capabilities. We set the camera’s ND filter to Auto, so we could shoot at wide aperture in good light, and include a real-world shot from the wide and long en of the lens, shot this way. Click through to see more.

News: Digital Photography Review (dpreview.com)

 
Comments Off on Sony Cybershot DSC-RX100 M3 : real world sample images

Posted in Uncategorized


35 Adorable Pet Images to Make You Say “Awww”

26 May

Pets fill the places in our hearts really fast, and it’s always cool to have an adorable picture of your pet on your desktop. While pet photography is one of the most interesting subjects to shoot, it’s not always easy to capture their true, cute personality. Unlike humans, pets do not understand what we are going to do and will Continue Reading

The post 35 Adorable Pet Images to Make You Say “Awww” appeared first on Photodoto.


Photodoto

 
Comments Off on 35 Adorable Pet Images to Make You Say “Awww”

Posted in Photography


Metropolitan Museum of Art offers free access to 400,000 images

22 May

DT45.jpg

The Metropolitan Museum of Art has made available access to more than 400,000 digital images in its collection. The museum is calling this new program ‘Open Access for Scholarly Content’, which provides ‘access to images of art in its collection that the museum believes to be in the public domain and free of other known restorations’. Any images listed with the letters ‘OASC’ on the museum’s website are available to download without a fee. Learn more

News: Digital Photography Review (dpreview.com)

 
Comments Off on Metropolitan Museum of Art offers free access to 400,000 images

Posted in Uncategorized


Lenstag helps photographers find stolen lenses and images

21 May

Screen_Shot_2014-05-20_at_2.47.12_PM.png

The website Lenstag bills itself as a tool for helping photographers find lost or stolen gear, but now it’s branching out to help people find images used without permission, too. Lenstag maintains a database of a user’s lens, camera body and accessory serial numbers and then trolls the web looking for photos posted with those registration numbers in the EXIF data of a photo. Learn more

News: Digital Photography Review (dpreview.com)

 
Comments Off on Lenstag helps photographers find stolen lenses and images

Posted in Uncategorized


Getting Sharper Images – an Understanding of Focus Modes

14 May

The longer you shoot, the larger the repertoire of subjects and assignments you photograph becomes. You start off photographing flowers in the garden, your neighbour’s dog, your sister’s kids, your friend’s wedding and then before you know it you’re doing product shots for your friend’s new company. All this happens over time and there is one pretty fundamental skill that must remain paramount throughout out your process, properly focused images. Sure we’ve all been there, we’ve all taken that shot once in while which is slightly soft (a polite photographer’s term to describe out-of-focus images). But, it’s a great shot so we keep it anyway, even tho we would still have preferred it to be tack sharp.

MG 3504flat

In focus images have been one of the most fundamental rules of photography right from the dawn of the craft. In the early 1900s it was a craft in its own right, but in the 1960s Leica introduced a rudimentary autofocus system that changed everything. Since then, autofocus has developed dramatically and it’s no longer a feature on cameras, it’s a given.

So, bringing autofocus up-to-date you have a few options to choose from in your modern DSLR. Those are some of the features I will cover in this article, along with when to use them. Both Canon and Nikon have very similar settings, albeit incorporating different technologies the results are very similar. There are also other brands like Sony and Olympus etc., that also follow suit, but here I will be discussing the four main focus modes in Canon and Nikon.

This image above was shot utilizing the AF-S (Nikon) or One Shot (Canon) autofocus mode on the camera. Here I focused on the models eyes and then recomposed my image so that she was over to the left of the frame, allowing for more space in the image in the direction she is looking.

Single Shot Mode

First off, you have the mode that’s probably been around the longest – Canon’s One Shot and Nikon’s AF-S. Both of these will do pretty much the same thing. This mode is predominantly used for stationary objects like model shoots (most of the time – more on when not to use it for model shoots later) and anything that doesn’t require your subject to move around too much in the frame. You half press the shutter in this mode, and then you can recompose the image. For example, you focus on the model’s eyes, then recompose to put her on the left hand side of the image. This autofocus mode will get you through most situations.

Active or Continuous Focus Modes

Next we have the step up from the single focus to Canon’s AI Servo, and Nikon’s AF-C modes. Essentially what this setting does is to continuously track your initial focus point and readjust the focus accordingly. This setting is ideal for moving subjects like active children, and pets that are constantly on the move.

Auto Modes

Finally out of the autofocus settings we have Canon’s AI Focus, and Nikon’s AF-A. Both of these settings actually leave it up to the camera to decide which is best out of the other two focusing modes to use. In this mode it will either choose to continuously track your chosen subject should it decide to move, or focus lock if you would like to recompose. In theory, then I needn’t of bothered explaining the other two settings as surely this is the best of both worlds? Not quite. I personally have tested this mode a fair amount with stop-start subjects and although the camera does a good job of keeping up with them it’s always more accurate to use continuous focus mode. The same also goes for its ability to determine when a subject has stopped and when to focus lock for recomposing. Personally I never use this mode as although it has the best of both, it also has the worst of both.

Infocus600px

Image above taken with an 85mm f/1.8 prime lens using manual focus. Shooting in manual focus negates the need to recompose and loose focus in autofocus modes.

So, although I have just covered the three basic settings here very briefly, there is, of course, a whole of host other technological advancements in autofocus that I haven’t covered. I know Nikon has extensive, matrix and 3D autofocusing features. As well most modern DSLR have incorporated the “back button autofocus” which also helps with focus locking. But going over all of that is not the purpose of this article.

Manual Focus Mode

The last focus mode I wanted to cover and one that is rarely used is the Manual focus mode. This mode strikes fear into the heart of nearly all modern photographers and that’s simply because they’ve probably never used it. Do you ever need to use it? That is something that only you can decide and is probably based on the type of photographs you take. If you only ever take portraits of energetic kids or fast paced sports, then autofocus is probably always your go-to mode. If however you shoot still life, architecture, landscapes and other detailed, relatively motionless subjects, then manual focus is probably a good way to go.

There are a few reasons for this. Landscape photographers will want to find the hyperfocal distance of their scene to maximize the amount of in-focus points (depth of field) in the image. This is based on an equation so autofocusing on a specific object is not always the way to go. Still life photographers will usually have their camera locked-down on a tripod so they will not want to focus and recompose once they’ve set up the shot, so it’s just far easier to focus manually. There is also another reason to want to use manual mode on some cameras and certain situations, and that was the catalyst for this article.

Outoffocus600px

This version of the image was shot using the autofocus mode AF-S/One Shot, and meant that after I had focused and recomposed the shot, the model’s eyes were left out of focus.

I recently purchased an 85mm f/1.8 prime lens, and I wanted to test the lens out and see what the sharpness was like at f/1.8. I predominately only photograph models so I set up my test and went about taking some shots at f/1.8 using my usual AF-S/One Shot autofocusing mode. When I got my shots back to the computer to take a look, I was surprised to see that most of them were very soft. It took a few minutes to realize my error and since then I’ve adjusted how I shoot with these parameters.

Recompose600px

Here you can see that the selected focal node is still situated in the middle of the viewfinder even though I have elected the outer most one when shooting in the portrait format.

I haven’t done a lot of very shallow depth of field shots up until this point so I hadn’t seen the now exaggerated results of my
poor focusing technique previously. At f/1.8 you have a very, very shallow amount in focus (depth of field). For example, a head shot with the eyes in focus, the tip of the subject’s nose will be out of focus. For the test I was photographing the model at 3/4 length and shooting up at her so my camera height was probably about her waist height. I was about 6 feet (2 meters) away from her and I was focusing on her eyes with my focal point in camera then recomposing my shot to capture the 3/4 length crop. The problem with most cameras is that although they have a lot of focusing points, they’re all clustered in the centre of the viewfinder so even though I chose the outer most focal point I still have a dramatic amount of recomposing to do.

Focusstack600px

The diagram above clearly illustrates what’s actually going on when you recompose an image after focusing in AF-S/One Shot autofocus mode. The actual part of the image that was in focus, is now out of focus.

This isn’t normally a noticeable problem when recomposing at f/16, but at f/1.8 that dramatic shift in the focal plane means the resulting image is very soft around the model’s eyes. As I recomposed it actually repositioned my focal point further back behind the model, meaning the back of her head and hair were in focus but not her eyes.

There aren’t too many ways around this pesky little issue, especially as you may not notice it on the back of the camera’s little screen. One thing that did resolve it though was by switching to manual focus. I could then compose my shot and manually focus on the model’s eyes, resulting in a fantastically sharp image where I wanted it to be sharp.

Granted there were a few things conspiring together here to really exaggerate the issue. Firstly, I was shooting at f/1.8, that’s always going to rely on critical sharpness. Secondly, I was down low shooting up. This always exaggerates the focal plane shift when recomposing and lastly I was stuck with limited focal nodes. There are many technical reasons why modern DSLRs don’t allow focal nodes towards the edges. A lot of smaller frame cameras like the mirrorless, APS-C and micro 4/3 cameras all have selectable focal nodes covering the viewfinder, but alas, DSLR technology isn’t there yet. Until it is, it’s a good idea to be aware of what’s going on in autofocus modes on your camera, and be prepared and ready to switch to manual focus when required.

Good Luck!

The post Getting Sharper Images – an Understanding of Focus Modes by Jake Hicks appeared first on Digital Photography School.


Digital Photography School

 
Comments Off on Getting Sharper Images – an Understanding of Focus Modes

Posted in Photography


Apple aims to use OIS to create high-resolution images

11 May

applepatent1.jpg

Apple Insider has discovered another interesting camera-related Apple patent application. The document titled “Super-resolution based on optical image stabilization” describes a way to use a camera’s optical image stabilization system to capture a series of images at slightly offset angles and then stitch them together to create one large high-resolution file. Learn more

News: Digital Photography Review (dpreview.com)

 
Comments Off on Apple aims to use OIS to create high-resolution images

Posted in Uncategorized


Little beauty: Nordin Seruyan’s macro images

10 May

nordinseruyan8v2.jpg

Indonesia-based photographer Nordin Seruyan’s vibrant macro images capture Southeast Asia’s insects in great detail. From praying mantises to spiders to dragonflies, Seruyan’s playful photographs capture common creatures in an uncommonly attractive way. See gallery

News: Digital Photography Review (dpreview.com)

 
Comments Off on Little beauty: Nordin Seruyan’s macro images

Posted in Uncategorized


35 Cityscape Images to Take Your Breath Away

02 May

Recently I’ve done a lot of natural world images including landscapes, bugs, waterfalls, flowers and even pets. So it’s time for something different and I’m shifting gears to man-made.

Here’s a collection of cityscape images to get you inspired enough to get out and take some of your own. Enjoy!

Photograph Up and Above by Sebastian Opitz on 500px

Up and Above by Sebastian Opitz on 500px

Photograph Shanghai at Night by Clemens Geiger on 500px

Shanghai at Night by Clemens Geiger on 500px

Photograph Brooklyn Bridge New York City - NY by Dominique  Palombieri on 500px

Brooklyn Bridge New York City – NY by Dominique Palombieri on 500px

Photograph Houses of Parliament, London by David Mar Quinto on 500px

Houses of Parliament, London by David Mar Quinto on 500px

Photograph Concrete Jungle 2 by Kerim Hadzi on 500px

Concrete Jungle 2 by Kerim Hadzi on 500px

Photograph Dark Pace by Toby Harriman on 500px

Dark Pace by Toby Harriman on 500px

Photograph Fire over San Francisco by Toby Harriman on 500px

Fire over San Francisco by Toby Harriman on 500px

Photograph Painted Ladies by Bobby Gibbons on 500px

Painted Ladies by Bobby Gibbons on 500px

Photograph Sydney Harbour by Dragostesun Photography on 500px

Sydney Harbour by Dragostesun Photography on 500px

Photograph Sky Gate by Gianluca Gobbi on 500px

Sky Gate by Gianluca Gobbi on 500px

Photograph Puddle Mirror Reflection on Notre Dame by Loïc Lagarde on 500px

Puddle Mirror Reflection on Notre Dame by Loïc Lagarde on 500px

Photograph Silent morning by Martin Stantchev on 500px

Silent morning by Martin Stantchev on 500px

Photograph Windows by Catalina Justiniano on 500px

Windows by Catalina Justiniano on 500px

Photograph Strolling Venice by Cristina Ramos on 500px

Strolling Venice by Cristina Ramos on 500px

Photograph Blue City by Woosra Kim on 500px

Blue City by Woosra Kim on 500px

Photograph Misty Taj by Daniel Cheong on 500px

Misty Taj by Daniel Cheong on 500px

Photograph The Trench Run by peter stewart on 500px

The Trench Run by peter stewart on 500px

Photograph The Aperture by  M. Rafiee on 500px

The Aperture by M. Rafiee on 500px

Photograph Golden Sunrise by Andi Andreas on 500px

Golden Sunrise by Andi Andreas on 500px

Photograph Hong Kong by César Asensio Marco on 500px

Hong Kong by César Asensio Marco on 500px

Photograph The Twilight Hour by Marc Perrella on 500px

The Twilight Hour by Marc Perrella on 500px

Photograph Golden Bricks by Toney's Photo Journey on 500px

Golden Bricks by Toney's Photo Journey on 500px

Photograph quarters.only by Robert Pfeuffer on 500px

quarters.only by Robert Pfeuffer on 500px

Photograph On the bridge II by Roland Shainidze on 500px

On the bridge II by Roland Shainidze on 500px

Photograph Microzurich by Vladimir Popov / Uhaiun on 500px

Microzurich by Vladimir Popov / Uhaiun on 500px

Photograph Paris TS by Federico Venuda on 500px

Paris TS by Federico Venuda on 500px

Photograph Still Morning by Tristan O'Tierney on 500px

Still Morning by Tristan O'Tierney on 500px

Photograph twilight arcs by Sven Fennema on 500px

twilight arcs by Sven Fennema on 500px

Photograph Roman Forum (Rome, Italy) by Domingo Leiva on 500px

Roman Forum (Rome, Italy) by Domingo Leiva on 500px

Photograph The Petronas Tower. by sk teh on 500px

The Petronas Tower. by sk teh on 500px

Photograph Sunset in Oia by Slava Mylnikov on 500px

Sunset in Oia by Slava Mylnikov on 500px

Photograph Gothic Quarters - Barcelona by Frank van Haalen on 500px

Gothic Quarters – Barcelona by Frank van Haalen on 500px

Photograph Colmenas II by Rosa M.  Font Regí on 500px

Colmenas II by Rosa M. Font Regí on 500px

Photograph Clash of the Titans by Alfon No on 500px

Clash of the Titans by Alfon No on 500px

Photograph Madrid full moon by Juan Carlos Cortina  on 500px

Madrid full moon by Juan Carlos Cortina on 500px

The post 35 Cityscape Images to Take Your Breath Away by Darlene Hildebrandt appeared first on Digital Photography School.


Digital Photography School

 
Comments Off on 35 Cityscape Images to Take Your Breath Away

Posted in Photography