With the huge assortment of software and plugins you have at your disposal these days, the photo processing technique of burning and dodging is practically ancient. It was (and still is) one of the most common ways of enhancing film images in the darkroom, and everyone from Ansel Adams to Imogen Cunningham used it.
They used it because it is powerful and simple and still is to this day. With all the complicated plugins and post-processing procedures you have at your disposal, you won’t get any better bang for the buck than creative dodging and burning.
This tutorial with show you how I do dodging and burning in Photoshop, for black and white images. I’ll save another article for you about using the technique for your color images. First, though, let’s make sure we all know what dodging and burning is.
WHAT IS DODGING AND BURNING?
Originally, dodging and burning was used in the traditional darkroom, to retouch film to enhance highlights, and deepen shadows on photographic prints. Photographers used simple darkroom tools to either allow more light from the developer machine to reach certain parts of the light sensitive photographic paper. This was known as “burning in” which made these parts of the photo darker. The photographer could also dodge the light – hold it back from the paper – allowing that part of the photo to remain less developed or lighter than the non-dodged area.
Using this method, photographers or retouch artists could control with great accuracy the developing process to ensure that their prints displayed the full range of tonal values needed to make the photograph pop.
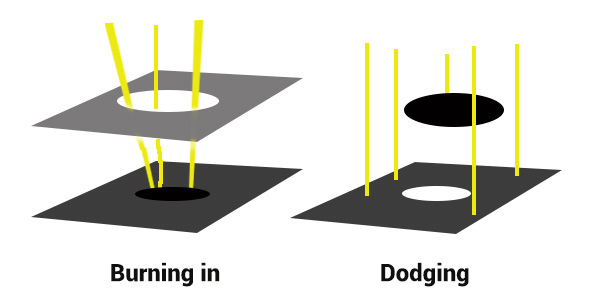
Darkroom burning and dodging: allowing more light to pass, or holding light back.
WHY YOU SHOULD DODGE AND BURN YOUR DIGITAL PHOTOS
So what has an ancient darkroom technique got to do with your photography? Plenty! Dodging and burning can add a whole new level of depth to your images. With Photoshop it’s simple.
Here are some compelling reasons to incorporate dodging and burning into your digital photography post-processing workflow:
- To create more dimensionality, make things pop out at your viewers, and make others recede into the shadows.
- To draw your viewer into your image. Our eyes are programmed to follow the light, and the lightest, brightest parts of your photo are where you want to direct viewers. Some creative dodging and burning will help get their eyes where you want them to go.
- To isolate the subject.
- To minimize distracting backgrounds.
- To turn the lights on, in a photo – if you need some creative lighting after your shot, dodging and burning can help.
- To make things more dramatic and moody – enhance the shadows to darken things down.
- Add a vignette to keep the viewer’s eye in the image.
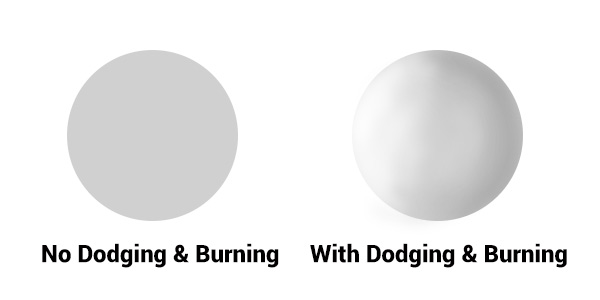
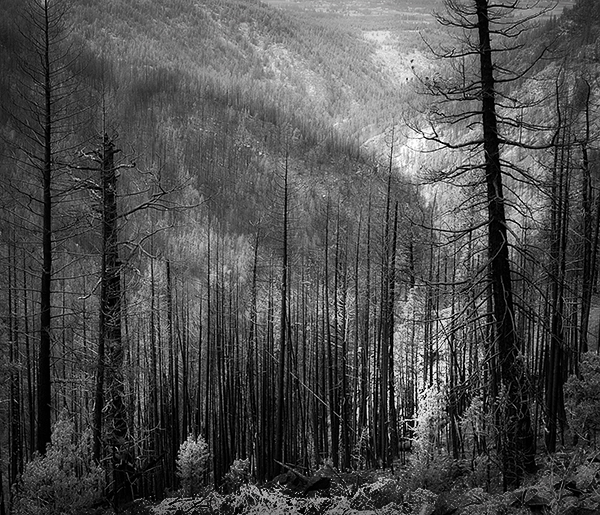
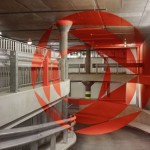
Dodging and burning add dimension.
The three dimensionality of the circle on the right was created purely by dodging and burning a copy of the one on the left. As well, it is super easy with the technique you’re about to learn. As with most things in Photoshop there are many ways to accomplish the same goal, and each have their advantages and drawbacks. I prefer this way because it gives you a huge amount of control and flexibility. It’s drop dead simple, and non-destructive.
Let’s look at before and after shots so you can see the difference between nothing, and selective dodging and burning.
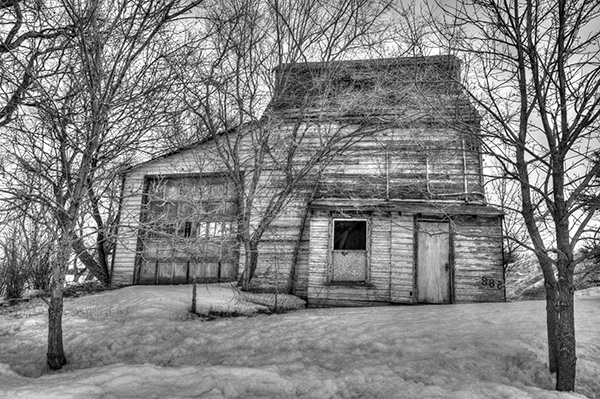
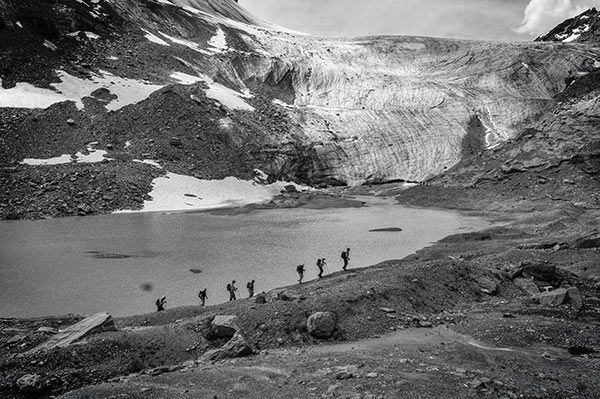
Before dodging and burning, the image is flat and has no center of interest.
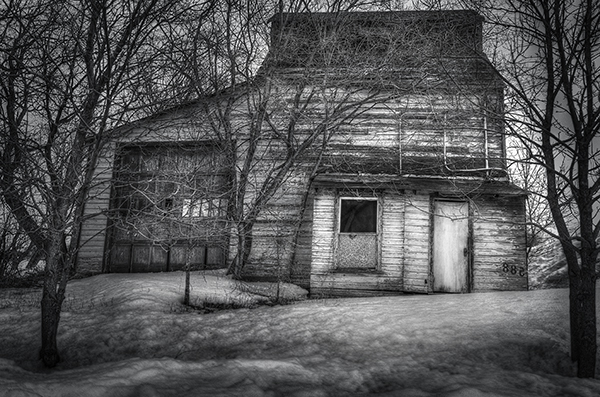
Final image, with dodging and burning applied – we are drawn by light to the door.
The second image has more drama, more of a moody feel. The snow has texture and dimension, and the small door and window are the clear center of interest. Nothing was changed in this photo other than adding tonality by dodging and burning. The look has been exaggerated so you can see the changes, normally dodging and burning is more subtle than this example. Although you can get quite dramatic results if that’s the mood you’re going for.
USE THE BEST TOOLS FOR THE JOB
 You may have noticed in Photoshop’s Toolbar, a couple of tools called Dodge and Burn. Forget about them. I don’t use these for my dodging and burning. I like to have more control when I work on my images. So instead of the pre-made tools I create my own using layers and the brush tool. It becomes artistic like creating a painting, and you have more freedom to be flexible.
Using layers give you the flexibility to change opacity, and to group your different layers into folders. You can then selectively turn on layers to see how your work is progressing.
HOW TO DO DODGING AND BURNING
Dodging – adding more light:
- Create a new layer. Switch the blending mode to Color Dodge, and rename this layer Dodge. You may end up having many dodge layers, so name it something more descriptive, door dodge or tree dodge.
- Select a pale gray color from the toolbox palette, initially this color will be light, for example #bcbcbc, or 188,188,188 on the RGB scale. This color determines the main intensity of the dodge, or how bright it will be.
- Select a soft brush at a size suitable for the area you want to bring out or emphasize.
- Initially set the Opacity and Flow of the brush to about 20% each.
- Brush on the new layer and instantly see the light colors start to POP. If there’s too much, you can either reduce the opacity of the layer, or reduce the opacity and flow of the brush itself.
Once you have an intensity you like, brush dodge segments of the image – the door for example. If you move to another part of the image use a new layer for that area or element. You do this because you may want to adjust the intensity by changing the opacity of the layer, or the brush, or even change the color to a lighter or darker shade of gray.
Finally create a Layer Group – click the little folder icon in your layers palette. Move all your Dodge layers into one Group. Name the group Dodge. This allows you to instantly turn off all the “lights” to see before and after. Did you go overboard too much, should you do more, or is it just right? Being able to turn all the dodging off with one click will help you decide.
Where and what to dodge:
You want the lightest parts of your image to lead the viewer’s eye to your subject. Can you create a pathway of sorts with a dodged or brighter leading line, a bright path that the eye can easily follow? Alternately you can also make leading lines darker by burning. Leading lines don’t always have to be bright.
Dodge (and burn) places with texture, to add that three dimensionality, to make the texture really stand out. Try dodging the subject a bit, just a subtle brushing with a gentle opacity to add some brighter tones relative to the rest of the image. Does it pop out a little more now?
You’ve finished dodging for now, next let’s go over to the dark side!
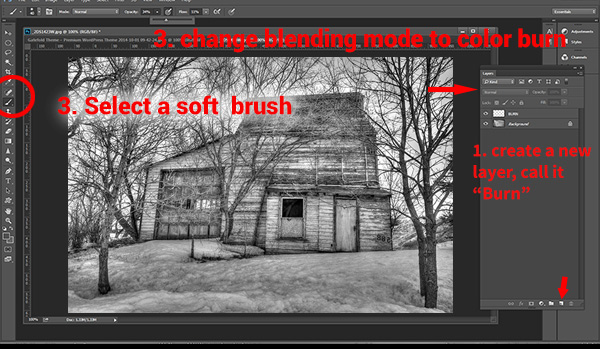
Burning – creating darkness:
Next you’ll do the exact same process for burning. I suggest starting with the exact same color and opacity settings too. Simply create a new layer and set the blending mode of Color Burn, and name the layer Burn.
Once again, if you need more drama, you can change the color of the brush, or change the opacity and flow of the brush or the layer. You can add more layers if needed, duplicate a layer to instantly double the amount of darkness.
This method is quick and intuitive, and if I feel that you’ve gone too far, you can turn off a few layers to hide their visibility in the image. I suggest you make a Layer group for the Burn layers as well.
You can even create another Layer group called D&B (for dodge and burn) and put the the other groups inside. Just ctrl+click to select them and drag them over top of the D&B layer. Now you’ll be able to see the total before and after view with one click. Off and on – good or not? More work needed or done?
SEEING THE BIG PICTURE
Once you’ve brushed in the areas that you want and think you have all the burning and dodging done, you can burn a vignette around the edges of your image to keep the viewer’s eye from leaving. It’s like framing your photo with a bit of darkness, so the eye stays on the brightness.
All you need to do here is create (yes) another layer and use the elliptical marquee tool, with a feathering setting of at least 50 pixels. On the new layer drag out the circle so it touches the edge of your frame. To add darkening to just the edge of the image to create the vignette, go to the top menu in Photoshop and click on Select>Inverse. This will now let you fill the area OUTSIDE the selection.
In the Tools Box, select the same grey color you used for the initial burning of your image as your foreground color, then hit Alt>Backspace on your keyboard to fill that selection with color. Set the layer blending mode to Color Burn. You may have to decrease the opacity of this layer a bit depending on the tones in your image. This vignette should be pretty subtle, it’s not meant to be a frame, just a very slight darkening to keep your centre of interest a few tones brighter, to keep the viewers’ eye in your frame.
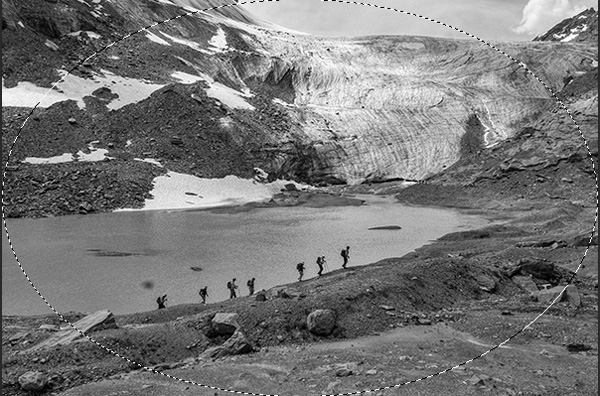
Initial selection
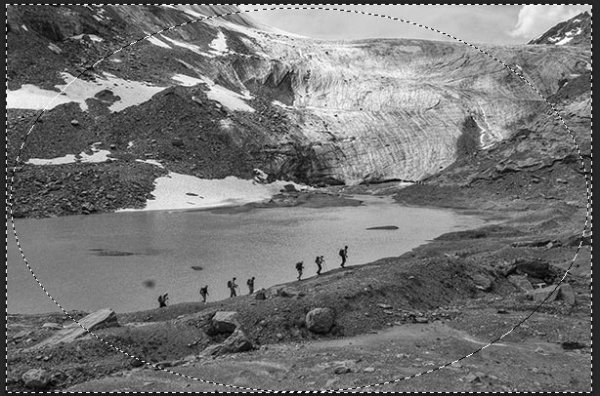
Selection inverted
Vignette added

FInal image
I’ve made a short screen capture video showing my technique for dodging and burning you can watch below if you prefer to follow along:
Once you give this method a try, you’ll see how easy it it and how you can achieve dramatic effects with a few quick steps. You have full control of the look and style of your image, and you can revert your steps at anytime to adjust if needed.
If you have alternate methods for dodging and burning let me know why you like them, and also what challenges they create for you. If you’d have any dodged and burned images you’d like to share, please do post them here. Inspire us!
The post Dodging and Burning to Create More Effective Black and White Images by Alex Morrison appeared first on Digital Photography School.

Digital Photography School


![Photograph [ ... snæfellsnes autumn ] by D-P Photography on 500px](https://gp1.wac.edgecastcdn.net/806614/photos/photos.500px.net/51502108/d8912c87fbf92158838096430cfedd749aeed47d/4.jpg)


![Photograph [shadow dancer] by Julia Borodina on 500px](https://gp1.wac.edgecastcdn.net/806614/photos/photos.500px.net/71282803/e25b1c0a1c49729879a450cc874556e94dc081a0/4.jpg)


You must be logged in to post a comment.