RSS
 

Posts Tagged ‘Images’

Photoshop Tip: Using the High Pass Filter to Sharpen Images

22 Nov

If you’ve used Photoshop, you are likely aware by now that there are many ways to accomplish the same tasks. One of the more important ones that should be done to almost every digital image is sharpening. This is necessary because most digital camera sensors make use of an anti-aliasing filter, which very slightly blurs the image, to reduce the chances of moire occurring in the image. This slight blurring, generally only one pixel in size, causes a slight loss of detail in an image. To correct for the slight blurring, tools such as Unsharp Mask are used. For a good tutorial on Unsharp Mask, check out How To Sharpen Photos: An Introduction.

High Pass Sharpening

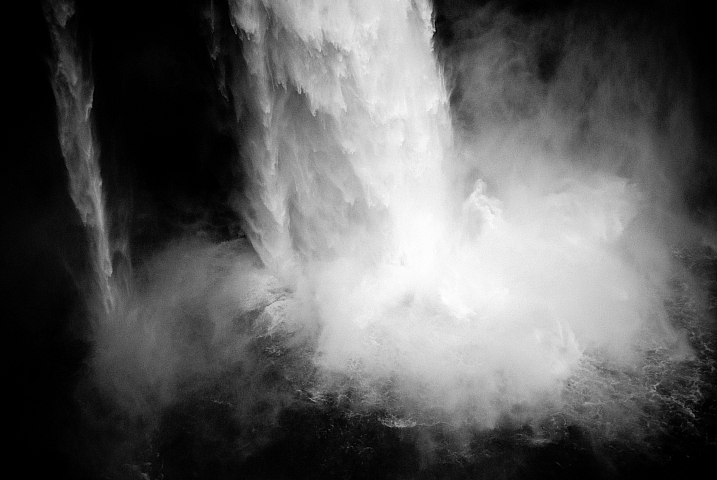
This shot of sunflowers benefited from the High Pass filter by sharpening the fine detail in the center of the flower.

Another easy way to sharpen your images is with a filter that’s not even found in the Sharpen menu under Filters in Photoshop. It’s relegated to the Other category at the bottom of the Filters menu, and is called High Pass. The High Pass filter is a bit easier to use than Unsharp Mask, in that it only has one slider to worry about, and the technique for using it allows for some experimentation even after it’s applied, so you can get your image looking exactly as you want.

Note: I am using the latest version of Photoshop, version 2015.0.1 in Creative Cloud.

Step 1: Edit your image, then flatten it

Before you use the High Pass filter, you’ll first want to process the image to your liking. Generally speaking, sharpening should be the final step in image editing, because it is directly dependent on image size. You will sharpen an image sized to 5×7″ differently than one sized to 13×19″. Once your image is edited, flatten all layers by going to the Layer menu and selecting Flatten Image. Then adjust your image size as needed if you’re going to print or to display online.

Step 2: Duplicate Layer

Now that your image is flattened, duplicate that layer by pressing <CTRL + J> (in Windows) or <CMD + J> (on a Mac). You’ll then want to zoom in to view the image at 100% by pressing <CTRL + 1> (in Windows) or <CMD + 1> (on a Mac), or just double clicking the magnifying glass in the toolbox. You’ll want to be at 100% so you can see the detail of the image clearly.

Step 3: The High Pass Filter

High Pass Filter Selection

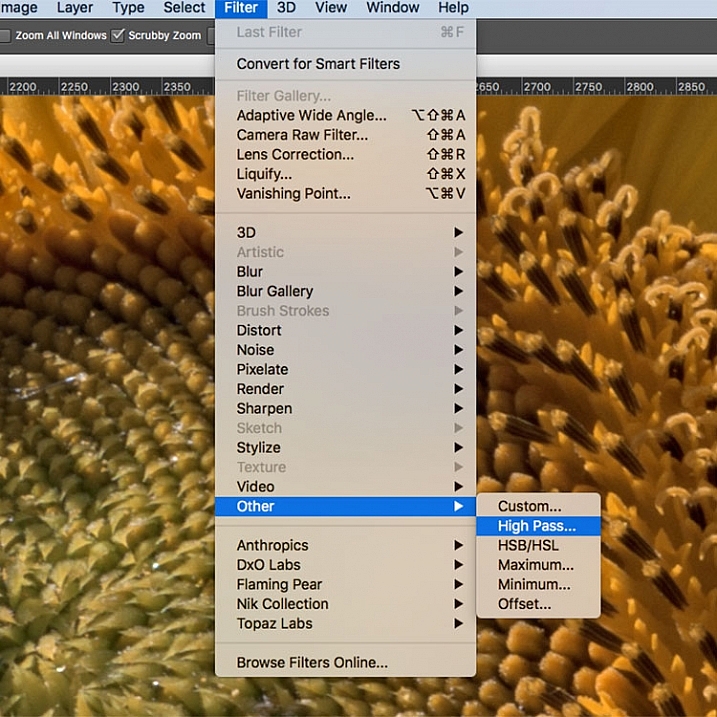
In the Filter menu, select Other, then High Pass.

Go to the Filter menu and select Other, and then High Pass. You will see the entire image turn a flat grey color. Not to worry, as this will allow you to see what the filter is doing.

Step 4: Adjust the amount of sharpening

high pass filter sharpening

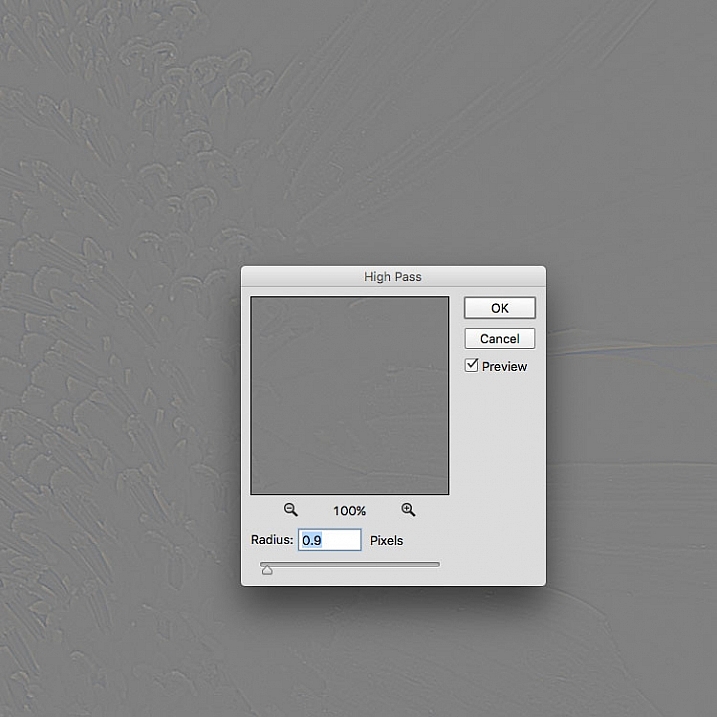
Once the High Pass filter dialog box pops up, use the slider to adjust the radius.

Once you run the filter, you’ll see a dialog box open up, showing a preview along with a radius slider. In addition, the image behind the dialog box will have turned grey, with some edge lines showing.  This allows you to see exactly what is being sharpened. The High Pass filter only sharpens edges, so anything that’s not an edge becomes flat grey. The amount of sharpening you do will largely be image dependent, as well as size dependent.

For this image of the sunflowers, I was making a large print, using the full resolution of the image. When doing so, I’ve found my radius amount will usually fall somewhere between 0.5 and 5 pixels. You need to be careful here, as too much sharpening will introduce unwanted artifacts and noise into the image. I use the preview as my guide. I want to see thin black lines over the grey areas, with little to no white. Once you see any white, it means you’ve begun to get a halo, which you want to avoid. The final effect will be a subtle sharpening, not a drastic pop. For this image, I used a radius of 0.9. You can see above that there are only black lines around the edges of the flower, with very little halo. Click OK when ready.


Step 5: Adjust Layer Blending Mode

High Pass filter layer blending mode
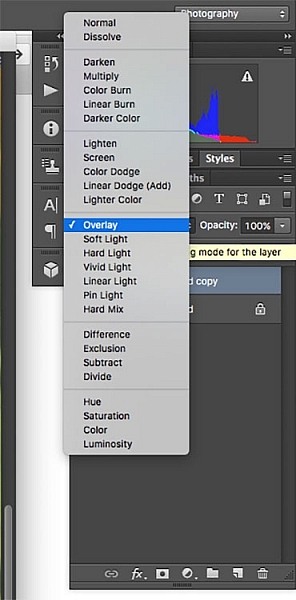
Once you’ve applied the High Pass filter, it’s time to get rid of that flat grey image and bring your photo back to life. Go to your Layers palette and select the Blending Mode drop-down menu and set it to Overlay. Your image will regain its color, and you can toggle the sharpened layer off and on, to compare the image with and without sharpening.

You can also experiment with different blend modes, including Soft Light, Hard Light, Vivid Light, Linear Light, and Pin Light. In addition, you can use the Layer Opacity setting to reduce the effect a bit, if you decide the sharpening is a bit too strong. The beauty of this technique is that it’s completely adjustable (non-destructive) after you’ve applied the filter, and because you’ve worked on a separate layer, you can easily undo the sharpening and start over again if needed. Also, again because you’re working on a separate layer, if there are certain areas in the image where you want the sharpening to be applied, you can use Layer Masks to hide or show it.

Final results

High pass filter comparison

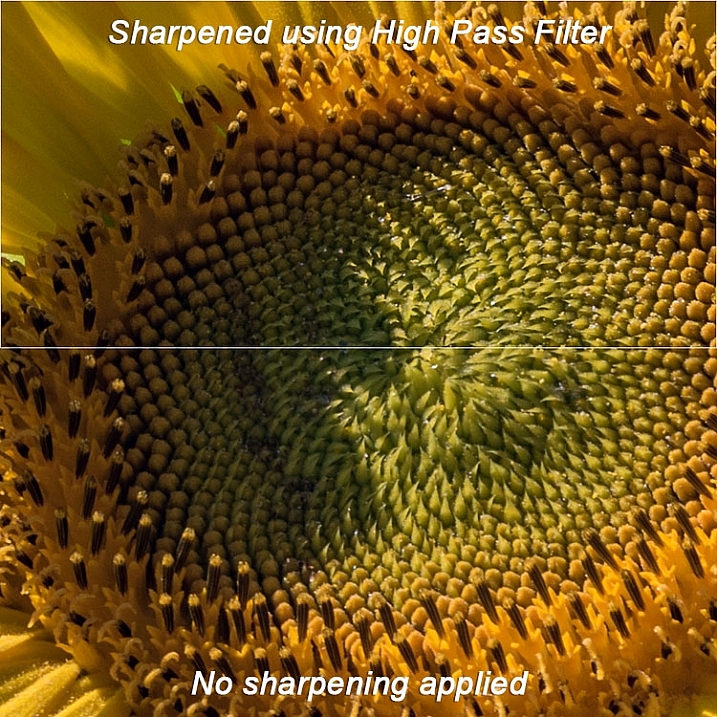
In this comparison image, the top half has been sharpened using the High Pass filter, while the bottom half has not been sharpened.

The High Pass filters allows a lot of flexibility in sharpening photos and is simple to use. It’s a great way to give your images a sharper, crisper look before uploading or printing. Give it a try and let me know what you think!

googletag.cmd.push(function() {
tablet_slots.push( googletag.defineSlot( “/1005424/_dPSv4_tab-all-article-bottom_(300×250)”, [300, 250], “pb-ad-78623” ).addService( googletag.pubads() ) ); } );

googletag.cmd.push(function() {
mobile_slots.push( googletag.defineSlot( “/1005424/_dPSv4_mob-all-article-bottom_(300×250)”, [300, 250], “pb-ad-78158” ).addService( googletag.pubads() ) ); } );

The post Photoshop Tip: Using the High Pass Filter to Sharpen Images by Rick Berk appeared first on Digital Photography School.


Digital Photography School

 
Comments Off on Photoshop Tip: Using the High Pass Filter to Sharpen Images

Posted in Photography


24 Easy Breezy Images that Represent Wind

21 Nov

Wind is an interesting subject to try and photograph because you can’t see it. So how do you capture a photo of air or a feeling like wind?

Let’s see how these 24 photographers did it:

Chriscom

By chriscom

Meena Kadri

By Meena Kadri

Daniel Parks

By Daniel Parks

Andrew Fysh

By Andrew Fysh

GraceOda

By GraceOda

Jacob Surland

By Jacob Surland

Ken Douglas

By Ken Douglas

Darwin Bell

By darwin Bell

John Morgan

By John Morgan

Crouchy69

By Crouchy69

George Agathos

By George Agathos

Lars Schmidt

By Lars Schmidt

Peter Nijenhuis

By Peter Nijenhuis

Ben Raynal

By Ben Raynal

Isabel

By Isabel

Andy Cull

By Andy Cull

Jakob Grunig

By Jakob Grunig

Photophilde

By photophilde

Christos Tsoumplekas

By Christos Tsoumplekas

Mark

By Mark

Brave Heart

By Brave Heart

Bill Dickinson

By Bill Dickinson

Takashi .M

By Takashi .M

Mark Dries

By Mark Dries

googletag.cmd.push(function() {
tablet_slots.push( googletag.defineSlot( “/1005424/_dPSv4_tab-all-article-bottom_(300×250)”, [300, 250], “pb-ad-78623” ).addService( googletag.pubads() ) ); } );

googletag.cmd.push(function() {
mobile_slots.push( googletag.defineSlot( “/1005424/_dPSv4_mob-all-article-bottom_(300×250)”, [300, 250], “pb-ad-78158” ).addService( googletag.pubads() ) ); } );

The post 24 Easy Breezy Images that Represent Wind by Darlene Hildebrandt appeared first on Digital Photography School.


Digital Photography School

 
Comments Off on 24 Easy Breezy Images that Represent Wind

Posted in Photography


How to Use Foreground to Create Depth in Your Images

18 Nov

One of the biggest hurdles in photography is the fact that our majestic three-dimensional scene is rendered into a mere two-dimensional image, and the physical depth that we experience in real life is lost. To resurrect this spacious feeling, we can create the illusion of depth where there is none, by using strong elements in the foreground.

Cannon Beach, Oregon, by Anne McKinnell

When we make a photograph, our natural urge is to get a clear shot of the main subject, without other objects getting between it and the lens. That’s exactly what makes foreground elements so powerful though – they’re unexpected, and sometimes even counter-intuitive. Like any other compositional element, they create shapes, lines, and patterns that lead the viewer’s eye through the image and can be used to enhance its visual impact.

What is the foreground?

When you are working with a grand vista landscape scene, you can often divide it into three sections: the foreground, mid-ground, and background. For example, the scene below contains some colorful shrubs in the foreground, a pond in the mid-ground, and trees in the background.

Paradise Meadows by Anne McKinnell

The foreground, mid-ground, and background areas are not at fixed distances, but are understood relative to each other. The foreground consists of anything that lies between you and your subject, which is typically considered to be in the mid-ground (but not always). The background is made up of everything behind the subject.

You can think of a photograph like a stage: you have the upstage – that’s the background. It gives setting and context to what happens below it. Center stage is the mid-ground, where the bulk of the action takes place. But downstage – the foreground – is the closest to the audience, and therefore the most intimate part. It is capable of whispering to them and luring them into the action. It is the most easily seen and heard, and therefore understood, and can reveal the finer details of the story.

Trona Pinnacles, California, by Anne McKinnell

Not all photographs have three sections though, some just have a foreground and a background, and some have no depth at all.

How is the foreground used?

The foreground should contain some key point of interest, such as a human figure, a tree, a boat, some flowers, rocks, or anything else that is comparatively near to you. Composing in this way evokes depth, and gives your image the illusion of that missing third dimension.

Green Point, Newfoundland, by Anne McKinnell

When you’re composing a photo and you feel that it’s looking a little too flat, placing something in the foreground can instantly add a sense of depth. Exactly how this is done depends entirely on your subject, and on your own creative decisions. This can mean physically adding something to your scene, if you are able to. But most of the time, you’ll be looking for objects in the surrounding area that would make an interesting foreground, and changing your perspective – either by moving your camera higher, lower, or to one side – to incorporate those elements inside of the frame.

For example, imagine a group of oak trees in a field, all standing in a row. If you photograph them head-on, they’ll all look more or less identical – their size, distance, and focus will be the same, and the composition will likely be a flat, static one. However, if you change your perspective and shoot them from one side, everything changes. One becomes closer, and therefore larger, while the others shrink in comparison. When a viewer sees this image, their eyes will immediately fall on the tree in the foreground first, and the implied line created by the row will pull their gaze inwards towards the other trees. Suddenly, the composition has depth!

Boone Hall Plantation, South Carolina, by Anne McKinnelll

Likewise, you could change your perspective by lowering your camera angle to incorporate rocks, flowers, or anything else that is on the ground, into your image. This use of foreground will provide a point for the viewer’s eye to enter the image, and any lines created in the foreground will direct their eye into the image.

Like any other compositional element, the foreground is only helpful if it adds to the impact of the image. If it doesn’t help tell the story, or worse yet, if it distracts the eye, then it isn’t working as a benefit to your image. Your foreground should be an important part of the scene, and not something distracting. Look for things that point towards the focal point in some way.

Hallgrimskirkja, Reykjavik, Iceland, by Anne McKinnell

Foreground elements can even be made of simple shapes and lines. In some cases, your foreground elements may be nothing but shapes and lines, like the paint on a stretch of road, the waves on the ocean’s shore, or the shadows cast across a wind-swept desert. Anything that forms a line towards your subject is especially effective. These are known as leading lines.

Similarly, a wall that stretches into the picture from the foreground will carry the eye along with it. The corners of your frame are especially strong points, and anything that leads inwards from them will have a particular impact. Textures are another compositional tool that can make for an interesting foreground.

Salton Sea, California, by Anne McKinnell

Arranging your composition so that there are interesting elements in front of your main subject is a very effective compositional tool that can evoke depth, by giving your image the illusion of the missing third dimension.


This week on dPS we’re featuring a series of articles about composition. Many different elements and ways to compose images for more impact. Check out the ones we’ve done so far:

  • Using Framing for More Effective Compositions
  • 7 Tips to Improve Your Skyline Photos
  • 33 Images that Exemplify Compositional Elements
  • Weekly Photography Challenge – Composition Craziness
  • How to Take Control of Aperture and Create Stronger Photos
  • How Cropping in Post-Production Can Improve Composition
  • Good Crop Bad Crop – How to Crop Portraits
  • How to use Focal Length and Background Compression to Enhance Your Photos

googletag.cmd.push(function() {
tablet_slots.push( googletag.defineSlot( “/1005424/_dPSv4_tab-all-article-bottom_(300×250)”, [300, 250], “pb-ad-78623” ).addService( googletag.pubads() ) ); } );

googletag.cmd.push(function() {
mobile_slots.push( googletag.defineSlot( “/1005424/_dPSv4_mob-all-article-bottom_(300×250)”, [300, 250], “pb-ad-78158” ).addService( googletag.pubads() ) ); } );

The post How to Use Foreground to Create Depth in Your Images by Anne McKinnell appeared first on Digital Photography School.


Digital Photography School

 
Comments Off on How to Use Foreground to Create Depth in Your Images

Posted in Photography


A Chapel in Space: Images Projected onto King’s College Ceiling

14 Nov

[ By Steph in Art & Installation & Sound. ]

chapel in space 1

Galaxies stretch across Gothic columns and spatterings of stars span the archways of the chapel at King’s College, immersing hushed crowds who have come to hear a lecture on space. Artist Miguel Chevalier transforms the cavernous interiors of this stunning structure at the University of Cambridge in England to go along with specific lectures, plunging guests into the subjects at hand visually as they listen to speeches by renowned professors and alumni.

chapel in space 2

chapel in space 3

chapel in space 7

The space visuals help illustrate Stephen Hawking’s research on black holes, while additional projections in the series explore visual interpretations of history, literature, religion and other subjects. Rather than simply playing video clips to accompany the lectures, or interpreting the subject matter in a literal way, the projections create a richly colorful and moody atmosphere.

chapel in space 4

chapel in space 5

chapel in space 6

chapel in spae 6

The site-specific installations were created in real-time, and represent the first time an outside artist has been invited to alter the chapel in any way. Previously, Chevalier has projected his stunning creations onto Moroccan mosques and an Italian castle built in 1240 for a project called ‘Magic Carpets.’ Biomorphically inspired, these patterns shift and swirl, making the surfaces seem alive.

Share on Facebook


[ By Steph in Art & Installation & Sound. ]

[ WebUrbanist | Archives | Galleries | Privacy | TOS ]


WebUrbanist

 
Comments Off on A Chapel in Space: Images Projected onto King’s College Ceiling

Posted in Creativity


33 Images that Exemplify Compositional Elements

13 Nov

This week on dPS we’re featuring a series of articles about composition. Many different elements and ways to compose images for more impact. Check out the ones we’ve done so far:

  • Using Framing for More Effective Compositions
  • 7 Tips to Improve Your Skyline Photos

Here’s how some other photographers do it and work with various compositional elements.

Lines

Zoltán Vörös

By Zoltán Vörös

Raymond M.

By Raymond M.

Jeff Wallace

By Jeff Wallace

Thomas Leuthard

By Thomas Leuthard

Georgie Pauwels

By Georgie Pauwels

Gianni Dominici

By Gianni Dominici

Color

Wester

By wester

Umberto Nicoletti

By Umberto Nicoletti

Louis Vest

By Louis Vest

Bill Selak

By Bill Selak

Shandie 8

By shandie 8

Sur Name

By Sur Name

Framing

Fernando Ocaña Fernández

By Fernando Ocaña Fernández

Lawrence OP

By Lawrence OP

Georgie Pauwels

By Georgie Pauwels

Georgie Pauwels

By Georgie Pauwels

Michelle Robinson

By Michelle Robinson

Littlenelly (rare But There)

By littlenelly (rare but there)

Perspective

Patrik Jones

By Patrik Jones

Topher76

By topher76

Vincent Moschetti

By Vincent Moschetti

Joris Louwes

By Joris Louwes

Mike138

By mike138

Perceptions I Sichtweisen

By perceptions I sichtweisen

Andreas Schalk

By Andreas Schalk

Aristocrats-hat

By Aristocrats-hat

Michael Coppola

By Michael Coppola

Chris Bird

By Chris Bird

Simplify

Dave Toussaint

By Dave Toussaint

Dawn Ellner

By Dawn Ellner

Thomas Hawk

By Thomas Hawk

Frédéric Vissault

By Frédéric Vissault

ELKayPics (away)

By eLKayPics (away)

googletag.cmd.push(function() {
tablet_slots.push( googletag.defineSlot( “/1005424/_dPSv4_tab-all-article-bottom_(300×250)”, [300, 250], “pb-ad-78623” ).addService( googletag.pubads() ) ); } );

googletag.cmd.push(function() {
mobile_slots.push( googletag.defineSlot( “/1005424/_dPSv4_mob-all-article-bottom_(300×250)”, [300, 250], “pb-ad-78158” ).addService( googletag.pubads() ) ); } );

The post 33 Images that Exemplify Compositional Elements by Darlene Hildebrandt appeared first on Digital Photography School.


Digital Photography School

 
Comments Off on 33 Images that Exemplify Compositional Elements

Posted in Photography


30 Fastastic Wet and Wild Images of Water

07 Nov

Water . . .

It’s essential to life for all creatures on this planet. We drink it, we play in it, cook with it, and of course – we photograph it!

There are many forms of water and many way to photograph it. Let’s look at how these photographers chose to do it:

Sudipto Sarkar

By Sudipto Sarkar

William Warby

By William Warby

Southtyrolean

By southtyrolean

Christopher Chan

By Christopher Chan

Berit Watkin

By Berit Watkin

Matthew Paulson

By Matthew Paulson

CatDancing

By CatDancing

Maricel

By Maricel

Kyle Burkholder

By Kyle Burkholder

Bram Cymet

By Bram Cymet

Hege

By Hege

Movement Six

By Movement Six

Evelyn Berg

By Evelyn Berg

Alexander Rentsch

By Alexander Rentsch

Hasin Hayder

By Hasin Hayder

Janet Ramsden

By Janet Ramsden

Jimmy Brown

By jimmy brown

Ravas51

By ravas51

Susanne Nilsson

By Susanne Nilsson

Kurt:S

By Kurt:S

Pam  Link

By Pam Link

Barbara  Walsh

By Barbara Walsh

Peter Roome

By Peter Roome

Caroline

By Caroline

-Reji

By -Reji

Sightmybyblinded

By sightmybyblinded

Massmo Relsig

By Massmo Relsig

Hege

By Hege

Vern

By Vern

Tate Kieto

By Tate Kieto

googletag.cmd.push(function() {
tablet_slots.push( googletag.defineSlot( “/1005424/_dPSv4_tab-all-article-bottom_(300×250)”, [300, 250], “pb-ad-78623” ).addService( googletag.pubads() ) ); } );

googletag.cmd.push(function() {
mobile_slots.push( googletag.defineSlot( “/1005424/_dPSv4_mob-all-article-bottom_(300×250)”, [300, 250], “pb-ad-78158” ).addService( googletag.pubads() ) ); } );

The post 30 Fastastic Wet and Wild Images of Water by Darlene Hildebrandt appeared first on Digital Photography School.


Digital Photography School

 
Comments Off on 30 Fastastic Wet and Wild Images of Water

Posted in Photography


24 Magical Images of Light Trails

30 Oct

Capturing light trails of something moving, often a vehicle, is somewhat magical because it’s something you cannot see with the naked eye. So only through the use of a camera and the right exposure techniques can this be possible.

Remember that light painting is just that if you show the light source – capturing the light trail.

Let’s look at a few images of light trails and see how these photographers captured the magic:

X_tine

By x_tine

JamesHarrison_

By JamesHarrison_

Howard Ignatius

By Howard Ignatius

Paulius Malinovskis

By Paulius Malinovskis

Cabrera Photo

By Cabrera Photo

Sam DeLong

By Sam DeLong

Todd Blaisdell

By Todd Blaisdell

VFS Digital Design

By VFS Digital Design

Katie Inglis

By Katie Inglis

Keith

By Keith

Jthornett

By jthornett

Jamie McCaffrey

By Jamie McCaffrey

Tom Roeleveld

By Tom Roeleveld

Alex Lin

By Alex Lin

Mike Boening Photography

By Mike Boening Photography

These * Are * My * Photons

By These * Are * My * Photons

Altug Karakoc

By Altug Karakoc

Wilson Lam

By Wilson Lam

Thomas Renken

By Thomas Renken

William Warby

By William Warby

Luc Mercelis

By Luc Mercelis

Aaronisnotcool

By aaronisnotcool

Alan Newman - An1.uk

By Alan Newman – an1.uk

Scott Griggs

By Scott Griggs

googletag.cmd.push(function() {
tablet_slots.push( googletag.defineSlot( “/1005424/_dPSv4_tab-all-article-bottom_(300×250)”, [300, 250], “pb-ad-78623” ).addService( googletag.pubads() ) ); } );

googletag.cmd.push(function() {
mobile_slots.push( googletag.defineSlot( “/1005424/_dPSv4_mob-all-article-bottom_(300×250)”, [300, 250], “pb-ad-78158” ).addService( googletag.pubads() ) ); } );

The post 24 Magical Images of Light Trails by Darlene Hildebrandt appeared first on Digital Photography School.


Digital Photography School

 
Comments Off on 24 Magical Images of Light Trails

Posted in Photography


Creating Ghostly Images for Halloween

29 Oct

While we may never actually see, let alone photograph a real ghost, we can create the illusion of a ghost image with our cameras. There is no exact science to capturing these images, and it sometimes takes some trial and error to create the effect you are looking to achieve. Still, there are several ways this can be accomplished, so let’s take a look at three of them:

  1. Multiple exposures in-camera
  2. Long exposures
  3. Combining images in Photoshop
To create this multiple exposure image, two exposures were captured on one frame. The first exposure captured the ghost and the tree and the second exposure was of the tree only. Notice the dark areas do not reflect light, allowing the tree to show through the ghost.

To create this multiple exposure image, two exposures were captured on one frame. The first exposure captured the ghost and the tree and the second exposure was just of the tree. Notice the dark areas do not reflect light, allowing the tree to show through the ghost.

Equipment

  • DSLR Camera: or at least a camera that will capture multiple exposures, and allow you to set your shutter speed.
  • Tripod: In most cases this is a must to keep your images aligned and sharp.
  • Remote Shutter Release: Any touch of your camera can cause enough shake to create a blurry image.
  • Neutral Density Filters: If you are trying to create ghost images in the daytime you may need to limit the light entering your camera to get a longer exposure.
  • Flash/Speedlight: While not a necessity for capturing ghost images, one or more flash can be added to light your subject and also will freeze the movement. Which is especially helpful in ghost images done in low light.

creating-ghost--images-3

Different types of ghost images

  • Sharp transparent figure: These ghosts will be sharply focused, which means a faster shutter speed should be used, or your subject must remain motionless during the exposure. Using a short burst of flash (freezes them) on the exposure that includes your ghost will also help to accomplish this.
  • Blurred motion figured: A blurred ghost is accomplished by allowing your ghost subject to move during a longer exposure. The trick here is not to have too long of an exposure or too much movement by your subject, because this may cause your ghost to completely disappear, or become so faint it is not noticeable.
creating-ghost-images2

This multiple exposure ghost had three shots combined. In the first exposure, the ghost had her hands over her face, then for the second exposure, the ghost removed her hands. Finally, in the third exposure the ghost was removed from the scene to allow the tree roots to show through her.

Multiple exposures ghosts

Most DSLRs now have a multiple exposure function which will allow you to take two, or more, images on the same frame. This method of shooting ghosts can be used in any lighting, especially in a daylight scene. Here are the simple steps for this method:

  1. Choose a unique location. Though a popular location is a graveyard, be creative in choosing your spot.
  2. Set the exposures for the lighting of the scene. Depending on your camera, this means you may have to compensate your overall exposure to allow for the multiple exposures. Some cameras will have an auto gain setting that will auto correct the exposure to compensate for the multiple exposures (basically it adds them all together).
  3. Set your camera to Multiple Exposures. This function offers various amount of control, depending on the camera model. Choose the number of multiple images you want, a number that also varies among different camera models. At minimum, you will want two exposures.
  4. Placing the camera on a good sturdy tripod is a must, so that the background does not shift from exposure to exposure.
  5. Test your exposure by taking a complete set of images. At this point it is not necessary for your model (ghost) to be present.
  6. Once you have the settings correct for a desirable image, it’s time to add your ghost. Pose your ghost in the scene and take the first exposure.
  7. Remove the ghost from the scene or move the ghost to another location and take as many additional images as you choose.
  8. The final exposure should be taken without the ghost to allow the background to show through the ghost.
  9. Your camera should now display your final image.
  10. Repeat steps 3 through 8 until you get the desired results. It may take some experimentation.

creating-ghost-images7

Long exposures ghosts

Taking a long exposure shot while your ghost moves through the image will create a blurred-motion figure. This method is especially useful for ghost images in low-light situations. The best time of day to shoot this type of image outdoors is right around sunset, while there is still enough light to illuminate the background.

  1. Again, choose a unique location. Though a popular location is a graveyard, be creative in choosing your location.
  2. Set your camera to its lowest ISO and set the shutter speed to a slow speed (long exposure), typically around 10 seconds (or more, depending on the light and amount of movement your ghost makes). This means you may need to use a small aperture to achieve a correct exposure. You may even need to add an ND filter to limit the amount of light that is reflecting onto your camera’s sensor.
  3. Placing the camera on a good sturdy tripod is a must, because you don’t want your background to be blurry, only the subject.
  4. Compose your image.
  5. Test your exposure without the ghost so that you are happy with it before you add your ghost.
  6. Have your ghost rehearse the movements you are expecting. Keep in mind that the motion should be smooth and continuous. If the ghost stops moving in multiple spots during the exposure, you may end up with multiple ghosts in your image. Also, if the motion is too fast the ghost may not show up in the image at all.
  7. Begin shooting the long exposure with your ghost in motion in the scene.
  8. Check your results. Review and continue.
  9. Repeat steps 2-7 as necessary until you get the results that you want.
Naveed Dadan

By Naveed Dadan

Creating ghost images in Photoshop

If your camera doesn’t have multiple exposure capability, don’t worry! You can accomplish nearly the same effect in Photoshop. This option works best on black and white images. While it is not impossible to process a ghost image with color, sometimes it is difficult to get the color tones to look right.

  1. Open both images in Photoshop – your background image and your ghost one.
  2. Outline the ghost image.
  3. Copy and paste the ghost image onto the background image, which will place your ghost on a separate layer.
  4. Select the ghost layer.
  5. Move the ghost image into place in the image using the Move tool. You may need to enlarge or reduce the size of the ghost (use Transform) to match the proportions of your background image.
  6. In the layer palate, change the transparency of the ghost layer until you get the ghostly effect you want.
  7. You may want to add a layer mask to the ghost to hide sections of the ghost, especially if you want them to appear behind objects in your background image. You could also use some special effects such as motion blur to add mystery to the image.
  8. Save the image as a Photoshop file (.psd) so if you want to edit the image later you still have the layers to edit.
  9. Flatten layers and save the final image as JPG or Tiff, whichever is your preferred file type.
This ghost image was created in Photoshop by combining an image of an old ghost town and scanning some old family photos to use as ghost images.

This ghost image was created in Photoshop by combining a photo of an old ghost town with scans of some old family portraits to appear as ghosts.

Get out and try it

It may take a good deal of experimentation to come up with results you are looking for, but hopefully the steps above will kick-start your imagination. There are so many possibilities, so don’t be afraid to try creative methods, sometimes the best results happen when you least expect them!

Another aspect of the shot: the color of your ghost’s clothing may make a big difference in your result. Light colored clothing will reflect light, and reversely, darker clothing will not reflect much light, which will create an almost invisible effect for the ghost figure.

One reminder I’d like to pass on to you is to not trust your LED screen in low light for proper exposure. Learn to use your camera’s histogram, because in low-light an image may look really bright on the back of your camera, but still be extremely underexposed.

Now get out there and shoot, and don’t be afraid of the ghosts! (Unless, of course, you see a real one!) If you try one or more of these techniques please share your images in the comment below, I’d love to see what you come up with.

googletag.cmd.push(function() {
tablet_slots.push( googletag.defineSlot( “/1005424/_dPSv4_tab-all-article-bottom_(300×250)”, [300, 250], “pb-ad-78623” ).addService( googletag.pubads() ) ); } );

googletag.cmd.push(function() {
mobile_slots.push( googletag.defineSlot( “/1005424/_dPSv4_mob-all-article-bottom_(300×250)”, [300, 250], “pb-ad-78158” ).addService( googletag.pubads() ) ); } );

The post Creating Ghostly Images for Halloween by Bruce Wunderlich appeared first on Digital Photography School.


Digital Photography School

 
Comments Off on Creating Ghostly Images for Halloween

Posted in Photography


6 Ways to Use Live View to Get Sharper Images

27 Oct

The LED monitor on the back of a camera is most often used to review captured images. But here’s a tip: Live View can also be a useful tool, helping you to focus your camera before taking the shot. In fact, Live View may be the most accurate means of focusing a camera. Let’s take a look at six ways you might use Live View to focus.

1 – Focus Stacking

Use live view to focus on different depths of field to use for focus stacking

Use Live View to focus at different distances for focus stacking.

Focus Stacking is similar in principle to HDR. However, when doing Focus Stacking, images are captured with different parts of the image in focus, then combined in Photoshop to create an image with more depth of field than would be possible with a single exposure. This method is a useful tool when doing macro photography. Calm winds are a must to capture focus stacking images. Use Live View to accurately focus each image. Here is the step-by-step outline of the process:

  1. Set up your camera on a sturdy tripod (a must!)
  2. Frame or compose the image
  3. Turn on Live View
  4. Zoom the Live View in so you can adjust the focus of each image to different distances
  5. Use Photoshop to process and blend the stacked images

2 – Manual Trap Focus for Macro Photography

Use live view to manually trap focus a macro photography subject.

Use Live View to manually trap focus a macro photography subject.

Manual Trap Focus can also be useful in macro photography. Set your camera to manual focus, and using Live View move the camera until the subject is in focus. Used in conjunction with a focusing rail on a tripod, or hand held, move the camera to focus the image. Another benefit of this method is that it also gives you a Live View of the depth of field for the image you plan to capture. See steps below to give this method a try:

  1. Set camera to manual focus
  2. Turn the focus ring on your lens to the closest focus distance
  3. Turn on Live View
  4. Move your camera closer to your subject until it is in focus. (Using a focusing rail can help you master this method.)

To fine-tune the focus, use the zoom feature in Live View to get the most accurate focus point possible.

3 – Focus on any point in your scene

Live View is not restricted to the usual focusing points in your camera’s main focusing system. Most newer camera models will have 51 or more focusing points. However, these points are clustered around the center of the image. In Live View, you can move your focusing point all the way out to the edge of the image.

4 – More Accurate Focus

Use live focus to zoom in for a more accurate focus on waterfalls.

Use Live View focus to zoom-in for a more accurate focus on waterfalls.

Live View also provides a more accurate focus than a camera’s main auto focusing system. The Live View system is based on the contrast of the image actually captured by the camera’s sensor. It is slower-focusing than your camera’s regular phase detection autofocus system, but it is more accurate. This works great for focusing in on subjects within landscape, and portraiture where a slower-focusing method doesn’t affect the ability to capture the shot.

5 – Manual Focus in Low Light

When photographing in low light situations, such as astrophotography, auto focusing often fails to provide a desirable result. Using Live View, in conjunction with manual focusing, can help obtain a sharp image. While in Live View, use the zoom to enlarge the subject’s image and then use manual focus to tweak the photo’s sharpness.

Use live view to focus when capturing low light images.

Use live view to focus when capturing low light images.

6 – Focusing on the Eyes

For the most compelling portraiture and wildlife photography, the most important focus is on the eye(s) of the subject. Using Live View, it is possible to isolate the eye for either auto focus or a manual focus. This method is limited to images that are posed, or with little movement.

Use live view to focus on the eye to fine-tune the focus in select wildlife images.

Use Live View to focus on the eye to fine-tune the focus in select wildlife images.

Conclusion

These are just a few ways that you can use Live View mode to focus your camera. Remember that using these methods will be much harder on your battery life. Always keep a spare, fully charged, battery with you when you are shooting. If you have any other ideas for using Live View for focusing, please leave them in the comments below.

googletag.cmd.push(function() {
tablet_slots.push( googletag.defineSlot( “/1005424/_dPSv4_tab-all-article-bottom_(300×250)”, [300, 250], “pb-ad-78623” ).addService( googletag.pubads() ) ); } );

googletag.cmd.push(function() {
mobile_slots.push( googletag.defineSlot( “/1005424/_dPSv4_mob-all-article-bottom_(300×250)”, [300, 250], “pb-ad-78158” ).addService( googletag.pubads() ) ); } );

The post 6 Ways to Use Live View to Get Sharper Images by Bruce Wunderlich appeared first on Digital Photography School.


Digital Photography School

 
Comments Off on 6 Ways to Use Live View to Get Sharper Images

Posted in Photography


Erez Marom: On the importance of naming images

26 Oct

Landscape and nature photographer Erez Marom has a lot of experience getting images in tough locations all over the world. Getting great shots takes a lot of work, but how many of us spend any time considering how to name our images? In this article, Erez takes us through his thought-process when titling his images, and explains why he thinks it’s so important. Click through to read the full article

Articles: Digital Photography Review (dpreview.com)

 
Comments Off on Erez Marom: On the importance of naming images

Posted in Uncategorized