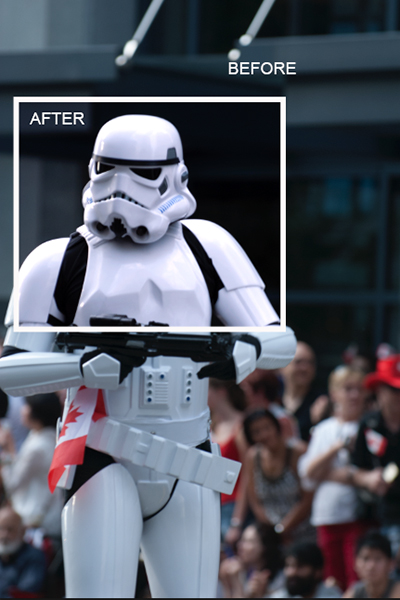
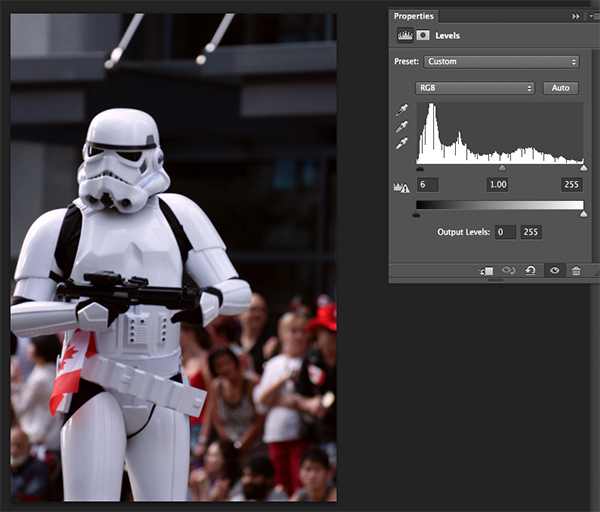
Notice the difference some quick adjustments using the Levels tool can make
Image editing is an important part of making your good images look spectacular. Photoshop and Lightroom are packed with tools to help you get your images to look great after you have downloaded them on to your computer. While there are many different tools in Photoshop to enhance your image, there are really only a handful of tools that you will use on just about every image; one of those is the levels tool. Photoshop has a levels tool, Lightroom doesn’t unfortunately. Each photographer has a different workflow when editing images, my suggestion is to follow a process that is the same for each image. When you open up an image in Photoshop or Lightroom, the first step is to look at the exposure. Is the image over or underexposed? At this stage of the workflow, you could be looking at a tool like the Shadow and Highlights adjustment, the next one to use would be Levels.
What is the Levels tool?
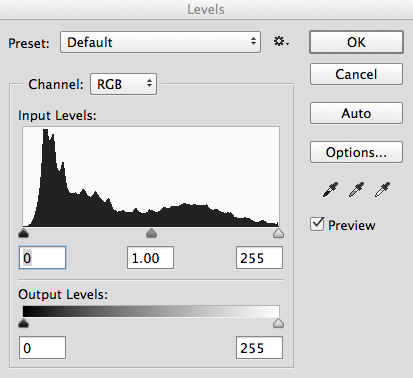
Levels tool in Photoshop
Levels does two things in one tool, it corrects the tonal range in an image and it corrects the colour balance. Adjustments made using the Levels tool are not only about getting the exposure on your image correct; it also has a second function and that is, it can correct for colour too. Yes, there are other tools within Photoshop that can do this, but the Levels tool can make it really quick and easy.
The Levels tool uses a histogram to show a visual representation of the tonal range in your image. There is a lot to be said about a histogram, but the most important thing to remember is that there is no right or wrong histogram. If you are unsure about how a histogram works, check out: How to read and use Histograms. On the histogram in the Levels tool, you will see a numerical range starting at zero on the left hand side of the graph, and 255 on the right. In the Levels function, zero represents black and if you have pixels that are at zero, that means there is no detail, they are totally black. The right hand side at 255 represents total white. If you have pixels at 255 that means they are totally white, with no detail. If the shape of your histogram is leaning to the left hand side, that means you have a lot of dark pixels in your image and your image is possibly underexposed. If the histogram is more on the right hand side that means you have a lot of bright highlights in your image and it is possibly overexposed. The middle slider is the mid-tone or gamma adjustment. All the pixels that are not highlights or shadows, fall into this category.
How does the Levels tool work?
When you open the Levels tool, very often your first instinct is to push the sliders into a position that makes the image look brighter. That can work, but I suggest that you do the following: Before you make any adjustments, take a look at your image and see if you can pick up a colour cast. This is a tint or colour that affects the whole image, and is often unwanted. For example, if you have a wedding photo of a bride shot on an overcast day and while everything looks okay, there may be a slight blue hue in the image from the overcast light. This means that her dress looks a little blue instead of white. In a case like this, a colour cast is something you want to get rid of. If however you have shot a summer sunset and the whole scene is bathed in warm orange light, this could also be seen as a colour cast, but in that case you would probably not want change it. One way to find colour casts in your images is to look at an area of the image that should be white and see if it has a tint. A colour cast will vary depending on the light you shot under; it could be green, magenta, blue, yellow, orange, or anything in between.
How to use the Levels tool
Make and adjustment layer for Levels
You can use the Levels tool on any image that needs the colour or contrast corrected. If you have an image that needs to have the colour cast corrected, like my shot of the Star Wars Stormtrooper does, then do the following:
- Open your image in Photoshop.
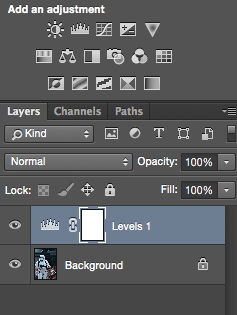
- Click on the adjustment layer icon at the bottom of the Layer panel and create a Levels adjustment layer, or click on the Levels tool icon in the adjustments panel which is directly above the layers panel.
Step 1 – If you need to do colour correction
If your image has a colour cast (the example image does, as there is a slight blue colour because it was overcast weather that day), follow these steps. Not all images need to have the colour corrected, if you are happy with the colour in your image you won’t need to do this. If you do have a colour cast in your image, then do the following:
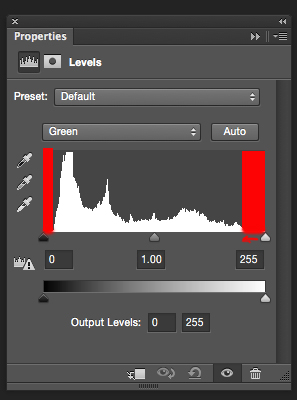
Bring the white and black sliders to the point where the graph starts moving upward
Part 1: In the levels tool, click on the drop down box above the histogram that says RGB. This will open up the three channels individually. Click on RED and bring the white slider and black slider in to part of the histogram where it starts to move upwards. Click on the the RGB drop down box again and click on GREEN and do the same, and finally click on BLUE and repeat one more time. This step will only work if there is a colour cast in your image. If there is no colour cast, the histogram will spread to the edges of the graph. In this image, there was a colour cast and this was how the GREEN channel histogram looked.
The red areas in the screenshot above show you where there was no colour information. By sliding the sliders inward to the edge of the graph, you will start to neutralize the colour cast.
Part 2: You will notice that as you make these adjustments, your image may have a very strong colour cast of the channel you are adjusting. Don’t be alarmed, this will all work out once you make the final adjustments.
Part 3: Once you have adjusted for the colour correction in all three colors, you can now adjust the exposure and contrast

Don’t be alarmed at the crazy colours you might see during the colour cast adjustments, they will work out in the end.
Step 2 – Adjusting for exposure and contrast
The Levels tool can also adjust your image’s exposure and contrast. In other words, you can use it to make the highlights, shadows and mid-tones brighter or darker – an all-in-one tool. The levels tool is really great to make some quick adjustments to your image, here is how:
Part 1: In the RGB channel, move the white slider in from the right to the edge of the histogram. Do the same for the black slider, adjusting it in to the edge of the histogram on the left. The important tip here is to make sure that you don’t overexpose the highlights and underexpose the shadows. This is called clipping and the best way to see if you are clipping any pixels is to hold down the ALT key when you are adjusting the white and black sliders.
2. Once you have those two sliders adjusted, you can slide the mid tone slider to add some contrast to the scene and this will be the final touch to your levels adjustment.
The final adjustment showing colour correction and contrast correction
Some final tips to remember
1. Like any tool in Photoshop, if levels is overdone, you will be able to see it in the image. So, be aware of over adjusting your image.
2. Small adjustments always work better than one big adjustment. Make small changes first and see if that works.
3. Use the ALT key to make sure you aren’t losing detail in the shadows and the highlights by clipping your pixels.
4. Add some contrast to your images in levels, that will give your image a bit more pop and will enrich the tones.
The levels tool is a powerful ally to have in your image editing workflow. I use this tool on just about every image I edit. It can really add some contrast and punch to your images so try and use it as often as needed. These techniques take practice, but once you know what to do, the levels tool is quick and easy to use.
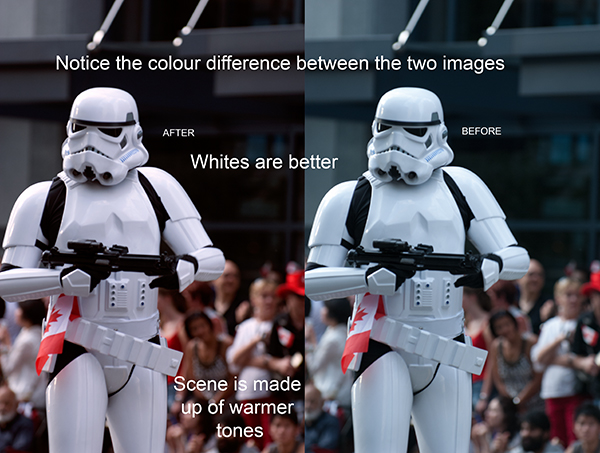
Compare the images side by side, there is a subtle but real difference
The post Using Levels in Photoshop to Image Correct Color and Contrast by Barry J Brady appeared first on Digital Photography School.

Digital Photography School


You must be logged in to post a comment.