RSS
 

Posts Tagged ‘Image’

4 Tips to Help you Decide Between Black and White or Color for your Image

09 Jul

Why do black and white photographs speak to us? In nature, colors are meant to attract, and cause things to catch our attention. Still, even without color, black and white images are a mainstay of our craft, and are powerful representations of the artistic spirit.

Half Color

There are many differing opinions when it comes to black and white photography. Some photographers love it, and shoot black and white exclusively, while other photographers absolutely shun the notion and shoot only in color. Then you have the majority of our lot who fall somewhere in between the love and hate poles. Luckily, the digital imaging age allows photographers to decide after the fact whether our images make us happier in full color, or in black and white. However, this ease of conversion can become somewhat of a problem because it is in fact so simple to switch from color to black and white, that it can cause conflicting feelings about which route to take. While there is really no absolute magic formula to determine the best choice for your particular image, there are some guidelines that you can follow to make your decision a little easier.

Here are four tips to help you decide if an image will be more appealing in black and white than in color.

Black and white or color?

#1 Does color have a large impact on the image?

This may seem like an easy judgment to make, but it is not always so simple. Color can be a fickle thing, and can either add to, or unintentionally detract interest from a photograph. Ask yourself, “does this image rely exclusively on color or are there other interesting aspects that can be emphasized?” Just how nice would it be to look at as a colorless rainbow? This not to say that all colorful objects and scenes won’t do well as black and white, but as a general rule most highly or diversely colored subjects should remain just that – colorful.

Silhouette
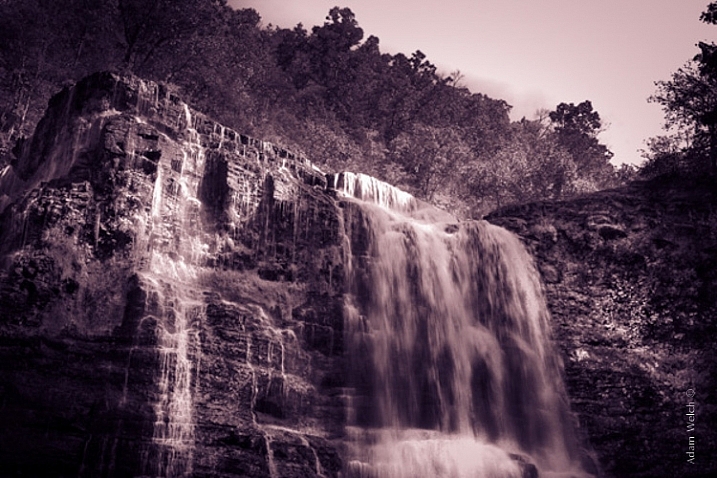
This image really had nothing to say in the way of color, so I made use of the heavy backlighting to create a strong contrast with the subject.

Two Giraffes
The original image didn’t have a lot going on as far as color, so I choose to convert it to black and white to really make the patterns pop.

The opposite of this usually proves to be true also. When you have an inherently bland scene or subdued colors, the image will usually do well when converted to black and white and this leads us to tip #2.

#2 Are there interesting light or contrasts?

This is where new photographers tend to encounter a little bit of difficulty because seeing good light or contrasts usually requires quite a bit of pre-visualization. Don’t worry! Developing an eye takes, well, some developing. The more you force yourself to look past what is readily apparent, the more you will learn to almost see in black and white.

When you remove color from the photographic equation, you are left with only differences in tone; lights and darks. These differences are what truly make good black and white images, and the differences in light and shadow bring contrast to the photograph. So, when you see that a given scene or subject presents the opportunity to exploit stark contrasts and unique lighting or shadow, it might be a great opportunity to try black and white. Take a look at this image of the leaf of a house plant.

Plant Leaf

I used a single flash behind the leaf to really bring out the contrasts within. Ordinarily these details might have gone unnoticed, and the black and white treatment really compliments the lighting.

The great Ansel Adam’s said that he; “could convey a greater sense of color with well executed black and white images using only light, shadow, and even subtleties in texture to express the qualities of the photo”. It’s that last variable, texture, that brings us to tip #3.

#3 Are there interesting textures?

When we think of texture, we can easily describe it in terms of how things feel physically, when we perceive them through our sense of touch. Texture in photography, however, can be a little more challenging to put into words. Texture in a photograph has to be perceived with our eyes and then we determine if it’s smooth, rough, or coarse. Transforming the tactile tangible into a visually tangible image takes practice and a trained eye, and this is where working in black and white can be the best choice. Examples of textures that work well for black and white photos are wood, metals and stone, even plants and human skin. Directional lighting (light from largely one source coming from the side) compliments, and helps emphasize textures.

This image was made with natural lighting coming in directly from one side. This really brings out the texture, imperfections, and grittiness of the photograph.

Hands

This last tip goes beyond the physical attributes of an image and delves into the feelings we want to convey through a photograph. This is where black and white photography can really shine.

#4 What is the mood you want to create?

Have you ever looked a photograph, and been immediately struck by how the photograph felt? This is often referred to as the mood of a photo. It could be a bleak and rainy street scene, or an image of a warm and welcoming sunset. In any case, using black and white is a good way to convey a sense of mood in your photography. Admittedly, black and white usually imparts dark, bleak, somber, or an etherial overtone to a photograph, but that does not mean that it doesn’t work well for more upbeat images. Convert some of your landscapes to black and white to see how the mood can change. Experiment with black and white portraits which can portray your subject with a more stoic and brooding persona.

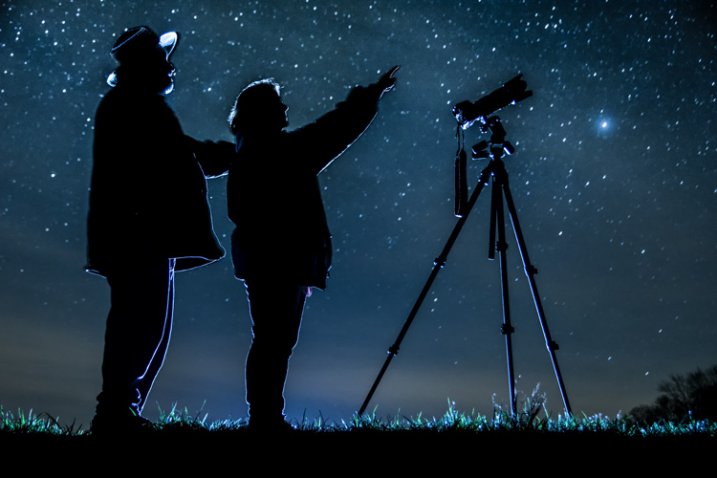
This photo of a hot day on Boston Common had lots of differences in lighting, along with some great coloring especially in the sky. Still, I chose black and white because it simply felt better to me, and matched what I saw in my mind more closely.

Boston Common

Keep in mind that you may run into some different terms if you decide to work more with black and white photography. These terms are usually interchanged, but in reality they are not all the same. It will help you to understand the differences in each so you can know what to expect.

Monochrome

Monochrome simply means varying shades of only one color are used to make an image. This is often thought of as black and white (which are technically monochromatic) but in reality any color can be used. Sepia toned photographs are a good example of images which are monochrome.

This is an example of a monochromatic photograph that is not black and white.

Sepia Waterfall (2)


Grayscale

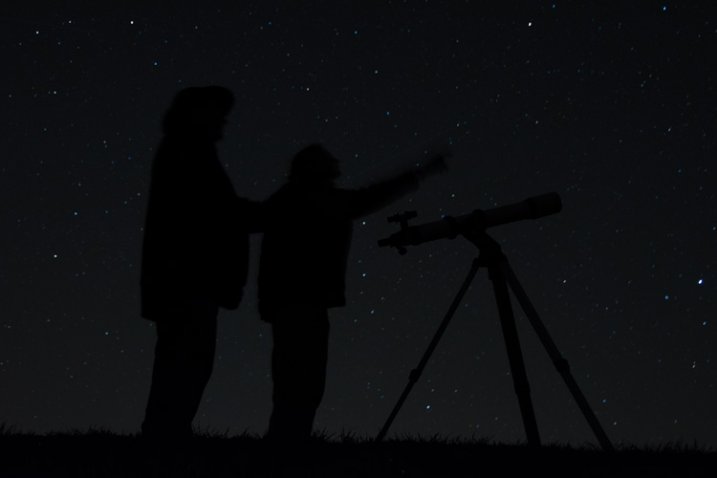
The term grayscale is another one that gets thrown around to label black and white images. Though not completely incorrect, grayscale images use only varying shades of gray (256 to be exact), and no other color. Grayscale can be a very bland when no other edits are used because it tends to leave the entire photo as middle gray. Notice how bland and uninteresting the below image looks when it’s converted to grayscale.

Grayscale

True Black and White

As I have said, black and white images are indeed monochromatic but not all monochrome images are black and white. True black and white photos use only black and white to produce the image although the majority still use a mix of gray tones.

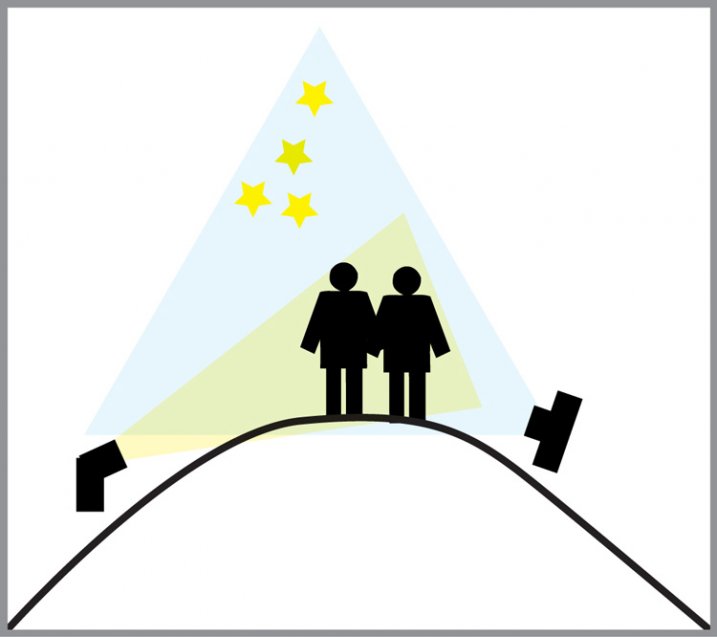
This is the same image as above after it has been further processed to be closer to a true black and white photo. The differences in tones become becomes more apparent, and the photo becomes much more pleasing.

True BW

Black and white photography has been a staple genre since literally the inception of photography, and has evolved into a high art-form. Of course there are some people who simply do not like black and white images and prefer everything in color. Still, black and white photography is something that should not be discounted, and certainly not underestimated in terms of artistic expression. Today’s processing software makes converting color images to black and white nearly effortless, so use these tips and give it a try!

googletag.cmd.push(function() {
tablet_slots.push( googletag.defineSlot( “/1005424/_dPSv4_tab-all-article-bottom_(300×250)”, [300, 250], “pb-ad-78623” ).addService( googletag.pubads() ) ); } );

googletag.cmd.push(function() {
mobile_slots.push( googletag.defineSlot( “/1005424/_dPSv4_mob-all-article-bottom_(300×250)”, [300, 250], “pb-ad-78158” ).addService( googletag.pubads() ) ); } );

The post 4 Tips to Help you Decide Between Black and White or Color for your Image by Adam Welch appeared first on Digital Photography School.


Digital Photography School

 
Comments Off on 4 Tips to Help you Decide Between Black and White or Color for your Image

Posted in Photography


Adding an Off-Camera Flash to Create a Winning Image

07 Jul

Star_gazers

This image, titled “Star Gazers”, won Grand Prizes at the 2015 Shoot the Hills photo competition. Held in the Hocking Hills region near Logan, Ohio, this competition takes place the 3rd weekend every April. 160 photographers from several states participated this year.

I initially came up with the idea for this shot over a year earlier, but my first attempt at the image failed miserably. (see below)

DSC_3387

What mistakes did I make?

If I would have checked the histogram I would have seen that all of the image was extremely under-exposed with all the data pushed up against the left side of the histogram.

If I had checked the histogram I would have noticed that the image was extremely under-exposed with all the data pushed up against the left side of the histogram.

  1. The image was under-exposed, because I failed to check the histogram. In the dark the image looked great on the LCD on the back of the camera!
  2. With the long exposure (30 seconds) there was no way for the subjects in the image to remain still enough to avoid blurring.

The Solutions

  1. The solution for the exposure was simple. First I turned down the brightness of the camera’s LCD screen. Then I used the histogram to determine my exposure.
  2. The length of exposure time was the main problem I had with this first attempt at capturing the image I had planned. It is nearly impossible for a live model to stand still for 30 seconds to prevent blurring. An off-camera flash was added behind the models to create the rim lighting in order to freeze their movement. Adding this flash was the major difference-maker from my earlier attempt of this image.

Other Factors to Consider

Sometimes it takes some trial and error to achieve the results you are looking for in an image. Improvisation may be required when unforeseen issues change shooting conditions. Many factors need to fall together for it to be possible to create an image such as this one. After waiting until 2 a.m. for the clouds to clear, it was finally time to capture the image I had pre-visualized nearly a year earlier.  Because the cloud cover remained near the horizon, it became necessary to change the angle of view to capture the higher, clearer sky. This adjustment also made it necessary to change the focal length from the 18mm I had planned to 50mm. One of the rules of the Shoot the Hills photo competition is that all images must be submitted straight out of the camera, so getting everything right in the camera is a must. Here are some additional factors required to capture such an image:

The Weather

  • Clear starry night – Probably the single most important factor to create this image is a clear starry night.
  • Dark sky – Find a dark sky, away from the lights of the city. There are dark sky maps on the internet.
  • Moonless night (or after the moon has set) – The light from the moon will fade out (overpower) many of the dimmer stars.

The Exposure

Histogram for the final winning. Notice how the histogram stretches back almost into the mid-tones, with a little info clear back into the highlights which is the stars and the rim lighting.

Histogram for the final winning shot. Notice how the histogram stretches back almost into the mid-tones, with a little info clear back into the highlights, which represent the stars and rim lighting.

I wanted to keep the shutter speed at 30 seconds for two reasons. First, that is the longest shutter speed most cameras allow without having to set them to bulb, and manually doing a timed exposure. Secondly, I didn’t want the stars to become extremely blurry. Using the histogram, I determined my exposure with my focal length at 50mm to be;  aperture at f/5 and ISO set to 2000, which I had predetermined was the highest ISO I could use, and still be able to minimize the amount of digital noise. As mentioned earlier, do not rely on the camera’s LED screen to determine exposure. In fact, in the dark the LED screen will look really bright when the image is actually extremely underexposed. To remedy this problem, turn the brightness down on you LED screen, if this setting is available. But always use the histogram to get the best exposure setting. If the histogram is all pushed over to the left side, the image is going to be underexposed.

Remote Triggers

Since I was also one of the subjects in the images, I used one remote to begin the exposure, and another to trigger the flash.

White Balance

After experimenting with several preset white balances I decided to set a custom white balance of 2560 Kelvin, to give the image a cool blue colored sky.

Focusing

Focusing a camera in the dark is one of the most challenging parts of creating a night shot under the stars. Here are some tips to set focus for night images:

  • Pre-focus before it gets dark. This is the easiest way to focus for a night shot, and after the focus is set, turn off the auto-focus so it doesn’t change.
  • Shine a bright flash light on the subject to allow the camera to focus, and as in the method above, after attaining focus, turn off the auto-focus.
  • Use live view to focus manually on a light.
  • Use back button focusing to preset focus

For this image I used back button focusing, and a flash light to set my focus.

The Logistics

The setup for this shot was at the top of a steep hill which came to a point. With the subjects at the very top, the camera was placed on a tripod below, and aimed upward at the subjects and the starry sky in the background. The off-camera flash was placed on a tripod on the other side of the hill and aimed upward at the subjects. The flash and tripod had to be placed low enough on other side of the hill, so that the actual flash did not show in the image.

layout

Conclusion

Henry Ford once said that “Failure is the opportunity to begin again more intelligently.”  When an image idea fails, take a look at what went wrong and then look for solutions to improve the image, return to the scenario and try it again. From my first unsuccessful attempt to capture star-gazers, the need to freeze the subjects and prevent the blurring, led me to try the off-camera flash technique. The back-lighting and a year’s experience made all the difference between a failed shot and a winner!

googletag.cmd.push(function() {
tablet_slots.push( googletag.defineSlot( “/1005424/_dPSv4_tab-all-article-bottom_(300×250)”, [300, 250], “pb-ad-78623” ).addService( googletag.pubads() ) ); } );

googletag.cmd.push(function() {
mobile_slots.push( googletag.defineSlot( “/1005424/_dPSv4_mob-all-article-bottom_(300×250)”, [300, 250], “pb-ad-78158” ).addService( googletag.pubads() ) ); } );

The post Adding an Off-Camera Flash to Create a Winning Image by Bruce Wunderlich appeared first on Digital Photography School.


Digital Photography School

 
Comments Off on Adding an Off-Camera Flash to Create a Winning Image

Posted in Photography


One Image of an Entire Year

02 Jun

We’re feeling super inspired by this photograph by Eirik Solheim.

Eirik set up an SLR in a window and snapped a pic every half hour for one year. This left him with 16,000 images. Whoa. He picked out 3,888 of ‘em and used a bit of code to stitch them into a single image.

You may not have a spare SLR that could be set up in a window for a year, but this idea can totally be taken in other directions.

  • Take 4 photos of a local park, one for every season, and use your usual photo editor to cut ‘n paste pieces into one image.
  • Make a composite of your summer campsite – take one photo an hour for twelve hours.
  • Set your camera up on the beach and grab a shot every half hour of the tide going out. (Check here for local tide schedules!)


Photo by Eirik Solheim


© Erin for Photojojo, 2015. |
Permalink |
No comment |
Add to
of an Entire Year”>del.icio.us

Post tags:


Photojojo

 
Comments Off on One Image of an Entire Year

Posted in Equipment


Fujifilm X-T10 First Impressions & Image Samples

18 May

The Fujifilm X-T10 shares a similar relationship to the X-T1 that the OM-D E-M10 shares with its siblings – advanced features borrowed from a higher-spec model in a compact body. The X-T10 uses the X-T1’s 16MP APS-C X-Trans sensor but offers slightly downgraded hardware and lacks weather-sealing. We’ve had the X-T10 in our hands long enough to get familiar with it and put together some first impressions. Read more

Articles: Digital Photography Review (dpreview.com)

 
Comments Off on Fujifilm X-T10 First Impressions & Image Samples

Posted in Uncategorized


Samsung Galaxy S6 units found to be using different image sensors

07 May

When the Galaxy S6 and S6 Edge were launched earlier this year there was no talk of the ISOCELL technology previously used by the Galaxy S5’s and Note 4’s in-house image sensors, so it was believed the 16MP 1/2.6 CMOS chip in the S6 was provided by Sony. However, rumors have emerged that in some units Samsung sensors are used instead of the Sony variant, and a company spokesperson has confirmed that different sensors are used. Read more

Articles: Digital Photography Review (dpreview.com)

 
Comments Off on Samsung Galaxy S6 units found to be using different image sensors

Posted in Uncategorized


Sony owns an estimated 40.2 percent share of the image sensor market

05 May

According to market research estimates, in 2014 Sony made 40.2 percent of all image sensors, leaving its rivals in the sector far behind. There’s no doubt that a lucrative Apple contract has helped put Sony ahead of the competition, as it earns approximately $ 20 for each iPhone sold. Read more

Articles: Digital Photography Review (dpreview.com)

 
Comments Off on Sony owns an estimated 40.2 percent share of the image sensor market

Posted in Uncategorized


Sony updates 24-70 and 16-35mm A-mount Zeiss lenses with improved AF and image quality

24 Apr

As promised last November, Sony has announced two new full-frame A-mount lenses. Compared to their 2008-vintage predecessors the Vario-Sonnar T* 16-35mm F2.8 ZA SSM II and 24-70mm F2.8 ZA SSM II feature improved image quality, less ghosting and flare, and a four-fold improvement in subject tracking speed, according to Sony. Another addition are seals that should make these lenses dust and water resistant. More details

Articles: Digital Photography Review (dpreview.com)

 
Comments Off on Sony updates 24-70 and 16-35mm A-mount Zeiss lenses with improved AF and image quality

Posted in Uncategorized


It’s Your Image Do What you Like to it

24 Mar

Quite some years ago when I was doing my Fine Art Degree at University I was working on an image which I wasn’t quite sure about. My tutor came over and asked what was wrong. I told him that I thought people wouldn’t like one aspect of it. He looked at me and said, “It’s your image, you can do anything you like to it.” Ever since then I keep repeating those words to myself.

For a number of years now I’ve been putting images on the internet like so many other people. The internet is flooded with them, yet, since the advent of digital photography, there seems to be a growing trend that making images your own is somehow cheating, or it is no longer a photo because you “Photoshopped” it. I don’t understand where this has come from.

1 LeanneCole manchester unity building

Manipulating Photos

So many times we hear people saying that they want to take the perfect image straight from the camera, but even in the days of film every image was manipulated to some extent in the darkroom. When working in the darkroom not every photo was printed exactly the same. They were all given different exposure times, or different levels of magenta for contrast (I only printed black and white) to get the best result. You could also dodge and burn for tone control.

Even color good labs would print an image once, then make colour corrections and repeat until they were happy with the final result.

I have no issues now in manipulating my photos until I am happy with the result. I am not looking for a true representation of what I see – I am looking for something more.

Of course, I have to add that there are different types of photography and some styles, like nature and pure landscape, that frown on too much editing. You can really only do basic editing to those. I do fine art photography and I think in this genre as anything goes.

I once read Adobe said about Photoshop “If you can imagine it, then you can create it.” I love that statement and it is one I live by. I believe there is nothing that is impossible and I push my images to get the best results for what I desire.

2 LeanneCole emu flats schoolhouse abandoned

Having a Vision

Before you start doing a lot of work to your images it is good to have an idea of what look you are trying to achieve. I don’t know about having a preconceived idea first. Some people can work like that, but I’ve never found it helpful. I usually find if I do work from a preconception, I’m often disappointed with the final result.

I have a certain thing, or look, that I try to get with my images because I like lots of drama and a sense of theatre. I have always been fascinated with how the world we live in would look if it were abandoned. I like empty images – images void of people. So many of my images, the fine art ones, don’t have people in them.

The thing to remember is that everyone works differently, and how I work is not going to be the same as you. I have some techniques that I often try with images, but I tend to work intuitively. I just try things, delete things, and keep going until I am happy with what I have.

3 LeanneCole pinklakes sunset national park

Putting Images on the Internet

The big test comes when the images are put online and people tell you what they think of them. The biggest thing to remember here is that it is your work; it is your image and your vision. What other people think shouldn’t matter.

There are always going to be people who tell you what to do with your image, and think they know what you want to do with it more than you. I come across these people all the time, and I usually say something like, “Thank you, that is an interesting idea, but it isn’t really what I wanted,” or, “I tried it, but decided I didn’t like it.”

Sometimes I think we care too much about what other people think, but in the end the only person who really has to like the work is you. If you are true to yourself then people start to understand that and begin to appreciate what you do.

4 LeanneCole emu flat church

Fine Art Photography

When you start disregarding the rules, you are moving further into fine art photography. There is a history in this area of pushing work to the limit, and bringing it back.

If you go to any gallery and look at the contemporary art works you will find things that are unique and were considered, at the time they were done, as breaking rules, not conforming. You have to admire artists like Picasso who just did what they wanted. They make their own images the way they wanted. How different would the world be today if artists like Picasso, Monet, Warhol, to name a few, hadn’t disregarded what was considered art and just did what everyone else was doing?

We live in a world where anything is possible and you can do whatever you like to your photos. There are always going to be people who think what you do isn’t photography, but you have to remember that it is just their opinion and you don’t have to listen to them.

5 LeanneCole mordiallic phillip bay boat

Making My Work My Own

In my own work, I have visions of what I am trying to accomplish and I strive to reach them. Though often, I have no plan of how I will actually get there, I just keep doing things until I am happy.

I have folders of skies, so I can make sure I get the sky I want for my images. I’ve had people tell me that if I replace the sky then I have changed the image and it is no longer a photo. I ask them, “What is it now?”, they say they “don’t know, digital art”, but what is digital art? I don’t listen, it is still a photograph. It is merged, and there’s more than one image, but it is still photography.

I have folders of textures to apply, though they can be overused. Again, it is a personal opinion and I might think that, and you can disagree. I find they can help certain images, but take over in others. It usually depends on how I feel at the time. I will try them, delete them, and then try something different. Often the hardest part is finding the texture that works best for that image.

6 LeanneCole lakecharm back pier tree

Conclusion

It really is all personal. Art is subjective. Love it or hate it, you have to respect what others do to their images. No one thing that Ansel Adams did in his darkroom was bad, we love his images. I say to you embrace that, make your images your own. Always remember;

It is your image and you can do what you like to it.

googletag.cmd.push(function() {
tablet_slots.push( googletag.defineSlot( “/1005424/_dPSv4_tab-all-article-bottom_(300×250)”, [300, 250], “pb-ad-78623” ).addService( googletag.pubads() ) ); } );

googletag.cmd.push(function() {
mobile_slots.push( googletag.defineSlot( “/1005424/_dPSv4_mob-all-article-bottom_(300×250)”, [300, 250], “pb-ad-78158” ).addService( googletag.pubads() ) ); } );

The post It’s Your Image Do What you Like to it by Leanne Cole appeared first on Digital Photography School.


Digital Photography School

 
Comments Off on It’s Your Image Do What you Like to it

Posted in Photography


Nikon releases ViewNX-i image browsing software

18 Mar

As promised earlier this month, Nikon has made its ViewNX-i software available for download today today. Building on the camera maker’s previous View NX 2 software, the new application works in conjunction with Nikon’s NX-D photofinishing software for editing photographs, and bundles Nikon’s ViewNX-Movie Editor for editing videos. Read more

Articles: Digital Photography Review (dpreview.com)

 
Comments Off on Nikon releases ViewNX-i image browsing software

Posted in Uncategorized


Walk Through and Review of Autopano Giga – Image Stitching Software

14 Mar
A six image photostitch of BC Place in Vancouver

A six image photostitch of BC Place in Vancouver

My first image editing software was Photoshop Elements 6 and the photostitching function was really erratic to say the least. I was doing real estate and architectural photography and needed a reliable and accurate tool that could quickly and properly stitch images together. I tried a few, but was not happy with all the results. The software was difficult to use and the results were irregular.

Then I heard about Autopano. I downloaded a trial and was pretty amazed at how quickly, and more importantly, accurately the software stitched scenes together that other pieces of software had not been able to. The stitching was seamless and effortless. I was impressed with the ease of use and the speed at which the software worked. I had found my tool of choice, Autopano Giga. Autopano Giga is a tool that is made by a company called Kolor. They develop image stitching software, pano tour software and 360 degree software, they are a specialist photography software company.

5 shot photo stitched image of the Orpheum Theatre, Vancouver BC

Five shot photo stitched image of the Orpheum Theatre, Vancouver BC

The first step in making effective panoramic images is knowing how to photograph them. That is beyond the scope of this article so for the purpose of this review we’ll assume you have some panoramic images already shot and want to stitch them.

Time to stitch

For the image stitching part of this process, I am going to be referring to the interface in Autopano Giga. This product works extremely well. It has been rated as one of the best stitching packages available. I have used it to stitch some pretty crazy panos together and it has been able to process almost anything I have thrown at it. I have done normal photostitches and I have done some multi-row stitches too. Autopano Giga has handled these with ease, and in some cases I have been pretty surprised how well it worked.

Let’s look at how this process works in Autopano Giga:
Panoramic images work well for architectural photography

Panoramic images work well for architectural photography

  1. Open Autopano Giga and on the first screen that you see, click on the second icon from the left to select your images to be stitched.
  2. Navigate to the images that you have processed and select them.
  3. Click on Detect on the top left hand side of the screen.
  4. Autopano Giga will now scan your images and do a preliminary stitch. This preview stitched image will be displayed on the right hand side of the screen that is open. This process may take a few minutes.
  5. Once the preview image is displaying, click on the Edit button (right-hand side of the screen) this will open the image in the Autopano edit screen. This is where you want to check the image to see that it has stitched together properly, and verify that there are no errors on the image.
  6. There are a number of options here, below is a high level overview of the most important functions
Detection and preview screen in Autopano Giga

Detection and preview screen in Autopano Giga

Autopano functions on the edit screen:

Autopano has a number of options you can use to render your panoramic image. These projections help with distortion and skewing. Below is an explanation of the most commonly used projections.

  • Spherical – The spherical function allows any panorama to be assembled. It is a commonly used option for building panoramic images.
  • Planar or rectilinear projection – This is a good choice if the angle is low. It’s recommended for architectural shots because it is the only mode that does not curve lines that are deemed to be straight lines. Sometimes if the angles are too extreme there may be a loss of sharpness, so just be aware of that.
  • Cylindrical projection – This projection can be used up to 360° (horizontally).
  • Mercator projection – The mercator projection can also be used up to 360° (horizontally). The effect of stretching up and down, the image may seem to become distorted.
  • Pannini projection – Keeps vertical lines vertical and straight radial lines. This can give a strong sense of perspective on views whose horizontal field of view is wide, and has a single and central vanishing point. It can however makes horizon lines seem curved. This can be corrected in the sliders that pop-up when you are editing in this projection.
  • Little planet projection – The Stereographic projection (also called fisheye projection) can be used to create a little planet. A right way up panorama achieves a planet effect and a backward panorama (180° rotation) makes a tunnel effect. Allows you to create an original view of a panorama, mainly using equirectangular panoramas (360°x180°). Using this projection with panoramas, whose horizontal field of view is less than 330°, is neither aesthetic nor usable.
  • Hammer projection – This projection is similar to a flattened world map, mainly used in astronomy applications. I use this for cityscapes too as it can correct some perspective distortion.
  • Orthographic projection – This is the view point of a sphere, whose panorama is viewed from afar, mapped to the outside and not inside like most other projections.
  • Mirror ball projection – This projection is the result of a visualization of the whole panorama on a spherical mirror, like looking into a crystal ball.
Projection function in Autopano Giga

Projection function in Autopano Giga

 Some of these projections are more useful than others. You may find that you will end up using only two or three. A good idea is click on each of them to see how they affect your image. The key factor in choosing a projection is in how the it affects your image visually. Does it work for the subject matter? Does the image look correct? Is the perspective distortion correct? Ask yourself these questions as you experiment with the projections.

Once you are happy with your projection and the way the image looks, you can now save the image to a folder on your computer.

Rendering

This is the process of saving your panorama.It is called rendering because the software needs to perform the final stitching and edits to your image. On the rendering screen, you will need to take note of the following:

Render and Save screen on Autopano Giga

Render and Save screen on Autopano Giga

Interpolator – The interpolator is the method used to assemble the pixels of your panoramic image, and will determine the quality and sharpness of your image. There are a few different options here, but the most commonly used option is Bicubic. The others are useful for advanced stitching.

Blending settings – The purpose of the blending settings is to allow combining of the overlapped sections of your panoramic to look smooth and seamless. You will notice the following presets:

  • Simple – This is fast, but it is possible that defects may be seen where the areas overlap.
  • Anti-ghost – Conserve the image’s strong characteristics (stops, lines, curves) when mixing while automatically removing objects that have moved
  • Exposure fusion – To be used if the panorama was created with a set of bracketed shoots. Keeps the best of different exposures.
  • HDR output – To be used by users who wish to create a “.hdr” format file in order to create post-production or special effects. Don’t use this on these images if they have already been processed as HDR images.
  • Custom – This is enabled when you manually change the parameters and they no longer correspond to a profile.

On the advanced settings, I generally leave that on the default.

Some of the features that I appreciate in Autopano Giga are as follows:

Exposure and colour blending – The software works hard at sorting out colour and exposure in the blended images. In the past, one of the worst problems with photo stitching was that sometimes the colour or exposure drifted and there was banding in the scene where the light or colour changed. This is a non-issue in Autopano Giga.

Panoramic detection – Sometimes I have shot more than a few panoramic images. When I get back to my computer, I can’t always see or remember which images were which. No problem, you can simply point Autopano Giga to a folder and it will detect all panoramics in that folder.

You can shoot freehand – The software has some really good functionality built-in that can work out multiple viewpoints. So, if you shoot a panoramic without using a tripod or a pano head, the software will be able to detect the scene and make adjustments for it, within reason. Nice to have though, I have shot many handheld panoramic and then dropped them into Autopano and they stitched quite easily.

Format

This section allows you to determine the format in which you want your image to be saved. The two formats I use most are TIFF and JPEG. TIFF is an uncompressed file (which means all the information is still in the file, this is great if you are planning to print the image large) The downside to TIFF is that the files are big. JPEG is a compressed format, that means that some image information has been discarded, the quality will still look the same to the naked eye, but if you print a JPEG image up really big, you may notice some image degradation. Depending on your final output and your space constraints you can choose the format that works best for you. Take the quality up to 12 and set the DPI to 300. This will ensure that you have the best quality image saved.

Output

On this screen, the software needs to know where to save your panoramic and what you want to call it. Choose your destination folder and name the file. Once this is done (it sounds more complicated than it is) click on the render button and the software will begin rendering your image. Depending on the size of the files being stitched, this rendering process can take a few minutes. Once complete, a screen will pop-up to let you know that the image is now rendered.

Edit the final image in Lightroom or Photoshop

Your image is now stitched together, but the final step in the process is to edit the image in your choice of editor. You may want to correct any perspective distortion in Photoshop using the transform tools. If your panoramic image is of a cityscape you will want to make sure that your horizon line is straight and that the buildings are vertical in relation to the horizon. From there you can follow your normal image editing workflow. Once you are done, you will have a fantastic, high resolution, panoramic image.

Final edited panoramic image of Medicine Lake in the Canadian Rockies

Final edited panoramic image of Medicine Lake in the Canadian Rockies

My comments on Autopano Giga

Autopano giga has made my editing and processing time much quicker and easier. I do a fair amount of panoramic photography, and the time saving when using this software is significant. I have used it to photograph landscape scenes, hotel rooms, building exteriors and architectural photography. It works exceptionally well in all of those areas. If you make sure that you overlap the images enough, it will stitch your images with ease.

The editing process in Autopano Giga is also very easy to use. Simply click on the projections to see how your image looks, make a choice, and you are done. You can make some technical adjustments within the editing area, but I recommend only doing that if it is absolutely essential.

The perspective control of Autopano Giga is fantastic. For the most part, the final stitched images look correct and I almost never pick up an error on the stitch. It is always a good idea to zoom in to the image to make sure that there are no issues like duplicated areas or bad stitches. This is not normally a problem if your overlap is good.

Autopano Giga is a great tool and if you enjoy shooting panoramic images, download a trial and see how it works for you. Panoramic photography is a lot of fun, I am always excited when I see the final stitched image, very often it is not what I was expecting and thats part of the excitement of these types of images. Having a tool that takes the frustration out of the process is a great advantage. So, go out there and experiment.

googletag.cmd.push(function() {
tablet_slots.push( googletag.defineSlot( “/1005424/_dPSv4_tab-all-article-bottom_(300×250)”, [300, 250], “pb-ad-78623” ).addService( googletag.pubads() ) ); googletag.pubads().enableSingleRequest();
googletag.pubads().disableInitialLoad();
googletag.pubads().collapseEmptyDivs( true );
googletag.enableServices();
} );

googletag.cmd.push( function() { googletag.display( ‘pb-ad-78623’ ); } );

googletag.cmd.push(function() {
mobile_slots.push( googletag.defineSlot( “/1005424/_dPSv4_mob-all-article-bottom_(300×250)”, [300, 250], “pb-ad-78158” ).addService( googletag.pubads() ) ); googletag.pubads().enableSingleRequest();
googletag.pubads().disableInitialLoad();
googletag.pubads().collapseEmptyDivs( true );
googletag.enableServices();
} );

googletag.cmd.push( function() { googletag.display( ‘pb-ad-78158’ ); } );

The post Walk Through and Review of Autopano Giga – Image Stitching Software by Barry J Brady appeared first on Digital Photography School.


Digital Photography School

 
Comments Off on Walk Through and Review of Autopano Giga – Image Stitching Software

Posted in Photography