While the sketch comedy television show Saturday Night Live mocked the awkwardness of Google Glass wearers this week, the Wall Street Journal offered up an etiquette guide for Glass wearers. Even Google’s Executive Chairman Eric Schmidt has warned we will have ‘develop some new social etiquette’ to accommodate the new technology. WSJ’s advice covers when and where to don the wearable tech, and more tips for early adopters. Read on at connect.dpreview.com.
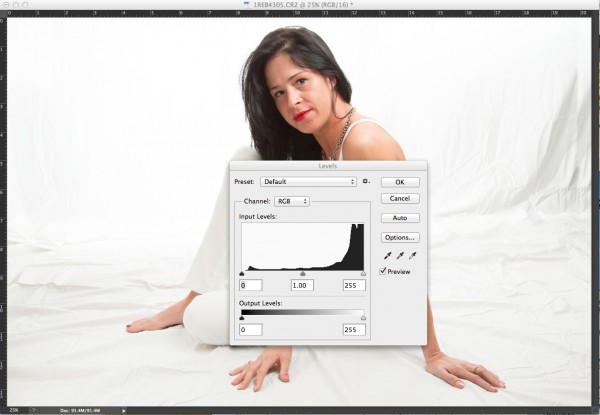
The finished image was a nice, high key portrait. See below for details on the histogram.
To many newbie photographers, getting the proper exposure in camera is the biggest challenge they face. While letting the camera do the work for them turns out fine most of the time, there are many times where the camera can require some help. Knowing just how to give your camera that help is key to getting an image you’ll want to keep. The best way to judge an exposure (or a potential exposure, when using Live View) is to use your camera’s histogram.
In this high key portrait, the histogram shows a majority of pixels on the right side, representing brighter pixels. This is to be expected due to the white background and outfit worn. The pixels in the middle of the histogram represent the subject’s skin tones, while the small dark peak on the left represents her hair. Notice also, that this histogram does show some highlight clipping. In some images, this may be a problem, but since this is a high key portrait and the background is the bright white area, and the skin tones are good, this is not a problem for this image.
A histogram, in it’s simplest terms, is simply a graph showing the brightness levels of pixels in the image. The right side of the graph represents bright pixels, while darker pixels are shown on the left side. Pixels representing midtones are in the middle, of course. A histogram runs, from left to right, showing values from 0- black, to 255- white. The height of the histogram represents how many pixels are recorded at a given brightness level. The primary aspects of the histogram that one should be concerned with are the left and right edges. Any pixels that recorded as bright white (255) or as pure black (0), would be pushed up against the edge of the graph.
Since a histogram is simply a representation of the tonal range of a given image, there really is no right or wrong histogram. The histogram will change based on the tones in an image. A high-key portrait, for example, would show pixels mainly to the right side of the histogram. A low-key image would show pixels mainly to the left side of the histogram. An image with a wide tonal range would show pixels across the entire histogram.
As I mentioned, when judging exposure, the primary areas of the histogram to be concerned with are the right and left edges. Pixels in these areas are rendering as bright white, or dark black. Generally speaking, unless an image is intended to show bright white or pure black areas, pixels pushed up to the very edge of the histogram could indicate an exposure problem. This is also known as “clipping”. For instance, when a large number of pixels are pushed against the right side of the histogram, in essence, being cut off by the edge of the histogram, it is said that the highlights are clipped.
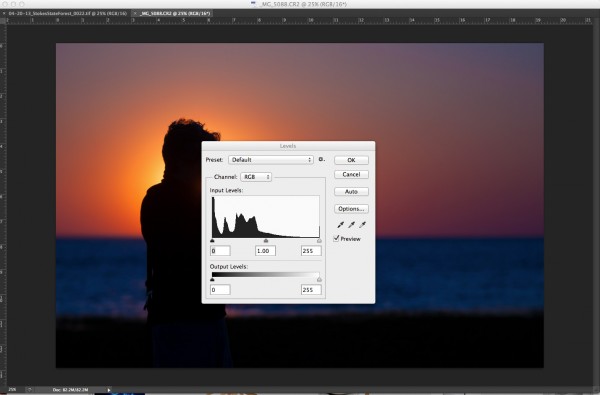
In this image, since the subject is in silhouette, and there are lots of dark tones, we expect to see most pixels on the left side of the histogram.
When judging the histogram, one must take into account the subject matter of the image. If the image should show bright white areas, yet the histogram shows the pixels as rendering more middle grey, due to the way the camera’s meter sets the exposure, you can then use exposure compensation or adjust your exposure manually to increase exposure and achieve the desired result. The same is true for darker images that the camera overexposes because the meter is trying to achieve middle grey. By reducing exposure, either manually by changing your shutter speed, aperture, or ISO, or by using exposure compensation, you can darken the image to achieve the desired image. The histogram of this new image will reflect the change to exposure.
Now, here’s the big secret. If you use Live View on your camera, you can view a live histogram, that will update and reflect changes in exposure when your exposure changes. This means you can judge what your current exposure is, and watch in real time how changes to that exposure will affect your image. It’s a great way to get a feel for how even a slight adjustment in shutter speed, aperture, or ISO can affect your exposure.
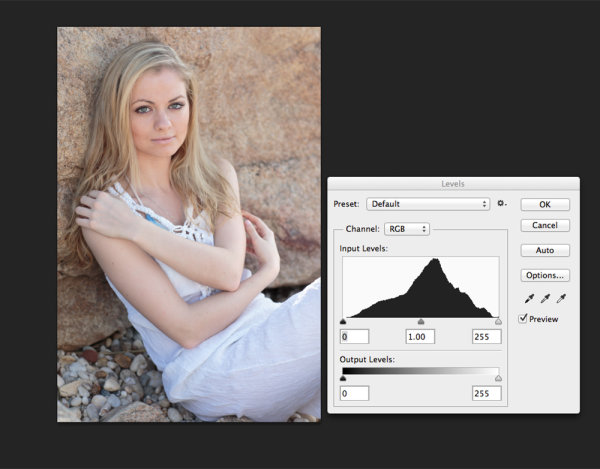
This portrait shows more midtones than anything else, so we see more of a classic peak near the center of the histogram, with the pixels falling off as they get to the edges of the histogram. You can see that neither the highlights or shadows are clipped .
Post originally from: Digital Photography Tips.
Check out our more Photography Tips at Photography Tips for Beginners, Portrait Photography Tips and Wedding Photography Tips.
The blending modes feature is one of Photoshop’s most undervalued tools for Photographers. Blending modes can be used to alter the ways in which each layer interacts with the layers below it, allowing for endless possibilities when it comes to setting the right tone or adding artificial lighting. Graphic designers and digital illustrators use blending modes all the time to Continue Reading
The post Ultimate Guide To Blending Modes in Photoshop appeared first on Photodoto.
iPhones, and internets, and ion implanters! Oh my!
In this tech-savvy world we can return to 100%-analog-photog-goodness and transform them to digital with some simple scanner-wizardry.
This handy guide will show you how to scan your film, merging all of the sweetest parts of analog with the ease and shareability of digital.
The best part? You don’t have to know a thing about rocket science to follow along.
Learn How to Scan Film!
p.s. Our buddies at Printstagram make some of the bestest Instagram prints we’ve seen! You can make it happen right from your phone.
Why it’s Cool:
We all know the benefits of analog photography: slower pace, limited number of frames, and those old cameras are just plain fun to use.
The only downside? Your inner tech maven is crying out for all of those lost shares on Facegram, instabook, and PinTube! Or something like that.
This guide will equip you with the tools to get started on making film grains best friends with digital pixels.
Ingredients:
Film Scanner (We used a flatbed Epson V600.)
A computer
Developed 35mm film
Dust Blower, Microfiber Cloth, or Anti-Static Brush
Flatbed Scanners vs. Dedicated Film Scanners
There are a few brands of scanners, but they mostly fit into two categories for consumers: flatbed scanners and dedicated film scanners.
This article will be dealing specifically with an Epson V600 flatbed scanner, but many of the techniques will still apply, especially to other flatbeds!
Here’s a quick rundown of the pros and cons of a flatbed scanner.
Cost: For the most part, a flatbed is a very reasonable option in terms of price and quality.
Uses: In addition to being affordable, many flatbeds are able to do both 120 and 35mm, something usually reserved for very expensive dedicated scanners.
Ability: Flatbed scanners are certainly capable of great results, but a dedicated scanner is always better. After all, that’s what it’s built for!
Step 1: Prepping The Film
Here’s what we need to do to the film in order to ensure the best scan.
Dust bunnies sound cute, but for scanning, they are not your friend! Use a dust blower, a clean microfiber cloth (Extra emphasis on clean! There’s nothing worse than scratched film), or an anti-static brush to get rid of any dust that may have settled on the negative.
Tips for preventing dust:
Break Out The White Glove: make sure your working environment is as clean as possible. If there’s no dust in the are to begin with, there won’t be any to go on your film.
Pre and Post-Scan Storage: Store your negatives in sleeves or binders to keep exposure to open air as infrequent as possible.
Dust During Drying: If you develop your own film, try to limit either the air flow around your film as it dries or the dust in the environment. Wet film and dust stick better than glue!
Step 2:Insert Film Into The Negative Holder
One of the greatest challenges with scanning is film flatness.
The scanner works a bit like your camera; it focuses on the film to take a “picture” of it. If your film isn’t flat, it’s harder for everything to be in focus. A little curl is manageable.
Place film under a book to flatten unruly negatives, but make sure they’re in a sleeve so they don’t get dusty or scratched.
Each negative holder is a bit different, but here’s how it’s inserted into ours.
Step 3: Place Negative Carrier Onto Scanner
This one’s as easy as it sounds! Each scanner has a specific orientation for the negative carrier depending on the film type.
On the Epson V600, there’s an “A” on the negative carrier that should line up with the “A” on the side scanner bed.
If your scanner doesn’t have markings, make sure to place the negative carrier under the slot of glass in the top of the scanner.
Step 4: Scanning Software
This step will also be specific to your scanner. We’re using the included Epson Scan software in Professional Mode.
Here are the main points:
Make sure to choose the “Film” setting and then the appropriate type: black and white, color negative, or positive
Choose the resolution: for files that are easy to work with and great for web use, we set ours to 1200 DPI. If you have plenty of space on your harddrive or want to print above an 8×10, scan at a higher resolution to get a larger image
Don’t forget to switch on Dust Removal to get any spots you missed earlier
First, hit the preview button and let the scanner generate a preview. At this point you can rotate the photo and mirror the image if the film isn’t oriented correctly.
Lastly, choose the file format for the scan and you’re good to go! We usually scan ours as jpeg. A TIFF can provide more information, but at the cost of much larger files. If you need to make corrections to a scan it’s a better option, but for many sharing purposes a jpeg is sufficient!
There are a few third party software options for scanning as well, and our favorites are VueScan and Silverfast.
The advantage to these programs is that they offer more customizability and control over the scanning process. Plus, they have some neat tricks such as setting the film stock to try to get the most faithful result. They’re both friends with PC’s and Macs!
Step 5: Final Touches
Once the scan is completed, you have a few choices of where to go next. You can take the scan “as is” and go from there, or import into Photoshop, Lightroom, and other editing programs to make some slight changes.
Sometimes a few tweaks are needed after the fact so that the imagined picture lines up with the actual picture!
Some post-scan adjustments
Contrast: This is a big one for black and white. Adjust the contrast so that it’s more faithful to the look of the negative
Color: Sometimes a scan will have a shift in colors or have an overall color cast that’s undesirable. The curves adjustment will be your BFF. Utilize the separate color channels to get the look right.
Sharpness: Sharpness can be detrimentally affected by the scan. Apply a little unsharp mask or boost the sharpening slider in Lightroom to taste.
Dust and Scratch Removal: Despite our best efforts, dust can still remain on the negative and sometimes they get scratched as well. An easy way to fix this is to use the healing brush or clone brush in Photoshop.
This isn’t to change the look of the film, but sometimes this information gets skewed in the scan and needs to be returned to the appropriate value.
Taking it Further
Try it with medium format!
Try using your DSLR and a macro lens to scan!
Ditch the film. Use your scanner as a Camera!
Related posts:
Meet Mr. Digital Clover, A Keychain Camera with Film Camera Appeal Extra photos for bloggers: 1, 2, 3 Bus rides can…
How-To: Turn Digital Photos into Artistic Sunprints! Extra photos for bloggers: 1, 2, 3 Boy, do we…
Keep Your Film Safe on Plane Trips Extra photos for bloggers: 1, 2, 3 The airport x-ray…
3 weeks ago we released a brand new mini-guide to Food Photography over at our sister site – SnapnGuides.
The guide was released with a 30% off early bird discount (bringing the price down to just $ 7) and today I just wanted to let dPS readers know that that discount ends in just on 24 hours time.
This ‘http://www.snapnguides.com/’ guide will:
break down all the important aspects of photographing food
give you practical advice on what gear to use
show you how to leverage available light
teach you how to use simple props to great effect
illustrate how to use different composition techniques and shooting angles to take great food images
help you to develop your own style of taking delicious photos of the food you make and eat
If you were thinking about grabbing a copy here’s the link to save 30% for the very last time.
In 24 hours the price will go up.
Post originally from: Digital Photography Tips.
Check out our more Photography Tips at Photography Tips for Beginners, Portrait Photography Tips and Wedding Photography Tips.
Grab our Food Photography Guide for just $ 7 [24 Hours Only]
Setting the tone of an image is arguable, the most important part of any photograph. As the photographer, this choice can help to define your overall style; making your work instantly recognisable purely by the tone of your chosen medium. You have to consider the composition, exposure and all those other technicalities. But it is how the subject is portrayed Continue Reading
The post The Pro Photographers Guide to Black & White Vs Colour appeared first on Photodoto.
It’s easy to forget about the video function built into your camera phone.
It’s just that videos end being too big to send to friends, and who wants to wait for a video to download anyway?
Man, are we spoiled. Back in our parents’ day, they had to carry 20lb VHS recorders just to shoot a few minutes of film! Us? We have a video recorder that fits in our pocket.
Vine fixes all of this and then some.
It’s an app that lets you share snippets of video –six seconds to be exact– in a super-digestible format. As you scroll through a stream of friends’ videos, the video on your screen instantly plays.
This isn’t just another Instagram. It’s a whole new platform for showing off your creativity. There’s so much you can do in six seconds!
Plus, you get to share life-experiences with friends as they happen. And that right there is pretty much the coolest thing your phone has to offer.
So get it, and then read on for all the best tips, ideas, and inspiration on Vine.
The Ultimate Guide to Vine
p.s. Hey DSLR lovers! Have you seen the Lensbaby Spark? It’s a way fun, bendable tilt-shift lens that’s totally affordable.
(…) Read the rest of The Ultimate Guide to Vine: Pro-Tips, Awesome Ideas, and Who to Follow! (1,319 words)
“Most of my pictures are grounded in people. I look for the unguarded moment, the essential soul peeking out, experience etched on a person’s face. I try to convey what it is like to be that person, a person caught in a broader landscape that I guess you’d call the human condition.” It’s by Steve McCurry, whom I didn’t know Continue Reading
The post Shoot Like Henri Cartier-Bresson: A Quick Guide To Becoming An Amazing Photojournalist appeared first on Photodoto.
Professional photographers Bob Krist and Joe McNally are featured in what is far-and-away the best resource to date on Nikon’s speedlight system and how to use CLS effectively. It starts with Krist in the studio teaching you the basics — and nuts-and-bolts control how-to’s — then goes out into the field. There, Bob takes on the roll as the color man to Joe’s lead as they work together to pull off a variety of sophisticated shots using Nikon speedlights. Congrats to Nikon for significantly dialing up the educational portion video as compared to the “Speed of Light” DVD of a few years ago. Yes, it is specific to the Nikon system and designed to help sell gear. But the educational content is there — they show everything you would need to know. (Uploaded with permission from Nikon.) Video Rating: 4 / 5
[HD] Enjoy this release of some of our past and present clients of 2011! We have 1000’s of photos of our clients so we cant put them all in, but we will be releasing videos now and then showing some of our work, so you may be in the next one… stay tuned! BodyIllusions Tattoo Studio is the finest studio in the area with prices that cannot be challenged by any studio in the area… we don’t overprice our tattoos. Check out the others and their portfolios of their work, then come see us and you will see why more and more clients are coming in to get their next piece of eternal artwork on them with one of our experienced artists! We cover all types and styles of tattoos from blackwork, greywork, portraits to coverups and custom pieces. We will also tattoo your artwork and designs, just bring them in and talk to one of the artists at BodyIllusions Tattoo Studio 🙂 BodyIllusions Tattoo Studio also performs all types and styles of brandings, cuttings, scarification and of course every body piercing available with the most eperienced body piercer in the area with over 20+yrs of experience, so you can feel confident with our epert work and high success rate in healings. The cleanest studio around, check us out. Thanks to all the clients in the video, we appreciate the honor of you allowing us to create your piece of art. We look forward to seeing you again in 2012… Thanks for watching and subscribe if you want to be updated on our future video releases. Seasons Greetings … Video Rating: 4 / 5


 We all know the benefits of analog photography: slower pace, limited number of frames, and those old cameras are just plain fun to use.
 There are a few brands of scanners, but they mostly fit into two categories for consumers: flatbed scanners and dedicated film scanners.
 Here’s what we need to do to the film in order to ensure the best scan.
 One of the greatest challenges with scanning is film flatness.
 This one’s as easy as it sounds! Each scanner has a specific orientation for the negative carrier depending on the film type.
 This step will also be specific to your scanner. We’re using the included Epson Scan software in Professional Mode.
 Once the scan is completed, you have a few choices of where to go next. You can take the scan “as is” and go from there, or import into Photoshop, Lightroom, and other editing programs to make some slight changes.
 3 weeks ago we released a brand new mini-guide to Food Photography over at our sister site – SnapnGuides.

You must be logged in to post a comment.