RSS
 

Posts Tagged ‘Guide’

Time-Lapse Photography – a Quick Guide to Building Your Movie

11 Aug

Time-lapse photography shows you events that occur over an extended period that are captured on camera and shown in a relatively short time.

Time-lapse imagery is the capture of individual images of a subject at preset intervals over a preset duration. These individual images are then combined using software, thereby compressing the event into a much shorter time span.  If you were to witness an ice cube melting it would take an hour or more. With time-lapse the process from solid to liquid could be seen in seconds.

What do you need to do time-lapse photography?

Cameras

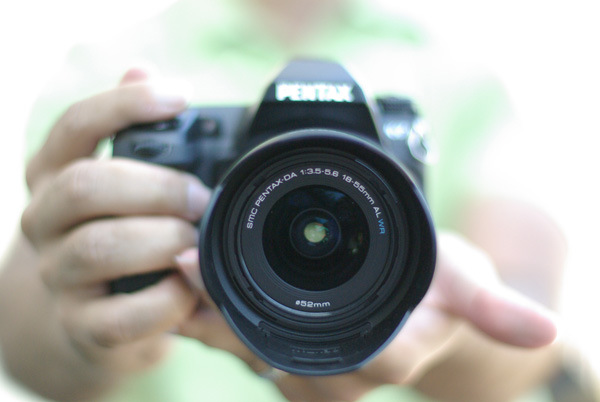
Though point-and-shoot cameras will do the job, digital single lens reflex cameras (DSLR’s) and mirror-less cameras allow for the most flexibility. They not only capture images that are of a higher quality but have features most suitable for time-lapse. In particular, they are capable of manual exposure and focus control. They also have an array of lenses to choose from and all the accessories required for capturing time-lapse sequences.

Lenses

All focal lengths are suitable based on the subject you select. A lens that has a manual aperture ring is best as the aperture blades do not open and close for each shot captured.

Intervalometer

The key to achieving a great lime-lapse sequence is a good intervalometer. This is a device capable of triggering your camera with accurate intervals and precise shutter actuations. It can be an external or internal device.

Tripod

Image Stabilization and Vibration Reduction are good but they are no substitutes for a good tripod for time-lapse photography. Use a solid tripod.

Batteries and/or AC Couplers

Because of the long duration of time-lapse sequences, the batteries in your camera may drain out before the sequence is completed. Here are a few tips to help you increase your battery life:

  • The single battery in your camera powers a number of functions. Many of these can be switched off for time-lapse capture or you can decrease their “on-time”.
  • A major drain on the battery is the LCD display and Live View. Use these screens only if it is imperative and then make certain that you lower the brightness using one of the custom functions. Also, limit the preview duration, keeping it to a minimum.
  • Don’t use your camera’s LCD screen for viewing and deleting images. Leave that activity to be performed on your computer after you have downloaded your images.
  • If you are shooting a sequence indoors you can use an AC coupler to power your camera.  An AC coupler is used in lieu of the camera battery.

Formula for Time-Lapse Capture

The typical frame rate for movies is between 24 and 30 frames per second. As a guideline, the greater the frames per second the smoother the playback.

When using a DSLR, you have all the control to create good time-lapse sequences. Selection of shutter speed, depth of field and the interval between shots can be set as desired. Just remember, the faster the movement of the subject or subjects within your project, the shorter the interval between images captured. However, you may be limited in low light situations.

Here is a guide for intervals:

1 Second

1 – 5 Seconds

15 to 30 Seconds

3 – 15 minutes

Air and Road Travel

Sunrise Sunset

Moon going across the sky

Growing Plants

City Scenes with Traffic

Crowd Scenes

Stars and Milky Way

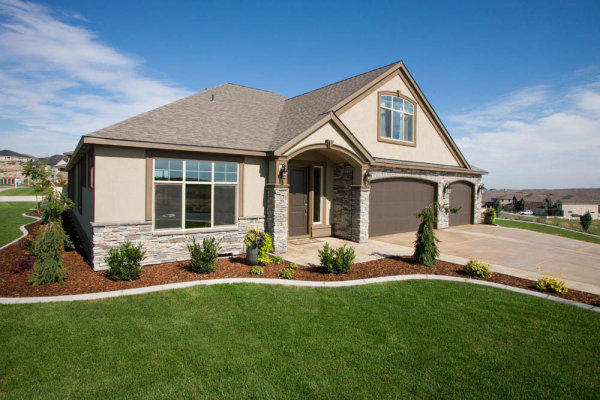
Home Building Projects

Bicycle Rides

Slow Moving Clouds

A good starting point for any subject matter is to create your time-lapse with a shorter interval than you may think is appropriate. You can always discard alternate or irrelevant images from your final sequence if you want to speed up the action.  For example, if you decide to use a 30 second interval for a moon sequence, but want to be sure that the final sequence will be smooth, shoot at 15 second intervals. You can get back to your original plan by removing every alternate image for the final sequence.

Prepare your images

Using any software editing program, crop or size your captured images to a width of 1920 pixels and a height of 1080 pixels for a 1080p HD video (use 1280 pixels by 720 pixels for 720p video). Make sure your crop registration is identical for all the images.  If you are not comfortable doing this, use the automatic resizing provided by most time-lapse assembly software.

Now that the images of the sequence are ready, you can use one of the many free applications for Windows and Mac operating systems to create your video. Some of these are VideoVelocity from CandyLabs, Photolapse from Stephan van der Palen and Time-Lapse Assembler created by Dan Bridges. For under $ 30 Apple Quicktime Pro 7 can be used to create some excellent time-lapse video.

How to use Time Lapse Assembler for Mac

tla-1

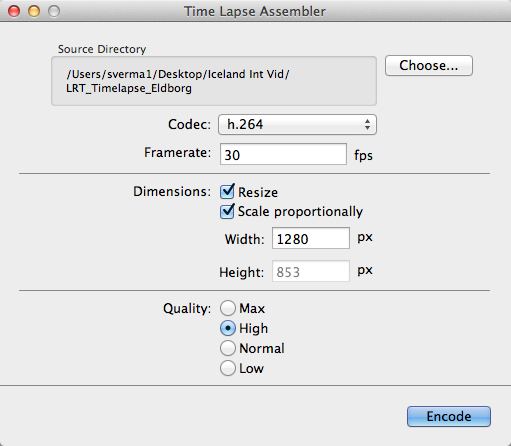
  1. Open Time Lapse Assembler
  2. Select the directory that contains the image sequence
  3. Select the codec. Use h.264 or mp4v for making .mov files or mp4v for making .mp4 movies
  4. Leave the frame rate at 30fps
  5. Set the dimension to resize
  6. Scale proportionately
  7. For HD video you can adjust the width to 1920 or 1280 (1920 for 1080P video and 1280 for 720p video)
  8. Select Quality High (you can always use Max but the rendering will take longer
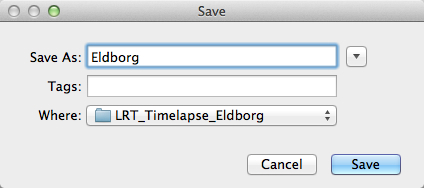
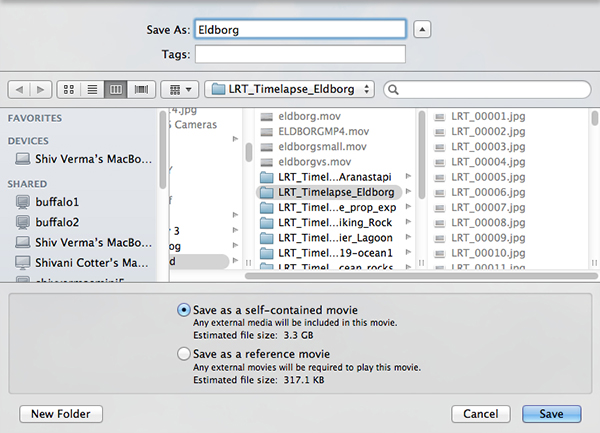
  9. Click on Encode
  10. You will be presented with a Save window. Name your sequence and click Save.

tla-2

The software will produce a Quicktime compatible movie file that can be viewed as is, or used for further editing in iMovie or any other video editing software.

See below an example of the video in very low resolution:

Here are the steps for Quicktime Pro 7
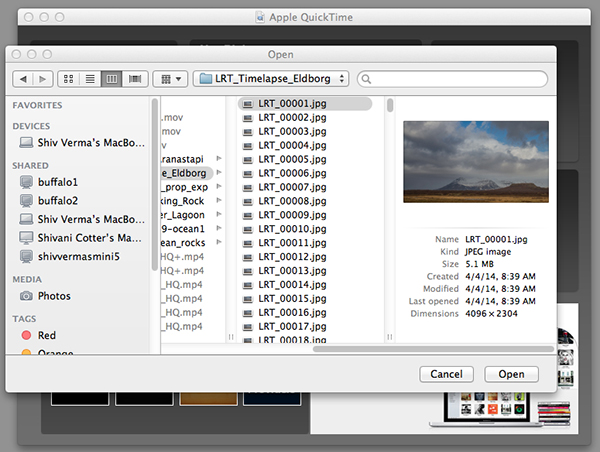
  1. Open Quicktime
  2. Go to the menu and under File – click on Open Image Sequence. Go to the directory where you downloaded your images (make sure you have only the images that belong in the sequence in this folder)
  3. Click on the first image of the sequence and click Open

    Select the Sequence

    Select the Sequence

  4. You will be presented with a choice for picking your frame rate – use 30 frames per second for a smooth sequence. Now click OK
  5. Quicktime will import all the images in that folder and assemble them in their original sequence and at their original resolution. You probably will not be able to see the entire image as it is larger than the resolution of your screen but you can go to the Menu>View>Fit to Screen. You now have the first frame visible in its entirety.
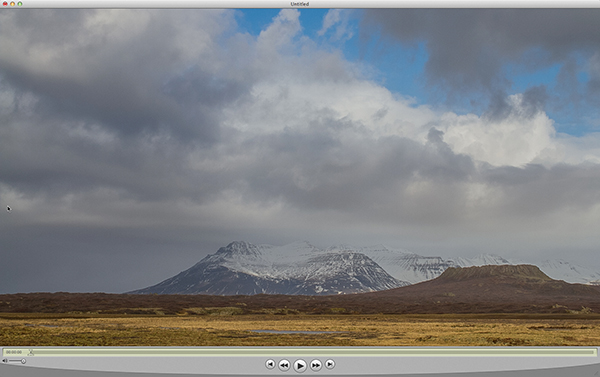
    Assembled Sequence

    Assembled Sequence

    If you attempt to play this sequence you will not see the movie as you might like it to be. It will not be smooth and may pause for long periods. This is because the individual frames are very large and the video has not been rendered for playback.

  6. Save this sequence File>Save
  7. You will be presented with options as to where you would like to save the Quicktime file.
  8. Save the file in the same directory as the original images and name the file

The next steps will render a viewable video

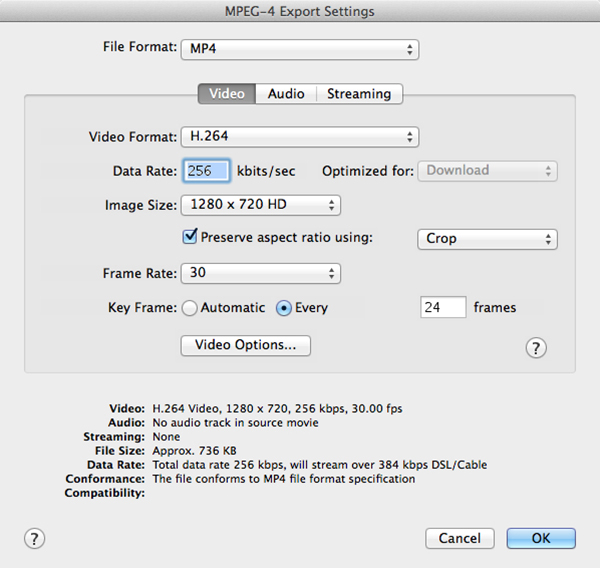
  1. You will export this sequence File>Export
  2. You will get the typical “Save As” option and the “Where” option. Save the export in the same folder as the original files giving it a pertinent name.
    QT-3
  3. There are two other sets of export criteria and an options button. For now, export the sequence as a QuickTime Movie and in the Options Section use H264.
    QT-4
  4. The export will take some time so be patient. Once the rendering and export is complete you will be able to watch the video. 

Have fun making your time-lapse – enjoy!

The post Time-Lapse Photography – a Quick Guide to Building Your Movie by Shiv Verma appeared first on Digital Photography School.


Digital Photography School

 
Comments Off on Time-Lapse Photography – a Quick Guide to Building Your Movie

Posted in Photography


Step-by-step Guide to Long Exposure Photography

30 Jul

In the past few years, thanks to the diffusion of useful accessories and photographic filters with good quality and low prices, the technique of long exposure has become increasingly popular among photography enthusiasts. Even if this technique can be used both in studio and in a urban environment, the perfect playground of long exposures is landscape photography.

Unfortunately often it happens that the result we get is far from our expectations, and we end up classifying the long exposure as a demoniacal technique. However, following this step-by-step guide to long exposure photography, you’ll see how easy it is to get a good result on the first attempt (or almost).

Picture 1

Step One: study the weather

A day with a cloudless sky is a good day to drink a beer with friends, not to make long exposures. Likewise it cannot rain forever, so do not resign yourself to an afternoon with your PlayStation. You should study satellite images rather than the meteorological sites, trying to figure out if there is an incoming storm, or if the downpour is about to end.

Step Two: visit the location well in advance

Scout the location ahead of time, as you need a lot of time to find the perfect composition, or at least more than the time needed for a “short exposure”. In fact in a long exposure the world is completely different from how you see it with your own eyes. You have to try to see it with your mind, looking for a harmonious composition that includes moving subjects, trying to predict the direction of the clouds or the force of the sea. Try not to put the sun into the composition because its movement will ruin the shot and it will create area of overexposure that is not recoverable. If you cannot avoid the sun, wait for it to hide behind a cloud.

Picture 2

Step Three: use a tripod

Mount your camera on a tripod and install all the accessories such as the remote shutter release and the filter holder (if you are using drop-in filters). However, wait to actually install the filters. Very important!

Step Four: compose the image and lock focus

Refine your composition, focus on the subject and lock the focus. If you are using manual focus, just do it. If you are using the autofocus mode, you should focus by half-pressing the shutter button, and once the focus has been made, while still holding down the shutter button halfway, push the lever from Auto Focus to Manual. In this way, your camera will maintain the focus (or alternately you could use back-button focus).

Picture 3

Step Five: set the exposure

Now set your camera to Manual (M) mode or Aperture Priority (A/Av) mode. Then set the aperture to an appropriate value for the scene (for landscapes I suggest between f/8 and f/11) and take a “Test Shot”. The test is complete when you get a correct exposure. To determine if the exposure is correct, check the histogram (do not trust your display, it is too bright). It is true, there is no universally correct histogram, but there are histograms that are universally incorrect, namely moved completely to the right or left side (the image is respectively overexposed or underexposed). Once the test shot is successful, write down the shutter speed you used for that shot.

Step Six: add your filter

Now add your Neutral Density (ND) filter. If the filter is very strong, for example 10 stops, you will not be able to see through the viewfinder or the Live View. Do not worry, because if you have followed the guide up to this point you will notice that we have already made the composition and the focus too. You are blind, but your camera will see everything perfectly.

Picture 4

Step Seven: change to Bulb mode

Set the shooting mode to Bulb (B) in order to take over the thirty second limit of the camera. Do not change any of the other settings (ISO and aperture) used in the test shot.

Step Eight: take your long exposure shot

It is finally time to take our long exposure shot. But how long will you to leave the shutter open? It is less difficult than you might expect. First of all, recollect the shutter speed that you noted down from the “Test Shot” you did in Step Five above. Now you must compensate by the number of stops introduced by the filter. For example, if your test shot was 1/15th of a second, adding 10 stops will get a shutter speed of approximately 60 seconds. There you have your shutter speed. No need to be stuck in the mathematics: on the internet you can easily find conversion tables and applications for your smartphone that will do the conversion for you.

Picture 5

Step Nine: check the histogram again

Once you’ve taken the shot with the calculated shutter speed, check the histogram. If the new histogram is approximately equal to the one of the test shot, mission accomplished. If it is shifted too far to the right or to the left, repeat the shot again correcting the shutter speed.

Easy, isn’t it? Now fill your backpack with your camera and filters and go to practice in the field. For any doubt or if you need any help, don’t hesitate to ask questions in the comments below. Please share your long exposure images as well.

The post Step-by-step Guide to Long Exposure Photography by Francesco Gola appeared first on Digital Photography School.


Digital Photography School

 
Comments Off on Step-by-step Guide to Long Exposure Photography

Posted in Photography


How to Master Your DLSR in One Afternoon a Beginner’s Guide

24 Jul

As the Editor-in-Chief of CLARITY, I believe that photography is one of the most unique forms of visual art. As a photographer, you must possess an ability to express yourself visually and also be technically proficient with the tools of your craft.

Thankfully, the technology is relatively simple to understand. Given a small amount of time, anyone can master the mechanics of their DSLR very quickly. I’m referring to the technical side of photography, or more specifically, how to use your camera.

photographybb-pentax-k7

I’m sure you’ll agree, digital SLR cameras are pretty appealing contraptions. They constantly evolve with new bells and whistles, and shiny attractive buttons and dials, but at their very essence, a camera is quite simply a box that captures and records light through a small opening. Light enters the camera and hits a sensor for a certain period of time, and that’s it. Too much light and the photo will be over-exposed (too bright). Not enough light and the photo will be under-exposed (too dark). By the end of this article, if feel stuck in Automatic Mode you will be able to break free and let your true creativity reign!

So how do you know when you have the optimal amount of light? Thankfully, when you are shooting in Manual mode, your camera has a built-in light meter to show you if your exposure is going to be too dark, too bright, or just right. You simply need to know how to control the amount of light that enters your camera, and for how long the sensor is exposed to that light.

Start Right Here – learn how to master your DSLR

There are three ways to control the amount of light that enters your camera, and all three are used to make your photograph either brighter or darker.

The Exposure Triangle

The first is the size of the opening through which light enters, called the aperture of your lens. The next is the duration of time that your camera sensor is exposed to the light, referred to as the shutter speed. The final option controls how sensitive the camera is to light, known as the ISO. These three controls all interact with one another in a give-and-take relationship, and the following “Exposure Triangle” is a great tool to help you understand the dynamics of these relationships.

Now, the trick is to balance these three options to achieve a perfect exposure. Typically, you will choose two ways of controlling how light enters the camera, and then compromise on the third. The two choices you make are solely dictated by the aesthetic you would like to achieve. Aperture size, shutter-speed, and ISO all have individual benefits, but they also produce side-effect consequences that lend an aesthetic component of their own. Let’s explore how they work in more detail.

Part One – Aperture

The size of the “hole” through which light enters your camera is called the aperture. Mechanically, the aperture is a little diaphragm inside the lens that you can widen or narrow by telling your camera what f-stop you would like to use. The f-number is a funny measurement because a small f-number (like f/2.0) equates to a wide opening, whereas a large f-number (like f/22) equates to a small opening. As you would imagine, a large opening allows more light to enter the camera resulting in a brighter photograph, and a small opening lets in less light resulting in a darker photograph. Pretty straightforward stuff so far right?

Side Effect of Aperture

The aesthetic effect of varying the aperture is that light entering a wide aperture translates into less focus between the foreground and the background in the photograph. This is how photographers blur out the backgrounds in their photos. When you want to isolate a subject by blurring out the background, you would use a wide aperture.

DOF f2 8 Dave Seeram

Light that enters through a smaller, tighter, aperture is more focused than light entering a wide aperture, and light that is more focused translates into sharper focus through the foreground-to-background depth in a photograph. So if you want everything as sharp as possible through the depth of your scene, you would want to use a narrow aperture.

DOF f16 Dave Seeram

Part Two – Shutter Speed

The shutter is basically a little curtain that opens and closes behind the aperture. It can be open for a long amount of time (like seconds, minutes, or even longer), or a short amount of time (like quick fractions of a second). As the shutter stays open longer, more light is captured by the sensor resulting in a brighter image. The shorter the shutter speed, the less light is captured resulting in a darker image.

Side Effect of Shutter Speed

The aesthetic effect here is that a fast shutter speed allows you “freeze” any motion in the scene, whereas a slower shutter speed blurs any motion. Imagine taking a photograph of a falling water droplet. If your shutter speed was set to 1/1000th of a second, the shutter is open for such a brief fraction of time that the drop would appear frozen in mid-air when photographed.

Fast ss dave seeram

Alternatively, if you set a much slower shutter-speed such as half a second, then the movement of the falling drop would be captured as a blur.

Photographybb traffictrails1

Give-and-Take

Typically, fast shutter speeds require a larger aperture for the sensor to capture enough light to produce a well-exposed photograph. Conversely, slow shutter speeds tend to require a smaller aperture to limit the amount of light coming in over the longer duration. You can see how these factors are all starting to work together.

Part Three – ISO

The third way of adjusting the overall brightness of your photograph is the ISO, which controls how sensitive the camera sensor is to light. A low ISO (like 100) results in a darker photograph, while a high ISO (like 6400) results in a brighter photograph.

Side Effect of ISO

Of course, there is a trade-off here too. The aesthetic compromise of using a higher ISO means that while you will produce a brighter image, a higher ISO also introduces more grain (or “noise”) into a digital photograph.

Usually, you will first decide upon your aperture and shutter speed based on the combination of their aesthetic effects to your vision for the final image, while aiming to keep your ISO as low as possible. If you know that you need a certain shutter speed along with a certain aperture and the resulting image is still too dark, that’s when you increase the ISO.

Generally speaking, when you’re shooting in an environment that is dark or dimly lit, you’ll want to raise the ISO to make the sensor more sensitive to light. When the lighting conditions are bright, you can keep the ISO low.

It’s all about finding a balance between these settings to achieve the best exposure. Once you decide upon one or two of these settings, the camera will require some compensation on the other.

Photographybb exposure triangle

The Exposure Triangle is a great reference to demonstrate how increasing or decreasing any one of these three settings affects the exposure of the image. This stuff can be learned quite quickly, but it’s best to experiment with these settings to see how they operate in the real world. This will help you gain a technical understanding of how to use your camera, but there’s still a long way to go with regards to making photographs that communicate. Remember, photography is a visual language. Once you learn how to use the camera, you can then learn to translate your vision into captivating photographs.

Both the technical and artistic aspects play important roles in the making of a beautiful photograph. At CLARITY, we show our readers how to quickly learn the technical side, but we go even further to teach the importance of developing your creativity. We’ll show you step-by-step techniques to making stronger photographic compositions, and what to do when you feel like your vision and results don’t line up. Join other DPS readers, and we’ll give you everything you need to know to make great photographs with ease, in any situation. Get a subscription to CLARITY on sale now at SnapnDeals.com.

SNAPNDEALS CLARITY BANNER

The post How to Master Your DLSR in One Afternoon a Beginner’s Guide by Dave Seeram appeared first on Digital Photography School.


Digital Photography School

 
Comments Off on How to Master Your DLSR in One Afternoon a Beginner’s Guide

Posted in Photography


Email Insiders Only: 2014 SEO Guide for Photographers

05 Jul

Your portfolio website could be the most beautiful, functional and user-friendly site in the world, but if no one ever sees it, then what’s the point? If no one visits your precious site, it wouldn’t do you any good. So you have to make search engine giants like Google, Yahoo or Bing notice you and send loads of targeted traffic Continue Reading

The post Email Insiders Only: 2014 SEO Guide for Photographers appeared first on Photodoto.


Photodoto

 
Comments Off on Email Insiders Only: 2014 SEO Guide for Photographers

Posted in Photography


26, June 2014 – Acadia National Park – A Quick Guide To Photography

26 Jun


It’s summer time and a lot of you will be heading out to America’s National Parks to capture their beauty and to enjoy the great outdoors.  I was in Yosemite NP last week working on a NEW LuLA tutorial.  It’s one of the grandest National Parks of them all. I’m still working on images and will post some on the home page soon.  Today’s article is by QT Luong.  He is known for being the first person to photograph all 59 US National Parks in Large Format.  He has come on board as a regular contributor and we will be regularly publishing his articles on his National Park Photography guides.  we’ll start with the ‘A’s and today’s article is  Acadia National Park – A Quick Guide To Photography.


The Luminous Landscape – What’s New

 
Comments Off on 26, June 2014 – Acadia National Park – A Quick Guide To Photography

Posted in News


Kids Posing Guide: Early Bird Discount Ends in 36 Hours

19 Jun

NewImageA few weeks ago we launched a brand new Kids Portraiture Printables collection in the dPS store with a 25% off Early Bird Discount (40% off if you get it with the companion eBook).

This post is just a quick note to let you know that that discount ends in just over 36 hours.

The printables collection is just $ 14.99 and gives you access to five kids posing models that cover all ages – Babies, Toddlers, Little Kids, Bigger Kids and Tweens.

Each of the 5 modules includes:

  • a tutorial to help you master posing kids of that age
  • a printable version of the poses that you can print out and fold up to take with you
  • a digital version that you can keep on your phone or tablet to use when photographing kids

NewImage

As an optional extra you can bundle this posing collection with our previously released Kids Portraiture eBook and save 40%.

The collection and eBook have been getting fantastic reviews from other websites like Two Days in Dublin who writes:

“If you want to improve your photography and capture those special moments, I recommend this e-book for those already in the business, just starting out in picture-taking, or for moms looking to capture great photos of their own kids!”

The Early Bird special ends in just over 36 hours so grab yours today here and start taking gorgeous photos of your kids.

The post Kids Posing Guide: Early Bird Discount Ends in 36 Hours by Darren Rowse appeared first on Digital Photography School.


Digital Photography School

 
Comments Off on Kids Posing Guide: Early Bird Discount Ends in 36 Hours

Posted in Photography


The Ultimate Photography Guide to Pricing That You Have to Read

18 Jun

Setting the proper price for your photography business is one of the most important, thus challenging, things you may face in your photography career. Photography pricing determines your priorities, profit potential, competition niche and business style. Bad pricing lists could not only cost you money, but also destroy your business before you can say Jack Robinson, if you know what Continue Reading

The post The Ultimate Photography Guide to Pricing That You Have to Read appeared first on Photodoto.


Photodoto

 
Comments Off on The Ultimate Photography Guide to Pricing That You Have to Read

Posted in Photography


Guide to Attracting Critters to Your Garden for Backyard Wildlife Photography

04 Jun

9783923464 5e8518e1f9 o
Wildlife photography brings with it some natural challenges. One of the greatest being that it is often difficult to have regular access to wild animals to photograph. Many of us are guilty of looking further afield for our subjects, but our own back gardens are prime locations for attracting, and photographing wildlife.

Live in the city suburbs? Doesn’t matter. Your area is likely to be bustling with bird life that you aren’t aware of yet. This guide will run you through a few of the best ways you can attract birds and animals to your garden for easier wildlife photography.

Provide Supplementary Food

Animals are suckers for food. They’re often hungry and looking for their next meal. The best way to get them to come to your garden is to provide nutritious, supplementary food. There are a variety of different methods you can use to feed wild animals.

Bird feeders are available in many different sizes and shapes. A normal tube system with various feeding holes is available from your local pet shop or garden centre. They’re inexpensive, and can be filled with many different varieties of seed. You can buy wild bird food from the same place, and get anything from mixed seeds to solely sunflower hearts. I use the latter, and to great effect.

For attracting mammals, you can get a variety of ground feeders. Squirrels, for example, love peanuts, hazelnuts and other nutty foods.
Robin in Snow

Don’t Forget the Ethics

By providing supplementary food to animals, you must not overfeed them. Fill the feeders maybe 2-3 times per week, so that they do not become dependent on you as a food source.

Make sure what you are feeding them is suitable. Ask a garden centre for advice if you need help. If using peanuts, they must be completely natural (not roasted) and unsalted!

If you decide to stop providing food, you must do so gradually. Slowly reduce the amount you are feeding over a month or so, allowing the animals to adjust naturally. Otherwise, you could end up unintentionally starving some individuals.

Getting Close for Photography

Many garden birds will allow you to sit quietly near the feeders, as they will eventually get used to you. However, if you want more freedom to move without scaring them away, get yourself a small tent hide (blind). These are available on Amazon at relatively cheap prices. A shooting blind will do the job perfectly.

Hide

Making an Area Photogenic

So by now you have the wildlife, but you still need to capture those stunning shots. A bird on a feeder isn’t the most attractive of images, but there are some neat tricks to avoid this.

Place some gnarled twigs and sticks around the feeders. If you need to, strap them to a pole so they are held horizontally. Birds will use these as queueing platforms for the feeders, waiting their turn to feed. You can utilize this moment to capture some lovely portraits of the birds on these photogenic branches. If you’re lucky, you may even get two birds fighting for pride of place.

You should also be wary of your backgrounds. If you are photographing with a messy backdrop, it will likely come out in the image and be distracting. If there’s no choice of positioning next to something plainer, then consider hanging a dark green sheet at a distance behind your subjects. This will create a pleasing bokeh for your photographs.

Red Poll and Siskin Fight

Be Patient

The key to wildlife photography is patience. Changes won’t just happen overnight. Provide food and wait, and eventually you’ll see results. It shouldn’t take too long, but birds don’t have a radar which tells them as soon as food is available – they have to find it first!

That’s just about it. Fine-tune your feeding stations overtime, adding or subtracting elements depending on what works and what doesn’t work. Good luck!

The post Guide to Attracting Critters to Your Garden for Backyard Wildlife Photography by Will Nicholls appeared first on Digital Photography School.


Digital Photography School

 
Comments Off on Guide to Attracting Critters to Your Garden for Backyard Wildlife Photography

Posted in Photography


Real Estate Photography – a Guide to Getting Started

20 May

real-estate-photography-home-front-lighting

Photography has never been more important to selling real estate than it is today. The markets are heating up again and demand for real estate creates demand for photography. This is good news to photographers, but like any business, there is plenty of competition. If you are new to real estate and architecture photography, here are some general guidelines to start you on the right path.

Camera Equipment

A camera, lens, and tripod, are all that is required to get started, but you might quickly learn that many competitors are very proficient at using supplemental lighting and Photoshop techniques.

Your camera should allow you to add a cable release, a flash, different lenses, and wireless triggers. Wide angle lenses are required. For cropped sensor cameras a lens around 10-22mm or 12-24mm is perfect, and for full frame sensor cameras, a lens around 16-35 mm will do the job.

Tilt-shift lenses help avoid converging vertical lines such as wall edges and door frames leaning in or out. There are several tilt-shift lenses available from Canon’s 17mm, the 24mm from Canon and Nikon, and others. While these lenses are wonderful to use, they are fixed focal length so if you need  a perspective that is for example; 19 mm or 27 mm or somewhere in between, a 16-35mm zoom lens is a great companion to a tilt-shift lens.

real-estate-photography-converging-lines

This image before processing shows diverging vertical lines, seen best by the edge of the fireplace, from using a 16-35mm lens tilted down to add foreground and minimize ceiling.

Shooting techniques vary from exposure blending, HDR, wireless flash, and light painting with multiple exposures. No matter your shooting style the camera should not be moved to guarantee image alignment of multiple exposures. The camera’s self-timer, a cable release, or wireless triggers insure no camera movement. The iOS App or Camranger also triggers the camera and provide a preview of the photo on a smart device.

Approaching the Property

The first image a potential buyer sees (usually) when reviewing properties online is an exterior photo. That photo is important so take the time to find the best angle and best light. Ask the realtor what are the important features to highlight. They usually want exterior photographs from front and rear, a deck or patio, landscaping and gardens, pool or hot tub, a barn, shop, or other outbuildings. Each feature should be emphasized in the composition by using the surroundings, like beautiful gardens leading to a cool garden shed.

  The client was most interested in the outdoor theater under cover on the back porch, which I captured, but I also captured this image showing the patio furniture and giving a broader view of the backyard.

The client was most interested in the outdoor theater under cover on the back porch, which I captured, but I also captured this image showing the patio furniture and giving a broader view of the backyard.

Exterior Lighting

Most outdoor subjects benefit from early or late day lighting, including real estate. Using Google Maps and Google Earth can help you determine the best time of day prior to the photo shoot.  Searching only takes minutes and provides an idea whether a home faces the sunrise or sunset, or neither.

Light hitting the front of a home is perfect as seen here after sunrise. In winter, some homes facing south never have the sun hitting the front of the home To avoid shooting into the sun, photograph from the same end of the house as the sun.

Light hitting the front of a home is perfect as seen here after sunrise.

In winter, some homes facing south never have the sun hitting the front of the home To avoid shooting into the sun, photograph from the same end of the house as the sun.

 This home has a huge yard and a street lined with cars. Photographing from the left put the sun right above the roof but moving to the right side was a better perspective and the sun was out of view.

This home has a huge hedge behind the camera and a street lined with cars. Photographing from the left put the sun right above the roof but moving to the right side was a better perspective and the sun was out of view.

Overcast skies can eliminate any problems with sun’s position, but shooting on poor days is a decision best discussed with the realtor.  The advantage is you can shoot any time of the day but the disadvantage is white skies can lessen the impact of an otherwise great exterior image.

The dusk/dark technique

The dusk/dark technique

The dusk/dark technique is often requested by clients because it helps sell properties. The image is photographed outside and from the best angle to showcase the house. The technique is to turn on all the lights in a room and shoot at a certain time. After sunset the sky’s exposure will balance with the room lights’ exposure. A better approach is to add lights to the rooms creating even lighting, and working this way means not having to wait for that perfect balance between room lights and outdoor light.

Interior Photography

Homes come in all shapes, sizes, styles, and conditions. I always tell my clients that I am not in the house cleaning business, so I send them a task list with my suggestions on prepping the home prior to the photo session. Once inside, I set out to photograph the main rooms: the living room, kitchen, dining area, master bedroom, master bath, are all ‘must shoot’ rooms. There could also be a library, office, large walk-in closet, and more. The client can often tell you what they deem important. Next, seek the best perspective for each room.

The master bathroom

The master bathroom

I describe my approach as using the inside elements: furniture, windows, and room layout, to create visual flow. I generally try to avoid composing something large in the foreground that prevents the eye from flowing through the room.

This is the first test shot I took of this room and the foreground chair blocked the flow through the room.

This is the first test shot I took of this room and the foreground chair blocked the flow through the room.

real-estate-photography-interior-after

By rotating the chair and lowering the camera height slightly, the eye can flow through the room easier. This image also has the vertical lines corrected.

Camera Height and Vertical Edges

There is broad agreement among clients and photographers, that if there is to be a rule it will state: verticals must be correct! In most interiors there are edges and corners of walls, door frames, and windows that have vertical sides and these edges need to truly be vertical. When you use a tilt-shift lens this problem is solved, but tilting the camera up or down with a non-TS wide angle lens makes vertical edges converge or diverge and they no longer appear straight.

One widely used approach is to level the camera using a hot shoe bubble level, making edges straight. While this is a simple solution, it is not always the best solution when using a non-TS lens. A level camera at chest height can result in foreground subjects, like furniture being cutoff at the bottom with too much ceiling at the top. Lowering the camera height will improve this problem but how low can you go and still have an effective photo?

This image by one of my online course students; Simone Brogini, illustrates this point. His camera is chest high and his camera is leveled to avoid diverging lines. The problem as I mentioned to him was that the foreground furniture is cutoff and there is too much ceiling that lacks interest.

This image by one of my online course students; Simone Brogini, illustrates this point. His camera is chest high and is levelled to avoid diverging lines. The problem as I mentioned, is that the foreground furniture is cutoff and there is too much ceiling that lacks interest.

 Simone also shot this bedroom image the same way. It looks pretty good but I advised him again that in my that camera height might be just a little too low as the bed and furniture get only about 1/3 of the frame and the wall and windows uses 2/3 of the frame.

Simone also shot this bedroom image the same way. It looks pretty good but I advised him again that in my opinion the camera height might be just a little too low, as the bed and furniture get only about 1/3 of the frame and the wall and windows use 2/3 of the frame.

So what is the perfect camera height? There are many opinions. Some suggest chest height while others suggest door knob height or even lower, all to avoid diverging verticals lines. I prefer chest height or close and correcting vertical lines using other methods like a tilt-shift lens or the Lens Correction Tool in Photoshop (or Lightroom).

This image shows the use of the Lens Correction Tool. The bed and furniture consume 2/3 of the frame and provide a fuller view of the room.

This image shows the use of the Lens Correction Tool. The bed and furniture consume 2/3 of the frame and provide a fuller view of the room.

Getting Good Exposure

The perfect interior exposure is challenging when balancing bright window light, with darker interiors. You can deal with scene contrast many ways; one is to shoot when outdoor light levels are lower. Midday light will be much brighter outside than during or after sunset, or on a cloudy day. Turning on every light inside increases the interior brightness, and if the outdoor brightness is lower a RAW file can often capture the scene in one frame.

  This room has a dark ceiling, dark furniture, and window flare and hot spots. To much contrast for one capture.

This room has a dark ceiling, a dark floor, a window flare and hot spots with too much contrast for one capture. (see corrected version below)

  On a overcast day, the interior exposure is quite good as well as the window exposure. A flash was bounced off the ceiling on the right.

On a overcast day, the interior exposure is quite good as well as the window exposure. A flash was bounced off the ceiling on the right.

To make sure I have all the exposures for a great image, I determine my ‘base exposure’, the image that has most of the data centred in the histogram. Then I bracket widely in +/- one stop increments of varied exposures so I have variety just in case I need them. Lightroom and Photoshop, and certainly other programs, allow selective lightening and darkening of shadows and highlights on a single image, but if the contrast is too much, I can blend those bracketed images into a great final image.

The Adjustment Brush was used to bring down the brightness of the left window. There is still a little flare around the window, but this worked for the real estate website.

The Adjustment Brush in Lightroom was used to bring down the brightness of the left window.

Interior Lighting

Just like a finely lit portrait, interiors can benefit greatly from nicely styled lighting. HDR can manage scene contrast but it does not create highlights and shadows in areas that have no directional light. If you have a dark cabinet against a dark wall, adding supplemental light can bring out that needed detail.

Most interiors have two light sources: window light and interior lights, both constant light sources. You can add constant lights or use strobe or flash. Constant lights, unlike flash, are like the lamp on the table or window light. Changing your exposure to darken window light also changes the exposure brightness of your constant lights. Flash is not a constant light! If you change your shutter speed to darken the window light exposure, flash exposure will not change and for this reason; flash or strobe provides flexibility when lighting interiors.

Photographers shooting for architects or magazines often have plenty of time to photograph a property with finely crafted lighting techniques, but a real estate photographer’s time is usually limited, making flash the perfect tool. Some photographers have mastered the balancing act of using direct on-camera flash to fill in a scene while others use on-camera flash in a bounce capacity.

Here the only light is coming from a window on the left and the ceiling fixtures, leaving dark areas in front.

Here the only light is coming from a window on the left and the ceiling fixtures, leaving dark areas in front.

Adding bounce flash, hand held just to the right of the camera, filled in those darker areas effectively.

Adding bounce flash, handheld just to the right of the camera, filled in those darker areas effectively.

Also popular are multi-flash wireless set ups allowing the flash to be placed around a room for styled lighting. Also growing in popularity is the ‘light painting’ approach where areas are selectively lit and the exposures are blended.

This image utilizes the Light Painting approach to interior lighting.

This image utilizes the Light Painting approach to interior lighting.

One side effect with outdoor lighting mixing with interior lighting is ‘lighting color balance‘. This is different than camera White Balance settings. Camera White Balance is set to either specific areas of your scene or set to average all light sources together.

There is a blue color cast above and right side of the window as well as the floor on the left.

There is a blue color cast above and right side of the window as well as the floor on the left.

When you have mixed light, such as daylight colored window light mixing with tungsten colored ceiling lights, and then throw in a fluorescent kitchen light, you have a veritable palette of different colors mixing together. Walls closest to windows will be blue while the wall closest to a lamp will be amber and the ceiling in the kitchen will have a green tint.

The final image shows color correction in those areas as well as verticals and window flare.

The final image shows color correction in those areas as well as corrected verticals and removal of window flare.

In some cases the effects of mixed light will be minimal and other times require attention. You can prevent mixed color in many cases by color matching the inside lights to the same color or use Photoshop color correction techniques to change color of specific areas.

The End Product

Once you have completed the assignment you will need to deliver the image files. Clients may have different preferences, but mine usually request low resolution for the web and high resolution for print publication.

Be sure to save your files in the proper file format and size for the intended use. Most Multiple Listing Service’s specify what is accepted format and acceptable sizes. I use Photoshop and the Save for Web option for the low resolution and TIFF format for high resolution.  Then final delivery of the files is made by Dropbox or a comparable online service.

Summary

Things to remember doing real estate photography:

  • You are not photographing for yourself; you are photographing for clients who will expect professional quality work.
  • Don’t get ALL the best gear, get only what is required to do the job well.
  • Master the creative side of photography such as angles, perspectives, and composition.
  • Master the technical side of exposure, HDR, supplemental lighting, color matching, and exposure blending.
  • Be careful when processing real estate images, like removing power lines, to avoid misrepresenting the property. 

There are many styles and techniques you can use to photograph architecture and real estate and you should master them all. Real estate photography is architecture photography and you can photograph a home for a real estate agent for $ 200 or photograph a model home for a home builder for $ 1000 or more.  Start small, plan big!

The post Real Estate Photography – a Guide to Getting Started by Charlie Borland appeared first on Digital Photography School.


Digital Photography School

 
Comments Off on Real Estate Photography – a Guide to Getting Started

Posted in Photography


The Ultimate Photographer’s Guide to Photo Contests That Are Worth Your Time

14 May

The Internet has brought an influx of photo contests. It seems like every blogger, photographer and “momtog” is putting up a photo contest. As a serious photographer, how can you know which ones to submit to, and if you do choose to submit to one, how to maximize your chances of winning? Here is everything you need to know about Continue Reading

The post The Ultimate Photographer’s Guide to Photo Contests That Are Worth Your Time appeared first on Photodoto.


Photodoto

 
Comments Off on The Ultimate Photographer’s Guide to Photo Contests That Are Worth Your Time

Posted in Photography