RSS
 

Posts Tagged ‘Guide’

Beginners Guide to Using TTL Off-Camera Flash

05 Aug

So you want to use off-camera flash. But why? Your camera has that hot shoe there for a reason, right?

There are two things that you may not realize:

  1. That many DSLR-speedlight combos are capable of wireless off-camera flash using through-the-lens (TTL) metering without any additional equipment
  2. That using off-camera flash can take your photography to an entirely new level both in quality and creative potential.

Many references to off-camera flash talk about sync cords and wireless transmitters, when in fact, many DSLRs with a built-in pop-up flash have the ability to wirelessly control a speedlight. Likewise, many hot shoe mounted speedlights are fitted with an optical receiver to be wirelessly triggered.

Image of pop up flash and speedlight optical receiver

Look, no wires! On camera pop-up flashes are often capable of optically triggering speedlights.

The least painful way to cross the proverbial bridge into the realm of wireless off-camera flash – often referred to as a remote or slave flash – is by utilizing your camera’s ability to act as a remote trigger for a flash combined with TTL metering.

Most Nikon cameras from the D70, and flashes from the SB-R200 and up; and Canon cameras from the 600D (T3i) and flashes from the Speedlite 90EX and up offer these features, but check the manufacturer’s website to be sure what setups will work. There are also a wide selection of other brands of flash, often less expensive, that offer similar features.

A TTL-equipped flash is manufacturer specific. The TTL feature of a Nikon dedicated flash will only work with Nikon, however, it could possibly still be used in manual mode.

In a nutshell, TTL is the way that the camera sets the exposure and flash intensity automatically by firing a nearly imperceptible pre-flash, taking an exposure reading, and adjusting settings accordingly. Nikon calls it i-TTL and Canon has dubbed it e-TTL but it’s basically the same deal.

For wireless off-camera flash functionality, the built-in flash on your camera is set to send an optical signal to your flash which triggers it.

Photo taken with a hot shoe mounted flash

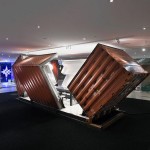
This photo was taken simply with a hot shoe mounted flash set to TTL metering and the camera set to aperture priority. Shot at 200mm, f/5.6 at 1/60th of a second with the flash pointed at a low white ceiling. Nice soft, even lighting.

Photo taken with off camera wireless flash

Exact same settings as the photo above except the flash was setup off-camera in remote mode, with TTL metering. It was placed at 45-degree from the subject and aimed towards the food. Voila! Directional, moody lighting.

First time users of this method will think they just discovered sorcery. Partly because it’s such a cool trick and partly because it is easy to achieve awesome results right away. Manually controlling an off-camera flash isn’t the end of the world but it requires more thought and consideration to balance the flash and camera settings to achieve desired results.

If you have a camera and a hot-shoe-mounted flash unit that are capable and you haven’t taken advantage of it yet, this is the point where you should start getting excited.

Setup for Nikon Equipment

Camera Settings (menu locations may vary depending on camera model)

  1. Open the Custom Settings Menu
  2. Scroll down and select menu “e” – Bracketing/flash
  3. Choose e3 on the list – Flash cntrl for built-in flash
  4. Choose the last selection on this list – Commander mode
  5. The first line item is Built-in flash, scroll right to highlight the Mode column. If you haven’t messed around with this it will probably be set to TTL.
  6. Scroll down until it reads – –. This means that the camera’s built-in flash will only trigger the off-camera flash and won’t add any additional light to your exposure.
  7. No need to change it but note what channel is selected as your flash will need to be set to the corresponding channel.
  8. Press OK.
  9. Pop open the built-in flash.

Flash Settings (varies depending on flash model)

Photo showing SB-600 remote flash setting

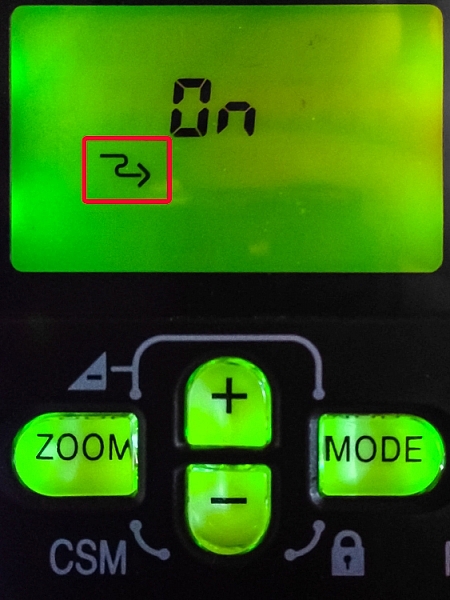
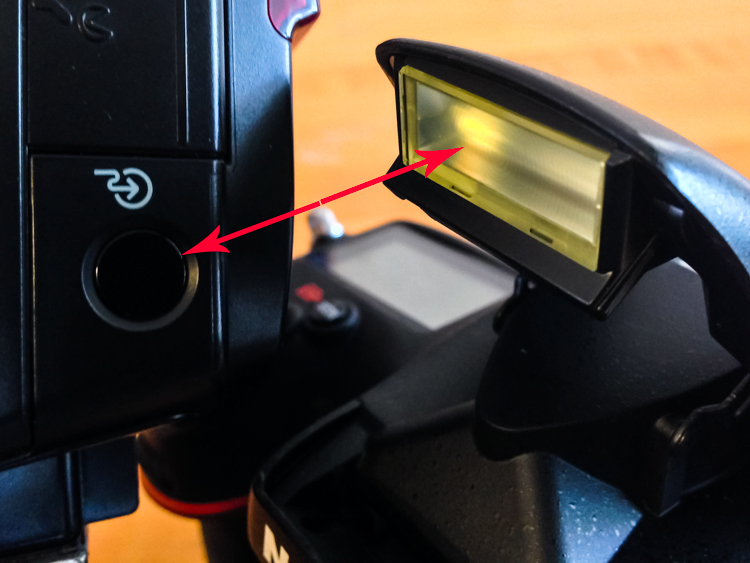
Users of Nikon speedlight models SB-600 and SB-800 are looking for this symbol indicating the flash is ready to be wirelessly triggered. The SB-800 selection is also marked Remote.

On some Nikon flashes you are looking for a curved arrow symbol that signifies it is set to be controlled wirelessly. On some models like the SB-600 and SB-800 this is accessed in the Custom Settings menu while the SB-700, SB-900 and SB-910 have a dedicated switch to set the flash to Remote.

Setup for Canon Cameras

Camera Settings (may vary depending on camera model)

  1. Press the Q button to open the menu.
  2. Cycle through until you reach the Built-in flash func. menu setting identified by a flash symbol. Press the Set button to select.
  3. Choose the middle menu item called Easy wireless flash shooting. This setting can also be found in the first page of the shooting menu under Flash control.
  4. No need to change it but note what channel it is set to as your flash will need to be set to the corresponding channel.
  5. Pop open the built-in flash

Flash Settings (varies depending on flash model)

On Canon a flash you need to set it to slave mode. Some Speedlite models have a dedicated switch for this setting, and others require you to hold down the zoom button to switch it on.

The system is an optical one, meaning that the receiver on the speedlight needs to “see” the signal from the on camera flash. A direct line of sight is recommended but I have found that you can often hide the speedlight slightly behind a wall or other object, and it will still receive the signal.

Other than the signal being interrupted by physical objects, it can also be finicky in bright daylight, and the range is limited compared to radio frequency triggers.

Food photo with off camera flash

Simply getting the flash off of the hot shoe and a couple of feet to the side casts more visible shadows and gives the photo more dimension.

Editor’s Note: If you have a system other than Canon or Nikon consult your camera and flash manuals for the settings. We apologize if you feel left out, but we are not able to cover every brand and combination in the scope of one article. 

Notwithstanding the limitations of the system, it’s an ideal introduction to off-camera flash with minimal investment of time or money – especially if you have the equipment already.

These are the very basics. Both Nikon and Canon systems are very flexible, and expandable, with the ability to adjust flash intensity from the camera, add additional flashes in groups, and in some cases, trigger other flashes from a master flash adding more versatility and utility.

After you get the system working its magic and have officially entered the  realm of off-camera flash, there are innumerable adjustments to make both on the flash and camera to gain more control, and fine tune your lighting to create the photo you see in your mind.

A Few Quick Tips

  • Very bright ambient light and flashing lights can interfere with the optical triggering
  • For best results, point the receiver window on the flash (usually covered with red plastic) toward the camera and rotate the flash head if necessary
  • If the background is too dark, try decreasing (slowing) shutter speed and/or increasing the ISO

If you want your subject and background to have more even lighting, take a look at Dragging the Shutter: Balancing Fill Flash with Ambient Light

For more technical information about flash placement, have a read of Working with Off Camera Flash and TTL.

Just starting out with off-camera flash? Let’s hear about your experience and see your results in the comments below.

googletag.cmd.push(function() {
tablet_slots.push( googletag.defineSlot( “/1005424/_dPSv4_tab-all-article-bottom_(300×250)”, [300, 250], “pb-ad-78623” ).addService( googletag.pubads() ) ); } );

googletag.cmd.push(function() {
mobile_slots.push( googletag.defineSlot( “/1005424/_dPSv4_mob-all-article-bottom_(300×250)”, [300, 250], “pb-ad-78158” ).addService( googletag.pubads() ) ); } );

The post Beginners Guide to Using TTL Off-Camera Flash by Jeremie Schatz appeared first on Digital Photography School.


Digital Photography School

 
Comments Off on Beginners Guide to Using TTL Off-Camera Flash

Posted in Photography


Beginners Guide to Creating and Applying Texture Overlays Using Photoshop

03 Aug

Creating and applying textures is surprisingly simple and fun to do.

Adding texture to photographs was happening long before the invention of Photoshop and other editing programs. In the days of the darkroom, we would scratch negatives with pins, sand paper them, stain the photographic paper with fixer before exposing, layer two negatives on top of each other in the enlarger, or push our film ISO to increase grain. These days, with editing programs being our digital darkroom, we simply have yet another way of adding texture to photographs.

What is a texture?

In digital photography terms it’s simply another layer added to your photograph in an editing program, usually an image of some sort of textural surface, such as paper, wood, concrete, etc., but anything at all can be a texture. They can be photographed, scanned or even made in Photoshop.

Almost anything can be used as a texture.

Some examples of textures. A friend’s work bench, a close-up of my lamp shade, a mossy rock, fog from a smoke machine, and some very ugly carpet.

Why use textures?

With the right texture overlay, and application of it,  you can add an extra level of depth and feeling to your photograph. You can use them for anything – from adding a vintage or grunge look to your photographs, to creating fine art pieces.

One of the best uses is to rescue a photograph that just isn’t quite working. I’ve been told no texture overlay will save a terrible photograph. While this is true for the most part, sometimes it can transform an otherwise unusable image to something more promising.

A texture can transform an otherwise unusable image into something more promising

A texture can transform an otherwise unusable image into something more promising.

Textures can be added to almost any kind of image. If you’ve ever downloaded a photography app for your Smartphone, you have most likely had them add a texture with the app’s built-in filters.

Some mobile phone apps add texture for you

If you’ve ever used a filter on a mobile phone app, you have probably already had textures added for you.

Getting started

You don’t need to create your own texture to get started. There are many pre-made, free textures available on the internet. A quick Google search will bring up a bunch of free texture sites. But not all textures are created equally, or usable legally. You need to look for textures that are a decent size and resolution, a 200px/72dpi texture over a 3200 px/300dpi image probably isn’t going to work so well.

You’ll also want to make sure the texture has the right copyright permissions. Sites like deviantart.com have many stock textures offered free by their artists for personal use. These artists ask that you simply return the favor by sending them a link to the image you created using their work. Other sites like freetstocktextures.com offer their images copyright free for personal and commercial use, as long as you aren’t reselling the texture images themselves.

Creating your own textures

Creating your own textures is as simple as taking a photograph. Why do that, when you can download free ones? Because it’s fun, your work is then completely all yours, and you can tailor your textures to suit your images. For example; if you’re photographing skateboarders at a skate park, you could also gather some shots of the concrete they skate on, or graffiti around the place to create original textures that work with, and possibly add to, the story of your subject matter.

create your own textures to add more story to your image

Textures can add a bit more of a story to your images.

The image above is of my daughter asleep after a day at the beach (many years ago) combined with texture of the water I took that day, to add to the story and memory of the day, and give the photo an extra dream like feel.

Create a texture with your scanner

Below is the first texture I created, one that I still use years later. It was created by scanning the bottom of an old baking tray. Scanning works well for textures of papers and other small flat surfaces.

You can also use a scanner to create textures. Thiis is a scan of the bottom of an old baking tray

Scanned texture from an old baking tray.

The baking tray texture was used in the image of the cello player at the beginning of this article, in combination with a manuscript image of the music she played on the day. I also used it in the image below; one of a series of images created in collaboration on album artwork with Canadian singer songwriter Sora. The texture was used to tie all the photographs in the album together even though some were taken by other photographers. Yet another use for textures!

Baking tray texture in combination with a few other textures.

Textures can be used to tie a series of images together.

Create a texture in Photoshop

You don’t need to understand complex Photoshop processes to create a texture quickly and easily. Here are a few simple steps to create a basic texture in a few minutes:

  1. Open a new file the size and resolution you require
  2. Brush around a couple of colors
  3. Add a Render Clouds filter
  4. Adjust levels for a bit of contrast
  5. Add a vignette and a color filter
Creating a texture in photoshop takes only minutes.

Paint in some colors, add Render Clouds Filter, some contrast, then some colour and vignette. Easy!

Instead of a Render Clouds you could use the Blur Tool to swirl your colors around, or try some of the other filters in Photoshop to get different effects. I tested it out on what was originally a rather terrible photograph of this orchid.

creating-and-applying-textures13

The texture, plus a few color adjustments and a warming photo filter, and it’s a whole different image.

create-and-add-textures09

While it does look a little like something you might see on your Facebook stream with a positive affirmation written across it in an awful font, it took me less than five minutes to do for this demonstration to show you how simple it can be to create a texture from scratch.

create-and-add-textures10

Applying your texture

It is really very easy to apply your texture. There are some more technical articles on adding textures here on dPS, but here is a quick guide to get you started.

Click and drag your texture thumbnail in the Layers palette over onto your original image. Your texture becomes layer 1 in your original image’s Layer palette. Choose your level of transparency with the Opacity Slider and use Free Transform Tool to move the texture about. Turn it around, enlarge or stretch. See where it sits best.

create-and-add-textures11

Then it’s simply fine tuning the Opacity, maybe putting Eraser Tool on a low opacity and painting out unneeded parts of the texture. Alternatively use a layer mask to paint out some areas, as well as back in, if you accidentally paint out too much.

create-and-add-textures12

Have fun with it and experiment. Try a few different layer blend modes, add multiple textures, or add the same texture image a few times, perhaps with each layer having a slightly different hue. There are no rules.

Have you created a texture that you love? Share it and its use (your images) in the comments below.

googletag.cmd.push(function() {
tablet_slots.push( googletag.defineSlot( “/1005424/_dPSv4_tab-all-article-bottom_(300×250)”, [300, 250], “pb-ad-78623” ).addService( googletag.pubads() ) ); } );

googletag.cmd.push(function() {
mobile_slots.push( googletag.defineSlot( “/1005424/_dPSv4_mob-all-article-bottom_(300×250)”, [300, 250], “pb-ad-78158” ).addService( googletag.pubads() ) ); } );

The post Beginners Guide to Creating and Applying Texture Overlays Using Photoshop by Lea Hawkins appeared first on Digital Photography School.


Digital Photography School

 
Comments Off on Beginners Guide to Creating and Applying Texture Overlays Using Photoshop

Posted in Photography


A Brief Guide to Lightroom Mobile and Lightroom Web

09 Jul

Lightroom mobile and Lightroom web

As you are aware, there are two ways to buy Lightroom.

The first is to buy a perpetual license, which means that you pay a set one-off fee to use the software for as long as you want. The second way is to subscribe to Adobe’s Creative Cloud Photography plan. With this, you pay a monthly fee that allows you to use Lightroom CC, Photoshop CC, Lightroom mobile and Lightroom web for as long as you keep up the subscription.

The subscription plan is somewhat controversial, and I know from comments on previous articles that some of you don’t like it. However, as it gives you access to Lightroom mobile and Lightroom web (as well as Photoshop CC) it’s worthwhile exploring the benefits of this licensing model.

Photoshop needs no introduction, but Lightroom mobile and Lightroom web are less well known. So let’s take a look at what they do, and how you can use them in your workflow.

Note: Lightroom mobile is now available for most Android and iOS smart phones and tablets. Up to date operating systems may be required.

Lightroom mobile helps you synchronize photos on your mobile device

In Lightroom CC you can synchronize any Collection with Lightroom mobile.

Lightroom mobile and Lightroom web

The lightning bolt icons on the left indicate these Collections are synchronized with Lightroom mobile.

Synchronized Collections appear on your mobile device (internet connection required) and you can download them for offline viewing.

Lightroom mobile and Lightroom web

Synchronized Collections created in Lightroom CC are immediately available for viewing in Lightroom mobile.

One practical application of this is that you can create a Collection containing your best photos to show people interested in viewing your portfolio. You can add or remove photos in Lightroom CC, and the updates are automatically pushed to Lightroom mobile. Very little work is required on your part, as most of the process is automated.

Lightroom mobile and Lightroom web

Lightroom mobile doesn’t require much storage space on your mobile device

Unless you have a device with a lot of storage space you probably don’t have room to store hundreds of full-size JPEG or Raw files in addition to what’s already on there.

Lightroom mobile works around that by using Smart Previews; a compressed preview of your photo that measures 2540 pixels along the longest edge. Crucially, Smart Previews are only a fraction of the size of a JPEG or Raw file (around 2%).

When you synchronize a Collection with Lightroom mobile, Lightroom CC generates Smart Previews of the photos it contains (if they don’t exist already) and uploads them to Adobe Cloud.

In turn, Lightroom mobile accesses Adobe Cloud and downloads the Smart Previews when they are required. They are cached and can be deleted when you need to free up memory. This system ensures you can use Lightroom mobile on devices without much spare storage space.

Lightroom mobile and Lightroom web

This Collection contains 37 photos yet only takes up 54.6Mb of my device’s storage space.

You can also download Smart Previews to your device and store them to enable off-line viewing and editing. This requires more storage space (although not a lot), but doing so both speeds up Lightroom mobile, and lets you view and edit photos without an internet connection. If you have a device with 64GB or 128GB storage, you have space for tens of thousands of Smart Previews.

Note: Lightroom mobile can be set to use a wi-fi connection only, so it doesn’t consume mobile bandwidth.

Lightroom mobile lets you Flag and rate images

If you use the Lightroom Library module to view images you will be aware that even on fast systems it’s not always as fast as you would like. Viewing images in Lightroom mobile is much faster. There’s virtually no delay in previewing images as long as you have enabled offline editing.

This means you can view photos and assign Flags or Ratings very quickly, greatly speeding up the amount of time it takes to view images from a shoot, and decide which ones to process.

Any changes you make to metadata, including Flags and Ratings, are automatically updated in Lightroom CC (internet connection required).

Lightroom mobile and Lightroom web

Lightroom mobile lets you process photos

Yes, you can process your photos in Lightroom mobile as well. All edits are synchronized with Lightroom CC. However, you don’t have the full functionality of Lightroom’s Develop module. But you can carry out the following:

  • All the adjustments available in the Basic panel
  • Cropping images
  • Apply one of 42 built-in presets
  • Add a vignette
  • Adjust Tone Curves
  • Use the Color/B&W adjustment tool

Note: Most mobile devices are not colour calibrated, so critical processing work should be carried out on a computer with a calibrated monitor.

Lightroom mobile and Lightroom web

Lightroom mobile synchronizes photos taken with your mobile device, with Lightroom CC

You can create a Lightroom mobile Collection that automatically populates with photos taken with, or added to your mobile device. Lightroom mobile uploads them to Adobe Cloud when you go online, and when you open Lightroom CC it downloads them and saves them on your computer. This works with JPEG, PNG and video files but not Raw files.

Lightroom web lets you make photos available for online viewing

When you synchronize a Collection with Lightroom mobile you can also make it available for public viewing. Lightroom generates a unique link for you to share with people so they can view the Collection in a web browser. Viewer’s logged in with an Adobe ID can comment on photos and mark favourites.

Lightroom mobile and Lightroom web

Lightroom web lets you access your photos from a web browser

Log in to the Adobe Lightroom website using your Adobe ID to access all your synchronized Collections. You can assign flags and ratings, make comments, mark images as favourites, and view essential metadata such as exposure settings. However, you can’t carry out any processing. You can also download a large JPEG file (generated from the Smart Preview).

Lightroom mobile and Lightroom web

Lightroom mobile as a backup

You may be wondering if you can use Lightroom mobile to edit or view photos taken in the field. The answer is you can, but with restrictions. The major one is that you can’t import Raw files into Lightroom mobile, even if they have been downloaded from your camera to your mobile device.

But you can import JPEG files. This is the workflow. It’s not as straightforward as it could be, but it works.

  • Shoot Raw+JPEG in-camera
  • Download all the photos to your mobile device
  • Import the JPEG files into Lightroom mobile
  • Assign Flags and Ratings, or process images in Lightroom mobile
  • When you get home, import the Raw files into Lightroom CC without changing the name. Meanwhile the JPEGS are synchronized via the Adobe Cloud
  • Use John Beardsworth’s Syncomatic plug-in to synchronize the changes you made to the JPEG files with their Raw equivalents

Your turn

Do you use Lightroom mobile or Lightroom web? What do you use them for? I’d love to know – please tell us in the comments.


The Mastering Lightroom CollectionMastering Lightroom ebooks

My Mastering Lightroom ebooks will help you get the most out of Lightroom. They cover every aspect of the software from the Library module through to creating beautiful images in the Develop module. Click the link to learn more or buy.

googletag.cmd.push(function() {
tablet_slots.push( googletag.defineSlot( “/1005424/_dPSv4_tab-all-article-bottom_(300×250)”, [300, 250], “pb-ad-78623” ).addService( googletag.pubads() ) ); } );

googletag.cmd.push(function() {
mobile_slots.push( googletag.defineSlot( “/1005424/_dPSv4_mob-all-article-bottom_(300×250)”, [300, 250], “pb-ad-78158” ).addService( googletag.pubads() ) ); } );

The post A Brief Guide to Lightroom Mobile and Lightroom Web by Andrew S. Gibson appeared first on Digital Photography School.


Digital Photography School

 
Comments Off on A Brief Guide to Lightroom Mobile and Lightroom Web

Posted in Photography


Become a Composition Master with This Great Guide: 60% Off Today Only

03 Jul

Deal #2 in our massive Mid Year Sale has just gone live – and it’s a goodie!

Iics hero shot discount

Today only you get 60% off Photography Concentrate’s Incredibly Important Composition Skills.

For the next 24 hours and only $ 19.98 (an exclusive dPS price), you’ll get:

  • A comprehensive 225-page ebook — filled with everything you need to know to come away with a deep understanding of composition and the practical know-how to put it to good use
  • 7 bonus videos — looking at examples of theories and techniques and how they influence the look and feel of each photograph, to bring all the concepts covered together
  • A printable pocket field guide — with the most essential composition information laid out, for you to print out, fold up and slip in your camera bag

Check out the video on the Photography Concentrate site to meet Lauren, the author of this tutorial, and learn more about how Incredibly Important Composition Skills will totally transform your photography!

Composition

This deal is an unbelievable amount of value.

Especially because building your composition skills is one of the fastest and most lasting ways to transform the quality of your images.

You see, people view images in predictable ways. And when you discover these patterns, you can use them to your advantage to create photographs that best communicate your desired message.

So are you ready to become a master in composition and gain real skills that you’ll use in every single shot you take?

Head to Photography Concentrate to snap up this amazing deal!

No Risk: Your Satisfaction is Guaranteed

Your satisfaction with this deal is guaranteed. For a full 60 Days, and if you don’t feel like you have stronger composition skills you’ll get 100% of your money back with no questions asked.

googletag.cmd.push(function() {
tablet_slots.push( googletag.defineSlot( “/1005424/_dPSv4_tab-all-article-bottom_(300×250)”, [300, 250], “pb-ad-78623” ).addService( googletag.pubads() ) ); } );

googletag.cmd.push(function() {
mobile_slots.push( googletag.defineSlot( “/1005424/_dPSv4_mob-all-article-bottom_(300×250)”, [300, 250], “pb-ad-78158” ).addService( googletag.pubads() ) ); } );

The post Become a Composition Master with This Great Guide: 60% Off Today Only by Darren Rowse appeared first on Digital Photography School.


Digital Photography School

 
Comments Off on Become a Composition Master with This Great Guide: 60% Off Today Only

Posted in Photography


Guide to Growing a Large Online Audience for Photographers

16 Jun

In this article, learn about how you can grow an online following that will enable you to profile your work, make important new contacts, and eventually monetize your photography.

TravelPhotographyMonetizedResized

Through growing my online following I have successfully monetized a career in travel photography, visiting amazing destinations like Quebec, Canada.

First, you need to decide on the best way to share your work. Is it a blog, a social media platform, or a combination of the two? Which social media platforms lend themselves best to photography? How many should you have? There are slight nuances between all social media platforms but the core ways to share remain the same.

Choosing your platform

The best advice for choosing your platform is to follow your heart. You should put your time and effort into the things that you enjoy. A great rule of thumb is to use a platform that you love, religiously, and then supplement it with one or two others. The best way to figure out what you love is to try everything, and I mean really try it. Give different platforms a few weeks each as you learn how to share content, how to engage with the community there, and how to navigate the different features. Look at how much momentum you can pick up in that time, how many users you connect with, and the sort of feedback you are receiving on your photography.

Some great platforms for you to try are Facebook pages, Instagram, Steller, Trover, Google+, Flickr, 500px, Tumblr, Pinterest, Ello and of course, your own blog. Each social media platform is different with its own benefits and limitations. Make some effort to learn about each as you try them and remember that social media is social! If you’re not sure of something, just ask someone that you follow.

ThePlatformILoveResized

The platform that I love the most is Instagram because it lends itself well to the simple compositions I favor, plus users love uncomplicated images and subject matter such as these baby turtles in Bundaberg Australia.

Sharing content

Each platform is a little different, as are the ways of sharing your photographs, but despite subtle differences the core of sharing remains the same. Share your best work, network within the platform to get that work seen, and engage with the people who are engaging with you.

What is your best work? From any shoot or session that you do, whether it is landscape, portraiture, a family shoot, wedding, macro, food photography, etc., choose a handful of favorites and feed them out slowly, as opposed to all at the same time. Build a story into your posts and talk about the work. You might wish to share your camera settings, a gaff you made during the shoot, some information about the subject matter, or maybe even ask for feedback or advice. Again this comes down to online sharing being social. Put yourself out there and you will be amazed at what can happen.

ChooseTheBestResized

I must have taken 500 photographs of the icebergs in Jökursárlón but I only shared a coupe online, and I made sure they were perfect for my audience, uncluttered with my trademark simple composition.

Networking can be as easy as discovering photographers that you admire and commenting on their work, or using hashtag searches to find inspiration or even liking streams of images that you’re into. When another user receives a notification that you’ve engaged with their work they’re likely to come and check out yours. If they don’t, find others who will. Sharing your work online to grow an audience requires time and persistence as well as a genuine love and passion for what you’re doing. That’s why it’s important to use the platforms that you enjoy.

WhyIEnjoyResized

Another reason why I enjoy Instagram is because it is so populated. I can find any type of image, any destination, and many people with similar interests by sharing there. Reindeer fan anyone?

Engaging can be done in several different ways but one of the most important ways is to thank people that have commented on your work or reply to questions as they’re asked. You don’t need to dedicate your life to it, but you will find that a little effort will enable you to snare new followers and build new connections.

Over time, you may notice that you receive more likes and comments on a certain type of image. For example, if your macro photography is getting double the likes of your portrait photography then your followers are telling you what they really love. You can choose to give them more of what they love, or continue to diversify. In my experience the biggest social media accounts often have quite consistent subject matters. You will start to get people following you just for your macro photography, and perhaps you’ll notice a dip in engagement when you post anything else. It’s up to you how to manage this, but the best advice is to always stay true to your passions.

StarTrueResized

Although I am well known for travel photography and landscapes I also love portraiture, and despite the lower engagement I continue to post the work that resonates with me.

Networking

It’s a funny thing networking on social media; so many people do it badly. If you want to do well with people online then simply remember to be a person! You are not a faceless photographer pumping out uploads; you are a person with feelings, opinions, humor and personality, so you should let that shine through. Whatever platform you are using, you should have a profile photo that looks like you and a bio with a little information about yourself. Each time you upload a photograph you should write an engaging caption, and when people talk to you, talk back as you would in real life. You may be astonished at how many amazing people there are using social media, and they are all at your fingertips.

ProfileShotResized

A strong profile shot of you looking like yourself, doing something you love, in a scenic but uncluttered background, will help people engage with you.

Over time you may realize that brands you admire use the same platform you do, and you should treat them the same way you would treat others. Engage with the brand and offer real feedback on what they’re doing in that space. Share your personality and you may find them discovering you back. The same goes with potential clients if you are trying to break into a certain photography industry. Just be yourself, share great work, network, engage, and persist.

Monetize

If you ever get to the stage where you have a large online following on any platform, then the time may be right to monetize. There are various ways of doing so. This can be really dependent on the type of photographer you are, and the kind of work you are doing. You may be a wedding photographer you has stylists offering you money to promote them on your channels. You might love travel photography (like me) and find a way to promote destinations to your online followers. Maybe you’re into lifestyle photography and brands pay you to include their product in shots in exchange for a fee. With an audience you will find that the photography industry will open up to you as more and more businesses are hiring based on both photography style and online reach.

OnlineReachResized

It’s not a complicated image, perhaps any decent photographer could have taken it, but combine this image with a 400,000 strong audience and I get a foot in the door thanks to my online reach. (Follow Lauren on Instagram here)

If not the above, then having an online following will expose you daily to an audience that may one day need a photographer. Online sharing gives you a chance to be seen by everyone from businesses, to journalists, to tourism boards, and of course potential clients and friends. By finding the platform that you love and sharing great work; by putting your best foot forward and networking and by keeping an eye out for opportunity, you can definitely go places no matter the level of your photography.

WeAllStartSomewhereResized

We all start somewhere. Online sharing has enabled me to take my photography to places I never would have believed possible and having an audience makes me proud and accountable for every image I share.

googletag.cmd.push(function() {
tablet_slots.push( googletag.defineSlot( “/1005424/_dPSv4_tab-all-article-bottom_(300×250)”, [300, 250], “pb-ad-78623” ).addService( googletag.pubads() ) ); } );

googletag.cmd.push(function() {
mobile_slots.push( googletag.defineSlot( “/1005424/_dPSv4_mob-all-article-bottom_(300×250)”, [300, 250], “pb-ad-78158” ).addService( googletag.pubads() ) ); } );

The post Guide to Growing a Large Online Audience for Photographers by Lauren Bath appeared first on Digital Photography School.


Digital Photography School

 
Comments Off on Guide to Growing a Large Online Audience for Photographers

Posted in Photography


Your Guide to Understanding Program Mode on Your Camera

03 Jun

Almost every DSLR or Mirrorless camera has a mode dial with a variety of letters and icons on it, some of which might seem cryptic or confusing. Usually you’ll find a green icon for Full Auto mode (usually a green A or rectangle), Full Manual mode (M), as well as Aperture Priority (A or Av) and Shutter Priority (S or Tv). Your camera might also feature scene modes such as portrait, night, or macro, and even some user-configurable modes indicated with a U1 or U2 (or C1/C2, etc.).

Somewhere on that dial is a letter that’s often left neglected, and unused by many people, even though it can be quite powerful – Program Auto (P). In my experience most people don’t use it because they don’t understand it. Is it Auto? Is it Manual? What can it do that the other modes can’t? The answer is a bit strange at first, but once you wrap your head around what the humble little P mode can do, you might find yourself using it much more than you thought.

DSC_2475

The camera mode dial operates on somewhat of a continuum. On one end you have Full Manual mode, which gives you complete control over the three elements of exposure: shutter speed, lens aperture, and ISO sensitivity. On the other end you have Full Auto mode which gives you almost no control over exposure except whether the flash turns on or not (and on some cameras, not even that much). On most cameras Full Auto will not even let you choose basic parameters like white balance and focus mode, which is fine if you just want to shoot some pictures and not worry about all the technical aspects of photography.

The other modes exist in the middle of the spectrum and give you some degree of control, while your camera handles the rest. For instance, in Aperture Priority you control the aperture and ISO, and let your camera figure out what shutter speed to use for a good overall exposure. In Shutter Priority things are reversed; you control the shutter speed and ISO, while your camera figures out what aperture to use.

program-auto-diagram

Program mode exists on the same continuum somewhere between Aperture/Shutter Priority and Full Automatic. When you initially put your camera in P mode you might notice that things look similar to Full Auto; your camera sets the aperture and shutter speed in order to get a proper exposure. One benefit you might not immediately realize is that you can set the ISO which will then remain unchanged by the camera. This is quite useful in situations where you want to intentionally use a lower ISO, such as outdoors or in bright light, or a high ISO when things are a bit darker and you prefer to not activate the flash. If nothing else, think of the Program Auto mode as an ISO Priority mode; you set the ISO and your camera figures out the shutter speed and the aperture. If that’s all you want to do, you’re set. Change the ISO (or not) and worry only about composing and framing your shots, then let your camera figure out the rest.

DSC_2624

Program Auto gave me a well-exposed picture but the result was not what I was hoping for. I wanted a smoother look for the fountain…

fountain-motion-blur

…so I quickly adjusted my shutter speed to 1/20 using the dial on my camera. Program mode kept a nice exposure while giving me the motion blur I was looking for.

If you’re willing to dig a little deeper you will find many more useful features to unlock in Program mode – far more than just giving you the ability to control the ISO. It’s kind of like the familiar Auto mode on steroids. There are many options available to you in Program that you won’t get in Full Auto, and many of these can help you get the shot you want, instead of the shot your camera thinks you want. However, as you start changing settings your camera will do its best to maintain a proper exposure. In this way Program is like the late-night infomercial version of Auto; it handles all the nitty-gritty complicated stuff for you…but wait, there’s more!

For example: if you are using Program mode while taking pictures at an indoor birthday party you can set a high ISO so you don’t need to use the flash, and your camera will choose a combination of aperture and shutter speed to get a properly-exposed photo. You can then rotate the command dial (on some cameras it might be pressing a button) to change these values if you decide you want a wider aperture or slower shutter. Essentially your camera says “Here’s what I think will be good,” and then you take over and say “Thanks bro, I’ll take it from here” as you shift the values of your shutter and aperture using the dial on your camera.

I shot this using Program Auto mode which was a great way to tweak my exposure settings on the fly with very little time to waste.

I shot this using Program Auto mode which was a great way to tweak my exposure settings on the fly with very little time to waste.

Or you might be outdoors doing some nature photography but aren’t quite sure what settings to use. So, you put your camera in Program and set the ISO to 100 in order to get as little noise as possible. Soon you might notice that your camera has selected a small aperture, and you’d like to get a bit of background blur so you quickly rotate the dial on your camera until your aperture is much wider. Your camera then automatically adjusts the shutter speed accordingly, in order to maintain a good exposure.

You can also set parameters within Program like white balance, metering mode (full/center/spot), select which focus point to use, and even tell your camera to use the flash or not. Contrast this to the Full Auto mode and you start to see the usefulness of the humble little P marker on your camera’s mode dial. At this point you might be wondering why you would want to use Program Auto instead of Aperture or Shutter Priority because those will also allow you to set the ISO, aperture, and shutter speed. Program Auto sort of functions like the best of all worlds: you can change various options if you want to, or you can just leave everything alone and let your camera figure it all out.

DSC_2641

Shooting in Program mode gave me a good overall exposure but I was not happy with the results…

microphone-spot-meter

…so I switched to spot metering, re-took the shot, and got what I wanted. Program allows for this flexibility, whereas Full Auto does not.

I must admit that even though Program mode can be quite useful I spend most of my time in Shutter or Aperture Priority along with Manual. For me Program is great to have in a pinch, but I generally prefer to make more of the decisions when shooting, instead of having my camera do the heavy lifting.

Still, it’s good to be aware of what it is, and what it can do, in case you find yourself in a situation where you don’t want to give up all control to your camera but also don’t want to do everything yourself. What’s your preferred method of shooting, and what do you like (or dislike) about using the Program Auto mode? Leave your thoughts in the comment section below.

googletag.cmd.push(function() {
tablet_slots.push( googletag.defineSlot( “/1005424/_dPSv4_tab-all-article-bottom_(300×250)”, [300, 250], “pb-ad-78623” ).addService( googletag.pubads() ) ); } );

googletag.cmd.push(function() {
mobile_slots.push( googletag.defineSlot( “/1005424/_dPSv4_mob-all-article-bottom_(300×250)”, [300, 250], “pb-ad-78158” ).addService( googletag.pubads() ) ); } );

The post Your Guide to Understanding Program Mode on Your Camera by Simon Ringsmuth appeared first on Digital Photography School.


Digital Photography School

 
Comments Off on Your Guide to Understanding Program Mode on Your Camera

Posted in Photography


Indoor Photography: Ultimate Guide to Kids Portrait

22 May

One of the things I have specialized in over the years is getting natural, great expressions from kids in photos. It’s not the easiest thing, and I’ll tell you why. Children are naturally curious, interested creatures. They move. They are used to interacting with people by looking at them in the eye, not down a scary round black hole, and Continue Reading

The post Indoor Photography: Ultimate Guide to Kids Portrait appeared first on Photodoto.


Photodoto

 
Comments Off on Indoor Photography: Ultimate Guide to Kids Portrait

Posted in Photography


Cargo Spotting: Field Guide to 20MM Global Shipping Containers

20 May

[ By WebUrbanist in Travel & Urban Exploration. ]

stacked cargo containers

Shipping containers pass by us daily on trucks, trains and ships, carrying 90% of the world’s non-bulk cargo with them, but if you have ever wondered what the mysterious colors and brands really mean, you will want to keep a copy of The Container Guide by your side. A publication of the Infrastructure Observatory, this volume contains a wealth of information on virtually all of the major companies that together own and ship the planet’s 20 million containers back and forth across the globe.

container guide on table

Produced by Tim Hwang and Craig Cannon of the American Container Society, this waterproof, pocket-sized book contains maps, photos, logos, guides and tips to spotting cargo containers on (or off) ships around the world, handily searchable by region, color and brand. Part of the inspiration for this publication was the relative anonymity with which so many of these semi-mysterious companies seem to operate despite their size (a mere 100 companies control 9 out of 10 containers).

infrastructure tour

Like Networks of New York, a recently-published field guide to internet infrastructure, this guide draws both conceptual and design “inspiration from classic Audubon birding guides, is a practical field guide to identifying containers and the corporations that own them. Inside you’ll find virtually every major shipping concern brought to life in full-color on durable, tear- and water-resistant paper.” More than just a resource or reference, the guide taps into our deeper shared urge to understand everyday systems and those unnoticed elements of daily life in a globalizing world.

shipping container port tour

The book also features introductions covering the history of containerized shipping, the rise of refrigerated modules and an introduction to using cargo containers as homes. The first of these three contributors recalls the instigator of this shipping revolution, Malcolm McLean “a trucker by trade, who saw that a multimodal unit that could be seamlessly shifted from ship to truck to train would do to shipping what Henry T. Ford’s production line did for the automobile manufacturer.” Indeed, the use of standard modules has revolutionized the way we ship and helped ships become the dominant form of transportation for goods around the world.

container guide publication

Author and researcher Tim Hwang has more than a passing interest in large systems. A initial failed attempt to gain visitor access to a power plant led him to create the Infrastructure Observatory, a more official outfit to allow him and his fellows to check out everything from factories and roadways to global ports and waste water treatment plants. Last year, the group’s efforts culminated in a fantastic event (hopefully to be soon repeated) called MacroCity. This conference featured a series of panel discussions, presentations and a set of field trips around the Bay Area, including all kinds of professionals from landscape architects and dam engineers to topical authors and niche academics.

baio

Born in San Francisco, the BAIO has now expanded to include a New York chapter that recently took a trip to the Global Containers Terminal in New Jersey. Upcoming plans include a series of tours surrounding the birthday of Victor Gruen, founder of the modern shopping mall. Longer term, Hwang hopes to see Infrastructure Observatory chapters grow in cities around the world. Meanwhile, he wears many other hats as well,  as co-founder of the Awesome Society, Director of Strategic Partnerships at Imgur and Director of the Intelligence & Autonomy Project at the Data & Society Research Institute among other past and ongoing pursuits.

Share on Facebook


[ By WebUrbanist in Travel & Urban Exploration. ]

[ WebUrbanist | Archives | Galleries | Privacy | TOS ]


WebUrbanist

 
Comments Off on Cargo Spotting: Field Guide to 20MM Global Shipping Containers

Posted in Creativity


7 Travel Photography Tips Your Tour Guide Won’t Tell You

14 May

This article is sponsored by the New York Institute of Photography. NYIP offers high-quality online photography courses that are affordable, convenient, and accredited.

Beauty is hiding in plain sight, but only for those who learn to see beyond the obvious. To capture the heart of a region through your lens, you must connect with a place on a deeper level. This often involves slowing down and immersing yourself in the culture of those who call it home. By doing so, you become more than just a tourist with a camera, but a participant searching for truth and understanding. Every corner of this earth has its own unique characteristics, and the successful travel photographer exposes these differences in a way that others can relate to.

chris_corradino_travel_1

1) Search for Simplicity

It seems counterintuitive, but in searching for clean, simple compositions, your photos will benefit from a new level of sophistication. As Paulo Coelho said,

“Elegance is achieved when all that is superfluous has been discarded and the human being discovers simplicity and concentration: the simpler and more sober the posture, the more beautiful it will be.”

When visiting new places, sensory overload can overwhelm even the most deliberate photographers. This is where a slow, methodical pace will have a big impact on your work. Large bus tours with heavy agendas don’t typically allow the necessary time to capture the look and feel of a place. Instead, try a self guided tour, or a small group that caters to photographers.

chris_corradino_travel_2

2) Include a Human Element

Many photographers struggle with the idea of adding people to their compositions. After all, it can be unnerving to include a stranger in your composition. Yet, by working a human element into your travel work, your photography will become more visually engaging. Not only does it create a sense of scale, but they become more salable for stock photography. You’ll just need to secure a model release in order to do this. With a number of smart phone and tablet apps for releases, this no longer needs to be an awkward exchange of actual paper documents. For the participant’s cooperation, you can offer to send a high resolution copy of the image.

chris_corradino_travel_3

3) Think Small

We all love to shoot scenic vistas bathed in the golden light of magic hour. While these dramatic landscapes can certainly round out a portfolio, it’s what you do with the remainder of the day that sets your collection apart. As you explore a location through your lens, think of yourself as a visual detective. No detail is too small. It’s the little things that ultimately add up to form the bigger picture.

chris_corradino_travel_4

4) No Rest for the Weary

Anyone who says you should pack your camera away midday is doing you a disservice. Contrary to what many suggest, the light is good all day, even at high noon. The trick is to best match the various qualities of light to your subject matter. A rolling green landscape can appear lush and vibrant with the simple twist of a circular polarizing filter. Why limit your photography to the hours around sunrise and sunset?

chris_corradino_travel7

5) Plan on Getting Lost

Researching potential shooting locations on the web is an essential part of any pre-trip preparation. With tools like the Photographer’s Ephemeris, you can study the precise time and locations of sunrise and sunset, along with with the moon phase. While this is helpful to create a basic shot list, remember to leave some time for unexpected adventure. Recognize that things will not always work out as planned. Getting lost is sometimes the only way to find what you’re looking for.

chris_corradino_travel5

6) X Does Not Always Mark the Spot

It seems that even the most remote destinations have been photographed from nearly every perspective. This doesn’t mean you shouldn’t shoot them however. Instead, consider it a personal challenge to go one step further and create something unique. How can you take what’s already been done, and make it yours? It’s this vision that separates your work from the masses.

chris_corradino_travel_6

7) Explore Beyond Your Zoom’s Range

Zoom lenses give you the ability to change your focal length with a flick of the wrist. This is indeed convenient for many types of photography including travel work. Yet, if you limit your perspective to what the lens provides, you’ll miss out on a number of great opportunities. Travel photography calls for us to explore beyond the end of our zoom range. Let curiosity guide your compositions and the nature of a place will reveal itself.

chris_corradino_travel 8

This article is sponsored by the New York Institute of Photography. NYIP offers high-quality online photography courses that are affordable, convenient, and accredited. Chris Corradino is a paid instructor with NYIP. 

googletag.cmd.push(function() {
tablet_slots.push( googletag.defineSlot( “/1005424/_dPSv4_tab-all-article-bottom_(300×250)”, [300, 250], “pb-ad-78623” ).addService( googletag.pubads() ) ); } );

googletag.cmd.push(function() {
mobile_slots.push( googletag.defineSlot( “/1005424/_dPSv4_mob-all-article-bottom_(300×250)”, [300, 250], “pb-ad-78158” ).addService( googletag.pubads() ) ); } );

The post 7 Travel Photography Tips Your Tour Guide Won’t Tell You by Chris Corradino appeared first on Digital Photography School.


Digital Photography School

 
Comments Off on 7 Travel Photography Tips Your Tour Guide Won’t Tell You

Posted in Photography


The Ultimate Guide to Natural Light Photography

22 Apr

Dps covers template 363x448

As a photographer, the most powerful tool you have is natural light

It may be free for the taking – but are you making the most of it to create beautiful images?

Today I’m pleased to announce the launch of our latest dPS eBook – Life in Natural Light by Rachel Devine.

Rachel is someone I have had come to photograph my family – largely because I love the way that she uses natural light to capture special moments of life – so when our team began talking about who we wanted to write this eBook Rachel was the first person to come to mind.

In this beautifully illustrated eBook Rachel reveals her secrets for finding and using natural light to tell unique visual stories, enhance mood and create quality images.

Knowledge, Advice and Inspiration

I love what Rachel and our team have done in producing this eBook. You’re going to come away from reading it with a few really important things:

  • a comprehensive understanding of the different types of natural light (because it’s something that is always changing)
  • practical advice on how to spot, control and harness the power of natural light
  • inspiration to get out and shoot having seen Rachel (and other photographers) beautiful images

What more could you want – theory, advice and inspiration that will transform your approach to this important topic!

NewImage

Our Early Bird Offer to dPS Readers

To celebrate the launch of Life in Natural Light we’ve put together a fantastic little bundle together for you. You’ll not only get this great eBook but bundled with it comes:

  • 16 Lightroom presets for you to use, optimized for natural light and custom-created by Rachel herself
  • A natural light printable worksheet, to use as a quick reference in the field

Normally this bundle would retail for $ 29.99 USD but for a limited time you can pick it up for just $ 19.99 USD.

Learn more about Life in Natural Light and grab your copy today here.

googletag.cmd.push(function() {
tablet_slots.push( googletag.defineSlot( “/1005424/_dPSv4_tab-all-article-bottom_(300×250)”, [300, 250], “pb-ad-78623” ).addService( googletag.pubads() ) ); } );

googletag.cmd.push(function() {
mobile_slots.push( googletag.defineSlot( “/1005424/_dPSv4_mob-all-article-bottom_(300×250)”, [300, 250], “pb-ad-78158” ).addService( googletag.pubads() ) ); } );

The post The Ultimate Guide to Natural Light Photography by Darren Rowse appeared first on Digital Photography School.


Digital Photography School

 
Comments Off on The Ultimate Guide to Natural Light Photography

Posted in Photography