RSS
 

Posts Tagged ‘Guide’

Waterproof buying guide updated for 2019

13 Mar

Fed up with winter and packing for a trip somewhere warm? We’ve updated our waterproof camera buying guide so you can be sure your scuba selfies look their best.

The Ricoh WG-50 and Fujifilm FinePix XP130 have been removed to make way for their successors – the WG-60 and XP140 – and Ricoh’s step-up WG-6 model has also been added. Our top recommendations, however, have not changed; we still think that the Olympus TG-5 is the best of the bunch.

Read our 2019 Waterproof Camera
Buying Guide

Articles: Digital Photography Review (dpreview.com)

 
Comments Off on Waterproof buying guide updated for 2019

Posted in Uncategorized


Your Guide to the Best Poses for Engagement Photos

11 Mar

The post Your Guide to the Best Poses for Engagement Photos appeared first on Digital Photography School. It was authored by Jackie Lamas.

Engagement sessions can be really fun, but it can get a little repetitive posing the couple together again and again throughout the session. Here are great poses that work for all couples during an engagement photo session.

1 - Guide to the Best Poses for Engagement Photos

Begin with foundation poses

A foundation pose is a pose where you set the couple in the exact spot facing a specific direction. Foundation poses are great to lead into different variations as you begin to build upon the poses. For example, you start with both people facing the camera. From this foundation pose, you can build so that the couple holds hands, look at each other, and in the end, you can capture them walking toward each other slowly.

2 - Guide to the Best Poses for Engagement Photos

From each foundation pose, you can get at least five different variations without having to move the couple all that much! This is helpful especially when you find yourself in tight spaces or pressed for time.

However, you don’t always have to stay in one spot. Depending on the location, feel free to move around and use all of the interesting nooks at the location of the session.

3 - Guide to the Best Poses for Engagement Photos

Posing facing each other

This is probably the most comfortable pose for all couples because it’s the most natural. Have the couple face each other, and with their arms furthest from the camera, have them wrap them around each other. This leaves the pose open from the front so that you can capture them looking at each other.

From here, have them hold hands loosely or play with their hands up with interlocking fingers. You can also have one person play with the other person’s hair while you get creative angles on the pose.

4 - Guide to the Best Poses for Engagement Photos

Have them give each other a good squeeze to help loosen nerves and get the most natural laughs and expressions out of the couple. Have them kiss if they’re comfortable with that.

You can also give them a little space so that they are directly facing each other. Here the couple can stand with their hands at their side and then hold hands. Have them lean in to kiss each other and let them move in closer if they need to.

5 - Guide to the Best Poses for Engagement Photos

From this pose, you can also ask that they get really close together – tummy to tummy – and have one person lay their heads on the other person’s shoulder/chest. This pose is romantic and sweet.

The “T” pose

The “T” pose is a variation on the prom pose and gives a more romantic feel to the photo. Have the taller person stand facing 45-degrees from the camera. Ask the other person to stand with their shoulder’s perpendicular to the other person. Have them get close and wrap their arms around each other.

This pose is great for all couples because it keeps the faces at an angle where the couple can look at one another, hug, kiss, and enjoy each other at close proximity.

6 - Guide to the Best Poses for Engagement Photos

Try photographing this pose with a wide-angle lens, like a 35mm, and place the couple in the center. This technique makes the pose much more interesting! Especially if you’re at a breathtaking or unique location.

When your clients are in this T pose, you can ask one person to look at the camera while the other closes their eyes or looks off into the distance. Get in close to take a beautiful portrait of the person looking at the camera.

7 - Guide to the Best Poses for Engagement Photos

This is also a perfect pose to get a nice ring shot while the couple’s arms are wrapped around each other. Try getting more of the couple’s bodies in the frame with the rings in focus and the rest out of focus.

Prom pose with variations

While the prom pose isn’t all that popular these days, you can still use the foundation pose to build on and get great photos of the couple. One variation is to get the shorter person to stand behind the taller. Here, they can hold onto the taller person’s arm and look at the photographer.

You can also have them loosely hold hands in this position and look off into the distance. The person in the front can look back or down while the person in the back can look at the camera. This is a romantic and sweet pose that can be taken full length or from a closer angle. Take both focal lengths to get more variety from the pose.

8 - Guide to the Best Poses for Engagement Photos

This pose can also stay in its original form where the shorter person stands in front and arms are wrapped around the waist. However, it’s best if you change it up a bit and have the hands of the person in front caress the face of the person behind. Here the pose becomes more romantic and has more connection rather than staying in its original form.

Ask the person in the back to wrap their arms up high around their beloved. Make sure that in this pose, the heads are not directly above one another. Move the front person to either side of the neck to avoid having the pose look stiff and disconnected.

9 - Guide to the Best Poses for Engagement Photos

From here, move around the couple and get different angles. Have the couple look off into the distance and enjoy the moment. Perhaps tell a joke to get them to laugh a bit.

To create a little bit more movement, from this pose, ask the couple to hold hands while the person in front moves towards the camera creating some distance from the other person. It will appear like they’re walking while holding hands. It’s a more creative take on the pose and adds beautiful movement.

10 - Guide to the Best Poses for Engagement Photos

Action poses

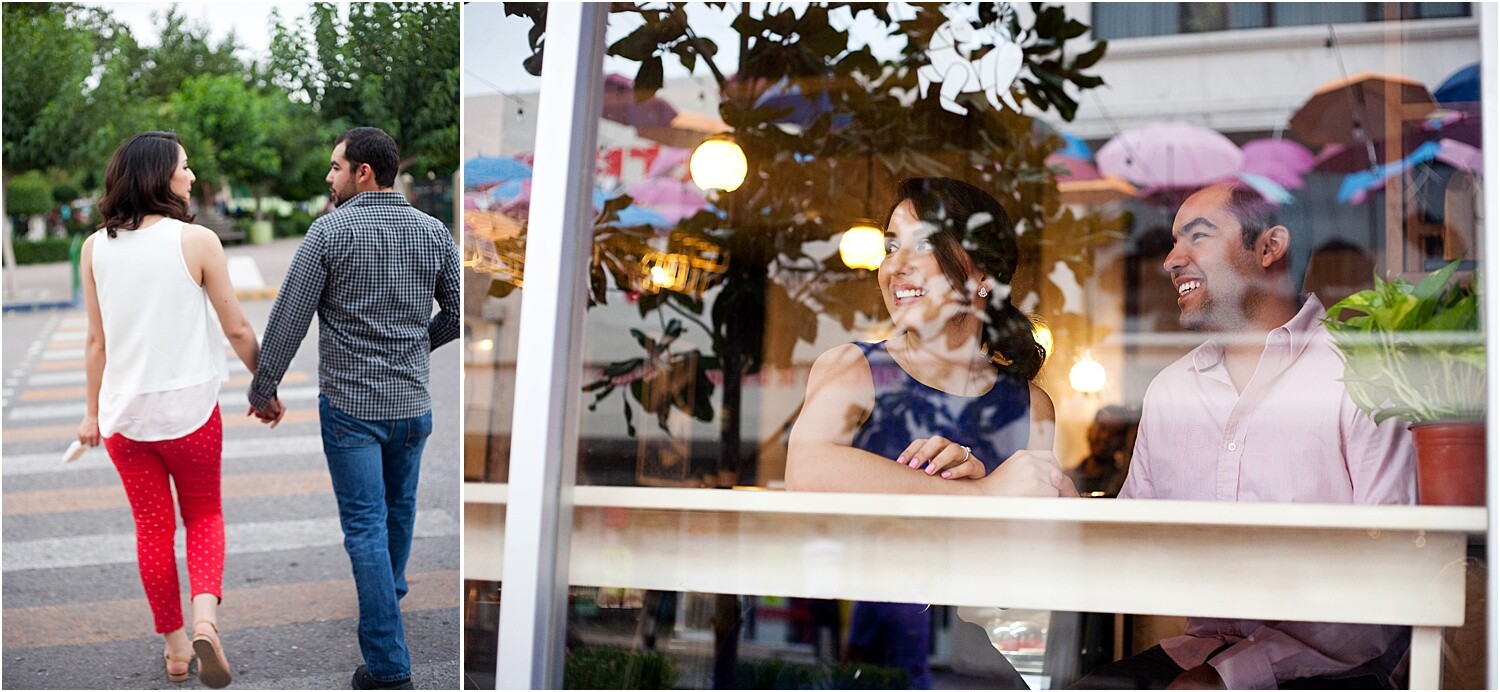
Action poses are fun and a great way to loosen nerves and get the couple more comfortable with being in front of the camera. These can include the couple walking, either holding hands or at a distance, climbing, dancing, or just talking with one another.

11 - Guide to the Best Poses for Engagement Photos

Starting with action poses can be more comfortable for a couple that is not necessarily big on kissing or being affectionate. If you’re in a location where there are activities, like an amusement park or coffee shop, have the couple do what they usually would if you weren’t around. This could be playing games, getting a coffee, enjoying some music together, walking, dancing, and talking.

12 - Guide to the Best Poses for Engagement Photos

You can also have the couple walk toward the camera while you’re out photographing the engagement session. Have them walk two or three times as you get different focal lengths and angles. Ask the couple to talk with each other or smile at one another because this looks more natural as they are walking.

Facing away from the camera

Having the couple face away from the camera can create more interesting photographs and keep the mood more romantic resulting in less posed and more natural looking photographs.

13 - Guide to the Best Poses for Engagement Photos

For one pose, have the couple stand at a distance facing away from the camera. Have the couple take one step forward and hold it as if they were walking. Have one person look back toward the camera and the other person looking down or to the side. You could have them do this as the couple is walking away from the camera. Just make sure that there is nothing in the way that could provoke a fall.

14 - Guide to the Best Poses for Engagement Photos

Another pose is having the couple face away from the camera but gets in close to each other. Here they can look at one another, hold hands, or kiss the forehead all while you are photographing from behind. Try getting the couple from a high angle, so it looks like you’re looking down at them.

Allow poses to develop naturally

While you set foundation poses and build different variations, allow the poses to develop into their own naturally. What I mean by this is that let the couple take charge in some of the poses with the kissing and getting close. Allowing for the couple to feel like they can move around within a pose can create more authentic and romantic expressions.

15 - Guide to the Best Poses for Engagement Photos

Couples feel most uncomfortable when they can’t be themselves, so during the session let them know that they are free to move and enjoy the moment. You are there to capture their love and excitement for their wedding day.

Once they have this liberty to move about in a pose, you’ll get real emotions and might even progress naturally through poses you may have thought of doing anyway!

16 - Guide to the Best Poses for Engagement Photos

Make sure to go with the vibe of the couple

Some couples aren’t romantic types and feel silly or uncomfortable doing lots of kissy or huggy shots. Try and get a feel for how the couple is. Are they playful? Active? Romantic? If after a few silly poses, you find that the couple is more on the romantic side, go for those types of poses.

17 - Guide to the Best Poses for Engagement Photos

Here are some ideas for each type of couple:

Romantic: Go with poses where the couple is close to each other. Either facing each other or hugging. Lots of closed eyes and enjoying the quiet moments of love between them. Try and photograph with a longer lens to give them space to be intimate with one another. Have them say something they love about one another while you photograph their reactions.

Fun/silly: Here you can get the couple talking and being overall silly. Try and get them to dance, tell jokes or play around at the location of the session. For example, having the couple make silly faces at one another or have one person tell a joke and get the reaction of the other person. Pose them with a little distance while holding hands to create a connection but not too close to where they feel uncomfortable having their photo taken so intimately.

Active: This couple will appreciate a good walk or even run! Have them jump, dance, climb, or even have one person piggy-back on the other! This couple is fun and needs to move around to keep them active by having them move around.

Not all of the poses have to be active if the couple is active, or romantic if the couple is the romantic type. Usually, after the first half hour, the couple has lost their nervousness and are more open to other poses. Just make sure that you keep an eye out for their natural personalities and go along with that vibe.

18 - Guide to the Best Poses for Engagement Photos

Being a little intuitive to the personality of the couple helps you create more authentic photos that they will love. An important note to remember is that some couples will be easy to pose, and others will need more direction.

In any case, let the couples know that they can move around and to not worry about holding poses for too long. Remind them to enjoy the moments and do what feels natural to them as a couple. This helps to calm nerves, and you’ll get much more real expressions than forced ones.

19 - Guide to the Best Poses for Engagement Photos

In conclusion

The best poses for engagement sessions are where you set a foundation pose and then build upon that depending on the vibe of your clients. Aim to give them a real and fun experience and document their personalities during the session. Pose them but let them feel free to move around and be themselves. They will have a great time and love their photos after!

The post Your Guide to the Best Poses for Engagement Photos appeared first on Digital Photography School. It was authored by Jackie Lamas.


Digital Photography School

 
Comments Off on Your Guide to the Best Poses for Engagement Photos

Posted in Photography


Full Moon and Eclipse Photography: Your Guide to Where They Are in 2019 and How to Capture Them Effectively

26 Feb

The post Full Moon and Eclipse Photography: Your Guide to Where They Are in 2019 and How to Capture Them Effectively appeared first on Digital Photography School. It was authored by Caz Nowaczyk.

Jongsun Lee

Full moons and eclipses are a unique time to capture some interesting photographs.

Full Moons

Full moons usually happen once a month, with the occasional second full moon falling in the same month. This second full moon is called a Blue Moon.

Solar and Lunar Eclipses

A solar eclipse happens when the new moon passes between the earth and the sun, casting a shadow over the sun.

A lunar eclipse occurs when the earth passes between the full moon and the sun, causing the moon to fall into earth’s shadow. Lunar Eclipses occur only at the full moon.

To give you the opportunity to shoot the moon, below is a calendar of Full Moons and Eclipses for 2019, followed by some articles that will help you to capture the moon or eclipse effectively.

Full Moon and Eclipse Calendar

Full Moons

New York, N.Y (US/Eastern)

Date Time
Jan 21 00:17
Feb 19 10:53
Mar 20 21:43
Apr 19 07:12
May 18 17:11
Jun 17 04:31
July 16 17:39
Aug 15 08:31
Sep 14 00:35
Oct 13 17:10
Nov 12 08:37
Dec 12 00:14

Eclipses

Date Type
July 2 Total Solar Eclipse
July 16 Partial Lunar Eclipse
Nov 11 Mercury Transit
Dec 26 Annular Solar Eclipse


Full Moons

Sydney, Australia (AEST)

Date Time
Jan 21 00:17
Feb 20 02:53
Mar 21 12:42
Apr 19 21:12
May 19 07:11
Jun 17 07:38
July 17 17:38
Aug 15 22:29
Sep 14 14:32
Oct 14 08:07
Nov 13 00:34
Dec 12 16:12

Eclipses

Date Type
July 17 Partial Lunar Eclipse


Full Moons

London, England, UK

Date Time
Jan 21 05:16
Feb 19 15:53
Mar 21 01:42
Apr 19 12:12
May 18 22:11
Jun 17 09:30
July 16 22:38
Aug 15 13:29
Sep 14 05:32
Oct 13 22:07
Nov 12 13:34
Dec 12 05:12

Eclipses

Date Type
July 16-17 Partial Lunar Eclipse
Nov 11 Mercury Transit


How to Achieve Better Full Moon and Eclipse Photography

20 Dos and Don’ts for Shooting the Moon

Beyond Full Moon Photography

Moon Photography: 6 Tips for Better Moon Photos

How to Photograph a Solar Eclipse

Tips for Photographing a Lunar Eclipse

How to Photograph a Lunar Eclipse


The post Full Moon and Eclipse Photography: Your Guide to Where They Are in 2019 and How to Capture Them Effectively appeared first on Digital Photography School. It was authored by Caz Nowaczyk.


Digital Photography School

 
Comments Off on Full Moon and Eclipse Photography: Your Guide to Where They Are in 2019 and How to Capture Them Effectively

Posted in Photography


Panasonic Lumix LX100 II added to enthusiast compact buying guide: Joint-winner with Sony RX100 VA

29 Jan

Following testing of the Panasonic Lumix DC-LX100 II, we’ve added it to our Pocketable Enthusiast Compact Cameras buying guide as joint-winner, alongside Sony’s Cyber-shot RX100 VA.

Articles: Digital Photography Review (dpreview.com)

 
Comments Off on Panasonic Lumix LX100 II added to enthusiast compact buying guide: Joint-winner with Sony RX100 VA

Posted in Uncategorized


Buying Guide: The best camera bargains of 2018

06 Dec

Last updated: December 4, 2018

If you’re looking for a high-quality camera, you don’t need to spend a ton of cash, nor do you need to buy the latest and greatest new product on the market. If you’re willing to miss out on some features, you can save a lot of cash by picking up a last-generation model or shopping around for deals on refurbished or older, but still current, cameras.

In this buying guide we want to direct your attention to some great-value cameras, which are still available. We’ll start with the least expensive options and go up in price from there.

Street prices listed below are current as of December 4th, 2018.

  • Sony Cyber-shot DSC-RX100 $ 369
  • Nikon D3400 w/18-55 lens $ 399
  • Canon PowerShot G9 X II $ 399
  • Canon EOS M100 w/15-45mm lens $ 399
  • Sony a5100 w/16-50mm lens $ 449
  • Sony a6000 w/16-50mm lens $ 499
  • Panasonic Lumix DMC-ZS100 $ 499
  • Fujifilm X-E3 $ 799
  • Nikon D7200 $ 799
  • Sony a7 II $ 899
  • Nikon D750 $ 1399

Sony Cyber-shot DSC-RX100
$ 449 MSRP, $ 369 street

While not as capable as later models, Sony’s original Cyber-shot RX100 is an inexpensive way to snag a genuinely compact camera with a 1″ sensor. It has a 28-100mm equivalent lens that will do well in low light at the wide end of the lens, but not-so-great at telephoto. You miss out on the faster lenses, electronic viewfinders and improvements in autofocus and JPEG image quality that arrive in the latest models.

The camera fits in a pocket with ease, though the body is slippery and some may find the controls a bit clunky. The RX100 has a 3″ non-touch LCD but lacks a viewfinder. Photo quality is excellent and the same can be said for its Full HD video. It focuses quickly and can shoot continuously at 10 fps. Wi-Fi is built-in for photo sharing.

More info | Check prices


Nikon D3400 w/18-55mm lens
$ 499 MSRP, $ 399 street

While it’s since been replaced by the D3500, the Nikon D3400 is essentially the same camera but in a slightly different (but still very compact) body. Like other Nikons, the D3400’s 24MP APS-C sensor has excellent resolution and dynamic range. Its autofocus system is dated and it can’t take many photos in a burst, so a sports camera it is not.

What makes the D3400 so appealing is that it’s great for beginners, with its ‘Guide mode’, selecting the correct settings for you based on use case, and tells you which of them were actually changed so you learn. The camera also features Full HD video capture (though AF is essentially unusable) and Bluetooth for easy photo sharing.

More info | Check prices


Canon PowerShot G9 X Mark II
$ 529 MSRP, $ 399 street

The Canon PowerShot G9 X Mark II is one of the cheapest and smallest compact cameras with 1″ sensor that you can buy. The larger-than-average sensor will produce better-looking images than your typical compact, though the slow-ish lens will reduce that advantage in low light.

The lens has a small 28-84mm equiv. focal range, which isn’t as versatile as most of its peers. Despite that, the G9 X II has a well-designed touch interface, snappy performance, Full HD video capture and the latest wireless features.

More info | Check prices


Canon EOS M100 w/15-45mm lens
$ 599 MSRP, $ 399 street

The Canon EOS M100 is one of least-expensive mirrorless cameras you’ll find. It’s packed with Canon’s latest features, including its excellent Dual Pixel autofocus system and also has a flip-up touchscreen display. It’s not as good at shooting action as the newer M50 model, which can also capture 4K video.

The M100 features Full HD video capture and Wi-Fi with Bluetooth. While there aren’t many native EF-M lenses available, the M100 is compatible with Canon’s enormous selection of EF and EF-S glass with an optional adapter.

More info | Check prices


Sony a5100 w/16-50mm lens
$ 549 MSRP, $ 449 street

It’s hard to believe but, five years after its introduction, Sony is still making its a5100 mirrorless camera. The compact Sony a5100 is a good choice for those on a tight budget seeking a point-and-shoot experience, but with interchangeable lenses. It hasn’t seen the improvements in video, autofocus or JPEG color that have arrived in newer Sonys, meaning you don’t get the excellent Eye AF feature.

The a5100 uses a 24MP APS-C-size sensor and has a hybrid AF system that’s still responsive today. There’s a selfie-friendly flip-up touchscreen LCD on the a5100, but no viewfinder. It can capture Full HD video and has Wi-Fi with apps you can download to the camera.

More info | Check prices


Sony a6000 w/16-50mm lens
$ 649 MSRP, $ 499 street

The Sony a6000 is one of the best-selling interchangeable lens cameras of all time, and for good reason. It has excellent image quality, a reliable autofocus system, 11 fps burst shooting and a sharp OLED viewfinder. The a6000 is targeted a bit more toward enthusiasts than the a5100, with dual control dials but (disappointingly) no touchscreen. It pre-dates features such as 4K video and Sony’s excellent Eye AF feature, and improvements in interface and JPEG color.

It captures Full HD video, offers Wi-Fi and can download feature-adding apps into the camera. It’s worth pointing out that Sony’s APS-C lens collection is relatively small and expensive compared to other mirrorless brands.


Panasonic Lumix DMC-ZS100
$ 699 MSRP, $ 499 street

The Panasonic Lumix DMC-ZS100 (TZ100 in some regions) is a compact camera with a 1″ sensor and 25-250mm equiv. lens. It fits easily in your pocket, making it an ideal camera for travel. Its lens has a relatively slow maximum aperture, so it won’t perform terribly well in low light, though it will still out-do compacts with smaller sensors. It doesn’t get the nicer JPEG colors of newer Panasonic models.

The ZS100 has a fixed touchscreen display and a ‘better than nothing’ electronic viewfinder. In addition to taking 4K video, the ZS100 also has genuinely useful features like ‘Post Focus’ and ‘4K Photo’. For those looking for a portable, versatile travel camera, the ZS100 is a bargain.


Fujifilm X-E3
$ 899 MSRP, $ 799 street (body only)

The Fujifilm X-E3 is a rangefinder-style mirrorless camera that produces excellent images straight out of the camera courtesy of its modern 24MP X-Trans APS-C sensor. Its well-built body has direct controls for shutter speed and exposure compensation, and most buttons are customizable.

A high-resolution EVF and touchscreen await users on the rear plate. It also offers Wi-Fi and Bluetooth. The X-E3 captures 4K video but not nearly to the high standard or newer models.While it doesn’t have a built-in flash, with a small external one included in the box. The excellent 18-55mm F2.8-4 lens adds just $ 300 to the cost of the camera and is well worth the money.

More info | Check prices


Nikon D7200
$ 1099 MSRP, $ 799 street (body only)

The Nikon D7200 is a midrange DSLR with a 24MP APS-C sensor that produces sharp images with excellent dynamic range and solid high ISO performance. It’s reasonably small and light and is sealed against the elements. The D7200 has a large optical viewfinder and a fixed 3.2″ (non-touch) LCD.

Autofocus performance is superb, whether you’re tracking subjects or shooting in low light. While the D7200 can record Full HD video, quality isn’t as good as other midrange cameras and autofocus is effectively unusable. The D7200 has built-in Wi-Fi, but the aging smartphone app is unreliable.

More info | Check prices


Sony a7 II
$ 1399 MSRP, $ 899 street (body only)

The Sony a7 II is a solid full-frame mirrorless camera that currently sells for a remarkably low price. It has built-in 5-axis image stabilization, a 24MP sensor, fast hybrid autofocus system and Full HD video capture. The camera has a relatively rugged, with some weather-sealing, high resolution EVF and tilting (non-touch) LCD. It misses out on the further improvements Sony has made in terms of JPEG color, autofocus and user interface in its latest models.

Photos have great resolution and excellent Raw dynamic range, though the a7 II struggles a bit at high ISOs. Some users might find the buttons and dials to be too small, so it’s worth trying one in person before you buy.

More info | Check prices


Nikon D750
$ 1999 MSRP, $ 1399 street (body only)

Despite being released way back in 2014, the D750 is still one of the most attractive full-frame DSLRs on the market and an incredible bargain as it approaches its fifth year of production. The D750’s 24MP sensor produces beautiful photos with low noise at high ISOs and plenty of dynamic range. Its autofocus system tracks subjects with ease, though the camera’s buffer fills quickly when shooting bursts.

The D750’s body is compact for a full-frame DSLR and it has a giant optical viewfinder, a 3.2″ tilting (non-touch) LCD, built-in flash, dual SD card slots and Wi-Fi. It can shoot good quality Full HD video, though autofocus performance in video and live view is for static subjects only. Battery life, on the other hand, is exceptional.

More info | Check prices

Articles: Digital Photography Review (dpreview.com)

 
Comments Off on Buying Guide: The best camera bargains of 2018

Posted in Uncategorized


Guide: How to get the most out of Sony’s autofocus technologies

03 Dec

Getting the most out of Sony’s autofocus technologies

After years of development, Sony’s mirrorless interchangeable lens cameras offer among the most advanced autofocus technologies on the market, allowing photographers to create pictures that simply wouldn’t be possible with other systems.

Sony was among the first manufacturers to add phase-detection autofocus pixels onto a camera’s main imaging sensor, which allows for ultra-precise focus. A wide spread of AF points and intelligent scene recognition algorithms are standard in Sony’s market-leading a6000-series, a7-series and a9 cameras, allowing for powerful and accurate subject tracking. While these technologies are obviously useful for shooting fast-paced sports and action, features like face detection, Eye-AF and Direct Manual Focus (DMF) can also be employed for portraiture, landscape photography and video work.

In this article, we’ll be outlining some key use-cases and recommending how to set up your Sony camera’s autofocus system to get the best results.

Sports and action

Because, unlike a DSLR, there’s no mirror in the way, the millions of pixels-worth of data from the image sensors in mirrorless cameras can be used to feed the cameras’ autofocus and metering systems in real time. This allows for sophisticated object recognition and tracking. Autofocus data is also taken from the main imaging sensor itself, which means that AF is inherently more accurate than conventional DSLR systems.

The flagship sports-oriented Sony a9 for example features 693 phase detection autofocus points offering 93% coverage across the image area (illustrated above). Having so many AF points – and such a wide spread – makes it possible for the camera to accurately track action right out to the edges of the frame – something that isn’t always possible with other full-frame cameras. Here are our recommended settings for shooting sports and action:

Recommended AF settings for sports and action:

  • Focus Mode: AF-C
  • Focus Area: Lock-on AF: Flexible Spot M

How to use: Frame your composition so the AF point is over your subject, then half-depress the shutter to start tracking it. At this point you can recompose the scene however you want, and your subject will continue to be tracked. To switch subjects, simply release the shutter, reframe to place the AF point over your new subject, and half-depress the shutter again.

Notes / Tips: This AF setup is also useful for more general photography: if you identify your subject by placing the AF point over it and engaging AF, the camera will keep track of it for you, making sure it’s perfectly focused when you take your shot.

For some types of fast-action photography, like birds-in-flight, air shows, or any situation where your subject is the nearest object in the scene or well isolated against distant objects, you can often trust the camera to automatically identify the subject and focus on it. This avoids the need for you to reframe and place the AF point over your subject before initiating AF, saving you time and helping you capture the moment faster. To try this way of working, switch the camera’s Focus Area to ‘Wide’, or use ‘Recall Custom Hold’* to assign a custom button to this focus mode so you can instantly activate it in fast-paced situations.


*Only available on A9, a7R III and a7III Alpha cameras.

Portraits

For the serious portrait photographer, Eye AF is fantastic, letting you focus more on posing and expression and leaving the camera to do the rest. With Eye AF enabled, a Sony camera will continue to track your subject’s eye, even when firing away at fast frame rates, which makes it a great option for catching just the right expression.

Sony’s Eye AF system is very ‘sticky’ in that once it’s been set to track a subject it rarely jumps off to someone else in the scene, even if your subject moves or momentarily turns away from the camera. And because of the wide AF area coverage, Eye AF will track your subject right out to the edges of the frame – this is useful for off-center compositions or erratic subjects like kids.

Recommended AF settings for portraits:

  • Focus Mode: AF-C
  • Focus Area: Flexible Spot M (or L)
  • Button Assignment: Assign Eye AF to AF-ON

How to use: If you have multiple people in the frame and are using any AF area other than ‘Wide,’ you can place that AF area over one of your subjects, and when you initiate Eye AF, it will track that person’s eye. To switch subjects, release the Eye AF button, place your AF area over the other person, and re-initiate. If you simply want to focus on a person yourself, just place your AF point over the desired portion of your subject, and half-press the shutter to focus.

Notes / Tips: If you only have a single person in the scene, or you’re happy to let the camera choose a face to focus on on its own (usually the nearest), switch Focus Area to ‘Wide’, then just press the Eye AF button.


Note that while we recommend assigning Eye AF to AF-ON for ease of use, you may wish to assign it to the AEL button if you prefer to use the AF-ON button for back-button focus.

Travel and general photography

As well as offering powerful autofocus features designed for portraiture and capturing fast-moving sports and action, Sony cameras are incredibly versatile when it comes to day-to-day photography. For general everyday and travel photography with Sony’s mirrorless cameras , we recommend the following autofocus settings:

Recommended AF settings for general photography:

  • Focus Mode: AF-S
  • Focus Area: Wide (Face Priority in AF: On)

How to use: For general photography, we recommend you simply let the camera choose what to focus on. It will focus on faces in the scene, and prioritize nearer subjects over further ones.

Notes / Tips: If you wish to take control, just assign a button – like a central press of the AF joystick – to ‘Recall Custom Hold’* and set its options to activate AF-S Focus Mode and Center Focus Area, with AF activation. That will allow you to quickly revert to the tried-and-true ‘focus and recompose’ method if necessary.


*Only available on A9, a7R III and a7III Alpha cameras.

Landscape photography

Traditionally, landscape photography has been the domain of manual focus, but even with static subjects, autofocus can be a huge time-saver. Here’s how we recommend you set your Sony camera’s AF for shooting landscapes.

Recommended AF settings for landscape photography:

  • Focus Mode: DMF
  • Focus Area: Flexible Spot: M (or L)
  • Button Assignment: Assign a custom button to focus magnifier

How to use: Compose your scene, then place the AF point over a portion of the scene you want focused. Use the focus magnifier to zoom into that region, then half-press the shutter to focus. While the shutter button remains half-pressed, you can turn the focus ring on the lens to fine-tune focus, then take your shot.

Notes / Tips: Using this technique, autofocus quickly gets you close to where you need to be, then it can be fine-tuned to achieve the correct balance of foreground and background sharpness for expansive scenes.

Video

Advanced HD and, more recently, 4K video features have been included in Sony’s E-mount mirrorless cameras from the very beginning, and Sony’s E-mount lenses are optimized for movie autofocus requirements as well as stills photography. Traditionally, a lot of filmmakers would rely on manual focus when shooting video, but Sony’s mirrorless cameras’ hybrid on-sensor autofocus systems function just as well (and in exactly the same way) when shooting stills and video, making AF useful and practical for videography.

Here are our recommended settings for video:

Recommended AF settings for video:

  • Focus Mode: AF-C
  • Focus Area: Wide (Face Priority in AF: On)
  • Center Lock-on AF: On

How to use: On their own, Sony cameras are capable of intelligently focusing in video, prioritizing faces and nearer objects, and smoothly racking focus when switching between subjects to focus on. If you turn ‘Center Lock-on AF’ on in the menus, you can choose which subject the camera should track (even if it moves around the frame) by simply tapping on it on the LCD. If your camera has a touch-sensitive screen, to switch to a different subject, you can just tap on it.

Notes / Tips: You can even customize how quickly the camera refocuses on your subject. In the menu, ‘AF Track Sensitivity’ tells the camera how responsive it should be subject movement, with the ‘Responsive’ setting best used for constantly and rapidly moving subjects. ‘AF Drive Speed’ controls how quickly the camera drives the lens focus element: ‘Slow’ yields the smoothest results, but ‘Fast’ is great for rapidly moving subjects and run-and-gun videography.

Note: Remember to turn Center Lock-on AF ‘Off’ before returning to stills shooting, or set up a separate Memory Bank for video shooting so its settings don’t interfere with your stills settings.


This is sponsored content, presented by Sony. What does this mean?

Articles: Digital Photography Review (dpreview.com)

 
Comments Off on Guide: How to get the most out of Sony’s autofocus technologies

Posted in Uncategorized


DPReview Buying Guide: Best compacts, drones and phones

26 Nov

These days, getting great images doesn’t have to mean buying a large, heavy interchangeable lens camera. In these buying guides, we’re offering our recommendations for the best compact cameras, camera drones and smartphones.

Articles: Digital Photography Review (dpreview.com)

 
Comments Off on DPReview Buying Guide: Best compacts, drones and phones

Posted in Uncategorized


DPReview Buying Guide: Best lenses for Canon, Nikon and Sony

24 Nov

New this year, we’ve added lens recommendations to our range of buying guides. Take a look through this guide for our advice on the best lenses to pair with Canon, Nikon and Sony cameras.

Articles: Digital Photography Review (dpreview.com)

 
Comments Off on DPReview Buying Guide: Best lenses for Canon, Nikon and Sony

Posted in Uncategorized


DPReview Buying Guide: Best cameras by use-case

24 Nov

It’s almost the end of the year, and we’ve been updating our range of buying guides. Here, you’ll find our current recommendations for the best cameras for all kinds of photography, from portraiture to sports.

Articles: Digital Photography Review (dpreview.com)

 
Comments Off on DPReview Buying Guide: Best cameras by use-case

Posted in Uncategorized


DPReview Buying Guide: Best DSLRs

21 Nov

Last updated: November 20, 2018

It’s not easy to answer the question ‘what’s the best DSLR’ because the question often means ‘what’s the best DSLR for me?’ And the correct answer to that question will depend on your budget and what you want to use the camera for.

It’s also complicated by the fact that, while DSLRs are renowned for their flexibility and image quality, there are now a series of cameras that offer similar (and potentially greater) capabilities that are also worth considering.

So, while this roundup will focus on DSLRs (cameras with a mirror that redirects the image from the lens through into an optical viewfinder), we’ll also recommend some mirrorless cameras that may be a better fit for you. These also have interchangeable lenses and comparable image quality but tend to be a bit smaller and are often better adapted to shooting video.

This guide breaks down your options roughly by price and focuses on all-round capability. For more precise recommendations, tailored to the photography you want to do, we’d recommend looking at our buying guides based around specific types of photography.

Jump to:

  • Best DSLR around $ 600
  • Best DSLR around $ 1000
  • Best DSLR around $ 1500
  • Best DSLR over $ 2000

Best DSLR around $ 600: Canon EOS Rebel SL2
($ 650 with 18-55mm lens)

The EOS Rebel SL2 (EOS 200D) features a 24 Megapixel sensor, fast Dual Pixel autofocus when using live view or taking video, a fully articulating touchscreen LCD and a ‘Feature Assistant’ that makes adjust complex settings easy. It can capture 1080p video and has built-in Wi-Fi and Bluetooth for easily sharing photos.

Read review | Check prices | More info

Mirrorless alternative:

Olympus E-M10 Mark III
$ 599 with 14-42mm lens

The E-M10 III has a retro-styled body and its electronic viewfinder is larger than the optical viewfinder on the SL2. It has a smaller, lower resolution sensor compared to the SL2 and a tilting (rather than fully articulating) touchscreen display, and it includes 4K video capture.

Read review | Check prices | More info


Best DSLR around $ 1000: Canon EOS 77D
($ 949 with 18-55mm lens)

The EOS 77D is two notches above the SL2 in Canon’s lineup, offering more controls, a faster processor and a sturdier body. It too has a fully articulating touchscreen though, oddly, its optical viewfinder is smaller than what’s on the SL2. Video can be captured at 1080p and connectivity features include Wi-Fi and Bluetooth.

Read review | Check prices | More info

Mirrorless alternative:

Fujifilm X-T20
$ 999 with premium 18-55mm lens

The X-T20 has a classic design and produces great-looking photos. It offers Film Simulation modes to bring out your creative side and also has a tilting touchscreen display, 4K video capture and Wi-Fi.

Read review | Check prices | More info


Best DSLR around $ 1500: Nikon D7500
($ 1450 with 18-140mm lens)

The Nikon D7500 inherits some features from the more expensive D500, including its 20 Megapixel sensor, improved metering system, tilting touchscreen LCD, weather-sealing and 4K video capture. While the live view experience isn’t nearly as robust as on Canon models, the D7500 is a clear winner when shooting through the viewfinder.

Read review | Check prices | More info

Mirrorless alternatives:

Sony a6300
$ 1299 with 18-135mm lens

The a6300 is a comparatively inexpensive alternative, and has a top-notch 24MP sensor, gorgeous 4K video, excellent AF and fast burst shooting. It’s also pretty compact, though its user experience isn’t for everyone.

Fujifilm X-T3
$ 1899 with premium 18-55mm lens

The X-T3 excels at both still photography and video. Photos look great and video features (including 4K/60p) and quality are top-notch. The weather-sealed body has an ultra-high-res viewfinder along with a clever 3-axis tilting LCD.

Read review | Check prices | More info Read review | Check prices | More info

Best DSLR over $ 2000: Nikon D850
($ 3300 body only)

The D850 is a high-end DSLR that sits just below the flagship D5 in Nikon’s lineup. It has a 46 Megapixel full-frame CMOS sensor, top-of-the-line autofocus system, a huge optical viewfinder, a tilting touchscreen LCD and dual memory card slots. Image quality is as good as you’ll find and the D850’s 4K video isn’t bad, though controls are a bit limited. As you’d expect the D850 is built like a tank and weather-sealed. Its large battery can take thousands of photos on a single charge.

Read review | Check prices | Read more

Mirrorless alternatives:

Sony a7 III
($ 2000 body only)

The a7 III is a heck of a camera for the price. It has built-in image stabilization along with an excellent 24MP full-frame sensor, stellar autofocus system, great 4K video quality and battery life that’s well above average.

Sony a7R III
($ 3200 body only)

The a7R III has a superb 42MP full-frame sensor plus in-body IS, excellent 4K video quality, dual card slots and above average battery life. It’s autofocus system isn’t as robust as the D850’s but it’s still solid in most situations.

Read review | Check prices | More info Read review | Check prices | More info

Articles: Digital Photography Review (dpreview.com)

 
Comments Off on DPReview Buying Guide: Best DSLRs

Posted in Uncategorized