RSS
 

Posts Tagged ‘Great’

How to do Great Black and White Conversions Using Photoshop

08 Oct

Black-and-white-in-photoshop-1

Some photos that you take you’ll want to convert to black and white. Photoshop has some tools that you can use to convert your photos to black and white and I’ll show you what these are and the best way to do the conversion.

Why you should shoot in color and convert to black and white

If your camera saves photos as jpeg images, even if it can capture in black and white, it’s advisable to avoid this setting and instead shoot in color and convert later. The reason is that when you capture in jpeg and have the camera set to black and white, all the color information is discarded when the image is saved and you can never get it back. So you will only ever have a black and white image. On the other hand if you capture in color you will have the choice to convert the photo to black and white, but you will also have a color image in case you decide it looks better that way.

Black and white conversions in Photoshop

You have a couple of choices when converting to black and white in Photoshop. You can desaturate the image by choosing Image > Adjustments > Desaturate. This removes the color from the image but you have no control over how it is converted.

Black-and-white-in-photoshop-2

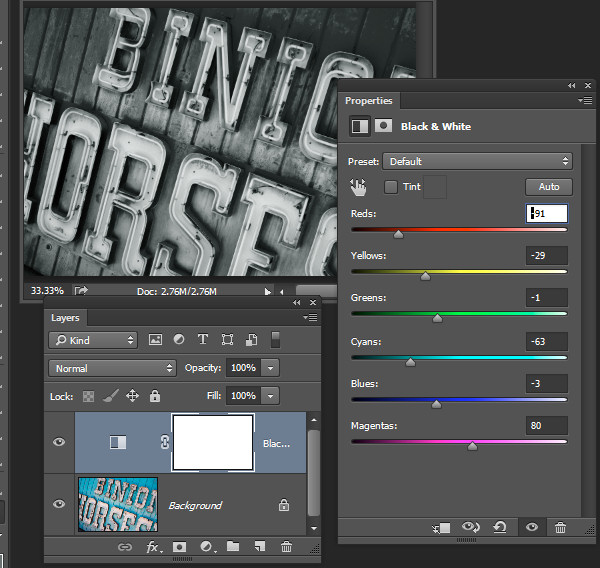
A better way to convert an image is to use a black and white adjustment layer. So choose Layer > New Adjustment Layer > Black & White and click Ok to create the new adjustment layer.

Black-and-white-in-photoshop-3

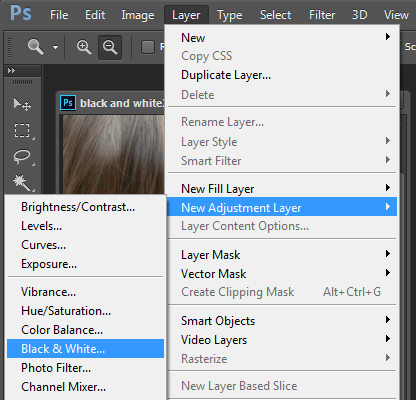
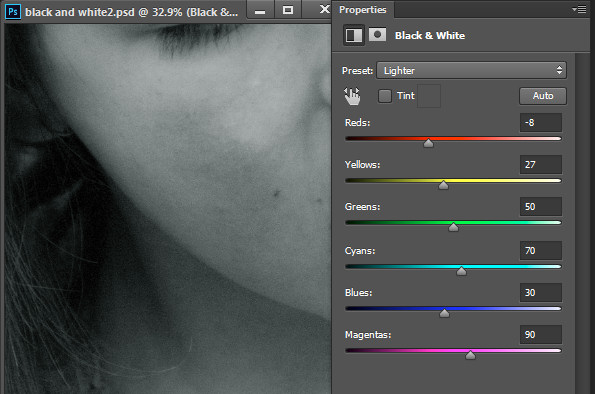
When the Properties dialog appears you will see sliders for red, yellow, green, cyan, blue and magenta. You can use these to control how the colors in the photo are converted. Drag a color slider to the left to darken areas in the image which are that tone and drag to the right to lighten them.

Black-and-white-in-photoshop-4

In some cases you may see little or no change when you drag a slider – this will happen if there is little or none of that color in the image.

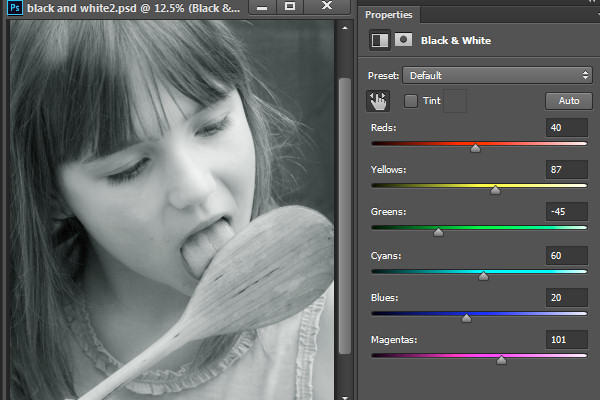
The sliders allow you to create a custom black and white conversion for your photo and you can also adjust how similar value colors are converted. In this image the girl’s pink shirt and the green background convert to a similar shade of grey – but adjusting the green slider to the left darkens the background and creates a more pleasing black and white image.

Black-and-white-in-photoshop-5

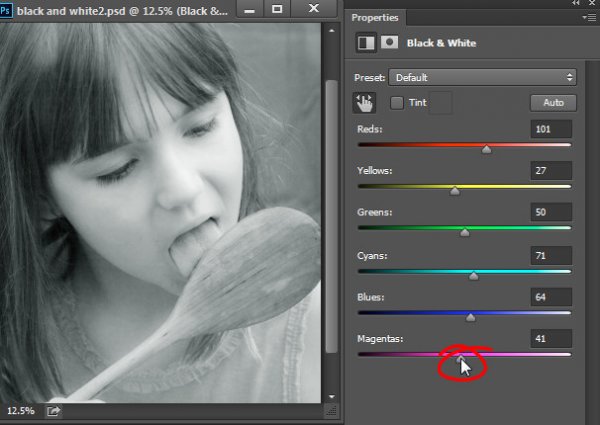
In addition to adjusting the sliders you can also use the targeted adjustment tool by clicking its icon in the Properties panel (circled in red below). You can then click on a specific area of the image and then drag to the left or to the right to adjust the color under the eyedropper. Drag to the left to darken the color, and to the right to lighten it. You should be aware, that this will, of course, adjust every occurrence of that color in the image, not just the area of color underneath your cursor.

Black-and-white-in-photoshop-6

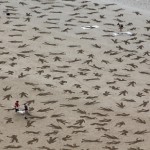
As you adjust the sliders take care to avoid dragging adjacent sliders in completely opposite directions. You are adjusting colors which are likely to be found in close proximity to each other in opposite directions – making one color light and the other dark. The risk is that you will create areas of mottled darks and lights in the image which won’t be aesthetically pleasing as in this image below:

Black-and-white-in-photoshop-7

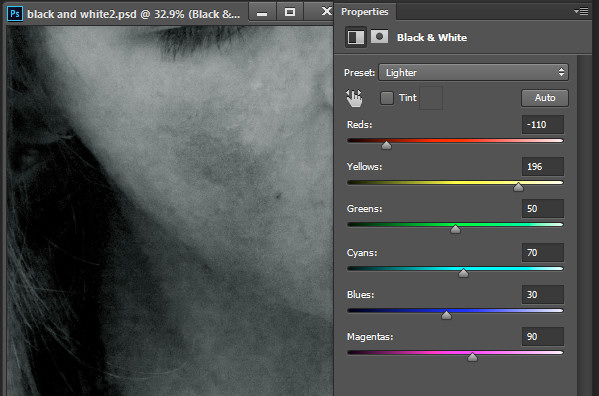
Instead, adjust adjacent sliders so their values are closer to each other for a smoother and more pleasing result as in this next image:

Black-and-white-in-photoshop-8

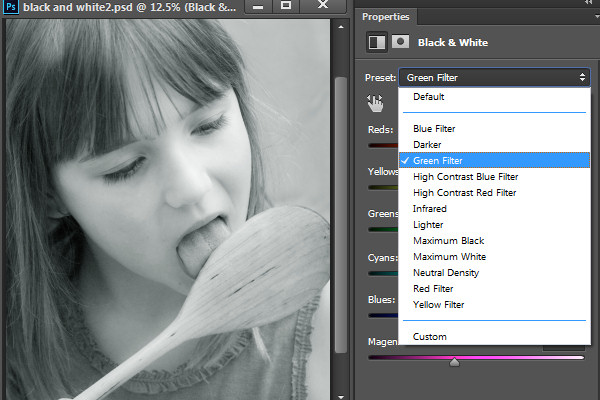
There are also presets options available from the Properties dialog that you can use as a quick start converting your image to black and white. Click a preset in the list to apply it. If you find one you like you can use it as is, or continue to adjust the sliders to fine tune the result.

Black-and-white-in-photoshop-9

Although you can apply this black and white conversion directly to the image using Image > Adjustments > Black and White, I suggest you use the adjustment layer method instead. The reason for this is that, when you use an adjustment layer you can double click the adjustment layer thumbnail to fine tuning the result at any time.

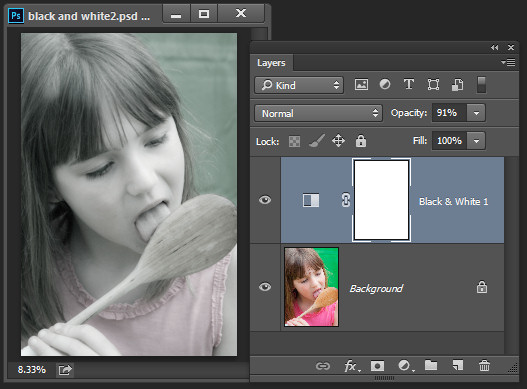
If you apply the adjustment as an adjustment layer you can blend it into the image below by reducing its opacity. Here I reduced the opacity of the black and white adjustment to reveal some of the original color image to give an almost hand tinted look to this image.

Black-and-white-in-photoshop-10

You can also, as I will explain below, add multiple black and white adjustment layers and use the built in masks to control how each adjustment layer affects the image.

Tinting a black and white image

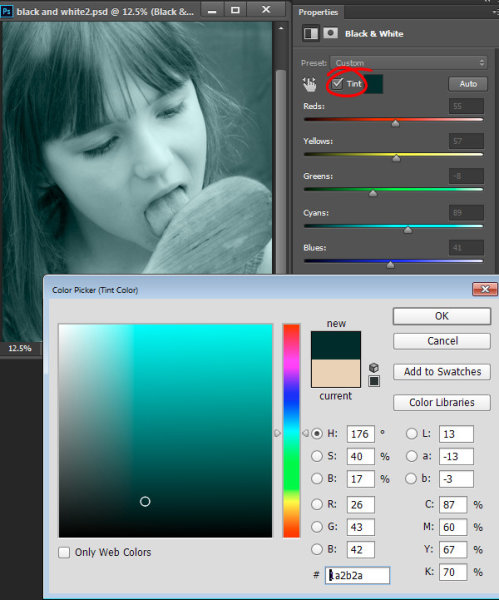
The Black and White Adjustment Layer Properties dialog also gives you the option of tinting the black and white image. To do this click the Tint button and click the color selector which allows you to choose a color to tint the image. Choosing a bright color will result in a brighter and more colorful tint and choosing a darker color will give a more subtle tone to the image.

Black-and-white-in-photoshop-11

Multiple black and white adjustments

Occasionally you may want to treat two areas of similar color in a photo in different ways. For example you may have an image that has a blue sky as well as other elements which are also blue. If you adjust the image using a single black and white adjustment layer all the blues in the image will be converted to a similar grey value and this may not be the effect that you want.

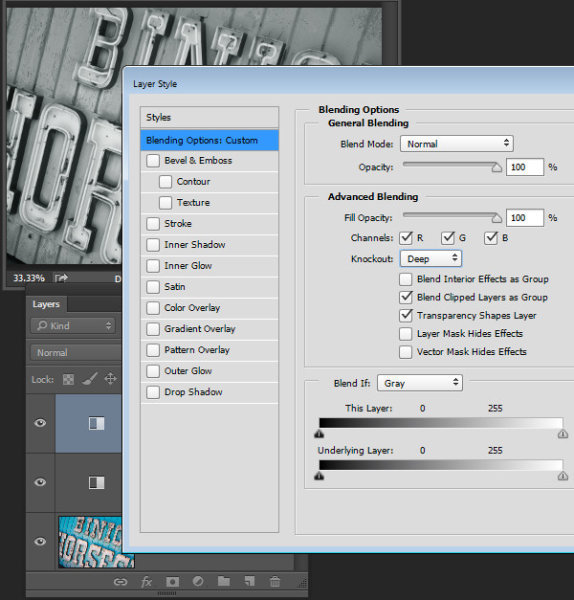
When you need to adjust two areas of similar color in an image in different ways you can apply two separate black and white adjustment layers. To do this, add the first black and white adjustment layer and use it to adjust the image the way you want it to look for one area of color. In this example I’ve adjusted the top of the image.

Black-and-white-in-photoshop-12

Then add a second black and white adjustment layer to the image. At this point you may notice that making changes using the second adjustment layer has no effect on the image at all. This is to be expected – a black and white adjustment layer won’t have any effect when applied over the top of what is basically a black and white image. You can change this behavior by selecting the new adjustment layer and choose Layer > Layer Style > Blending Options. From the Knockout dropdown list select Deep and then click Ok.

Black-and-white-in-photoshop-13

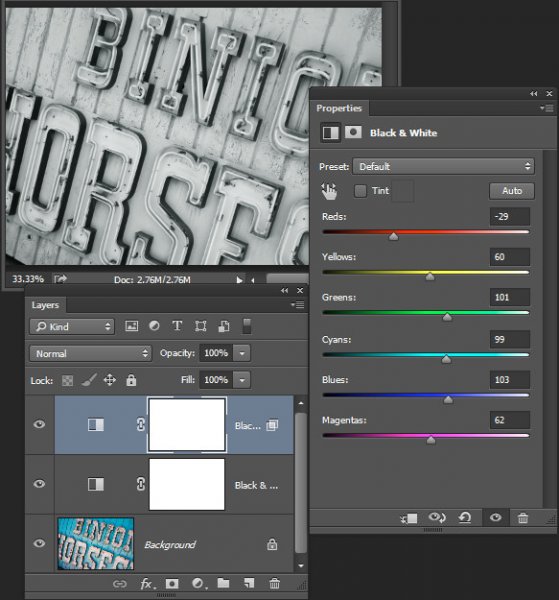
Now you can use the new black and white adjustment layer to fine tune the image. In this case I used it to adjust the image so the bottom part looked the way I wanted it.

Black-and-white-in-photoshop-14

To finish the image you can blend the two adjustments using the masks on one or both adjustment layers.

For this example I targeted the mask on the topmost adjustment layer and filled it with a black to white linear gradient using the Gradient tool. I dragged down at an angle across the middle of the image so the gradient would follow the angle of the sign. The result is that the top most black and white adjustment layer no longer has any effect on the topmost part of the image (the mask is black in that area).

Black-and-white-in-photoshop-15

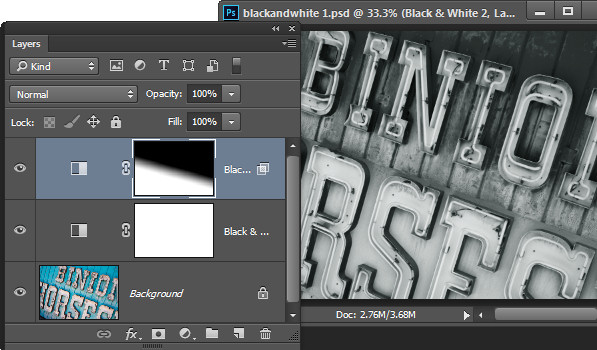
This process has allowed me to convert two areas of the photo, both of which contain a similar blue color to different tones of gray, one light and one dark.

If you prefer to watch a video showing these adjustments see below for the same steps:

This second video shows how to craft custom black and white images in Photoshop:

For tips on using Lightroom for your black and white conversions try these:

  • Tips for Shooting and Processing Better Black and White Photographs
  • How to Convert Photos to Black and White in Lightroom
  • Create Better Black and White Photos Using Local Adjustments in Lightroom 5
  • 3 Tips for Better Black and White Conversion using Lightroom

Do you have any other tips for black and white conversion using Photoshop?

The post How to do Great Black and White Conversions Using Photoshop by Helen Bradley appeared first on Digital Photography School.


Digital Photography School

 
Comments Off on How to do Great Black and White Conversions Using Photoshop

Posted in Photography


Tips For Great Indoor Portraits Using Natural Light

05 Oct

192

You don’t have to have an amazing dedicated photography studio to get great shots indoors. Most homes have at least one or two spots that work just fine. You don’t have to have a lot of additional equipment, in fact, these tips will help you take indoor photos with just your camera and natural window light (and even incandescent light in a pinch).180

Seek the best light

Take a tour of the home you are going to shoot in to scout out the best light. I’ve done newborn sessions in a kitchen multiple times because that’s where the light was best. Often times bedrooms are little havens of sunshine as well. It might not be the room with the prettiest furniture, but that’s okay. Light is most important to me, and the other things in the room are secondary.

Eliminate clutter or simplify

Once you’ve found some nice light, do all that you can to eliminate clutter in the area you are going to shoot. Move distracting objects if possible; it’s much easier to move them before you shoot than to try to take them out later in post-processing. If you can’t avoid clutter, try getting in close to your subject.

200

Shooting in low light

Most of the time I shoot indoors with my 50mm f/1.4 lens on a full-frame body (try a 35mm lens on an APS-C or cropped sensor). It gives me enough space to get everything in the photo that I want, and gives me the ability to open the aperture wide enough to take photos in poorly lit rooms, if needed. Other lenses can work just as well, depending on what you are trying to achieve, but this is the lens that I have found has the most versatility for my indoor shooting.

You will often need to push the ISO higher if you don’t have a lot of natural light coming in. I prefer some noise, or grain, to the look of a flash, so this doesn’t bother me too much. Ideally you’ll want to shoot on days with plenty of sunlight, and a time of day when you have plenty of light indoors. This isn’t the situation to shoot in the golden hour, right before sunset. You might want to try late morning or early afternoon for more natural light.

185

Direction of light is important to create mood

When you are shooting with natural window light, pay attention to the direction the light is coming in, just as you would when shooting outdoors with the sun. You can have a beautiful hazy backlit photo, or a dimensional dramatic side-lit photo, or a flattering crisp photo lit directly from the front. Decide what mood you’d like in your photo, and also pay attention to the space you have to maneuver, and any clutter that may be in the background. 451

Mixed lighting situations

Sometimes you have to just work with what you’ve got. If you’re forced to shoot with incandescent lighting, you can still get some meaningful photos. Try not to have incandescent lighting and natural window lighting fighting to light your subject at the same time. It usually creates a crazy white balance issue, and it’s hard to make right, unless you just convert the photo to black and white. I’ll usually turn overhead lighting off, unless there is absolutely not enough light without it, or I’m shooting in a situation where I don’t have control over where the action happens.

456

Fitting it all in the shot

At times I have had to be very creative to get everything in the photo that I need to include. You can always use a wider angle lens, but that can distort things, and you might not want that look. I’ve stood on counter tops in the kitchen, on beds (watch out for ceiling fans-I’ve had a couple of close calls when I wasn’t paying attention), and wedged myself behind furniture. Anything for a good shot, right?

183

Finally

One last tip: Sometimes you may not be sure exactly where the best spot is for the lighting you’re hoping for. Don’t be afraid to experiment, and move your subject around until you’re happy with the way everything looks. If I have a newborn on a blanket, it’s a simple thing to rotate the blanket around until I like the way the light rests on his face.

Don’t be afraid to get your camera out indoors! With some practice and experimentation, you’ll find lots of ways to make great photos without any extra equipment.

171


The post Tips For Great Indoor Portraits Using Natural Light by Melinda Smith appeared first on Digital Photography School.


Digital Photography School

 
Comments Off on Tips For Great Indoor Portraits Using Natural Light

Posted in Photography


6 Great Reasons to Get over Post-Processing Anxiety

24 Sep

I’m baffled when my workshop students tell me that they find image post-processing to be a chore, a dreaded task that prevents them from even looking at their beautiful photographs more than once. If you’re one of those types, I’m here to tell you that you’re missing out on a delicious second hit of creative joy.

1 – Don’t Miss Out – Post-Processing is Half the Fun

Night Photography with high ISO - Gavin Hardcastle

Unprocessed version below. Total processing time = five minutes. Steps taken:

  1. Boosted blacks and shadows
  2. Reduced whites
  3. Increased exposure by +1
  4. Increased clarity
  5. Increase contrast
  6. Subtle noise reduction
  7. Subtle sharpening

Victoria Night Photography - Gavin Hardcastle

I think one of the reasons that I love photography so much is that I get that double whammy of artistic creativity. The first is when I’m out taking the shot, often standing in awe at the scenery unfolding before me. The second hit is when I get back home and start processing my images.

When I’ve shot an image that I know is really strong, I can’t wait to get that RAW file opened up so that I can relive the moment and get creative with my processing to realize the visual feast that I witnessed when I was on location.

2 – RAW Files are Your Best Teacher

RAW file processing of Landslide Lake - Gavin Hardcastle

Unprocessed version below. Total processing time = three minutes. Steps taken:

  1. Boosted blacks and shadows
  2. Reduced whites
  3. Added high contrast grad filter just above water level to emphasize mountain structure
  4. Increased clarity
  5. Increased contrast
  6. Subtle sharpening added
  7. Increased vibrance
  8. Increased red highlights in the foreground

Unprocessed RAW image of Landslide Lake - Gavin Hardcastle

The first thing that you’ll learn when processing your images is what you did wrong. Maybe you selected the wrong aperture, perhaps your ISO was too high and your image is full of noise, or maybe you just focused in the wrong spot.

By processing and essentially studying your own photographs, you’ll quickly learn which techniques you need to improve and what you could have done to make your images better. If you got everything right when taking the shot, you’ll have loads of fun tweaking the most quality out of your RAW file, and producing an image that you’re proud to share with the world.

If you simply don’t care about sharing your images that’s fine, but if you’ve captured a beautiful moment in time, chances are that most people will gain pleasure from seeing your work. Don’t be so shy, process that image and show the world what you made.

3 – Didn’t Get it Right in Camera? No Problem

It’s totally possible to capture a truly beautiful image in camera, that requires minimal or zero processing, and that’s something you should strive for. However, most of the time there are technical challenges that our cameras simply can’t handle. That’s where image processing comes to the rescue. This could be as simple as red-eye reduction, right through to noise reduction and fixing blown out highlights.

When you’ve become adept at image processing, you’ll be far more daring in your photography by taking photos that you otherwise thought might have been too noisy, too blown out, or unusable for whatever reason. Having even a basic understanding of image processing will open your creative horizons and give you more confidence.

4 – The Camera Sees What You Did Not

aroura-borealis-photography-gavin-hardcastle

Unprocessed version below. Total processing time = five minutes. Steps taken:

  1. Changed the white balance
  2. Reduced whites
  3. Reduced red highlights in the foreground
  4. Increased clarity
  5. Increased contrast
  6. Applied heavy noise reduction
  7. Added subtle sharpening
  8. Increased vibrance

aroura-borealis-unprocessed-photography-gavin-hardcastle

There are times when your camera can see things that you might have missed or were not capable of seeing. When shooting aurora like the image above, most cameras are able to record colours that are barely visible to the naked eye. Some of this processing happens in the camera, but until you look at the RAW file and see what can be done to clean up your image, you won’t realize the full potential of the moment that you captured.

In the image above, I chose the wrong white balance while shooting, and wasn’t really happy with the colours until I switched the white balance to Tungsten in Adobe Camera Raw. I could have done this in camera, while shooting, but everything looks awesome on the little LCD screen on the back of the camera so I thought it was fine until I got back home.

High ISO images of the Milky Way or an aurora might be totally unusable until we’ve cleaned up the noise, fixed any white balance issues and corrected the contrast – among other things.

5 – It’s Easier Than You Think

Sve Your Adobe Camera RAW Defaults

This is how I do it in Adobe Camera RAW. Once you’ve tweaked your most commonly used settings such as lens profiles, chromatic aberration, shadows, highlights, etc., click on the top right tab and then choose ‘Save New Camera RAW defaults’. This well be called up automatically when you next open a RAW file.

A lot of the grunt work can be taken out of editing your images by the simple act of saving your default processing settings to match your camera and lens. Whether you process your images in Adobe Camera RAW or in Lightroom’s Develop Module (which is almost the same thing), you can save your most commonly used processing settings as a default file that will automatically be applied to any RAW file that you open.

This is a real time saver and can be used as a great starting point. There’s no one setting to suite all images, but if you often shoot the same types of images, it’s good to have a default setting that is already pre-configured for your equipment and processing style.

You can even save multiple presets so that if you change your shooting style for different projects, you’ve already got your previous go-to processing settings to get you off to a quick start. From that point, simply tweak your settings until you’re happy.

6 – Black and White Saves the Day

buttle-lake-the-hand-monochrome-conversion

Unprocessed version below. Total processing time = five minutes. Steps taken:

  1. Boosted blacks and shadows
  2. Reduced whites
  3. Converted to black and white
  4. Increased clarity
  5. Increased contrast
  6. Added a vignette
  7. Used the dodge brush to accentuate tree root highlights

buttle-lake-the-hand-unprocessed

I often shoot images that I know will work in black and white much more effectively.

Let’s say I really like the composition that I’ve got and the weather conditions are just perfect, except for the fact that there isn’t much colour in my scene. In those situations I’m already looking forward to converting my image to black and white which can sometimes result in a much more punchy, and dramatic image than the original colour version.

You can easily do the conversion in either Photoshop or Lightroom. Then have fun playing with contrast, shadows and highlights and maybe even a little dodge and burn to accentuate key areas.

Start Processing Your Images Right Now

I hope these six reasons have convinced you that it’s worth setting aside just a little bit of time to process your images. You might discover that you’re a much better photographer than you realized. At the very least, you’ll be able to figure out where you went wrong, and what you need to do to improve your photography.

Maybe you’ll even learn to love image processing as much as you loved taking the shot.

The post 6 Great Reasons to Get over Post-Processing Anxiety by Gavin Hardcastle appeared first on Digital Photography School.


Digital Photography School

 
Comments Off on 6 Great Reasons to Get over Post-Processing Anxiety

Posted in Photography


Drawn in Dust: The Great Traveling Dirty Truck Art Exhibition

05 Sep

[ By WebUrbanist in Art & Street Art & Graffiti. ]

dirty car road art

Typical art travels inside, safely stowed in carefully-packed containers to prevent damage – these drawings do the opposite, playing up the folk-artsy practice of scribbling into built-up grime on vehicles.

dirty truck back travel

“Using his finger to scribe into the layer of dirt built-up from exhaust emissions,” Ben Long “creates elaborate drawings on the rear shutters of white haulage trucks. In this on-going series, collectively entitled The Great Travelling Art Exhibition, he expands upon the daubing and crude slogans that commonly adorn commercial freight vehicles.”

dirty truck art process

Some of the pieces will be rapidly wiped away by rain or vandals, but others have survived for as long as six months and on long cross-country road-trips made by their drivers. Like street art, these reverse graffiti works are susceptible to the elements and necessarily temporary.

dirty vehicle art city street

The artist’s motivations are various, but include a desire to make his work more accessible outside of traditional gallery spaces, reduce the costs of creative expression by using free materials and obviating the need for a studio space in which to create.

dirty truck road art

At the same time, there are a lot of artistic conventions still in play here – hallmarks of the ‘high art’ world, as it were. Long crafts these compositions within (and with reference to) a fixed frame, much like a canvass, and signs the pieces as well.

Share on Facebook


[ By WebUrbanist in Art & Street Art & Graffiti. ]

[ WebUrbanist | Archives | Galleries | Privacy | TOS ]


WebUrbanist

 
Comments Off on Drawn in Dust: The Great Traveling Dirty Truck Art Exhibition

Posted in Creativity


Tips for Taking Great Portraits in 10 Minutes or Less

20 Aug

Portraits 10 minutes or less 01

Yes, you read that right. 10 minutes tops (not counting editing time), and you could have a set of photos worthy to hang on the wall. Don’t get me wrong, I’m not telling you that every session should be that speedy, but sometimes that’s all the time you have.

Portraits 10 minutes or less 02

Maybe you’re dealing with some kids that aren’t too happy about being there, and 10 minutes is all they’re going to give you before the meltdown. Maybe you’ve got awful weather, and you’ve got 10 minutes before the tornado hits. Maybe you decide 10 minutes before the sun goes down that it’s the perfect day for some photos, and you must do them right then (or your model shows up an hour late and you’re losing light fast). Maybe you want photos of your favorite pet, and you know that you’ll be lucky to get 10 minutes of attention.

Maybe, like me, you like to do little mini-sessions sometimes, and you stack them in 10 minute increments. Maybe, just maybe, you like a challenge. So, here’s your challenge: see if you can follow these tips and get great portraits you’ll love in 10 minutes or less. Ready, set, go!

Portraits 10 minutes or less 03

Pick one location

For a portrait session in a time crunch, you must choose ONE location. Just one. Find a spot that has good light, a nice background, and stick with it. Moving around is great if you have lots of time, but our goal right now is speed and quality. Use a tried and tested spot, or scout out a good spot ahead of time. This would also be a good time to use a great indoor studio spot, but stick with just one backdrop.

Portraits 10 minutes or less 04

Make a plan

Go into your 10 minute session with a plan. For example: Let’s say you have a family who wants to hang a family photo collage on their wall. You know you’ll need a family photo, one of each kid, one of the kids together, and one of the parents together. You might want to give an option of portrait orientation (vertical), or landscape orientation (horizontal), especially for the family photo. So, take one of each of those. You may want to do one of family photo standing, and one seated. Maybe plan for one close-up and one full-body portrait of each kid. Whatever your scenario is, plan out ahead of time what you’re going to need, then stick to the plan. This isn’t the time to experiment.

Portraits 10 minutes or less 05

Put your subjects at ease quickly

Normally, you’d get to know your subjects a little bit, and put them at ease. You still need them to feel comfortable, so don’t skip this, just put it on fast-forward. The second you greet them, be happy, be enthusiastic, be fun! Every minute counts, so let them know right away that for this 10 minutes, your only focus is them. Let them feel your confidence in them, and in yourself. You don’t have time for awkward photos, so they have to be on board and comfortable right from the start. You could say something like, “Are you ready for the most painless photo session you’ve ever had? Let’s do this!”. It might get a laugh, and put them at ease right away. Who doesn’t want a painless photo session?

Portraits 10 minutes or less 06

Know your camera well

Finally, know your camera. When you’re in a time crunch, you don’t want to be fiddling with the settings, and panicking if things aren’t going how you expect. The more time you practice with your camera when you’re not under pressure, the better you’ll perform when it really counts. Know what settings you like, and when to use different apertures, shutter speeds, and ISO settings. If you are comfortable with these, you’ll be able to change them on the spot, in between photos, without wasting time.

If you aren’t comfortable with your camera yet, this would be a good time to use aperture priority, or even the auto setting. This isn’t the time to learn; this is the time to apply what you have already learned.

Portraits 10 minutes or less 07

So, are you ready? I’m sure we’ve all got 10 minutes to spare. Give it a try, see if you can shoot at least eight portraits you love in 10 minutes or less using these tips. Let me know how it goes. The photos I shared here are an example of a real life less-than-10-minute session.

Portraits 10 minutes or less 08

The post Tips for Taking Great Portraits in 10 Minutes or Less by Melinda Smith appeared first on Digital Photography School.


Digital Photography School

 
Comments Off on Tips for Taking Great Portraits in 10 Minutes or Less

Posted in Photography


3 Tips for Taking Great Cloud Photos

10 Aug

You may already have your own method of effectively shooting cloud photos. If so then you understand that conditions may vary greatly. Some days, your photos may turn out happy and light. On other days they may turn out dull and grey. However, there are at least three techniques you might consider in order to capture better sky and cloud photos.

Shoot when the sun is brightest and cloud movement is dynamic

01 DSC 1788

The best time to photograph an epic cloud shot is when the sun is at its brightest and is directly appearing and disappearing from behind the clouds. The above photograph was shot on a day in Prague when the clouds were particularly dynamic. It was windy so the clouds kept hiding and revealing the face of the bright sun.

Below is an example of why shooting when the sun is directly behind the clouds may be more compelling. Although the clouds in the photo below are interesting, the result is not as mysterious or as epic in my opinion as the one above. This is of course a matter of personal preference. Be patient, observe the situation and find out, which you like better.

02 DSC 1838

Wait for sunset to capture vibrant colors

03 DSC 8130

Many different techniques come into play when you want to photograph sky and clouds of different colors, but one of the more important factors to consider is the time of day. Sunset is the easiest time to capture vibrant colors. The reason is that as the sun goes down on the horizon, the sky and clouds will take on various hues of pink, orange, yellow and blue. The above photo was shot in Los Angeles where the sunset colors change every few minutes. At first, the clouds turned a bright orange and yellow.

Compare this to the photo below, where just a few moments later, some of the clouds cleared, the sky became a lighter blue and the remaining clouds turned reddish pink.

04 DSC 8135

By shooting clouds during sunset you will be able to capture a variety of unique colors.

Shoot on a tripod and bracket exposures to produce different moods

If you’re shooting with a DSLR, I recommend using a tripod and taking multiple photos in “Auto bracketing mode” or “Auto exposure mode”.

First, set your camera to Aperture Priority and then turn on Auto bracketing (AEB). It’s best to set your bracket exposures to -1, 0, and +1. This will give you three pictures of the clouds at various exposures. The three photos below were shot at -1, 0 and +1 exposures. Notice how distinctive they are in terms of mood.

05 DSC 8164

This image was shot at -1 has a dark and sinister mood.

06 DSC 8162

This photo, shot at 0 exposure, has a serene mood.

07 DSC 8165

Lastly, this image, shot at +1, has a light mood.

If you prefer, you can combine all three to create an HDR photo, which aggregates all the details from the different exposures. You may then edit the HDR photo to produce a photo with your own desired mood.

What other tips can you think of for shooting great cloud photos?

Do you ever shoot during thunderstorms? What’s the best cloud photo you’ve ever shot, and in what conditions? Share with us some examples and of course, if you have any other tips for great cloud photos that you think I’ve missed, please share those as well.

The post 3 Tips for Taking Great Cloud Photos by Ry Sangalang appeared first on Digital Photography School.


Digital Photography School

 
Comments Off on 3 Tips for Taking Great Cloud Photos

Posted in Photography


Infographics 101: How to Take A Great Selfie Like a Master

09 Aug

We all know the obvious, selfies are here to stay! So why not make the best out of them? Shutterfly’s guide offers tips on how to capture a great selfie that’s worth sharing. It teaches you everything from how to find the best lighting to giving your picture that little extra oomph before posting. Follow these tips, capture your selfie, Continue Reading

The post Infographics 101: How to Take A Great Selfie Like a Master appeared first on Photodoto.


Photodoto

 
Comments Off on Infographics 101: How to Take A Great Selfie Like a Master

Posted in Photography


Finding Great Subjects to Photograph Close to Home

05 Aug

You don’t need to take expensive and exotic trips to make good images. So if staying at home is more your thing then a few simple ideas can help you create beautiful images. What you might view as commonplace and bland can still be photographed in an imaginative and skillful way to produce an image that shows a far more striking aspect of the subject or scene. I am not suggesting you get all creative with software manipulation either. I am suggesting explore your imagination and creativity; perhaps push your technical boundaries a little and this will further enhance your photographic skill.

flowers-home

The ability to take an everyday scene and construct from it a superb image will require your application of some or all of the following:

  • vision to see the various elements that might be included in an image
  • concentration and time to develop the idea and assimilate all the components
  • awareness to recognize the potential of a color, shape and form
  • observation to study the scene and time enough to mentally collate the aspects of the image and to try them out in camera
  • willingness to try something new

This skill of making the mundane magnificent is not dependent on the type of camera and lens you use, it works with anything. My particular interest is nature and wildlife, but the skill can readily be applied to most of your chosen genres of photography.

Getting started

To start you should be looking for a spark or catalyst to kick off the mental process. This can be anything that takes your fancy such as color, shape, pattern or motion.

Once you have selected your particular environment, and isolated some elements for a composition, then take some time to arrange and rearrange them in your mind. Walk around, kneel, lie down and test different perspectives. Work the opportunity and let the image evolve, don’t rush it. You may get a few strange looks in certain circumstances, but that is the price you pay.

Something simple like a field of rapeseed (or field of other flowers or crops depending on where you live) is a common, beautiful, bright yellow sight which also heralds the arrival of summer. The endless fields of yellow can be monotonous, but they can provide you with a colorful subject in their own right, or a backdrop for a smaller subject. You can use the color, the size of the field and the detail of individual flowers. Look about for a subject, choose a perspective and include other elements such as: blue sky, clouds, a tree, a car, a sunrise or sunset, or all of the above. Let the image unfold.

Finding subjects close to home

The images here are all taken this year, with this article in mind, all within a couple of miles of my house. This is to demonstrate that there is much on our doorsteps that might keep our photographic needs satisfied, well some of them at least.

Choose any patch of grass on a dewy morning and have a look for a good collection of dew drops and try a backlit shot. The sparkles and perfect shapes of the droplets make an intriguing subject. Here I have turned the image into a black and white just to emphasize the shape and patterns, but often you’ll want to keep the lovely green of the grass.

001 Dewy Morning in the Grass

Garden birds are probably the most accessible wildlife for you budding nature photographers. With some simple skills you can go beyond just taking a record shot, but can create lovely images. Place a bird feeder in a good position, with a decent background, and a thoughtfully placed perch and sit back and wait. Change the perch and change the background at will and you have a whole suite of different images available to you.

002 Robin on Chair

A sunrise over a meadow may be a regular occurrence in your home patch, but to make it a little different get down low in the vegetation. Here I have obstructed the sun with a tree at the edge of the meadow, and thus broken the sunlight up into many light sources coming through the foliage. The background is formed by selecting an aperture that provides sizeable circles of confusion (out of focus light sources) behind the subject. The subject is just a few seeding grass heads, but you can turn the simple into the stunning by constructing an image.

003 Meadow Sunrise

Vast fields of cultivated crops can provide you with a wonderful opportunity. A bright yellow rapeseed field for example. Look for something to isolate within the vast swathe of yellow that provides a point of interest in an image full of color. Sometimes it is simply a color that can spark your thinking, but spotting a dewy web provides a focus for the image. Prowling the edge of the fields on a bright and sunny day will also yield a lot of insect life, which could become your whole new world.

004 Rapeseed Field

You can choose a different day and different weather to change your image. On a foggy day dewdrops collect on spider webs and can give you an abstract view of the rapeseed field. The spark here was the pattern effect of the drops and then the gorgeous yellow background.

005 Rapeseed Field Dewdrops

This image was created by using a long lens that can accommodate a lot of foreground (has a lot of reach and you can stay back from the subject) and can throw the background and foreground out of focus with a shallow depth of field, while filling the frame. If you shoot into the sun, then the sunlight passing through the green foliage will bring out the bright, and almost luminous, green of the leaf with which you can compose the foreground and background. The spark was the beautiful color of the backlit green foliage, completely different from the front-lit color.

006 Garden Bluebell

Sometimes simplicity is the only catchword you need to remember. Find a patch of wildflowers, pick the most concentrated spot and shoot away, picking various subjects. The color and the profusion will give you all you need to create an intriguing and colorful image.

007 Summer Flowers

Spring and summer are obviously the prime times for encountering wildlife, and therefore photographic subjects for your nature images are abundant. Unless you live in the tropics, the winter season can be a lot more mundane, so you are probably going to have to work harder. Colorful weeds and insects are always a feature of summer. Putting them together works a treat, although it may take some patience.

008 Dandelion and Ladybird

It is not all about your hands and knees or the hedgehog perspective, so a few leading lines and an old barn will give you a far superior image to a snapshot of endless cultivated fields. Throw in a few colorful wildflowers in the foreground, a dark stormy sky and the farm fields you drive past routinely may take on a new perspective.

009 Old Barn in Fields

A very sparse little patch of flowers, with color being their only redeeming quality, can still provide you with a good opportunity. This technique is purely an in-camera one and utilizes controlled motion of the lens. Slow the shutter speed (low light, low ISO, dull weather or a combination) and zoom in or out by hand while the shutter is open gives the resulting motion blur. This can be used in a variety of ways and once you start your imagination may take hold. If you don’t have a zoom do the same with your prime lens but twist the camera in your hands.

010 Flower Burst

So just to show you that you can make great images close to home with a little effort.

Do you have any other tips or tricks for finding ordinary things and making great photos? Please share in the comments below.

The post Finding Great Subjects to Photograph Close to Home by Richard Taylor appeared first on Digital Photography School.


Digital Photography School

 
Comments Off on Finding Great Subjects to Photograph Close to Home

Posted in Photography


How to do Great Portraits with One Light

25 Jul

When you first start experimenting with lighting it’s easy to become overwhelmed. Never has the old expression K.I.S.S. (keep it simple stupid) been more appropriate. The most important step is to master what you can achieve with one light source before you start adding others.

1b

Besides, what you CAN achieve with only one light source, used correctly, is quite remarkable.

For this article I have delved into my back catalogue and sourced images that were shot with a single speedlight off-camera. I hate carrying tons of equipment and even now, for 80% of my commercial work, I will try to use one light source only when possible.

2

Shot with a Canon 600EX-RT Speedlite bounced into a 40” white Profoto umbrella

In the below business portrait a diffused umbrella gives us nice catch lights in the subject’s eyes, while allowing for rapid fall away to bring out the shadows. The portrait is shot against a pop-up Westcott black background. A diffused umbrella is a great low-cost investment that massively improves the quality of light from your speedlight, and is easily set up and transported.

3

Lit with a Canon RT600 Speedlite into a Phottix Para-Pro diffused umbrella

To create the image below I had to expose for the blue sky and then pump as much light into the subject as possible – this is a speedlight at the limit of its capability – the umbrella helps to increase the size and evenness of the light spread. The image was shot at 24mm so the umbrella is as close to the subject as possible without being in the frame.

4

Lit with a Sony HVL-F58 speedlight bounced into a 40” white Profoto umbrella

It is entirely possible to create professional results without spending a fortune – this cropped cutaway headshot used a Sony SM58 speedlight with an Orbis ring-flash modifier handheld over the top of the speedlight. For this modifier to be effective you really need to be quite close into your subject, as the flash output is significantly reduced by the modifier. Used properly though it can create some great results.

5

Lit with a Sony HVL-F58 speed light and an Orbis Ring Flash modifier

6

Another example of a portrait shot with the same modifier, lit with a Sony HVL-F58 speed light and an Orbis Ring Flash.

Notes for doing one light portraits:

  • When you are shooting single light setups, you need to remember to keep it simple
  • You can create some great shadows with a single light source
  • Watch out for hotspots created by undiffused light
  • Try blend your added light with the ambient light
  • Using large modifiers can help to spread your light more evenly
  • Move your subjects, not the light, to fine tune your images
  • Experiment by changing your position to the light source
  • Work with the distances, subject to light source, to change the hardness and softness of the light

Below is an example of blending the ambient light with artificial light. The speedlight in this instance is to camera right on a light stand about six feet from the model, and slightly in front of her. Shot at full power with no modifier it is hitting the model and the tree. While by no means perfect the image does work as the over exposure on the tree gives a little separation.

7b

Lit with a Sony HVL-F58 with no modifier

We can see the same model here closer to sunset; shot with a speedlight fitted with an orange gel, bounced into a 30” silver umbrella to emphasize and enhance the already warm available light.

8

Lit with a Sony HVL-F58 speedlight, gelled, bounced into a 30” Profoto silver umbrella

Reflectors can also be used to great effect with a single light source, especially when mixing the ambient reflected light with flash fired directly into the reflector will give your images that extra pop. In the portrait below, the natural light and sun were not enough to light the model. A half-power flash from a speedlight helped to improve the overall lighting of the image, and really make the catch lights in the sunglasses stand out.

9

Lit with a California Sun Bounce gold/silver and a Sony HVL-F58 speed light

Sometimes ambient light is almost enough. In the below portrait 95% of the light is coming from a window camera left. A thin white blind diffused the light beautifully and evenly but didn’t give the catch lights in the eyes. To fix this I used a diffused umbrella with a speedlight on ¼ power, slightly to camera right. Because of the low power setting the artificial light doesn’t really change the ambient light but does give the eyes that needed brightness to make the image.

10

Lit with natural window light a Sony HVL-F58 and a Phottix para pro diffused umbrella

In conclusion

Everything you see here was lit with a single speedlight, and reasonably priced, easily set up modifiers.

Modifiers used – Silver and white umbrellas, a diffused umbrella and an Orbis Ring Flash all of which can be purchased for a few hundred dollars.

Have you done any portraits using only one light? Do you have any additional tips or questions? Please share or ask in the comments below.

For more portrait help try these:

  • Using Off-camera Flash to Fix Lighting Problems for Outdoor Portraits
  • Tips for Great Beach Sunset Portraits
  • 6 Portrait Lighting Patterns Every Photographer Should Know
  • Portrait – Lighting the Shot, a dPS ebook

The post How to do Great Portraits with One Light by Leo Edwards appeared first on Digital Photography School.


Digital Photography School

 
Comments Off on How to do Great Portraits with One Light

Posted in Photography


How to Choose a Great Portrait Photography Location

14 Jul

There’s an expression in the photography world called ‘ESP’ which stands for ‘Expressions sell photographs’. It’s true, a lovely expression is the single most important thing in any portrait photo (unless it’s a silhouette).

However, portrait photography isn’t as simple as teasing out a beaming smile, or haughty laugh from your subject. If your captivating expression is complemented by delicious light and an intriguing environment then you have all the ingredients for a cracking image.

Whenever I photograph portraits these are some of the things I’m looking for when I scrutinize the location.

How to choose a great portrait location

Meaningful location

Is it a meaningful location?

The first thing to do is ask yourself if the location adds to the story you’re trying to tell. For example, when I’m hired to create family portraits I always ask the family if there’s anywhere they like to go, a location to which they have a strong emotional connection. Sometimes they’re proud of their home or garden and we do the session there. Other times it will be in a wood where they walk their dog, or where they go picnicking on lazy summer days. This is far more meaningful to them than some sanitized image on a white background.

Your goal is to either choose a location that helps tell the story of the people in the portrait, or that gives the photo more emotional meaning to the people you’re photographing.

Areas of open shade

Open shade

Every time a bride tells me they’re praying for a gloriously sunny wedding day I don’t have the heart to tell them I’m praying for some lightly diffused cloud cover with intermittent dashes of sunlight upon my express request.

Glaring sunshine causes harsh shadows, particularly in the most important part of the portrait – the eyes.

Open shade is ideal because it doesn’t have harsh sunlight falling directly on the subject, but because the shade is ‘open’ it means there’s still enough light to give the eyes some sparkle. A tree is a perfect example of open shade, so is window light. The subject is in shade but they’re not completely closed off as they would be in the centre of a room, or in a forest. Open shade offers you some nice, soft directional light that creates enough shadow on the face to create depth, but without being harsh.

Lead in lines

Lead in lines

Lead in lines are just as helpful to portrait photography as they are to landscapes. They create depth to a photograph, lead you towards your subject and give the image a three-dimensional feel.

You can use fences, paths, a long twisting tree branch, the lines in a cornfield – anything that draws the viewer’s eye towards your model.

Lead in lines 2

Twinkly leaves

If you position your subject so there are back-lit leaves behind them then you’ll get a beautiful mosaic of green twinkles behind your subject if you use a low f-number on your camera (like f/4 for example).

With backlit subjects like this it’s often wise to use the spot metering mode to help your camera expose correctly for the face and avoid having a silhouette. Using a reflector to bounce some extra light into their face will help even more.

Twinkly leaves

Tantalizing textures

A barn door may not sound like a very exciting background, but rough textures can help the smoothness of your model’s skin pop out of the photograph. I also like rustic walls, and the repeating parallel lines of reeds.

Tantalising textures

Geometric shapes

Our brains like order. We like the pieces of the puzzle to fit together, which is probably why we get so frustrated when putting together flat-pack furniture! This is why our brains like the elements of a photograph to fit together like a completed jigsaw. I look for triangles, circles, rectangles and squares; and compose the image in a way that helps them fit together in harmony. This is also why we like clean, uncluttered hotel rooms that subtly use defined shapes, like the folded triangle of a bed sheet, or the repeating rectangles of a stack of towels.

When you start looking for shapes you’ll see them everywhere. Geometric shapes are often the basis for modern art and when you deconstruct many great photos into line drawings they’ll often look like that.

Geometric shapes

Foreground, mid-ground and background

To give your images depth and a three-dimensional feel you need the viewer’s eye to find interest in the front, middle and background of the photo. Diffused blades of grass could be the foreground, a smiling toddler can be the mid-ground and sunlight sparkling through a tree could be the background.

Foreground midground background

Avenues of trees

I love the effect you get when photographing people in an avenue of trees, using a long lens, because it ticks nearly all the boxes in one go. The leaves provide the necessary shade while the path provides a lead in line and creates depth in the photo. The long lens helps produce a fabulous tunnel vision effect that draws you in and helps to frame the photo, along with the trees themselves.

Long avenue of trees

The next time you decide to photograph someone use these tips and place your subject in the best position to ensure great light and cracking composition. If you have any questions then I’ll be happy to answer them below.

The post How to Choose a Great Portrait Photography Location by Dan Waters appeared first on Digital Photography School.


Digital Photography School

 
Comments Off on How to Choose a Great Portrait Photography Location

Posted in Photography