RSS
 

Posts Tagged ‘Great’

How to Take Great Photographs at the Fairground

02 Jul

Packed with people, bright lights and fast-moving rides, fairgrounds can provide photographers with loads of opportunities to take some colourful and creative images. So, why not grab your camera, head to your nearest fair and try out some of the following ideas for yourself.

Somethingwicked750

When to visit

Fairgrounds can be fun to take pictures of, whether you go in the daytime, or at night. However, with their bright lights, they really come alive once the sun has gone down. My preferred time to arrive is around one hour before sunset, as this allows you to take a look around before it gets dark, and gives you time to plan your shots.

Arriving at this time will also enable you to shoot during the crossover period – the part of the evening where the sun has set, but there is still light and colour in the sky. The deep, dark blue sky provides a striking contrast to the bright, colourful lights and can often look better in photographs than a fully black night sky. In my opinion, this is the optimum time to capture fairgrounds in all their vibrant glory.

What to take with you

Whatever lens you choose to take, there should be some great photo opportunities awaiting you. However, if possible, take a variety of lenses to expand the range of shots you can take. A wide-angle will be useful for capturing the action of fairground rides and a telephoto will enable you to crop closer into details, or people on the rides. The accompanying shots were taken using 24-105mm and 70-200mm lenses. When visiting the fair with friends and family, I have also found it useful to take a 50mm (f/1.8) lens so that I cAN take some pictures of them enjoying themselves.

If you’re planning to capture the fairground rides after sunset you are going to need a tripod due to the slow shutter speeds that you will be using. A remote shutter release will also come in very useful to reduce the risk of blurred images from camera shake.

Photographing fairground rides

Tango750

The most dynamic and exciting photographs of fairground rides aim to convey a sense of speed and movement. Slow shutter speeds are used to capture the colourful trails and patterns created by the fast-moving lights. They’re fun to take, and you can get some dramatic shots relatively easily.

Once you have decided which ride to shoot, fix your camera to your tripod and fit a remote release. (Remember to turn off Image stabilization if your lens has this.) Shutter speed is the most important aspect of getting the correct exposure in this instance, so set your camera to shutter-priority or manual mode. The amount of movement you capture in the image will vary on a number of factors, not least the speed of the ride itself, but a good place to start is with a shutter speed of one second.

Set the ISO to the lowest setting available and the white-balance to Auto, as this should be effective in most situations. (For long-exposure shots such as these, I would recommend shooting in RAW so that you will be able to change the white balance settings during post-processing if necessary.) Autofocus may struggle in low-level light, so manually focus on a part of the ride when it is not moving.

Take a test shot using these settings while the ride is stationary to check the exposure. Pay particular attention to the sky and, if necessary, use exposure compensation. Then, as the ride begins to move, play around with the shutter speed to see what works best. Anything longer than ½ second should produce a decent amount of motion blur and light trails, the effect does depend on the speed of the ride. Keeping the shutter open for a longer time means that you can capture more light trails and patterns – although sometimes this can result in images with messier light trails and a lack of clear, distinct shapes. Ultimately, your choice of shutter speed will depend on the nature of the ride (how fast and how much it moves – vertically, horizontally, diagonally etc.) and your creativity (personal preferences between clean light trails or chaotic swirls of colour).

When composing your shot, give some thought to the angle you are taking it from. Try to get in close and shoot from a low angle, looking up at the ride to minimize distracting backgrounds, but always stay a safe distance from moving rides. Remember to leave enough space in the frame to capture all of the movement so that you don’t inadvertently cut anything off. Spend some time watching how the ride moves before taking a shot. Also, with all the movement going on, try to include a still element in the frame to help ground the image. Signage, fairground stalls, or even (non-moving) spectators can add to the story you are telling in your final image.

Photographing people at fairgrounds

Fairgroundportrait750

Fairgrounds are not just about the rides. By providing great lighting and a fun-filled atmosphere, they’re the ideal place to try out some candid photography. Candid shots of people engaging in activities around the fair will be more interesting than shots of people sitting around doing nothing and often will add an element of story to your image. Also, by being focussed on the activity, your subject is less likely to focus on you taking their photograph. This can produce better candid shots because as soon as a person knows they are being photographed, their natural behaviour tends to disappear quite quickly. Why not take advantage of all the activities on offer at the fair, and try to capture people’s reactions to the action – whether that is trying to win a prize on a fairground stall, eating one of the many sugar-based treats on offer, or even waiting in line for a ride.

When taking candid pictures, set your camera to continuous shooting mode and take a number of shots in quick succession to stand a better chance of perfectly capturing the reaction you want from your subject. Use a wide aperture to let in lots of light. It may also be necessary for you to increase the ISO setting to get the correct exposure. A telephoto lens with a focal length of around 200mm should enable you to capture the (often extreme) reactions of people on fairground rides for some particularly dramatic candid shots.

The lighting at fairgrounds can also be great for illuminating people for some posed shots. Colourful lights can produce great background bokeh for fun portrait shots of friends and family. Simply put, bokeh is created by out-of-focus light so you will need a shallow depth of field. Using a very wide aperture will help, but you will also need to think about the distance between the subject and the light sources (the further away the better) and the distance between the subject and your camera (stand close to the subject and use a reasonably long focal length). There is often enough light available from other sources to fully illuminate the subject, but a flash with a diffuser may also come in handy.

Get creative

Superbowlzoom750

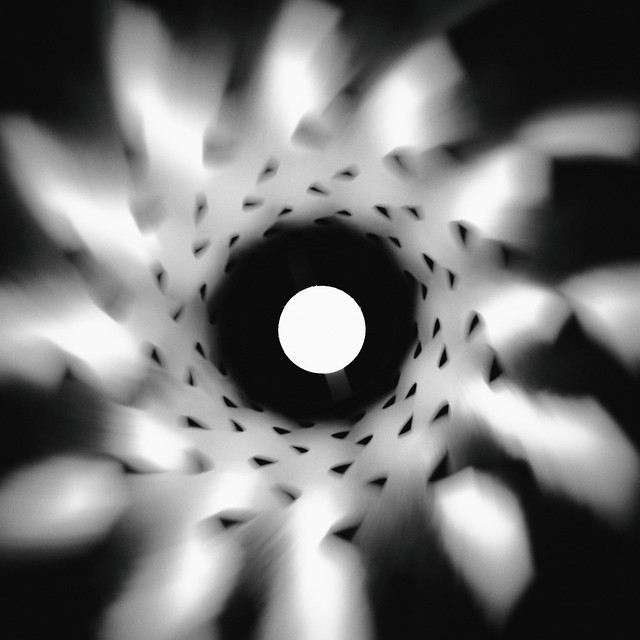
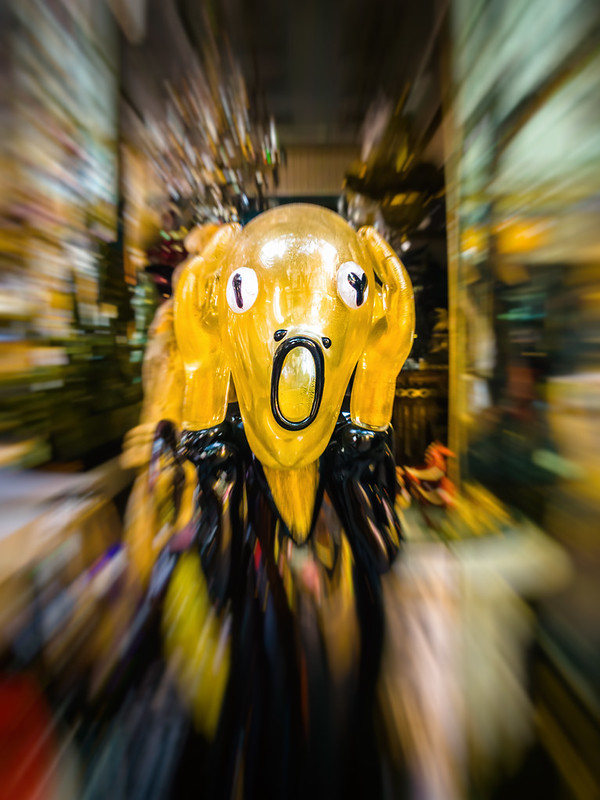
One of the best reasons to take pictures at fairgrounds is that they’re a great place to get really creative as a photographer and experiment with a range of techniques. You can add movement and drama to your images, even when the rides are not moving. For instance, try to create a zoom burst effect in-camera. Use the slow shutter speed settings detailed previously, then manually change the zoom on the lens, while the shutter is open. Experiment with different shutter speeds and staggered zooms; you may be surprised at how the effect changes. For even wilder shots, try the zoom effect on a ride that is moving – to illustrate the type of effects you can achieve, the two shots below show the same moving fairground ride with the zoom burst technique applied to the second image.

Steamup452750

Steamup45zoomburst750

A good way to add an increased sense of speed to a slower ride, such as the dodgem cars or carousel, is to take a panning shot by moving your camera in line with the moving subject during exposure. The aim is to keep the subject (carousel horse) as sharp as possible and the background as blurry as possible. Shoot in shutter-priority mode and select a speed of 1/30th of a second to start. You can then experiment with slower speeds depending on the level of light and the speed of the subject. Make sure to shoot in continuous shooting mode and, if your camera has it, use automatic focus tracking. Press the shutter half way to activate the focus tracking when the subject enters the frame. Lock focus on the subject and, as smoothly as possible, pan your camera to match the movement of the subject and take your shots.

Funfairhorsepanning750

Finally, when leaving the fair, try to capture the fairground lights as part of a wider landscape shot if possible. If the fair is anywhere near water (on a seaside pier, for example) look out for the creative potential of reflected fairground lights.

Have fun!

When taking pictures at the fairground, like at any other busy event, stay safe, keep an eye on your kit and remember to have some fun while you are there!

Geesespectators750

googletag.cmd.push(function() {
tablet_slots.push( googletag.defineSlot( “/1005424/_dPSv4_tab-all-article-bottom_(300×250)”, [300, 250], “pb-ad-78623” ).addService( googletag.pubads() ) ); } );

googletag.cmd.push(function() {
mobile_slots.push( googletag.defineSlot( “/1005424/_dPSv4_mob-all-article-bottom_(300×250)”, [300, 250], “pb-ad-78158” ).addService( googletag.pubads() ) ); } );

The post How to Take Great Photographs at the Fairground by Richard Beech appeared first on Digital Photography School.


Digital Photography School

 
Comments Off on How to Take Great Photographs at the Fairground

Posted in Photography


Great Crates: 10 Beautiful Shipping Container Conversions

10 Jun

[ By Steph in Architecture & Houses & Residential. ]

converted shipping containers cantilevered office 1

Incredibly strong, durable, lightweight and affordable, shipping containers are integrated into into all sorts of architectural projects, whether they’re still highly visible components or completely disguised. Since the focus is on practicality and price, the resulting structures aren’t typically too pretty. These 10 converted shipping container houses, schools, galleries and train stations prove that in the right hands, reclaimed crates can be beautiful, too.

WFH Shipping Container House

converted shipping container wFH 1

converted shipping containers wfh 4

converted shipping containers wfh 2

You can’t even tell, from inside or out, that this home in Wuxi, China by ArcAgency was made from three shipping containers. It’s set on a steel frame and covered with a sustainable bamboo facade, and even features a solar cell-clad green roof. Producing more energy than it consumes, the modular unit is a prototype for this new way of building. In addition to being made into a single-family home, it could be stacked into multi-story townhouses.

Maison IEDEKIT Quebec Container House
converted shipping containers idekit 1

converted shipping continers idekit 2
Seven shipping containers form the basis of the Maison Idekit in Quebec, which disguises them from the outside but leaves them visible inside. The container shapes, covered in timber, can still be discerned from the house’s silhouette, some jutting out at angles and others stacked in the center. Maison Idekit helps homeowners craft containers into their own custom-designed, low-cost homes.

Container Corner House

converted shipping containers corner tokyo

converted shipping containers corner tokyo 2

converted shipping containers corner tokyo 3

Two shipping containers stacked at an angle take advantage of a tiny sliver of land in urban Tokyo, and can easily be moved as needed. Tomokazu Hayakawa architects split one of the containers in half to form the ground floor gallery spaces, with the second crate functioning as an office. They simply painted the exteriors black, but framed out the interiors as required by Japanese law. The hatch doors still open to let in light and air.

Whitney Studio Gallery + Education Space

converted shipping containers lot ek whitney 3

converted shipping containers lot ek whitney 2

converted shipping containers lot ek whitney

When New York’s Whitney Museum of American Art needed a new gallery and education space, they turned to shipping container experts LOT-EK to craft a temporary low-cost structure that would see them through until the museum moved to a new location in 2015. Six containers stacked two-high are sliced diagonally, the operable windows highlighted in neon yellow. This cut-out detail makes the structure more dynamic, and improves air flow inside.

Rooms Within Rooms at the Adriance House

converted shipping containers adriance house

converted shipping containers adriance house 2

converted shipping containers adriance house 3

Not only do the 12 shipping containers that make up the Adriance House in Maine help hold up the glazed envelope that surrounds them, they also function as individual rooms within a room. Two of the containers are cut open on the ground level to connect the kitchen and living rooms to the common area, while the rest hold bedrooms, bathrooms, offices and lounges. The whole home measures 4,000 square feet and can be opened to the outdoors via a double-height garage door.

Next Page – Click Below to Read More:
Great Crates 10 Beautiful Shipping Container Conversions

Share on Facebook


[ By Steph in Architecture & Houses & Residential. ]

[ WebUrbanist | Archives | Galleries | Privacy | TOS ]


WebUrbanist

 
Comments Off on Great Crates: 10 Beautiful Shipping Container Conversions

Posted in Creativity


5 Great Ways to Learn Photography

28 May

All images ©Gina Milicia

“Every Artist was first an Amateur”- Ralph Waldo Emerson

Learn 1

If you’re just starting out as a photographer, congratulations! There’s never been a more exciting, or easier time to learn the art of photography. Today’s market is flooded with tertiary courses, books, workshops, websites, podcasts and online courses that didn’t exist as little as ten years ago.

When I began my career 25 years ago, there were only a few options. You could learn photography at a university or technical college, you could complete an apprenticeship or internship with a photographer, or you could teach yourself through trial and error and by studying the work of other photographers. I combined all three of these techniques and found a way that worked really well for me.

Today there are dozens of ways of developing your photography skills. None of them is right or wrong; just find the one that best suits your personality and learning style. This is a surefire way to fast track your development as a photographer.

Learn 2

What is your learning style?

There are three different ways you can learn a new activity. Most people are a combination of all these styles of learning, so that’s why it’s best to try several different styles to help you learn new techniques.

1. Visual

A visual person will learn best from seeing something demonstrated and looking at photos, maps and diagrams.
Watching “how to” videos and reading books and online blogs really support your learning style if you are a visual learner.

2. Auditory

Auditory style people learn through listening to lectures or audio presentations, talking things through and listening to what other people have to say. Listening to podcasts and audio books would be a great way to support your learning style.

3. Kinesthetic

Kinesthetic people like to learn by doing activities. You prefer to be hands-on and try things out and discover how they work. Attending practical workshops would really suit your learning style

So if you really want to cover all bases read, watch, listen and do.

I know for a fact that my weakness is auditory. I can’t sit still in a lecture or presentation for very long before I get fidgety, but if I listen to information while I’m doing a menial task I find I retain far more information. That’s why I love podcasts and audiobooks so much. I’m able to learn so much while I’m out walking, driving or burning, I mean cooking dinner.

Learn 9

Here are five options worth considering:

1. University/college degree or photography diploma

This is the traditional road, and the one that many people take. You’ll learn a wide variety of photographic styles, in a structured environment, from experienced teachers and industry experts. You’ll also have access to state-of-the-art studios with all the latest cameras, lighting equipment, accessories and software.

Learning in school also has the advantage of being in a group learning environment. This will help you develop networks and social skills that you’ll use in the future. Sharing the journey with your new friends will make learning more fun.

The downside is the expense. Depending on where you live, a degree or diploma can cost tens of thousands of dollars or more. There’s also a significant investment of time. This can be difficult to manage for older students who may have families to support.

The school’s location will also be a factor. Many of the better photography courses are located in capital cities, so you’ll also need to consider travel or relocation expenses.

If you think you’re suited to this style of education, thoroughly research the schools in your area. Find out who the teachers are, who the past students have been, and what they’ve gone on to achieve. If it’s feasible, attend an open day and ask current students what they think. I’ve known students who’ve been miserable and have even failed classes because their personality didn’t match their schools’ cultures. After transferring to schools better suited to their learning styles, they thrived.

Learn 4

2. Assisting – apprenticeship – internship

Apprenticing is a traditional, and often overlooked, way of learning the ropes and breaking into photography. This is how many of my peers and I, worked our way up the ladder.

After graduating from art school, I started out as an unpaid intern with a celebrity and fashion photographer. At the end of my eight-week internship, I was offered a full time job. I couldn’t have landed such a sought-after position based on my portfolio and by cold-calling photographers alone. I learned more in my first month on the job than in four years at art school.

The 18 months I spent assisting taught me tons of lessons about how to light, direct, pose and talk to models. It also taught me how to work with makeup artists and stylists, and how to deal with difficult clients. But most importantly, I witnessed first-hand the ups and downs of running a business. Had I gone straight out on my own without working as an assistant, I never would’ve realized that ALL photographers experience downturns in their business, and that nobody — no matter how amazing or in-demand — is immune. That lesson was gold and saw me through many quiet times through my career.

In some cases interning with the right person can be more valuable than doing a course. But that person needs to be generous with their knowledge, and should be an encouraging teacher. The wrong kind of internship can find you stuck in a tiny office filing, answering phones, and performing menial non-photography jobs without the opportunity to ever learn anything.

Learn 8

3. Workshops

Workshops are a great way to refine and advance your skills. One of the advantages of workshops is that you can select the style of photography and techniques you want to improve, and the photographers you want to learn from.

Some workshops are local, and only last a couple of hours. Others last longer and are held in exotic locations. These are great for travellers who want to shoot on location, but are reluctant to travel on their own.

Whatever course you’re thinking of attending, read up on it. Read testimonials and find out how much experience the teacher has. But most importantly, find out the class size. Larger classes are fine for software workshops such as Lightroom and Photoshop, but when it comes to learning the craft of photography, smaller groups are much better. You’ll get more one-on-one time with the instructor.

Learn 7

4. Online courses

Online course are great for learning at your own pace and in the comfort of your own home. Look for courses that are taught by professionals you respect and in a style you can relate to. The more you enjoy and relate to your teacher, the easier it’ll be for you to learn. Many of the really good courses offer money back guarantees, making them a zero-risk investment.

Learn 6

“When the student is ready, the teacher appears” – Buddhist Proverb

5. Mentors

A mentor can be anyone who’s realized the goals you want to achieve. This includes both friends who can help you understand some of your camera’s settings, and professionals with five, 10, 20, or more years of experience. Their skills may vary, but anyone who’s farther down the path than you has valuable information that will save you time, money and effort in reaching your goals.

A great place to start looking for mentors is in your friendship and social media circles. It isn’t as daunting as it sounds. Look for someone whose work and working style you admire and respect. Follow them on social media and look for ways you can add value to the relationship. Retweet their posts, comment on their photos, share their work, refer clients to them, and send them links to great locations or items that may be interested in.

Give the relationship time to develop before you ask them to mentor you. That will increase the chance that they say yes, because they will have had a chance to get to know you. A mentor is far more likely to want to give up valuable time to work with you if they can see you show initiative, and are respectful of their time.

I’ve been lucky enough to work with several mentors in my career and I know their knowledge and guidance has saved me years of extra work and opened many doors I may never have walked through had I have stumbled along on my own.

Learn 5

“The journey of a thousand miles begins with a single step.” – Lao Tzu

Finally, there is plenty of great information out there, and lots of amazing teachers, but in the end it’s up to you to take the first step.

What have been the most successful ways for you to learn photography? Do you have any other suggestions I may have missed? I’d love to hear from you, please leave a comment below.

googletag.cmd.push(function() {
tablet_slots.push( googletag.defineSlot( “/1005424/_dPSv4_tab-all-article-bottom_(300×250)”, [300, 250], “pb-ad-78623” ).addService( googletag.pubads() ) ); } );

googletag.cmd.push(function() {
mobile_slots.push( googletag.defineSlot( “/1005424/_dPSv4_mob-all-article-bottom_(300×250)”, [300, 250], “pb-ad-78158” ).addService( googletag.pubads() ) ); } );

The post 5 Great Ways to Learn Photography by Gina Milicia appeared first on Digital Photography School.


Digital Photography School

 
Comments Off on 5 Great Ways to Learn Photography

Posted in Photography


How Your Camera Gets in the Way of Creating Great Photos

21 Apr

I am the kind of person who loves nothing more than to read a new camera manual back to front. When the Canon 5d MK3 came out the manual was over 200 pages, YUM! It was the thickest Canon manual yet, heaven!

Anthonyepesphotography dps2 1

I love my kit and I love finding out how it works, what cool tricks I can do with it and what every single button does plus custom settings, autofocus modes, etc. I still use film (and digital of course), print my own work (which I keep detailed records of) so you can see that I am a solid tech nerd.

Yet, I see all the time how distracting the camera can be when we are taking photos. This statement probably seems like a massive contradiction so let me explain. We expect this piece of kit to take great photos for us – even though the camera is an inert and emotionless device with no brain or heart. Thinking, seeing and feeling are what create great photographs.

Sound technical knowledge is just the springboard – don’t get stuck there. Use it to launch your work to the next level by spending the majority of your time improving your ability to see, and I don’t mean just taking photos.

Anthonyepesphotography dps2 4

Good technique will only improve the quality of your shots – it will not help you create awesome images, it will not help you tell a story, communicate the feelings of a subject, or show the viewer how a place feels to be standing right there. Only you, the photographer can do that. This is where I think many photographers get a bit lost.
Diane Arbus, one of my favourite photographers, and one of the most revered portrait photographers we’ve ever had, had a brilliant relationship with her camera:

“I think the camera is something of a nuisance in a way. It’s recalcitrant….I mean I can work it fine, although I’m not so great actually. Sometimes when I’m winding it it’ll get stuck or something will go wrong and I’ll just start clicking everything then suddenly, very often, it’s alright again.”

For her the camera was just a tool that helped her execute her vision. To create her famous portraits, she spent the most amount of time on finding subjects she was fascinated by, creating a relationship and connecting with them. It’s that connection, and the ease at which her subjects felt with her that created the power of her work. The expressions that she obtained from her subjects are often very moving and they tell the story about what it was like to be them.

Once you’ve learned the fundamentals of how to use your camera, then you are obligated, in my opinion, to focus on seeing, truly looking and truly feeling what’s going on in this world. That is how you will create truly unique and original images.

Anthonyepesphotography dps2 2

Seeing is a state of mind

Learning to really see, is learning to be in a state of mind where you notice everything around you. Not just visually, but with every sense, because all of your senses feed into each other. You’re wandering around one morning and you smell fresh bread baking; it leads you to the back door of a bakery where the door is propped open and the bakers are laughing as they bake trays of bagels. It’s intriguing. It is making you smile.

You are not taking photos. But you are practicing seeing by noticing, by having the intention to notice. All of this is fuel for your photography. It stokes the flames of your creativity, it creates a discipline that you are becoming more and more aware in this world. At first it is a very active practice. It’s like becoming a child again. You have to keep paying attention rather than get lost in your thoughts, your to-do list, your future. But the more you do it the more it comes naturally and you start to see the impact that it has on your photography.

Anthonyepesphotography dps2 3

Chase the light

A great way to develop your eye is to always be chasing the light. Light diffracts, reflects, is filtered, and bounces off of things in a myriad of ways. If you see a shadow, think about where is that light coming from. I’ve spent a lot of my life looking for the sources of reflected light; off building windows, puddles. It’s like a light puzzle and when I’ve found the incident angle, I’ve solved it, and sometimes get a good shot as a prize.

Return to the same places

We miss most of the things that are happening around us because our brain blocks out what it considers to be unnecessary stimuli. So we are essentially fighting our brain and retraining ourselves to notice. I find going back to a place is a good way to see new things. Ask yourself, “What can I see in this place today that I didn’t see yesterday? How can I show something new that I haven’t photographed before? How has this new light changed the scene?”.

Anthonyepesphotography dps2 5

Create seeing projects for yourself

One fantastic way to start training your eye is to create a seeing project for yourself. Pick a subject, then look for that subject wherever you go. I’ve done snail-trails; my friend did red-jack playing cards. It could be tabby cats, purple cars, the colour yellow. Lots of people like shooting doors. You get the idea.

Choose something that is not that rare, but rare enough that you’ll be challenged, and it will help you to develop your eye. It’s like when your mate gets a new car and suddenly you see that car everywhere. The reality is that there aren’t more of those cars but your attention has been focused, honed to it. I’m always taking photos of things embedded in the street, purely for my own satisfaction (looking down is as important as looking up!)

Feel

Our senses all work together, and heightening one sense will heighten the others. Having an emotional reaction to your subject will help your photos because you will imbue those feelings in your photos. I loved what travel photographer Steve McCurry said in an interview:

“A picture of a guy in the street in New Guinea, with a bone through his nose is interesting to look at. But for it to be a really good photograph; it has to communicate something about what it is like to live with a bone through your nose. It is a question of the moment to reveal something interesting and profound about the human condition.” Steve McCurry

Anthonyepesphotography dps2 6

Shoot the third thing

A few years back Victoria Coren wrote about some advice her father, the late writer Alan Coren, had given. I thought this was a brilliant idea that could be applied to taking photos:

“Don’t write the first thought that comes into your head, because that is what everyone will write. And don’t write the second thought that comes into your head, because that is what the clever people will write. When you hit on a third thought, pick up the pen. That one is just yours.”

That first thought is the photo everyone sees and takes (the tourist shot). The second photo is one you thought over and shot. But the third photo is one where you stopped and really examined everything around you. When you start taking that third shot you will see your style come through. This third way of shooting will come quicker as you practice.

Don’t underestimate the power of looking in a different direction

I’ve found that photographers are often drawn to the same places. I have had so many situations like this one – where I’ve stood with banks of photographers on Westminster Bridge and they are all shooting in one direction:

Anthonyepesphotography dps2 7

But then, if you turned around, there was a very different style of photo behind us, which everyone was ignoring:

Anthonyepesphotography dps2 8

Seeing is a lifelong journey that will open up tremendous opportunities for your photography. Commit to improving your ability to see, and it will transform your photos. Push yourself always to see more, experience more and feel more.

googletag.cmd.push(function() {
tablet_slots.push( googletag.defineSlot( “/1005424/_dPSv4_tab-all-article-bottom_(300×250)”, [300, 250], “pb-ad-78623” ).addService( googletag.pubads() ) ); } );

googletag.cmd.push(function() {
mobile_slots.push( googletag.defineSlot( “/1005424/_dPSv4_mob-all-article-bottom_(300×250)”, [300, 250], “pb-ad-78158” ).addService( googletag.pubads() ) ); } );

The post How Your Camera Gets in the Way of Creating Great Photos by Anthony Epes appeared first on Digital Photography School.


Digital Photography School

 
Comments Off on How Your Camera Gets in the Way of Creating Great Photos

Posted in Photography


3 Tips for Getting Great Skin Tones Using Adobe Camera Raw

10 Apr

Skin tones can be one of the more difficult aspects of a photograph to master. Getting pleasing skin tones will make your image appear more eye-catching and attractive. If you know the right steps to take, skin can be pretty simple to master. Using these three simple tricks, using only Adobe Camera Raw (ACR), your skin tones will appear more balanced and pleasing to the eye.

Before3 1

After3 1

Note: working in Lightroom you can do the this as well, because the sliders and options are the same!

White Balance

When trying to get great looking skin tones, the first thing you should pay attention to is the white balance. Correct white balance will set the stage for great skin tones. If the white balance is too cool, your skin will appear gray or bluish. On the other hand, if the white balance is too warm, the skin will look yellow or orange. Neither of these options are very pleasing to the eye, and make the skin more difficult to work with later on.

To see if your white balance is accurate, use the white balance targeted adjustment tool. It looks like an eye-dropper and is located at the top of the screen. It is the third tool over from the left. Click on the dropper, then click on an area of your photo that is white. The whites of the eyes are a good place to start. This should give you a good indication of where the white balance should be set. If your image still appears too warm or cool to your taste, use the temperature slider located to the right of your screen, it is the first one. Adjust this by sliding it to the right or left until your get a pleasing white balance. You may have to adjust Tint as well.

Whitebalance1

Exposure

Next, make sure your exposure is correct. Take a look at the histogram located in the upper right hand corner of the screen. Ideally, you want it to look like a smooth bell curve, with the high point of the curve right in the middle. Check to make sure that the curve does not go too far to the left or the right. This may indicate that your photo is over or underexposed, causing your skin tones to either be gray and dark, or too bright and blown-out in some spots.

Exposure 2

If your curve does fall too far to one side, use the exposure slider to fix it. Located three sliders down on the right hand side of your screen, move it either left or right. Watch your histogram. When the majority of the curve is in the middle, you’ve got it! In some photos, there will be parts of your image that are very bright or dark, and cause your histogram to spike on parts of the curve. This happens often when you have a bright sky in the background. If this is the case, your curve will be off the chart on the right edge of the histogram. In an image like this, you would look at where the majority of your curve lies and ignore the parts of the curve that are out of range.

For more information see: How to Read and Use Histograms

Luminance

Finally, to give your skin tones just a little more brightness you will want to locate the luminance sliders (look for the HSL panel, the L stands for Luminance). You will see a horizontal strip of buttons directly under the histogram on the right panel. The fourth one to the left is HSL/Grayscale, click on that button. After selecting that option, three tabs will appear. Click on the Luminance tab. Choose the orange slider, which is two down, and move it to the right. You will notice that this affects mainly the skin in your photo and leaves the other areas of the image untouched. The more you move it to the right, the brighter the skin will appear. Keep moving the orange slider back and forth until the skin is the brightness you prefer.

Luminance 2

Before1 1

After1 1

Once you have adjusted your RAW image using these three steps, you can open it up in Photoshop to do any fine tuning or adjustments on the remainder of your photo. Your skin tones, however, should already look great and need little, if any additional work.

Before2 1

After2 1

Do you have any other tips for making great looking skin tones using ACR? Please share them in the comments below.

googletag.cmd.push(function() {
tablet_slots.push( googletag.defineSlot( “/1005424/_dPSv4_tab-all-article-bottom_(300×250)”, [300, 250], “pb-ad-78623” ).addService( googletag.pubads() ) ); } );

googletag.cmd.push(function() {
mobile_slots.push( googletag.defineSlot( “/1005424/_dPSv4_mob-all-article-bottom_(300×250)”, [300, 250], “pb-ad-78158” ).addService( googletag.pubads() ) ); } );

The post 3 Tips for Getting Great Skin Tones Using Adobe Camera Raw by Emily Supiot appeared first on Digital Photography School.


Digital Photography School

 
Comments Off on 3 Tips for Getting Great Skin Tones Using Adobe Camera Raw

Posted in Photography


Shooting Winter Wonderland: How to Take Great Snow Images

14 Jan

Shoot what you love. The Amazing Images Will Follow. That’s my motto. Above, you can see a shot of my daughters, Zoe and Tenley, on their first day of snow ever. Zoe wanted to hold the snow in her hands and blow it, Tenley agreed, and just as Zoe was blowing, Tenley reached up and whitewashed her face with the Continue Reading

The post Shooting Winter Wonderland: How to Take Great Snow Images appeared first on Photodoto.


Photodoto

 
Comments Off on Shooting Winter Wonderland: How to Take Great Snow Images

Posted in Photography


Start a New Great Year – How To Develop Ideas More Creatively

05 Jan

As a photographer, coming up with ideas and visualizing what you imagined in an image, is an essential progress. Coming up with those (hopefully) great ideas isn’t an easy task though because of the sheer flood of pictures that everyone sees everyday. Here are my strategies for coming up with ideas that help you stand out from the masses. According Continue Reading

The post Start a New Great Year – How To Develop Ideas More Creatively appeared first on Photodoto.


Photodoto

 
Comments Off on Start a New Great Year – How To Develop Ideas More Creatively

Posted in Photography


dPS 12 Days of Christmas: Save up to 88% on Some Great Photography Training

13 Dec

It’s that time of year where we at dPS kick off our annual 12 days of Christmas campaign!

12 days christmas

This is the fifth time we’ve run this and this year we’ve got our biggest deals yet!

Here’s how it works.

Every day between now and Christmas we have put together a fantastic deal on some photography training products.

In the coming 12 days you’ll see some of our own dPS eBooks at discounts we’ve never offered before as well as some deals from other photography sites that we’ve negotiated on your behalf.

Deals this year are as high as 88% off.

Each deal only lasts for 24 hours so you’ll need to be quick!

Get Notified of Each Deal

To get notified of each deal as soon as it goes live simply subscribe via email here:


Don’t worry we keep your email completely private and you can unsubscribe at any point if you find the deals are too many!

We’ll also be updating the deals here on the blog and on our Facebook page.

Our first deal goes out to those who are subscribed in the next 24 hours so keep an eye on your inbox and don’t forget you only get 24 hours to grab each one!

googletag.cmd.push(function() {
tablet_slots.push( googletag.defineSlot( “/1005424/_dPSv4_tab-all-article-bottom_(300×250)”, [300, 250], “pb-ad-78623” ).addService( googletag.pubads() ) );
} );

googletag.cmd.push(function() {
mobile_slots.push( googletag.defineSlot( “/1005424/_dPSv4_mob-all-article-bottom_(300×250)”, [300, 250], “pb-ad-78158” ).addService( googletag.pubads() ) );
} );

The post dPS 12 Days of Christmas: Save up to 88% on Some Great Photography Training by Darren Rowse appeared first on Digital Photography School.


Digital Photography School

 
Comments Off on dPS 12 Days of Christmas: Save up to 88% on Some Great Photography Training

Posted in Photography


How to Find Great Backgrounds for Portraits

17 Nov
Portraits and backgrounds

I used a short telephoto lens at a wide aperture to throw the cliff in the background out of focus in this photo. With this technique, the background itself isn’t so important as no-one can tell what it is, but it must still complement the subject.

Finding great backgrounds that complement the subject is an essential part of the process of creating beautiful portraits. My article How to Plan the Perfect Portrait Shoot will help you with the other aspects of putting together a portrait shoot, but today I thought it would be interesting to delve deeper into the subject of backgrounds for portraits. Here are some things to think about in your search for the perfect background for your portraits.

Do you want your background to be sharp or blurred?

This is an important question because the answer dictates your entire approach to the portrait shoot.

If you want the background to be in focus, then this suggests that the background is in some way relevant to your subject. For instance, if you are taking a portrait of a performing musician, then perhaps it would be nice to take a photo in a venue where they perform, including the background to show the environment.

On the other hand, if your aim is simply to take a pretty portrait of somebody, then the background may not be so relevant, but it must be complementary. A good example of this is taking a portrait of somebody on a beach, where the environment becomes an important part of the composition.

The easiest way to take a portrait with the background in focus is to use a wide-angle lens with a smallish aperture (f/8 is ideal). You should be careful not to get too close to the subject (avoiding distortion) and to include lots of background.

Portraits and backgrounds

I used a 24mm lens at f/4 for this portrait. With such a wide-angle lens f/4 was sufficient to ensure the entire background was relatively sharp.

If you want to take photos with a completely blurred background, then the background itself isn’t so important. It will be out of focus, so nobody will be able to tell what it is. The important thing is that you need to be able to position your model some distance from the background. Then all you need to do is to use a short telephoto lens with a wide aperture, and if the model is far enough from the background it will go out of focus.

This technique works best with prime lenses because of their wider maximum apertures. But you can still make it work, even with an 18-55mm kit lens (which typically have maximum aperture settings of f/5.6). You’ll just need to move your model further away from the background, and get as close to her as you can (try taking a simple head and shoulders shot) to make it work.

Don’t forget there’s a middle ground between these two extremes. You may want to render the background slightly out of focus, so it is still recognizable but not so sharp it competes with the model for attention.

Portraits and backgrounds

The background of this portrait is out of focus, but still sharp enough for the viewer to tell what it is.

Are you going to take your photos indoors or outside?

The answer to this question is important because it leads to the question of how you are going to light your photo.

For example, indoor locations can be great for shoots that take place in the winter time, or even at night, when you can’t rely on the weather to be good enough to take photos outdoors. While you may be able to use your house as a location, another idea is to keep an eye out for interesting indoor locations in your local area that you may be able to use. Examples are cafes, bars and hotels. Once you’ve found a photogenic location, it’s a simple matter of finding the right person to ask for permission to use that location for a shoot.

Once you’ve found the location, you need to decide how to light the portrait. You might be fine with natural light, especially if there are large windows or your camera works well at high ISOs. You’ll probably need an assistant with a reflector to help out.

If you decide to use flash to light your portrait, things may be a little more complex. You’ll need room for lighting stands, and you may need to run power cords across the floor. If you intend to use flash, make sure you mention this when you ask permission to use the location.

Portraits and backgrounds

I took this portrait in a cafe, using natural light from the windows.

If you are going to take your photos outside then the question of lighting still applies. Do you intend to use natural light? Again, an assistant with a reflector may be useful. If you intend to use flash to supplement or even overpower the natural light, then you need to consider if you have enough room in your chosen location to set them up? Will you need someone to help you? Thinking through the practicalities will help your shoot run smoothly.

Background ideas

Finally, here are some of my favourite locations for taking portraits. You may find these suggestions useful in your search for great backgrounds.

Beaches: I especially like rocky beaches as rocks make great backgrounds. The key to getting the best from a beach location is to take the portraits close to the sunset and utilize the beautiful quality of light during the golden hour.

Gardens or parks: Public gardens can be a great place to take portraits. They are normally quite beautiful and may contain a variety of plants and trees that you can’t find elsewhere in your area.

Urban or suburban areas: I like to wander around interesting parts of the city I live in with my model looking for good backgrounds. It’s amazing how many times a wall or doorway can make a simple yet effective background for a portrait.

Portraits and backgrounds

This portrait was taken using an ivy covered wall (that I found on a street near my house) as a background.

Woodlands: These can be tricky as the light tends to come from above, between the trees, almost like a spotlight. The result is harsh shadows under your model’s eyes and nose, even on an overcast day. The solution is to use a reflector or flash to fill in the shadows. While the lighting isn’t always easy in woodlands, the results can be worth the effort.

Children’s playgrounds: Use a playground at a quiet time and your model can have lots of fun on the rides, adding a sense of movement and vitality to your portraits.

Portraits and backgrounds

We went to a children’s playground in the late afternoon (no kids to disturb) to take this portrait. My model enjoyed playing around on the rides.

Your turn

These are my suggestions, now it’s your turn. Can you suggest any locations or types of background that are suitable for portraits? Please let us know in the comments.


The Natural Portrait photography ebookThe Natural Portrait

My ebook The Natural Portrait teaches you how to take beautiful portraits in natural light. This 240 page ebook, published by Craft & Vision, takes you through the entire process of natural light portrait photography through from finding a model, deciding where to shoot, working with natural light and post-processing your images. Click the link to learn more or buy.

The post How to Find Great Backgrounds for Portraits by Andrew S. Gibson appeared first on Digital Photography School.


Digital Photography School

 
Comments Off on How to Find Great Backgrounds for Portraits

Posted in Photography


Had a Great Time Photowalking Last Week at the Microsoft Store #MSStoreWalkSF

25 Oct

Microsoft

I had a great time out photowalking last Thursday night with a great SF crew around downtown SF. The walk was hosted by the always awesome Microsoft store in San Francisco (go check them out in the Westfield Centre in SF).

Thank you to everyone who came out for the walk. It was great to see old friends and also make some new ones. :)

We started out the walk in the center itself and got some nice photos of the great dome. From there we made our way up Powell Street, shooting some of the local color around Union Square and eventually made our way to the very top of Nob Hill. Originally we planned for the walk to take a turn down California Street and head towards downtown, but we were sort of distracted by the always imposing and always grand Fairmont Hotel atop Nob Hill.

I've Got a Room at the Top of the World

I've Got a Room at the Top of the World

We explored the lobby of the Fairmont and an elevator of us also somehow found our way to the top of the hotel with some of the most amazing views of San Francisco that exist.

After our fun at the Fairmont we headed back down California and cut through Chinatown to shoot this distinctive SF neighborhood.

Finally we finished up our way back up Market Street back to the Microsoft store where our ever so gracious host treated us to a spread of food and drinks to finish up an eventful walk.

During the walk folks uploaded their photos from their mobile phones directly to a OneDrive account and we got to watch them in full high res glory on the Microsoft store’s 110 inch LCD display while we refueled on artichoke hearts and chicken skewers.

I was super impressed with so many of the great shots that people got on the walk. If you want to see some of what was shot check out these photos on Flickr here.

I shot with two cameras on the walk. I shot with my trusty Canon 5D Mark III and on mobile I shot with one of the Nokia Lumia 1020 mobile phones.

There Has to Be an Invisible Sun

All of the photos that are in this blog post were shot with the Lumia 1020. The camera on this phone is the best camera on any phone at present. The phone has a 41 megapixel(!) camera that actually shoots in RAW! It’s got a Zeiss lens and I was super impressed with what it was able to do. I liked that the camera could be used in 100% manual mode. Having more granular control over what I was trying to do with it was really helpful. You can pick this phone up for $ 49 with a contract here.

*Disclosure: this walk and post were sponsored by Microsoft and I received compensation for working with them on it.

Jesus Christ Loves Barry Blanchard

His New View

Buy Me Some Red Shoes Baby

Scream

Escape

Crown

Sky Light

Neon Dancers

The Angels of Market Street

More Time for Architechts

Betty

Baby

Sharp Lines


Thomas Hawk Digital Connection

 
Comments Off on Had a Great Time Photowalking Last Week at the Microsoft Store #MSStoreWalkSF

Posted in Photography