RSS
 

Posts Tagged ‘gear’

How to take more Photography Gear through Airports

23 Sep

Have you ever wondered how you can get more gear onto a plane without paying an excess baggage fee?
We found this interesting video from photographer Peter Leong, a wedding photographer in Japan who travels regularly for overseas weddings, describing how he carries camera gear on board.

Have you worn a photography vest before? What has your experience been when traveling with photography gear and taking it through airport security?

googletag.cmd.push(function() {
tablet_slots.push( googletag.defineSlot( “/1005424/_dPSv4_tab-all-article-bottom_(300×250)”, [300, 250], “pb-ad-78623” ).addService( googletag.pubads() ) ); } );

googletag.cmd.push(function() {
mobile_slots.push( googletag.defineSlot( “/1005424/_dPSv4_mob-all-article-bottom_(300×250)”, [300, 250], “pb-ad-78158” ).addService( googletag.pubads() ) ); } );

The post How to take more Photography Gear through Airports by Darlene Hildebrandt appeared first on Digital Photography School.


Digital Photography School

 
Comments Off on How to take more Photography Gear through Airports

Posted in Photography


How to Prevent and Solve a Photography Gear Disaster?

15 Sep

What could possibly go wrong?

Let me be your fall guy here. I’ve been shooting for 25 years, and I’m completely human. I’m also not the most careful person.

I’ve left a SLR in a drybag that unfortunately collected water, then sat soaking for a week. I’ve had a camera slide off the top of a car (like a coffee cup – but much, much worse) then go bouncing across three lanes of traffic. Miraculously, the camera and its lens survived! I’ve opened my car door and had my DSLR fall only 1.5 feet and break off the lens at the mount. My main 28-300mm L lens has gone into the shop twice as the fabric in the locking collar has worn out. I left a lens behind during a hike, and it was gone when I went back for it. I’ve had camera errors while shooting a wedding, and my main desktop computer has been stolen.

Marcus_jb1973

By marcus_jb1973

Bad things happen sometimes. Sometimes it’s your fault, sometimes it’s not.

In this article I want to help you prepare for the the worst case scenarios for camera and lens care. I want to get you thinking about disasters before they happen and also give some advice on what to do when things go awry. Then at the end I’d love to hear your own tales, especially if they are helpful to other photographers.

We will cover cameras and lens mishaps, such as:

  • Theft
  • Lost or missing gear
  • Dropped
  • Moisture incursion
  • Corrupted/error message

What to do before things go wrong

There are steps you can take just in case things go wrong.

Insure it

Pictures Of Money

By Pictures of Money

Whether it’s for business or pleasure, if your camera gear is valuable to you, consider insuring it. For professional photographers this should be a no-brainer, but often those in the freelance realm aren’t bringing in huge paychecks, so they skimp by and avoid insurance. Don’t!

For non-professionals, check with your renter’s or homeowner’s insurance to see if your gear is covered. You might find there is a limit for electronics, but you can always pony up a few extra dollars to ensure all your gear is insured. Also check your auto policy to see if gear left inside a car is covered (while remembering to always lock your gear in your trunk!), it often is not.

Register it

GotCredit

By GotCredit

This is another part of the process many skip. Registering your gear with the manufacturer helps them update you if something should be found wrong with your equipment. We hear about food recalls on the nightly news because they have huge impacts. But did you hear about the Canon Powershot eyecup recall (14,000 units) in 2014 or the Nikon 1 NIKKOR VR 10-30mm recall in 2015?

These kind of recalls don’t make big news and often don’t even make the photo blogs.

Claim it

LensTag is a free service you should consider using to track your gear. The online service allows you to enter camera gear to their database, verify it with a photo of the serial number and search for stolen gear before you buy. We have an article here on dPS that explains the service in more detail Lenstag: a World Without Camera Theft.

In the UK there is a service called Immobilise.com which works in a similar fashion; log your items on the site before they are stolen, alert the service when something goes missing, cross your fingers. This service seems more robust and is checked by police in the UK. You can register more than cameras here as well.

Tag it

Tagging your equipment with contact information is helpful for having your goods returned when they go missing accidentally. I accidentally left a camera on a log on a trail many decades ago and the next day someone had turned it in to the park ranger’s office. Good people do exist! Give them a hand.

Avery, the label company, has a number of options for inkjet and laser printer. For instance, their 6570 label is meant to stay on permanently and can be cut to a useful size. This is a good option, though not perfect, for inkjet printers while the 6576 labels work better on a laserjet printer. You might want to write your information in permanent marker, but know that it will fade and need replacing.

Write it down

Ana C.

By Ana C.

This tip is the most common sense, but I feel it needs repeating. Grab a piece of paper and an old fashioned pencil and simply write down the serial numbers for your gear. Then store it in a safe place. Saving this info online is also handy, via services like Dropbox or Evernote, or email it to yourself, so it can be retrieved from any computer if you are away from home.

What to do after things go wrong

Theft

When I realized my Mac had been stolen during a break-in to my house, my stomach churned to the point of almost throwing up. Luckily, my camera was with me at the time. If it was stolen, I was prepared in a way I wasn’t for my computer. I have my camera serial numbers written down and in electronic form that I can retrieve from anywhere online (while noting it’s pretty easy for astute thieves to scrap off serial numbers).

The first step after a theft is to report it. Whether it is a break-in at home or a snatch and run in a foreign city, any insurance company will typically desire a police report with higher value items.

If you are keen on recovering your gear, don’t trust to the police alone to find it; start looking! In the US places liked Craigslist or eBay are popular choices for thieves looking to offload gear. Pawn shops are another option, but searching them all, depending on where you live, can be time consuming.

You might also want to try services like StolenCameraFinder.com or CameraTrace.com. I have not used either service so I can not vouch for them, but they both have the ability to search for your camera’s serial number (see section about writing down this info). CameraTrace also sells those permanent stickers I talked about earlier to make a reunion with your gear easier.

Missing

Sometime we are our own worst enemy and we misplace things, expensive things. If you never do, then you can skip this section.

Patrice-photographiste

By patrice-photographiste

For everyone else, the obvious thing to do is to retrace your steps. Believe that there are good Samaritans out there (there are!) who want to get you back together with your camera or lens.

If you visited shops, ask the employees if they have seen a camera. The best way for you to get back together with your gear is to let others know you are looking. Leave a card with your contact information everywhere you might have left your gear.

You can also try other online services like CameraFound.com, which will warm your heart when you see how many people are actually trying to help others retrieve their camera or phone equipment. It lists over 1000 found cameras even in far flung locations like Oman and Kazakhstan.
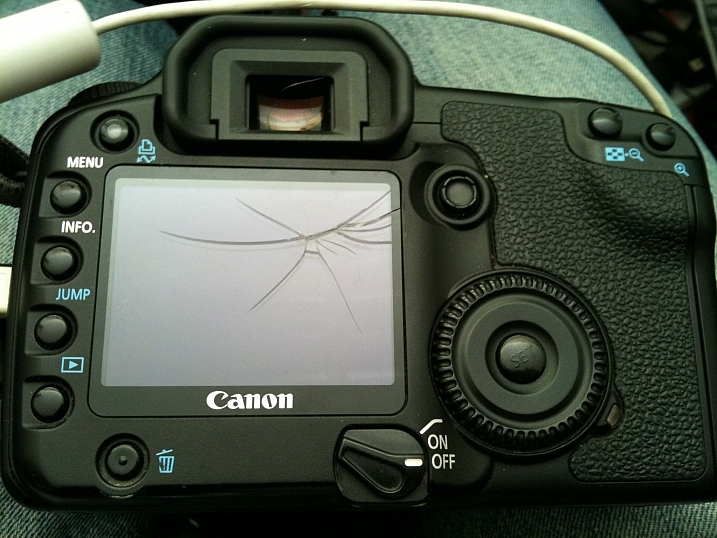
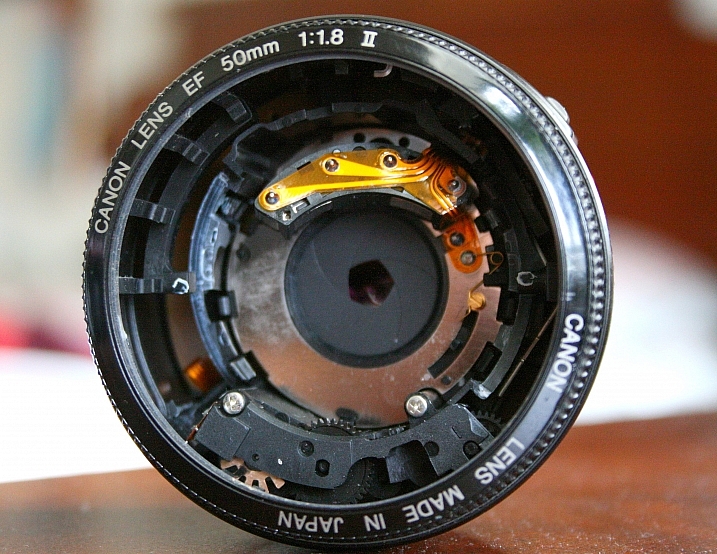
Breaks

Watching my camera fall out the passenger door, in slow motion, had me cringing before it hit the cement floor of my garage. I had reached over to open the door for someone and didn’t see the camera precariously wedged between the seat and the door.

This was a Canon L series lens and I thought I was out $ 1200 to buy a replacement. With a break this bad (the lens snapped off the mounting ring that holds it to the camera body) and no experience with repair shops, I thought I was out of luck.

Richard Masoner / Cyclelicious

By Richard Masoner / Cyclelicious

Many major manufacturers provide free estimates for repairs but you will be on the hook for shipping costs. Ask around at local camera clubs as well to see if there is a trusted local repair shop in your area. They can often save you some money, but make sure they are authorized by your manufacturer. My point is to not despair; get a quote first.

I was happy that the repair for my lens was only $ 200. Spending $ 200 still sucked, but it meant I was back in business, and didn’t need to drop $ 1200 on a new lens because of my own stupidity.

You might want to ask around to see if there is a reputable local repair shop other owners use. I know in Seattle there is such a store, and they can tell you the moment you walk in if your camera is salvageable or a goner. They can often be cheaper than a repair from your manufacturer.

Also, things like cracked LCD covers can be replaced for relatively little money. If the LCD itself is broken, giving you weird colors and streaks, then it’s time to get it repaired. Adventurous photographers have replaced their own LCDs with success, but if you have any doubt, pay a pro to do it.
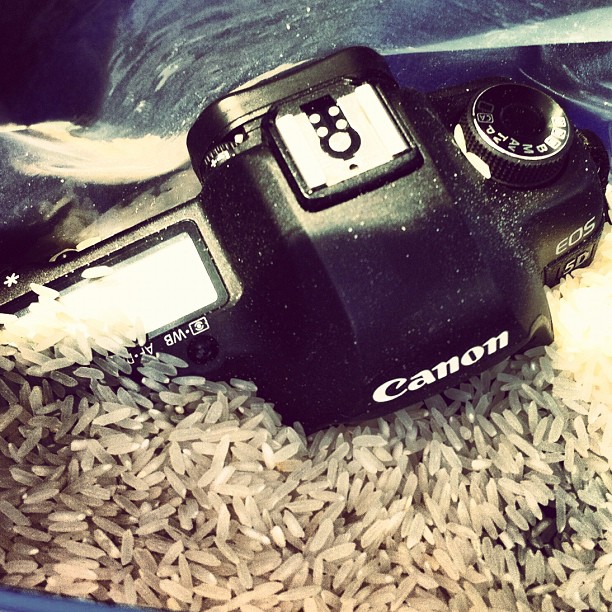
Moisture incursion

It’s no joke that moisture and electronics make horrible friends. The electronics always get the worst of it, but there are some things you can do to possibly limit or stop damage.

First, shut everything off! Take out the batteries too. Damage to electronics from water happens when the water acts as a connector between two items inside your camera, which normally won’t share power. The power from one circuit uses the water as an excellent conduit to move wherever the water touches. This is the classic short circuit that we think of that smells of melting wires and plastic. In worst cases, things can catch fire.

Limit those chances by shutting everything down, and taking out the batteries, until you are 100% sure the inside of your components are bone dry. This can takes days or sometimes weeks.

Kevin Baird

By Kevin Baird

To dry out equipment on your own, go for a slow fix. Using a hair dryer may work for something like a memory card, but not for a whole DSLR. A time tested method is to use something that naturally absorbs water, like rice or the desiccant packs that come with new shoes. You want to make the new host hungry for the water inside the camera instead of just from the atmosphere itself, so put your camera, and soaked parts, together with the rice or absorbent items inside a ziplock bag large enough to hold them all.

Lenses can be tricky as water might leave a film behind on elements inside as they dry. If after a thorough drying, the quality seems affected, it’s time for the lens to get a professional cleaning.

My personal advice with salt water is to not mess around with home fixes and get the camera in to a reputable repair shop or manufacturer as soon as possible. When salt water dries it leaves behind the salt, and that can corrode your camera’s innards a year from now without you realizing it.

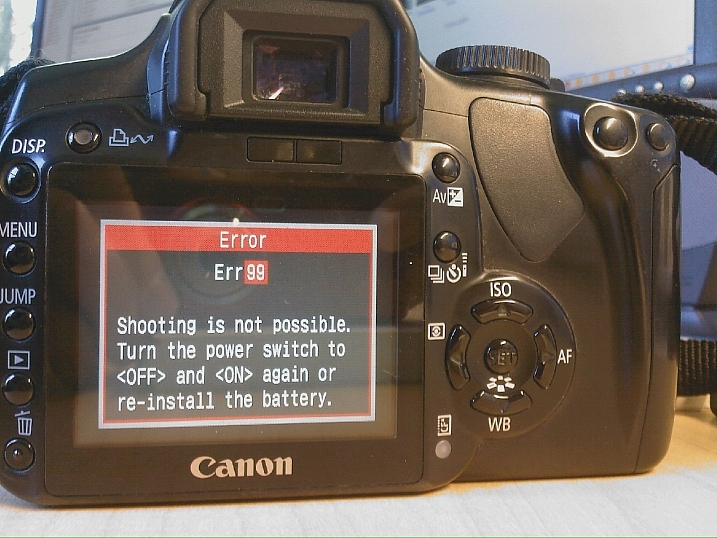
Corruption or error messages

“Err 99” pops up on your camera. What do you do? Freaking out seems like a good option. But better than that these days, is simply googling the error.

Kate Sumbler

By Kate Sumbler

I can’t cover all the errors for all cameras, but I have run into these situations about four times in my 14 years of owning digital cameras. They are nerve-wracking  to say the least.

The first steps are always, 1) Breathe slowly. 2) Power off the camera if it appears any image writing activity is done. 3) Remove the battery (ies) and wait a minute before putting them back in.

Some errors dictate sending your camera in to the manufacturer. Some are cleared by the steps above when your camera simply stumbles over its own circuitry. Google is your friend and will list many remedies. Read forum threads to get a feel if certain suggestions cured other people’s similar issues.

Conclusion

I hope the tips here have helped you start thinking about disasters before they happen in order to lessen their impact. And if things do go south in a hurry, take action as soon as you can to get your gear back in working shape.

Most importantly, I’ve seen a lot of camera and lens gear mishaps, but I haven’t seen them all. I’d like to hear about problems you have had, and what you did to fix them if you think the information might help other readers.

googletag.cmd.push(function() {
tablet_slots.push( googletag.defineSlot( “/1005424/_dPSv4_tab-all-article-bottom_(300×250)”, [300, 250], “pb-ad-78623” ).addService( googletag.pubads() ) ); } );

googletag.cmd.push(function() {
mobile_slots.push( googletag.defineSlot( “/1005424/_dPSv4_mob-all-article-bottom_(300×250)”, [300, 250], “pb-ad-78158” ).addService( googletag.pubads() ) ); } );

The post How to Prevent and Solve a Photography Gear Disaster? by Peter West Carey appeared first on Digital Photography School.


Digital Photography School

 
Comments Off on How to Prevent and Solve a Photography Gear Disaster?

Posted in Photography


How to Improve Your Photography Without Buying New Gear

11 Sep

It’s not the camera that makes good photography; it’s the photographer. How many times have you heard that? Probably a lot more times than you can count. It has become a bit of a cliché than anything, but it’s one that still rings true. You don’t need to spend thousands of dollars on brand new, state of the art camera systems and lenses, to be able to create great photos. You know that by now. There’s just one problem. All of those lenses and cameras are so, so shiny.

Most of that shininess is just a product of the camera manufacturers’ marketing departments churning out a constant onslaught of, “Buy me! Buy me! I’m so shiny! Buy me now!”

Shiny lenses are great, but are they the best investment for your photography right now?

Shiny new lenses are great, but are they the best investment for your photography right now?

The best advice? Ignore it as much as possible.

A bad photo made with a $ 5000 camera, is no better than a bad photo made with a $ 700 camera. It may be sharper and it may have a higher dynamic range, but it’s still a bad photo.

It’s okay to want new and better things, and depending on how fast you progress in your photography and what you want to achieve with it, you will eventually have to upgrade and buy new pieces of kit. There may be a few exceptions in genres like macro and wildlife photography; however, the chances are that you don’t need that several thousand dollar lens right now.

Grow out of your equipment

If you take the time to really learn and put into practice all of the various skill sets, you will eventually come to a wall you can’t pass with modest equipment. That’s when it’s time to upgrade. Take your time getting there though, and enjoy the experience. With well rounded skills, you will know that moment the instant it arrives.

Other ways to invest in your photography

However, there are places where you can invest your money that will not only help your photography, but also speed up the process quite a lot. These are education and experiences. Really, they’re both the same thing, but it’s easier to describe them in terms of two sub-categories.

Education

Everybody needs to learn. Constantly. Never stop learning; otherwise you’ll get left behind.

The Internet is full of free resources, and you should absolutely use every bit of it to your full advantage. To quickly rise to the top of the learning curve, however, you should consider adding things like books, online courses, and workshops to your shopping list.

Workshops can be great value for money and provide a boost to your skills.

Workshops can be great value for money and provide a boost to your skills as well as introduce you to new locations.

Photography books tend to be focused on a particular subject. They also tend to go much further in depth than other resources. Most importantly, they’re relatively cheap. Try to avoid books that try to encompass everything about photography, and stick to specific topics like lighting, portraits or food.

How big of a library can you put together for the cost a lens that you’ve been after?

In the same vein, workshops and seminars can deliver a huge amount of information in a very short period of time for a reasonable cost. They also have the benefit of giving you face to face tuition with someone who’s experienced in the field that they are teaching. This is often invaluable, particularly if you learn better with a hands-on approach.

When considering workshops, please do your research and be sure of what you’re buying. Just think, would you buy something from eBay without first checking a seller’s feedback?

Personally, I feel one of the most overlooked, yet one of the most valuable tools, to learn photography is monographs and coffee table books. Studying the work of accomplished photographers will show you all of the things you’ve learned in theory, put into practice. It can also help you discern your likes and dislikes and give you ideas on what to try for your own portfolios. Don’t just stick with the old masters like Edward Weston and Imogen Cunningham; include contemporary photographers like Martin Parr and Mario Testino for a more thorough reference.

Experiences

Spending money on travel can help to force you to use the gear you have.

Spending money on travel can help to force you use the gear you have.

If education is learning, then experience is the actual doing. Do you want to be a travel photographer? Then don’t upgrade your lenses, buy a plane ticket instead. Do you want to be a fashion photographer? Hire experienced models and make-up artists. Wildlife photographer? Go photograph wolves on a workshop and rent the lens you need, rather than buying it.

If that’s a bit too expensive, then consider buying things to photograph. Food, toys, flowers, whatever fits in-line with your interests, and gets you up and using the camera you have now.

Purchasing things to photograph will help you build a portfolio which is far more important in the long run.

Purchasing things to photograph will help you build a portfolio which is far more important in the long run.

You can read all the theory in the world, but if you don’t put it into practice it just stays theory. The bonus here is that by actually working toward your goal, you will probably wind up earning a bit of money to put towards that fancy kit when you do need it.

It all comes back to the “grow out of your equipment” idea discussed earlier in this article.

You already have what you need. If you have read this article through, then the chances are that you already have everything you need to go out and make photos and develop your skills.

Now, I don’t presume to know every situation out there, and my experiences are only mine. I cannot, and will not, tell you what to do, but if you’re yearning for a new piece of gear I can only encourage you to honestly answer the question, “Do I really need this for my photography to progress or do I just want it?”

googletag.cmd.push(function() {
tablet_slots.push( googletag.defineSlot( “/1005424/_dPSv4_tab-all-article-bottom_(300×250)”, [300, 250], “pb-ad-78623” ).addService( googletag.pubads() ) ); } );

googletag.cmd.push(function() {
mobile_slots.push( googletag.defineSlot( “/1005424/_dPSv4_mob-all-article-bottom_(300×250)”, [300, 250], “pb-ad-78158” ).addService( googletag.pubads() ) ); } );

The post How to Improve Your Photography Without Buying New Gear by John McIntire appeared first on Digital Photography School.


Digital Photography School

 
Comments Off on How to Improve Your Photography Without Buying New Gear

Posted in Photography


Kayaking with Cameras: Keep your Gear Dry in Watery Situations

03 Aug

These hot summer days make us want to jump in a lake (or pool – or river – or ice chest) to keep cool. But let’s face it, wet cameras make for sad photographers.

We’ve been packing our gear in our favorite waterproof cases to document our summer adventures. Our pals Margo and Sara just took a few out for a test drive float down the river.

Check out their camera-filled kayak adventure and pick up some near/in/on/under water photography tips along the way …

(…)
Read the rest of Kayaking with Cameras:
Keep your Gear Dry in Watery Situations (431 words)


© Erin for Photojojo, 2015. |
Permalink |
No comment |
Add to
Keep your Gear Dry in Watery Situations”>del.icio.us

Post tags:


Photojojo

 
Comments Off on Kayaking with Cameras: Keep your Gear Dry in Watery Situations

Posted in Equipment


Peak Design’s Everyday Messenger carries more than camera gear

25 Jul

Peak Design, maker of the Slide and Clutch and other camera gear, has launched its newest bag on Kickstarter. Called ‘The Everyday Messenger’, this bag features an adaptable design able to tote around one’s everyday gear along with photography equipment. Read more

Articles: Digital Photography Review (dpreview.com)

 
Comments Off on Peak Design’s Everyday Messenger carries more than camera gear

Posted in Uncategorized


Product Review: F-Stop Gear Lotus Backpack

14 Jul

PWC-Lotus2015-0622-0001
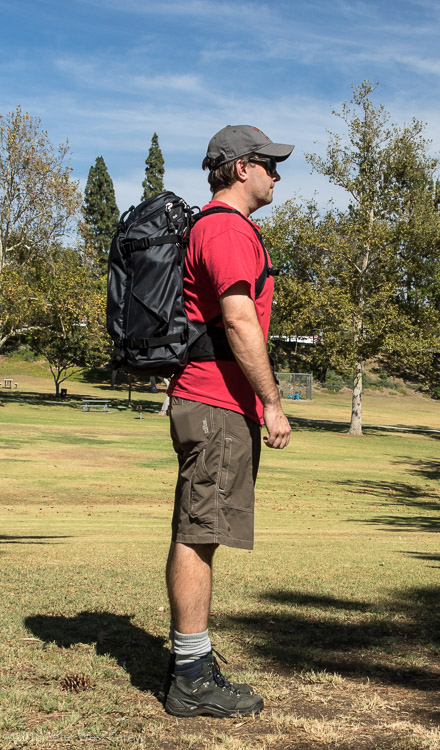
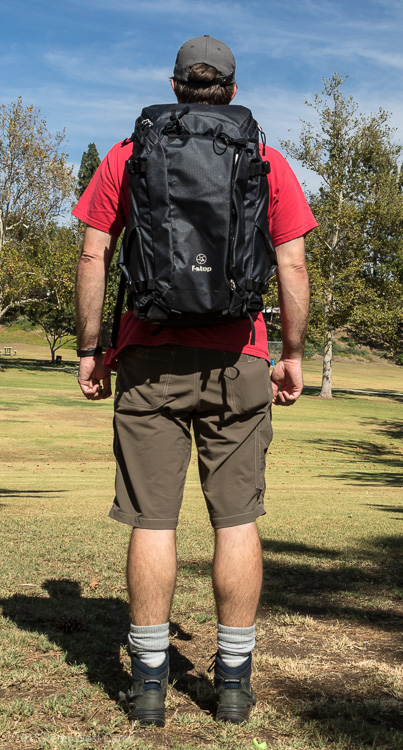
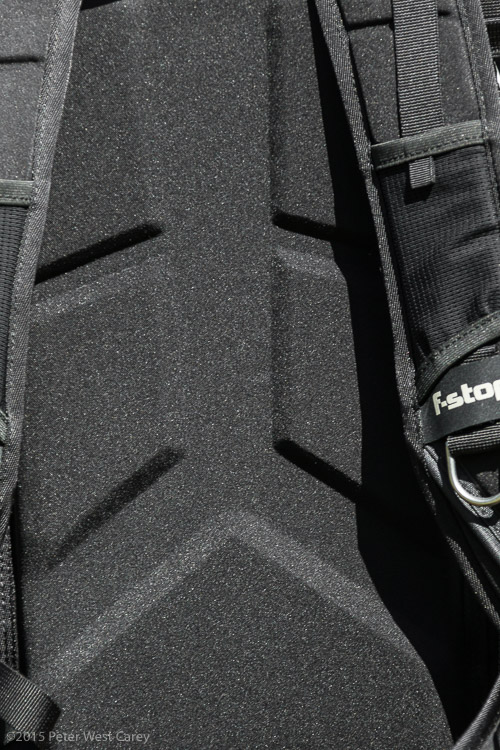
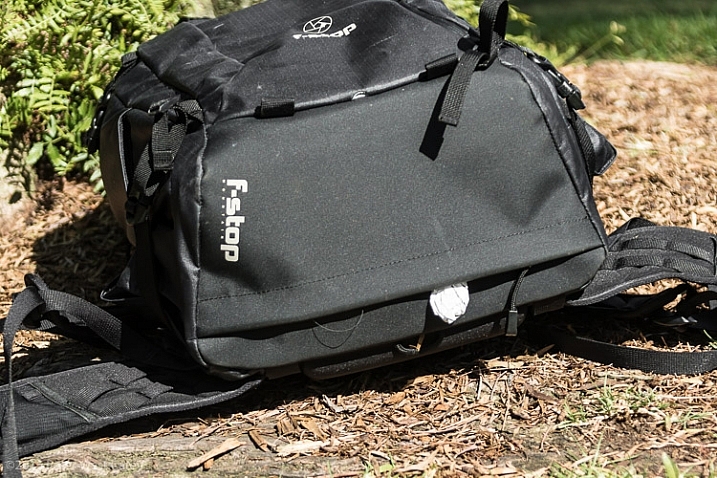
Rather than run down the long list of the Lotus Backpack’s features, I’m going to point you to f-stop’s webpage which has far more complete specs. To sum up this pack; it is built for the serious outdoor photographer who wants an all-weather backpack for their camera. They don’t want to spend all weekend out in nature (f-stop has larger packs for that) and they will be carrying a camera, maybe two, a few lenses and a flash, plus food and clothes.

Let’s dive right into what works and what doesn’t with this backpack.

The Good – F-Stop Gear Lotus Backpack

Weather and sand protected

The Mountain Series from f-stop is all about getting into the elements and keeping your photography gear safe. The water resistant fabric sheds downpours but also helps to keep other elements off your gear. It’s not entirely waterproof as the back access panel is foam and nylon, so I wouldn’t use this pack as a primary on rafting trips. But for trekking the backcountry and scaling peaks, it is nice to not have to deal with a separate pack cover.

PWC-Lotus2015-0622-0024

The thicker hide of this pack gives it some heft, but a lot of protection as well.

Easy, big zippers and it holds a medium sloped ICU

I have a couple of other f-stop packs and I can say without a doubt that the large zippers for the back access panel, and top access are an improvement. They work well with one hand, which is important while handling gear, and they round the corners with ease.

PWC-Lotus2015-0622-0021

Behind one set of large zippers and the back panel is just enough room for the f-stop medium sized sloped ICU (Internal Camera Unit). F-stop uses interchangeable inserts to hold your camera gear, which I have found optimal for maximizing space inside the pack depending on how much gear I want to bring. Sometimes I travel light (camera and two lenses) and a small ICU works fine, leaving me more space inside the pack for food and hiking gear.

PWC-Lotus2015-0622-0016

The sloped medium ICU will hold two DSLR bodies and two lenses, including lenses equivalent to a 70-200mm f/2.8 (pictured here is the Canon 28-300mm L lens, which is the same size as a Canon or Nikon 70-200mm f/2.8) and battery grips, laid on their side. This makes me quite happy.

PWC-Lotus2015-0622-9298-2

Canon 7D Mark II w/28-300mm L and Canon 7D w/10-22mm, both with power grips. Plus rooms for filters and batteries.

Super comfortable

Every pack manufacturer tries to make their bags comfortable; some resort to gimmicks and odd designs. I thought f-stop was doing this with their back support and its multiple channels leading away from the center. It turns out, that center channel is just deep enough to brace your spine and add support to the rest of your back. The hip belt, while not robust (a plus for travel and fitting in overhead bins) gets the job done with enough fabric to take 100% of the pack weight while remaining comfortable. When overstuffed, the hip belts can be lacking, but keep the load under 40lbs/18kg and you should be fine.

PWC-Lotus2015-0622-0033

PWC-Lotus2015-0622-0034

PWC-Lotus2015-0622-0009

Garbage pocket

I’m one of those hikers who likes to keep nature clean and the bottom zippered area of the pack is perfect for garbage. It’s not easy to get into with the pack on and it could have other uses, but as it will constantly get crushed when the pack is set on the ground, I have chosen to take a clue from f-stop’s other packs and keep this area reserved for trash.

PWC-Lotus2015-0622-0014

PWC-Lotus2015-0622-0015

All the add-on space

F-stop makes sure you are not limited when their bags can’t contain all of your gear. The hipbelt has loops for an extra lens case or accessory pouch. On the back and sides are loops for f-stop’s Gate Keeper system. While company promo pictures show people strapping snowboards and skis in these location, they also work great for tripods, hiking poles and a wet raincoat.

PWC-Lotus2015-0622-0005

PWC-Lotus2015-0622-0025

The small tab is for f-stop’s Gate Keeper add on straps

Ice axe loops

After I note you probably won’t strap a snowboard to the back of this pack, I do have a soft spot for adventure backpack companies who include ice axe loops. Seemingly eons ago I climbed mountains and used those loops regularly. Were I to scale another mountain, I would greatly appreciate their inclusion on this pack. You can kind of use them for trekking poles or a monopod as well.

PWC-Lotus2015-0622-0002

Just enough pockets, maybe one more though?

Inside and out, the Lotus has a fair number of pockets. I appreciate the divider in the top compartment and the pocket for either a tablet or a water bladder (complete with discrete opening in the top of the bag to route a drinking tube) on the inside of the pack. There is a small pocket on the inside of the main back panel that can hold just a filter or some cards. Under the top lid is another mesh pocket that holds a couple of filters at most.

PWC-Lotus2015-0622-0020

PWC-Lotus2015-0622-0029

On the front of the bag is an ample, lengthy, zippered pocket great for maps or tablets or other long, thin items. It can hold a lightweight jacket as well. The sides have these odd little pockets. I see what I think they were trying to do here (economize space and streamline the sides so they don’t stick out) but it makes the pockets, well, odd. I can shove in a water bottle if the pack is not filled to capacity on the inside, so they work in that regard.

PWC-Lotus2015-0622-0024

PWC-Lotus2015-0622-0013

Not easy access, but it works.

For my liking I’d like to see at least one more pocket for items larger than a filter. I’m not sure where it would go, but I have grown accustom to enough pockets on my Mindshift Gear Rotation180 Pro and my f-stop Satori EXP that this pack certainly feels like a downsize in terms of pockets. Given the real estate and target market, that is understandable though.

Good range on the sternum strap

I love the sternum strap on this pack. I’m weird that way, but I also have a long torso and most packs have a sternum strap that ranges from choking me to just about choking me. The Lotus understands a longer torso and the sternum straps extend down further than most packs. As is often the case, the clip for the strap contains a whistle for signaling in the backcountry.

PWC-Lotus2015-0622-0032

Fits under an airplane seat

Lastly, this pack fits under the seat of most average planes! Here it is pictured under a seat in a 737-800. Not much room for your feet (I could fit one foot on one side) but the nice part is being able to get to cameras, or other items, easily while flying. Even when fully packed it also fits comfortably in overhead bins.

PWC-Lotus2015-0603-8562

Loops, clips and sneaky pockets

The metal attachment loops on the shoulder straps are easy for clipping spare gear to, and there is a clip on the right shoulder strap to help with routing a hydration tube. There are also two mini-pockets on the hip belt for small items, like a pocket knife, spare memory card or chapstick.

PWC-Lotus2015-0622-0008

What about the bad?

Side zippers get covered by compression straps

Those side pockets with the funky velcro gussets? The zippers for those pocket start at the top of the pack and are usually covered by the side compression straps. It’s a little annoyance but sometimes requires using both hands to get to a water bottle, or other items stored within.

PWC-Lotus2015-0622-0010

PWC-Lotus2015-0622-0012

PWC-Lotus2015-0622-0011

A little loud (crinkly)

I kept trying to place the sound of this pack. It makes a crinkle noise, as the material for the pack is stiffer for waterproofness. I finally figured out the sound is the same as that for a SCUBA BCD, the jacket you see divers wearing that helps keep them neutrally buoyant. If you plan to use this pack for silent ninja work, you might want to think again.

No water bottle, quick pockets

Getting a water bottle in and out of this pack is not a quick affair (see above). I enjoy the side mesh pocket of other packs for this purpose, and the Lotus is missing them. Again, this is probably to keep the bag streamlined. I might get a pouch to keep a bottle up front on the hip belt as an alternative.

Small zippers are a little stiff, certainly need two hands

While the big zippers on the back panel are heaven, the smaller pocket zippers are tough, at least when the bag is new (ask me again in a year for an update). This is just the nature of the beast when wanting a zipper to keep out the elements, I suppose. I have to use two hands when opening the top most compartment, or jerk the zipper around multiple times. Same goes for the side zippers.

PWC-Lotus2015-0622-0022

Top pocket a little shallow

I don’t like the top pocket because of its shallowness, and tendency to allow items to spill out. There is a velcro patch and a net inside this pocket which does help keep valuables in place (sized perfectly for a Moleskine notebook or a passport) and there is a detachable clip for keys. But overall, I worry about things easily falling out of this pocket each time I open it.

Conclusion

F-stop knows what they are doing, and this bag fills the need for a smaller day pack that is protected against the elements. Some things aren’t as convenient as on other packs of this size (water bottle access, small zippers are stiff) but when compared to employing a pack cover and the trouble that brings, it is a fair tradeoff. I’m 6’1″ and I loved how well the bag is sized for my torso; how well it stuck with me as I climbed over rocks or dashed through the airport.

If you want a day pack where you don’t have to worry about the weather ahead, and you desire hours of comfort while traversing mountain ridges, the f-stop Lotus is worth a look. With its interchangeable, padded camera carriers and room for the 10 essentials, this bag ensures you and your gear will get out there to get the shot in comfort and style.

Disclaimer: f-stop furnished me with a test model for this review which I was allowed to keep. The opinions above are entirely my own and they know I will call them out if their gear stinks. I don’t want any of our readers to pick a bad camera bag.

googletag.cmd.push(function() {
tablet_slots.push( googletag.defineSlot( “/1005424/_dPSv4_tab-all-article-bottom_(300×250)”, [300, 250], “pb-ad-78623” ).addService( googletag.pubads() ) ); } );

googletag.cmd.push(function() {
mobile_slots.push( googletag.defineSlot( “/1005424/_dPSv4_mob-all-article-bottom_(300×250)”, [300, 250], “pb-ad-78158” ).addService( googletag.pubads() ) ); } );

The post Product Review: F-Stop Gear Lotus Backpack by Peter West Carey appeared first on Digital Photography School.


Digital Photography School

 
Comments Off on Product Review: F-Stop Gear Lotus Backpack

Posted in Photography


Canon warns about dangers of counterfeit camera gear

03 Jul

Canon made an announcement this week warning of counterfeit 600EX-RT flash units being sold as the real deal. Equally as disconcerting as the idea of being ripped off is that these counterfeits are also incredibly difficult to tell apart from the real thing. Read more

Articles: Digital Photography Review (dpreview.com)

 
Comments Off on Canon warns about dangers of counterfeit camera gear

Posted in Uncategorized


Do You Really Need the Latest Greatest Gear?

28 Jun

If you’re like me, you enjoy reading and learning about the latest photography gear as soon as it comes out. Looking each month at popular photo magazines and online sites, reading the reviews, product articles, and ads, it’s hard not to head to your local camera shop and start spending money! But, really needing that new gear can be a very different issue. Let’s take a look at what you may, or may not, truly need as tools to create your art.

BobbyBaker Wave

Caught up in Marketing, or do you have a true need?

Yes, those big number megapixel camera bodies can be very sexy, and every month it seems that there are new, better than ever, lenses to consider. Besides photography, I also have a passion for sports cars. I have often chuckled at what a friend and I call the “horsepower wars”. Auto manufacturers stoke up the fires of desire for their cars with the ever raising horsepower number – resulting in more power than you would ever need, unless you’re a racecar driver! Camera companies, to an extent, have done likewise with megapixel marketing causing some to jump to buy because more must always be better, right? Or is it? That all depends. Ask yourself these questions:

#1 Are you happy with the results that you’re getting with your current camera body or system – for what you shoot?

If you can say yes, great! Keep shooting and growing, and you’ll know when it’s time to upgrade gear.

#2 Have you explored all settings and capabilities and understand them with your current camera?

I bet very few of us have fully explored all the capabilities of our current cameras.

#3 Do you have a clear understanding of megapixels, their size and relationship to sensors, and what that means to print sizes?

It’s best to understand this before you jump to a new body just because it has more megapixels (read this article on sensor size).

#4 Are you able to shoot the right size files for the size prints you need with consistently high quality results?

If you need to create bigger high-quality prints than you are capable of now, consider upgrading.

BobbyBaker Winter Tree

#5 Are you making money and growing happy customers with your current gear if you are a pro?

Then why mess with a good thing? Keep shooting and booking those gigs. Stay aware of updates and new gear. and you’ll know when you need a change.

#6 Are you comfortably ready to spend another several thousand dollars for the latest new gear?

The latest and greatest usually comes with a significant price tag. You may also need new batteries, memory cards or a computer upgrade. So factor it all in.

#7 Do you feel you need to upgrade to be taken seriously as a photographer?

Do you feel intimidated that you don’t own a “pro” body, and think that you need to in order to be a serious photographer – even though you may not really need a metal, sealed, or full-frame body?

This is the worst reason to buy more gear! Keep learning, growing, and be confident that your work comes from your eye and brain – not from how cool your new gear may be.

#8 What will the latest camera body, lens, etc., give you that you aren’t able to produce today with current gear?

If you can point to something that would definitely result in better quality work, then it is worth considering investing in better, or more gear.

If you answered: “yes, the latest, greatest new gear would make a significant difference in my work or business” then it would seem to make sense to jump in and spend what is needed to achieve that. But, if you feel the need to buy some new gear in order to feel more accomplished, or to keep up with your buddies, or think buying a new camera would be the main determinant of good work versus less than good work – or if your current gear is doing the job just fine and there are many settings/capabilities yet to explore with it, you should probably reconsider spending the money right now.

BobbyBaker Setting The Stage

Knowing when you NEED new gear

If you just love to buy all the latest gear as soon as possible, and can afford to do so, that’s very cool, fun, and good for you – but to me it’s always been about what you see, how you see it, and how you capture it – not the gear used. Currently I own a Nikon D800, D700, and I still have my D300 (I traded my D80 and other stuff towards the D300). I was a late adopter of the D800, buying it nearly a year after it was released. I admit that all the hype and the reviews of this 36.3 megapixel marvel very nearly tempted me to immediately run out and spend the $ 3000 right away on the latest and greatest camera. Instead I looked at my needs, and at that time all they were served very well with my D700 – which I still love.

As my fine art photography business grew, I became in need of providing larger files to produce much larger prints than I had been doing. It was only then that I really considered the D800, and eventually bought it – because I needed that tool. With regard to my lenses, I slowly but surely worked my way to a couple of professional level lens that cost a bunch, but really made a huge difference in my work. Once again, it wasn’t about buying gear because it was new, or well-known and on magazine covers, but because I had grown to need it. I worked alongside other photographers who used the latest pro level bodies and lenses, but I stayed the course using my 12.3 megapixel D300 body and DX lenses until I grew to where I had a sincere need for better gear, and not before.

BobbyBaker If Only

A while back I visited Austin, Texas on non-photography business, and knowing that my visit coincided with the SXSW event, I wanted to be sure to take a camera along. I threw my trusty ol’ D300 in my suitcase with an 18-200mm DX lens. Yes, I took my oldest, non-full frame DX body and a lens that cost a third of my favorite FX lens to shoot SXSW. And you just know that everywhere I turned that week in Austin, I saw someone shooting with the latest greatest camera. That bothered me not one bit! You can see the results of this shoot on my website in SXSW Portfolio. The images were reviewed by Shutterbug Magazine which wrote of the collection, “it makes you want to be there, an interesting link to the musical nature of Bobby Baker’s remarkable photography.” I didn’t need the latest gear to successfully capture this opportunity, just a good, solid camera (one that happened to be discontinued for more than five years) the understanding of how to use it well, and a good eye.

BobbyBaker Bat Bar BobbyBaker Upright on 6th

I am not saying that you shouldn’t buy new gear when it hits the market; what I am saying is buy the gear that you need and can afford, and don’t get caught up in marketing numbers or worse, pressure because your buddy has a mega-megapixel camera and you feel you need one to keep up. It’s about what you see, and what you create when capturing it, not what you used to shoot it. I look at other photographers work all the time, not their gear.

googletag.cmd.push(function() {
tablet_slots.push( googletag.defineSlot( “/1005424/_dPSv4_tab-all-article-bottom_(300×250)”, [300, 250], “pb-ad-78623” ).addService( googletag.pubads() ) ); } );

googletag.cmd.push(function() {
mobile_slots.push( googletag.defineSlot( “/1005424/_dPSv4_mob-all-article-bottom_(300×250)”, [300, 250], “pb-ad-78158” ).addService( googletag.pubads() ) ); } );

The post Do You Really Need the Latest Greatest Gear? by Bobby Baker appeared first on Digital Photography School.


Digital Photography School

 
Comments Off on Do You Really Need the Latest Greatest Gear?

Posted in Photography


10 Essential Pieces of Gear you Need for Landscape Photography

22 Jun

If you are interested in going out and getting some high quality landscape photographs, here’s a comprehensive list of items you will either want to consider, or must have, in order to increase your chances of getting some keepers:

002

#1 – The Internet

Whenever I start to plan a photo shoot to a particular location, I usually begin by googling the area. If it’s a relatively well-known location, you will probably find some very interesting, and comprehensive, websites made by other photographers or adventurists/bloggers. The problem is, if it’s a famous location, you will also get a ton of not-so-interesting and even incorrect information as well. Weeding through Google to isolate the helpful and high quality blogs or websites from the crummy ones is an art form all its own. Once you get used to perusing Google, reading just a few sentences of a blog will clue you in as to whether or not the information you’ve found is worth taking it to heart or not.

If you aren’t lucky enough to find two or three really good blogs about the location, head over to Alltrails.com. It has a sizeable database of locations around the country that have been hiked, including user’s reviews of the location and the level of difficulty in getting there. If it’s a famous site, TripAdvisor.com has a good database of information, including the places to stay nearby.

From there, you’ll be off and running with more information than you probably need. In most cases, what becomes tricky is weeding through everything you find and parsing it down into just a few brief paragraphs on your overall plan of action.

#2 – A Strong Backpack

If you’re looking for a place to save some money, a backpack is not where you want to be counting pennies. You get what you pay for, and when it comes to choosing a backpack to take on a landscape shoot, it is very important you use a bag that is strong and water resistant, with reinforced padding.

Don’t fall victim to the lame zipper bug (you know you’ve been there before, trying to unzip the bag and before you know it, the zipper pops off the bag like a cricket). Do yourself a favor and invest in a high quality bag, like the Tamrac Expedition Series, or the Lowepro Pro Trekker. It will last you many years, and will help you take care of your camera and lenses in the long run.

001

#3 – A Weather-Sealed DSLR Camera

Generally speaking, for various reasons, I still much prefer a DSLR (such as the Nikon D810) over a full-frame mirrorless camera (such as the Sony A7r) for landscape photography. One reason is that certain DSLR models are significantly more rugged and weatherproof than mirrorless.

Eventually you’re going to drop a camera. It happens to all of us (at least that’s what everyone told me the first time I dropped a camera), especially those of us who are out in less than perfect weather conditions. DSLRs made from composite magnesium handle some rough treatment much better than the plastic-bodied entry level DSLRs. My first full-frame DSLR was the Nikon 700. That camera could survive being run over by a small truck. A perfect companion for the clumsy, just-starting-out landscape photographer that I was then.

Also consider investing in a quality raincoat for your lens/camera. I don’t recommend getting one of the cheap, flimsy, clear plastic covers made from recycled sandwich bags…they will tear easily and won’t stay put in windy conditions. Get a cover that is heavy duty…one good coat will last a long time, and they aren’t pricey.

#4 – A Sturdy Tripod

To handle poor footing out in the muddy, rocky, sandy wilderness, and to protect your camera lens setup, a tripod is one item you don’t want to mess around with. In fact, this is the one item more than any other that I would recommend you consider heading to the northern end of your projected budget in order to select a high quality tripod.

A flimsy tripod could end up costing you a chunk of a paycheck in repair bills. It only takes one good gust of wind to knock over an unstable tripod. Having a nice camera and lens, but an entry-level tripod is like putting four worn down, old tires on a Ferrari. It won’t run properly and it’s dangerous for the rest of the setup.

003

A good tripod will outlive both of us, so it’s rare you’ll need to invest in more than one over the course of many years. A few extra bucks goes a long way towards getting having a more stable, secure setup.

See Really Right Stuff, Manfrotto, Gitzo, or Feisol for excellent tripods. In my opinion, you should strongly consider carbon fiber over aluminum; they are the lightest and strongest on the market.

#5 – Lenses

This is where the fun begins, and your wallet ends. Lenses are the single most important piece of equipment in photography. You can have the finest camera, tripod, backpack, media card, and accessories available, but if you don’t have quality glass, it will severely complicate your ability to take a good photograph.

I typically prefer to shoot with prime (fixed focal length) lenses, as opposed to using zoom lenses. My preference for primes is mostly about making sure that I get as personal and into the scene as possible.

With zoom lenses, I tend to get a bit lazy and shoot without adequately working the scene. There is no substitute for moving your feet and SEEING the composition with your own eyes, and not just through the viewfinder. The element of perspective is lost if you simply zoom, instead of walking around and checking things out with your own eyes first.

That said, it’s strictly a subjective thing. I know plenty of photographers who prefer using zoom lenses, and that’s great. Most of the time, the best gear for you is the gear you’re most comfortable with. The key suggestion here, with any lens, prime or zoom, is that you RENT one and try it out before buying it. You can’t know how the lens will work for you until you use it in various situations.

004

#6 – A Reliable Remote Trigger or Shutter Release

This is often overlooked by many photographers, but I firmly believe having a remote trigger makes a big difference. Without one, you have to physically press on the top of the camera. No matter how careful you are, and no matter how securely fastened the camera is to the tripod, this will introduce some micro-shake into the setup. If you want your image to be as tack-sharp as possible, you don’t want anything touching the camera that doesn’t have to. Once the mirror locks up, you want your setup to be as steady as a concrete slab. Every DSLR has its own proprietary remote shutters, and you can also find quality third-party remote shutters available at a lower cost.

#7 – Filters

For landscape photography, some filters are almost as essential as lenses. I’ll keep it brief here and stick with just a few basic filters I would always want to travel with:

Circular Polarizer

A polarizing filter helps mitigate the nasty, harsh reflection of the sun off of shiny objects such as water or anything wet. To get it to work, you simply turn the filter until you see the glare disappear, then you stop turning the filter. A polarizer will also help darken a blue sky and make it a deeper, richer blue. Some people like that look, some don’t. If you do, a polarizer will help you achieve it. I use a polarizer practically all of the time when shooting in daylight.

Neutral Density Filter

An ND filter basically acts as sunglasses for your lens, it blocks some light from reaching the camera’s sensor, thereby slowing down the exposure. For example, a 3-stop ND filter (usually denoted as an 8X or 0.9 ND filter) allows three stops less light through than you’d get without the filter attached. A 5-stop ND filter will allow five stops less light, and so on. For the serious landscape photographer I’d recommend having a 2-stop, 3-stop and 10-stop ND filter. If you want to do some long exposure waterscape work, the 10-stop will come in handy to help make the water look silky smooth. You can also stretch out clouds or turn people into invisible ghosts with ND filters.

Graduated Neutral Density Filter

These are similar to ND filters, but instead of the entire filter being tinted, only the upper portion is darkened, with the tint getting darker from the middle to the edge. So, for example, if you’re photographing a horizon with a sky that’s two or three stops brighter than your foreground, you could use a graduated ND filter to help bring out the foreground more, without blowing out the horizon. It will effectively balance the amount of light received from both the brighter horizon and the darker foreground. Usually just a two or three stop GND filter is necessary. Here’s a photograph of a Graduated ND Filter:

005

Reverse Graduated Neutral Density Filter

Same principle as the one above, except instead of the tint getting darker from the middle of the filter to the edge, it’s reversed. The middle of the filter starts out the darkest, and gradually gets lighter as you travel towards the edge. These are excellent for shooting sunrises and sunsets, where the horizon line is the brightest area of the frame, and as you go higher in the sky, it becomes less bright. This is what a Reverse Graduated ND Filter looks like:

006

UV or Clear Filter

If it’s my lens, I want to do everything I can to protect it from wear and tear. I always have a clear, or UV, filter on the front of every lens I own. It does nothing to help improve the photograph in any discernible way, but it does a great job protecting the front lens element from dirt and dust, or from me walking into a door lens-first, which has happened more times than I prefer to admit.

007

#8 – Extra Batteries and Media Cards

Always, without exception, carry an extra battery for your camera, an extra media card, and an extra battery for any other battery-consuming device. If you’re bringing along a flash that takes four AA batteries, take an extra set of four with you. Chances are you won’t ever need them, but there will always be the one time when you do, and you’ll wish you had them.

#9 – The Photographer’s Ephemeris

This clever app (TPE) does an amazingly accurate job at detailing when and where the sun, and moon, will rise and set. If you’re out chasing sunsets and sunrises for photographs, this app is a must-have.

#10 – A good pair of shoes

No joke; having a comfortable pair of shoes is like having good vision. If your feet aren’t comfy, then nothing else matters. You will not be as good a photographer as you otherwise would be with comfy feet. This especially holds true on longer hikes; invest in a good pair of hiking boots. A pair that strike a balance between breathing well but also offering some water resistance.

That’s enough for the list of equipment you’d want to consider having to photograph landscapes. If you’ve made it this far in this article, I hope you’ve gotten something useful out of it. Have fun shooting those landscapes!

008

googletag.cmd.push(function() {
tablet_slots.push( googletag.defineSlot( “/1005424/_dPSv4_tab-all-article-bottom_(300×250)”, [300, 250], “pb-ad-78623” ).addService( googletag.pubads() ) ); } );

googletag.cmd.push(function() {
mobile_slots.push( googletag.defineSlot( “/1005424/_dPSv4_mob-all-article-bottom_(300×250)”, [300, 250], “pb-ad-78158” ).addService( googletag.pubads() ) ); } );

The post 10 Essential Pieces of Gear you Need for Landscape Photography by Jeb Buchman appeared first on Digital Photography School.


Digital Photography School

 
Comments Off on 10 Essential Pieces of Gear you Need for Landscape Photography

Posted in Photography


f-stop gear introduces four additions to its Mountain Series of tough terrain bags

28 May

f-stop gear, maker of rugged camera bags, has introduced three new models and a refreshed existing model to its Mountain Series. The Ajna, Sukha, Shinn and Tilopa offer increased durability and ripstop Nylon shells for weather-proofing. Read more

Articles: Digital Photography Review (dpreview.com)

 
Comments Off on f-stop gear introduces four additions to its Mountain Series of tough terrain bags

Posted in Uncategorized