RSS
 

Posts Tagged ‘from’

Successfully Copy Photos from Your Memory Card to your Computer

02 May

Before you can begin editing your photos you need to get them safely off your camera and onto your computer. Unfortunately this process is often hijacked by (well-meaning if misguided) software which purports to do the work for you but leaves you wondering just where your photos really are! So, to help you understand your options for getting your photos onto your computer, here’s what I recommend.

First of all: Take Charge!

The first thing to understand about getting photos from your camera card or camera onto your computer is that you’re in charge. Any application that opens and tries to grab your photos for you can be closed down. If it is not the application you want to use then do just that – close it.

Now you can take charge and manage the process in a way that makes sense for you.

Choose your application

If you’re using Photoshop then you can use Bridge to import your photos. If you are using Lightroom then you can launch Lightroom and import your photos using it. If you don’t have either program, or if you prefer to manage the process yourself, you can do so using Finder on the Mac or Windows Explorer on a PC. I’ll cover this process first, then look at Bridge and Lightroom.

Importing using Finder or Windows Explorer

import-photos-using-Windows-1When attached to your computer, a camera or memory card works like any drive, so you can view its contents. You can also copy photos from the memory card onto your computer’s hard drive manually using Explorer or Finder.

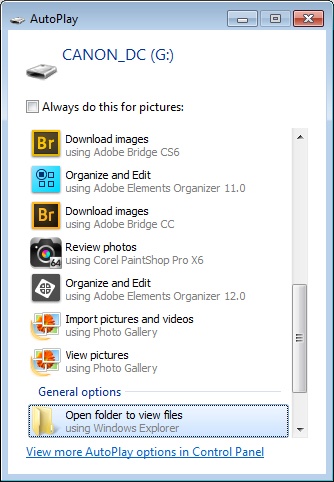
On a PC, if the AutoPlay dialog appears when you insert your camera card or attach your camera, choose the Open Folder to View Files option.

If the dialog doesn’t appear, simply launch Windows Explorer and select the drive that represents your camera or memory card.

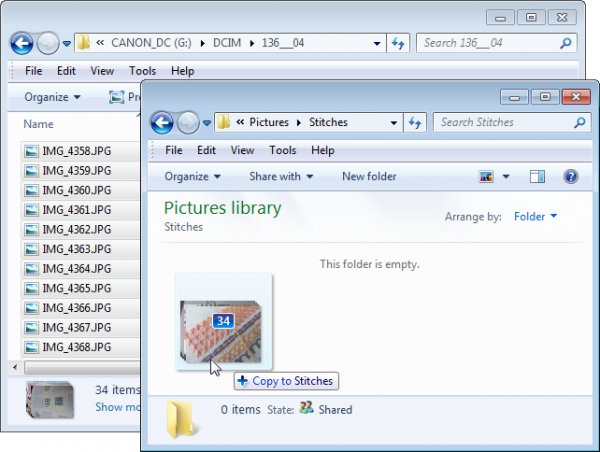
Navigate to the folder that contains your photos – there may be multiple folders depending on how your camera stores images on the card. You can select the photos, then drag and drop them to the folder of your choice. It’s often easier if you first open the target folder in a second Windows Explorer window so you can drag from one to the other.

import-photos-using-Windows-2

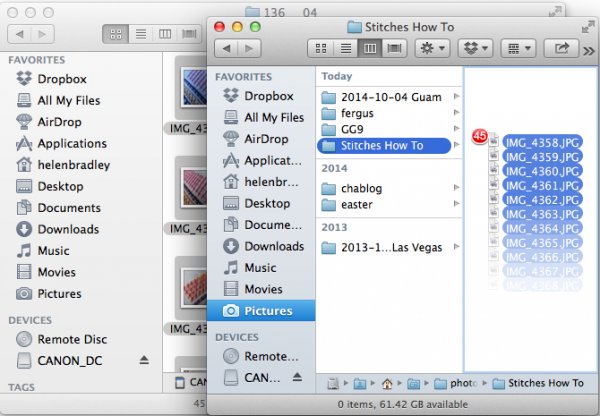
The process is similar using Finder on the Mac. If iPhoto launches – stop it from downloading any photos and close it. Then you can drag photos from your camera card open in one Finder window, to a folder of your choice open in a second window.

import-photos-using-finder-on-the-mac

Importing Photos using Bridge

If you are using Photoshop, launch Adobe Bridge and choose File > Get Photos from Camera. Click the button to open the Advanced Dialog.

import-photos-using-bridge-1

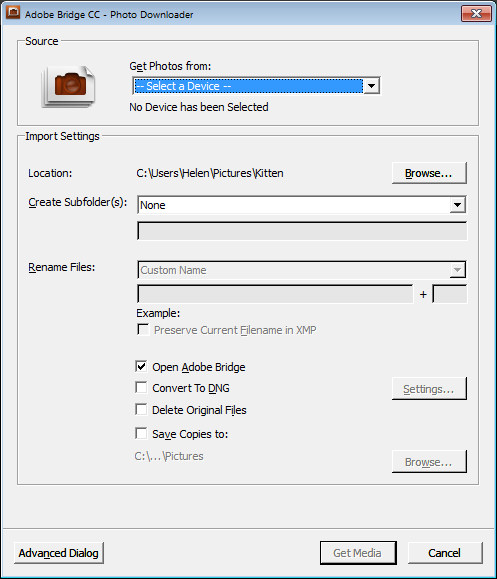
From the “Get Photos from” drop down list select the drive letter that corresponds to your camera or card.

import-photos-using-bridge-2

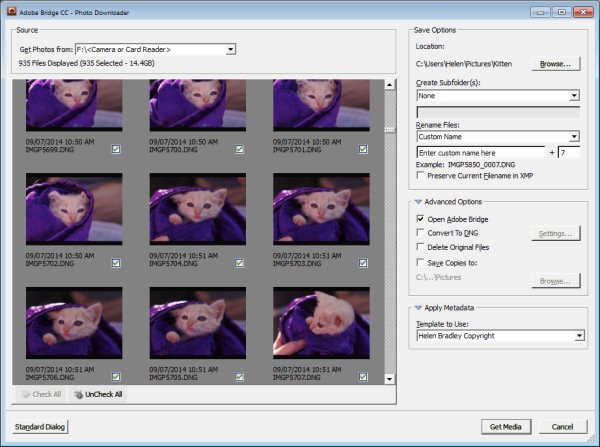
You can now see and select the photos to import. This is one benefit of using Bridge over Windows Explorer – you will see thumbnail images of your raw files so you can see what you are importing.

On the right of the dialog select the folder in which to place the images. Typically this will be inside your My Pictures folder on your computer but you can choose any location that makes sense to you. However, if you want to find your photos later, on it is essential that you pay attention to the choices you make here.

import-photos-using-bridge-3
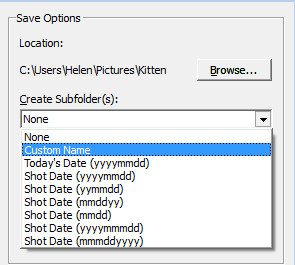
Once you have selected the folder to import the images into, you can, if desired, select a subfolder. In this way you can group photos by shoot, date or something that makes sense to you.  Bridge will create the folder for you if it doesn’t exist, so choose an option from the Create Subfolder(s) list and, if required, type a name for it or choose the date to use – either the capture date or today’s date. If you don’t want to organize photos in a subfolder then click None.

import-photos-using-bridge-4
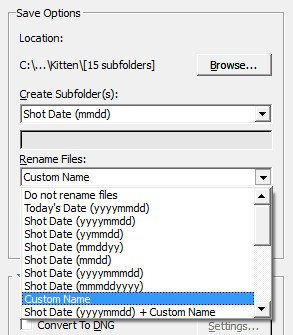
You can also select to rename files on import, or not. Choose Do not rename files if you don’t want them renamed or alternatively select a naming convention from the list.

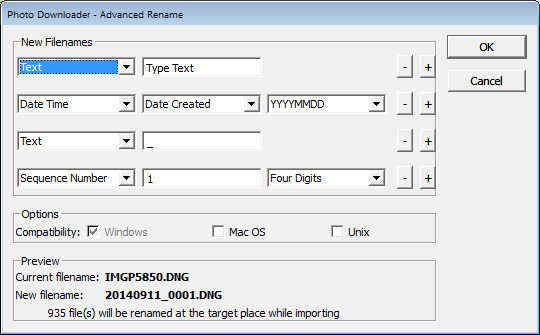
If you have advanced naming requirements for which the dialog does not provide an appropriate choice, scroll to the bottom of the list and click Advanced Rename to open the Advanced Rename dialog where you can create quite complex naming conventions. Whatever choice you make check the entry just below the dialog where Bridge shows you an example of the naming convention in place so you can check to see if it is what you want.

import-photos-using-bridge-5

In the Advanced Options area you can choose other options including Convert to DNG – which is handy if your camera captures in a manufacturer specific format such as CRW, NEF, PEF and so on, but you prefer to work with DNG files. Select this option and Bridge will do the conversion for you.

You can also select Delete Original Files although this is not recommended. It’s best to make sure that the images are correctly copied onto your computer before the originals are deleted so I suggest you leave this option disabled.

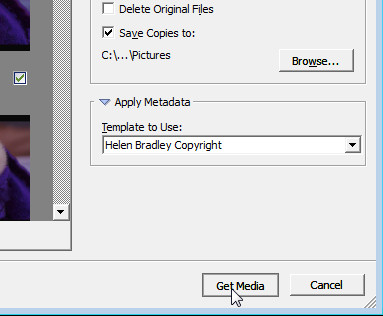
Bridge offers a backup option so it will make a copy of your photos on import. To do this, click the “Save Copies To:” checkbox and select an alternate location (such as an external drive) in which to save a copy of your photos.

import-photos-using-bridge-6

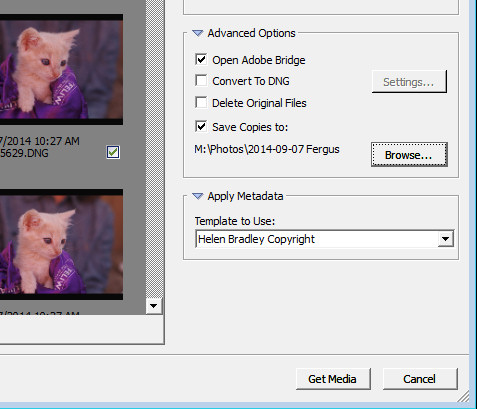
If you have a metadata template already created you can select this from the Apply Metadata drop down list.

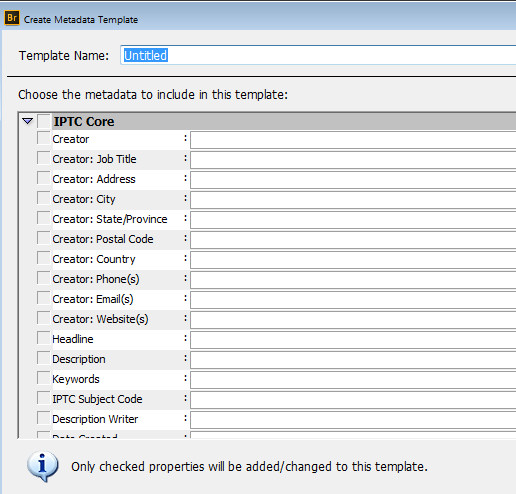
In future you can create such a metadata template in Bridge by selecting Tools > Create Metadata Template. I suggest that you complete the IPTC Core Data for Creator as well as Copyright Notice, Copyright Status and Rights Usage Terms. Also complete the Type Of Source entry in the IPTC Extension group. When completed this will give you a good all round metadata preset to apply to all your images. For more information on IPTC Copyright Metadata check out this article: Lightroom: Add your IPTC metadata on Import.

import-photos-using-bridge-7

When you have your import settings selected and configured to meet your needs click Get Media to import the images.

import-photos-using-bridge-8

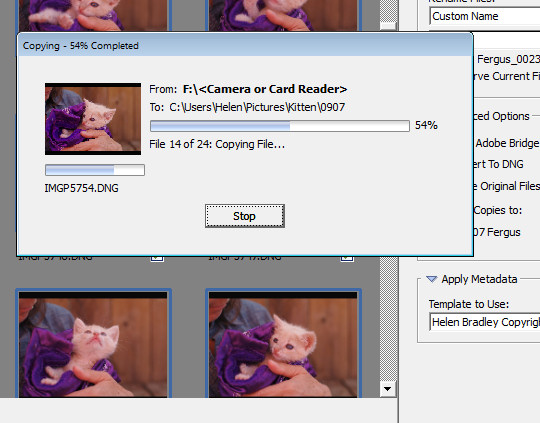
You will see a dialog showing you the progress of the import process.

import-photos-using-bridge-9

Importing Photos using Lightroom

If you’re using Lightroom then it is the obvious choice for managing the process of importing photos from your camera or memory card. From the Library module click Import, then select the source in the top left corner of the Import dialog.

import-photos-using-lightroom-1

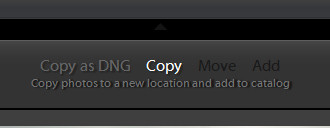
Across the top of the screen you will see only two choices, Copy as DNG and Copy. This reflects the fact that you’re importing images from a camera card or camera – the options Move and Add are not available for this process (if you do see Move and Add as available options, it appears that Lightroom isn’t recognizing your camera or camera card correctly and even though they may be available you should not use either of these choices).

import-photos-using-lightroom-2

Next, open the File Handling panel on the right of the screen and select the kind of preview to create – Standard is a good choice. You can choose Build Smart Previews or not (if you’re unsure, check Build Smart Previews).

Checking Don’t Import Suspected Duplicates will ensure that Lightroom doesn’t import images again, that you’ve already previously imported. This is one feature available in Lightroom which is not also available in Bridge.

In Lightroom you can also choose to make a backup by making a second copy of your photos to an alternate location as you import them.

import-photos-using-lightroom-3

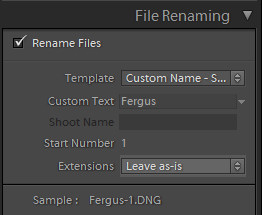
File Renaming panel allows you to rename images on import – you can select from a range of naming templates and even create your own. Here I’ve chosen to use the Custom Name – Sequence template so I’ve typed the Custom name and the sequence is set to start at 1:

import-photos-using-lightroom-4

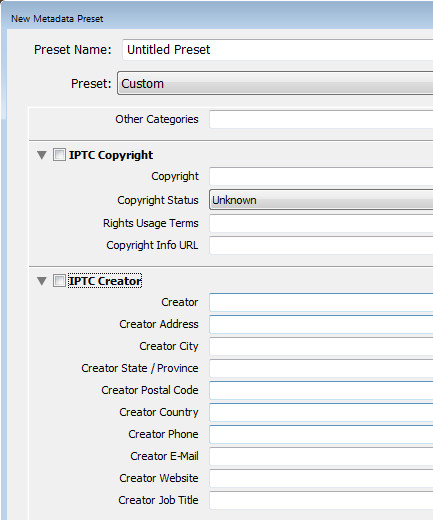
The Apply During Import panel has an option for applying metadata to the image upon import. Unlike Bridge the drop down list for Metadata presets also includes an option New which you can use to create your own metadata preset. I suggest you complete the IPTC Copyright and IPTC Creator details, and in the IPTC Extension Administrative select Original digital capture from a real live scene from the Digital Source Type drop down list. Type a name for the preset and from the Present drop down list click Save current settings as new preset.

import-photos-using-lightroom-5

In the Destination panel you’ll need to select the location into which the images are to be copied. If you’re copying them to your hard drive then typically you’ll select your C drive, then your My Pictures folder which should be in your Users area.

If you save your images to an external drive then select the external drive and the folder into which the images should be imported.

If the folder does not exist you can create a subfolder on import by selecting the Into Subfolder checkbox and type a name for the folder that Lightroom should create to import the images into.

import-photos-using-lightroom-6

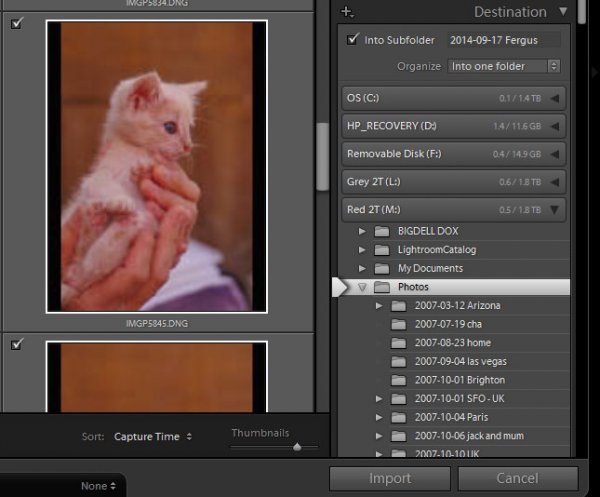
From the Organize drop down list you can select to put the images into this folder (Into one Folder) or to organize them by date. Whichever choice you make you can see a preview of what’s going to happen in the folder list, allowing you to check and make sure that everything is going to be imported and arranged to your requirements before you go ahead and complete the import process.

import-photos-using-lightroom-7

When you’re ready to import the images click Import.

Whatever process you choose to use for getting images off your camera card onto your computer the acid test for whether it is a good system or not will be if you can find your images later on. Also be aware that it’s advisable to make a backup copy of your images in case your computer is stolen, damaged or your hard disk crashes. For this reason a backup on a removable external drive is a sensible choice.

Having an import routine that you understand, and can reliably execute, is a necessary first step for any photographer. The worst possible scenario is to have copied your images from your camera card to your computer and erased them from your card, only to discover that you cannot find the images. It’s a scenario that way too many users have encountered – don’t let it happen to you!

Find a video version of this blog post here:

Do you have any other copy and import tips? Please share in the comments below.

googletag.cmd.push(function() {
tablet_slots.push( googletag.defineSlot( “/1005424/_dPSv4_tab-all-article-bottom_(300×250)”, [300, 250], “pb-ad-78623” ).addService( googletag.pubads() ) ); } );

googletag.cmd.push(function() {
mobile_slots.push( googletag.defineSlot( “/1005424/_dPSv4_mob-all-article-bottom_(300×250)”, [300, 250], “pb-ad-78158” ).addService( googletag.pubads() ) ); } );

The post Successfully Copy Photos from Your Memory Card to your Computer by Helen Bradley appeared first on Digital Photography School.


Digital Photography School

 
Comments Off on Successfully Copy Photos from Your Memory Card to your Computer

Posted in Photography


Griddy Cities: Aerial Cyberpunk Cityscapes Shot from 7,500 Feet

23 Apr

[ By WebUrbanist in Art & Photography & Video. ]

aerial new york city

Flying over New York City, San Francisco and Las Vegas, this photographer has managed to both capture the essence of each city he shoots from the night sky above while also turning these places into surrealistic, faux-futuristic versions of themselves.

aerial new york

aerial vegas tilt shift

Using a full-body harness to hang out of helicopters, adventurous artist Vincent Laforet went to great lengths and high altitudes (in some cases nearly 10,000 feet) to take pictures of each setting (NYC and LV shown above, SF shown with making-of video below).

aerial downtown sf city

Special permission needed to be obtained to use flight paths normally reserved for passing planes. Tilt-shift techniques make the scale more comprehensible and help highlight areas of focus in each shot. What is truly remarkable, though, is how each set both reflects the photographer’s personal style but also very much embodies the character of each distinct location.

Next Page – Click Below to Read More:
Griddy Cities Aerial Cyberpunk Cityscapes Shot From 7500 Feet

Share on Facebook


[ By WebUrbanist in Art & Photography & Video. ]

[ WebUrbanist | Archives | Galleries | Privacy | TOS ]


WebUrbanist

 
Comments Off on Griddy Cities: Aerial Cyberpunk Cityscapes Shot from 7,500 Feet

Posted in Creativity


New from Polaroid: the Zip Instant Printer

20 Apr

With an instant printer in your pocket, you’re ready to rock insta-prints at all times.

Check out the latest from Polaroid … Zip! A printer that prints photos from your phone.

Edit any shot on your phone or use it as-is. Instantly print any photo, anywhere. You can even print multiples to share! Sharing is caring.

Pocket-size is the new fun-size.

Learn More about Zip or Order Yours Here!


© Erin for Photojojo, 2015. |
Permalink |
No comment |
Add to
the Zip Instant Printer”>del.icio.us

Post tags:


Photojojo

 
Comments Off on New from Polaroid: the Zip Instant Printer

Posted in Equipment


Fujifilm XF 16mm F1.4 moves from roadmap to retailers

16 Apr

Another lens from Fujifilm’s roadmap is making its way to retailers, and that’s the XF 16mm F1.4 R WR wide prime. This lens, equivalent to 24mm on APS-C, has a nine-blade aperture, flare-reducing Nano-GI coating, and a minimum focusing distance of 15cm/6 in. It’s also sealed against weather and dust and can function at temperatures as low as -10C/+14F. More details

Articles: Digital Photography Review (dpreview.com)

 
Comments Off on Fujifilm XF 16mm F1.4 moves from roadmap to retailers

Posted in Uncategorized


Save The Memory Project restores over 400,000 photographs from Tsunami-hit areas of Japan

15 Apr

A project to salvage, clean, scan and return photographic prints found in the areas devastated by the August 2011 Great East Japan Earthquake and Tsunami has reunited over 90,000 images with their rightful owners since shortly after the disaster struck. The Save The Memory Project has recovered over 400,000 prints from the rubble of affected areas, having cleaned, scanned and posted digitized versions to an online system for owners to claim. Learn more

Articles: Digital Photography Review (dpreview.com)

 
Comments Off on Save The Memory Project restores over 400,000 photographs from Tsunami-hit areas of Japan

Posted in Uncategorized


CP+ 2015: Nikon Interview – ‘We learned from the D600 episode’

11 Apr

When we attended CP+ earlier this year in Yokohama, Japan we sat down with senior executives from several major camera and lens manufacturers. We were lucky enough to sit down with a number of Nikon engineers to ask them about their overall strategy with respect to FX vs DX, and DSLR vs mirrorless. We were also able to ask pointed technical questions regarding innovative technologies in Nikon cameras, and the answers were very enlightening. Click through to read the interview

Articles: Digital Photography Review (dpreview.com)

 
Comments Off on CP+ 2015: Nikon Interview – ‘We learned from the D600 episode’

Posted in Uncategorized


How to Photograph Babies from a Week Old to Sitting up

24 Mar

There is a huge trend among baby photographers to do all of those awesome shots of babies all curled up and almost “in the womb” looking. I LOVE those shots, but they have very definite parameters, meaning that you have to catch the baby while she is still curly; so 3 to 7, or sometimes, at the very oldest, 12 Continue Reading

The post How to Photograph Babies from a Week Old to Sitting up appeared first on Photodoto.


Photodoto

 
Comments Off on How to Photograph Babies from a Week Old to Sitting up

Posted in Photography


5 Lessons Learned Switching from DSLR to Mirrorless for Travel Photography

23 Mar

Two months ago, after shooting for 10 years with Canon, I completely switched to Sony. It surprised some readers of my blog, as well as some fellow photographers. To address the issue, I published a detailed post on my blog with the reasons behind my switch. To save you time, I will summarize my reasoning, not only in one sentence but in one word: INNOVATION. I could see that, in the last two to three years, the main innovation was happening in the realm of mirrorless systems and I felt that Canon was simply an outside observer.

I considered the switch for a long time. I first waited because mirrorless systems were not up to DSLR standards to which I was accustomed. Then suddenly, about a year ago, all mirrorless manufacturers began releasing new camera models that could compete with any DSLR and, in some cases, even surpassed them.

SwitchingfromCanont Sony Photo 1

Big Sur, California – Sony A6000, Sony 10-18mm lens

That was when I decided to switch. But, it took another six to seven months to choose the right kit (camera and lenses) for my travel photography needs.

My initial choice was the Panasonic Lumix GX-7 which was the perfect camera for me feature-wise but I was not too crazy about the selection of high-end wide angle lenses.

My second choice was the full frame Sony A7 and, I almost pulled the trigger last fall. However, after holding it in my hands, the Sony A7II in combination with the newly released Zeiss 16-35mm lens was almost comparable to the DSLR in weight and size.

That was when my choice was made. Just before the Christmas holidays, I sold all of my Canon gear to prevent cold feet. Then, I ordered the Sony A6000, Sony 10-18mm f/4, and Zeiss 16-70mm f/4 in one shot. I paid $ 2000 in total. Sony lenses are always pricy but I found that the price of the complete kit was very reasonable.

SwitchingfromCanont Sony Photo 2

Sony A6000, Sony 10-18mm lens and Feisol Tournament Tripod

I just returned from my first photography trip of the year; I spent two weeks in Hawaii and Northern California where I exclusively shot with my brand new Sony gear.

Below are my thoughts after putting this new equipment through the real life test of travel photography. Please note, I only addressed the features of the camera which are important to me as travel photographer.

Lesson 1: Size does matter in travel photography

As a DSLR shooter, when preparing for a long and demanding sunrise/sunset hike, I always faced the same dilemma – what equipment to bring? Should I carry everything and look (and feel) like a Sherpa tackling Everest? Or should I hike light and risk missing important gear?

I do not have to compromise anymore as I can now put everything in a small camera bag and bring it with me. The Sony A6000 (344g) and the Sony 10-18mm (220g) weigh 564g (19.9oz) total. I still cannot believe that a high-quality wide angle zoom lens can weigh only 220g. I call it freedom.

Don’t get me wrong, the size and the weight were not the main reasons for my switch. I would never jeopardize quality for the sake of weight reduction but it was important consideration.

SwitchingfromCanont Sony Photo 3

San Francisco, California – Sony A6000 with Sony 10-18mm lens

Lesson 2: Electronic Viewfinder (EVF) – a new way of looking at the scene

Somehow, in many mirrorless reviews, the EVF is presented as a negative factor and is portrayed as somewhat of a disadvantage compared to the DSLR optical viewfinder. I do not agree with that conclusion. For me, the EVF is one of the main advantages of mirrorless cameras. Finally, when I look through the viewfinder I can see what the camera’s sensor sees.

It is a very new and refreshing experience with the EVF, when you can assess the depth of field of the scene before taking the picture.

Here’s a real life scenario. Earlier I was shooting using exposure compensation -2EV and I forgot to reset it to zero. Now, when looking through the EVF, I can see right away that the exposure is wrong because the EVF picture is too dark.

When I shoot wide at 10mm, I can even see barrel distortion which realistically represents the photo I am about to take.

I often use manual focusing when shooting landscapes, which was pretty much an impossible task with the DSLR in bright conditions because of the display screen glare. Now, not only can I easily use the manual focus in any condition, I can also take advantage of Focus Peaking, an amazing feature that highlights areas that are in focus with the bright color. There is no more guess work.

In one of the reviews, I read how awful and pixelated the EVF picture becomes in dark conditions. I can confirm that it looks pretty bad but it is good enough for composing the shot and beats the DSLR where all you can see is pitch black.

For me, the EVF simplifies the process of taking pictures and makes it more predictable.

SwitchingfromCanont Sony Photo 4

California State Route 1 – Sony A6000 with Zeiss 16-70mm lens

Lesson 3: I love the 24 megapixels sensor

During the silly megapixel war between major camera manufacturers, I decided for myself that 16Mpx was the right pixel count for my needs and I had no plans of upgrading only for that reason.

The Sony A6000 comes with 24Mpix, which I initially did not consider as an important upgrade. What I realized later, after starting to process photos, is that the 24Mpx sensor produces unbelievably clean and sharp images and, in combination with native quality lenses, it resolves an insane amount of detail. Photos look acceptable even at 100% magnification.

Although, I have to admit the higher pixel count is more taxing on my computer and I might need to upgrade it soon.

High ISO photography is not something that I do often when I travel and it was hard for me to assess low light performance of the sensor. But, what I can see based on family photos from the holidays is that ISO 3200 is still acceptable and excessive noise is easy to eliminate in Lightroom.

SwitchingfromCanont Sony Photo 5

Lanikai Beach O’ahu, Hawaii – Sony A6000 with Sony 10-18mm lens

Lesson 4: 11fps is a game changer

Sports photography is somewhat of a hobby for me. The only times when I shoot sports are when professional cycling peloton comes to Montreal every September and when my daughter is playing water polo. In order to test 11fps in combination with the fastest focusing system in the industry, I went to the beach in Hawaii to photograph surfers.

I switched from RAW to JPEG, set the camera to a continuous shooting mode and enabled Object Tracking. I was amazed not only with the new experience of shooting but with the results as well. Shooting at 11fps reminded me of filming the video and then going frame by frame in the editing software, selecting the best frames. There are no missing moments. The focus was spot on, in pretty much every frame.

I can see how the Sony A6000 can be a game changer for sports and wildlife photographers.

SwitchingfromCanont Sony Photo 6

Makapu’u Point O’ahu, Hawaii – Sony A6000 with Sony 10-18mm lens

Lesson 5: Not everything is perfect in paradise

Even though my initial experience of using the Sony A6000 is very positive, there are some shortcomings and annoyances I want to address.

Battery life:

According to Sony, you can take up to 360 shots on a single battery charge and I found this number to be pretty accurate. I even managed to take close to 390 shots when shooting in bracketing mode. It is not bad at all considering the small battery size and the EVF high power consumption. However, when you are accustomed to shooting 1500 shots on a single charge with the DSLR, the difference is very obvious. Now, I carry three spare batteries with me at all times and I have to remember to keep them charged.

Bracketing:

For some inexplicable reason you can shoot five bracketed shots at 0.7EV intervals only, which makes it completely useless. In extreme lighting conditions I have to shoot two sets of bracketed shots (-2, 0, +2), offsetting them manually using exposure compensation (-1 EV). This is very annoying.

No GPS tagging:

Even though the camera has decent wireless connectivity, the GPS tagging utilizing a mobile phone is missing.

Buffer writing lock:

When a camera transfers photos from the buffer to a memory card, the system is completely locked. You cannot even preview images during the transfer.

2-Second delay shortcoming:

You cannot trigger bracketed shots using the 2-second delay functionality. I had to buy, and carry around, an unnecessary extra piece of equipment: Wireless Shutter Release ($ 10).

SwitchingfromCanont Sony Photo 7

Sandy Beach, Hawaii – Sony A6000 with Sony 10-18mm lens

Conclusion

The switch from a Canon DSLR to the mirrorless Sony A6000 was less stressful and less painful than I expected. I believe that one of the main factors that made it possible was my purchase of native Sony lenses so I did not have to deal with the glass from other systems with the converters.

I am waiting for the widely rumored Sony A7000 which is supposed to be the successor of the Sony NEX-7. I hope Sony addressed the shortcomings of the A6000 and introduces new pro features like: weather sealing, built-in body stabilization, GPS tagging and advanced bracketing. I am definitely planning to get the new A7000 and keep the A6000 as a backup body.

googletag.cmd.push(function() {
tablet_slots.push( googletag.defineSlot( “/1005424/_dPSv4_tab-all-article-bottom_(300×250)”, [300, 250], “pb-ad-78623” ).addService( googletag.pubads() ) ); } );

googletag.cmd.push(function() {
mobile_slots.push( googletag.defineSlot( “/1005424/_dPSv4_mob-all-article-bottom_(300×250)”, [300, 250], “pb-ad-78158” ).addService( googletag.pubads() ) ); } );

The post 5 Lessons Learned Switching from DSLR to Mirrorless for Travel Photography by Viktor Elizarov appeared first on Digital Photography School.


Digital Photography School

 
Comments Off on 5 Lessons Learned Switching from DSLR to Mirrorless for Travel Photography

Posted in Photography


Danny MacAskill leaps from Skye to eclipse other action shots

21 Mar

The weather spoiled today’s solar eclipse for many would-be watchers in the UK but it was visible in some parts of the country. Dutch photographer Rutger Pauw teamed up with trials biking genius Danny MacAskill to get a rather different shot. Using a long telephoto lens and shooting from over 300m away, Pauw had to communicate with MacAskill by radio to time the shot precisely, a process complicated by only having enough battery power to fire their super-powerful strobe once. Read more

Articles: Digital Photography Review (dpreview.com)

 
Comments Off on Danny MacAskill leaps from Skye to eclipse other action shots

Posted in Uncategorized


First images from upcoming Samsung S 300mm f/2.8 ED OIS

17 Mar

It hasn’t even entered production yet, but Samsung’s S 300mm f/2.8 ED OIS telephoto lens is certainly shaping up to be a very nice addition to the NX line. We were fortunate enough to be allowed access to a pre-production engineering sample of this new lens for a few hours. As a result we’ve put together a small gallery of images which should give some idea about the lens’s likely performance once it becomes available. See gallery

Articles: Digital Photography Review (dpreview.com)

 
Comments Off on First images from upcoming Samsung S 300mm f/2.8 ED OIS

Posted in Uncategorized