RSS
 

Posts Tagged ‘from’

Turn On: Backwards Glances From Famous Monuments

24 Jul

[ By Steve in Drawing & Digital. ]

Photographer Captures The World's Greatest Monuments - The Wrong Way Round

Photographer Oliver Curtis turns his back on some of the world’s most famous monuments, capturing a wholly unexpected side to these familiar cultural icons.

Photographer Captures The World's Greatest Monuments - The Wrong Way Round

If life is a journey and not a destination (to quote Ralph Waldo Emerson), then the ideal photographer to document the trip would be Oliver Curtis. In his Royal Geographical Society exhibition aptly titled “Volte-face”, Curtis visits the world’s most famous monuments and evocative locations… and then turns 180-degrees, snapping the polar opposite of what visitors have come from across the globe to see! The results are often enlightening in their own right, as the above views from the Chairman Mao Memorial Hall in Beijing, China’s Tiananmen Square and the Great Wall of China at Mutianyu illustrate.

American Dreaming

Photographer Captures The World's Greatest Monuments - The Wrong Way Round

Curtis’ odd odyssey unfolded over a period of four years and involved a staggering amount of travel – one would hope he’d enrolled in a frequent flyer program beforehand. From start to finish, however, Curtis never lost sight of his mission “to send our gaze elsewhere and to favor the incidental over the monumental.” The photo above, taken at the White House on a perfect summer’s day, epitomizes his curious yet enlightening vision quest.

Let My People Golf

volte-face_pyramids-giza-egypt

Curtis was inspired to record “counter-views” of the world’s most-photographed places in 2012, while visiting the Pyramids of Giza. Finding an ideal spot to capture the Great Pyramid of Khufu – the largest of the three main pyramids – Curtis glanced back in the direction from which he had came… and one might say he never looked back, er, sort of. “Immediately in front of me and under my feet,” explains Curtis, “the sand of the desert was adorned with an assortment of human detritus; litter, pieces of rusted metal, a large rubber washer and a torn hessian sack. Then, in the mid-distance I saw a newly constructed golf course, its fairways an intense green under the late morning sun.”

Acropolis Now

volte-face_parthenon-athens-greece

“I found this visual sandwich of contrasting colour, texture and form intriguing not simply for the photograph it made but also because of the oddness of my position;” adds Curtis, “standing at one of the great wonders of the world facing the ‘wrong’ way.” Though the locations may differ (that’s the Parthenon in Athens, Greece, above), Curtis’ photographic subjects evoke certain similarities due to they’re being cheek-by-jowl to greatness. Take the white stone bench in the image above: if you didn’t know it shared real estate with one of the world’s most iconic structures, it would seem perfectly at home in most any suburban garden.

Kodak Moment

Photographer Captures The World's Greatest Monuments - The Wrong Way Round

In a world too-often suffused with the profane, these photographs provide a refreshing atmosphere of the mundane by being the antitheses of the associated famous construction. This works on a number of levels: no doubt Lenin would spin in his tomb if he knew a Kodak kiosk was conducting capitalism just outside!

The Rio Thing

Photographer Captures The World's Greatest Monuments - The Wrong Way Round

Far from being overshadowed or perhaps because of it, these images display a subtle narrative all their own. Indeed, these reverse-views spotlight actual locales where workers and random folks display a palpable lack of awe; the consequence of daily exposure (or over-exposure, more likely) to what the rest of the world has put on a pedestal. Speaking of which, the trio above appear oblivious to Rio de Janeiro’s enormous Christ the Redeemer statue looming over them.

Next Page – Click Below to Read More:
Turn On Backwards Glances From Famous Monuments

Share on Facebook


[ By Steve in Drawing & Digital. ]

[ WebUrbanist | Archives | Galleries | Privacy | TOS ]


WebUrbanist

 
Comments Off on Turn On: Backwards Glances From Famous Monuments

Posted in Creativity


Artist Socks Series: Wear Pairs of Figures from Famous Paintings

24 Jul

[ By WebUrbanist in Design & Products & Packaging. ]

artist socks abstract

Simple stripes, colors and patterns are all that is visible when you are wearing shoes, but kick them off and you can show off famous figures from classic paintings. They may not be fit for formal wear situations, but are certainly fun for everyday occasions (and a great idea for sock puppet shows).

vincent van socks

artist sock box

These series of silly socks from ChattyFeet is equally informal about their titling of the various pairs. Famous artists are given name twists, resulting in Andy Sock-Hole and David Sock-Knee. Other pairs include Frida Callus and Feetasso (from Frida Kahlo and Pablo Picasso).

andy sock hole

david sock knee

From the designers: “The master of modern art David Sock-Knee is on hand (or foot) when you want to impress with your knowledge of home-grown British artists. They are just the thing to wear to that exhibition opening event and don’t forget to snap a ‘sockie’ photo when you visit famous galleries. Follow in this famous face’s footsteps by recreating your favourite holiday scenes in acrylic – just don’t splash any on your socks!”

art fun socks

artist feetaso

ChattyFeet is a quirky brand that offers “silly sock personalities” for adults and children alike. The studio’s line of cheeky characters colorfully drawn onto comfortable cotton socks.

Share on Facebook


[ By WebUrbanist in Design & Products & Packaging. ]

[ WebUrbanist | Archives | Galleries | Privacy | TOS ]


WebUrbanist

 
Comments Off on Artist Socks Series: Wear Pairs of Figures from Famous Paintings

Posted in Creativity


Tips for Processing Landscape Photos – from Basic Edits to Artistic Interpretation

20 Jul

All professional, and many hobbyist photographers, post-process their photos. There are various reasons why you want to edit your photos, besides the fact RAW files need some level of processing, including:

  • To fix minor errors made when you took the image.
  • To make the image look more like you envisioned when you took it.
  • To add your artistic touch to the image.
  • Because image editing is fun, and is an important part of photography.

Sunrise 0

Landscape photography is often about being in the right spot at the right time. This is not always possible, so a little post-processing might help. “Why make it when you can fake it” seems to have become more and more common.

One question often raised, is how much editing you can do before you have over-processed your photo. Too much and your photo no longer represents the reality of the landscape.

It’s subjective how much editing is acceptable. Some argue the editing has gone way too far and is destroying photography. Others put their heart and soul into image editing. They try to get the most out of every detail in the photo, and to make their personal interpretation.

Landscape photographers are not photojournalists documenting reality. As such there should be plenty of room for an artistic interpretation of landscape photos. In the rest of this article, I’m going to discuss different levels of editing, using one of my own landscape photos as an example.

1. The leave as is approach – no editing

The easiest method is to save your files as JPG and do no editing at all. If you don’t want to buy an image editing software, or you simply don’t care to spend time on post-processing, that’s fine. It’s your decision. You can still enjoy the time you spend out in nature taking photos.

Obviously, with this approach, nobody can accuse your photos of not being real. But unless you learn some basic editing skills and post-process your images, you’re likely not to be regarded as a serious photographer.

Hardly any of the images with most likes on social media and photo sharing sites are unedited. In digital photography capturing the photo is just half the work, the rest is about post-processing techniques.

Sunrise 1

2. Basic editing

In my image (above), I realized I was sloppy with the composition when I took it. I had to fix this. Often one adjustment leads to another. Let’s go through the different steps I applied to this image.

The image above is the untouched RAW file straight out of the camera. Some photographers are happy with this result, and leave it there. After a closer look, I found there were several other things with the image I could improve. Because it’s a RAW file, I knew there was a lot of image data to work with.

Basic editing is supposed to enhance what’s already in the photo, not fix what is wrong. Ideally, you should get the shot as technically correct as possible in the camera. One nice thing about digital photography is how easy it is to make small adjustments after the shot. If you fail on the exposure or the horizon is not perfectly straight, no problem, you can fix it

Levelling a tilted horizon and verticals, cropping, and dust spot removal

capture-2b
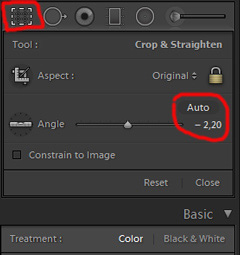
While you edit, you can make simple adjustments to your composition, like levelling the horizon and cropping. By cropping, you can tighten the composition, and to some extent “move” elements, so they align according to the rule of thirds or golden mean.

In the photo below I have levelled the trees, as they were leaning slightly to the right. I did not notice that when I took the photo. Most photographers will not question if levelling the horizon, cropping, and removing dust spots are acceptable image editing. It’s part of the workflow.

Sunrise 2

Adjusting the White Balance (WB)

I took this image an early morning, at sunrise. The reflections from the clear blue sky gave the scene an overall blue color cast. At the computer, I remembered the scene as being warmer. Warmer is perceived as more pleasing. I could be wrong, because who remembers exactly what colors a scene had at the time they took the image?

Photographers often claim they edit their photos to represent how they saw the scene. It is probably more correct to say they edit their photos the way they wish they saw the scene.

capture-3b
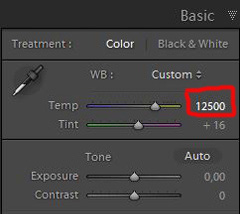
So I decided I wanted my image to have a warmer color tone. I adjusted the White Balance by adding more yellow.

I could have achieved something similar by setting the camera White Balance to the Cloudy preset, at the time I took the image. Changing the White Balance after the shot is another advantage when you shoot your files as RAW. Either way, the result is altered, and to some extent, the reality is changed.

Although the significant impact changing the White Balance can have on an image, it is usually accepted as part of the post-processing workflow.

Sunrise 3

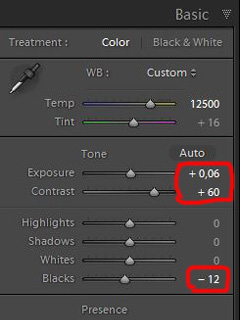
Increasing Exposure and Contrast

Because no adjustments are made to the RAW files in camera, the images look unfinished when you open them up on your computer. The preview on the LCD is an embedded JPG version of the photo, which often looks much better.

capture-4bEven with modern digital cameras you don’t always hit spot on with the exposure. If you don’t get it right in-camera, with RAW files you can easily correct the exposure one two stops when post-processing.

My image is no exception, it looks flat, and needs a few more adjustments. So I increased the contrast slightly. When you increase contrast, the image tends to get a little darker. To compensate for this, I had to increase the exposure a tiny bit. You can see the result so far below.

Sunrise 4

Decreasing Highlights and increasing Shadows

capture-5b
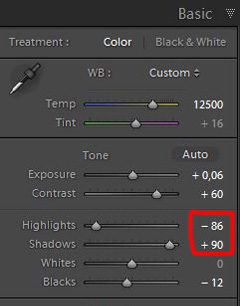
One more thing that bothered me was the black chunk of trees to the far right. The trees have now become too dark with no details in the shadows. I fixed this by increasing the shadows slightly. I also lowered the highlights a little to bring out more of the texture in the ice. In the version below the trees to the right are no longer completely black.

With these last adjustments, the image starts to look pretty decent. So far so good. All of the edits I have done until now are within what most photographers will find acceptable.

Sunrise 5

3. Beyond basic editing

Oversaturated colors

Photos with saturated and vibrant colors are eye catching. If you want attention when you post your images on social media sites, it’s a good idea to boost the colors first.capture-6

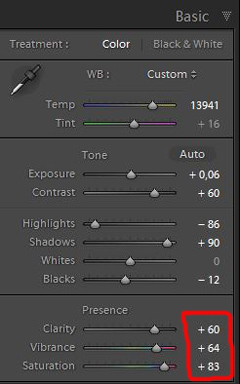
At this stage, it was attempting to make the sunrise more beautiful. To me, it was already an awesome winter morning sunrise. But I felt I could make it even better – with some over-processing.

I did this simply by increasing vibrance and saturation significantly. The image now has an entirely different feel. To me, it looks fake. But I bet this version would have received more attention on my social media sites if I posted both versions there. I have seen this happen with some of my other images before.

With this level of editing, the discussions start as to whether or not the image represents a realistic landscape. It can be your artistic interpretation of the scene, but to me it’s not authentic anymore.

Sunrise 6

4. Photo editing artistically

Adding texture for a complete different look

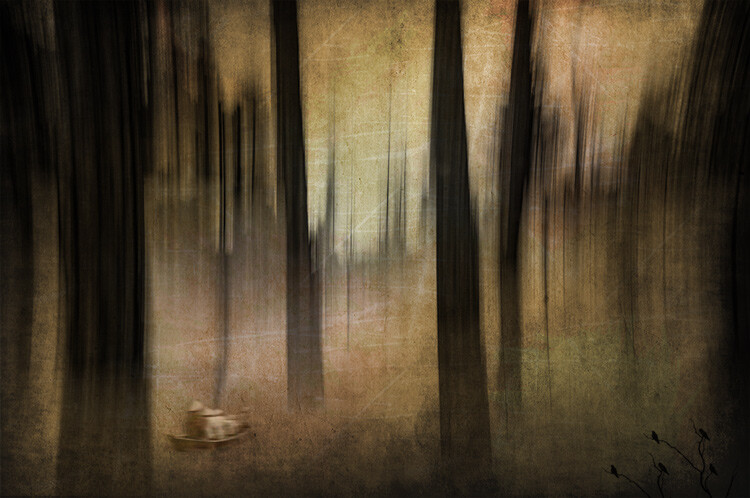
In the next image I have used my artistic freedom as a photographer and artist. I blended in a couple of texture layers and photo filters with the original image. By using textures properly, you can create some interesting effects on your images.

If this is a realistic landscape photo or not, is no longer a relevant question. It’s not, nor is it supposed to be. But you can discuss whether or not you like this style. While all the previous edits were made in Lightroom, the last two versions were made in Photoshop, as Lightroom doesn’t have the layers function which is needed.

Sunrise 7

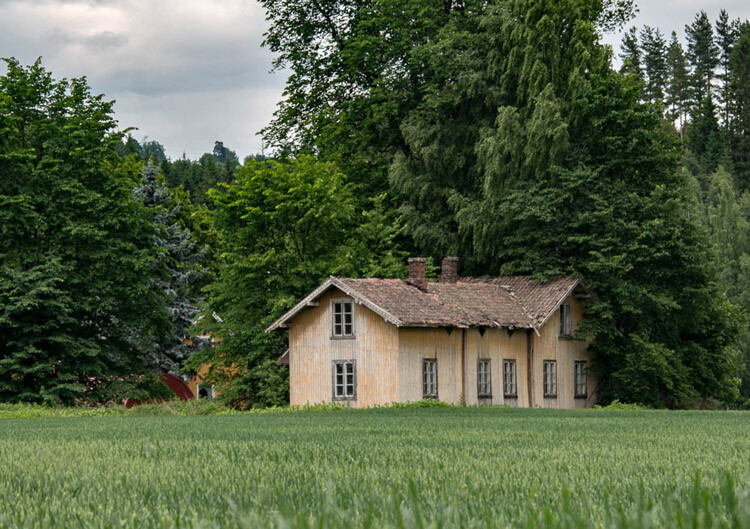
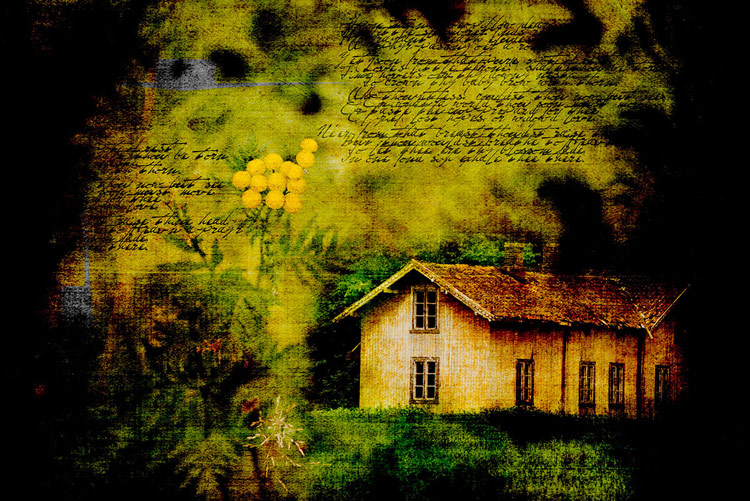
Composite of several images makes this surreal piece

The last version of my image is a composite. Only a few elements are left from the original, but you can tell it’s still there. The result is so extreme that nobody can blame you for faking a realistic landscape image. Everybody know this is a creative piece of art. Again it’s very subjective whether like the style or not. Compositing is a whole new level of photo editing, it’s not for everyone.

When you create composites, you need many of the same skills as when you photograph. For a balanced composite, you must know about composition techniques and how to deal with light and shadows, as well as colors.

Sunrise 8

Conclusion

With digital photography it’s possible to create the image you want. Your imagination and skills are your only limitations. The general trend is bold and vivid colors get a lot of attention, at least among some photographers. Whether you want to follow this trend or not, is your decision. The fact is that more of the images you see online look similar, due to the same post-processing techniques. It’s getting harder to be recognized online unless you make something different.

As a landscape photographers you have a few challenge to tackle because the elements of nature are limiting. Light and weather conditions might not be as you wish when you’re at your dream scene. Maybe you never come back to the same spot again. In such a situation it’s tempting to fix the light (slightly) in post-production. In other words, to fake reality like I did with the oversaturated image.

ICM_forest_original_edit

Original edit

ICM_forest_creative_edit

Creative edit

Photography is art, so it’s not wrong if you choose to do so, but be open with what you have done. Don’t pretend you experienced the sunrise of your life if you didn’t. In the end, it’s up to you what you’re comfortable with. Nobody can take away your creative vision.

You can do more advanced editing in Lightroom than I have shown in this tutorial. In Photoshop however the possibilities are endless. You can manipulate, remove, and add content to your images. With such drastic steps, you’re not only altering the reality, but you’re cheating. That’s if you claim your photo is real.

Now it’s your turn. What’s your opinion about how much you can edit landscape photos? Please share your thoughts in the comments below.

Original edit

Original edit

Creative edit

Creative edit

This week we are doing a series of articles to help you do better nature photography. See previous articles here:

  • 3 Habits Every Outdoor Photographer Should Develop to Avoid Missing Shots
  • 5 Tips for Better Nature Photography
  • 27 Serene Images of the Natural World
  • Weekly Photography Challenge – Nature
  • 10 Ideas for Photographing Nature in your Backyard
  • 6 Tips for Capturing Character and Personality in Wildlife Photography
  • 5 Tips for Setting the Focus in Your Landscape Photography
  • 7 Tips for Better Marine Wildlife Photography

googletag.cmd.push(function() {
tablet_slots.push( googletag.defineSlot( “/1005424/_dPSv4_tab-all-article-bottom_(300×250)”, [300, 250], “pb-ad-78623” ).addService( googletag.pubads() ) ); } );

googletag.cmd.push(function() {
mobile_slots.push( googletag.defineSlot( “/1005424/_dPSv4_mob-all-article-bottom_(300×250)”, [300, 250], “pb-ad-78158” ).addService( googletag.pubads() ) ); } );

The post Tips for Processing Landscape Photos – from Basic Edits to Artistic Interpretation by Kim Rormark appeared first on Digital Photography School.


Digital Photography School

 
Comments Off on Tips for Processing Landscape Photos – from Basic Edits to Artistic Interpretation

Posted in Photography


15 Photographs from Ed Ruscha and the Great American West

16 Jul

I had a wonderful opportunity to attend the press preview on Thursday for the new exhibition “Ed Ruscha and the Great American West,” which opens today and runs through October 9th at the de Young Museum in San Francisco.

Ed Ruscha has long been a hero of mine. With my own photography focusing on the American Road and my background growing up in Los Angeles, so much of Ruscha’s work has always rung true to me personally and I’ve felt a certain sort of affinity with it. Gas stations, neon signs, old swimming pools, and the images of a uniquely American experience, fill the current Ruscha exhibition. Mixed in with these beautiful, nostalgic and iconic images are the words that further explain this modern life: “Honey . . . . I Twisted Through More Damned Traffic to Get Here,” “God Knows Where,” “Slobberin Drunk at the Palomino” I remember back in high school or was it college once watching X, or maybe the Blasters or the Knitters perform back at North Hollywood’s Palomino, my memory is hazy and alcohol likely was involved.

“In 1956, at the age of 18, Ed Ruscha left his home in Oklahoma and drove a 1950 Ford sedan to Los Angeles, where he hoped to attend art school. His trip roughly followed the fabled Route 66 through the Southwest, which featured many of the sights—auto repair shops, billboards, and long stretches of roadway punctuated by telephone poles—that would provide him with artistic subjects for decades to come.” This may be all the inducement you need to read to get you to this show.

Here are 15 photographs that I took on Thursday at the new exhibit representing my own interpretation.

Standard

Every Building on the Sunset Strip

A Particular Kind of Heaven

Slobberin Drunk at the Palomino

Honey . . . . I Twisted Through More Damn Traffic to Get Here

Hollywood

Poolside, Series of Nine Photographs

God Knows Where

Burning Gas Station

Hollywood, 19698

La Brea, Sunset, Orange, De Longpre

Texas

Ed Ruscha

15 Photos from Ed Ruscha and the Great American West-9

Ed Ruscha and the Great American West Exhibition Store

Complete 15 photo set here, but everything usually looks better on Ello. ?

More Ruscha here.

More de Young Museum here.


Thomas Hawk Digital Connection

 
Comments Off on 15 Photographs from Ed Ruscha and the Great American West

Posted in Photography


4 Ways to Get Inspiration from the Streets to do Better Wedding Photography

14 Jul

Be inspired by decisive moments on the streets to create better wedding photography.

If you are reading this article you must have some interest in street photography, or maybe you are starting as a professional wedding photographer, but most likely you are interested in both fields. This will give you some ideas on how to draw inspiration from street photography that you can use in your wedding work.

A street photographer can be anyone going out to wander the streets of a city with their camera, in order to make photographs that tell the human story of daily life as it occurs on the streets. A wedding photographer on the other hand, is one that is hired to capture memories, tell the love story, and the unfolding special day in a family’s life. The wedding photographer is a professional with enormous responsibility to find, and deliver the right frames, that will recreate trusted memories, decades after the big day is over.

A clear personal artistic voice is what separates one photographer from another. That voice is who you are, but that voice of yours needs constant care and development, in order for it to be a dominant factor in your photographic style as a professional photographer. Competition, changing trends, and the release of new gear also have their own voices that can influence your photography. Maintaining a balance between your inner world and the outer influences is key to success as a street-wedding photographer.

The following tips came from the world of street photography and are perfectly suited for the wedding photographer. If you master them on the street, you can go to a wedding with confidence, and sing your own song with your camera.

1 – Planning versus reacting

Wedding photography tips
What it takes to make great decisive moment photographs is, that first of all you need to see them before they occur. The longer before the better, it will give you the time to plan your composition, and work towards a frame that will be exciting and tell a story. In order to see things before the happen it takes looking around your subject, and constantly look at the surroundings of the bride, rather than focusing your attention only on her. This way you will be able to notice other elements and people that make your frame more interesting and communicative. Even as short as two or three seconds can be long enough for a street photographer to plan a good frame.

If you look around and plan your next shot you have a greater chance of catching the decisive moment, rather the one that follows.

2 – Create emotion

wedding photography tips motion
Freezing and blurring the movement of objects and people are two ways to communicate emotion in a photograph. It is a property that is unique to still photography, and is a big part of the photographic language. But often many photographers think that a wedding photograph has to be sharp and in focus, and the end result is often a precise documentation of reality, rather a poetic description of the moment. Give yourself the time it takes on the street to fully understand how the blurring and freezing of motion is being read and perceived by the viewers.

Master motion techniques then bring them into the weddings you photograph.

3 – Understand the way light can work for you

wedding photography tips light
Explore the way light falls on things, and the way it looks in your street photographs. When your are under the stress and responsibility of a wedding day the thinking side of your brain often takes over, and shuts down the creative side. You may see the wedding as a checklist of photographs to be taken, images of subjects, rather than decisive moments to tell a story.

One way to keep the creative brain in charge of things is to remind yourself constantly to work with the light, see light, change it if necessary, and let go of the subjects. If you are photographing the bride getting ready, she is the subject whether you think about it or not, now it’s time to think about light.

4 – Responsibility and integrity

wedding photography tips

Whether you work for yourself as a street photographer, or as a professional wedding shooter, you should be able to sleep well at night. You should never publish street photographs that might hurt someone’s feelings or cause them damage. However, that being said, you should also remember that the act of photographing people on the streets doesn’t harm them in any way, and have no fear to do your art.

There is another side to the coin of responsibility, that is integrity. when you are hired to photograph a wedding be sure to have shown only photographs that were made by you, that are a good representation of your style and voice. Be sure to let your clients know that they are going to get artistic street-wedding photographs if that is what you want to give them!

googletag.cmd.push(function() {
tablet_slots.push( googletag.defineSlot( “/1005424/_dPSv4_tab-all-article-bottom_(300×250)”, [300, 250], “pb-ad-78623” ).addService( googletag.pubads() ) ); } );

googletag.cmd.push(function() {
mobile_slots.push( googletag.defineSlot( “/1005424/_dPSv4_mob-all-article-bottom_(300×250)”, [300, 250], “pb-ad-78158” ).addService( googletag.pubads() ) ); } );

The post 4 Ways to Get Inspiration from the Streets to do Better Wedding Photography by Ouria Tadmor appeared first on Digital Photography School.


Digital Photography School

 
Comments Off on 4 Ways to Get Inspiration from the Streets to do Better Wedding Photography

Posted in Photography


Wireless tethering on a budget: control your camera from your phone or tablet for $40

13 Jul

Wireless tethering is nothing new, but it’s not exactly a cheap proposition. Well, that’s changed, as Seattle-based photographer Alan Lawrence shows on his blog. For around $ 40, you can wirelessly control and transfer images from your camera to your phone or tablet.

In short, this DIY wireless tethering requires a TP-Link MR3040 Battery Powered 3G Wireless Router, some software, a USB cable, and some time. Lawrence says the router is similar-looking to the CamRanger, a device that offers tethering functionality out-of-the-box, but the router retails for under $ 30 compared to the CamRanger’s $ 299 MSRP.

Once you’ve got your hands on the router (and he does say you need a specific version, which is the one linked above), you’ll need a $ 9 app called DSLR Dashboard for Android, or QDSLR Dashboard for iOS. The last thing you’ll need is a compatible USB cable, and you’re almost in business.

The DSLR Dashboard website has a link to download new firmware for the router, and once you’ve updated that, all you have to do is connect to the wireless network you’ve set up and launch the app. You can control your camera from your device and download files instantly after you’ve taken them.

You can read all the nitty gritty details over on Alan Lawrence’s blog.

Articles: Digital Photography Review (dpreview.com)

 
Comments Off on Wireless tethering on a budget: control your camera from your phone or tablet for $40

Posted in Uncategorized


Photographer captures kayakers with help from drone-mounted Speedlites

12 Jul

Australian adventure photographer and Canon Master Krystle Wright is the subject of a new video from Canon in which she details photographing kayakers with the EOS-1D X Mark II. Wright captures the kayakers dropping down a 60ft waterfall in near darkness with help from a drone rigged with two 600-EX Speedlites.

‘With the way the world is these days, there’s so many images being produced,’ she explains, ‘you really have to push hard to create something that is unique.’ We’d say the unique approach definitely paid off with some memorable shots.

Articles: Digital Photography Review (dpreview.com)

 
Comments Off on Photographer captures kayakers with help from drone-mounted Speedlites

Posted in Uncategorized


8K Helium Super 35mm sensor on the way from RED

12 Jul

Movie camera manufacturer RED has announced that it will be introducing a new 8K sensor that it is calling Helium. At 29.9×15.77mm the new sensor is much smaller than the current 8K Dragon sensor, which measures 40.96×21.6mm, but both sensors have 8192×4320 pixels.

The attraction of the new Helium sensor is that a wider range of lenses will provide sufficient coverage for its shorter diagonal, even though it is slightly larger than the standard Super 35mm format. It should also be easier to make and may take some of the pressure off the company’s difficult delivery of the larger Dragon 8K VistaVision sized sensor. The Helium is designed to operate in the same Weapon camera, but the company’s CEO Jarred Land also let on that a new camera, the Epic-W, will also come with the new sensor.

The announcement was made in a casual way in Land’s July Update on the Red User forum and via pictures posted on Land’s Instagram and Facebook pages, as well as those of the company designer’s Matthew Tremblay. Little technical detail has been released so far, but it is known that the pixels will be just 3.65 microns and that the sensor will be available in ‘coming months’.

For more information see the RED website and REDuser forum.

Articles: Digital Photography Review (dpreview.com)

 
Comments Off on 8K Helium Super 35mm sensor on the way from RED

Posted in Uncategorized


Tokina AT-X 11-16 Pro DX II Review: Best Value from Wide Angle

29 Jun

Tokina 11-16mm f2.8 is an ultra wide angle lens for crop sensor camera bodies (DX) with a moderately fast constant aperture of f2.8. It is Tokina’s top of the line lens (AT-X) with an internal focusing (IF) and Super-low Dispersion glass (SD). It is available in Canon, Nikon and Sony A mounts. Due to its focal length and fast aperture, Continue Reading

The post Tokina AT-X 11-16 Pro DX II Review: Best Value from Wide Angle appeared first on Photodoto.


Photodoto

 
Comments Off on Tokina AT-X 11-16 Pro DX II Review: Best Value from Wide Angle

Posted in Photography


Photographer finds 1200 rolls of unprocessed film from 1950s

29 Jun
One of the 66 bundles of undeveloped film, which total an estimated 1,200 rolls, all shot by a single photographer in the 1950s. Far too much for Levi Bettwieser to develop himself.  

Levi Bettwieser is the founder and film technician for The Rescued Film Project – an archive of images from ‘lost and forgotten’ rolls of film, sourced from all over the word. Last year, Bettwieser acquired 66 packages of undeveloped film from the 1950s, totaling an estimated 1,200 rolls.

Each package is made up of several rolls of undeveloped film, meticulously wrapped in aluminum foil, newspaper and athletic tape and as Bettwieser explains, ‘this is way more film than I can process myself.’ The single roll that he has developed shows some degradation but has yielded usable images. 

Blue Moon Camera in Portland has agreed to take on the task of developing the rest of the unprocessed film, but even with a discount, processing so many rolls is going to cost a lot of money. Bettwieser has launched a funding campaign on Indiegogo.com, and at time of writing, his team has raised roughly a third of the total funding goal of $ 15,000.

If you’re interested in this project, you might enjoy reading a series of articles that we published in 2014. 

Articles: Digital Photography Review (dpreview.com)

 
Comments Off on Photographer finds 1200 rolls of unprocessed film from 1950s

Posted in Uncategorized