RSS
 

Posts Tagged ‘Food’

Household Items to Bring to Your Next Food Photography Shoot

03 Jan

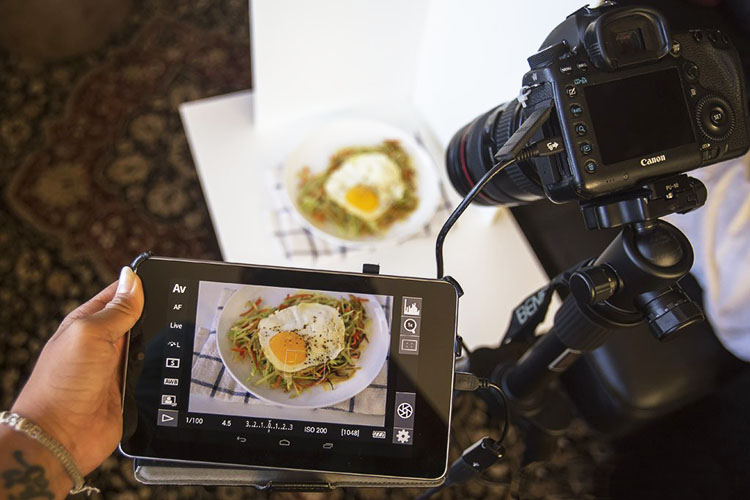
One of the most common assumptions about food photography is that hardcore food styling techniques must be involved to make dishes more visually appealing. In fact, there are professional food stylists who will employ all sorts of techniques to transform a dish into an inedible, yet highly photo-worthy subject. However, food styling techniques can also be very simple and accessible. Below is a list of common household items that can also help you out on your next food photography shoot.

Tweezers Food Styling Tips for Photography

For Keeping Food Clean

Tweezers

It’s pretty much inevitable that a plate of food will have quite a few moving parts that can easily fall out of place. While the Spot Healing Brush in Photoshop can make crumbs or blemishes disappear in post-production, it’s best to remove those bits and pieces from the dish before your shot is taken. This is where a pair of tweezers comes in. Use them to rearrange food on a plate or reach down into a deep glass or bowl to make adjustments.

Tweezers Food Styling Tips for Photography

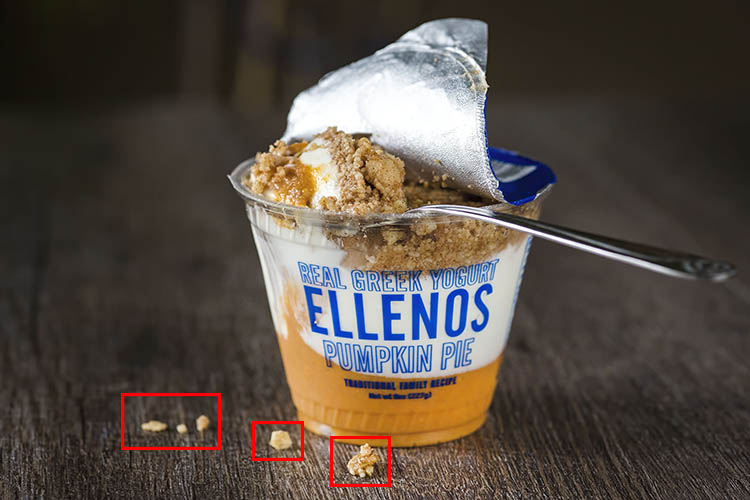
These crumbs could have been easily removed with tweezers, or removed in post production.

Cotton balls

Besides being used to soak up pools of excessive liquid that might gather on a dish, cotton balls are also great for propping up food. Stuff one or two behind a piece of food to give it some leverage and height. Since they’re small and absorbent, the cotton balls can easily hide and blend into a dish so it’s not obvious they’re being used.

Q-tips

Serving a similar purpose to tweezers and cotton balls, Q-tips (cotton swabs) are important for small touch ups. Use them dry or dipped into some rubbing alcohol to remove small blemishes from a dish and you’ll save yourself some valuable time in post-production. Which leads me to my next point…

Rubbing alcohol

Throughout a food photography shoot, your props and gear are bound to come into contact with some morsels of food. Bring a small bottle of rubbing alcohol to keep your gear clean, and even consider keeping some hand sanitizer nearby to clean your hands after rearranging plates of food.

Highly absorbent paper towels

If it’s not already obvious, all of the food styling tools listed thus far have to do with cleaning and touching up dishes before they’re photographed. This tool is the last of the cleaning sort and is useful not only for wiping dirty hands after styling, but also for absorbing liquid from juicy meats, iced drinks, or other plates of food that are a touch too wet.

For Keeping Food Fresh

Food Styling Tips for Photography

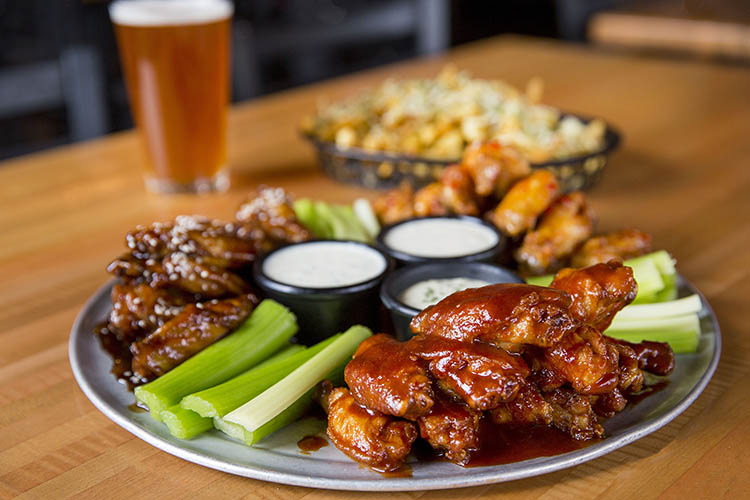
Using a spray bottle filled with water was essential for keeping the shine on these saucy chicken wings.

One of the biggest challenges for food photographers is to shoot dishes while they still look appetizing and edible. These tools will help restore shine and luster to dishes to imply freshness.

Nonstick cooking spray

Restore a bit of shininess to a dish and help it reflect light better by adding a bit of nonstick cooking spray. Be very careful, however, as a spray that is too strong might dishevel parts of your dish.

Spray bottle filled with water

This serves the same purpose as the nonstick cooking spray, but in a slightly more controllable manner as you can often shift the nozzle of a spray bottle to emit a smaller or larger stream of water.

Eye-dropper

When you need ultimate control over liquid application, it’s best to use an eye-dropper instead of a spray bottle or nonstick cooking spray.

For Applying Creative Touches

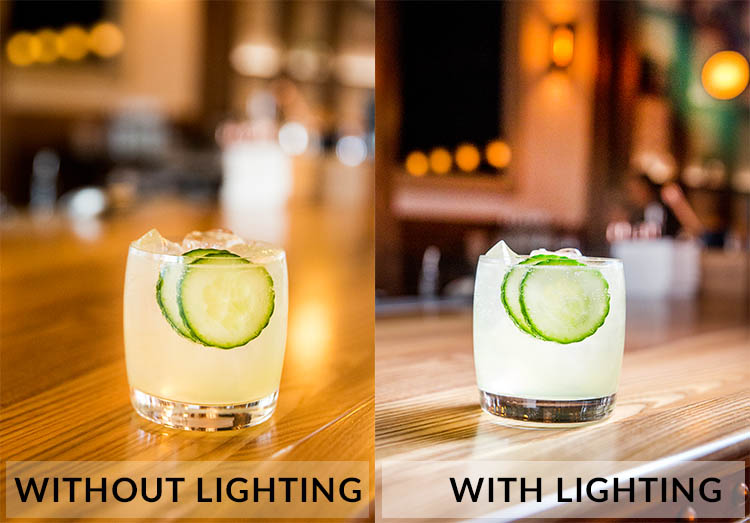
After using the above tools to perfect the details of your photo subject, it’s time to focus on two other factors that can take your photo to the next level; light control, and selecting a creative background.

Tin foil (or a large metal baking sheet)

Depending on your preferred camera tools, you may already have a reflector in your food photography kit. If you don’t have a reflector, you can use a sheet of tin foil or a metal baking sheet. If you use tin foil, you have the added bonus of being able to use smaller pieces and mold them.

Food Styling Tips for Photography

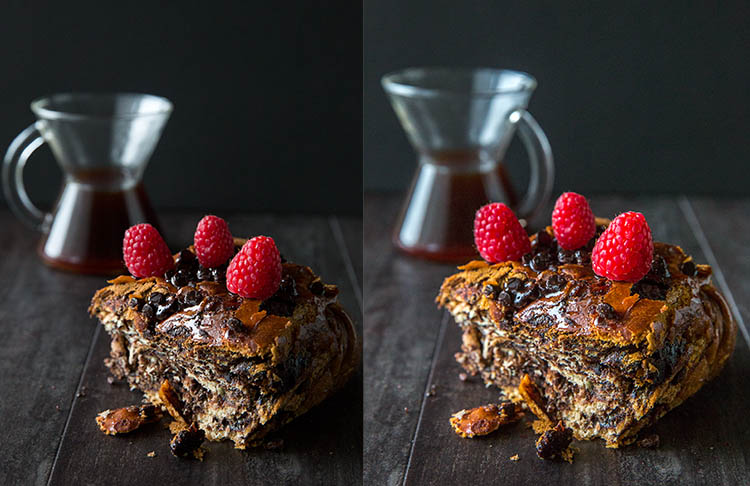
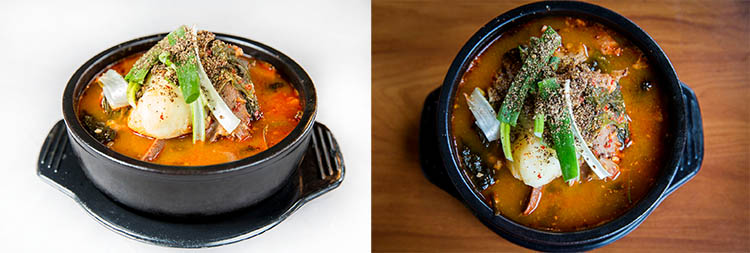
On the left: shot without a reflector; on the right: shot with a reflector to the right of the food.

Baking parchment paper

In photography, baking parchment paper can serve a couple of purposes.

First, it can be used as a cheap alternative to a diffuser (light modifier) to soften the light aimed at your subject. Simply tape a sheet of parchment paper to a window where sunlight is shining through. The resulting light will soften considerably, reducing the shadows and glare on your food subject.

Another way to utilize parchment paper is as a photography background or surface. Try plain parchment paper for a white surface, or the brown version for a different color option.

Food Styling Tips for Photography

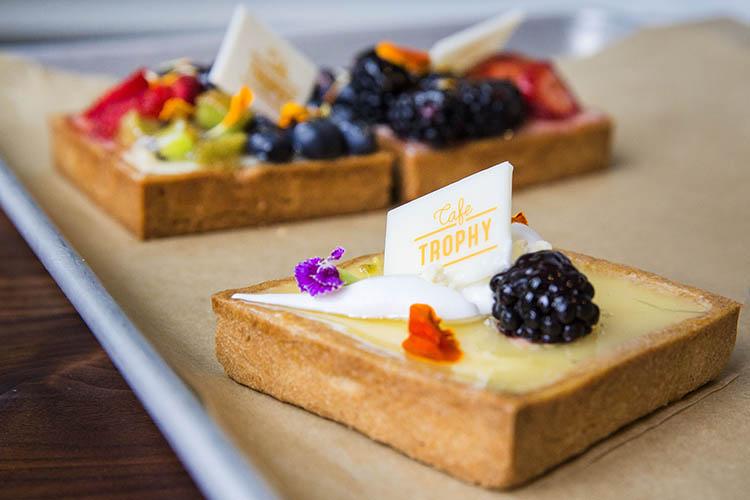
Parchment paper can add a different texture and color to your photo subject.

Gift wrap

Since we’re on the subject of photography surfaces, gift wrap is another affordable option for shooting food against creative backdrops. Cutting boards, tabletops, and placemats are also popular options, but they can be pricey and take up lots of room to store. Gift wrap, on the other hand, is plentiful with a variety of colors and textures to choose from.

Tweezers Food Styling Tips for Photography

The same dish shot with different backgrounds. White gift wrap paper was used on the left and a wooden table surface on the right.

Over to You

Do you have any simple food styling tips or tricks to share? Let me know in the comments below!

googletag.cmd.push(function() {
tablet_slots.push( googletag.defineSlot( “/1005424/_dPSv4_tab-all-article-bottom_(300×250)”, [300, 250], “pb-ad-78623” ).addService( googletag.pubads() ) ); } );

googletag.cmd.push(function() {
mobile_slots.push( googletag.defineSlot( “/1005424/_dPSv4_mob-all-article-bottom_(300×250)”, [300, 250], “pb-ad-78158” ).addService( googletag.pubads() ) ); } );

The post Household Items to Bring to Your Next Food Photography Shoot by Suzi Pratt appeared first on Digital Photography School.


Digital Photography School

 
Comments Off on Household Items to Bring to Your Next Food Photography Shoot

Posted in Photography


Desert Farm Grows Food Without Soil, Groundwater, Fuel or Pesticides

28 Oct

[ By WebUrbanist in Architecture & Offices & Commercial. ]

sundrop-farm-aerial-view

Using the sun and the sea, renewable sources of energy and water, a desert farming operation in Australia show how organic food in a fresh new and sustainable way.

The soil-free hydroponic systems of Sundrop Farms use solar energy to filter brackish water for use on crops, growing 17,000 metric tons of food annually. The sun’s energy also powers, heats and cools the greenhouses as needed, reflected via a series of 23,000 mirrors. In contrast, a “conventional greenhouse uses groundwater for irrigation, gas for heating, and electricity for cooling.”

sundrop-farm-tomato-row

The “plants are grown hydroponically, which is the technical way of saying we don’t use soil. Our plants flourish on nutrient-rich coconut husks instead.” Additional climate and irrigation controls allow the farm to maximize outputs with minimized inputs.

sundrop-farm-solar-tower

The desert location as well as natural control strategies allow Sundrop to accomplish their goals without harmful, expensive or polluting inputs as well. “Unlike traditional agriculture we use no fertilizers and no weed killers. We control plant eating bugs with carnivorous ones, just the way nature intended.”

sundrop-farms-hydroponics

Sundrop’s success illustrates the possibilities of working in a world where water, land and energy are all scarce and valuable. Moreover, the farm shows that fruits and vegetables can be produced year-round in any conditions thanks to hydroponics and green energy, from rural wastelands to urban food deserts.

“Because we do everything in a controlled environment, we know what our input costs are, and we’re doing everything on a renewable basis, we can provide real consistency of supply and a higher quality product at a better price year ’round,” said Philipp Saumweber, chairman and CEO of Sundrop Farms.

sundrop-farm-systems

“Existing farming practices are unsustainable,” explains Sundrop. They generally use fossil fuels, excessive groundwater and require appropriate soil and weather conditions. “Yet by 2050 rising populations will see a 50% increase in food demand. Climate change is increasing the number and the severity of catastrophic weather events. And water scarcity is becoming more acute in arid regions. We need to look at alternative ways to create energy and to produce food. That’s no longer a preferred option but a necessity. Fortunately however, things are starting to change.”

Share on Facebook


[ By WebUrbanist in Architecture & Offices & Commercial. ]

[ WebUrbanist | Archives | Galleries | Privacy | TOS ]


WebUrbanist

 
Comments Off on Desert Farm Grows Food Without Soil, Groundwater, Fuel or Pesticides

Posted in Creativity


How to Take Cool Food Photos in Your Refrigerator

18 Oct

Nothing gets me more excited creatively than coming up with different scenarios or ideas to further develop and hone my photography skills. For me, this is what makes photography so interesting and never dull. Yes, it can be frustrating and challenging. However, there are so many ways and endless possibilities for capturing images.

title

Bottled water in a refrigerator.

A picture is worth a thousand words, as the phrase goes. But I also like the story behind the photograph or image. Recently, I came across online the work of Mexican photographer, Felix Hernandez Rodriguez, who has a wonderful behind the scenes (BTS) video of his “The Love Car | The Making Of”.

I won’t spoil it for you by describing it in words. Instead, I feel It is best that you watch it for yourself at your leisure (see below).

Got lemons – make lemonade

Anyway, I had the misfortune back in July during a hot spell, of my refrigerator (or fridge is the term I use for this apparatus), deciding to just quit. I got a replacement and the first thing I noticed was the LED light inside. So it got me thinking, could I possibly use that one light source and produce decent enough shots with it?

led-light

An LED light inside a refrigerator.

Taking photos inside a fridge sounds a bit daft, I hear you say. However, for this article I will show you that even a daft idea can be cool. (Pun intended)

Shooting inside a fridge

I approached this project in five ways:

  1. Taking photos of the food or items just using the LED light source inside the fridge.
  2. Try to create decent food shots while working with two major constraints, time and size. Time: I couldn’t leave the fridge door open for long periods of time, which meant I had to set up my scenes and shoot fast.
  3. Size was another factor, especially in trying to get different POV shots
  4. Get imaginative and create a shot that the viewer doesn’t realise it was taken in a fridge.
  5. Just go with the flow.

Preparation

My fridge is relatively small in comparison to refrigerators in the US or Canada, so taking the food items out and storing them in a cooler bag for an hour or so wasn’t an arduous task. However, if you have a huge refrigerator, the next time time you do a clean out of your refrigerator may be the time to try out this project.

full-fridge

A packed refrigerator full of food items.

The space I was working with was really small, 19” x 19” x 33”, so I decided I would use my Sony RX100 which has a 35mm focal range equivalent of 28-100mm.

empty-fridge

The inside of my fridge which is relatively small in comparison to refrigerators in the US and Canada.

Initial shots

My initial test shots were random, in order to test the lighting and to determine what camera settings I would end up using. Shooting in RAW, I settled on an aperture of f/2.8, ISO 400 and a shutter speed of 1/50 – 1/60 and handheld the camera. I didn’t want to go higher with the ISO, as to keep noise down to a minimum. A wide open aperture allowed for the background to remain out of focus.

I left everything in the fridge and took some random shots of food items.

cherry-tomatoes-taken-underneath-glass-shelf

Cherry tomatoes taken from underneath a glass shelf in the refrigerator.

The Shots

Next was to take everything out of the fridge and start with just the top shelf left. It was nearest the light source and I wanted to see what type of shots I would get. From taking many shots at different angles, an idea sprung to mind. I wanted a slice of lemon shot from underneath the glass shelf. Later in post-production, I added in the frosted glass along with the broken glass effect to give it more zest! (Sorry pun intended again).

apple

A red apple taken sitting on a shelf inside a refrigerator.

lucy-with-turtle-beans

A test shot with Lucy and some turtle black beans.

lemon-sooc

A slice of lemon taken from underneath a glass shelf. This is straight out of the camera.

lemon-with-broken-glass

This is the same shot as above but I added a frosted glass and broken glass effect for impact in the editing process.

I also took a slice of cucumber. Notice how it appears to have a sad face?

cucumber

A poor sad looking cucumber!

Second setup

The next plan of attack was placing items on the bottom part of the fridge, as in the furthest point away from the light source. I wasn’t really expecting to get any decent shots. But I was pleasantly surprised. I felt the shots had an almost ethereal feeling to them.

jack-sprat-with-grapes

A Jack Sparrow lego figure with a bunch of red grapes.

fruit-composition

A fruit composition sprayed with a little water inside the refrigerator.

flower

A yellow flower taken inside the refrigerator.

flower-and-cucumber

The sad looking slice of cucumber looked happier against the flower!

Key Takeaway Points

Unless you have a moderately small refrigerator, this project is most likely not for you. Was it worth doing? In my opinion, any excuse to take photographs is well worth doing.

I found it was better to take the shots over a few days. This allows for planning what type of shot and what food or other items to use. Plus you need the least amount of time to have the fridge door opened. Spray water on the food so that the light catches the water droplets to add depth to the shot.

Have you had a crazy idea for a personal project? If so please leave a comment or share your images and story below.

googletag.cmd.push(function() {
tablet_slots.push( googletag.defineSlot( “/1005424/_dPSv4_tab-all-article-bottom_(300×250)”, [300, 250], “pb-ad-78623” ).addService( googletag.pubads() ) ); } );

googletag.cmd.push(function() {
mobile_slots.push( googletag.defineSlot( “/1005424/_dPSv4_mob-all-article-bottom_(300×250)”, [300, 250], “pb-ad-78158” ).addService( googletag.pubads() ) ); } );

The post How to Take Cool Food Photos in Your Refrigerator by Sarah Hipwell appeared first on Digital Photography School.


Digital Photography School

 
Comments Off on How to Take Cool Food Photos in Your Refrigerator

Posted in Photography


Urban Food Park: Scandinavia is Growing a “Silicon Valley for Agriculture”

03 Oct

[ By WebUrbanist in Architecture & Public & Institutional. ]

danish-food-park

An expansive master-planned complex to facilitate urban agriculture and private/public collaboration, The Agro Food Park is Denmark’s version of “Silicon Valley” for food research and development. From experimental greenhouses to vertical farm prototypes, the park is bringing together academics and businesses to work on creating a sustainable future via global food security.

scandanavian-food-park

Co-designed by an array of architecture, engineering, technology and agriculture firms, the food park was first opened in 2009 and already hosts nearly 100 companies in 44,000 square meters of space. The newly-expanded plan, however, will grow the park by 280,000 square meters over the coming decades, requiring careful strategic planning reflecting environmental considerations.

food-park-master-plan

The long-term master plan features a communal Lawn showcasing experimental developments, a main-street Strip hosting various gathers and activities, and a series of Plazas to facilitate interactions between companies and researchers. The huge complex is also designed to recycle its own waste efficiently and minimize its footprint, a “practice what you preach” approach to ecological urban agriculture.

food-park-plan

“Innovation occurs best when knowledge is concentrated in clusters and cross-pollinate. By linking food production to urban life, we have tried to create an environment where people, knowledge and ideas meet. The dream is to create the framework for agriculture’s answer to Silicon Valley.”

food-park-systems

Though the plan is complex, the mission of the place is simple: to feed the world in a healthy way. The expressions of that mission, however, vary greatly, from initiatives to use clean energy and create biodiversity to facilitating healthy air and clean water. In short: it is not just about good food, but how best to produce edible goods in a sustainable way.

food-park-arrangement

“Embracing Agro-Urban Ecosystem Design, the AFP treats urban and agricultural development together as a unified, productive and restorative ecosystem,” said the project architects.

futuristic-silicon-valley-food

“By integrating the carbon cycle and other ecological processes into large scale urban systems and their surroundings – buildings and energy flows, water cycles and wastewater treatment, land use and food production – the AFP creates economic value within the urban and agricultural infrastructure.”

Share on Facebook


[ By WebUrbanist in Architecture & Public & Institutional. ]

[ WebUrbanist | Archives | Galleries | Privacy | TOS ]


WebUrbanist

 
Comments Off on Urban Food Park: Scandinavia is Growing a “Silicon Valley for Agriculture”

Posted in Creativity


Street Eats: Free Urban Refrigerators for Sharing Spare Food

22 Aug

[ By WebUrbanist in Culture & History & Travel. ]

A few years back, one man in Saudi Arabia was hailed as a hero for putting leftover food from his restaurant in a refrigerator along the street for anyone to take; since then, an ongoing effort in Europe has been scaling up the same approach to serve whole communities of people in need.

In Germany, urban refrigerators have spread thanks to help from online food-sharing apps and thousands of volunteers. A digital platform that connects those in need with stores and restaurants that have excess food boasts 10,000,000 pounds of shared edibles to date. Still, they have a long way to go: the European Commission estimates that over 100,000,000 tons of usable food is discarded annually across the EU. Globally, a whopping 40% of edible leftovers are thrown away.

food fridge germany

Currently, over 100 shared food spots have been developed across Germany, 20 of which are located in Berlin. Large chain supermarkets are playing a significant part, making a coordinated effort to donate food they cannot sell but that is still safe and edible. Passers by also fuel the efforts, however, depositing whatever they can spare at these sites.

grocery store

Germany is leading the charge on multiple food-related fronts these days, home to the world’s first packaging-free grocery store and first in-store vertical micro-farms. As a landlocked country without much space to grow (in terms of population or produce), Germany is bent on innovation and looks likely to remain a leader in this department for years to come.

Share on Facebook


[ By WebUrbanist in Culture & History & Travel. ]

[ WebUrbanist | Archives | Galleries | Privacy | TOS ]


WebUrbanist

 
Comments Off on Street Eats: Free Urban Refrigerators for Sharing Spare Food

Posted in Creativity


Floating Greenhouse: Mobile Barge to Grow Food & Cruise Danube

08 Jul

[ By WebUrbanist in Architecture & Cities & Urbanism. ]

eco barge

Designed to float down the Danube river in Europe, the Eco Barge is a solar-powered floating greenhouse illustrating the possibilities of offshoring urban food production.

floating eco barge concept

floating greenhouse model

In addition to growing usable organic produce on the water, the barge has educational components, aiming to host presentations and workshops for citizens of European cities along the river, starting in Belgrade. Growing on the water allows food production to remain local without taking up valuable urban land.

floating solar greenhouse

floating greenhouse design

An indoor office and presentation space brackets one end of the barge while the greenhouse is situated at the other, an open space with solar panels sitting in between. Sun and wind power systems generate renewable energy used to power the vessel as well as its on-board irrigation system.

floating hotel concept

floatel

Salt & Water, the architectural and yacht design firm behind the Eco Barge, are known for their floating projects, including a floating hotel concept made up of private yachts. These independent boats share common docks and community spaces, but can detach for explorations as well.

Share on Facebook


[ By WebUrbanist in Architecture & Cities & Urbanism. ]

[ WebUrbanist | Archives | Galleries | Privacy | TOS ]


WebUrbanist

 
Comments Off on Floating Greenhouse: Mobile Barge to Grow Food & Cruise Danube

Posted in Creativity


The Secret to Finding the Hero Angle in Food Photography

27 Jun

Have you ever stared at a photo of a food dish, and instantly thought that something looked a little odd? Like the shot wasn’t quite bang on, but you can’t quite put your finger on what it is? Chances are the dish hasn’t been shot using its hero angle.

Rachel Korinek Food Photographer DPS Hero Angle 12

You can have the freshest ingredients, the maddest styling skills, and be able to tame ever changing natural light, but if your angle isn’t complimentary to the food you’re shooting – you’re missing out on the full potential of creating a powerful food image.

Never fear though, the secret to finding the hero angle in food photography is simple. Just approach the shoot with two things in mind; the height of the dish and/or the props, and the layers contained in them.

The Height of Your Dish and Props

The height of food basically falls into two categories; tall or flat.

Tall subjects are simply anything with height – like a bundt cake, an ice cream cone, or a burger with the lot. For tall subject you will usually default to shooting somewhere between a 45 degree angle to straight on. Going beyond 45 degrees can sometimes limit being able to see the full dish and layering.

Flat subjects are simply anything whose width is inherently larger than its height – like a tart, a cookie, or a pancake. For these types of subjects, default to shooting somewhere between straight above and a 75 degree angle. Going too close to 45 degrees will also accentuate their flat qualities.

Rachel Korinek Food Photographer DPS Hero Angle 8 Rachel Korinek Food Photographer DPS Hero Angle 5

But what about everything else? What about soup, salad, or how about liquids? I am so glad you asked, because this is where the fun starts.

There are quite a few foods that are dependant on serve-ware. A burger or cake can hold their own, but liquids, soups, salads, and puddings cannot. Which category these guys fall into is dependent on the food styling prop in which they are presented.

Take soup for instance, is it being served in a bowl, or is it a fancy cold soup served in a tall shot glass? The salad, is it served on a plate or a large glass bowl? What sort of holder is the liquid in; tall, short, opaque? Is it in a flat tray because you’re about to freeze it and turn into granita?

Oh the possibilities are endless! But remember, they all fall into two categories, so you’ve got a 50/50 shot of getting it right. I’m pretty sure you’ve got this.

The Layers in Your Dish and on Set

There are two things to consider when thinking about layers in food photography. The layers present in your food dish and the layers present on set.

Layers in a dish are the number of visual components in a recipe. The classic example is a burger with seven layers, bun, meat patty, cheese, sauce, slice of tomato, lettuce, bun. Or a layer cake with seven layers, cake, jam, cream, cake, jam, cream, cake. So to get the best food photography shots, you’ll want to choose an angle that exposes these layers in their best light.

Rachel Korinek Food Photographer DPS Hero Angle 6 Rachel Korinek Food Photographer DPS Hero Angle 7

Layers on set are the number of elements or props that you have on your set (props) on top of one another. For example, napkin, plate, and garnish would be three layers and would appear on top of one another. I don’t count the food/recipe as a layer as it is the subject and will always be present. If the prop layers are an important part of telling the food story, you’ll want to make sure your angle captures those elements too.

Putting it all Together

Now that you’ve thought about the height of your dish and the layers, you can marry those two, in order to figure out your hero angle. Let’s look at some examples.

This is a little game I like to play called; Okay, Better, Hero. There is nothing wrong with any of these shots I’m about to show you per say, but there can only be one hero, right? That’s what we’re aiming for, so let’s dive right in.

Turkish Delight (a flat dish without layers)

Rachel Korinek Food Photographer DPS Hero Angle 1

I shot this Turkish delight with a 105mm micro (macro) lens, at a 25 degree angle, overhead, and 75 degree angle respectively.

Because this is such a flat dish, you may expect that the overhead angle would be the most flattering. But really the 75 degree shot is hero angle, here is why. It is so close to overhead, yet allows you to capture the gorgeous light coming through the Turkish delight which adds to the richness of its colour.

25 degrees also captures the colours, but accentuates the flatness of the dish, and detracts from the overall feel.

Rachel Korinek Food Photographer DPS Hero Angle 11
Horizontal variation, shot at the same angle.

The Burger (tall dish with layers)

I shot this burger with a 105mm micro (macro) lens, at a 45 degree angle, 25 degree angle, and straight on respectively.

Rachel Korinek Food Photographer DPS Hero Angle 4

The hero angle is the one shot straight on, because it allows the viewer to focus on all the delicious layers, and elongates the height of the burger which you naturally expect to be a tall food. Your mind thinks, the taller the burger, the more ingredients, and the more bang for your buck you get.

The 45 degree angle doesn’t give you enough context of the layers, and the 25 degree angle makes the top burger bun look too flat.

Kale Pesto (tall dish without layers)

I shot this with a 60mm micro (macro) lens, at a 85 degree angle, 45 degree angle, and straight on.

Rachel Korinek Food Photographer DPS Hero Angle 3

Pesto, being a sauce or condiment, is dependant on the serve-ware in which it is presented. As you want to show that there is enough of the pesto to coat an entire family size dish of pasta, it was shot in a tall glass. This also complimented the tall spoon, and bottle of oil in the shot as props.

The 45 degree angle is workable, but straight on one is the hero angle here. It allows for an overall sense of how the dish is being served and stored, while still allowing the viewer to comprehend its texture.

If you want to get into the nitty gritty, the 45 degree angle allows for reflection of the plate to show up in the glass, hindering the ability to see the texture of the pesto.

Egg and Bacon Muffins (flat with layers)

I shot this with a 60mm lens, at a 45 degree angle, 30 degree angle, and from directly overhead.

Rachel Korinek Food Photographer DPS Hero Angle 2

Here the 45 degree angle accentuates the flatness of the dish, but does show the layers. The 30 degree angle is better, but it doesn’t show the full layers of the dish as much as the overhead shot does. That’s why the overhead shot is the hero angle in this case. It allows you to see right into the dish, while still getting the action of the egg filling being poured into each compartment.

Putting Finding That Hero Angle Into Practice – 5 Take Aways

Next time you’re doing a food photography shoot, put the following into practice:

  1. Thinking about whether your dish falls into the tall or flat category.
  2. Are there layers in your dish, or through your use of props on set?
  3. For tall foods, especially those with layers, explore angles between straight on and 45 degrees.
  4. For flat foods, explore angles between overhead and 75 degrees.
  5. Take a few shots with different angles outside the recommended ones above, and look for the OK, better, hero shots.

Do you have a favourite angle for food photography that you can always rely on? Please share in the comments below, as well as your food shots.

googletag.cmd.push(function() {
tablet_slots.push( googletag.defineSlot( “/1005424/_dPSv4_tab-all-article-bottom_(300×250)”, [300, 250], “pb-ad-78623” ).addService( googletag.pubads() ) ); } );

googletag.cmd.push(function() {
mobile_slots.push( googletag.defineSlot( “/1005424/_dPSv4_mob-all-article-bottom_(300×250)”, [300, 250], “pb-ad-78158” ).addService( googletag.pubads() ) ); } );

The post The Secret to Finding the Hero Angle in Food Photography by Rachel Korinek appeared first on Digital Photography School.


Digital Photography School

 
Comments Off on The Secret to Finding the Hero Angle in Food Photography

Posted in Photography


Brain Food: Vending Machines Offer Books Instead of Snacks

23 Jun

[ By SA Rogers in Design & Products & Packaging. ]

book vending machine 1

You can buy all kinds of weird things from vending machines these days – from live crabs to blue jeans to gold bars – but this new iteration is more entertaining than most, and it’ll certainly keep you busy longer than a bag of Skittles. Peruse the covers of a curated selection of books through the glass of these BooksActually vending machines in Singapore for a new distraction on demand. If only this idea caught on everywhere, maybe we’d spend a bit less time standing around staring at our phones.

book vending machine 6

Two of the machines are now ready for reading enthusiasts in high-traffic areas, including the National Museum of Singapore and the Singapore Visitor Center. Fittingly for these locations, the selections appear to be Singapore-centric, including books by local authors as well as helpful guides for tourists. Each machine contains about 150 books with up to 22 titles, and the outsides of the machines are painted by local artists to indicate what’s inside.

book vending machine 3

“The whole idea is about accessibility and eyeballs,” says Kenny Leck, owner of BooksActually. “There are not enough bookstores in Singapore… these vending machines could be a visual touchpoint. You may not buy [a book] but we’ll let you know these exist. And from there, there could be more possibilities. We start with visual awareness: books where you see a local author’s name. The ultimate place we want to put them are at train stations.”

book vending machine 5

Of course, book vending machines aren’t entirely new, though they’re far more popular in Asia than they are stateside. The first book-dispensing machine, called the Penguincubator, was installed in London way back in 1937. An Irish company called ‘A Novel Idea’ installed a machine at London’s Heathrow airport, but went out of business. It’s kind of hard to pick out a book when you can’t even read the back cover, but the concept could work with highly recognizable beach-read-type titles that are about the equivalent of junk food for your brain, anyway.


Share on Facebook


[ By SA Rogers in Design & Products & Packaging. ]

[ WebUrbanist | Archives | Galleries | Privacy | TOS ]


WebUrbanist

 
Comments Off on Brain Food: Vending Machines Offer Books Instead of Snacks

Posted in Creativity


IKEA Indoor Gardens Produce Food Year-Round for Homes & Restaurants

13 Jun

[ By WebUrbanist in Design & Fixtures & Interiors. ]

ikea home garden

IKEA recently launched a hydroponic gardening system to allow people to grow fresh produce at home (without soil or sunlight) and has just unveiled a similar system under development that is aimed at helping restaurants raise ingredients in-house.

ikea home grown

The KRYDDA/VÄXER hydroponic garden lets sprout seeds without soil using absorbent foam plugs that keep plants moist (without over-watering, thanks to a built-in sensor). Germinated seeds can then be transferred to pots fitted into a growing tray featuring a solar lamp. The system is designed to be easy to use for even inexpert gardeners.

ikea seeds

Meanwhile, in another bit to expand their sustainability model beyond furniture, furnishings and fixtures, IKEA has teamed up with Space10 to create The Farm, an aquaponic garden system for restaurants. A prototype is live and working the basement of Space10’s office in Copenhagen, and the two companies are planning to develop the system further for mass production and commercial deployment.

the farm ikea

Few customers realize that IKEA is actually already one of the largest restaurant chains in the world, selling over a billion Euros of food annually. It is well-positioned to push for changes in the food supply chain (photos by Kristine Lofgren for Inhabitat).

the farm meal

The Farm prototype can even create a complete burger (of sorts) on site, specifically: a “bugburger” made of mealworm, beetroot and gluten and top with freshly-grown herbs and lettuce. Aside from this particular (and peculiar) delicacy, however, the design is aimed at bringing as much of the food production process in-house, similar to a recent system developed in Germany allowing grocers to raise and sell their own fresh produce.

the farm fresh

ikea fresh food

On multiple fronts, IKEA is changing the face of the farm-to-table movement, operating in parallel to larger urban vertical farming systems to generate products that are cheap and accessible, making gardening something that any city dweller or restaurant owner can dig into.

Share on Facebook


[ By WebUrbanist in Design & Fixtures & Interiors. ]

[ WebUrbanist | Archives | Galleries | Privacy | TOS ]


WebUrbanist

 
Comments Off on IKEA Indoor Gardens Produce Food Year-Round for Homes & Restaurants

Posted in Creativity


5 Tips for More Professional-Looking Food Photography

01 May

In an age where iPhones are shooting stellar images and high quality DSLRs are coming down in price, it’s becoming increasingly challenging for food photographers to make a living as professionals. As a food photographer in Seattle, I’ve noticed that many of my clients have become opinionated about what makes a good photo, and in many cases are shooting right next to me with their iPhones. I take it as a positive sign that clients, and most people with smartphones, are becoming more informed and educated about photography, but there is of course the notion that this could very soon make professional photography even more undervalued.

So, what’s a professional food photographer to do? Here are some tips to help make sure you capture quality food photography images that attest to the value of paying you, a professional, to do the job.

Tip #1: Don’t use natural lighting

Food photography tips

Natural lighting is fantastic, and I still try to use it as often as possible. However, many of my clients have realized the value of using natural lighting and tend to shoot their iPhone photos in naturally lit areas. Taking into account the quality of iPhone photos these days, it’s not unusual that their cell phone photos look pretty darn good, even compared to my DSLR shots. To make sure your photos always look unquestionably better than those taken with a cell phone, use natural lighting less and do some experimenting with strobes and off-camera flash.

Tip #2: Shoot in dark spaces

Taking tip #1 into consideration, take full advantage of your professional-grade camera’s low lighting capabilities, and/or your strobe lighting knowledge, by shooting dishes of food in spaces where iPhones have a slim chance of performing well. This is also a good opportunity to incorporate some of the unique features of the restaurant’s interior spaces, into your main shot.

Food photography tips

Photographed in an extremely dark space, this photo wouldn’t have been possible without a DSLR and strobe.

Tip #3: Use a macro lens

While cell phone cameras are becoming equipped with better features with every new release, many still can’t shoot quality macro photos the way that DSLRs can. Use this fact to your advantage and make a macro lens your best friend when shooting food photos. Don’t be afraid to get up close and personal, and capture the details of the dishes you’re shooting. These photos may not be exactly what your clients have in mind, but at the very least it’s always a good thing to show them an alternative perspective that reminds them why they hired you.

Food photography tips

Tip #4: Be a creative director and/or food stylist

Most amateurs approach food photos very statically, opting to shoot dishes from a seated position or overhead. Very few will get creative and incorporate people, props, or activity in their shots. This is your opportunity to shine as a food photographer. Move beyond standalone food photos and use your creativity to make a more dynamic shot. Ways to do this might be capturing action shots, adding a beverage or extra silverware in the shot, or even working with chefs to help them plate dishes in ways that will be photographically appealing. These skills are also part of the reason your client is hiring you, so don’t be afraid to exert your creative authority.

Food photography tips

Tip #5: Shoot tethered

A very simple, yet highly effective, way to come off as a polished, professional photographer is to shoot tethered. If you’re unfamiliar with tethered shooting, it is basically the act of connecting your camera to a computer or tablet, which allows your clients to see your shots on a screen just seconds after you’ve pressed the shutter. This might sound intimidating, but it’s a very simple way to make sure that you and your client are on the same page throughout the photo shoot. It also invites your client to actively participate in the shoot and give you feedback and their own ideas. Tethered shooting is very easy to do using a USB cord or even Wi-Fi technology if your camera has this capability. If you have the means to shoot tethered, definitely consider offering this service to your clients.

Food photography tips

Tip #6: Transmit photos via Wi-Fi

If you have a client who is shooting alongside you with their iPhone, chances are it’s because they want access to photos for immediate posting on social media. Do yourself and your client a favor and offer to send them images on the spot using in-camera Wi-Fi, or do a few quick edits and transmit some shots directly from your computer if you’re shooting tethered. Depending on your agreement with your client, you could even charge a little extra for these services.

Over to you

Do you have other tips for offering more professional-looking food photography that outperforms iPhones and other amateur cameras? Let me know in the comments below!

googletag.cmd.push(function() {
tablet_slots.push( googletag.defineSlot( “/1005424/_dPSv4_tab-all-article-bottom_(300×250)”, [300, 250], “pb-ad-78623” ).addService( googletag.pubads() ) ); } );

googletag.cmd.push(function() {
mobile_slots.push( googletag.defineSlot( “/1005424/_dPSv4_mob-all-article-bottom_(300×250)”, [300, 250], “pb-ad-78158” ).addService( googletag.pubads() ) ); } );

The post 5 Tips for More Professional-Looking Food Photography by Suzi Pratt appeared first on Digital Photography School.


Digital Photography School

 
Comments Off on 5 Tips for More Professional-Looking Food Photography

Posted in Photography