RSS
 

Posts Tagged ‘Focus’

Getty Images Reportage shifts from editorial to commercial focus

03 Sep
Getty Images Reportage has gained a reputation for photojournalism and covering important issues.

Getty Images has reportedly communicated a change in strategy for Getty Images Reportage. Launched in 2007, Reportage represented top photojournalists, as well as emerging photographers, with a focus on in-depth features that addressed important issues and stories. Some of these have included the Haiti earthquake, the war in Afghanistan, Nigerian and Somali pirates, and the nuclear legacy of Northeast Kazakhstan.

The company announced that as of October, Reportage will no longer represent its photographers for editorial assignments. In its place, Getty will back a new commercial agency called Verbatim, which will represent Reportage’s photographers to commercial clients instead. According to the report in TIME, Reportage will keep its Emerging Talent program, but will become mainly an archive following the transition.

Articles: Digital Photography Review (dpreview.com)

 
Comments Off on Getty Images Reportage shifts from editorial to commercial focus

Posted in Uncategorized


How to Add a Soft Focus Look to Your Images for a Unique Style

21 Aug

Soft focus photographs present themselves with a tranquil and almost dream-like effect. They have become quite popular, and can be found to some extent in many genres of photography, from portraits to landscapes.

In reality, what many of us think of as soft focus photos, aren’t actually soft focus at all. The more accurate term is soft contrast. Soft focus is essentially the blurring of an image, which is not exactly the same as soft contrast. The softening effect can be achieved a number of ways using softening filters mounted in front of your lens, or in post-processing. With the powerful digital editing tools we have today, a soft contrast effect is both easily achieved, and infinitely adjustable.

Before and After

In this example, you will see at a step-by-step workflow for applying a soft focus, or soft contrast, look to a photograph in Photoshop using our old friend the High Pass Filter. You might be familiar with using the High Pass for sharpening, but in this case it will be used on the opposite end of the spectrum. We will begin with a RAW image file and work our way to a finished product ready for publishing.

Don’t worry. All these edits are incredibly easy, fast, and will give your images a little creative boost if used correctly. Let’s get started!

Here have the RAW file or as I affectionately call it the “Genesis Image”.

Raw

Make basic edits first

We will begin with some basic edits in Adobe Lightroom, then transfer the image to Photoshop to apply the soft contrast magic. It’s best to perform your core processing first, before beginning the soft contrast process. I like using Lightroom because it makes for a super simple transfer, for working in tandem with Photoshop.

For this photo I performed some global exposure adjustments, as well as made some selective adjustments. I also made use of the HSL panel to bring the color saturation and luminance closer to my visualization.

LR Adjustments

Open in Photoshop and duplicate the background layer

Once you’ve finished the foundational processing it’s time to bring your image into Photoshop. Right click it in Lightroom and choose “Edit in Photoshop”.

Now that you have your file open in Photoshop, you can begin the easy process of applying the soft contrast effect. To begin, you need to duplicate the base layer. Do this by right clicking the base layer and selecting Duplicate Layer, or by pressing control+J (command+J for Mac).

Duplicate Layer

Apply the High Pass Filter

Next, select the High Pass Filter. To do this, select from the top menu: Filter > Other > High Pass. The image before you will transform into a garbled mass of gray muck.

High Pass Filter Select

You will be given the option of adjusting the radius of the High Pass. I have found that for most images, a radius of 10-20 pixels is appropriate, but in the end it will be up to you and your creativity to decide. After you’ve selected the radius, click OK.

Next, go to: Image > Adjustments > Invert. You can save some some time by using the keyboard shortcut Ctrl+I (Command+I for Mac).

High Pass Invert

Change the layer blend mode

And vola! Wait…the photo still looks like a moldy piece of bread. Everything is okay, though! The next step is one of the most important, and it will make all the difference. In your layers panel, change the blending mode to Softlight.

High Pass Softlight

Boom!

High Pass Softlight Effect

The image looks like a photo again. The soft contrast effect has now been applied to every part of the image. If you like how everything looks, great, you’re completely finished and can go on your way. Most often though, additional fine tuning will be needed to bring out the best of your photograph. This is the real power of Photoshop, because you can now selectively choose what areas will benefit most from the softening. To do this you need to add another layer mask, but don’t let this intimidate you.

Add a layer mask to refine the effect

At the very bottom of the layers panel you will see a small row of icons. The layer mask icon is the white rectangular box with the gray dot inside, click that. A layer mask will be added to your adjustment layer. This way, you can choose exactly where you want your effect to be applied using the brush tool.

Add Mask

Now I can really get creative. I want to leave the softening effect on some areas, but remove it from some of the key points of the composition; namely the rock face and the ground surrounding the waterfall. Use the brush tool (paint brush icon) and a layer mask to show or hide your edit. Be sure the two black and white squares at the far left bottom of the tool panel show the black square above the white one (hit D on your keyboard to set them to default and X to swap the colors). This means you are hiding the effect from the image by masking it.

If you click the two sided arrows above the squares (switch to put white on top – or click X on your keyboard to do this) you will be able to paint back in the effect, in the case you remove too much (using a mask is non-destructive editing, you are not removing pixels just hiding or showing parts of one layer). Also, remember the the brush tool is completely customizable as far as size, flow, and opacity are concerned.

Layer Mask Adjustments

Final edits back in Lightroom

In the case of this photo, I save and close it in Photoshop, and it will automatically import back into Lightroom where I will finish up some minute details. The final edits include mainly selective sharpening and a slight vignette.

Final Adjustments

And it’s done! In what amounts to a few short minutes, I have gone from a RAW file, to an image that artistically captures what I saw when I clicked the shutter.

Before and After

As with any type of post-processing, it’s important to remember that less is often more. Be judicious with your edits and only go as far as you need, in order to reach the image you want to make.

Have a soft contrast or soft focus image you’ve edited in Photoshop? Feel free to share them in the comments below.

googletag.cmd.push(function() {
tablet_slots.push( googletag.defineSlot( “/1005424/_dPSv4_tab-all-article-bottom_(300×250)”, [300, 250], “pb-ad-78623” ).addService( googletag.pubads() ) ); } );

googletag.cmd.push(function() {
mobile_slots.push( googletag.defineSlot( “/1005424/_dPSv4_mob-all-article-bottom_(300×250)”, [300, 250], “pb-ad-78158” ).addService( googletag.pubads() ) ); } );

The post How to Add a Soft Focus Look to Your Images for a Unique Style by Adam Welch appeared first on Digital Photography School.


Digital Photography School

 
Comments Off on How to Add a Soft Focus Look to Your Images for a Unique Style

Posted in Photography


5 Tips for Setting the Focus in Your Landscape Photography

18 Jul

In many types of photography the question of where you should set your focus is pretty simple. For example, in portrait photography, there is one simple rule: focus on the eyes. When the eyes aren’t on the same plane of focus, focus on the near eye. End of story.

It is pretty simple with other types of photography as well. In wildlife photography you focus on the animal. In fact, in any type of photography where there is a clear subject, you always focus on that subject. That’s not to say it is always easy, but at least it isn’t difficult to figure out.

Mullaghmore

Foreground sharpness is paramount in many landscape photos.

But what about landscape photography where you are generally capturing more of a scene than a solitary subject? Where do you focus to ensure that everything in the scene is as sharp as possible? The answer isn’t always so clear. Therefore, in this article, we’ll cover some tips for helping you know where to set the focus.

Tip 1: Don’t Just Set the Focus at Infinity

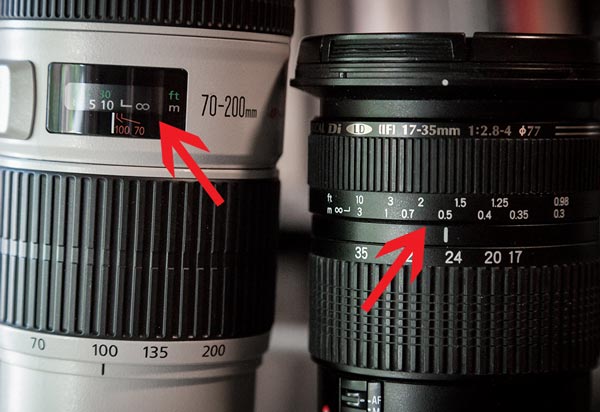
Again, oftentimes in landscape photography, you are trying to capture a scene rather than a solitary thing. Many times, the scene you are trying to capture is far away from you. Most lenses have a range of focus values, and once you get beyond a certain distance (often 20-30 feet, or 8-10 meters) the focus is set at infinity. Everything beyond that point will just be infinity. Therefore, if you are taking a picture where most things in the frame are far away, it might seem that you should just set the focus at infinity. If you are using autofocus (and most of us are), you might be inclined to set the focus using something that is very far away from you.

If everything in the frame is truly at infinity, then setting the focus at its maximum distance is not a horrible idea. If there is nothing close to you, then there is just no need to do anything else, you don’t need to overly complicate things. But more commonly there are aspects of the scene that are closer to you than infinity. Where do you set the focus then?

Derryclare

You can get into hyperfocal distance (we’ll talk more about that in a minute) and make this as technical as you want. But often your time is precious when you’re out shooting. The light is changing and things are moving. You can get a pretty good sense of things without resorting to calculations. As a result, consider this rule of thumb: set the focus at infinity and then just turn it back a little bit. The obvious question is what is, how do you define a little bit, and I’m afraid I don’t have a good answer for you. It will vary from lens to lens, but will usually be about a 5-10° turn or just to the highest distance number printed on the lens (if your lens has these numbers).

focus-ring-distance-600px

Why would you want to do that? Because of the depth of field that will be in your picture (more on depth of field below). Since you are taking an outdoor photo, you will probably not be shooting wide open, or even with a large aperture. So, there will likely be some depth depth of field involved. It doesn’t necessarily have to be a large depth of field, but the point is that it gives you some leeway. By pulling the focus forward, that leeway will still get everything out to infinity in focus. It will also get things a little closer in focus as well.

Tip 2: Try Focusing a Third of the Way into the Picture

Many pictures are ruined because the foreground is not sharp. It happens all the time. Therefore, if you have something in your scene that is close to the camera, focus on it. If the ground is prominent in your picture, set your focus close to you. Make sure that foreground is in focus. Often you will set the focus only a few feet in front of you.

But wait a second, you might ask, what about my background? Won’t it be out of focus or blurry? Probably not. If you’re using your wide-angle lens (and if you are taking a outdoor photo that has a discrete foreground, then you probably are) you will have a wide depth of field, even at moderate to large apertures.

Connemara

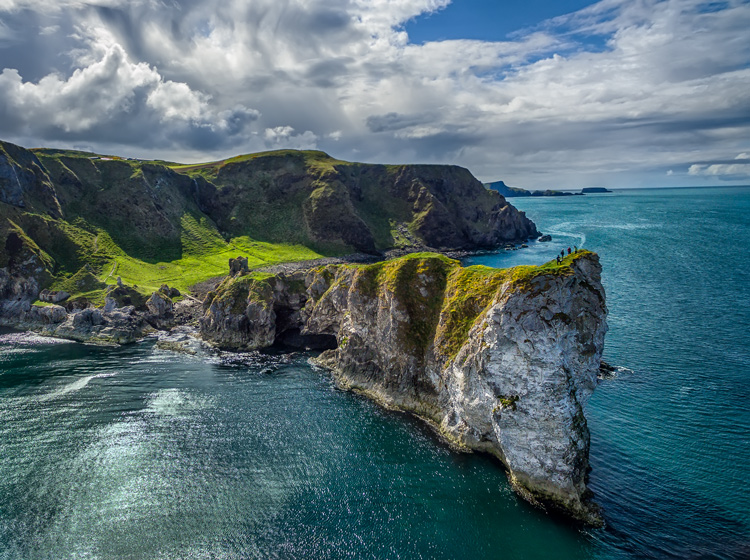
A sharp foregound focus furthers the viewer’s sense that they can walk into the picture.

Tip 3: Focus on the Subject Matter

Let’s not lose sight of the obvious though. When you have a definite subject or center of interest in your photo, just focus on that. It is the most important part of your picture and you absolutely need it in focus. Don’t worry about your foreground, don’t worry about your background. Just make sure the subject is in focus. Frankly, if there is a little fall-off in sharpness from your subject, that will probably not be such a bad thing.

Dingle-Sheep

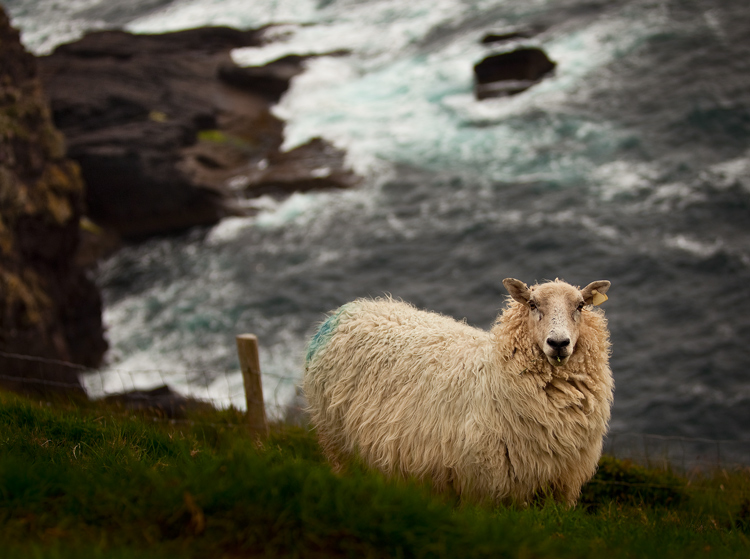
Sometimes you just want a definite subject in focus, and having the background start to blur out is just fine, as in this image of a sheep.

Tip 4: Watch the Aperture

There are no free lunches in photography. You probably already know that by using a smaller aperture to get a larger depth of field, it will cost you light. The smaller aperture lets in less light so you will have to use a longer shutter speed (risking blur if you aren’t using a tripod) or raise the ISO (risking digital noise in your picture). But the smaller aperture will also lead to something called diffraction, particularly in cameras with smaller digital sensors. Therefore, just using the smallest aperture possible isn’t always the answer. You cannot just set your focus anywhere and rely on a super-wide depth of field to save you.

There are two ways around this issue though, which we’ll talk about next.

Kinbane-Head

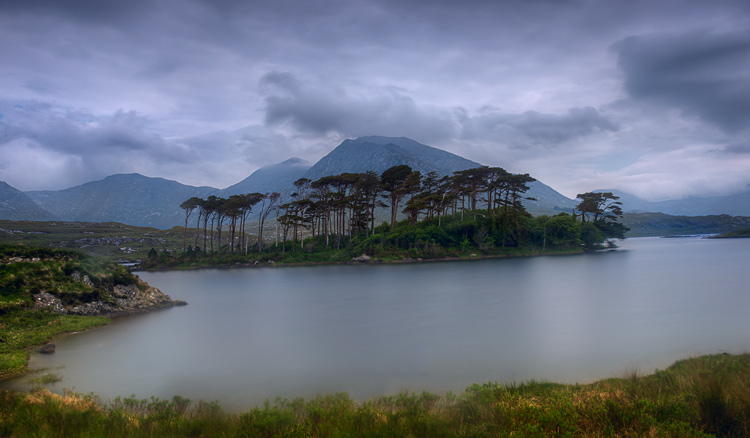
With everything in the shot at a distance of infinity (30 feet or more), I did not need a wide depth of field to keep everything in focus.

Tip 5: Know Your Hyperfocal Distance

Hyperfocal distance is just a fancy name for determining how close you can set your focus, and still keep your background acceptably sharp. There are apps and calculators that will tell you this distance depending on your aperture, sensor size, and focal length. For a full explanation of hyperfocal distance along with some charts and links to apps that will calculate it for you, check out How to Find and Use Hyperfocal Distance for Sharp Backgrounds .

An example will illustrate the point made above about backgrounds tending to remain sharp when you are using wide angle lenses. If you’re using a 16mm lens on a full frame camera, and shooting at f/11, your hyperfocal distance is only 2.5 feet. That means you can set the focus on a point just in front of you, and keep everything behind that point sharp.

Knowing the hyperfocal distance will often liberate you to set the focus point quite close, in order to maintain sharp foregrounds in your picture. It also means you often don’t need to use the smallest aperture your lens offers, so you can avoid the effects of diffraction.

Ballintoy-Arch

Tip 6: Consider Focus Stacking

When the methods above won’t work for you, or you just need to make sure absolutely everything in the photo from front to back is tack sharp, you may want to consider focus stacking. Here you take multiple pictures of the same scene using different focus points.

Start by setting the aperture of your lens where it is sharpest (also called the sweet spot – if you don’t know, that is usually in the range of f/5.6 – f/8). Take a shot with the focus set close to you, then repeat the process, gradually setting the focus point farther and farther away with each shot. Later you blend your pictures in Photoshop (for more about how to do that check out Maximizing Depth of Field Without Diffraction).

This method is not a cure-all. It obviously won’t work with moving subject matter. In addition, it can be tedious, and you risk slightly moving the camera since you have to twist the focus ring between shots. Still it can be a powerful tool for maintaining focus and sharpness throughout your entire picture.

Setting the Focus Summary

No rule is going to cover every situation when it comes to focus. As with many aspects of photography, you’ll just have to use your own judgment in the field. Hopefully, as you do so, these tips will help you nail the focus and keep the picture tack sharp where it matters.

This week we are doing a series of articles to help you do better nature photography. See previous articles here:

  • 3 Habits Every Outdoor Photographer Should Develop to Avoid Missing Shots
  • 5 Tips for Better Nature Photography
  • 27 Serene Images of the Natural World
  • Weekly Photography Challenge – Nature
  • 10 Ideas for Photographing Nature in your Backyard
  • 6 Tips for Capturing Character and Personality in Wildlife Photography

googletag.cmd.push(function() {
tablet_slots.push( googletag.defineSlot( “/1005424/_dPSv4_tab-all-article-bottom_(300×250)”, [300, 250], “pb-ad-78623” ).addService( googletag.pubads() ) ); } );

googletag.cmd.push(function() {
mobile_slots.push( googletag.defineSlot( “/1005424/_dPSv4_mob-all-article-bottom_(300×250)”, [300, 250], “pb-ad-78158” ).addService( googletag.pubads() ) ); } );

The post 5 Tips for Setting the Focus in Your Landscape Photography by Jim Hamel appeared first on Digital Photography School.


Digital Photography School

 
Comments Off on 5 Tips for Setting the Focus in Your Landscape Photography

Posted in Photography


Sony 35mm FE lens firmware update improves manual focus reliability

15 Jul

Sony has issued firmware updates for its 35mm full-frame primes which claim to improve focus point reliability when using manual focus for long periods of time. The new firmware is offered for the FE 35mm F1.4 ZA and FE 35mm F2.8 ZA Zeiss-branded lenses.

Articles: Digital Photography Review (dpreview.com)

 
Comments Off on Sony 35mm FE lens firmware update improves manual focus reliability

Posted in Uncategorized


Metabones unlocks native Sony focus modes for Canon-mount adapters

24 Jun

Updated firmware allows Sony users to use all their AF modes when shooting Canon EF-mount lenses with Metabones adapters. It does so by emulating a native Sony lens, much like the recent Sigma MC-11 adapter. This update to the Metabones line of Smart Adapters and Speed Boosters enables the use of modes such as continuous Eye-AF and Direct Manual Focus. Updated firmware also brings smoother aperture control to most of Metabones’ adapters. And though the company doesn’t make any claims as to video focusing, if the adapters do truly emulate native E-mount lenses, we’d expect full phase-detect AF functionality during video.

The Metabones is only the second E-mount adapter to offer ‘native’ lens functionality with adapted lenses, with the Sigma being the first.* However, in practice the Sigma MC-11 has had many issues, too often reverting to contrast-detect AF off-center, and constantly hunting back and forth in minute increments in AF-C.

It’s not surprising, then, that Metabones lists a series of caveats and exceptions, most of which reflect the range and diversity of EF lenses that people might use. There are also warnings of increased battery usage and of poor continuous AF performance from lenses that aren’t designed to be driven in the pattern required for fast contrast-detection AF. Finally, Metabones mentions potential problems when shooting stopped down, undoubtedly a result of Sony’s ‘stop-down focusing’ that cripples the AF system if you shoot at smaller apertures by depriving the AF system of light, and literally shutting off phase-detection altogether at apertures smaller than F8.

Firmware for the latest adapters can be downloaded from the Metabones website. Owners of Mark I, II or III Smart Adapters and original Speed Boosters will need to return their adapters to the factory, where they will be updated free-of-charge. We’ll keep you apprised of actual performance once we’ve had an opportunity to try out the new firmware with a variety of lenses.


Press Release:

Metabones® Adds “Native” AF and Smooth Iris to EF Mount Speed Boosters® and Smart Adapters by Firmware Upgrade

Vancouver, Canada, June 23, 2016: Metabones® releases Metabones App 2.3, a major firmware update with the following additional features.

  • Eye-AF (A6300/A7series).
  • Fast contrast detect AF for all E-Mount cameras.
  • DMF (direct manual focus) for E-Mount cameras, where the camera switches to MF as soon as AF completes. This is useful for checking AF accuracy when used with focus peaking.
  • Smooth iris for Sony E-Mount and FZ-Mount cameras and Blackmagic, JVC and Panasonic Micro Four Thirds Mount cameras.

Metabones® has already added fast EF lens autofocus to its Micro Four Thirds Mount Speed Boosters® and Smart Adapters™ last year. With this speedy advantage now extended to E-Mount, EF-Mount lenses are now capable of focusing quickly across the widest variety of mirrorless cameras with trusted Metabones precision and reliability.

The smooth iris feature slows down the movement of the electromagnetic aperture diaphragm so that video footage transitions smoothly when the aperture changes, with reduced tick noise from the lens. The latest Canon and Tamron SP lenses have special support for this feature and Metabones® makes use of it if the lens supports it.

Limitations:

  • E-Mount “native” autofocus features may not work with all lenses.
  • “Native” autofocus may be lesser in performance and/or accuracy compared to the original “Green” mode phase-detect autofocus for A6300, A7 Mark II and A7R Mark II.
  • AF-C and video autofocus may have unsatisfactory AF performance and/or accuracy. This is a limitation inherent in DSLR lenses, which lack the low latency required for making many fine movements in rapid succession during AF-C and video focusing.
  • Excessive hunting may occur if a small aperture is used with AF-C, video or “Liveview Display Setting Effect” turned on.
  • The first few autofocus attempts may result in false positives where the camera gives focus confirmation but the subject is not in focus. This issue goes away on its own after a few trials with most lenses.
  • No support for in-camera correction such as peripheral shading, CA and distortion.
  • Power consumption may increase compared to the original “Green” mode autofocus. We recommend turning off the “Pre-AF” option to conserve battery power. On A7 series cameras and A6300 the option is on page 3 under the “gear” tab.
  • Actuations of the electromagnetic aperture diaphragm and/or the focus motor of the lens result in noises which may be picked up by the camera’s internal microphone during video recording. Use of an appropriately placed external microphone is required for video work.
  • The aperture moves in 1/3 stop steps with most Panasonic cameras and 1/8 stop steps with other cameras, which may be noticeable in video recordings. Programmed exposure mode and shutter priority exposure mode should not be used for video. Lenses supporting “smooth iris” smooth out the transition but do not increase iris resolution.

The following lenses have been tested for “native” AF. Refer to Metabones’ web site for the most up-to-date list. Lenses equipped with smooth iris support are marked with asterisks. APS-C lenses are not compatible with Speed Booster®.

  • Canon EF 8-15mm f/4L USM Fisheye*
  • Canon EF-S 17-55mm f/2.8 IS USM
  • Canon EF-S 18-55mm f/3.5-5.6 IS II*
  • Canon EF 24-105mm f/4L IS USM
  • Canon EF 28-80mm f/3.5-5.6 II
  • Canon EF 40mm f/2.8 STM*
  • Canon EF 50mm f/1.2L USM
  • Canon EF 50mm f/1.4 USM
  • Canon EF 70-200mm f/2.8L IS II USM*
  • Canon EF 70-200mm f/4L USM (non-IS)
  • Canon EF 70-300mm f/4-5.6L IS USM*
  • Canon EF 85mm f/1.2L II USM
  • Canon EF 100mm f/2.8L IS USM Macro*
  • Canon EF 100-400mm f/4.5-5.6L IS USM (I)
  • Canon EF 100-400mm f/4.5-5.6L IS II USM*
  • Canon EF 200mm f/2.8L II USM
  • Canon EF 300mm f/4L IS USM
  • Sigma 18-35mm f/1.8 DC HSM Art 013
  • Sigma 24-105mm f/4 DG OS HSM Art 013
  • Sigma 50mm f/1.4 EX DG HSM
  • Tamron SP 24-70mm f/2.8 Di VC USD A007
  • Tamron SP 45mm f/1.8 Di VC USD F013*
  • Tamron SP 70-200mm f/2.8 Di VC USD A009*

Incompatible lenses: (“Green” mode PDAF is still supported on A6300, A7 Mark II and A7R Mark II.)

  • Canon EF 50mm f/1.8 II
  • Canon EF 100mm f/2.8 USM Macro
  • Canon EF 135mm f/2L USM
  • Contax N lenses modified to EF mount by Conurus Canada
  • Sigma 18-125mm DC OS HSM
  • Tamron SP 17-50mm f/2.8 Di II VC B005
  • Tamron 28-300mm f/3.5-6.3 (IF) Macro A20

OSX and Windows versions of the firmware updater are available for download from Metabones’ web site. The same download updates Speed Booster® ULTRA, Smart Adapter™ Mark IV, EF to FZ Mount Smart Adapter and all EF Mount to Micro Four Third mount products. Updates to earlier Smart Adapters™ (I, II and III) and the original Speed Booster® are by factory only and are free of charge except for shipping.


* A TechArt adapter was technically the first to offer native lens functionality, but it was so highly unreliable that we never considered it a viable option.

Articles: Digital Photography Review (dpreview.com)

 
Comments Off on Metabones unlocks native Sony focus modes for Canon-mount adapters

Posted in Uncategorized


Looking Sharp: A focus stacking tutorial

29 May

This was taken in the deserts of Southern Utah at Snow Canyon State Park near St. George, Utah. 

 Photo: Chris Williams Exploration Photography

Background: Understanding the Process

One of the questions that I receive quite often from beginner photographers is “How do I produce tack sharp images from front to back in challenging shooting conditions or in cases where the foreground fills up nearly half the frame?” The answer in short is to utilize a process known as focus stacking. The answer is simple but the process can be very labor intensive from a shooting and processing standpoint.

Even when working with a large depth of field there may be occasions where you still have to take more than one image due to low light, wind and or large foreground subjects. Most technique books will tell you that this is easily accomplished by stopping down to a very small aperture such as F22, focusing on a set focal point at about 1/3 of the way into the frame or determining the spot from your hyperfocal distance (the distance between a camera lens and the closest object that is in focus when the lens is focused at infinity), focus at that spot and take your image.

Here’s one of the images that I used during focus stacking.  This was shot at 35mm and at f/2.8 due to conditions at the time of shooting.  As you can see it was impossible to achieve sharp focus throughout the image.

In principle this sounds like a very quick and easy fix to a somewhat complex problem that plagues most landscape photographers. In practice, however, it comes with a couple of big issues. Not only can using an aperture this small decrease image quality due to diffraction, it doesn’t actually deliver the maximum possible depth of field. That’s where stacking comes in. In the digital age we can now improve upon this technique and produce higher quality, tack sharp images from the front to the very back of the frame.

Before diving into this process I should mention that you may not always need to use this technique and this process is really up for interpretation in regard to what you define as a ‘sharp image’. The lens quality and aperture play a huge role in whether or not you wish to go through the work of focus stacking an image. In general, I always use this process now as I want my images to look tack sharp even when printed at very large sizes.

Selecting the Aperture

Choosing the aperture is an important first step to this process. I always try to choose an aperture in the ‘sweet spot’ of the lens. This is a bit of a loaded term; you have to decide whether you are after maximum resolving power or greater overall focus in your image. These differences may be subtle in some cases, but regardless I always try to choose optimal sharpness over depth of field in an individual image, bearing in mind that I’m going to be stacking multiple images. I would rather take a few extra shots to ensure that the RAW files are of the highest quality I can achieve given the conditions.

Generally speaking, the sweet spot of a lens is about 2.5 to 3-stops from the maximum aperture. This does vary from lens to lens however; for example, I normally shoot between f/8 and f/11 when possible on my Canon 16-35mm f/2.8L ii to achieve the sharpest results possible (which I know is a few stops greater). The bottom line is to get to know your lens! You can even run it through an aperture progression and compare the images to find that coveted lens ‘sweet spot’.

Behind the Lens

Focus stacking can be very tricky when you’re out in the field. I use the following steps to ensure that I don’t miss a focus point and to make adjustments on the fly in changing conditions such as light, wind and rain.

  • Find your desired composition and make sure that your tripod is in safe position that won’t allow for any movement or shifting while you’re performing the in camera focus stacking.
  • Place your camera on your tripod, turn on live view, switch your lens to manual mode, make sure that your camera is set to manual and dial in your composition.
  •  Once you have the composition dialed in lock your camera down on your tripod and make sure that your ball-head or camera mount is completely locked down so no movement can occur during this process (if some movement does occur you can try to correct this using Auto-Align in Photoshop, but I always try to avoid this to the best of my ability).
  • Use either your camera’s in camera timer (set for 2-10 seconds) or use a remote shutter trigger to avoid any camera movement issues.
  • Once you are 100% sure that you’re happy with the composition it’s time to adjust your settings; I always fire a few test shots to ensure that I can freeze the foreground subject (flowers etc.) and to see what I can get away with in regard to ISO/Aperture/Shutter-speed while still yielding an acceptable result with respect to proper exposure and the signal to noise ratio.
  • This may sound trivial but play with your settings a bit to find the right exposure/sharpness balance; aim to keep the ISO at base and the aperture as close to the ‘sweet spot’ as possible (f/8-f/11 in most cases) this may not be possible depending upon conditions, so make adjustments as you see fit.
  • Adjust your CPL or lens filter (ND etc.), if you’re using one, to give the foreground more pop etc.

The Progression

Now comes the fun part: how do you make sure that you have everything in focus and that you don’t miss a focus point? There’s definitely more than one way to go about doing this, but I generally focus on the foreground elements that are closest to the lens; normally near the bottom 1/3 of the frame in live-view.

I normally zoom in to my area of interest in Live-View and dial in my focus point using manual focus.  After taking the image I repeat the process for my next focus point.
  • While in live-view, zoom in to the bottom most portion of your foreground subject and manually adjust the focus until everything is sharp and adjust your settings depending upon conditions (wind etc.)
  • To find your next focus point stay in live-view, zoom in to the same area you just photographed and move up in the frame to find your next focus point
  • Repeat this process until you reach the background elements in your image and take your final exposure.
  • You may want to bracket your last exposure to keep the highlights and shadows from clipping or to catch a sunstar; if you’re shooting on a camera that has a great deal of dynamic range (like a Sony a7r/ii or Nikon D810) then you may be able to do this with one exposure; it’s completely up to you

The toughest thing about focus stacking in the field is dealing with changing conditions such as wind, rain and light. When wind is an issue I always run through at least two or three focus stacking progressions to ensure that I have a sharp frame at each focus point. Even in perfect conditions I still run through a focus point progression at least twice to ensure that I haven’t missed a point. There’s nothing worse then getting home after a long day of shooting only to find that you completely missed a focus point.

Once you take your camera off of your tripod or move your tripod, it will be a huge pain to get everything lined up again and you may not even be able to in most cases. Double and triple check your exposures to ensure that you’ve got all of your focus points nailed down before moving your camera and packing up your gear.

Articles: Digital Photography Review (dpreview.com)

 
Comments Off on Looking Sharp: A focus stacking tutorial

Posted in Uncategorized


Learning curve: LensRentals examines a series of linear focus motors

21 Apr

To the point…

Quick and to the point: that’s the reasoning behind the use of linear focus motors, but it’s less true of the latest blog post on the subject, over on LensRentals.com. That’s what we love about the crew’s in-depth teardowns. In their latest post they tear apart a series of linear drive lenses and discuss the various designs they’ve encountered. Some are pretty robust and others, well, take a look for yourself…

The need for new designs

The ring-type focus motors [pictured above] that were traditionally the default choice for high-end DSLR lenses are not especially well suited to the needs of mirrorless cameras or video shooting. Contrast detection autofocus requires not just being able to move a focus group quickly but also the ability to stop it, then drive it back in the other direction, all with high precision. Video requires silent and carefully-controlled focus drive, to allow smooth refocusing while the camera is recording. These different requirements have prompted the adoption of new types of focus motors.

Linear electromagnetic motors

Among the more popular alternatives to ring-type drive is the linear motor, which features a permanent magnet and a coil of wire that, when electricity is run through it, slides along a bar parallel with the magnet. In principle these fulfill the things demanded of them: fast, precise and quiet (we’ve been very impressed by how fast some of the linear motor lenses we’ve used can be).

Surprisingly, the internet has very few good diagrams of these designs, but you can sometimes recognize lenses that use this type of motor because the focus element rattles around when the camera is switched off. This is because in many linear motor lenses the focus element is only held in position when power is being provided to the focus coil – the rest of the time, the focus carriage can just slide up and down its rails. This isn’t true of the Sony and Zeiss designs that much of the blog post discusses – these appear to have some sort of brake to stop this disconcerting behavior.

Rattle and, er, break

Generally we don’t worry too much about this rattling, but perhaps we should. LensRental’s experience with large numbers of hard-worked lenses reveals that not all linear motor designs are the same. Early Sony motors attach the moving coil to the focus element carriage with just a single blob of glue. Oddly enough, this can fail; leaving the coil racing up and down the rail but with the focus element uncoupled. Later designs do a better job of securing the moving coil to the carriage, prompting Roger Cicala to define two categories within lenses of this kind: Type 1 motors and Type 1a designs that are very similar but don’t break so readily.

No right answer

As well as highlighting a failure mechanism of poor designs, Cicala and Co’s teardowns hint at a fundamental shortcoming of linear motor’s capabilities. Fujifilm’s use of two, three and four linear motors in some lens designs suggests that they struggle to move large, heavy lens elements quickly, taking a brute-force approach.

This is also likely to explain why Sony adopted three different focus drive technologies (linear electromagnetic motor, piezoelectric direct drive and ring-type motors, sometimes in combination) in its recently-announced GM series of lenses: because there isn’t yet a single technology that provides all the necessary characteristics in a way that works for all lens designs.

Results, not technologies

Like LensRentals, we’ve seen very different results between the best and the worst examples of each lens motor type, which is why we try to concentrate on performance, rather than technology, when we write about lenses. We’ve also been lucky not to experience any of the motor failures (perhaps better described as motor detachments), that LensRentals has seen, but it’s interesting to see the designs of lenses improve as manufacturers become more experienced at using each technology. Or, as in the case of the Sony 70-200mm F2.8 pictured here, a mixture of technologies.

We also hope Cicala makes good on his promise to look at other emerging focus technologies, and the ways in which they’re developing, in the coming weeks.

Articles: Digital Photography Review (dpreview.com)

 
Comments Off on Learning curve: LensRentals examines a series of linear focus motors

Posted in Uncategorized


Change of focus: 755 MP Lytro Cinema camera enables 300 fps light field video

12 Apr

Lytro is bringing its Light Field technology to the world of cinema and visual effects, shortly after its CEO announced in a blog post Lytro’s intention of abandoning the consumer stills camera space. Lytro Cinema turns every frame of live action into a 3D model, capturing intensity, color, and angular information of light rays. Coupling light field with a 755 MP sensor capable of capturing images at 300 fps, Lytro Cinema promises extensive post-production freedom, including adjustment of focus, depth-of-field, shutter speed and frame rate, as well as the elimination of green screens.

Although Lytro experienced some difficulty in adoption of light field technology in stills, the technology had, and continues to have, immense potential for imaging. Saving creative decisions for post-processing allows for more creative freedom, and allows a photographer or DP to focus on other elements during capture. Nowhere will this be more appreciated than in cinema, where the realities of production mean that any technology aimed at saving certain creative decisions, like focus, for post-capture are welcome.

Focus and aperture sliders in post-production. In video. No joke. I wish my Raw converter had this (Lytro’s Raw converter already does). Photo credit: Lytro

And that’s exactly what Lytro Cinema aims to do. By capturing directional information about light rays and essentially sampling multiple perspectives behind the aperture, Lytro Cinema allows for adjustment of focus placement, depth-of-field (via aperture adjustment), perspective, and more in post-processing. And since a depth map is rendered for every frame of video, Lytro claims Cinema will make it easier to combine CGI with live footage, no longer requiring green screens to extract elements or subjects from a scene. You’ll be able to just extract a subject based on its depth, which Lytro shows in a convincing example below:

Since light field cameras effectively sample multiple perspectives from behind the lens, you can even simulate camera movement as if it were moved on-set. The degree of motion is of course limited, but the technique can be very effective, as demonstrated in this haunting music video shot entirely on the stills-focused Lytro Illum. As Lead Engineer for Light Field Video Brendan Bevensee explains: “You have a virtual camera that can be controlled in post-production.” That means there’s also nothing stopping one from simulating short dolly motion or perspective shifts in post, with nothing but a static camera at the time of capture. “You can shift the camera to the left… [or] to the right, as if you had made that exact decision on set. It can even move your camera in and out” says Head of Light Field Video, Jon Karafin.

Imagine small, smooth, meditative camera movements that don’t even require a complicated motion rig to set up.

Furthermore, by precisely recording X, Y, Z, pitch, roll, and yaw, Lytro Cinema even offers automated camera tracking, which makes it easier to composite and mat CGI elements. And just as the Illum paired with Lytro Desktop software allowed one to select various objects and depths to throw them in and out of focus for selective depth-of-field and background blur, one can do the same in video with the Cinema, choosing, for example, to marry live footage from minimum focus to, say, 10m with different footage, or CGI, for everything beyond those distances. In other words, control over not just single planes, but ranges of planes.

Beyond just light field benefits, Lytro is also addressing another common headache: the selection of shutter angle (or shutter speed). Often, this is a decision made at the time of capture, dictating the level of blur or stuttering (a la action scenes in ‘Saving Private Ryan’ or ‘Gladiator’) in your footage. At high frame rates of capture, though, high shutter angles are required, removing some of the flexibility of how much motion blur you can or can’t have (e.g. 300 fps cannot be shot with shutter speeds longer than 1/300s, which inevitably freezes action). By decoupling the shutter angle of capture from the shutter angle required for artistic effect, a DP can creatively use motion blur, or lack thereof, to suit the story. The technology, which undoubtedly uses some form of interpolation and averaging in conjunction with the temporal oversampling, also means that you can extract stills with a desired level of motion blur. 

Lytro claims that by capturing at 300 fps, they can computationally allow for any of a number of shutter angles in post-production, allowing a cinematographer to decouple shutter angle required for capture from that required for artistic intent. Photo credit: Lytro

With every development over at Lytro, we’ve been excited by the implications for both stills and video. The implications for the latter, in particular, have always been compelling. Along with the announcement of the Lytro Immerge 360º virtual reality light field rig, we’re extremely excited to see light field video becoming a reality, and look forward to what creatives can produce with what is poised to be an unimaginably powerful filmmaking platform. Filmmakers can sign up for a demonstration and a personalized production package on Lytro’s site. For now, Lytro Cinema will be available on a subscription basis, understandable given the complexities involved (the immense data capture rates require servers on-set).

Head over to the Lytro Cinema page for more in-depth information. Lytro will be demo-ing “Life”, a short film shot using Lytro Cinema at NAB 2016.

Lytro Brings Revolutionary Light Field Technology to Film and TV Production with Lytro Cinema

  • World’s First Light Field Solution for Cinema Allows Breakthrough Creative Capabilities and Unparalleled Flexibility on Set and in Post-Production
  • First Short Produced with Academy Award Winners Robert Stromberg, DGA and David Stump, ASC in Association with The Virtual Reality Company (VRC) Will Premiere at NAB on April 19

Lytro unlocks a new level of creative freedom and flexibility for filmmakers with the introduction of Lytro Cinema, the world’s first Light Field solution for film and television. The breakthrough capture system enables the complete virtualization of the live action camera — transforming creative camera controls from fixed on set decisions to computational post-production processes — and allows for historically impossible shots.

“We are in the early innings of a generational shift from a legacy 2D video world to a 3D volumetric Light Field world,” said Jason Rosenthal, CEO of Lytro. “Lytro Cinema represents an important step in that evolution. We are excited to help usher in a new era of cinema technology that allows for a broader creative palette than has ever existed before.”

Designed for cutting edge visual effects (VFX), Lytro Cinema represents a complete paradigm shift in the integration of live action footage and computer generated (CG) visual effects. The rich dataset captured by the system produces a Light Field master that can be rendered in any format in post-production and enables a whole range of creative possibilities that have never before existed.

“Lytro Cinema defies traditional physics of on-set capture allowing filmmakers to capture shots that have been impossible up until now,” said Jon Karafin, Head of Light Field Video at Lytro. “Because of the rich data set and depth information, we’re able to virtualize creative camera controls, meaning that decisions that have traditionally been made on set, like focus position and depth of field, can now be made computationally. We’re on the cutting edge of what’s possible in film production.”

With Lytro Cinema, every frame of a live action scene becomes a 3D model: every pixel has color and directional and depth properties bringing the control and creative flexibility of computer generated VFX to real world capture. The system opens up new creative avenues for the integration of live action footage and visual effects with capabilities like Light Field Camera Tracking and Lytro Depth Screen — the ability to accurately key green screens for every object and space in the scene without the need for a green screen.

“Lytro has always been a company thinking about what the future of imaging will be,” said Ted Schilowitz, Futurist at FOX Studios. “There are a lot of companies that have been applying new technologies and finding better ways to create cinematic content, and they are all looking for better ways and better tools to achieve live action highly immersive content. Lytro is focusing on getting a much bigger, better and more sophisticated cinematography-level dataset that can then flow through the VFX pipeline and modernize that world.”

Lytro Cinema represents a step function increase in terms of raw data capture and optical performance:

  • The highest resolution video sensor ever designed, 755 RAW megapixels at up to 300 FPS
  • Up to 16 stops of dynamic range and wide color gamut
  • Integrated high resolution active scanning

By capturing the entire high resolution Light Field, Lytro Cinema is the first system able to produce a Light Field Master. The richest dataset in the history of the medium, the Light Field Master enables creators to render content in multiple formats — including IMAX®, RealD® and traditional cinema and broadcast at variable frame rates and shutter angles.

Lytro Cinema comprises a camera, server array for storage and processing, which can also be done in the cloud, and software to edit Light Field data. The entire system integrates into existing production and post-production workflows, working in tandem with popular industry standard tools. Watch a video about Lytro Cinema at www.lytro.com/cinema#video.

“Life” the first short produced with Lytro Cinema in association with The Virtual Reality Company (VRC) will premiere at the National Association of Broadcasters (NAB) conference on Tuesday, April 19 at 4 p.m. PT at the Las Vegas Convention Center in Room S222. “Life” was directed by Academy Award winner Robert Stromberg, Chief Creative Officer at VRC and shot by David Stump, Chief Imaging Scientist at VRC.

Learn more about Lytro Cinema activities during the 2016 NAB Show and get a behind-the-scenes look on the set of “Life” at www.lytro.com/nab2016.

Lytro Cinema will be available for production in Q3 2016 to exclusive partners on a subscription basis. For more information on Lytro Cinema, visit www.lytro.com/cinema.

Articles: Digital Photography Review (dpreview.com)

 
Comments Off on Change of focus: 755 MP Lytro Cinema camera enables 300 fps light field video

Posted in Uncategorized


Lytro CEO confirms exit from consumer photography business, focus on VR

05 Apr

In a recent blog post, Lytro CEO Jason Rosenthal has confirmed that the company is headed out of the consumer imaging business to focus instead on developing a light field virtual reality platform. Rosenthal admits that it was too risky to compete in an established consumer space (that was in decline, no less, thanks to smartphones), and determined the value-add of light field technology to VR would have greater impact. Hence, Lytro has scrapped product development in the consumer camera space.

Says Rosenthal, ‘The cold hard fact was that we were competing in an established industry where the product requirements had been firmly cemented in the minds of consumers by much larger more established companies.’ He also mentions the rise of smartphones and consumer satisfaction with image quality from them.

And ‘while consumer Light Field cameras offered a number of true technological breakthroughs such as interactive 3D pictures, radical lens specs, and the ability to focus a picture after the fact,’ the reality was that there was much more investment Lytro would’ve had to make to its cameras competitive with modern cameras in image quality. Meanwhile, VR companies and Hollywood studios were increasingly asking for light field technology in cinematic and next-gen content. ‘We had just raised $ 50MM in new capital. We didn’t have the resources to both continue building consumer products and invest in VR.’

Accordingly, in November of last year, Lytro announced Immerge, a 360° light field video capture device, just after announcing plans for layoffs as the company shifted direction toward video and VR. The pro-grade Immerge was a confirmation of this change in focus. It’s currently only a concept camera, capable of recording live action VR in what Lytro claims as ‘six degrees of freedom’ that, if we understand correctly, should allow for multiple perspectives from multiple angles of view, as well as focus and depth-of-field control after-the-fact. This is a clear benefit for VR capture, which aims to capture as much scene content as possible for the viewer to explore in a virtual environment. 

The decision to shift the company’s focus was not taken lightly. Rosenthal details the anxiety he felt before shifting the company vision, but now says ‘My middle of the night panic attacks are gone. I wake with a burning desire to go to work because I am so excited by what we are building and its potential to help shape VR.’

Have a read of Rosenthal’s full blog post here. It’s quite insightful in laying out some of the considerations Lytro has faced as a company. Some of us here are certainly disappointed that Lytro appears to be completely exiting the consumer camera space, as light field technology had a lot of potential in revolutionizing autofocus, in decoupling depth-of-field and light gathering ability, bringing depth-based image editing to the table, and in radical lens design previously thought impossible, thanks to the ability of light field data to perform certain corrections – even image stabilization – after-the-fact as opposed to optically. That said, we certainly understand the change in direction and are very excited to see what Lytro brings to VR and video.

We’ll be following closely. Let us know your thoughts in the comments below.

Articles: Digital Photography Review (dpreview.com)

 
Comments Off on Lytro CEO confirms exit from consumer photography business, focus on VR

Posted in Uncategorized


A Beginner’s Guide to Focus Stacking

23 Mar

Other than for special effect, photographers generally do not want out-of-focus images. But sometimes, regardless of which camera settings are used, not every detail of an image can be captured tack sharp. Depth of field (DOF) can be so shallow, that interesting aspects of the photos are without sharpness. Setting to a smaller aperture may be used to increase DOF, but moving the aperture farther from a lens’s sweet spot introduces lens diffraction into the image, again resulting in some fuzziness. Also, if stopping down the camera’s aperture, shutter speed will need to be increased and blurry images may result. Increasing ISO to help with the exposure will introduce digital noise to the image.

So, how do you shoot with the best aperture and shutter speed combination, and get sharp images from front to back of an image? A technique that can help resolve this problem is called focus stacking. Here’s some helpful info about this technique.

13 image Focus Stack

13 image focus stack

What You Need

  • A tripod.
  • A DSLR camera, capable of shooting in manual mode. It is possible to use a point and shoot camera, but it must have manual mode and manual focus capabilities.
  • Depth of Field iPhone app (helpful but not required).
  • Photoshop or another focus stacking software.

How to Shoot for Focus Stacking

Focus stacking is similar in principle to HDR. However, with focus stacking, images are captured with different focus points, and later combined in Photoshop, to create an image with more DOF than would be possible with a single exposure. Landscape and macro photography are two genres of photography that benefit most from using this procedure. Be warned – calm winds and reasonably stationary objects are a must!

Before beginning to shoot, it is always helpful to know a lens’s sweet spot, defined as the aperture that the lens produces its sharpest image. (It is usually found about two to three stops from wide open.) Experiment until this important setting is determined.

6 image Focus Stack

Landscape

There are two basic scenarios when shooting landscapes, that may benefit from focus stacking. The first is when the subject is a close foreground object, with an interesting background, both desirable aspects to be in sharp focus. The second, is when using a telephoto lens (which typically has a shallow depth of field) and the subject covers multiple distances, that may be brought into sharper focus. (FYI: If shooting a landscape with a wide angle lens, the DOF may be adequate enough to capture a sharp image that has no benefit in being processed by focus stacking.)

Tip: Here is a little trick to find out if focus stacking will benefit an image when photographing a scene or subject. After composing the image, set the focus point about one third into the image. Then, using Live View, enlarge the image and check to see if the foreground and background are sharp or blurry. If either or neither are in focus as sharply as desired, the image could benefit from focus stacking.

Steps for Shooting Landscapes for Focus Stacking

  1. Place the camera on a sturdy tripod – a must!
  2. Frame the subject and compose the shot.
  3. Determine exposure for the scene, and set the camera to manual mode, to ensure that the exposure is constant for every image.
  4. Set the camera to Live View and aim the focus point on the nearest object desired to be in focus. Use the camera’s zoom (+ button, not zoom on the lens) to preview the focus through Live View. Then switch to manual focus and use the focus ring to fine tune for sharpness if necessary.
  5. Take the first exposure.
  6. Without moving the camera or adjusting any settings, move the focus point to an object mid-way in the image and refocus.
  7. Take the second exposure.
  8. Again, without changing anything, refocus on an object at the farthest point of the intended image.
  9. Take the third exposure.
    To capture landscapes, three images are generally all that is necessary to create sharp focus stacking images, but it’s completely fine to take extra images to make sure that the entire scenee is covered. A rule of thumb would be to add more images for longer focal lengths. Be aware that extra images will take longer to process in post-production. If available, check the DOF with a Smartphone app, in order to figure out how many images will be necessary, to get every aspect of the photo in focus.
Using three images focus stacking. The first image was focused on the fence, the second was focused mid-way into the image, and the third was focused on the front of the house.

The first image was focused on the fence, the second was focused mid-way into the image, and the third was focused on the front of the house.

Macro Photography

Macro photography can benefit from focus stacking more than any other type of photography, because a macro lens has an extremely shallow depth of field.

  1. Place the camera on a sturdy tripod – a must!
  2. Frame the subject and compose the shot.
  3. Determine the exposure for the subject, and set the camera to manual mode to ensure that the exposure remains constant for each and every image.
  4. Set the camera to Live View and aim the focus point on the nearest object desired to be in focus. Use the camera’s zoom (+ button, not zoom on the lens) to preview the focus through Live View. Then switch to manual focus and use the focus ring to fine tune for sharpness if necessary.
  5. Take the first exposure.
  6. Without moving the camera or adjusting any settings, move the focus point to a distance slightly farther away from the lens. Remember that DOF in macro will be measured in fractions of an inch, instead of feet, as in landscape photography.
  7. Repeat step 6 as many times as needed to cover every aspect of the subject’s DOF. This could range from as few as six images to 30+ images. Make sure the entire subject is covered or the results may be unusable. If available, check the DOF with the iPhone app (www.setmycamera.com), in order to figure out how many images will be necessary to get every aspect of the photo in focus.
By focus stacking the flowers only and leaving the background out of focus makes the flowers stand out in the final image.

Focus stacking the flowers only makes the flowers stand out from the background.

Image on right is a single image capture at 85mm focal length. Image on right is a 12 image focus stacked image. Each image had a DOF of less than one inch.

The image on right is a single image capture at 85mm focal length. The image on right is a 12 image focus stack. Each image had a DOF of less than one inch. Note the additional detail in the image on the right, compared to the single image.

Tip: As often used when capturing HDR images, take a shot with your hand in front of the camera before and after each series of images. When working with the images later, this will make it easier to tell where each series starts and ends.

Use you hand to mark the beginning of each series of images, this will make processing you images much easier.

Use your hand to mark the beginning of each series of images. This will make processing your images easier.

Processing the Final Images

Processing the files to accomplish the final image may seem like the most difficult part of creating a focus stacked image, but it’s really very simple to do in Photoshop. Here’s how:

  1. Open Photoshop
  2. Get each image on a separate layer: Under File, choose Scripts and Load files into stack. Click Browse and select all the images.
  3. Check the box for Attempts to Automatically Align Source Images.
  4. Click OK and each of the images will open into a new layer in Photoshop.
  5. Open the Layer palette and select All Layers.
  6. Under Edit, select Auto-Blend Layers.
  7. Check the box for Stack Images and Seamless Tones and Colors. Optionally, select Content Aware Fill Transparent Areas, which will fill any transparent areas generated by aligning images in step 3. (Be aware this will increase processing time. Generally, I do not choose this option; rather, I just crop the image slightly later, if necessary.)
  8. Click OK
  9. Flatten the image by selecting Layer/Flatten image and save.

Focus-stacking-1

Note: If you are using a Lightroom and Photoshop workflow, after importing your images into Lightroom, instead of following steps 2 through 5, you can simply add all your images into Photoshop layers by selecting all your images, then go to Photo/Edit in/Open as Layer In Photoshop. This will open all the selected images as layers. You will then have to Align your images by selecting all the layers in the layer palette, then go to Edit/Auto Align Layers. Then continue at step 6 above.

Summary

It is nearly every photographer’s intention to capture the sharpest images possible, and focus stacking can be another tool to help you achieve this goal. The trick to this whole process is to take enough focused images, to create a final photo that is in focus from foreground to background. The results can be amazing once you get the hang of it! Give it a try and post your results and any questions you have here.

googletag.cmd.push(function() {
tablet_slots.push( googletag.defineSlot( “/1005424/_dPSv4_tab-all-article-bottom_(300×250)”, [300, 250], “pb-ad-78623” ).addService( googletag.pubads() ) ); } );

googletag.cmd.push(function() {
mobile_slots.push( googletag.defineSlot( “/1005424/_dPSv4_mob-all-article-bottom_(300×250)”, [300, 250], “pb-ad-78158” ).addService( googletag.pubads() ) ); } );

The post A Beginner’s Guide to Focus Stacking by Bruce Wunderlich appeared first on Digital Photography School.


Digital Photography School

 
Comments Off on A Beginner’s Guide to Focus Stacking

Posted in Photography