RSS
 

Posts Tagged ‘Flash’

Discover How to Master Off-Camera Flash like a Pro

06 Aug

Off-Camera Flash Advanced Course

If you want to figure out how to get amazing results like the pros, the secret is off-camera flash. Phil Steele has just released the sequel to one of the best off-camera flash courses we’ve ever promoted through Digital Photography School. And it has been worth the 4 year wait!

But don’t worry, if you haven’t done the original course, you can still learn these advanced lighting techniques to make your photos stand out. For one week only we can offer you a one-time only 50% discount off the $ 147 course fee. The course will never be available at this price again.

For just $ 74 the Advanced Off-Camera Flash Photography course by Phil Steele makes amazing photography accessible. What once required a complicated and expensive studio setup, can now be done with small portable speedlights.

Phil will save you even more money by showing the few essential and inexpensive pieces of gear you’ll need to get started, and some options for more advanced shooting. He’ll then teach you all the techniques you need to get the kind of photos that photographers with on-camera flash just can’t achieve. He’ll even show you his mistakes so you can learn from them.

Just some of the fun techniques you will learn include how to:

  • take beautiful night portraits using background lights for a glamourous bokeh effect
  • master the art of tabletop photography for selling on ebay or simply capturing beautiful objects
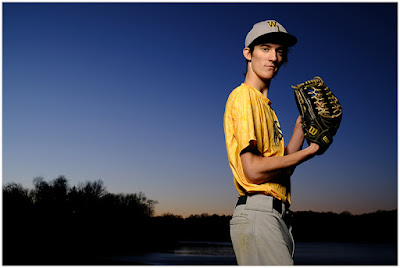
  • master the art of daylight portrait photography with blurry backgrounds, even in full sunlight
  • use simple colored gels that transport your photos to another world, or add excitement to any event
  • create drama in your event photography with flash backlighting
  • remove your own lights from your photos in post-production

Or maybe you have already dabbled in off-camera flash, but you know you’re not quite there, like Sue:

“Phil, I have had three flashes for couple of years, and they have just sat there doing nothing. I just needed someone to explain in my terms how to use these flashes, and your course certainly is doing that. I love that you show us that everyone makes mistakes. I never know if what I am doing is right, and this course is pointing me in the right direction. I also love the in-depth retouching explained so well. Thank you!”

—Sue Masterson, Ballarat, Australia

For the next week only, Phil is offering a 50% discount off his course fee of $ 147. dPS readers will pay just $ 74 for his Advanced Off-Camera Flash Photography course, and you’ll also get a great deal if you want to pick up his original course “How to Shoot Professional-Looking Headshots and Portraits on a Budget with Small Flashes”.

You’ll get instant access for life to 22 videos (over 5 hours of training) distilling almost a decade of Phil’s experience with off-camera flash, and of course, a 100% full money back guarantee.

If you’re not getting the results you want with your photography, off-camera flash may just be what you need to get professional-caliber results.

And remember, it doesn’t matter if you haven’t done the original course (all though a lot of you have!), and you get a great deal on it if you haven’t.

Learn more and buy the course

More testimonials from Phil’s students:

“Another informative, clear, and easy-to-understand course. I like the manageable “chunks”, which allow you to digest and understand each section, before moving onto the next. The easy, relaxed teaching style aids concentration, and you avoid getting bogged down in jargon. Showing your mistakes was a great idea, not only showing you as “human” but also a great learning tool. This course is up to, if not exceeding, the high standards of your previous courses.”

—John Steel, Rochdale, UK

“This is THE course I have been waiting for for soooooo long. Perfect! I watch videos from everyone out there, both on YouTube and some that I’ve paid for. You are the best by far hands down. You speak clearly. I am the lead photographer at my university (I loved your Event Photography course, too.) I will be recommending your course to the other photographers on my team. It was worth the wait.”

—Bob Weidner, Pocono Mountains, Pennsylvania

“Phil—another fantastic course—well worth the wait!  I learned something from every video, and feel (once again) a renewed sense of confidence to raise my own photography game!  Particular favorite videos were #15 (Colored Gels) and #21 (Overpowering The Sun). Your teaching style is terrific as always, and I thoroughly enjoyed every minute of the course. I can’t wait for the next one!”

—Steve Burn, Toronto Canada

“GREAT JOB! Kudos on making this course “up close and personal.” It has a wealth of technical expertise…explained, illustrated, and demonstrated in a very easy to understand way. I loved the removing-the-lights trick. Including some of your “mistakes” makes this much more helpful for the real-world photographers who are going to implement this vast amount of knowledge. Thank you so much!”

—John Quinn, S.J., Photography Instructor, Loyola High School, Los Angeles

“Finally a photography course to get EXCITED about. The techniques laid out in this course not only deliver immediate (and truly dramatic) results, but also will change how I’ll be shooting serious photos the rest of my life. Phil Steele can teach like few others. Whatever your experience, the material here will open up to you an entirely new realm of photographic possibilities.”

—Sebastian Michaels, Photoshop Instructor, North Carolina

“Your courses are well organized and deliver the proper content in the right amount of time. I love the fact that you teach it from the beginning of the shoot (planning and gear explanation) to the end product ready for the client. I find it helpful to know that even as a professional that you can make mistakes as well! I have learned so much from your training courses that could never be accomplished by reading books or attending seminars!”

—Duane T. Bruning

Like many dPS students before you, we’re confident you’ll get a lot out of Phil’s teaching. And remember, Phil offers a full money back guarantee, so you can benefit from this one-time only 50% discount completely risk-free. And if it’s not for you, you can get a full refund.

The post Discover How to Master Off-Camera Flash like a Pro appeared first on Digital Photography School.


Digital Photography School

 
Comments Off on Discover How to Master Off-Camera Flash like a Pro

Posted in Photography


Nissin MG10 hammerhead flash goes on sale

31 Jul

The MG10 hammerhead flash unit from manufacturer Nissin will be available from the end of this month priced $ 599. The handle-mount flash is designed to be used both attached to the camera and as a studio-type head, and has a maximum guide number of 262ft/80m@ ISO 100 and with the zoom set to the 200mm position.

When connected to the camera via the company’s 2.4Ghz Nissin Air System radio communication the flash can be remotely triggered and controlled, and the zoom head will automatically synchronize with the focal length of the lens in use. The head can adjust to cover focal lengths of between 24mm and 200mm, while an additional diffuser panel expands the coverage to 18mm. Using the Air system the flash unit can be used to trigger the camera too, as it has a shutter release button built-in to its grip.

The handle can be mounted on the left or the right side of the camera, and is powered by either eight AA cells or a pair of rechargeable PS8 lithium ion batteries. When the Li-ion batteries are in use recycling time drops from 3.5 seconds to just 1.5 seconds at full power, and we should expect 500 full power bursts per charge.

A modeling light is included to assist pre-visualization, and every unit comes with a quick release L mounting bracket, AA magazine, a ball head and a filter holder. Via the Nissin Air System the MG10 can wirelessly operate with up to eight groups of other flashes in TTL and M modes, and a MicroSD card slot is designed to allow users to update firmware themselves when improvements are released.

For more information see the Nissin website.

Press release

The ultimate power – Nissin MG10

An advance NAS 2.4Ghz Wireless strobe for on-camera and studio shoot

Nissin Japan Limited (Chairman Mr. Goto Chikara) proudly announces the MG10, an advance NAS (Nissin Air System) 2.4Ghz Wireless strobe for both on-camera and studio shoot, available in the bottom of Jun 2018

The MG10 is a high power (80GN, 165 w/s) advance strobe in the N.A.S., Nissin Air System*1. The flexible hand grip arrangement which can be used both left and right side with height level adjustment. Every single MG10 included a quick release mounting magnesium “L” bracket, AA battery magazine, Li-Ion battery magazine, ball head, filter holder and wide-angle diffuser. There is a shutter release button on top of the handle and standard adapter screw under the flash head for using in the studio shooting. It also fully supports Air 10s and Air 1 commander wirelessly.

Patented design – magnetically contacted motorized zoom head *2

The removable external motorized zoom allows MG10 to zoom 24 ~ 200mm and 18mm with diffuser. It can also control in manual and auto synchronize lens focal length via Air 10s.

Fast recycling time with full power

When two Li-ion batteries with PS8, type 26650, the recycling time is only 1.5 seconds (500 flashes with 5000mAh batteries or higher). With 8 AA re-chargeable batteries the recycle time is approximately 3.5 seconds*3.

High power modelling light (LED)

The powerful modelling light without zoom head which is perfect match for applying to the studio usage.

Set your group of strobes free – The Open Mode allowing multiple Air10s pair to the same group of strobes

The “open mode” allows for multiple Air10s units to pair the same group of the MG10 strobes which means the need to re-pair devices is eliminated. Even if cameras are changed, the same settings can be used as the shoot continues. This convenient functionality allows multiple cameras and commanders to share a same group of NAS strobes (MG10).

New wireless remote shutter replaces the camera shutter button

With the wireless remote button from flash, signal can transfer through the shutter cable socket (2.5mm) on Air 10s and then go to the camera. It is more flexible for holding MG10 as shutter release to moving around during shooting.

Independent control of maximum 8 groups

MG10 supports the basic and advance groups in maximum 8 groups via Air 10s. The basic group which is independently control the exposure setting in TTL or M mode. The advance group which is control both TTL and M mode in the mixing setting.

Sustainable performance – easily updated via a Micro SD card slot

The MG10 equipped with a Micro SD card slot that allows user to update the device easily by themselves. Nissin plans on putting a Micro SD card slot on all future strobes and commanders.

Articles: Digital Photography Review (dpreview.com)

 
Comments Off on Nissin MG10 hammerhead flash goes on sale

Posted in Uncategorized


SLC-1L-04: A Hack for Manual Flash at Sunset

16 Jun

Manual flash is great for its consistency and repeatability throughout a shoot. But working in a fluctuating ambient environment, such as against a fast-waning sunset, can get hairy.

Today in the Lighting Cookbook, how to easily control the exposure level of both your subject and background without your eye ever leaving the viewfinder. Read more »
Strobist

 
Comments Off on SLC-1L-04: A Hack for Manual Flash at Sunset

Posted in Photography


Leica announces SF 60 Flash Unit and SF C1 Remote Control Unit for M and SL cameras

04 Jun

$ (document).ready(function() { SampleGalleryV2({“containerId”:”embeddedSampleGallery_4514698769″,”galleryId”:”4514698769″,”isEmbeddedWidget”:true,”selectedImageIndex”:0,”isMobile”:false}) });

Leica has announced a new flash and remote control flash unit for its Q, SL/CL and M-series digital cameras. The Leica SF 60 flash offers TTL metering, and high-speed sync up to 1/8000sec. The SF 60 has a guide number of 60 at ISO 100, and also features tilt and zoom, with a built-in diffuser and reflector card.

The Leica SF C1 remote control unit enables wireless control of SF 60 flash units across up to seven channels, in three groups. The SF C1 incorporates a Micro SD card slot for future firmware updates.

The SF 60 flash and SF C1 controller will be available later this month, for $ 595 and $ 350 respectively.

Press Release:

Leica Camera Announces Leica SF 60 Flash Unit and Leica SF C1 Remote Control Unit For On- and Off-Camera Flash Photography

Both compact and versatile, the new flash system allows for
supreme quality light control in any situation

June 4, 2018 – Leica Camera presents the new SF 60 flash unit and the SF C1 remote control unit as perfectly complementary additions to the Leica S, SL and M systems. The two units can also be used in combination with the Leica Q and the Leica CL. While the flash unit provides an extensive range of options for flash-photography in a compact form, the remote control unit enables off-camera flash with the SF 60, providing for endless creative opportunities.

Leica SF 60 Flash Unit

Despite its low weight of 10.8 ounces and a height of only 9.8 cm, the Leica SF 60 offers numerous professional functions. The Leica SF 60 is an extremely powerful and versatile mobile solution for all photographers who appreciate the advantages of excellent light-management in any situation, with impressive features such as TTL-flash, HSS (High-Speed Sync) to 1/8000s, a flash head with tilt and swivel function, a zoom reflector, an integrated diffuser and a reflector card, as well as master-slave capability, as well as an impressive guide number of 60 meters (at ISO 100).

The SF 60 also provides continuous LED light output, adjustable in nine steps, as a source of light for spontaneous video recording of subjects in low light. All settings can be conveniently made via two dials and the color LCD panel of the flash unit. The Leica SF 60 is powered by four AA cells. For longer shooting sessions, the unit can also be connected to a Power Pack as an external power supply, which, in addition to higher capacity, also enables even faster flash recycle times and simultaneous power supply to up to two SF 60 flash units. If required, other devices with USB charging ports, e.g. smartphones or tablets, can also be recharged from the Power Pack.

Leica SF C1 Remote Control Unit

The Leica SF C1 remote control unit adds a multitude of creative options. It is mounted on the hot shoe of the camera and enables wireless remote control of SF 60 flash units in the 2.4-GHz frequency band. The flash units can be organized in up to seven channels, each with three groups, and controlled either together or separately with the same or different settings. Photographers can use all functions of all the flash units, just as if they were mounted on the camera. This opens up countless options for professional lighting set-ups with system flash units.

As is the case with the Leica SF 60 flash unit, all settings can be viewed and easily changed on the clearly laid-out color LCD panel of the Leica SF C1 remote control unit. Alongside reserves sufficient for around 3,000 exposures from its two AAA cells, the future-proof SF C1 remote control unit also features a microSD card slot that allows the latest firmware updates to be uploaded to keep the unit at the cutting edge of technology.

Both units will be available worldwide in Leica Stores, Boutiques and Dealers later this month. The SF 60 Flash will retail for $ 595 and the SF C1 Remote Control will retail for $ 350.

Articles: Digital Photography Review (dpreview.com)

 
Comments Off on Leica announces SF 60 Flash Unit and SF C1 Remote Control Unit for M and SL cameras

Posted in Uncategorized


Tips for Using On-Camera Flash for Beginners

26 May

Flash is a challenging subject and can be confusing if you’ve never used it. These two videos will give you an overview of some flash basics you need to know, and how to take the next step when using flash – bouncing it for better lighting.

On-Camera Flash Basics

In this video, Chris from The Camera Store gives you a crash course in some on-camera flash basics. He covers what you need to know to get your flash photos looking better and more natural so you don’t have subjects with deer in the headlights looks or black cavernous backgrounds with no light.

?

Flash for new users

?

Next, this video from Mark Goodin of RealWorld will walk you through understanding some of the settings on your flash and how to use it to make better light on your subject. He even gives a couple tips for diffusing your on-camera flash (the built-in one that pops up) so it isn’t so harsh.

Want more?

If you want more flash photography tips, try these dPS articles:

  • A Quick Guide to Using Bounce Flash for More Natural-Looking Photos
  • How to use Off-Camera Flash to Create Dramatic Images with Cross Lighting
  • What is a Flash Bracket and Why Do You Need One?
  • How to Understand the Difference Between TTL Versus Manual Flash Modes
  • Flash Shopping Guide – 5 Things to Consider When Buying a Speedlight
  • Tips for Using Speedlights to Create the Right Lighting for Outdoor Portraits

The post Tips for Using On-Camera Flash for Beginners appeared first on Digital Photography School.


Digital Photography School

 
Comments Off on Tips for Using On-Camera Flash for Beginners

Posted in Photography


Video: A Sony flash ‘feature’ you may not like, and how to work around it

16 May

Photographer Robert Hall sent us his latest video, because he’s found some interesting things about the way the live view and EVF on recent Sony full-frame mirrorless cameras respond when you attach a flash or flash trigger to the hot shoe. And, usefully, he’s also found a workaround.

Like many mirrorless cameras, the Sonys offer a choice of whether the preview display reflects your settings (to help assess exposure) or ignores them to give a consistently bright preview (useful if you’re working with strobes in a studio). This is one of the key advantages a digital preview can offer over an optical viewfinder. You select this by turning “Setting Effect” On or Off in the Live View Display menu.

However, when you attach a flashgun or trigger, this setting is over-ruled, automatically switching to a ‘corrected’ preview simulating the metered exposure. This is a behavior we quite liked when we tested the camera, but Hall points out that it’s not very helpful if you want to assess the contribution of ambient light to your scene. It essentially surrenders the advantage of using a digital preview.

This, in turn, led Hall to work out what the ‘Shot Result Preview’ option—assignable to a custom button—is for. It lets you work around the camera’s enforced behavior when you have a flash or trigger attached, albeit at the cost of one of your custom buttons. We checked with some other brands and found Panasonic cameras do the same thing as Sony, but without any kind of workaround.

From our perspective, it would be much simpler to add a second option after the ‘Settings Effect’ On/Off option in the menu: one that lets you define what happens when you add a flash. That way you can accommodate the preferences of both kinds of photographer, but without the need for workarounds.

It also goes to show: for all that we criticize the complexity of menus in current cameras, it’s extremely difficult to build a camera that works the way every user will want. It also highlights the occasional need to re-assess the way cameras work, from the ground up, rather than gluing patches and workarounds on top of what’s already there.

Articles: Digital Photography Review (dpreview.com)

 
Comments Off on Video: A Sony flash ‘feature’ you may not like, and how to work around it

Posted in Uncategorized


hähnel introduces Modus 600RT flash for Micro Four Thirds

15 May

Battery and accessory brand hähnel has extended its range of radio-triggered Modus 600RT flash units with a model for Micro Four Thirds cameras. The unit can be used directly in the hotshoe as a standalone flash, or will work within a group of flashes as a TTL commander or a slave using radio or optical communication.

The company already makes this model speedlight for Canon, Fujifilm, Nikon and Sony systems, and is adding Olympus and Panasonic cameras with this new model.

Although the Modus 600RT shares its basic design with the Godox TT685 flash, and much of its specification with the Godox V860II, hähnel claims its flash has significant advantages that account for the difference in price. A spokesperson told DPReview that the build quality of the 600RT is improved, and that hähnel is especially proud of its firmware updates and customer service—both before and after purchase.

The Modus flashes also feature Digital Channel Matching that locks the transmitter and receiver together once they are connected, to reduce the possibility of interference. Another major difference, according to hähnel, is the quality of the supplied lithium-ion block battery, which is injected with silicone to insulate the circuits and to provide improved shock absorption. The company says these hähnel Extreme li-ion batteries have a longer life and retain their charge for longer than competitors’ equivalents.

The Modus 600RT has a guide number of 60m/197ft at ISO 100, and can produce 600 full-power bursts per charge with only a 1.5-second delay for recycling.

With a transmitter and receiver built-in, the flashes work as both commanders and slaves in groups of other hähnel Captur-compatible guns as well as in combination with manufacturers’ original and third party units. A Viper TTL radio controller can be used from the hotshoe to control single guns or up to three groups of guns at a range of 100m/330ft, and can operate in full TTL, manual or strobotic modes with DCM. The zoom head offers coverage for 20-200mm lenses and high speed synch mode allows use with shutter speeds as short as 1/8000sec.

The hähnel Modus 600RT for micro four thirds is available now and will cost £270/$ 250/€250 including a Viper transmitter, hähnel Extreme li-ion battery and charger. For more information, read the full press release below or visit the hähnel website.

Press Release

{PressRelease}

hähnel announce launch of MODUS 600RT Speedlight for Micro Four Thirds

Following on from the very successful launch of the MODUS 600RT Speedlight for Canon, Nikon, Sony & Fuji, hähnel have now announced availability of the MODUS for Micro Four Thirds (Panasonic & Olympus).

The staggeringly powerful hähnel Extreme Li-Ion battery provides the power for the MODUS and beats the speed of AA-powered speedlight’s hands down. With a GN of 60, the MODUS will handle over 1000 shots at ½ power and over 600 shots at full power.

Rather than waiting the normal 4-6 seconds which normal Speedlight’s would require at full power, the MODUS 600RT has fast re-cycling in abundance at just 1.5 seconds. The built-in wireless receiver/transmitter offer TTL, manual and multi modes and high-speed sync supports up to 1/8000 of a sec.

The unique wireless connectivity really steps into its own when paired with the Viper TTL Wireless Flash Trigger. Use them together and control up to 3 separate groups of flash guns in either TTL, manual or Multi (Stroboscopic) mode. DCM channel matching and over 100m range makes the Viper TTL the perfect partner for this new speedlight.

With a long-standing reputation for high- quality accessories, it is no surprise that the MODUS has received ‘Best Value Accessory’, ‘Best Accessory’ and ‘Gear of the Year – Best Flashgun’ accolades from Digital Photographer, Digital Camera and N-Photo magazines since launched.

Stock available from Monday 28th May.

MODUS 600RT WIRELESS KIT FOR MICRO FOUR THIRDS RRP £269.99

{/Pressrelease}

Articles: Digital Photography Review (dpreview.com)

 
Comments Off on hähnel introduces Modus 600RT flash for Micro Four Thirds

Posted in Uncategorized


What is a Flash Bracket and Why Do You Need One?

18 Apr

A flash bracket is a device that attaches to your camera and allows you to keep your flash at a greater distance than your built-in or shoe-mounted flash. The result is lighting that is more attractive and consistent. But it comes at the expense of adding quite of a bit of extra bulk to your camera.

In this day and age of MagMod and other portable lighting modifiers, are flash brackets still relevant for photography? Perhaps. Let’s dig into when and why you might need a flash bracket (or not).

Camera flash bracket

Parts of a flash bracket

Flash brackets typically consist of a metal frame that attaches to the tripod screw on the base of your camera. The top portion of the flash bracket will also have a cold shoe mount for attaching an external lighting source such as a speedlight flash.

Camera flash bracket

As a result of your flash no longer being connected to your camera’s hot shoe mount, you’ll have to add an extra accessory to complete your flash bracket setup. You’ll need a flash trigger, which can take the form of a dedicated TTL cord, sync cable, or a wireless radio transmitter.

Once you put it all together, you’ll have a beast of a camera rig.

Why use a flash bracket?

The reasons for needing a flash bracket depend entirely on what kind of photography you do, and the gear that you have. Generally speaking, flash brackets are useful for the following reasons.

Predictable, consistent lighting

Flash brackets allow you to have predictable, consistent lighting. This is especially key for event photographers who may need to roam between rooms with differing ambient lighting conditions. A flash bracket can help you achieve consistent lighting no matter the ambient light.

Among the most common applications for a flash bracket is at a red carpet event. If you look a the photographers working the event, almost all will have a flash bracket of some sort. That’s because they have no control over the ambient lighting at the event and must quickly take horizontal and vertical images of a fast-moving subject.

Camera flash bracket on a Canon camera

No need for an assistant

It holds your flash slightly off camera without the need to physically hold your flash off-camera or use an assistant. Again, this is most useful for event or wedding photographers who may not have an extra set of hands.

Helps you shoot in a vertical orientation

If you shoot a vertical image with direct flash attached to your camera’s hot shoe mount,  you might notice that your photo subject has a sideways shadow. You’ll have a similar challenge even when trying to use your flash’s built-in bounce card or a lighting modifier such as the MagMod MagBounce.

Most speedlights don’t rotate 90 degrees, with the exception of select Sony flashes with the Quick Shift Bounce feature. In order to keep your flash position consistent when shooting horizontal and vertical photos, you need a pivoting flash bracket to help you swivel the flash to always keep it above the camera.

Camera flash bracket

Shooting a vertical photo with the flash mounted to your camera’s hot shoe means your flash is at a sideways angle.

Camera flash bracket

Resulting image when shooting vertically without a flash bracket. Note the heavy shadow to the subject’s side.

Camera flash bracket

Shooting a vertical photo with a flash bracket keeps the flash on top of your lens, allowing for more consistent lighting.

Camera flash bracket

Resulting image when using a flash bracket. The side shadow is almost totally eliminated.

What about bounce flash?

Bouncing your flash off the ceiling or using the built-in bounce card is a great way to achieve nice lighting. But depending on the type of photography you do, you can’t always guarantee there will be a good surface to bounce your flash. When you need consistent lighting in unpredictable photography environments, a flash bracket could help you out.

Camera flash bracket

Shooting a vertical image with a bounce card results in awkward angles when shooting without a flash bracket.

Camera flash bracket

Resulting image when shooting without a flash bracket.

Camera flash bracket

Shooting a vertical image with a bounce card and a flash bracket results in an image with more balanced lighting.

Camera flash bracket

Resulting photo when shooting with a flash bracket.

Recommended flash brackets

Flash brackets can range from very simple and inexpensive, to more complex and thus more costly. A straight flash bracket such as this one by Vello will be pretty cheap, costing $ 20 or less. It’s much harder to find a rotating or swiveling flash bracket that will do so smoothly and without adding too much bulk. After much research, I ended up purchasing the model below, used mainly for my red carpet photography shoots.

Custom Brackets RF-PRO Rapid Fire Flash Bracket

This flash bracket (Custom Brackets RF-PRO Rapid Fire Flash Bracket) stands out for several reasons. First, it is somewhat thin and compact, especially when folded down. This makes it easy to store and carry with me on location. The layout of the flash bracket is also such that it keeps my speedlight relatively close to my camera body and lens, making for an overall low-profile rig.

Many other flash brackets such as this option from LimoStudio end up being extremely bulky as they elevate the flash way above the camera. This might be helpful if you need to move your flash around a lot, but it makes for a much bigger footprint.

Constructed of sturdy aluminum, the Custom Brackets unit is very solid, yet relatively lightweight considering the load that it is meant to carry. And finally, it is one of few flash brackets out there that easily and quickly rotates the flash.

Camera flash bracket

So do you need a flash bracket?

If you have the luxury of setting up lighting and controlling your photography environment, you probably don’t need a flash bracket. However, if you do a lot of on-location photography and don’t always have control over your lighting factors, a flash bracket could help you out, and be a handy addition to your bag.

Do you use a flash bracket for photography? If so, tell us what brand you use and in what photography scenarios below in the comments areas.

The post What is a Flash Bracket and Why Do You Need One? appeared first on Digital Photography School.


Digital Photography School

 
Comments Off on What is a Flash Bracket and Why Do You Need One?

Posted in Photography


Review of the Godox AD200 Pocket Flash

02 Apr

Can you think of the ideal camera flash which can fit in your pocket, has almost 3-times output or regular speedlights, and also features a modeling light? The Godox AD200 is one such pocket flash (not if you are wearing skinny fit jeans) which meets all three of those expectations. That is why this flash has been my personal favorite outdoor fashion shoot light source.

To give you a quick overview of some of the features of the Godox AD200 flash, it features TTL, HSS (high-speed sync) up to 1/8000th of a second, 60 guide number, multi-stroboscopic flash feature and second-curtain sync.

If these specifications make you interested in this Godox flash, let me share my personal views and experiences after using it for more than six months now.

Review of the Godox AD200 Pocket Flash

Built Quality and Physical Overview

When you hold the Godox AD200 flash in your hand your first reaction might be that it is too heavy, as it weighs about 1 kg (2 lbs). Although it is heavier than any flagship flash than you might have used to date, at the end of this review you may realize that it is still worth carrying along to a shoot.

The built quality seems and feels durable and strong, almost a par with Canon and Nikon speedlights.

Talking about the physical overview, the front side of Godox AD200 has an interchangeable flash head mount. This allows you to mount the standard Fresnel flash head or the bare bulb flash head.

The only difference between this flash as compared to a speedlight is that the head of the AD200 cannot be rotated. And, the AD200 cannot be mounted on a camera, it can only be used as an off-camera flash. This could be a concern for some, but actually, this flash is not built to be used on-camera anyway.

The standard Fresnel head

The Fresnel flash head is ideal for situations when you are shooting without a light modifier and want to use it as any other speedlight. But an additional feature that the AD200 has is two LED strips on this head, which can use used as a modeling or continuous light. The continuous light could help the camera to focus in low-light conditions, instantly.

Bare bulb

The bare bulb flash head is ideal when while using this Godox flash with a light modifier, as the bulb is omnidirectional. I would choose to avoid using this head otherwise, as it is fragile and could easily be damaged shooting without a light modifier.

Controls

On the back side of the flash rests an AV display panel which is big enough for you to clearly see the various icons being displayed. There are five buttons dedicated to respective functions, a dial to adjust the flash exposure and the infrared sensor panel. The placement of the buttons, dial, and the screen is exactly what you as a photographer would desire in a flash.

On one side of this pocket flash, you will spot the Lithium battery slot, an unlock switch to change the flash head and a rubber cover which covers the 3.5mm sync cord jack and wireless control port. On the other side sits the ON/OFF switch, mini USB port, and a 1/4″ tripod/stand mounting hole.

Review of the Godox AD200 Pocket Flash

Highlighted Features and Performance

TTL (Through-the-lens)

This pocket flash by Godox features TTL metering, a technology which allows the flash to sync with the camera and automatically set the flash exposure based on the camera exposure. Using a flash in TTL mode is exactly the same as using the camera in automatic mode. The camera exposure helps the flash to set its own output value accordingly to correctly expose the frame or the subject.

The TTL mode performance on the Godox AD200 is precise in a majority of situations and it works perfectly in sync with the camera exposure to properly expose the subject. I rarely came across any instances where I got an underexposed or overexposed photo when shooting in TTL mode. Even if I did encounter exposure issues, I used the FEC (flash exposure compensation) feature to overcome it.

HSS (High-Speed Sync)

The Godox AD200 can sync up to 1/8000th while using its HSS functionality. This is ideal for situations where you want to freeze a fast-moving subject or shoot at an outdoor location where you need to control the light.

Review of the Godox AD200 Pocket Flash

Rear-Curtain Sync

Using the rear-curtain (or second-curtain) sync feature of the Godox AD200, you can shoot some really creative and cool photos with long exposures.

Ideally, when you shoot using a flash, the light gets fired from the flash the moment the shutter opens. So if you are shooting a long exposure photo of two seconds, the flash will fire the moment you press the shutter release button and whatever happens after that does not get exposed properly.

But by using the second-curtain sync feature, you can instead make the flash fire right before the shutter closes. Considering the above example, the flash will now fire just before the 2-second exposure is completed and the shutter closes.

Using this feature might sound confusing, but trust me, once you practice you may fall in love with it.

Flash Exposure Compensation

Assume flash exposure compensation to be exactly like the exposure compensation feature of your DSLR camera. If you feel that you are not getting the desired exposure in your photo while using the flash in TTL, or if you plan to try something different, you can adjust the flash exposure compensation.

This amazing feature lets you reduce or increase the flash output as per your desire, all you have to do is adjust the exposure value to your requirements. This is basically like shooting in aperture priority or shutter priority mode, without getting into manual mode.

Review of the Godox AD200 Pocket Flash

Flash Output

The AD200 has a guide number of 60 and the flash output that you get is almost three times of what any flagship speedlight can provide. I was able to expose my subject correctly while shooting outdoors in bright daylight conditions, and believe me when I say that the flash is powerful enough to overpower the background light.

Imagine using three speedlights at a time and on the other hand using just one Godox AD200 flash. The light output shall be almost same. For me, it has performed amazingly well even in low light conditions as I used the built-in LED light to ensure that the focus and flash exposure were correct.

Godox AD200 Flash Recycle Time

The recycle time also plays an important role while deciding on the perfect flash, so here are some tests that I conducted to figure out the recycle time of this flash at various powers.

The recycle time on this flash at full power is quite impressive:

  • While using the flash at 1/1 (full) power, the recycle time that I got was just less than 2 seconds.
  • While using the flash at 1/2 power, the recycle time that I get was almost half a second.

I mostly use a flash when I’m shooting fashion and portraits, and with this swift recycle time I hardly miss any shots. Even if you plan to buy this flash for wedding, action, or event photography, I am sure you will thank me later.

Review of the Godox AD200 Pocket Flash

Would I recommend this?

At $ 299, this pocket flash by Godox looks like an ideal choice for a fashion, wedding, event, or even sports photographer. This flash has almost all the features that you, as a hobbyist or as a professional photographer, would require to get the desired results, with almost three times the power of a regular speedlight.

I have been using this portable flash for almost 6 months now, and I do not have any major complaint about this beauty, except for the display panel which could be better for outdoor visibility.

The best part about the Godox AD200 is that there is a universal model of this pocket flash. This means that you can pair this flash with the compatible trigger (Canon, Nikon or Sony) and use it as an off-camera light source. So if you own multiple brand cameras, this is another reason you should consider investing your $ 299 in this Godox flash.

The post Review of the Godox AD200 Pocket Flash appeared first on Digital Photography School.


Digital Photography School

 
Comments Off on Review of the Godox AD200 Pocket Flash

Posted in Photography


A Quick Guide to Using Bounce Flash for More Natural-Looking Photos

09 Mar

Creating a portrait using flash is a whole lot more than just pointing your flash at your subject and taking the shot. Learning how to use flash creatively opens up a variety of new lighting options – which you can use to make the picture you envision in your head show up on your camera’s LCD screen. In this article, we’re going to look at using bounce flash.

Bounce flash is a handy trick you can use in a pinch to improve both the quality and amount of light in your finished picture using a flash unit right on top of your camera.

A photo taken using bounce flash to light the subject

The soft lighting for this image was created using a single flash, positioned on the camera and pointed directly up at the ceiling.

What is bounce flash?

Bounce flash is exactly what it sounds like. You aim the flash unit on your camera at a ceiling or nearby wall so that the light reflects off it and then back towards your subject.

This may seem like a really roundabout way of providing illumination, but there are a number of excellent reasons why you would want to bounce your flash, such as:

  • It quickly creates soft light.
  • It can be used to create directional light.
  • Helps you avoid the drawbacks of direct flash.

Let’s go through each of these points in more detail to get a better sense of how to use bounce flash to improve your photography.

Left: On-camera flash rotated to bounce off a wall to the side. Right: Built-in flash that cannot be rotated or bounced.

1. How does bounce flash create soft light?

One of the most important factors in determining how soft the light in your image will be is the apparent size of the light source. Notice I said “apparent size” – not “actual size”.

Your pop-up flash or attached speedlight are small light sources – so if you aim them directly at your subject you get harsh lighting. This is why photographers often use softboxes, umbrellas or other modifiers to create a larger source of light – which makes the light softer.

You can use this same concept to quickly create a larger apparent light source by bouncing your flash off a roof or wall and spreading out the light.

Direct flash is that which is aimed right at the subject.

Direct flash – not flattering to the subject and creates a harsh shadow on the wall behind.

Flash aimed at the ceiling to bounce the light and soften it.

Flash bounced off the ceiling – much more even and softer lighting.

2. How can bounce flash create directional light?

Understanding the direction from which the light is coming – and using that to your advantage – can have a huge impact on the quality of your photos.

Without flash, you’re at the mercy of whatever ambient lighting is available. When you are indoors in a dimly lit room, that ambient light is often rather unpleasant as the light usually comes from the ceiling overhead. This casts deep and dark shadows under people’s eyes – not at all a flattering look for a portrait.

By setting up near a wall, you can bounce your flash off it and effectively create a new light source that sweeps in from the side. Think of it as creating a new window to add more light to the scene. This new light will fill in those ugly shadows for a much more pleasing look.


The result of the flash being bounced off the wall to camera left is more directional light as seen here.

3. How does bounce flash improve on direct flash?

Sometimes a direct flash can significantly improve an image. Sometimes it results in redeye, awkward shadows, and a deer-in-headlights look.

Using bounce flash solves the red-eye problem since that is caused by light reflected directly back at the camera from the back of the eyeball. When your main light is bouncing in from overhead or from the side, you can also say goodbye to large shadows cast by your subject onto the background.

Lastly, direct flash creates boring lighting that flattens facial features and textures. Bounce flash results in more sculpted light that can be used to accentuate features and show depth.

Example of a photo taken using direct flash as the key light

This portrait was taken with direct flash, causing a harsh shadow on the back wall and a bad case of red-eye (Settings: 1/80th, f/3.2, ISO 500)

Example of photo taken without using any flash, high ISO

Without using flash, I had to bump the ISO up to 6400 in order to keep the right exposure. The colors are dull and there is a lot of noise in the shot (Settings: 1/80th, f/3.2, ISO 6400)

Example of a photo taken with bounce flash

With bounce flash, the light on the model is soft and even. There is a glimmer of catch-light in the subject’s eyes and no shadow on the back wall. (Settings: 1/80th, f/3.2, ISO 500)

What do you need to get started with bounce flash?

In order to shoot bounce flash, the bare minimum you will need is an external flash unit with a head that can swivel and tilt.

If you are planning on buying a new flash, make sure to research how it can be maneuvered. Some cheaper models will provide more flash power than your standard in-camera pop-up flash, but if they can’t be adjusted to tilt and swivel then you won’t be able to use them for bounce flash lighting.

Get a flash that can both rotate (swivel) and tilt (up and down) in order to do bounce flash.

Balancing the light

When shooting with flash in a bright room, you need to perform a balancing act in order to keep the light looking natural. This is the case with bounce flash as well.

A flash picture essentially has two exposures:

  1. The ambient, or available light, which is all the light from windows, light bulbs, candles, chandeliers, etc.
  2. The light from your flash.

As the photographer, you need to balance these two exposures to create the image you want. Fortunately, this doesn’t mean that you need to go around flicking light switches until you get the exact amount of brightness needed for each shot – your camera settings can control how much light will be in the final shot.

In this image, the flash is too strong and the exposure is not well-balanced with the ambient light in the room. Exposure here was: 1/125th, f/4, ISO 250, flash was ETTL with +2 Flash Exposure Compensation.

Aperture:

Opening up the aperture will allow more light in, effectively increasing the flash power and also making the camera pick up more of the ambient light

ISO:

Increasing your ISO means the sensor “collects” more light. Again, this effectively increases the power from your flash as well as the influence of the ambient light.

Shutter Speed:

Here’s where a lot of control comes in. As long as you stay within your camera’s maximum sync-speed, your flash will influence the final shot regardless of the shutter speed. On the other hand, a long shutter speed will collect a lot of ambient light, and a short shutter speed will collect less, often drastically affecting the final image.

It may take some time to get used to this balancing act with aperture, ISO, and shutter speed so that your bounce flash shots give you well-lit subjects with natural-looking lighting.

The inside of a car, lit by bounce flash

Firing a flash into the roof of the car creates soft, bounced light that really makes all the surface details shine.

Other details to keep in mind

Flash Power

Since the light from your flash has to travel the extra distance to bounce off a wall or ceiling before reaching the subject, you can’t use your camera’s ETTL metering as is to determine the amount of power needed. Your camera assumes that you are using direct flash, so if you don’t make any adjustments, the flash power will always be a bit too low.

Increase your camera’s flash exposure compensation depending on the distance to the surface you are using to bounce the light. For a typical ceiling in a home, this might be an adjustment of +1/3 or +2/3. If you are photographing in a hall with high ceilings, you may need to boost your flash by +1 or even more.

A young man photographed using bounce flash

A seamless background and soft light from bouncing the flash off a slanted ceiling gives this picture the type of quality you might expect from multiple flashes and a studio setup.

Color

Important question: What color is going to be reflected back at you if you shoot a flash into a pink wall?

Yup, you guessed it – it’s gonna be pink. The light from your flash is going to take on whatever color it bounces off. So unless you’re going for that funky, unnatural pink look, you’ll want to make sure you bounce your flash off neutral-color surfaces like whites, grays or blacks. (Alternatively, you can shoot or convert to black and white.)

Don’t blind people!

As you start to discover how fun it is to swivel your flash around and create dramatic and interesting light, it can be easy to forget where your flash is pointed. If an unfortunate passerby steps between the wall and your flash just as you fire off a shot, they might get an unwelcome blast of light. It’s a good idea to check and make sure the coast is clear before snapping each shot.

Give it a shot!

Bounce flash is a handy trick in your arsenal to help you land that perfect shot when the situation allows for it. So tilt your flash up and give it a try!

The post A Quick Guide to Using Bounce Flash for More Natural-Looking Photos by Frank Myrland appeared first on Digital Photography School.


Digital Photography School

 
Comments Off on A Quick Guide to Using Bounce Flash for More Natural-Looking Photos

Posted in Photography