RSS
 

Posts Tagged ‘Flash’

9 Steps to Get Over Your Fear of Off-Camera Flash

25 Feb

fastflash_bookIf you want to learn more about using flash for creating portraits, pick up Gina’s brand new dPS ebook: Fast Flash for Portrait Perfection. Now on sale for an introductory price for a limited time only.


For the first three years as a professional photographer I suffered a severe case of Photophobia and Photoaugliaphobia. I tried to cover it up by saying things like, “I’m a natural light photographer” or “I really don’t like the aesthetics of flash photography”. In reality I was scared to death of using flash. I just couldn’t wrap my head around the concepts and science behind it.

Fear: False Evidence Appearing Real

  • Photophobia – Fear of light
  • Photoaugliaphobia – Fear of glaring lights

Each shoot I went on that involved flash was accompanied by a sleepless night, with dreams about turning up to the shoot naked (anxiety dream) and just the thought of having to use flash, also had a mild to moderate laxative effect on me.

Fearflash main

I managed to work out a system where if I shot at f/8, with the flash dialled in to a particular spot, I would end up with a shot that looked half decent. I had a few successful shoots (and by that I mean there was a detectable image on the film, often blown out by two stops) and was feeling pretty confident about my high-tech – stand here, shoot at f/8, and don’t change anything on the dial – approach to flash photography.

I started getting cocky and developed a “geez you’re good you should do this for a living” strut. In my mind, I’d mastered flash. Sure it wasn’t amazing, but I’d convinced myself that I was pretty good at it.

Then everything changed. I botched a few big jobs in a row; a wedding, where only one frame turned out, a corporate shoot where the flash overexposed the logo, and a historic family portrait where 200 members of the same family flew in from around the world to be in one place together. I set the camera to the wrong shutter speed. The only record of the event is now a faded memory.

Gear 11

I blamed Flash. It was the common denominator – it’s unreliable, difficult to use, and completely stupid. Why bother, I’m a natural light photographer and I don’t need this in my life.

I then started to go through all the stages of grief:

  • Denial – this isn’t my fault right? Flash did it. It’s stupid, right?
  • Anger – what do you mean this is my fault?? Are you kidding me?
  • Bargaining – dear God/Universe/Oprah please make this go away. I will never eat Nutella again.
  • Depression – I suck at photography, what was I thinking? Who do I think I am?
  • Acceptance – I suck at photography, what was I thinking? Who do I think I am?

Probably the toughest, and most grown-up thing I did as a professional photographer, was to face up to the fact that I sucked at flash photography. I needed to develop a learning style, a protocol that would help me understand flash, learn how to use it well, and stop being afraid of it.

PG 51 manual mode

Learning a new skill can be overwhelming at first. I can still remember learning to drive stick shift, and bunny hopping my father’s car around the block, stalling at every red light and being frustrated at the number of things I needed to remember. At the time, I thought there was no way I could possibly remember how to do everything. But, little by little, day by day, I started to overcome the shock of the new, and driving became second nature.

I think the reason that many photographers become frustrated with flash, is because they are working with lighting styles, and modifiers that are too complicated and involve too many variables. Most of us are impatient. We want to get to the “good stuff” right away. But the danger is that you never really understand the subtle differences between each lighting style and modifier.

When it comes to teaching flash photography, I like to implement what I call, The Bruce Lee Protocol. Bruce Lee was a master in martial arts, whose training requires participants to master each level, or belt, before they move on to the next. If a white belt in Karate attempted to break a plank of wood with a roundhouse kick, they would probably end up breaking their foot.

Fearflash 2b

We all want to skip straight to the black belt, but doing this before we’re ready usually ends with tears.
Taken for: Japan Karate Association Australia (JKA)

It took me many years to realize that owning every single light modifier and photography gadget, was not going to make me a better photographer. The one thing that would improve my photography was deciding on one lighting style and modifier, and working with it until I felt I’d mastered it.

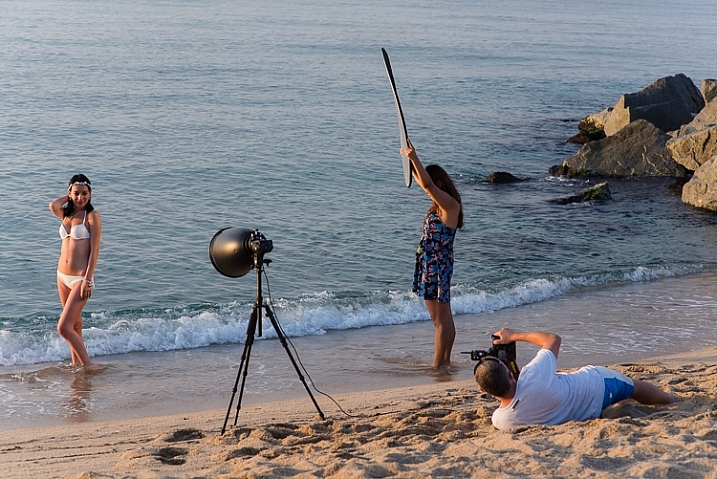
I use one light with the same modifier for 80% of my fill-flash photography. I can vary the look of my shots by the way I expose my images, and where I position the light. If you’re just starting out, I recommend that you buy only one modifier and one light, then work with that setup until you’re confident, and happy with your style. Here is my stepped approach to learning how to light with flash based on The Bruce Lee Protocol.

The Bruce Lee Protocol to Learning Flash

Just like training for a black belt, I believe it’s a great idea to stay on one level, until you feel 100% ready to move on to the next. A white belt in Karate would never attempt to break a plank of wood in half with a roundhouse kick , a newbie to lighting shouldn’t attempt to work with a beauty dish before they have mastered working with an umbrella.

Step One: White Belt – Laying the foundation

I think it’s a great idea to ease into lighting, by starting with daylight. Work with hard light, soft light, flat light, and contrasty light, until you are confident you can notice the subtle differences.

Step Two: Yellow Belt – Easing into a new way of thinking

Start by adding fill-flash to your images, using flash on-camera, set to auto. This will give you the confidence to continue working with flash. The next stage is to introduce flash on-camera modifiers, to soften and shape the light.

Step Three: Orange Belt – Expanding your knowledge

FlashPoint Li-on zoom flash and commander set

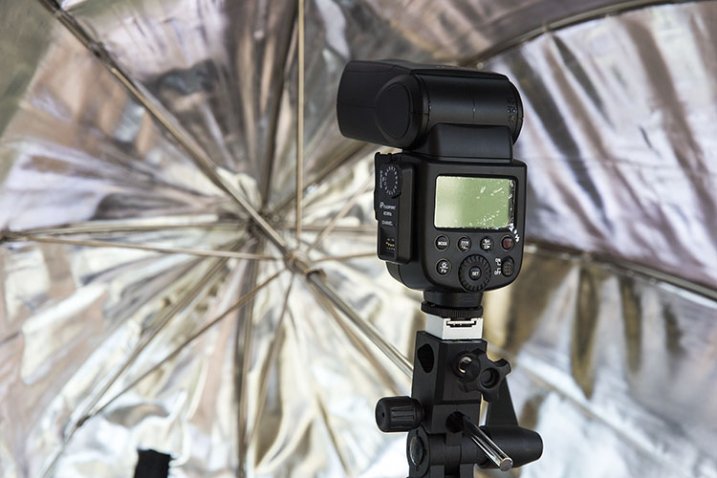
Umbrella light is a great choice for a fill-light. It closely resembles daylight, making it perfect for lighting large areas. Because the light is very soft and spreads everywhere, this is the easiest light shaper to work with, making it an ideal light modifier to start learning.

Step Four: Green Belt – Developing your skills

Once you have gotten the hang of working with umbrellas, try adding reflectors to your shot, and focus on balancing the daylight and flash.

Step Five: Blue Belt – Confidence

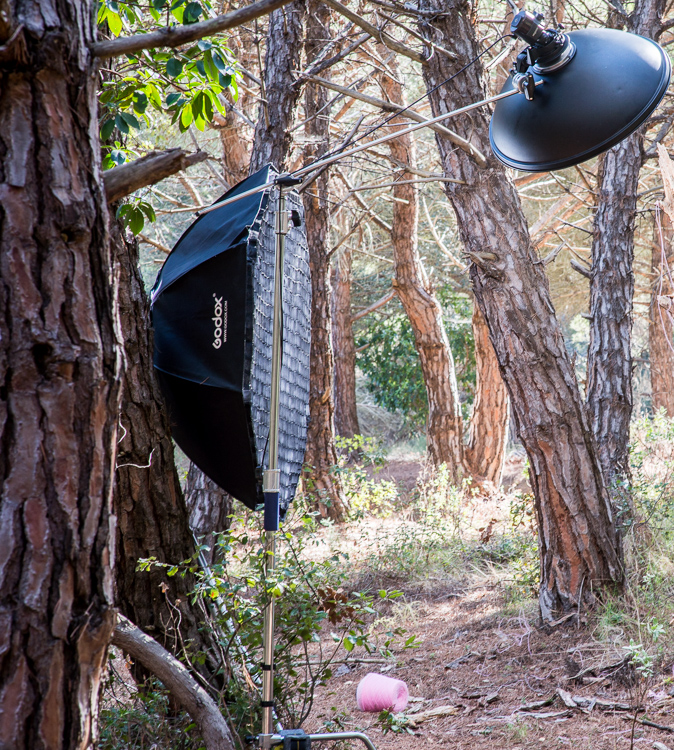
It’s time to ditch the Umbrella and move up to softboxes, umbrellas boxes and octaboxes.

The umbrella box is the most convenient light modifier, because it combines the simplicity of an umbrella, with the control of a softbox. The box design eliminates the complications of using this modifier outdoors. Umbrella boxes are also cheaper than softboxes, so they’re a great choice for your first serious light modifier.

Head 5 200

Softboxes create a soft light that is more contained than that from an umbrella. This makes it a better choice of light modifier if you want to light only certain areas of your image. They are completely enclosed, and are a much better light modifier to use outside, as they are less likely to blow around in windy conditions.

Step Six: Purple Belt – Getting serious now

Once you have mastered soft light, it’s time to start experimenting with hard light. Hard light is tricky to work with, because there is very little room for error. Hard light modifiers include beauty dishes and grid spots.

If you’ve done all the work, adding a beauty dish or grid spot to your lighting setup, will be much easier to manage at this stage.

Fearflash 1

Step Seven: Brown Belt – Bringing everything together

Now you are ready to work with hard and soft light at the same time. The hard light, like a beauty dish or grid spot, can be used as the main light, and the soft light becomes the fill.

Step Eight: Red Belt – Developing your own style

Once you’ve mastered each of the lighting styles individually, and know how to work with them together, you can focus your attention on developing a lighting style that is unique to you.

Step Nine: Black Belt – Enlightenment

A black belt in lighting comes with the realization that we never really stop learning. Most of the best photographers in the world will admit that they are yet to master their craft, and the more they know, the more they realize they have yet to learn.

One of my greatest highlights of the past few years, has been watching the students I have taught overcome their fear of flash, and seeing their styles evolve and develop.

Here are some of my favourite examples of their work, and the steps they took to create these images.

Lisa McTiernan

Lisa McTiernan

Off-camera flash has scared me for a while now. Finally! Simple, easy to understand info, that even after one go has opened up a whole new world for my photography. Gina Milicia you’re my hero. Legit.

I wanted a moody vibe for this shoot in an empty concrete carpark. I wanted the shot to look like it was lit by the fluorescent lights on the walls and ceiling, and not by my speedlight. After setting the exposure for the ambient light, I bounced the flash (with the diffusion dome) off the ceiling at an angle to soften, and bounce it back onto my subject’s face and upper-body to highlight his red shirt. I set the flash to 1/16 power, and adjusted the level until I got the look that worked. Exposure: 1/100th, f/5.6, ISO 500, 27mm lens.

Kristi Louise Herd

Kristi Louise Herd

www.herdstarphotography.co.uk ( weddings only for now) www.flickr.com/photos/herdstar

This is from a photo shoot I did with an aspiring model, it was my first night shoot and my first using flash. Before I did the shoot I read and re-read your ebook, Portraits, Lighting the Shot. Tricks I learned from you became invaluable. I used the trick with the phone to focus, as the light was pretty dim. It worked fantastic, and the softbox, which I had never used before, was held just above and sightly to the left of the model (I had seen this again in a diagram from your ebook). Camera settings: Nikon D750 f/4.2, 1/30th, ISO 800, focal length 112mm. I would never have achieved this shot without learning from you Gina Milicia.

Erica Rampant

Erica Rampant

Hi Gina, I asked a few weeks ago about placement for lighting for a milk bath shoot. Here is the result! It was taken with a Nikon D610, 50mm Sigma Art lens, ISO 100, f/2.2, 1/160th of a second.

This is my friend Antonette, she just gave birth to a healthy baby boy and I was there to photograph it. She had a home birth and her baby was born in water! I’m still a new photographer and have only been shooting for five months, but have been listening to you, and learned so much!

Natalie Ord

Natalie Ord

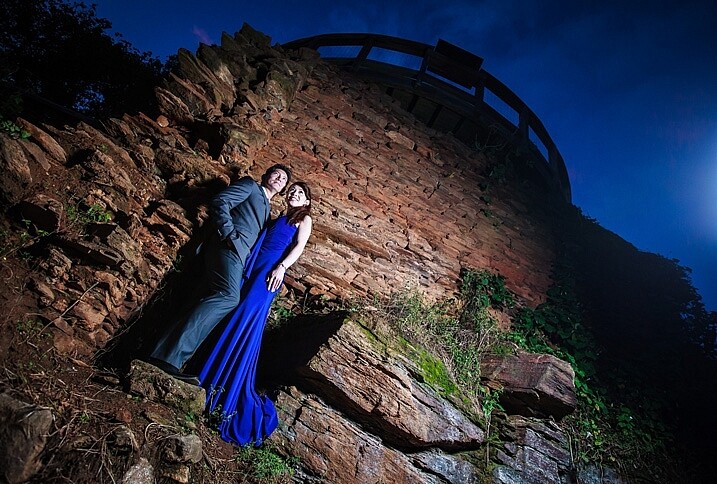
This is a shoot a recently did for a client. The day was windy, overcast, and I had limited time. I needed to portray the client as friendly, accessible, and show that she is rural-based, so it was important for me to get the background exposed right. I couldn’t have done that without using off-camera flash.

Settings were 1/320th, ISO 250, f/7.1, using PocketWizards, a Canon Speedlite 600EX without a softbox, as it was windy and I didn’t have anyone to hold the stand, shot on my 70-200mm f/2.8L with a Canon 5D MkII.

Gary Lun


Gary-Lun-3

Canon 5D MkII with Canon 16-35mm f2.8 at 18mm, f/4.5, 1/125th, ISO 1600. Flash was Yongnuo YN560III at 1/8 power, positioned at camera right. Softbox was using SMDV SpeedBox-60.

Quick story: I was doing an engagement shoot at a typical location in town for many photographers. It was packed with photographers that day! Anyway, in order to get a unique photo I knew I must use flash. So I waited until all other photographers were gone, because the sun is going down (since most of them were using natural light), took my flash out, asked the couple to stand near something with texture, and took the shot.

Phil Enn

Phil Enn

Canon 7D, 17-85mm at 17mm, f1/6, ISO 200, six speed lights held in a bunch, off to camera right.

Andrew McNamara

Andrew McNamara

Canon 5D MkII, 24-70mm at 24mm, f/9.0, ISO 100, 1/50th with a camera-mounted Canon 480exII Speedlite. As stated in the original story, shot from inside a training element for the Southern Cross Search Dogs photoshoot. I had a diffuser on the flash, just for the safety of the dogs eyes, and bounced it just a little.

P.S. I’m one of those people who are afraid of flash so this was a big step!

Rahim Mastafa

Rahim Mas
Inspired by one of your ebooks, I used one studio strobe as a key light to the front of him, and a speed light as a kicker, over his shoulder on the backrest. Settings were: f/2, 1/1500th, ISO 100, Sony a77, 50mm lens.

Matt Zahn

Matt Zahn

This was part of my self portrait challenge. Since it was nighttime, and obviously no natural light to shoot with, I attempted to create the illusion that this was natural light coming through a window. I used my Canon 430exII Speedlite on my T5i. I slid a home-made snoot over the end, and used some electrical tape to create some of the shadows. This shot was taken at 1/400th, f/5.0, ISO 400. I also placed a gold reflector to camera left, behind me.

Scott Stokhaug

Scott Stockhaug

With the help of your ebook, Flashfast for Portrait Perfection, I made a minimal investment to get that speedlight off my camera, and open many new doors! This photo is my Rembrandt lighting, along with black background that was shot in my home, in broad daylight, with no backdrop. I love this technique!

Next step

So where are you on The Bruce Lee Protocol steps? Do you have a fear of flash? Have you overcome and mastered it already? Please share with us where you are, and what you’ve done to conquer your fears.


fastflash_bookIf you want to learn more about using flash for creating portraits, pick up Gina’s brand new dPS ebook: Fast Flash for Portrait Perfection. Now on sale for an introductory price for a limited time only.

googletag.cmd.push(function() {
tablet_slots.push( googletag.defineSlot( “/1005424/_dPSv4_tab-all-article-bottom_(300×250)”, [300, 250], “pb-ad-78623” ).addService( googletag.pubads() ) ); } );

googletag.cmd.push(function() {
mobile_slots.push( googletag.defineSlot( “/1005424/_dPSv4_mob-all-article-bottom_(300×250)”, [300, 250], “pb-ad-78158” ).addService( googletag.pubads() ) ); } );

The post 9 Steps to Get Over Your Fear of Off-Camera Flash by Gina Milicia appeared first on Digital Photography School.


Digital Photography School

 
Comments Off on 9 Steps to Get Over Your Fear of Off-Camera Flash

Posted in Photography


Sigma introduces EF-630 multi-function flash

24 Feb

Sigma has announced a more powerful external flash for DSLRs, the EF-630. It updates the existing EF-610 flash units by covering a 24mm to 200mm focal range (as wide as 17mm with the built-in Wide Panel), with an auto zooming function. Based on Sigma’s naming conventions it’s safe to assume the EF-630 offers a guide number of 63. It’s also able to tilt upward by 90°, left/right by 180° and downward by 7°. It offers TTL exposure control, high-speed sync and slave mode for use with other flashes. 

No pricing or availability is given for the EF-610.


Press release:

Sigma Introduces Electronic Flash EF-630 Multifunctional External Flash

Boasts TTL exposure control, high-speed sync, wireless flash functions, rear-curtain sync, auto-zoom, and wide-angle illumination coverage and more

KANAGAWA, JAPAN — February 23, 2016 – Sigma Corporation of America, a leading DSLR lens, camera, flash and accessories manufacturer, has just announced the Sigma Electronic Flash EF-630, a multifunctional flash designed to work with current digital SLR cameras. Offering greater output of light, the EF-630 features TTL exposure control, high-speed sync, wireless flash functions, auto-zoom and bounce-flash, amongst additional features that make it ideal for many types of photography.

“Lighting is one of the most important factors when it comes to creating a beautiful image, and can be the difference between capturing the perfect moment and missing it entirely,” comments Mark Amir-Hamzeh, president of Sigma Corporation of America. “The EF-630 has all the features advanced photographers look for in a flash and is the perfect companion to the DSLR.”

The Sigma EF-630 flash automatically adjusts for focal lengths of 24mm to 200mm focal length, making it ideal for wide angle and super-zoomed shots alike. For ultra-wide angle shots, photographers can utilize the built-in Wide Panel to cover an angle of up to that of a 17mm lens.

Compatible with most well-known digital SLR cameras, the EF-630 features auto TTL exposure control, as well as remote control operation through the TTL wireless flash function, where the camera lens calculates the correct exposure automatically for perfect lighting. For multi-flash setups, photographers can use the Slave Flash Function to trigger additional flashes. To achieve a softer look, photographers can bounce light off of a white wall, ceiling or reflector by tilting the EF-630’s flash head upwards by as much as 90°, or swiveling left or right by 180°. For close-up shots, the flash head can also be titled down by 7°.

The FP Flash function of the EF-630 makes flash photography possible at shutter speeds greater than the normal sync speed, which is typically limited at shutter speeds up to 1/250 second for most cameras. The FP Flash function for high shutter speeds is necessary when setting a larger aperture to limit depth of field when shooting in daylight, as high shutter speeds are used to balance the daylight and the flashlight at any shutter speed. To capture natural motions, the Rear-curtain Sync mode allows the flash to be triggered immediately before the rear-curtain of the shutter closes, recording blurred trails behind a moving subject rather than in front.

Additional EF-630 features:

  • Intuitive user interface: dot matrix LCD screen for improved menu visibility, D-Pad and dial settings controls, and easy one-click disengage function improve ease of use
  • Modeling flash function: check for intense reflections and shadows before capturing the shot
  • AF assist light: accurate auto-focus in low light conditions
  • Auto Power-off: flashgun automatically powers off after a period of non-operation to conserve battery life
  • Manual flash power level control: manually sets the flash power level from 1/1 to 1/128

The new EF-630 Flash can be updated with the latest software from a workstation or laptop using the Sigma Optimization Pro software and Flash USB Dock (sold separately).

Articles: Digital Photography Review (dpreview.com)

 
Comments Off on Sigma introduces EF-630 multi-function flash

Posted in Uncategorized


Nissin releases i60A flash unit with a guide number of 60m

24 Feb

Flash manufacturer Nissin has announced a hotshoe flash unit that features a guide number of 60m and the company’s NAS 2.4GHz radio wireless control system. The Nissin i60A can control three groups of flashes in its role as a commander, or it can be controlled via another Nissin flash unit (only the Di700A at the moment) equipped with the NAS system or by the company’s Air 1 commander unit. Although each unit will have a TTL system dedicated to the mount it is designed for, the i60A also comes with multiple control systems built-in. This means that every flash can be used off-camera in an optically connected network of Canon, Nikon and Sony TTL flashes, no matter the mount. The i60A is equipped with 8 channels.

The zoom head covers focal lengths of 24-200mm, and it is at the 200mm that the quoted GN60m@100 ISO has been measured. The unit has been designed to be small so that it will be attractive to owners of compact system cameras – it measures 98x73x112mm and weighs 300g without batteries. Manual control allows 1/3-stop increments from full power to 1/256th, and auto exposure compensation is available up to +/-2EV.

The head rotates 180° and tilts directly upwards, and the unit is powered by 4AA cells, that Nissin says will provide 220 full power bursts, or via an external battery pack.

The Nissin i60A will be available for Nikon, Canon cameras in May 2016, and Micro Four Thirds, Sony and Fujifilm cameras in the future. No pricing information has been released yet. Nissin doesn’t have any English information posted yet, but there is a Japanese press release PDF on the website.

Articles: Digital Photography Review (dpreview.com)

 
Comments Off on Nissin releases i60A flash unit with a guide number of 60m

Posted in Uncategorized


Phottix announces next generation of Odin TTL flash controllers

02 Feb

$ (document).ready(function() { SampleGalleryV2({“containerId”:”embeddedSampleGallery_1596139815″,”galleryId”:”1596139815″,”isEmbeddedWidget”:true,”selectedImageIndex”:0,”startInCommentsView”:false,”isMobile”:false}) });

Flash and accessory manufacturer Phottix has released details of the second generation of Odin flash controllers that will go on sale mid-February. The Odin II units, which allow wireless TTL control of hotshoe and portable studio flash units, will add two extra control groups and 28 additional channels to the radio trigger’s reach, and will make the user interface easier to handle. 

The Odin system, which is compatible with Nikon, Canon and Sony cameras can be used with the company’s battery-powered Indra 500 and 300 portable studio flash heads, as well as the company’s Mitros hotshoe flash units. The new models also add an AF assist lamp, 10 new custom functions and digital ID for channels 5 to 32 to ensure the correct units are communicating. 

The Odin system is divided into transmitters and receivers, and Phottix’s own flash units have the receivers built-in. Photographers using Canon, Nikon or Sony branded flash units can use their hotshoe flash units with an Odin receiver to take advantage of the better range and connection of radio transmission over the line-of-sight systems camera brands tend to produce. Radio also works better when shooting outside in bright conditions.

The company says that new firmware will be released for the Mitros and Indra flash units to make them compatible with the new features. 

The Canon and Nikon models will be available first, with those for Sony cameras arriving in late April. The transmitters will cost £160, while receivers will be £125.

For more information visit the Phottix website.

Press release: 

Introducing the Phottix Odin II TTL Flash Trigger

Phottix adds cutting edge functionality and features to its flagship trigger

Eagerly anticipated by thousands of Odin customers, the Odin II is the result of requests from Professional Photographers demanding more from their TTL flash systems.  Phottix is delivering on its promises to provide the very best system available today. 

Unrivalled Control and Streamlined User Interface

The Odin II allows more control than ever before.  The controls are logical, simple to use, and allow extremely fast adjustments.

With five groups, A, B, C, D and E, the dedicated quick access buttons allow changes to be made by simply turning the new thumb wheel which is perfectly placed below the improved large LCD screen to adjust the compensation.  The backlit LCD panel shows the settings at a glance.  Now you can control five channels or groups of lights at the touch of a button, in TTL Mode or in a combination of full manual mode and TTL – the choice is yours.  When switching a group off, its display line disappears from the screen, showing just the groups remaining active.

Backward Compatibility

The Odin II system is compatible with the original Odin system, Phottix Mitros+ Speedlights, the award-winning Indra360 and Indra500 TTL Studio lights, Strato and Strato II receivers, and Atlas II in receiver mode.  Using channels 1 to 4 you can work with the kit you already own with the Phottix Odin II.

More Channels and Digital ID

To take advantage of the Phottix Odin II, a total of 32 channels can be used, channels 5 to 32 use the full functionality of the Odin II receiver, including a user-set digital ID for the ultimate in secure triggering.  Users can remotely control Speedlight zoom settings, providing the perfect coverage from a wide angle to a spot light.  When shooting with the Phottix Indra360/500 series, the Odin II transmitter also offers remote modelling light control and full light ratio controls.

High Speed Sync and Overdrive Sync

High Speed Sync with TTL flashes and Overdrive Sync with manual enable flash photography at up to 1/8000 second for creative photographers.  The newly added AF assist light makes autofocus a breeze in dimly lit locations.  An additional ten custom functions allow users to customise the Odin II, including switching on/off the audible beep, screen brightness, an AF Illuminator function and the ODS system control functionality, as well as a full factory reset should you need it.

Firmware Updates

Firmware upgrades for the Phottix Mitros+ and Phottix Indra360/500 will soon be available to take advantage of the new features of the Odin II – these will be announced shortly via the Phottix Journal and on the Phottix.com website.

Major Features 

  • 5 groups A, B, C, D and E
  • 32 channels with user-set Digital ID on channels 5 to 32
  • Group buttons and thumbwheel control for fast operation
  • TTL Power Control +/- 3EV
  • Manual Power Control 1/1 to 1/128th
  • High Speed Sync – up to 1/8000s on compatible cameras
  • Second Curtain Sync (Nikon and Sony only)
  • AF Assist Light
  • Flash zoom control
  • Modelling Light Control with Indra500/360
  • 2.4 GHz, Range up to 100 metres
  • Compatible with Indra500/360 TTL, Mitros+, Odin, Strato, Strato II and Atlas II
  • Always up to date via the latest Firmware.

Odin II for Nikon and Canon will be available from all Platinum Dealers week commencing 15th of February 2016, the Sony Odin II is expected to arrive in late April.

Articles: Digital Photography Review (dpreview.com)

 
Comments Off on Phottix announces next generation of Odin TTL flash controllers

Posted in Uncategorized


Nikon Japan announces price increases of up to 18% for lenses and flash units

29 Jan

Nikon has released details of price increases it will implement in the Japanese market from the beginning of March this year. The changes will affect a total of 73 of its DX and FX lenses, as well as three teleconverters. In addition, 21 lenses for the Nikon 1 system will be included, the FT1 mount adapter and six Speedlite flash units along with the systems associated wireless remotes. Newer lenses, such as the recently announced AF-P 18-55mm F3.5-5.6G/VR, the 200-500mm F5.6E ED VR, the 24-70mm F2.8E ED VR and the 24mm F1.8G ED are not included in the list. 

The degree of increase varies across the board, but some products, such as the SB-300 flashgun, will face a price hike of close to 18%. Others though will be increased by less than 5%. 

The company cites pressures from increasing costs of raw materials for the price rises, and claims that it has done all it can to absorb the additional costs itself.

As the information was intended only for the Japanese market there is no mention of the rises coming into force in other regions. We’ll update this story with more details as and when we receive them.  

For more information see the notice posted on the Nikon Japan website. 

Articles: Digital Photography Review (dpreview.com)

 
Comments Off on Nikon Japan announces price increases of up to 18% for lenses and flash units

Posted in Uncategorized


Fast Flash for Portrait Perfection: 25% Off our New Flash Photography eBook

27 Jan

NewImage
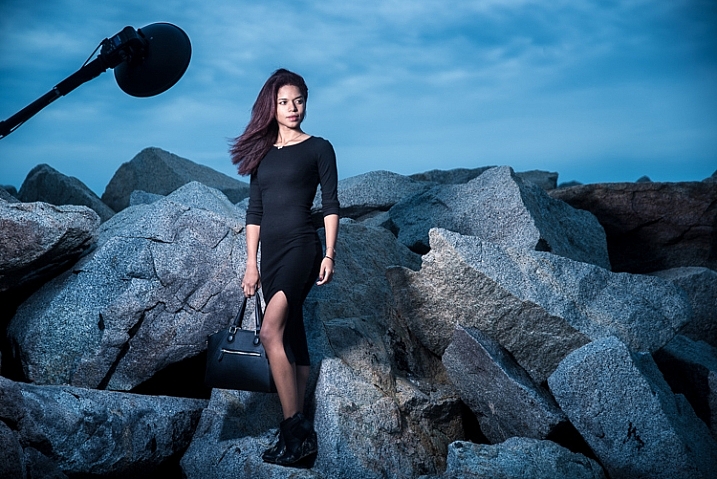
Who said flash portraits had to be complicated?

With our brand new ebook, Fast FLASH for Portrait Perfection by Gina Milicia, they don’t have to be!

A five-time dPS ebook author, Gina has been using flash lighting in her portraits for over 25 years – photographing a-list celebrities, heads of state… even royalty.

Now in this practical how-to guide, she’s sharing all her best flash secrets, tips and techniques.

She’s really held nothing back!

Created specifically to take away the guesswork when it comes to flash photography, this practical ebook will give you the skills and confidence you need to create AMAZING portrait images.

Learn more about Fast FLASH here.

Is this flash photography ebook for you?

Yes! If you:

  • Want to learn all there is to know about flash, from one of the world’s best portrait photographers
  • Don’t want to get bogged down with technical explanations
  • Are looking to develop your own unique portrait lighting style
  • Want to understand what gear to use (and what not to use), no matter your budget
  • Want to greatly improve the quality of your portrait images, whether you’re a beginner, enthusiast or pro

There are loads of examples included, too. All shot by Gina using mostly budget lighting kits (but with studio-quality results that you can achieve as well!).

Grab a Copy and Save 25% Today

To celebrate the launch of this brand new Flash Photography eBook you can pick it up today for a limited time 25% off discount. Normally $ 19.99 USD today it is yours for just $ 14.99 USD.

Pick up your copy of Fast FLASH here.

googletag.cmd.push(function() {
tablet_slots.push( googletag.defineSlot( “/1005424/_dPSv4_tab-all-article-bottom_(300×250)”, [300, 250], “pb-ad-78623” ).addService( googletag.pubads() ) ); } );

googletag.cmd.push(function() {
mobile_slots.push( googletag.defineSlot( “/1005424/_dPSv4_mob-all-article-bottom_(300×250)”, [300, 250], “pb-ad-78158” ).addService( googletag.pubads() ) ); } );

The post Fast Flash for Portrait Perfection: 25% Off our New Flash Photography eBook by Darren Rowse appeared first on Digital Photography School.


Digital Photography School

 
Comments Off on Fast Flash for Portrait Perfection: 25% Off our New Flash Photography eBook

Posted in Photography


Fujifilm announces development of EF-X500 flash

16 Jan

$ (document).ready(function() { SampleGalleryV2({“targetContainerClass”:”sampleGalleryImageViewerContainer”,”galleryId”:”9790642505″,”isEmbeddedWidget”:true,”selectedImageIndex”:0,”startInCommentsView”:false,”isMobile”:false}) });

Among all of its new cameras announcements, Fujifilm also made public the development of a new external flash. The EF-X500 is a high-end, weather-sealed model with a guide number of 50m at ISO 100, the ability to control up to three sets of TTL off-camera strobes, and a high-speed sync mode that supports the X-Pro2’s maximum 1/8000 sec shutter speed. The zoom head range is 24-105mm equiv., and can go as wide as 20mm with the wide panel pulled into place. 

It has a large, backlit display on its back side along with a control dial for easy setting adjustment. As you’d expect, the flash can tilt and rotate – 10° down, 90° up, 135° left and 180° right. It uses four AA batteries and also supports Fujifilm’s EF-BP1 external battery pack.

The EF-X500 is expected to ship in May at a price yet to be determined.

Press Release:

FUJIFILM ANNOUNCES THE DEVELOPMENT OF A NEW HOT-SHOE MOUNT FLASH FOR X-SERIES CAMERAS

A new high-end external flash is being developed to complement FUJIFILM X cameras with high-speed synchronization and multiple flash TTL auto functions

Valhalla, N.Y., January 14, 2016 – FUJIFILM North America Corporation, a leader in premium mirrorless cameras, today announced that it is developing a new high-end external shoe mount flash, the FUJIFILM EF-X500. The EF-X500 allows users to expand their photography with high-speed synchronization and multiple flash TTL auto functions. It will be added to the premium X-Series camera accessory line-up in May 2016. Price to be confirmed.

Designed with FUJIFILM X cameras in mind
The new FUJIFILM EF-X500 external flash will feature a low-profile, premium design that is perfectly suited to complement the style of the compact and lightweight X-Series cameras.

With high-speed synchronization (FP), the new EF-X500 supports the 1/8000 sec. shutter speed featured in the new, flagship model FUJIFILM X-Pro2, as well as other Fujifilm X cameras.

The multiple flash-unit TTL auto function unleashes users’ creativity by allowing them to control any lighting conditions so it will accompany their X-Series camera in all low light and studio applications.

Fujifilm has added a weather and dust resistant build making the EF-X500 flash the perfect companion for the FUJIFILM X-T1 and X-Pro2 to further enhance their rugged, weather resistant capabilities.

Specifications

Type Hot-shoe mount flash
Guide Number 50/164 (ISO100?m/ft.) at 105 mm zoom head position, equivalent to 35mm format.
Zoom 24mm-105mm equivalent to 35mm format.
When the extendable wide panel is pulled out, the flash coverage is approx.. 20 mm.
Bounce capability Flash head tilts down to 10° or up to 90° and rotates horizontally 135° to the left and 180° to the right.
Color temperature Approx. 5600K
Flash modes TTL / Manual / Multi.(repeating flash)
Flash exposure compensation -5.0 – +5.0, 1/3 step
(The available range and step depend on camera models)
High-speed synchronisation (FP) Capable (supported camera only)
Manual 1/1 – 1/512, 1/3 step

Multi.(repeating flash)

1/4 – 1/512, 1/3 step, 1-500Hz, 2 – 100 flashes
Wireless communication type Optical pulse communication (in multiple flash-unit photography operation)
Wireless modes Master and Remote
Communication cannels From 1 to 4.
Remote groups Up to three groups (A/B/C)
Power source Four LR6 (AA-size) alkaline batteries,
four FR6 (AA-size) lithium batteries, or
four HR6 (AA-size) rechargeable Ni-MH batteries
(optional).
External Power Source BATTERY PACK EF-BP1 (optional)
Dimensions W67.5 x H123.9 x D106 (mm)

* Specifications subject to change without notice.

Articles: Digital Photography Review (dpreview.com)

 
Comments Off on Fujifilm announces development of EF-X500 flash

Posted in Uncategorized


Tips for Using Flash to Enhance Outdoor Nature and Landscape Photography

13 Dec

Late on a winter evening, I was photographing atop a ridge in Colorado’s Front Range. I had been working on some landscape shots, but with the light fading from the sky, the thought of beer and food was beginning to overwhelm my desire to stay out. The colors were shifting to the deep tones of blue hour, and the light was long gone from the hills. About to give up and head home, I spotted a lone juniper atop a rocky outcrop, perfectly silhouetted against the deep blue of the mountain sky. I sighed, tempted to ignore the scene, but instead put my camera back on the tripod, walked over and composed a shot. With a click, I snapped the shutter.

CO KenCaryl evening 30Dec2011 6

The image was decent, nice blues with a clean black foreground, but it needed some warmth, an element to contrast with the abundant cool tones. “If only I could get a beam of sunlight to reach back above the horizon…” I thought to myself.

Wait a second… I didn’t need the sun, I had a flash and a remote trigger in my bag. I pulled it out, all thoughts of beer and food forgotten, and placed the flash on a boulder a few feet to my left. I set it low, to 1/4 of full power, then took a shot.

Better, I thought, looking at the image glowing on the back of my camera, but still not right. The light coming from the flash was too cool, lacking the warmth I wanted. Digging back in my bag, I emerged with a pack of gels and slapped a half cut of CTO (color temperature orange) over the flash, and clicked off another.

CO KenCaryl evening 30Dec2011 7

“Now we’re talking”, I muttered. A warm beam of light crossed the rocky foreground to light up the tree. Never mind that the actual sunlight disappeared 45 minutes before, I could re-create it with a little artificial light trickery. A few adjustments to the flash’s positioning and brightness, and I had my keeper shot. Finally, I could go home.

Using Flash Outdoors

For most photographers, flash is relegated to the studio, and if used outside it is usually restricted to portraiture. But there is so much more potential for artificial light. Landscape and wildlife photography can often benefit from a little flash, and with some creativity, it can bring out the best in your images. Here are a few tips to help you get using flash for your outdoor nature and landscape photography.

To get started, you’ll need a few things in your bag:

  • At least one flash
  • Some kind of remote trigger (I use cheap and simple wireless triggers I found on Amazon for a few bucks)
  • A selection of multi-colored gels
  • A flash stand or assistant
  • For night photography, a strong headlamp or hand-held flashlight is a good addition to the kit
A windmill stands in the garden of the Finca Santa Anita in Salta Province, Argentina.

A windmill stands in the garden of the Finca Santa Anita in Salta Province, Argentina.

General Guidelines

As with almost all flash use, for best results, you’ve got to get the light off your camera. On-camera, straight flash, looks weird and unnatural. I like to say that photographic rules are meant to be broken, but this one seems universal: get the flash off your camera.

Get the flash off your camera

Direction of light, and how much to use it, is a matter of your personal vision, but here are my thoughts: Artificial light should either look so natural, you don’t notice it comes from a bulb, or so obvious, that it’s clear the scene was lit for artistic reasons. Anything in between usually doesn’t work.

As with all successful photography, you need to think through your image, and the story you are trying to tell. Do you want a natural-looking scene or are you aiming for an artistic portrayal of your subject? Once you have an answer to that question you can move forward.

Scrubby pines grow from the rocks of the Dakota Hogback in the foothills of Colorado outside Denver, late evening.

Scrubby pines grow from the rocks of the Dakota Hogback in the foothills of Colorado outside Denver, late evening.

Imitating Natural Light on the Landscape

The near-dark hours before dawn and just after sunset, or full night, are the most suitable times to add a bit of light to a scene. A natural look is usually subtle and may rely heavily on the light that is already available to you. In my example of the juniper tree, I kept the flash setting low, and warmed the light with a gel to get a sun-like look. Finding the right balance between flash and ambient light is critical.

The further you get from the flash, the dimmer, and harder the light becomes. A flash aimed toward the ground will be very bright close to the strobe, fading quickly to invisibility. When setting your scene, use the test button to look at the throw of light across your subject. Aim it carefully, and take advantage of the flash’s zoom to consolidate the beam just where it is needed.

A Western Scrub Jay perches in a tree in the foothills of the Rocky Mountains outside Denver, CO, USA.

A Western Scrub Jay perches in a tree in the foothills of the Rocky Mountains outside Denver, CO, USA.

Adjusting Exposure

Once set, pop a shot or two, and check the results on your LCD. Almost always, you’ll find you need to adjust the flash brightness, placement, or the ambient light exposure.

When using flash remember this: adjust ambient light with the shutter speed, and flash with the f-stop (aperture).

For example, if you want to bring out more brightness in the sky, lengthen your shutter speed, if you want to increase the apparent brightness of your flash, open up the aperture. This is effective for small adjustments in camera, and keeps you from having to constantly readjust flash settings.

Lighting Your Vision – Artistic Styles

An artistic look is more straight forward, but light direction, intensity, and color are just as important. I often photograph the northern lights around my home in Fairbanks, Alaska. Often the moon, stars, or aurora itself, are sufficient to illuminate the foreground, but at times, it fades to black as you can see below.

AK FAI aurora 112073 17

In such cases, a splash of light is just what I need. When photographing the aurora, or the night sky in general, I rarely carry an actual flash, but I’m always wearing a headlamp. During a typical 5-10 second exposure, if I need a little extra texture or warmth, I can pan the beam quickly over the foreground, “painting” it with light as I did in this image.

AK FAI aurora 112073 18

Light from a typical LED is very cool, but cover it with CTO gel, and nice warm tones result. Light painting is a popular technique, but one that requires some practice to make sure your subject is evenly lit, and not too bright. Mixing light painting and ambient can be very effective to even out brightness in an image, and compensate for highlights. In Argentina, a few years ago, I was shooting a historic farmhouse during the late evening. Bright porch lights on the house needed to be evened out, so I painted some key parts of the scene.

Arg Salta SantAnita house night 104133 18

A warning: painting light can mess with the color of a digital image. If you use your camera’s automatic settings, as I do, light painted images will often require some color correction in post-processing. Shoot in RAW to be sure you retain this flexibility.

Wildlife

Flash can also play an important role in wildlife photography. Birds in particular are often down low in dark forests, where natural sunlight is rarely found. The flat, boring light beneath the foliage can be replaced by the directional light of a flash.

CO Dec2009 AMRO 3

When using flash with a long telephoto, you can often get away with on-camera, or bracket-mounted flash, as I did of the portrait of the American Robin above. Using camera-mounted flash is easy with TTL (Through The Lens) compatible strobes. In fact, this technique is so easy, that I’m not even going to go into it, because more interesting possibilities exist.

Where I live in Alaska, the winters are long, and during the few hours of daylight, the sun is often hidden behind trees or clouds. The birds I love to photograph are usually stuck in flat, gray light. There are a few trees in my yard that the birds prefer. By setting up a flash (or two), gelled with CTO to emulate the absent sun, I’ve managed to create some well lit portraits of these guys.

RBNU 21Dec2011 2

The method is similar to lighting a landscape. You’ve got to choose your flash placement to avoid shadows, and since there is rarely a chance to replicate a poorly exposed shot, it’s best to get your settings right and then leave them in place throughout the shoot. In this case, I was going for an almost studio-like look, so I took advantage of the white snow as a background, making the final image appear almost as a cut-out.

ORJU 22Dec2011 2

I like to put my flashes atop a tall stand to get them over my head like a low angle sun. Done right, the set up and exposure takes only a few moments, and the results can be great.

Conclusion

Artificial light in the outdoors offers a great opportunity to create unique images. Think through your shots, consider where extra light can be added, and what role it will play in the final image. Not every situation requires it, in fact, most don’t. But there are times when that extra pop of light can take a photo from mundane to extraordinary.

Have you tried using flash with your nature or landscape photography? Please share your tips and images in the comments below.

googletag.cmd.push(function() {
tablet_slots.push( googletag.defineSlot( “/1005424/_dPSv4_tab-all-article-bottom_(300×250)”, [300, 250], “pb-ad-78623” ).addService( googletag.pubads() ) ); } );

googletag.cmd.push(function() {
mobile_slots.push( googletag.defineSlot( “/1005424/_dPSv4_mob-all-article-bottom_(300×250)”, [300, 250], “pb-ad-78158” ).addService( googletag.pubads() ) ); } );

The post Tips for Using Flash to Enhance Outdoor Nature and Landscape Photography by David Shaw appeared first on Digital Photography School.


Digital Photography School

 
Comments Off on Tips for Using Flash to Enhance Outdoor Nature and Landscape Photography

Posted in Photography


Lumu Power meters light, flash and color temperature

02 Dec

The team behind the Lumu smartphone light meter has launched a Kickstarter campaign to fund the production of Lumu Power, their next generation device. In addition to ambient light levels, the Lumu Power is also capable of measuring flash exposure and color temperature. Read more

Articles: Digital Photography Review (dpreview.com)

 
Comments Off on Lumu Power meters light, flash and color temperature

Posted in Uncategorized


Supporting Your Off-Camera Flash – Tripods, Monopods or Light Stands?

31 Oct

I’ve generally been a natural light photographer. I understand natural light and love its variability. Normally it’s enough to get some beautiful photographs; many photographers stop here and go no further.

Constantly critical of my own photographs, I realized that I was at the mercy of natural light, searching and modifying, but rarely creating or directing. That’s why I chose to learn how to use flash those years ago. To get full control, it’s essential to put the flashes where you want them, and for this, you need to support them. This article will talk about the options available to you for holding your speedlights and off-camera flash.

Off Camera Flash

Off-camera flash

Human Light Stands

Using a human light stand is one of the easiest ways to support an off-camera flash and is often overlooked. If you can get someone to hold your flash, you get what’s effectively a voice activated light stand (VAL). It’s easier to change lighting setups this way, especially if your subject is moving. There’s also less hassle on windy days. That said, most people won’t know how to position the lighting modifier and it will tend to drift as you’re shooting. Another photographer or an experienced photography assistant will be very useful.

DSC_0472-2

Handheld

Hand holding is quite simply, having either you, or an assistant hold the flash. It’s perfectly possible to do this yourself if you feel comfortable taking pictures with one hand, and it gives you a lot of control. Or hand the flash to someone else and let them know where to point it.

Monopod Boom

Again, you can do this yourself, and it helps if you have the monopod touching the ground because it means that your arm doesn’t feel as tired while holding a larger softbox or beauty dish. Or your photography assistant (or family member, friend, or passer-by) can boom, or hold the flash up, to light your subject from a higher angle. This gives you a lot of control and if you look at photographers like Annie Leibovitz and Joey L, you’ll see that their assistants are often using this approach.

DSC_5516-3

It can be heavy so make sure you pause for breaks. I use a long aluminium Benro monopod that allows me to attach a flash to either end. It’s cheaper than the Gitzo alternative, but do bear in mind that there seems to be no after-sales support. Carbon-fibre is lighter, but not essential.

off-camera-light-stand_4396

Off-camera flash

Tripods

I’ve been using my tripods to support my off-camera flashes for a long time. First because I already have them, and secondly because they are perfect for uneven ground. Generally they don’t get the flash high enough, but they are stable, especially if you weight them down by hanging a heavy camera bag from the center column.

Small, Lightweight Tripod

This is my go-to option when I’m travelling light and won’t have an assistant. The idea is that the tripod is so small and light, that I can wear it on my belt and largely forget about it. Of course it doubles as a tripod, which I’d normally want to have with me anyway. It’s flimsy by itself and needs to be weighted down with a camera bag. It’s also far too small for most purposes, so it needs to be up on tables and so, to get more height. But you’re more likely to actually carry it, so that’s a good thing. I use a 1kg Sirui tripod that I’m pretty happy with, especially for the price, with an equally small and light ball-head.

english-photographer-light-stand

Big, Heavy Tripod

As I began to use larger lighting modifiers, like huge octoboxes and parabolic umbrellas, I needed a heftier support for them. I happened to have an enormous old tripod which has been excellent. It weighs a lot by itself, and is definitely bulky, but is easily carried with its broad shoulder strap. It’s perfect for uneven ground, and can be made more stable by hanging the camera bag from it. I use one of Manfrotto’s largest tripods which gets the flash over my head (I’m 6’2″). It’s old, and very durable.

DSC_1979-2

Proper Light Stands

And then there are dedicated light stands, designed for the purpose of supporting off-camera flashes. I started using these when I wanted to get the flashes higher above the subjects. Some are light and flimsy, and others heavy and stable. Some stack together, and others are designed precisely for travel. They seem to break regularly in transit, or just being used on set. They do get the flashes high off the ground, but they don’t seem particularly stable because they’re tricky to weight down with the camera bag, and as soon as the ground is uneven, they’re a pain to use and won’t work on a steep slope.

Off Camera Flash

Supporting Larger Flash Modifiers

Light Stands

These come in several shapes and sizes. Generally all the legs open at the same angle so they only work on fairly flat ground. Smaller light stands meant for travelling are a good solution, though they can be flimsy. Larger light stands can get the flash very high off the camera. Balanced properly, they can be used with a boom pole to get the flash over your subject.


C (entury) Stand

My most recent acquisition, and now my go-to light stand unless I’m travelling light, is the C-Stand or Century Stand. It’s an old design from Hollywood film studios, and very well engineered. It weighs a lot which is inconvenient if you’re walking to your shooting location, but helpful because it means the stand is more stable in use. The legs are also made so that it’s very easy to weight them down using sand bags. I personally use a lead diving weight belt for ballast. Importantly, one of the legs can move along the central column, which means that you can use the stand on uneven ground and on stairs. It’s not quite as versatile on uneven ground as the huge tripod, but it’s much taller; up to 3 meters (9.8 feet). It’s cumbersome to pack because it’s an L-shape, but when it’s on location, it’s perfect. The included boom is very useful, and can handle hanging backdrops too. I use the C-Stand from Pixapro which is well made enough to outlast me. It’s designed to make it a pleasure to use. Though not a pleasure to carry!

DSC_5120

You can see the various light modifiers in the video below, as well as see them used on location.

Any questions, let me know in the comments below. Do you have any other creative solutions for holding off-camera flash?

googletag.cmd.push(function() {
tablet_slots.push( googletag.defineSlot( “/1005424/_dPSv4_tab-all-article-bottom_(300×250)”, [300, 250], “pb-ad-78623” ).addService( googletag.pubads() ) ); } );

googletag.cmd.push(function() {
mobile_slots.push( googletag.defineSlot( “/1005424/_dPSv4_mob-all-article-bottom_(300×250)”, [300, 250], “pb-ad-78158” ).addService( googletag.pubads() ) ); } );

The post Supporting Your Off-Camera Flash – Tripods, Monopods or Light Stands? by Ben Evans appeared first on Digital Photography School.


Digital Photography School

 
Comments Off on Supporting Your Off-Camera Flash – Tripods, Monopods or Light Stands?

Posted in Photography