RSS
 

Posts Tagged ‘Flash’

Hands-on with Sony’s wireless flash system, arriving in August

11 Jul

$ (document).ready(function() { SampleGalleryV2({“containerId”:”embeddedSampleGallery_7699465702″,”galleryId”:”7699465702″,”isEmbeddedWidget”:true,”standalone”:false,”selectedImageIndex”:0,”startInCommentsView”:false,”isMobile”:false}) });

Sony’s wireless radio flash trigger system, introduced back in March, is headed to retailers this August. The system is comprised of a ‘commander’ (FA-WRC1M) and a receiver (FA-WRR1). There can be up to 5 groups, each of which can contain 15 flashes. A standard sync port on the receiver allows for control of studio strobes with ease, though of course you’ll lose TTL capabilities. High Speed Sync (HSS) is also supported. The system has a maximum range of 30m/98ft, and the commander unit sports a large LCD with an intuitive user interface.

What we like

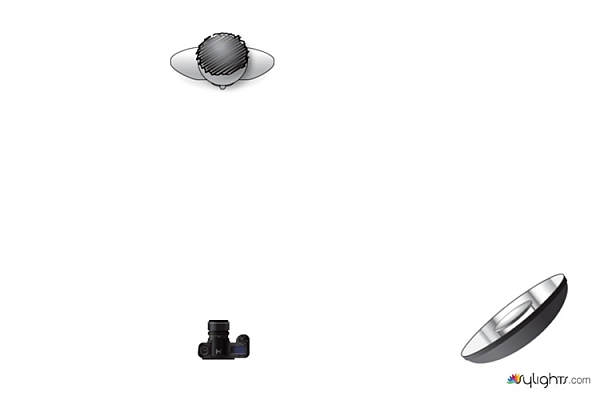
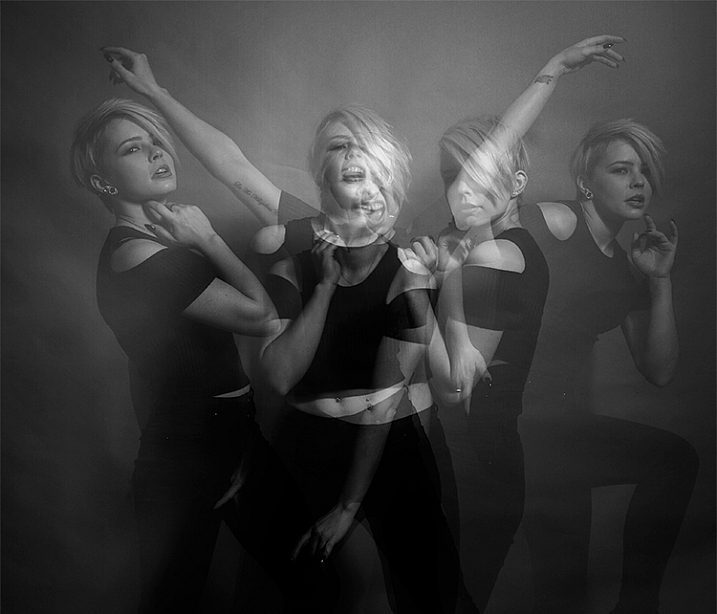
At a recent shooting event in San Diego, CA, I got some brief hands-on time with the new transmitters and receivers, and was pleased with how intuitive the user interface was (not something you can always take for granted with flash systems). For the shot below, I used E-TTL with three flashes (groups) – one (A) at camera right for some harsh side-lighting, one (B) front left of model Eliza as the key, and one (C) directly in front of her for a tiny bit of balance to the overall light. I dialed in my exposure manually to ensure ambient was drowned out, then varied the ratios of groups A, B, and C on the transmitter’s LCD with ease until I got the lighting just as I wanted it. Essentially, it all worked just as I’d expect it to. Adjust flash ratios, groups, Manual power, Flash Exposure Compensation are all very intuitive and direct. Furthermore, the option of triggering studio probes was very handy. Studio shooters: rejoice.

What we’re less pleased with

If you’re an event shooter, I was less pleased with the lack of an AF assist beam on the transmitter. This speaks to a larger problem with Sony mirrorless: no Sony E-mount camera will trigger any off-camera AF assist beam. Red/IR AF assist beams are a boon to any event photographer; for example, I rely on it for fast AF at dim wedding receptions, where all my flashes are off-camera for dramatic lighting. In such scenarios, AF assist beams on transmitters allow the camera’s AF system to focus in near-darkness, obviating the need for a heavy flash on-camera. Sony’s continued lack of any support of off-camera assist beams on transmitters or flashes is unfortunate, given Sony’s desire for acceptance by pros, and considering that in our own lab tests, Sony’s a7R II and a6300 focus incredibly well with red/IR assist beams triggered by Canon/Nikon systems (contrary to the belief of many that on-sensor phase-detect AF systems can’t ‘see’ these beams).

While one can fault both Canon and Nikon for similar oversights in their latest radio triggered flash systems, we find the omission increasingly unforgivable given that 3rd party options like Phottix and Yongnuo do offer AF assist beams on their radio triggers. Yet while these 3rd party options do at least work on Canon and Nikon DSLRs, they fail entirely to trigger AF beams on Sony FE cameras, due to Sony’s continued lack of support of AF assist beams (save for the largely useless one built into the camera).

We’re hopeful that this is something Sony will address in the future. It’s by no means a deal-breaker though for what appears to be a very capable radio trigger system that should find a way into your kit if you shoot with Sony flashes.

Both the commander and receiver will be available in August at $ 350 and $ 200, respectively.

Pricing and Availability – New FE 70-200mm f/2.8 GM OSS G Master lens. Teleconverters and Wireless Lighting Control System

Today, Sony has also released pricing and ship timing for the FE 70-200mm f/2.8 GM OSS G Master lens, 1.4x and 2.0x teleconverters plus their new wireless lighting control system. All products were introduced earlier this year.

One of the most eagerly anticipated lenses of the year, the Sony FE 70-200mm f/2.8 GM OSS G Master lens takes its place as the flagship telephoto zoom in the Sony lens lineup. Featuring built in Optical Stead Shot (OSS) and a fast f/2.8 maximum aperture across the zoom range, the lens will be an ideal fit for nature, sports, travel, fashion, beauty and wedding photographers. This lens will ship this July for a retail price of $ 2,500 US and $ 3,300 CA.

Designed exclusively to fit the 70-200mm F2.8 G Master lens, the new 1.4x and 2.0x teleconverters (models SEL14TC and SEL20TC) will both be sold for the same retail price of about $ 550 US and $ 700 CA, and will ship this July.

The versatile new wireless flash and control system – comprised of the FA-WRC1M wireless radio commander and the FA-WRR1 wireless radio receiver – was designed to meet the growing demands of professional Sony photographers. With a maximum range of 30m (approx. 98 feet) and the ability to control a maximum of 15 separate flash units in 5 different groups, it offers a flexible wireless flash shooting experience with exceptional performance.

The FA-WRC1M commander will be sold for about $ 350 US and $ 480 CA. The FA-WRR1 receiver will be sold for about $ 200 US and $ 280 CA. Both products will ship this August.

The new lenses, teleconverters and wireless lighting system will be sold at a variety of Sony authorized dealers throughout North America.

Articles: Digital Photography Review (dpreview.com)

 
Comments Off on Hands-on with Sony’s wireless flash system, arriving in August

Posted in Uncategorized


Cactus promises 1/8000sec flash sync with V6 II transceiver, new version for Sony users

28 Jun

Hong Kong-based flash and flash trigger manufacturer Cactus has upgraded its V6 wireless transceiver system to allow flash sync speeds of up to 1/8000sec. The company, claiming its transceivers can apply TTL control to multiple brands of flash at the same time, says that the V6 ll will be compatible with units from Canon, Nikon, Olympus, Panasonic and Pentax. Cactus also plans to bring high speed flash to Fujifilm X cameras even though Fuji doesn’t support the feature with its own flash units. Cactus has, at the same time, announced a V6 lls for Sony users with the same capabilities, but offers a Sony-compatible hotshoe foot.

The Cactus V6 ll offers an LED AF-assist light and remote control of the flash’s power output and zoom head position, as well as the features of the previous version. Also new is the ability to detect the on-camera flash in the network and to assign an automatic profile to that flash on start-up. This should make the system easier to work with.

The Cactus V6 ll will be available from July priced at $ 95. The Sony version is scheduled for an August release. For more information and a list of pre-installed flash profiles visit the Cactus website.


Press release:

Go high-speed sync! Cactus launches the V6 II, a newest version of its popular Wireless Flash Transceiver to add cross-brand HSS and the V6 IIs, a dedicated Sony version.

After two years in the making, Cactus V6 II & IIs – the second generation of the World’s First cross-brand wireless flash transceiver, NOW supports high-speed synchronisation (HSS)!

Besides the revolutionary remote power control of Canon, Fujifilm, Nikon, Olympus, Panasonic and Pentax flashes all at the same time, the new models now support HSS / FP mode in the same cross-brand environment.1 This unique function gives photographers flexibility undreamed of. Matching flashes with same camera system for off-camera flash photography is over.

Two High-Speed Sync Modes
1. Normal HSS: Supports shutter speed up to 1/8000s.
2. Power Sync: Boosts flash contribution above camera’s x-sync speed, perfect for extreme conditions where Normal HSS is not powerful enough. 2

Cactus also extends HSS capabilities to Fujifilm cameras despite them not yet
supporting high-speed sync at the time of writing.

AF-assist
Both the V6 II and IIs now has an automatic LED AF-assist light that makes autofocusing in dark environments possible – even in pitched-black!3 Besides the camera-mounted V6 II/IIs, off-camera units will also activate the AF-assist light, which helps focusing even when camera is far from the subject.

V6 IIs for Sony
The dedicated Sony version – V6 IIs, embodies all the desirable functions of its sibling V6 II but with a Sony compatible hot shoe on the transceiver body, ensuring a seamless and secured connection with Sony cameras and flashes. Mounting the V6 IIs on a Sony Alpha camera allows the photographer to shoot above camera’s maximum x-sync speed and control power and zoom of Sony, including those with a Minolta/Sony hot shoe via an adapter, and other V6 II compatible flashes. 4 It is the perfect wireless flash trigger for existing and new users of Sony Alpha cameras, especially those who may still have non-Sony system flashes in their camera bags.

Highly Intelligent
V6 II and IIs can now auto-detect the on-camera portable flashes at device start-up by selecting the system the flash belongs to and assigning an Auto flash profile. Similarly, the V6 II will auto-detect the camera and selects the system accordingly. 5 This simple plug-and-play makes the setting up extremely quick and easy that both amateurs and professionals appreciate.

Expands Flash Compatibility
Remote zoom control now applies to all compatible TTL flashes, gives the photographer much quicker controls. Better still, previously unsupported digital TTL flash models on the V6 are now being supported.

Features at a Glance
1. Cross-brand wireless manual power and zoom control with HSS support of Canon, Fujifilm, Nikon, Olympus, Panasonic, Pentax and Sony flashes;

2. Two cross-brand high-speed sync modes:
•?Normal HSS supports shutter speeds up to 1/8000s;
•?Power Sync boosts flash contribution above camera’s x-sync speed;

3. Multi-master supports up to 20 photographers firing the same set of flashes at their own power settings;

4. AF-assist light assists focusing in low light environment;

5. Flash profile customization ensures accurate power output;

6. Work seamlessly with the RF60 series to support HSS and Power Sync;

7. Other useful features inherited from the V6 including:

  • Lo Power
  • Absolute Power
  • TTL Pass-through
  • Group Sequence
  • Sport Shutter
  • Remote Shutter
  • Relay Mode
  • Delay Mode
  • Firmware Update support

Price and Availability
Cactus V6 II and IIs are currently scheduled to be available in 2016 July and August respectively and both are priced at US$ 95.00 (ex VAT).

Articles: Digital Photography Review (dpreview.com)

 
Comments Off on Cactus promises 1/8000sec flash sync with V6 II transceiver, new version for Sony users

Posted in Uncategorized


Sigma announces pricing and availability for sd Quattro and EF-630 flash

24 Jun

$ (document).ready(function() { SampleGalleryV2({“containerId”:”embeddedSampleGallery_4930243882″,”galleryId”:”4930243882″,”isEmbeddedWidget”:true,”standalone”:false,”selectedImageIndex”:0,”startInCommentsView”:false,”isMobile”:false}) });

Sigma Corp. has announced pricing and availability for its sd Quattro mirrorless camera, a bundle including the camera and a 30mm F1.4 Art lens, as well as the EF-630 external flash.

The sd Quattro is a mirrorless camera with an APS-C-size Foveon sensor (which Sigma claims is ‘equivalent’ to 39MP), hybrid autofocus system, 2.36M-dot electronic viewfinder and ‘Super-Fine Detail’ mode that combines seven exposures into one for high dynamic range. The sd Quattro will priced at $ 799 body-only when it ships in July.

The sd Quattro will also come bundled with Sigma’s 30mm F1.4 DC HSM Art lens for $ 999.

The company also released pricing for its EF-630 external flash. It will initially be available for Sigma cameras, with Nikon and Canon versions to follow. The flash covers a range of 24-200mm (and can go down to 17mm via its built-in wide panel), supports high speed sync and offers an easy-to-use interface via its dot matrix display. The EF-630 will set you back $ 379 when in ships in July.

Press release:

Sigma Announces Pricing and Availability for sd Quattro, new sd Quattro bundle and Sigma EF-630 Flash

Pricing and availability announced for the Sigma sd Quattro camera, a new sd Quattro camera and 30mm 1.4 Art lens bundle, as well as new EF-630 Flash

Ronkonkoma, New York — June 24, 2016 – Sigma Corporation of America, a leading camera, DSLR lens, flash and accessories manufacturer, today announced the pricing and availability of the sd Quattro camera along with a new bundle including the sd Quattro and 30mm 1.4 DC HSM Art lens, as well as pricing for the new Sigma EF-630 external flash. The Sigma sd Quattro features an APS-C sized sensor and a redesigned mirrorless system among other advancements, and will be available in July for the street price of $ 799 USD. The sd Quattro and Sigma 30mm 1.4 DC HSM Art bundle is expected to be available in July for the street price of $ 999 USD. The Sigma EF-630 flash is the latest external flash from Sigma and boasts an overhaul from previous models, including a new docking station that allows users to update the flash via personal computer. The ideal match with the new sd Quattro, the new Sigma EF-630 flash will be available in July for Sigma mount for the street price of $ 379 USD, along with its dedicated USB Docking station for $ 79 USD. Additional mount availability for systems including Nikon and Canon are to be announced at a later date.

“Our goal with the sd Quattro and 30mm 1.4 Art bundle is to make our new camera available to more photographers interested in the unique aspects of our Foveon Quattro sensor,” stated Mark Amir-Hamzeh, President of Sigma Corporation of America. “The cameras are truly exciting and showcase some great advancements including a new mirrorless design, updated auto-focusing system, a rugged build, and paired with our renowned 30mm 1.4 Art lens make for an extraordinary pair. Additionally, our new EF-630 flash system shows Sigma’s dedication to photography with updated performance from previous models, and makes for an ideal pairing with our new sd Quattro cameras.”

About the sd Quattro and 30mm 1.4 DC HSM Art
The sd Quattro utilizes our proprietary Foveon Quattro sensor renowned for its high-resolution capabilities. A magnesium alloy body makes the sd Quattro durable and rugged, while a dust and splash proof design make it ideal for photographers facing harsh conditions. On top of the new design, these cameras boast a list of useful advancements. These include a two-mode Autofocus detection that combines Phase detection for focus speed and Contrast detection for focus accuracy. The focus settings have also been enhanced with such modes as Movement Prediction, Face Detection, Free Movement, Focus Peaking and a variety of others. The new 2.3 megapixel viewfinder displays close to 100% of the field of view, and when placed in “Auto” will toggle between the viewfinder when the user has the camera to their eye and then to the LCD when the user lowers the camera. A new “Super-Fine Detail” mode brings out the full potential of the Quattro sensor by capturing seven different exposures with one shot and merging them for exceptional dynamic range (images can be extracted individually as well). The Sigma 30mm 1.4 DC HSM Art is a staple prime lens in Sigma’s lineup. This compact prime lens is designed for APS-C sensors and touts a bright 1.4 aperture. Part of the Sigma Global Vision lineup, every Sigma 30mm 1.4 Art is individually tested before leaving our single factory in Aizu, Japan and can be updated and fine-tuned with the Sigma USB dock and Sigma Photo Pro software. 

About the Sigma EF-630 Flash
Compatible with most well-known digital SLR cameras, the EF-630 flash will be available in Sigma mount in July with additional mounts, including Canon and Nikon, in the future. The FP Flash function of the EF-630 makes flash photography possible at shutter speeds greater than the normal sync speed, which is typically limited at shutter speeds up to 1/250 second for most cameras. The FP Flash function for high shutter speeds is necessary when setting a larger aperture to limit depth of field when shooting in daylight, as high shutter speeds are used to balance the daylight and the flashlight at any shutter speed.  

EF-630 features:

  • Intuitive user interface: dot matrix LCD screen for improved menu visibility, D-Pad and dial settings controls, and easy one-click disengage function improve ease of use
  • Slave flash function: for use with multiple flash systems
  • Modeling flash function: check for intense reflections and shadows before capturing the shot
  • AF assist light: accurate auto-focus in low light conditions
  • Auto Power-off: flashgun automatically powers off after a period of non-operation to conserve battery life
  • Manual flash power level control: manually set the flash power level from 1/1 to 1/128

The new EF-630 Flash can be updated with the latest software from a workstation or laptop using the Sigma Optimization Pro software and Flash USB Dock FD-11 (sold separately).

Articles: Digital Photography Review (dpreview.com)

 
Comments Off on Sigma announces pricing and availability for sd Quattro and EF-630 flash

Posted in Uncategorized


How to Create Compelling Wide-Angle Portraits Using One Off-Camera Flash

11 May

What are your most memorable moments as a photographer? As a travel photographer, my short list of stand-out moments include wandering alone in Namibia’s dead tree forest, photographing sunbeams from the top of a cliff in China, and capturing the Aurora Borealis on the coast of Iceland.

1 Colombian Girl

However, a year ago all of those amazing locations and moments were trumped by spending 30 minutes photographing a little girl outside her home near Villa de Leyva, Colombia (pictured above). This was the first time the girl had her portrait taken, let alone by a foreigner. With all the confidence of an experienced model, she literally stole the show that day. I believe the session is an important memory for her and instantly became my top moment photographing to date.

Ironically, two years ago I would not have even bothered taking this picture. I was focused on landscape and outdoor travel scenes. Also, if I’m honest with myself, I was somewhat intimidated by using artificial lighting and working with people as subjects. In April of 2014, I gave environmental portraiture a shot and have never looked back. It is now an important focus of my work.

This article will provide some guidance on how you can create images like the ones you see here, using a wide-angle lens and just one off-camera flash. But first, let me let you in on a little secret – it’s not that difficult.

Getting things right in camera is the important first step, which is the focus of this article. Processing your images is equally important, but I’ll cover that in a future article. So, let me start by providing you with the core techniques, then get into equipment and settings.

2 Smoking Guy

Use a (Relatively) Wide-Angle Lens

Lens choice is critically important in portraiture. Most portrait photographers reach for their 85mm or 105mm lens when heading out on a shoot. These focal lengths give a nice, realistic look to the subjects. However, I find myself drawn to portraits that have a surreal look to them, and include extra context that helps tell a story. Also, wide-angle lenses require you to shoot close to your subject, which also brings your viewer into the scene.

So, the first step is to leave your 85mm or 105mm in the bag, and grab a wide-angle lens. Most of the portraits you see here were created at 24mm using a full frame camera (use a 16mm for the same view if your camera has a cropped sensor). For me, this focal length is the perfect blend of reality and distortion. If you shoot much wider, elements closer to the lens, such as arms and hands, look too big or elongated. Also, wider focal lengths mean a much bigger background, which is usually not desirable.

3 Dockworker Ships

Choose a Compelling Subject

Your subject is paramount. The Indonesian dockworker above is amazing. I spent 20 minutes photographing this guy and really had a difficult time choosing the best image. On the other hand, you could spend all day photographing me on the same dock, in front of the same ships, and have nothing but tossers at the end of the day.

I look for people that have experienced life. The ideal subject has a particular interesting quality about him or her, that makes them stand out from the rest. However, my subjects also have an everyday person quality about them. Finding subjects can be challenging, especially if you live in the suburbs of Chicago, like I do. I am a travel photographer and usually find my subjects in rural areas overseas. However, there are great subjects everywhere.

Clothing is critically important. If your 90-year old rural villager is wearing a hat that says, “I Love New York”, then you will want to politely ask him to take it off, or at least turn it around for the picture. The point is, don’t let out-of-context clothing ruin or weaken your shot.
4 Smiley Guy

Choose a Complementary Background

Your image is only as strong as the weakest part of it, which is often the background. This is because, as photographer Jim Zuckerman puts it, “The world is a compositional mess”. There are two important qualities you want out of your background:

First, at the very least, your background must be non-distracting. Although you can easily isolate your subject with a longer focal length, the background becomes a major consideration with wide-angle portraits. Beginner, and even intermediate photographers, can overlook even some obvious distractions in the background. You have probably seen them before: trees that look like they are growing out of the subject’s head, patchy spots of bright light in the scene, colorful objects, straight lines and geometric shapes. You essentially don’t want anything that competes with your subject for attention.

The image of the Indonesian dockworker below is non-distracting, but not much more. He is essentially standing in front of a shipping container, so this image won’t win any awards for its background. Nevertheless, it is still a good picture because of the strength of the subject.

5 Dockworker Container

Second, whenever possible, include a background that complements your subject by providing a context. I’ve shot many images with simple non-distracting backgrounds. But, my favorite pictures are those with a background that tells a story about the subject. This is why I love shooting in places like rural China and Indonesia. These countries have many ancient villages that provide opportunities for amazing backgrounds, such as in the image below.

6 Chinese Guy Hat

I like to keep all evidence of modernity out of the background. I don’t like plastic stuff in my pictures. I don’t include modern looking buildings or cars. Instead, I prefer rural areas with weather-beaten buildings. Of course, this all depends on what you are after. The important thing is that the background complements the subject and does not distract from it.

Shoot in the Right Lighting Conditions

Because the majority of the background is not lit by the flash, many of the same outdoor photography lighting principles hold true, even if a flash is being used. Try shooting either early or late in the day (when the sun is low in the sky) or in overcast conditions. I actually prefer overcast conditions, but still shoot relatively early or late in the day.

Put Your Subjects at Ease

I don’t hire models, so some subjects work well and others not as well. What you want to avoid is a picture of your subject standing flat-footed, straight up and down, and holding a fake smile.

To help avoid this, it is a good idea to start your session by gaining their interest and confidence. If you have some images you’ve shot and processed, show them to give him or her an idea of what you are looking for, and hopefully peak their interest. This should communicate immediately that you are not looking for them to just stand there and smile. It should also show that the posing expectations will be basic.

7 Colombian Lady Cat

Posing and Composition

Because I am shooting wide, I get quite close to my subjects and warn them ahead of time about this. For me, the eyes are a critically important part of the picture and must be very sharp. I focus on the closest eye, and re-focus frequently as I move around the subject slightly.

I generally ask him or her to look directly at the camera and not to smile, although not always. I then start moving slightly left or right, asking them to keep their head still and just follow the camera with their eyes. I usually shoot from slightly below eye level. I have them stand or sit at an angle to the camera. If the subject is standing, I have them put their weight on the back foot.

I like to include the subject’s hands in the composition. With a wide-angle lens, their hands in the foreground will look large, so try to strike a balance with the hands being prominent, but not too large. You can do this by simply positioning the hands closer to or farther away from the lens relative to their body.

8 Chinese Girl Laughing

Equipment and Settings

The Camera

Your camera should be equipped with an internal or external flash trigger to control your off-camera flash. Here is how I set things up:

  • Start by leaving your flash or trigger initially turned off.
  • Set your camera to manual mode.
  • If the session is outdoors, I try for settings of ISO 100, f/7.1 and a shutter speed of around 1/160. You can adjust your f-stop and shutter speed to your preference, but keep in mind that you cannot go faster than your camera’s maximum flash sync speed.
  • Make the necessary adjustments to slightly underexpose the background by 1/3 to 2/3 stop. I usually start by adjusting shutter speed, but go no slower than 1/60 and no faster than 1/160. If necessary, I will then adjust my f-stop to f/5.6 at the widest. Then, and only then, will I start bumping up the ISO.
  • If you are indoors, you need to start with a higher ISO as a first step, and then make your adjustments to shutter speed and f-stop in the same manner.

9 Chinese Woman

Lighting

For 90% of my portraits, I use a single off-camera flash, diffused with an umbrella or softbox. The most important rule with flash is “don’t ruin your shot,” which is usually done by putting too much flash on your subject. Instead, you want to get a decent balance of natural and artificial light, so that the flash is undetectable to the untrained eye, but lights your subject brighter than the underexposed background.

Now, turn your flash and trigger on:

  • Set your off-camera flash to manual mode.
  • I typically position the flash at a 45-degree angle to the subject, about 2-3 feet (slightly less than a meter) away, higher than their head, angled downward.
  • I usually start with 1/16 flash power when outdoors, and adjust from there until the subject stands out from the background, but does not look like they have been blasted with flash.

Post-Processing

You need to get things right in camera first. But, you will need to use a variety of post-processing techniques to get the effect you see in these images. I’ll coverthe techniques I use to process environmental portraits in a future article.

Thank you for reading, please share your wide-angle portraits and questions in the comments below.

googletag.cmd.push(function() {
tablet_slots.push( googletag.defineSlot( “/1005424/_dPSv4_tab-all-article-bottom_(300×250)”, [300, 250], “pb-ad-78623” ).addService( googletag.pubads() ) ); } );

googletag.cmd.push(function() {
mobile_slots.push( googletag.defineSlot( “/1005424/_dPSv4_mob-all-article-bottom_(300×250)”, [300, 250], “pb-ad-78158” ).addService( googletag.pubads() ) ); } );

The post How to Create Compelling Wide-Angle Portraits Using One Off-Camera Flash by Ken Koskela appeared first on Digital Photography School.


Digital Photography School

 
Comments Off on How to Create Compelling Wide-Angle Portraits Using One Off-Camera Flash

Posted in Photography


SanDisk iXpand Flash Drive for iPhone and iPad updated with flexible design

23 Apr

SanDisk has launched a refreshed iXpand Flash Drive with a flexible Lightning connector for Apple’s iPhone and iPad. The new model has an updated design that’s compatible with most device cases, according to SanDisk, as well as a USB 3.0 connector for rapid transfers to desktop. Additionally, SanDisk has updated the iXpand Drive mobile app with a new design and additional functionality.

Using the iXpand Drive app, users can open the iPhone’s camera, take photos or record videos, and have the content saved directly onto the iXpand Flash Drive rather than the device’s internal storage. The app can be set up to automatically backup photos and other content to social media, and supports direct music and video playback. For security purposes, the new iXpand drive also includes encryption software for password-protecting the flash drive.

The new iXpand Flash Drive is available in 16GB ($ 44.99), 32GB ($ 69.99), 64GB ($ 89.99), and 128GB ($ 129.99) capacities. The drive is compatible with the following Apple devices running iOS 8.2 or later:

  • iPhone 6s
  • iPhone 6s Plus
  • iPhone 6
  • iPhone 6 Plus
  • iPhone 5s
  • iPhone 5c
  • iPhone 5
  • iPad Pro (12.9-inch)
  • iPad Air 2
  • iPad Air
  • iPad mini 4
  • iPad mini 3
  • iPad mini 2
  • iPad mini
  • iPod touch (5th generation)

Via: SanDisk


Press release:

SANDISK REINVENTS ITS FLASH DRIVE FOR IPHONE AND IPAD

APR 21, 2016

COMPANY EXPANDS ITS INDUSTRY-LEADING MOBILE STORAGE PORTFOLIO WITH NEW IXPAND FLASH DRIVE

MILPITAS, Calif., April 21, 2016 – SanDisk Corporation (NASDAQ: SNDK), a global leader in flash storage solutions, today launched the next-generation iXpand™ Flash Drive, a mobile storage device designed to help people quickly and easily free up space on their iPhone and iPad  with up to 128GB of additional capacity1.  The iXpand Flash Drive features a new, modern design that fits with most iPhone and iPad cases, a USB 3.0 connector for faster transfer speeds to Mac or PCs, and a completely redesigned app to easily manage photos, videos and music.

According to a recent consumer survey2 conducted by SanDisk in the U.S., many iPhone users are looking to free up more space on their phones. “People are using their mobile phones to capture tons of photos and videos, and more than 70 percent of users transfer files off of their iPhones to another storage location,” said Dinesh Bahal, vice president, product marketing, SanDisk. “Our line of mobile storage offerings can immediately help them free up space. With the new iXpand Flash Drive, people can spend more time using their iPhone to capture what they love, and less time worrying about how and where to transfer these photos and videos.”

Designed to be the perfect storage companion for iPhone and iPad, the reinvented iXpand Flash Drive features a flexible Lightning connector and now a USB 3.0 connector so users can quickly and easily move photos and videos between their iPhone and iPad and Mac or PCs.  The iXpand Flash Drive allows users to automatically back up their camera roll and contacts, and watch popular video formats3 straight from the drive. The new drive also includes encryption software that password-protects files, allowing people to share their content while keeping sensitive files secure across devices4.

The product features a redesigned app, the iXpand Drive app, which offers new features and an improved user experience.  Giving users the option to save space instantly, the app now has a camera function so users can shoot and save photos or videos directly to the drive instead of on their iPhone or iPad.  The app also allows users to automatically back up content from popular social networking sites, as well as play back music within the app. 

Built for the next-generation iXpand Flash Drive, the iXpand Drive app is available for download from the App Store for iPhone and iPad. The app launches when the iXpand Flash Drive is plugged into an iPhone or iPad – allowing for immediate storage expansion, access to the user’s content and easy file management. 

SanDisk offers a full range of mobile storage solutions, making it easy for consumers to expand the memory and manage content on their favorite Apple and Android devices.  To see SanDisk’s complete line of innovative offerings, please visit: www.sandisk.com/home/mobile-device-storage

Pricing and Availability

The iXpand Flash Drive features a one-year limited warranty in the United States5. It’s available in 16GB, 32GB, 64GB and 128GB capacities, with MSRPs of $ 49.99, $ 69.99, $ 89.99 and $ 129.99, respectively.  The drive is compatible with iPhone 6s, iPhone 6s Plus, iPhone 6, iPhone 6 Plus, iPhone 5s, iPhone 5c, iPhone 5, iPad Pro (12.9-inch), iPad Air 2, iPad Air, iPad mini 4, iPad mini 3, iPad mini 2, iPad mini and iPod touch (5th generation) running iOS 8.2 or later. The new iXpand Flash Drive is available now at BestBuy.com, Amazon and SanDisk.com.

Articles: Digital Photography Review (dpreview.com)

 
Comments Off on SanDisk iXpand Flash Drive for iPhone and iPad updated with flexible design

Posted in Uncategorized


Meizu reveals PRO 6 with 21MP camera and 10-LED flash

14 Apr

Chinese mobile device manufacturer Meizu has launched the PRO 6. It will be sold alongside the PRO 5 with the same 21MP 1/2.4-inch sensor and F2.2 aperture, but updates its dual-tone flash with 10 LEDs arranged in a circular pattern on the back plate. Read more

Articles: Digital Photography Review (dpreview.com)

 
Comments Off on Meizu reveals PRO 6 with 21MP camera and 10-LED flash

Posted in Uncategorized


Special Effect – How to Create Multiple Flash Exposures in a Single Frame

18 Mar

Many photographic techniques, rightfully, tend to focus on polished images. They vary anywhere on the spectrum from getting sharper images to capturing accurate skin tones. These techniques are important. However, sometimes they’re not very much fun. Sometimes, that’s precisely what you need to have, and exactly what photography should be – fun.

This article will guide you through a fun special effect technique that will allow you to capture multiple exposures in a single frame, using the test button on your strobes or flashguns. Using this method, you will gain a new tool to add movement, and a sense of action in your studio photography.

how-to-multiple-flash-exposures-2793

What you need

  • A dSLR on manual settings (set from 2-10″ or bulb exposure)
  • A very dark room (or nighttime outdoors)
  • A tripod
  • A human subject
  • A strobe or flashgun (speedlight) with a test button (to manually fire the flash)
  • Someone to serve as an extra pair of hands (not required but it helps a lot)

Setting it up

how-to-multiple-flash-exposures-2795

Aperture

Because you’re using flash, the aperture setting is the most important in this technique. As long as your shutter speed is slower than your camera’s flash sync-speed, aperture is what controls how the flash exposure is recorded, and it also dictates what power output to set on your flash. I suggest using an aperture somewhere between f/8 and f/16, to get the best results. A smaller aperture will also help to minimize the effect of any ambient light in your images.

Camera settings

With your camera on a tripod, set the dial to manual mode, the ISO to 100, and your shutter speed to between two and six seconds. To test if your shutter speed is suitable, take a test shot without any flash. As long as the image is completely black at the end of the exposure, it will work for this technique.

This time can be changed and extended later, depending on how many movements you want to capture.

Lighting

To start with, try to keep your lighting simple. A single light source will give you unlimited potential. This technique will work with multiple lights, but it is best to build up to that over time, as you get used to how the technique works.

As for lighting placement, the choice is yours. The lighting will, and should, depend on the final intent of the image you are trying to create. However, if you’re unsure, try starting with your light high above, and in front of, your subject. That will provide a good starting point to make adjustments from there.

Use a light meter, or manually calculate the exposure, to set your flash output, so it matches your chosen aperture.

how-to-multiple-flash-exposures-diagram

Simple lighting set-ups, like this one used in these images, can be the most effective.

Direction

With everything set up, you need to explain to your subject how to move. The easiest way to explain this is, “Pose, wait for the flash, pose, wait for the flash, and pose again”.

In more detail – you want to wait for your subject to adopt the first pose, set the focal point, and start the exposure. Press the test button on your strobe to fire the flash. After this first flash, your subject should move to their second position as quickly as possible, where you will press the test button again. Repeat as many times as required.

Keep trying

The hardest part of this technique is that it is incredibly hit and miss. Getting your subject to move into positions that create pleasing compositions, without be able to evaluate while it’s happening, is tricky. It takes time and patience. You will need to shoot a lot of frames, and most of them will be unsuitable. Just keeping making as many attempts as you can, until you think you have something, then take some more.

how-to-multiple-flash-exposures-2781

Tips

Here are a few things to keep in mind that will make your attempts easier.

Start small

Sometimes it’s hard judge how movements will appear in the final image. By trying to squeeze too much in, you might end up with a cluttered mess in your images. Start with two or three movements to gauge where things are and build it up from there.

how-to-multiple-flash-exposures-2787

Trying to include too many movements may result in a cluttered mess like this image.

Remote triggers

If you have a remote trigger for your strobes with a manual button on it, you can hold it in your hand and fire the flash. This is much more preferable than having to move between the camera and your light source during each frame.

Recycle rate

If you want to squeeze more than two or three movements into a six second exposure, try to ensure that your flash isn’t set to full power. By reducing the power output, you’re also decreasing the amount of time it takes your flash to refresh. This will allow you to fire the strobe more times in the short timeframe.

Clarity

There is no one way to process images from this technique, and all of that is up to you. However, if you want crisper, more pronounced outlines of your subject, the clarity slider in Lightroom or Adobe Camera RAW will help a lot.

Neutral backdrops

how-to-multiple-flash-exposures-2793-2

Colored backdrops will overpower images using this technique.

For color images, try and stick to a black or grey background. Because your subject is moving to different positions, the background continues to expose once your subject has moved. If you use a colored background, as I did with these images, that color will dominate your exposures. Of course, this can be used judiciously as a feature of the image should you choose.

Two second timer

If you can’t rope someone into being your assistant for the day, set your camera to use the two second timer, to give you time to move between the camera and the strobe.

Keep going

Once you’ve had a go at this technique with people, feel free to try and think of ways to use it with other subjects. For example you could use it to capture a hammer at different points in its swing, or perhaps a basketball at different parts of its arc. The choices are endless. Be creative with it, have fun, and if you give it a go please share your images below, as well as any questions you may have.

This is the third of a series of articles we will be featuring this week on dPS all about special effects. Check out the others here:

  • How to Photograph the Full Band of the Milky Way
  • Fire Spinning with Steel Wool – A Special Effects Tutorial

googletag.cmd.push(function() {
tablet_slots.push( googletag.defineSlot( “/1005424/_dPSv4_tab-all-article-bottom_(300×250)”, [300, 250], “pb-ad-78623” ).addService( googletag.pubads() ) ); } );

googletag.cmd.push(function() {
mobile_slots.push( googletag.defineSlot( “/1005424/_dPSv4_mob-all-article-bottom_(300×250)”, [300, 250], “pb-ad-78158” ).addService( googletag.pubads() ) ); } );

The post Special Effect – How to Create Multiple Flash Exposures in a Single Frame by John McIntire appeared first on Digital Photography School.


Digital Photography School

 
Comments Off on Special Effect – How to Create Multiple Flash Exposures in a Single Frame

Posted in Photography


Nissin adds radio receiver unit to Air system for branded flash units

15 Mar

Flash manufacturer Nissin has announced it has produced a receiver unit for its NAS wireless flash communication system that allows flash units from Canon, Nikon and Sony to be used within its radio command structure. The new Air R units are designed to convert flashguns that usually rely on line-of-sight optical control when used off camera in a group to come under the company’s 2.4GHz radio network.

Once mounted into the hotshoe of the receiver flash units from Nissin and other brands compatible with Canon, Nikon or Sony systems can be controlled by either an Air transmitter from the hotshoe of the camera, or by a Nissin flash unit that features the Air commander mode – such as the new i60A.

The receiver is equipped with eight channels and can work in one of three groups. The system allows flash exposure compensation of +/-2EV and manual output from full to 1/128th power. The company says the NAS Air system has a range of 30m and supports high speed sync at shutter speeds of up to 1/8000sec. The Nissin Air R units will cost £59.94 or £109.98 with a Nissin Commander Air 1 transmitter.

For more information see the Nissin website or the Kenro website for an English version.

Nissin Air R Specifications:

Compatibility: For Nissin, Canon and Sony flashguns
Wireless system: Radio
Radio specifications: 2.4GHz ISM band
Channel: 8 channels. Auto or manual select
Flash groups: A, B, C (3 groups)
Power source: 2 AAA batteries (not included)
Guide number: Low GN mode / High GN mode (default)
Mode (set at NAS Commander): TTL, manual and manual zoom
EV Compensation on flash: (TTL) -2.0 – +2.0 in ½ EV increments (manual)
Each group can be adjusted independently or synchronised
Manual output: 8 steps of manual output 1/128, 1/64, 1/32, 1/16, 1/8, 1/4, 1/2, 1/1 – full power
Manual zoom: Manual adjustment 24 / 35 / 50 / 70 / 85 / 105 / 135 / 200mm
Continuous shooting speed: 10 shots per second
Number of flashes: Approx 5000
Transmission distance: Maximum 30 metres (dependent upon the environment)
High Speed Synchronisation: 1/8000 sec (controlled by NAS Commander)
External sync socket: Standard PC sync cable
Mode: TTL, N, M zoom, no setting is needed, all settings controlled from the NAS commander
Synchronisation modes: No setting is needed, controlled by NAS commander
Mounting: Built-in stand, cold shoe / 1/4” tripod bush
Dimensions: 60 (L) x 60 (W) x 50 (H) mm
Weight: 55g (excluding batteries)


Press release:

NISSIN LAUNCHES NEW RECEIVER AIR R RANGE 

Kenro Ltd, the specialist photographic and audio-visual equipment supplier, is delighted to announce the launch of a series of revolutionary new products from the Nissin Air System range.
 
Kenro is the exclusive UK distributor for Nissin, a market-leading producer of electronic flash units for photographers. Nissin has a history of developing innovative products with phenomenal quality standards, and the Nissin Receiver Air R is no exception.

The Receiver Air R is a game-changing new addition to the Nissin Air System (NAS) 2.4GHz radio transmission wireless flash system. Compared with the traditional optical wireless transmitters, 2.4GHz radio transmission is less susceptible to the usual issues caused by not having clear line of sight between transmitter and receiver, and provides coverage of up to 30 meters (98 feet). In addition, radio transmission ID technology gives each of the NAS-compatible devices a unique identity to prevent misfiring in the event of signal interference.

The Nissin Commander Air 1 was launched last year and has been very well-received by camera users all over the world – the Receiver Air R adds a new dimension of flexibility to this already popular product. Combined with the Nissin Commander Air 1, it allows a photographer to wirelessly control almost any kind of Nissin camera flash and original manufacturer’s flash in the current market with NAS and TTL & HSS support. Camera users who currently own a Canon, Sony or Nikon original flash will be able to make their existing flashes compatible with the Nissin Air System, utilising full TTL.

High Speed Sync up to 1/8000 seconds, zoom and manual power output can all be controlled wirelessly at a competitive price without giving up quality and reliability. What’s more, one Commander transmitter can control up to 21 separate Air R receivers, which can be programmed into three groups to give the camera user an almost limitless range of lighting options without having to spend precious time readjusting flashguns between shots.

Paul Kench, Managing Director, Kenro, says: “This is a great new addition to the Nissin Air System that will really open up the creative opportunities available to photographers and camera users and allow them to be much more flexible in their approach to lighting, without the need to replace all their existing kit. The Receiver Air R range expands the possibilities without breaking the bank.”

The Nissin Receiver Air R range is available now:
NFG014NR: Nissin Receiver Air R Nikon – SRP £59.94 inc. VAT
NFG014N/AP: Nissin Commander Air 1 + Receiver Air R Nikon – SRP £109.98 inc. VAT
NFG014SR: Nissin Receiver Air R Sony – SRP £59.94 inc. VAT
NFG014S/AP: Nissin Commander Air 1 + Receiver Air R Sony – SRP £109.98 inc. VAT
NFG014CR: Nissin Receiver Air R Canon – SRP £59.94 inc. VAT
NFG014C/AP: Nissin Commander Air 1 + Receiver Air R Canon – SRP £109.98 inc. VAT

Articles: Digital Photography Review (dpreview.com)

 
Comments Off on Nissin adds radio receiver unit to Air system for branded flash units

Posted in Uncategorized


Sony announces development of wireless flash control system

08 Mar

To kick off WPPI in Las Vegas, Sony has announced that it’s developing a wireless radio flash control system for its range of flashguns. Consisting of the FA-WRC1M radio commander and FA-WRR1 receiver, the system will provide control over 15 flashes in 5 groups up to 30m away. It will offer sync speeds up to 1/250th sec as well as a high sync speed. No pricing has been given, but Sony estimates the system will be available this summer in the US and Canada.

Press release:

Sony Announces Development of New Wireless Lighting Control System at WPPI 2016

LAS VEGAS, Mar. 7, 2016 – Sony Electronics, a worldwide leader in digital imaging and the world’s largest image sensor manufacturer, has today announced plans to release a new wireless lighting control system to meet the growing demands of professional Sony photographers.  

Designed for compatibility with their ? interchangeable cameras and external flash units, the new lighting system will include the FA-WRC1M wireless radio commander as well as the FA-WRR1 wireless radio receiver.  A prototype of the new system will be on display in Sony’s booth at WPPI 2016.  

With a maximum range of 30m (approx. 98 feet), the new radio controlled system will allow for an extremely flexible wireless flash shooting experience with exceptional performance in all types of shooting conditions. In total, the system can control a maximum of 15 separate flash units in up to 5 groups of flashes.   While using the system, photographers have the ability to control the exposure of connected flash units either manually or automatically depending on preference.   Additionally, the new lighting control system will be capable of flash sync speeds of up to 1/250th of a second with high speed sync (HSS) available as well.  

The new Wireless Lighting Control system will be available this summer at authorized retailers throughout the US and Canadian markets.  Pricing and detailed specifications will be released at a later date.

Articles: Digital Photography Review (dpreview.com)

 
Comments Off on Sony announces development of wireless flash control system

Posted in Uncategorized


CP+ 2016: Nissin gets serious with radio-triggered flash solutions

28 Feb

CP+ 2016: Nissin Stand Report

Flash manufacturer Nissin offers some compelling alternatives to on-brand flashes, and they’ve recently updated their lineup with the announcement of the i60A, pictured in the middle here. The i60A features a Guide No. of 60 at at 200mm (ISO 100), which is more powerful than the company’s flagship Di700A, which has a GN of 54 under the same conditions. Impressive, given the flash’s overall smaller size. It also features High Speed Sync (HSS).

Possibly the most compelling feature of the i60A (and the flagship Di700A)? Integrated 2.4GHz radio wireless control in conjunction with the Air 1 commander and Di700A flash. Off-camera event flash photography’s best friend. They’re ergonomically fantastic as well. Read on as we dig a little deeper into these products.

CP+ 2016: Nissin Stand Report

The i60A is significantly smaller than the Di700A (illustrated in grey here) – Nissin’s flagship and the flash that introduced the 2.4GHz radio wireless control system. At only 98mm tall, the i60A is significantly smaller than the 140mm tall Di700A. It’s lighter too: 300g (without batteries) vs. the Di700A’s 380g. And yet it provides brighter flash output. Nice.

CP+ 2016: Nissin Stand Report

The i60A is Nissin’s second flash to work with the company’s 2.4 GHz radio wireless control system, meaning you can trigger it off-camera with the Air 1 commander (on right) or Di700A flash on-camera. It can even act as a radio trigger itself in commander mode. Radio triggering can be essential for fast-paced, unpredictable scenarios, like at a wedding reception or dance floor where objects might momentarily block off-camera flashes triggered optically or via infrared.

While Canon has had their own solution in the 600EX-RT flash and ST-E3-RT emitter, Nikon has only just recently announced their radio solution, and Sony has no such solution at all. Given the intuitive on-board control of manual power or auto TTL flash exposure bias on both the Air 1 commander and any flash units, the Nissin solution is quite attractive, even mandatory if you’re looking for radio-triggered flash on a Sony system.

CP+ 2016: Nissin Stand Report

So you’ve seen the Air R in a couple of photos now and are probably wondering what it is. It’s a receiver for Nissin’s 2.4GHz radio wireless control system, meaning you can attach it to flashes without radio control to have them join Nissin’s system. There are versions for Nissin, Canon, and Nikon flashes.

CP+ 2016: Nissin Stand Report

The Nissin i60A has a tiltable, rotatable head, capable of rotating up and down 90°, and left and right 180° in either direction. This is great for creating a softer bounce flash effect, either on or off-camera. The flash is powered by 4 AA batteries, which should provide 220 full power bursts.

Every version of the i60A helpfully comes with the ability to act as a Canon, Nikon, or Sony radio slave, triggered by an Air 1 commander. That means that you can have a Canon version of the Air 1, mounted to a Canon body, fire a Nikon version of the i60A off-camera. Cool.

CP+ 2016: Nissin Stand Report

Pictured here is the i60A in comparison to the Di700A. As we’ve said before, the i60A is significantly smaller. The downside? The i60A is missing the red AF assist beam. It does, however, have a small LED light that can be used for AF assist, though its far more annoying to subjects than a red assist beam.

Speaking of AF assist, it’s important to note that the Sony versions of these flashes can only fire AF assist beams on Sony Alpha SLT cameras, not Sony E-mount cameras. That means the assist beams are useless on the popular a7 and a6000-series cameras. We confirmed with Nissin that this is due to Sony E-mount cameras failing to send a signal over the hot-shoe connection when the shutter button is half-depressed. That’s a shame, because pros need focus ability in extremely low light conditions – the dance floor of a wedding reception, for example. I told Nissin we’d stress this with Sony, and their response was ‘please, please do’.

Sony: your move.

CP+ 2016: Nissin Stand Report

We mentioned favorable ergonomics earlier on, and here’s why. Take a look at the user interface of the Air 1 commander. You’ve got visual indicators for manual power and flash exposure compensation (TTL), for each group. It’s simple to use the dial to bias these. No menu digging. The Di700A has a similar display, though the i60A’s truncated display means it can’t show quite as much information. 

Articles: Digital Photography Review (dpreview.com)

 
Comments Off on CP+ 2016: Nissin gets serious with radio-triggered flash solutions

Posted in Uncategorized