RSS
 

Posts Tagged ‘Five’

Five Places for Perfect Natural Portrait Lighting

10 Mar

1 portrait lighting

Wouldn’t it be great if you could get beautiful, natural-looking portraits without ever having to use flash?

Well, perhaps you can. There are many different locations, often closer than you think, where you can find the right lighting for great looking portraits. Often they’re missed because we might not know where to look.

Generally, your best strategy is to look for what is called Open Shade. Ideally, you are looking for a situation where the stronger overhead light is being blocked by a structure, either man-made or natural.

2 open shade diagram

There are a lot of variables to pay attention to, but with a little practice you begin to recognize good natural lighting situations that are right in front of you.

1. Find a gazebo or front porch with a roof

This is a particularly good technique for you to use when it’s sunny outside in the middle of the day, but it can work on overcast and rainy days as well.

It’s often a bad idea to pose your subject out in the direct sun, particularly when it is up high in the ske. That kind of lighting can produce harsh shadows, as well as cause your subject to squint their eyes.

I use the front porch location quite a bit when photographing high school seniors in the middle of the day. An overhang of any sort can block strong overhead light and allows your subject to be lit with the softer surrounding bounce lighting.

3 front porch lighting

In the case above, I also used a large white collapsible reflector, off to the right side, to provide additional fill-light with this handsome young man. A large aperture was used to help create an out of focus background.

If you have no porch available you can get your model to help create a good lighting situation by using a prop like a wide-brimmed hat for a close-up head shot.

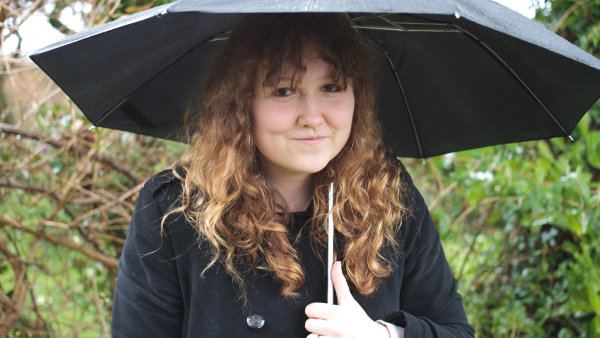
2. Under an umbrella

Andrew Menage

By Andrew Menage

Using an umbrella can work well to protect your subject from both the rain, and overhead lighting. Note that the color of the umbrella will have a significant effect on the color of the light that is illuminating your subject. A black umbrella is neutral in color and will block almost all of the light from above.

3. Near a window

Just because you may not be able to shoot outside doesn’t mean you still can’t use the outdoor light to create a natural looking portrait. There is a right way and a wrong way to do this.

5 window lighting

6 window lighting diagam

Make sure that most of the window is forward of your subject. The larger the window, the softer the lighting. The reflector can be any light colored object that is fairly neutral in color. The closer it is to your subject, the more fill light it supplies.

4. Find a bridge or an overpass

If you shoot in a more urban setting, you’ll likely have bridges or overpasses in your area. The photo below was taken at the entrance to a pedestrian underpass. Not only did we get good portrait lighting, we also got the model out of the wind and snow.

7 under bridge lighting

One important thing to remember is to watch your background. Although I was generally happy with the pose and the lighting, I could have done a better job controlling the background in this portrait.

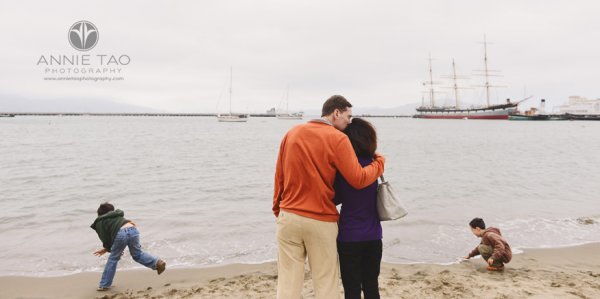
5. Anywhere at sunset

This is one time when you do want the sun in the face of your subject. You only have a few minutes of this sweet light when most, or all, of the sun has disappeared below the horizon.

8 diffused portrait lighting sunset

Direct sun can be too bright at the beginning of sunset. You may have to wait until just after sunset to get a softer look. In the beach photo above, the light was nicely diffused by a few clouds on the horizon between my subjects and the setting sun.

More ways to find places with great natural portrait lighting

Similar to the way you use an umbrella, you can create your own overhead roof by having an assistant hold a light blocker above your subject. This could be anything lightweight, a large piece of cardboard, or even one of the a collapsible, panels like the ones shown below.

9 Photodiox diffusion panels

There are two factors that dramatically effect how well this technique works.

The first is how far back your subject is posed underneath the covering object. If you pose her too far back, you may not have enough light to get a nice photograph. If she is too far forward, you may get too much overhead lighting.

Secondly, how high the shading object is above your subject’s head affects how the light will illuminate their features. The best way to master this technique is to play around and experiment.

It’s always a great idea to shoot a few variations in several locations, and adjust exact placement of your subject. You’ll be able to learn a lot from your mistakes and your successes.

googletag.cmd.push(function() {
tablet_slots.push( googletag.defineSlot( “/1005424/_dPSv4_tab-all-article-bottom_(300×250)”, [300, 250], “pb-ad-78623” ).addService( googletag.pubads() ) ); } );

googletag.cmd.push(function() {
mobile_slots.push( googletag.defineSlot( “/1005424/_dPSv4_mob-all-article-bottom_(300×250)”, [300, 250], “pb-ad-78158” ).addService( googletag.pubads() ) ); } );

The post Five Places for Perfect Natural Portrait Lighting by Bruce Lovelace appeared first on Digital Photography School.


Digital Photography School

 
Comments Off on Five Places for Perfect Natural Portrait Lighting

Posted in Photography


Canon announces five PowerShot compacts

08 Jan

Canon has introduced five PowerShot models, ranging from budget to midrange. The SX610 HS has a 25-450mm equiv. lens, 20.2MP BSI-CMOS sensor, 3″ LCD, Wi-Fi with NFC, 1080/30p video. Stepping up to the SX710 HS adds a 25-750mm lens, DIGIC 6 processor (the only model with this), and 60p video. The SX530 HS pairs a 16MP BSI-CMOS sensor with a whopping 24-1200mm lens. On the budget end there’s the ELPH 170 that has a 20MP CCD, 25-300mm lens, and 720p video. A cheaper ELPH 160 has a 28-224mm lens and no image stabilization. More details

Articles: Digital Photography Review (dpreview.com)

 
Comments Off on Canon announces five PowerShot compacts

Posted in Uncategorized


Gear Envy: Five Things to Consider Before Buying Your First Camera

07 Jan

GearEnvy 1

1. The Ol’ Gear versus Photographer Chestnut

What’s the best camera and lens you can buy when you’re starting out?

  • Anything by Nikon
  • Anything by Canon
  • Nikon and Canon are overrated; Pentax is what all the cool kids are using
  • Do the best you can with what you can afford right now

A photographer went to a socialite party in New York. As he entered the front door, the host said “I love your pictures – they’re wonderful; you must have a fantastic camera.” He said nothing until dinner was finished, then: “That was a wonderful dinner; you must have a terrific stove.” – Sam Haskins

Believing a great camera will make you a great photographer is like thinking Roger Federer’s tennis racquet will make you a world champion tennis player. Um, it won’t – I’ve tried. I’ve also worn the same jeans as Gisele Bundchen and they didn’t make me a supermodel. Cooking with Wolfgang Puck’s saucepans didn’t make me a master chef either.

Great gear won’t make you a great photographer. Great lenses, however, can improve the sharpness of your images, and great lights and accessories can improve their quality. But all of that can be undone with poorly executed or sloppily composed images.

Just because something’s technically perfect doesn’t necessarily make it great or even good. A good photo should inspire an emotional reaction, and no camera or lens available today can achieve that for you.

I’m blown away daily by evocative photos on Instagram, 500px, and Flickr. Eighty percent or more of these images are taken with smart phones or entry-level cameras with kit lenses. When I share my images online, I get just as big a response from images taken with my iPhone as I do from images taken with pro gear. Because of the Internet, there’s never been a greater time in history to have your work seen and loved, or to inspire a reaction.

The best first camera you can buy is the one you can afford right now.

2. What are you shooting?

GearEnvy 2

Next, you should ask yourself what your your gear is for? Where will you use it and how often?

  1. I only take my camera to church on Sundays.
  2. I’m going to document my trek to the summit of Mount Everest, rodeo rides and my next Tough Mudder event.
  3. I photograph sixty weddings a year.
  4. I’m still learning, but I love to take photographs every opportunity I get.

Are you planning on taking your camera to rugged subzero locations? Will you be shooting thousands of images a day or only taking photos on special occasions? This is the first question to consider before purchasing any new gear – what will you use it for?

If your answer is #2 or similar, you may want to consider a heavy duty pro body that’s built to take rough and tumble handling and extreme weather conditions; a cheaper lightweight camera may not withstand the wear and tear or hold up to the elements.

If you plan on taking thousands of frames daily or weekly, it may be more cost effective to invest in a mid-range camera that’s built to shoot more frames. The shutter on a cheap camera usually rolls over and dies after about 100,000 frames, so spending a few hundred extra may give you more longevity.

The subject matter you’ll be shooting will also influence your choice of lens. For example, if you’re planning on shooting a lot of portraits and head shots, many fashion and portrait photographers use long fixed focal lenses or zoom lenses. If you’ll be doing a lot of weddings, professionals stock their kits with wide and long lenses and lenses that are somewhere in-between. If you’ll be shooting a lot of scenery, landscape photographers get more use out of wider lenses. And lastly, if you plan on shooting a lot of food or products, you may want to consider adding a macro lens to your kit.

3. Brand loyalty. Which brand should you buy and why?

With cameras there’s no definitive answer to this question. Nikon appears to have a slight edge over all the other SLR brands, but there are advantages and disadvantages to each.

I spent the first 15 years of my career shooting with Nikon because both my brother and my first mentor used them. I loved my Nikon and never dreamt of swapping over. I initially invested in secondhand bodies and prime lenses and after I had saved enough coin to buy new, I stayed loyal to Nikon. Later when I switched over to digital, I continued my Nikon love affair.

The decision to convert to Canon was made for me by the lack of decent Nikon upgrades on the market in 2004-2005 and by the fact that Canon’s 1DS MKII blew anything Nikon made that year out of the water. I switched to Canon and invested in two new camera bodies, new lenses, speedlights and accessories.

Fast forward 10 years and you could argue that Nikon now makes better bodies than Canon, and that Canon makes slightly better lenses. For better or worse, I’ve made a commitment to Canon, and I’m sticking to that – for now. I still suffer the occasional bout of gear envy, but hey, I’m only human.

My advice is to test out each camera on offer in your price range. You’ll find that some cameras are more comfortable to use than others. Also factor in the warranty, general after-sales service, and how easy it is to have the brand you’re looking at serviced or repaired in your area. Another good indication of quality is the camera’s resale value. If your potential camera is flooding the low-end of the secondhand market, it may be a good indication you’re about to buy a lemon. Finally, check out camera reviews and look up discussions about the model you want to buy on forums. The photography community is incredibly thorough and generous with information.

4. Holy crop! Does size matter?

GearEnvy 3

I bought my first digital Nikon 13 years ago and paid $ 17,000 AUD (approx. $ 14,000 USD) just for the body. It took 256 MB memory cards and produced raw image files that were around 6 MB. I used that camera to shoot hundreds of covers, poster shots, magazine spreads and advertising campaigns, and nobody ever questioned the file size.

Today my iPhone takes 8 MB photos. So, does that mean my iPhone camera is better? Umm – no. It’s not the quantity of the megapixels that count; it’s the quality of the megapixels and the size of the sensor. Cramming lots of megapixels onto a tiny sensor decreases image quality, making grainier looking files.

So how big are the sensors in the various cameras on the market today? A camera phone sensor is the size of a tic tac, a compact camera sensor is the size of an M&M, an entry-level SLR sensor is the size of postage stamp, and a pro level camera sensor is the size of a 35mm film frame.

So how many megapixels are enough and what’s the best size sensor for you? Well again, the answer comes down to what the output is going to be.

If you plan on shooting images that are going to end up on billboards or really large wall prints, then a full frame sensor that produces raw image files that are larger than 20 MB is ideal. An entry-level camera can produce large enough files to create billboard size images; they just won’t look anywhere near as good.

If you plan on printing midsize images — A4 (8.5×11″) or smaller — then an entry-level to mid-range camera will achieve really good results.

Finally, if you’re mostly going to share your images online, you can get away with a smart phone or compact camera, but any of the above will do the job, as well.

5. Physical size and weight

GearEnvy 4

Does this camera make my bum look big?

This factor is often overlooked until you get home and pull your new camera out of the box and use it a few times. You may think you want the biggest, heaviest camera and the longest lens, but four hours into an eight-hour mountain hike, you may change your mind.

I currently use two different bodies: the 1DS MKIII and the 5D MKIII. My 1DSIII weighs twice as much as my 5D and produces better quality images, but I’m prepared to take a hit in quality when I’m travelling because I know I’ll shoot more if I’m carrying a lighter camera. Having to schlepp a heavy camera around makes me think twice about bringing it out in the first place.

A good camera should feel comfortable and be like a natural extension of your body. Test out how easy it is to change settings with one hand; believe me, this will get frustrating if it’s a difficult process.

Have I missed anything you feel is worth considering? Do you have anything to add to the discussion or have any questions? I’d love to hear from you.

googletag.cmd.push(function() {
tablet_slots.push( googletag.defineSlot( “/1005424/_dPSv4_tab-all-article-bottom_(300×250)”, [300, 250], “pb-ad-78623” ).addService( googletag.pubads() ) ); } );

googletag.cmd.push(function() {
mobile_slots.push( googletag.defineSlot( “/1005424/_dPSv4_mob-all-article-bottom_(300×250)”, [300, 250], “pb-ad-78158” ).addService( googletag.pubads() ) ); } );

The post Gear Envy: Five Things to Consider Before Buying Your First Camera by Gina Milicia appeared first on Digital Photography School.


Digital Photography School

 
Comments Off on Gear Envy: Five Things to Consider Before Buying Your First Camera

Posted in Photography


2 November, 2014 – Five Brief Audio Interviews from PhotoPlus

02 Nov

The PhotoPlus 2014 show in New York in late October saw a few new products being announced, for the first time in North America at least. I had been at Photokina in Germany the month before, and frankly, with only a few exceptions, found the industry to be a bit in the doldrums, as well as in a transition state.  PhotoPlus, because it is a consumer show, was much more lively and the crowds seemed to looking at everything with enthusiasm.

Because I was at the show for only one day, I was traveling light, and so instead of the more extensive video interviews which Kevin and I did at Photokina in September, I did mostly audio interviews at PhotoPlus. I also focused my attention on some of the smaller companies exhibiting for the first time, but also with Epson who is just now announcing the SureColor P600 photo printer in North America, though it was shown at Photokina earlier.


The Luminous Landscape – What’s New

 
Comments Off on 2 November, 2014 – Five Brief Audio Interviews from PhotoPlus

Posted in News


Five Things You Need to Know Before Starting a Pet Photography Business

02 Oct

Pet photography is a fast growing and super fun genre of photography, and it’s awesome to see so many people wanting to celebrate animals and the role they play in our lives! But how do you turn your passion for animals and photography into a thriving and successful business? What do you need to consider before setting up your business? Today I’m sharing the knowledge I’ve gathered over the last three years to help you prepare yourself for what is the best job in the world.

Image Nine

#1 Do you really love animals?

Pet photography is messy, dirty, and at times incredibly frustrating work. You need to be comfortable with being jumped on by Great Danes, pawed by pugs, and scratched by cats. You need to be happy crawling through the mud, and bending and stretching at weird angles.

Image Six

This was shot lying on the wet ground on a freezing cold morning – but totally worth it!

You also need to be exceptionally patient. Often at the start of a shoot your subject will spend about half an hour running around like crazy, and jumping all over the place before finally calming down enough for you to photograph. You also need to accept that you will never have that much control over your subject – try telling a puppy to sit still and tilt his head 45 degrees!

At some point, your camera equipment will get covered in drool, your shoes will get peed on, and you will end up ruining several pairs of pants. So if you don’t really, truly, love animals, you are going to find the whole process miserable and give up very quickly.

#2 Is there a market for it?

I am lucky enough to live in a city (Melbourne, Australia) that has the highest rate of dog ownership in the country. People here absolutely adore their pets. There are high-end pet stores, hundreds of dog friendly cafes and parks, and so many Pet Expos that I have lost count. But that’s not always going to be the case for your area, so do your research. Some good things to find out are:

  • What’s the rate of pet ownership? Your local council is a good resource.
  • What is the general attitude towards pets? Do people see dogs as “just dogs” or are they part of the family or substitute children?
  • Are there lots of pet friendly cafes, restaurants, and parks? What are the pet shops in your area like? Do they sell just the basics or are they a bit fancier?
Image One

Kimbo is most definitely part of the family.

It’s also a good idea to factor in things like the amount of disposable income the average pet owner has, and the general cost of living. One really handy tip – if the area you are in isn’t particularly pet friendly, focus your marketing on areas further afield.

#3 Do you have the right equipment and know how to use it?

Pet photography is similar to sports and wedding photography in the sense that if you miss a moment, it’s not likely to be repeated. We all know that equipment doesn’t make the photographer, but at a minimum you want to have a DSLR, prime lenses that autofocus (the 50mm f/1.4 is a great place to start), a good quality zoom lens, high-speed memory cards, and an speedlight you can use off-camera if necessary.

Image Two

Proof that with the right equipment, you can make it look as if a puppy is standing still.

Get to know your equipment back to front before you start charging for your work. Figure out how to change your shutter speed, aperture, and ISO without looking, and know how to change your lenses quickly. Some of the best shots come without warning, and if you’re staring at your camera wondering why something isn’t working, you’ll miss the shot.

As you know, practice makes perfect, and the only way to get really good at photographing pets and knowing your equipment is to find the most badly behaved animals you can and shoot, shoot, shoot. There’s no point in using well behaved, well trained dogs, because there are so many that aren’t. You know the friend who has a dog that jumps all over the furniture and runs in circles constantly? The friend with the cat who hates everyone? Practice with these sorts of pets and your camera will become like an extension of you before too long.

#4 What’s your style?

You know you’ve made it as a photographer when people can pick out your work from a line up. Having a distinct style is so important for setting you aside from the crowd. Here are some things to consider to help you find your style:

Are you a natural light or a studio photographer?
Do you like clean, clear backgrounds that don’t distract from the pet, or do you like contrasting backgrounds that add to the photo?
Do you like posed shots or natural?
How do you feel about styled shoots? Using props?
Do you want a soft or high contrast feel to your shots?
Do you like obvious post production or a more subtle approach?
Do you want to incorporate the pet owners in the shots?

When I started my business, I saw a gap in the market for really beautiful, shallow depth of field shots of pets. I also happen to love shooting with my lenses wide open, so that became my style. It has been refined over the years, but people hire me because they want beautiful, close up, emotive shots with a sense of warmth and humour to them. I only shoot in soft natural light, no direct sun, and I don’t do high action shots such as agility shows. I also very rarely photograph people with their pets, because it’s not my thing.

Image Four

Props can be an awesome way to bring a bit of humour to your shots.

Remember – do what you love and what feels good for you. Copying another photographer’s style is a waste of time and won’t help you grow.

#5 How are your animal handling skills and knowledge?

This is such an important thing to consider before you start your business. Safety (both yours and your subject’s) is extremely crucial. At best, you can be opened up to a law suit, at worst, you could seriously injure or kill someone’s pet.

Image Eight

When you’re dealing with 40 kilos (88 pounds) of Doberman, you want to be confident with your animal handling skills.

Be honest with your skill level. For example, I have grown up and volunteered around cats my entire life, and I’m very comfortable with them. I also know their body language, signs of stress, and how to play with them properly. But I didn’t know nearly as much about dogs. I volunteered for a shelter walking dogs, taking photos, and doing general handling, which helped me a huge amount. I also did some basic dog handling courses, as well as reading up on different breeds and their personalities. I’m now at the stage where I’m 100% comfortable dealing with all breeds and sizes of dogs.

Image Three

Ellie is fourteen years old, so I was very mindful of her range of mobility. She was happiest lying on her bed, so I shot around this rather than forcing her to stand up.

Even if you grew up with dogs, it’s a great idea to read up on the different breeds and their traits. This will help you so much when you are shooting, and by knowing what makes a certain breed tick you’ll be able to produce some great pictures.

Image Five

Ralph and Gidget were on lead for this session, and the leashes were removed later in Photoshop. We had so much more fun knowing that there wouldn’t be any unforeseen accidents.

Unless you’re shooting in a fenced in, off-lead area, it’s better to be safe than sorry and keep the dog on a long lead. That way you avoid any accidents, and you can always edit leads out later in Photoshop (a big secret of pet photographers). Never, ever force a dog or cat to do something physically uncomfortable.

Lastly, one final safety tip – always talk to the owner BEFORE you start shooting. Find out as much as you can about their pet. That way, if certain things terrify or stress them, you know what to avoid. Always check for food allergies before offering treats!

Image Seven

Did someone say treats??

I hope that this article has given you some things to consider – and most importantly, don’t forget to have fun!

The post Five Things You Need to Know Before Starting a Pet Photography Business by Erin McNulty appeared first on Digital Photography School.


Digital Photography School

 
Comments Off on Five Things You Need to Know Before Starting a Pet Photography Business

Posted in Photography


How to Alienate Photography Models in Five Easy Steps

22 Aug

Back in June, I decided to try my hand at modeling. Now, this is not completely new — I’ve been modeling for myself (with my mom pressing the shutter button, as I don’t have a remote and have never mastered the self-timer) for about six years now, on and off since I got my first (and only) DSLR. I’ve modeled Continue Reading

The post How to Alienate Photography Models in Five Easy Steps appeared first on Photodoto.


Photodoto

 
Comments Off on How to Alienate Photography Models in Five Easy Steps

Posted in Photography


How to Improve Your Portrait Photography in Five Minutes

31 Jul

People often ask me for tips on taking better photos of their friends and family.

After much thought on photography tips that can apply to various experience levels and equipment — from DSLRs to smart phones — I present to you a short article with tips you can learn in five minutes to help you improve your portrait photography. If you have more time and would like more specifics, I’ve noted additional articles on each tip that may interest you.

Annie-Tao-Photography-DPS-article-Improve-Portrait-Photography-perspective

Tips that will instantly improve your portraits:

1. Don’t put everyone in the center

That person may be the center of your life, but they don’t always need to be in the center of all the photos.

Aside from corporate headshots, positioning your subjects directly in the center of your frame for every image can be… yawn. And don’t just substitute it with the “rule of thirds” either. Think how boring everything would be if they were always in the same place, whether that is the center of every frame or at a third mark.

Be adventurous once in awhile – mix it up!

Annie-Tao-Photography-DPS-article-Improve-Portrait-Photography-dont-center

Annie-Tao-Photography-DPS-article-Improve-Portrait-Photography-dont-center-2

If you can’t break the rules because you have never heard of the Rule of Thirds, you can read this article.

2. Keep one eye on the background

If your subject is right in front of a lamppost or a tree, reposition yourself or your subject, so it doesn’t look like he is growing a lamppost out of his head.

Another example:  if your subject is wearing a green dress and sitting on the grass, have her move where the background is a different color, so she doesn’t look like a floating face in a sea of green.

Also, be mindful of distracting elements behind your subjects, like a garbage can. The background can turn a good photo into a bad one, so keep one eye on the background.

Annie-Tao-Photography-DPS-article-Improve-Portrait-Photography-background-2

If you want to read more about the impact of backgrounds, check out Improve Your Background, Improve Your Photography.

3. Capture the story, not just a smiling face

Of course we all prefer a photo of someone smiling, but we aren’t always in a constant state of joy. Consider taking shots when someone looks pensive or serious, for example, or engrossed in an activity.

Try to resist the “look at me and smile” routine. I guarantee that photo will tell more of a story than one where people stop what they are doing to flash a fake smile.

Annie-Tao-Photography-DPS-article-Improve-Portrait-Photography-not-smiling

Annie-Tao-Photography-DPS-article-Improve-Portrait-Photography-capture-story-2

Annie-Tao-Photography-DPS-article-Improve-Portrait-Photography-capture-story

For more tips on this, read: Don’t Wait For A Smile.

4. Change your perspective

Did you know you can create the tone or mood of an image by the angle of your camera and your closeness to your subject?

Your perspective when you take the photo influences the viewer’s perception of the image. Taking a shot from the top, looking down can paint a picture that someone is small. A tight shot of a teardrop can provide a sadder tone than a shot that was taken from a distance.

So next time, before you click the shutter button, think about what tone you want to give and what story you want to tell.

Annie-Tao-Photography-DPS-article-Improve-Portrait-Photography-perspective-4

Annie-Tao-Photography-DPS-article-Improve-Portrait-Photography-perspective-3

To see examples of different perspectives and when you would use them, you must read The Power of Perspective.

There are many things you can do to improve your portrait photography. I narrowed my list to four because these were the ones that came to mind first.

Do you have a good tip to share? Please comment below. We’d love to hear it.

The post How to Improve Your Portrait Photography in Five Minutes by Annie Tao appeared first on Digital Photography School.


Digital Photography School

 
Comments Off on How to Improve Your Portrait Photography in Five Minutes

Posted in Photography


DxO Optics Pro v9.5.1 released with support for five new cameras

12 Jul

Software maker DxO Labs has announced the release of DxO Optics Pro 9.5.1 for Mac, which includes support for five additional cameras. Now supported by DxO Optics Pro (Elite Edition only) are the Sony A7S, as well as (both Standard and Elite Editions) Sony Cyber-shot DSC-RX100 III and SLT-A77 II, the Nikon 1 J4, and the Samsung NX30. Read more

Articles: Digital Photography Review (dpreview.com)

 
Comments Off on DxO Optics Pro v9.5.1 released with support for five new cameras

Posted in Uncategorized


DPReview exclusive: Lytro Illum in the hands of five leading photographers

21 May

Lytro-Kyle.jpg

In conjunction with the announcement of what Lytro is calling its ‘professional-grade light field camera’, the Illum, the company put its new product in the hands of five leading photographers. Today, Lytro has exclusively released a promotional video to DPReview that takes us behind the scenes as five ‘creative pioneers’ discover what they can do with this innovative new technology. See the video

News: Digital Photography Review (dpreview.com)

 
Comments Off on DPReview exclusive: Lytro Illum in the hands of five leading photographers

Posted in Uncategorized


Five Tips for Special Event Photography

13 Apr

Often times shooting special events is not the most glamorous gig in photography, but when a client calls you up looking for a photographer to shoot an event, you take the job.  Sometime’s you end up somewhere great like the trading floor of the New York Stock Exchange, other times you’re in a small, dark, dull event space with only 20 people making the best of the situation.  Regardless of the size or location of the event, you’re job is to make some great images.  There are a lot of little things that can make diving into special event photography much easier or much harder on yourself, below are a few ideas of how to prepare and execute the photography at your next event.

Event photography tips 01

#1 Dress Like You Belong There

As a photographer, there are plenty of times when you can go to work in jeans and a t-shirt, after all clients aren’t watching you do post production.  When photographing a special event however, you should dress like you belong there and blend in with the crowd.  This doesn’t necessarily mean a suit and tie every time for men, or that a blazer is necessary for women, but slacks/dressy pants, comfortable, low key, black shoes and a nice shirt/blouse usually are a must.  If it is a higher end event you men should be sure to wear a suit coat and tie while women should wear a blazer if they feel it is necessary.  If you’re unsure of the appropriate attire, always air on the side of safety if you’re over dressed you can always take the coat off and stick the tie in your pocket.

Event photography tips 02

#2 Take Pre-event Shots

While it may be an afterthought for your client at the event, the event planner responsible for dotting the i’s and crossing the t’s will love that you captured shots of the room prior to the guests arrival. Not only will it be something they can use to sell their services in the future, it will also allow them to catalog the set-up in case they have a very similar type of event in the space again. This will prove invaluable to the client and should be the way you start any event.

#3 Don’t Over Shoot (but don’t undershoot either)

The divide on Over vs Under shooting seems like it would be quite blurry, it really isn’t. If you are photographing a special event, you have to remember that even though great photos are key, the attendees having a good time is the top priority. While it is completely acceptable to photograph the attendees, both candidly and posed, be sure to make mental notes of who you have photographed so that you aren’t going to the same groups of people over and over again. Along with posed shots, if the lighting allows for it, bump up your ISO and shoot candids with ambient light. Once you move past a cocktail hour and into a reception, keep your focus to the stage. Candid audience or crowd shots are nice here and there, but a good rule of thumb is that once plates go down and people are eating, keep the camera pointed away from the tables and onto the stage and shoot conservatively.

Event photography tips 03

#4 Be Quick

Wether it’s a panel discussion or candids at a cocktail hour, no one is at the event to be with you. Accept it. While shooting candids, be ready to go, take a step back, click off three frames and move on, any more than that (unless it’s a VIP or there is a glaring, non-camera related, issue) and you might be intruding on the attendee’s time. When shooting a panel discussion, or anything on a stage, shoot a lot with a long lens. While close, intimate shots from a wide lens look awesome, the people who are paying, or are invited to the event aren’t there to look at the back of their head. If you do have the opportunity to shoot from up close, be quick, quiet and stay as low as possible.

Event photography tips 04

#5 Edit Hard and Deliver Quickly

I find that no matter how hard I try to not over shoot an event, I still end up trashing about half of what was shot. It usually isn’t because the shots aren’t good, but because there is something very similar and slightly better in the edit. If you shoot three frames each of every group you photograph at an event(which is pretty typical) and have hundreds files, there’s no reason you can’t cut at least one of the frames for each group, if not two. Your client only needs the cream of the crop since there is only be a limited amount of use for event photos. If there are any VIP’s you might want to leave an extra frame or two in if they are also good, but for the general attendees the top frame of three works best every time. The same rule applies to shots of speakers or the panel at a discussion, edit hard and give the client the cream of the crop.

Once you get your edit down to the best images, bring your files into your editing software (I am still a diehard Photoshop guy) and crank out the images. The best thing about corporate events is that for the most part everything should be consistent and can be batch processed out in no time. From here, deliver your files, unless a disc is requested, we deliver everything via our PhotoShelter page online.

Event photography tips 05

Special Event Photography may not be the most fulfilling form of photography in the world, but when it comes time to pay the bills, you will be glad that you learned how to execute the photography aspect of them.  There are always events going on and opportunities to find work, just remember to dress the part, get photos before the event as well as during it, not over shoot, be in and out of groups and to edit hard with a quick turnaround to keep clients happy.

Event photography tips 06

The post Five Tips for Special Event Photography by Patrick Nugent appeared first on Digital Photography School.


Digital Photography School

 
Comments Off on Five Tips for Special Event Photography

Posted in Photography