Tag: first

  • Grinding Light: First Glow-in-the-Dark Skateboard Park in UK

    [ By WebUrbanist in Architecture & Cities & Urbanism. ]


    glowing

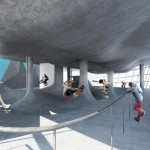
    A permanent installation opening as part of the Liverpool Biennial in England, this glowing skate park will be the first of its kind in the UK, enabling skaters of all skill levels to give it a shot by day or night.

    glow in the dark bowl

    glowing skate park edge

    Designed by Korean artist Koo Jeong A (photos by Thierry Bal & Gareth Jones), the minimalist structure borrows elements from skateboarding and BMXing traditions. Previous work by A includes another glow-in-the-dark park in France.

    glow skate park uk

    The park was developed in conjunction with Wheelscape Skateparks, a company that uses sprayed concrete to sculpt complex shapes that go beyond basic geometries of cast-in-place approaches.

    glow ramp slide design

    “I devised extremely steep, sharp angles, which would be a challenge to the most courageous and skilled skaters,” says the artist. “It was as if they would be the great mountaineers that the rest of us would admire. And with its glow-in-the-dark surface, I hoped the Wheels Park would offer an experience of contemplation.”

    Share on Facebook


    [ By WebUrbanist in Architecture & Cities & Urbanism. ]

    [ WebUrbanist | Archives | Galleries | Privacy | TOS ]


    WebUrbanist

  • Adding it up: Sony a7R II First Impressions Review

    The Sony Alpha 7R II has been the topic of much discussion and in our office, much testing. We’ve published a number of articles with results of our tests, picking apart Raw files from its 42MP full-frame BSI CMOS sensor and pushing its 399 on-sensor phase detect AF points to their limits. This first impressions review is the culmination of that work to date, including an in-depth analysis of the camera’s image quality and the effects of shutter shock. Read more

    Articles: Digital Photography Review (dpreview.com)

  • Fox Talbot’s historical Mousetrap camera leaves UK for first time, heads to Tokyo

    One of the first cameras to make a permanent photographic image has left the UK for the first time to be part of an exhibition hosted by the Japan Camera Museum in Tokyo. The so-called Mousetrap camera, used by William Henry Fox Talbot in his early experiments in creating the negative process in the 1830s, is the centre-piece of an exhibition entitled Kingdom of Elegance, Mahogany and Brass which shows off early cameras from the UK’s photographic industry. Sponsored by The British Embassy, the exhibition displays cameras owned by the Royal Photographic Society, the National Media Museum of the UK and a private collector called Kobayashi Yas.

    Articles: Digital Photography Review (dpreview.com)

  • Sony Xperia Z5 Premium features first 4K screen on a production smartphone

    Sony announced the Xperia Z5 Premium today, boasting a 5.5″ 4K display. It was unveiled alongside the Xperia Z5 and Xperia Z5 Compact, and each offers a new 23MP 1/2.3-inch Exmor RS BSI CMOS sensor with an F2.0 lens. A new hybrid AF system claims to acquire focus in 0.03, which would make it the fastest AF system on any current smartphone camera. Read more

    Articles: Digital Photography Review (dpreview.com)

  • Samsung introduces PM1633a, world’s first 2.5″ 16TB SSD

    This month at the 2015 Flash Memory Summit, Samsung introduced an SSD with the highest capacity ever: 16TB. The new drive has a total usable storage space of 15.36TB, exceeding all other similar high-capacity SSDs. Read more

    Articles: Digital Photography Review (dpreview.com)

  • Killer 4K? Sony Cyber-shot DSC-RX100 IV first impressions updated with video samples

    Our Sony Cyber-shot RX100 IV first impressions continues to grow as we’ve added a variety of video samples to the preview. The RX100 IV is Sony’s latest enthusiast compact, and its 20MP 1″-type stacked CMOS sensor is capable of 4K video and slow-motion clips ranging from 120-960 fps, all with virtually no rolling shutter. We put a number of these modes to the test. Read more

    Articles: Digital Photography Review (dpreview.com)

  • Open Swim in MN: Nation’s First Naturally Filtered Public Pool

    [ By WebUrbanist in Architecture & Public & Institutional. ]

    first natural pool united states

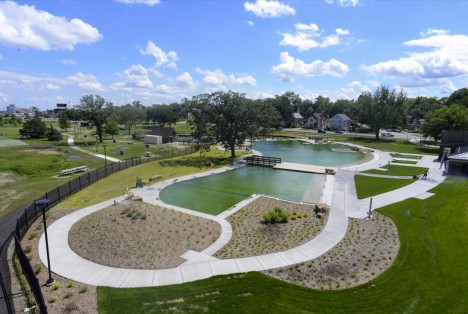
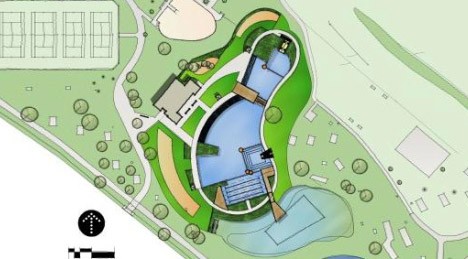
    After years of design and development, the first naturally filtered public swimming pool in the United States is set to open later this month in Minneapolis, the largest city in the Land of 10,000 Lakes. Located close to the Mississippi River in Webber Park, the project draws on European precedents but Minnesota law had to be changed to allow for this novel, chemical-free approach.

    natural pool minneapolis park

    A series of filtration strategies including appropriate plants, bacteria and microorganisms serve to keep the pool organically free of harmful bacteria and nutrient build-ups.  Some city swimmers will still need to accustom themselves to the unusual look of the water, appearing more like that of a lake than a chemically-cleaned pool, but for most Minnesotans this should not prove too difficult.

    natural self filtering pool

    The main 500,000-gallon swimming area has space for up to 500 people in the water at once and a 13-foot deep end for diving, while an adjacent bioengineered pond helps to cycle and clean water from (then return it to) the human-occupied side. Over 2.5 miles of underground and underwater pipes push and pull water through this complex but effective system.

    natural swimming pool

    The project has not been without problems, including delays and additional costs, but as the first of its kind in the country there were bound to be some setbacks along the way. Migrating ducks and toads, for instance, attempted to settle the pool while it was under construction and had to be scared away and moved along, respectively. Poorly-chosen fill had to be replaced, weather pushed back elements of construction and various other surprises found on-site contributed to slower execution. Still, this ground-breaking approach represents a solid test case for other states interested in pursuing similarly sustainable organic pools as well as a legislative precedent for other areas with similar laws currently prohibiting naturally filtered designs (lead image via CBS MN).

    Share on Facebook


    [ By WebUrbanist in Architecture & Public & Institutional. ]

    [ WebUrbanist | Archives | Galleries | Privacy | TOS ]


    WebUrbanist

  • Sony Cyber-shot DSC-RX100 IV first impressions review posted

    The fourth iteration of Sony’s Cyber-shot RX100 series brings a host of high-speed features from super slow-mo movies to 4K video with virtually no rolling shutter. It all stems from the RX100 IV’s 20MP stacked CMOS sensor and the additional room for high speed circuitry that the design allows. Our full review is well under way; for now take a look at the first installment. Read more

    Articles: Digital Photography Review (dpreview.com)

  • The First 3 Photoshop Blend Modes You Need to Understand

    Photoshop can be extremely intimidating to learn, but once you start to get a grasp on some of the tools it has to offer, you’ll wonder how you ever processed photographs without it. If there’s one area of Photoshop that is both extremely confusing, and yet, extremely powerful when harnessed properly, it’s got to be the collection of blend modes. While this article won’t cover all of the options available within Photoshop, it should give you a good place to start your journey into using Photoshop blend modes.

    Photoshop blend modes: a few basics to get you startedphotoshopblendmodes
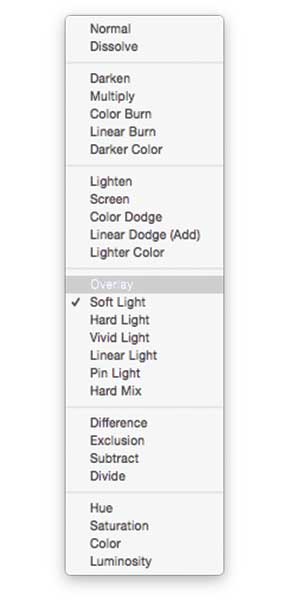
    • Photoshop blend modes are found in a drop down menu at the top of the layers panel (it defaults to “Normal”)
    • There are 27 different options to choose from, including the default “Normal” blend mode.
    • Adobe has organized these 27 blend modes into six different categories
      • Normal – Contains blend modes that don’t actually blend the layer being selected. (Normal shows the layer, and the dissolve layer essentially just removes pixels from the top layer as you reduce the opacity this effect is increased).
      • Darken – These blend modes use 100% white as a neutral, they have an overall darkening effect on images.
      • Lighten – Here Photoshop is using 100% black as a neutral, they have an overall lightening effect on images.
      • Overlay – In the Overlay mode Photoshop is blending the top layer and bottom layer together in a way that adds contrast. The effect of this changes based on the opacity of the layer, and the type of blend mode selected.
      • Difference – The difference set can be referred to as the inversion group, as these blend mode options are often used to either cancel colors of the layer below it, or to invert them.
      • Hue – Here Photoshop allows you to get very creative with the HSL of the layers in question.
    • When you apply a blend mode to a layer, it takes the effect of the given blend mode and it is applied to the layer directly below it within Photoshop.

    To simplify the process of trying to learn all 27 blend modes at once below, let’s learn about the three most versatile blend modes Photoshop has to offer.

    The first three Blend Modes you need to learn

    In all the example photographs below I’ll be using two layers to demonstrate the different effects of each of the three blend modes. The top layer is simply a white, gray, black layer and the bottom layer is the same image placed under those three colors.

    3-tones

    White, gray, black layer.

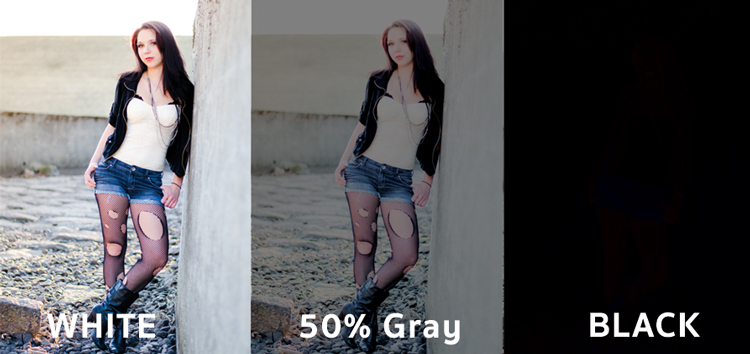
    Multiply Blend Mode

    This blend mode falls within the “Darken” group and therefore it is considering 100% white a neutral. The basic math behind how this blend mode works is that the dark pixels of the background layer are multiplied with those of the foreground layer and combined. Therefore the result you end up with is an overall darkening of the image, as the dark pixels within both layers become more significant while the light pixels are essentially removed.
    blend-modes-multiply


    As you can see in the 50% gray layer, the darker pixels from the gray foreground layer are helping to darken the layer below it.

    This blend mode is great for creating shadows or removing bright pixels from an underlying layer. It can be used in conjunction with a curves adjustment layer to add additional darkness to a layer. By effecting the dark end of the curve this can become really handy when trying to emphasize shadows, or darken an image.

    Screen Blend Mode

    As mentioned above, the lighten group sets black as neutral and therefore when we use the screen blend mode the black layer has no effect, 100% white stays as white and the 50% gray is somewhere in the middle.

    blend-modes-screen


    In a similar mathematical method to the Multiply blend mode the screen blend mode is multiplying the light pixels of both the foreground and background layers to achieve the final blend. As you can see in the above example, at 50% gray the light pixels are made even lighter as the bright pixels of the gray layer are multiplied with those of the layer below it.

    The Screen blend mode is therefore great for removing darkness from an image or can even be used to create soft glow effects around a subject.

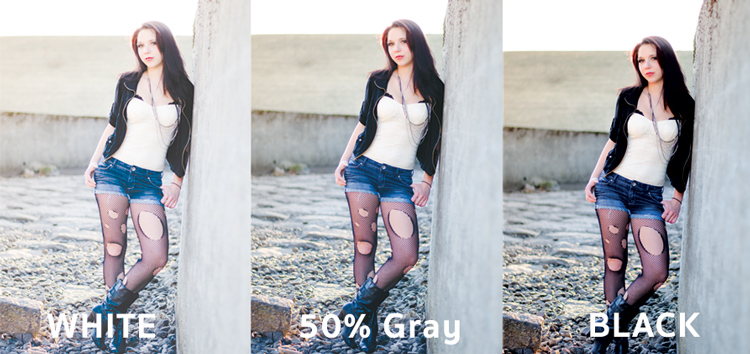
    Soft Light Blend Mode

    Here the formula used by Photoshop is essentially both that of the Multiply and Screen blend modes, then that effect is divided by two. What this means is that you’ll be darkening the dark pixels and lightening the light pixels, and then dividing the end result by two (or 50% of full strength). What ends up happening is an overall increase in contrast of the image

    As a result, the Soft Light blend mode, is a great way to add a bit of contrast to an image. For an even stronger effect – use the Overlay blend mode.
    blend-modes-softlight


    One of the best techniques for using this technique is to duplicate your layer and apply the Soft Light blend mode to that layer. You’ll se an instant increase in contrast which can then be fine tuned with the opacity slider of your duplicated layer.

    An example of Photoshop blend modes in action

    photoshopblendmodes1

    Original – (placed as Full Size 750 x 378)

    The original image was a bit on the flat side, so by duplicating this layer, and changing it Soft Light blend mode, you’ll notice an increase in contrast. This higher contrast look works well with the rocks, and graffiti wall behind the model.

    photoshopblendmodes2

    Duplicated with Soft Light blend mode

    To take it a step further, a Curves Adjustment Layer was added above the duplicate layer and the blend mode was set to multiply. A layer mask was then applied to this Curves layer to reveal it only over the model’s upper body and face. By applying this small adjustment you’ll notice a bit more definition in the face and shadows.

    photoshopblendmodes3

    Curves adjustment + Multiply blend mode added to model’s face and upper torso to add definition and shadow detail.

    These three Photoshop Blend modes are just the beginning, but the key to learning a program the size and depth of Photoshop, is to take it in bite sized pieces or you’ll get frustrated and give up quickly. I hope that by focusing your attention to just these three blend modes you’ll be able to digest the program a bit easier.

    googletag.cmd.push(function() {
    tablet_slots.push( googletag.defineSlot( “/1005424/_dPSv4_tab-all-article-bottom_(300×250)”, [300, 250], “pb-ad-78623” ).addService( googletag.pubads() ) ); } );

    googletag.cmd.push(function() {
    mobile_slots.push( googletag.defineSlot( “/1005424/_dPSv4_mob-all-article-bottom_(300×250)”, [300, 250], “pb-ad-78158” ).addService( googletag.pubads() ) ); } );

    The post The First 3 Photoshop Blend Modes You Need to Understand by John Davenport appeared first on Digital Photography School.


    Digital Photography School

  • Triangle Tower Approved: First New Paris Skyscraper in 42 Years

    [ By WebUrbanist in Architecture & Offices & Commercial. ]

    paris new skyscraper tower

    At nearly 600 feet (180 meters) tall, this structure was narrowly granted permission to be the first skyscraper to grace the Parisian skyline in nearly half a century. Designed by Herzog & De Meuron, the Tour Triangle will be the third tallest building in the city, shorter only than one other skyscraper and the Eiffel Tower.

    paris new architecture skyscraper

    The triangular tower (already nicknamed simply ‘Triangle’) is slightly pyramidal in shape, tapering toward the top on all sides but most dramatically along two of its facades. An affair of steel and glass, it is starkly modern with respect to its neighboring buildings. Perhaps like the Eiffel Tower, originally widely hated, or the Centre Pompidou, a structurally-inverted museum, it can become an icon within the city over time.

    paris skyscraper city limits

    Despite being located at 1 Place de la Porte de Versailles, right on the edge of the central ring road surrounding the innermost part of the city (and arguably reinforcing a key nexus point), critics are concerned about the building overshadowing the surrounding urban landscape. The measure to approve its construction barely passed.

    paris tour triangle tower

    Advocates are quick to point out that the building will create thousands of jobs both as it is constructed and once it is completed, as well as creating much-needed residential and office space in the city. For decades, the city limited new structures to around 100 feet, curbing development inside the city limits and forcing developers into suburban spaces.

    Share on Facebook


    [ By WebUrbanist in Architecture & Offices & Commercial. ]

    [ WebUrbanist | Archives | Galleries | Privacy | TOS ]


    WebUrbanist