RSS
 

Posts Tagged ‘first’

First shots: Pentax K-1 pre-production sample gallery

18 Feb

After being introduced to the long-awaited Pentax K-1, staff contributors Jordan Stead and Sam Spencer took a quick stroll with the K-1 and a handful of lenses: the recently announced 15-30mm, the 24-70mm and the 70-200mm. As an added bonus, and to our delight, we found the 70mm F2.4’s image circle covers full-frame, so we snapped some samples with it as well. Take a look to see what this pre-production 36MP contender is capable of.

Articles: Digital Photography Review (dpreview.com)

 
Comments Off on First shots: Pentax K-1 pre-production sample gallery

Posted in Uncategorized


Special K? Pentax K-1 First Impressions Review

18 Feb

After years of promises and months of teasing, Ricoh has finally unveiled the Pentax K-1, a 36.4MP full-frame DSLR built around the K lens mount. It becomes the only conventional DSLR to offer a full frame sensor with image stabilization.

The camera is extensively sealed and features magnesium alloy construction. But despite its range-topping status and high-end build, it has a relatively low list price of $ 1799.

Pentax K-1 Key Specifications

  • 36.2MP full-frame CMOS sensor with no anti-aliasing filter
  • 5-axis image stabilization rated to 5 stops by CIPA standard testing
  • 100% pentaprism viewfinder with 0.7x magnification
  • 33-point AF system (25 cross-type)
  • Extensive weather-sealing
  • 1/200 sec flash sync speed
  • 14-bit Raw recording (DNG or PEF)
  • AA filter simulation
  • Multi-shot Pixel Shift Resolution mode
  • Built-in GPS with electro-magnetic compass and Astrotracer function
  • 4.4 fps continuous shooting (6.5 fps in APS-C crop mode)
  • Wi-Fi
  • 1080/30p video

Sensor-shift cleverness

As this list of spec highlights should make clear, the K-1 makes the most of its moveable sensor. As well as the image stabilization, which is rated to an impressive 5 stops, the camera offers a host of other clever features. These include anti-aliasing filter simulation which vibrates the sensor during exposure to intentionally blur high frequency detail across multiple pixels, to avoid moiré. Then there’s the Pixel Shift Resolution mode that increases color resolution by shooting four consecutive images with the sensor moved by one pixel – effectively canceling the Bayer color filter array and lowering noise by image averaging.

The other sensor-shift modes are also clever: the K-1 includes Horizon Correction, which rotates the sensor if you hold the camera slightly off-level, and the Astrotracer system that uses the sensor’s movement to cancel-out the effect of the Earth’s rotation when taking images of stars (something it can calculate using its GPS).

Upgraded AF and metering

The sensor at the heart of the SAFOX 12 AF module. It gives 33 AF points in all, 25 of which are cross type and three of which offer greater accuracy when paired with bright lenses.

The camera gets a new AF module (called SAFOX 12) which features 33 focus points, 25 of which are cross type. The central three of these offer higher precision when used with F2.8 or faster lenses and they continue to focus down as far as -3EV.

An 86,000-pixel RGB metering sensor acts to offer 77-segment metering but also aids the camera’s autofocus system, enabling scene analysis and subject detection to yield accurate exposures and automatically select the correct AF point to stay on your subject (subject tracking) when using continuous AF.

Core competence

Overall, though, it’s not the clever use of the sensor that most stands out about the K-1, it’s Ricoh’s obvious focus on the core photographic capabilities. There’s a reason we chose to list the viewfinder size so far up the list of specifications – it’s because we think it’s something users coming from existing Pentax cameras will most appreciate. Sure, there are multiple exposure modes and time lapse options, but the things that most jumped out are the high resolution sensor, the well positioned dials, the large viewfinder and image stabilization – the core things that help you to get better images. Speaking of core things: some may bemoan the omission of a dedicated AF point control, though the four way controller can be re-purposed for this.

Which isn’t to say the K-1 is entirely without the occasional flourish. Aside from clever sensor shift modes (that some – particularly landscape – photographers will surely come to love), the most obvious of these is its ‘Cross-Tilt’ LCD. The Cross-Tilt mechanism takes a tilting LCD cradle and mounts it on four legs that slide along a cross-shaped series of slots, allowing the screen to extend outwards and move in a complex manner, before the screen itself is tilted up/down.

The K-1’s Cross-Tilt LCD system has all the elegance of two deck chairs mating, but it provides a useful range of articulation.

Mounted to the back of the LCD are four white LEDs that can be used to shed light on the rear controls. Another LED, whose behavior can be set independently, shines a light on the lens mount for easier alignment when swapping lenses in the dark. The camera’s card bay and remote release port are also illuminated by LEDs.

For the most part, though, the camera’s focus is very much toward a traditional approach to still photography. Video capture tops-out at 1080/30p (which can also be encoded as 60i, if you prefer), which is a long way from cutting edge, but we very much doubt that Ricoh has would-be film makers in mind with this model.

Still shooters are likely to appreciate the camera’s Smart Function system, which adds a third command dial to the top right corner of the camera and a further control to define its function. The three dials give direct control over three of the camera’s parameters with the ability to customize one of them without going anywhere near a menu.

Pricing

And how much does Ricoh want for this twin-dial, weather-sealed, magnesium alloy, image-stabilized full frame camera? The list price is a fiercely competitive $ 1799, body only. To put that in perspective, that’s $ 200 lower than the launch price of Nikon’s more basic D610 and $ 300 less than what Canon originally expected for the EOS 6D, meaning there’s only a $ 100 premium over the list price of Sony’s image-stabilized a7 II.

This is a very similar pattern we’ve seen from Ricoh before, with the company’s models often including higher-end features (twin control dials, prism viewfinders and weather sealing) at a lower price than you’d need to spend to get them from one of the other DSLR makers.

Lens lineup

At present, Pentax offers a mixture of full-frame compatible lenses, including a handful of screw-drive FA prime lenses from the film-era and the much-loved 31, 43 and 77mm FA Limiteds from the late ’90s/early 2000s. However, the company is already starting to flesh-out a range of more modern ‘D FA’ zooms, including a 15-30mm F2.8, a 24-70mm F2.8 (both suspiciously reminiscent of certain current Tamron-branded zooms) a 70-200mm F2.8 and an 150-400mm F4.5-5.6. For now, though, those looking for modern, fast-focusing primes will be disappointed.

But that isn’t the whole story, of course. Part of the reason for all the interest in a full-frame Pentax is the vast collection of K-mount lenses that exist around the world. The K-1 lets you use the aperture rings on these lenses and can give a focus confirmation beep with the central AF point, even with manual focus lenses. When you mount an older, manual lens the K-1 prompts you to manually specify the focal length so that the image stabilization can be tuned appropriately.

 Review History
17 Feb 2016 First Impression Review based on Pre-Production camera running Firmware 0.3

If you're new to digital photography you may wish to read the Digital Photography Glossary before diving into this article (it may help you understand some of the terms used).

Conclusion / Recommendation / Ratings are based on the opinion of the reviewer, you should read the ENTIRE review before coming to your own conclusions.

We recommend to make the most of this review you should be able to see the difference (at least) between X, Y, and Z and ideally A, B, and C.

This article is Copyright 1998 – 2016 and may NOT in part or in whole be reproduced in any electronic or printed medium without prior permission from the author.

Articles: Digital Photography Review (dpreview.com)

 
Comments Off on Special K? Pentax K-1 First Impressions Review

Posted in Uncategorized


Slalom House: The World’s First Residential Rooftop Ski Slope

07 Feb

[ By WebUrbanist in Architecture & Houses & Residential. ]

ski slope apartment complex

Designed for Astana, the cold capital city of Kazakhstan, this ‘white roof’ 1,000-foot ski run wraps around an apartment tower, bringing winter sports right to residents’ doorsteps.

architecture ski slope roof

Despite the length of winters, this urban setting offers little by way of local options, forcing citizens to drive for hours to the closest ski destinations, at least until now.

rooftop ski slope

The slope is designed to wrap around the roof of the building, taking advantage of curves and grade changes all the way down and potentially usable with Snoflex (artificial snow) all year round.

ski slope design

Incorporating 421 domestic units, this 21-floor design by Shokhan Mataibekov Architects was recognized as a finalist in the 2015 World Architecture Festival and is now seeking funding.  Additional shops and restaurants on the ground floor would serve both skiers and apartment dwellers. Upon completion, it would be the first such mixed-use skiing center of its kind in the world.

Share on Facebook


[ By WebUrbanist in Architecture & Houses & Residential. ]

[ WebUrbanist | Archives | Galleries | Privacy | TOS ]


WebUrbanist

 
Comments Off on Slalom House: The World’s First Residential Rooftop Ski Slope

Posted in Creativity


Heavy hitter: Sony FE 24-70mm F2.8 GM first shots

06 Feb

$ (document).ready(function() { SampleGalleryV2({“containerId”:”embeddedSampleGallery_9303055313″,”galleryId”:”9303055313″,”isEmbeddedWidget”:true,”selectedImageIndex”:0,”startInCommentsView”:false,”isMobile”:false}) });

Note: if you’re viewing on mobile, please click here.

Sony has made some strong claims about its new G Master lens series. Unveiled earlier this week, the FE 24-70mm F2.8 GM is one of three in the lineup to make its debut, giving Sony’s full-frame mirrorless customers a fast, constant standard zoom for the first time. We had a few moments to shoot with the lens at Sony’s press event in New York, and while we only provide a small sampling of shots at this time, we will be updating this gallery as soon as we can. 

Our initial impressions are extremely positive: sharpness appears to rival prime levels wide open, and there’s very little axial chromatic aberration to speak of. Sony’s claims may not be exaggerated at all.

We need to make a note about lens corrections: it seems that the camera we were handed had vignetting and chromatic aberration corrections turned on. The way this feature works is that these corrections are applied even in Raw mode (technically, vignetting correction is applied prior to writing the Raw file, while chromatic aberration correction information is embedded in the Raw and irreversibly applied by ACR).

The good news is that we’ve looked at Raw conversions from third-party converters that ignore the CA correction profile, and CA from this lens appears to be very minimal. Watch this space for more sample images, hopefully very soon.

Articles: Digital Photography Review (dpreview.com)

 
Comments Off on Heavy hitter: Sony FE 24-70mm F2.8 GM first shots

Posted in Uncategorized


Veggie Factory: World’s First Vertical Farm Run Entirely By Robots

03 Feb

[ By WebUrbanist in Architecture & Offices & Commercial. ]

robofarming

Taking vertical urban indoor farming efficiency to the next level, a new automated plant coming to Japan will be staffed entirely by robots and produce 30,000 heads of lettuce daily.

spread indoor farm

The so-called Vegetable Factory is a project of Spread, a Japanese company already operating vertical farms. Located in Kyoto, its small army of bots will various seed, water, trim and harvest the lettuce.  Spread’s new automation technology will not only produce more lettuce, it will also reduce labor costs by 50%, cut energy use by 30%, and recycle 98% of water needed to grow the crops.

spread stacked farm

“The use of machines and technology has been improving agriculture in this way throughout human history,” says J.J. Price of Spread, tells Tech Insider. “With the introduction of plant factories and their controlled environment, we are now able to provide the ideal environment for the crops.”

spread human farm

Like other vertical farms, the benefits of this approach are numerous, including: reduced waste, controlled runoff, more efficient use of space and the ability to produce food locally (reducing cost, time and waste associated with rural-to-urban transport). Meanwhile, the fear of automation is becoming a reality, say critics, while advocates point out that this will free up factory workers to potentially engage in more interesting occupations within the same industry (if herding robots is considered interesting, at least).

Share on Facebook


[ By WebUrbanist in Architecture & Offices & Commercial. ]

[ WebUrbanist | Archives | Galleries | Privacy | TOS ]


WebUrbanist

 
Comments Off on Veggie Factory: World’s First Vertical Farm Run Entirely By Robots

Posted in Creativity


History Repeating: Olympus PEN-F First Impressions Review

27 Jan

The original Olympus PEN-F first hit the streets in 1963. Built around the half-frame film format, it quickly gained a following thanks to its beautiful, yet simple design and small size. Getting 70 images to a roll of film probably didn’t hurt, either. Now, 53 years later the PEN-F is back.

The digital reincarnation of the 35mm film Olympus PEN-F does not replace the current digital PEN flagship E-P5, rather it slides in next to it as the ‘premium’ option in the PEN family. The reason being that unlike digital PENs before it, the F has something much more OM-D-like: a built-in 2.36 million dot OLED electronic viewfinder. The F also boasts the highest output resolution of any Olympus body to date, boasting a 20MP Four Thirds sensor (probably the same one we’ve seen in the Panasonic Lumix DMC-GX8).

Released specifically to appeal to street shooters and the design conscious looking for a capable camera with retro-styling and rangefinder-like controls, the PEN-F has a lot going for it.

Olympus PEN-F features:

  • 20MP Live MOS Four Thirds format sensor
  • 5-axis image stabilization with automatic panning detection
  • 2.36 million dot OLED electronic viewfinder
  • Up to 10 fps continuous shooting (20 fps with electronic shutter)
  • Highly customizable interface, twin controls
  • Fully articulating 1.04 million dot, 3″ LCD touchscreen
  • 50MP High-res Shot mode
  • 1/8000 sec top mechanical shutter speed (1/16,000 with e-shutter)
  • 1080/60p video recording

All of the above come packaged in a machined aluminum and magnesium body, with no visible screws anywhere. A faux-leather wrap encircles the PEN-F and the body itself is both well-weighted and has a very solid feel to it. 

With many of the same guts as the OM-D EM-5 II and sleek rangefinder-style looks (reminiscent of Fujifilm’s X100 series cameras), the most direct competitors for the PEN-F are probably Sony’s a6000 and Fujifilm’s just-announced X-E2S – both of which are APS-C format cameras. Of course, the PEN-F also has to compete against alternatives within the OM-D series as well.

To help us to better understand how the PEN-F fits into the market place as a whole, we chatted with Eric Gensel, a technical specialist with Olympus. He breaks down exactly how the PEN-F fits in Olympus’ lineup, who the target-audience of the camera is and what went into the design process:

Compared to its siblings

Many of the highlight features of the PEN-F aren’t new. In fact a lot of the key spec is shared with other recent Olympus releases. However, some functions have been improved upon. For instance, thanks to its 20MP sensor, the Pen F is capable of higher resolution in multi-shot mode compared to the OM-D E-M5 II, up to 80MP in Raw mode (50MP in JPEG). It also features a dedicated creative control knob on the front, as well as four customizable shooting modes, accessed via the locking exposure mode dial.

It’s hard to see the PEN-F as a large step forward given how many of its core features are inherited from other models, but it offers a handling experience that is unique in Olympus’s lineup. Is the PEN-F more than just a pretty face? Let’s dig in.

 
Olympus PEN-F
Olympus OM-D
E-M5 II
Olympus PEN E-P5
Pixel count 20MP 16MP 16MP
Image stabilization 5-axis 5-axis 5-axis
Stabilization (CIPA) 5 stops 5 stops 4 stops
Max shutter speed

1/8000
(1/16000 electronic)

1/8000
(1/16000 electronic)
1/8000
On-sensor PDAF No No No
Continuous shooting
(without /with AF)
10 fps / 5 fps 10 fps / 5 fps 9 fps / 5 fps
Flash Clip-on
Tilt/bounce/rotate
Clip-on
Tilt/bounce/rotate
Pop-up flash
Viewfinder Built-in 2.36M-dot LCD
1.23x mag
Built-in 2.36M-dot LCD
1.48x mag
Optional VF-4 accessory EVF w/ 2.36M-dot LCD and 1.48x mag
Max video res/rate 1080/60p 1080/60p 1080/30p
Max bitrate 77Mbps 77Mbps 20Mbps
Mic socket No Yes No
Rear screen

Fully articulating 3″ touchscreen
1.04M-dots

Fully-articulated
3.0″ touchscreen
1.04M-dots
Flip up/down
3.0″ touchscreen
1.04M-dots
Wi-Fi Yes Yes Yes
Environmental sealing? No Yes No
Battery life (CIPA) 330 310 330
Weight 427 g 469 g 420 g
Dimensions 125 x 72 x 37mm 124 x 85 x 45mm 130 x 94 x 63mm

Pricing and availability

The Olympus PEN-F will be available at end of February – early March 2016, and will hit the streets at a body-only price of $ 1199. It ships with the FL-LM3 flashgun seen in the image at the top.

If you're new to digital photography you may wish to read the Digital Photography Glossary before diving into this article (it may help you understand some of the terms used).

Conclusion / Recommendation / Ratings are based on the opinion of the reviewer, you should read the ENTIRE review before coming to your own conclusions.

We recommend to make the most of this review you should be able to see the difference (at least) between X, Y, and Z and ideally A, B, and C.

This article is Copyright 1998 – 2016 and may NOT in part or in whole be reproduced in any electronic or printed medium without prior permission from the author.

Articles: Digital Photography Review (dpreview.com)

 
Comments Off on History Repeating: Olympus PEN-F First Impressions Review

Posted in Uncategorized


Leica launches its first rugged camera with the X-U (Typ 113) underwater compact

21 Jan

$ (document).ready(function() { SampleGalleryV2({“targetContainerClass”:”sampleGalleryImageViewerContainer”,”galleryId”:”5760715033″,”isEmbeddedWidget”:true,”selectedImageIndex”:0,”startInCommentsView”:false,”isMobile”:false}) });

German camera manufacturer Leica has announced it has produced a waterproof, shock-proof and dust-proof compact camera that uses an APS-C sensor. The Leica X-U (Typ 113) joins the X family of compacts, but offers waterproofing to 15m / 50ft and a body that is designed to be used both beneath and above the waves.

The camera uses a 16.3MP CMOS sensor like the other models in the X series, but sports a 23mm F1.7 Summilux ASPH lens that delivers the same angle of view as a 35mm lens would on a full-frame camera. The lens can focus down to 20cm and features a flash housing directly above the axis of the front element that reduces the distance between the flash and the subject – which will be useful underwater, as illumination drops off quickly. The flash has a guide number of only 5m at ISO 100, and according to Leica has an operating range of 0.3-2m at that ISO setting. 

The camera shoots both Raw and JPEG files, and has a movie mode that records at 30 fps in 1080 HD resolution. When used underwater a press of the UW button activates Underwater mode, which adjusts the white balance accordingly and sets distortion correction to suit the conditions.

Leica says the camera was designed in collaboration with Audi Design, and that the top plate is made from high grade aluminum and the body coated in ‘high-grip TPE armoring’. 

The camera is available now, and costs £2400 / $ 2,950. A floating neck strap is available for £50 / $ 95 and a wrist strap for £32 / $ 65. Correct me if I’m wrong, but I think this is Leica’s first ever commercially available underwater camera.

For more information see the Leica website. 


Press release:

Built for the challenge – born for adventure: Introducing the Leica X-U

New outdoor camera from Leica delivers outstanding picture quality in the harshest conditions   

Leica Camera has unveiled its first camera designed specifically for outdoor and underwater photography – the Leica X-U (Typ 113).  

Incorporating a fast Leica Summilux 23mm f/1.7 ASPH. lens (equivalent to 35mm in 35mm format) with underwater protection filter, and a large APS-C CMOS sensor, this fully waterproofed member of the Leica X family delivers images with exceptional brightness and clarity, even in the harshest of conditions.  

Created for the adventurous photographer, the Leica X-U allows the user to capture breathtaking underwater moments in perfect detail, at depths of up to 15 metres. Shock-resistant, dust-sealed and shatter-proof, this rugged camera is the ideal companion for any outdoor expedition or adventure – whether it’s action or underwater shooting, extreme sports, travel, architectural or landscape photography – and also offers video capture in full HD quality.  

Optimum picture performance is guaranteed, thanks to the cutting-edge technology the X-U shares with all models in the Leica X range. Combined with its professional 16.5 MP (16.2 MP effective) APSC CMOS sensor, the Leica X-U’s premium Summilux 23 mm f/1.7 ASPH. lens ensures natural colour reproduction and outstanding resolution, even at the closest focusing distance of 20 centimetres. Its fast f/1.7 maximum aperture also offers the freedom to explore the creativity of selective focusing. In addition, due to the camera’s excellent resistance to stray light and flare, the Leica X-U is the perfect choice for an extensive range of indoor and outdoor lighting conditions – at any time of day or night.  

Made in Germany in collaboration with Audi Design, the stylish yet minimal Leica X-U focuses on the essential features: simple and intuitive operation, as well as ultimate precision. With a top plate made from premium aluminium and high-grip TPE armouring, the body ensures exceptional usability, handling and durability, as well as water resistance to a depth of up to 15 metres.  

Designed to embrace the elements, and for the most ambitious photography projects, the Leica X-U incorporates a non-slip body, a toughened monitor screen cover, and a failsafe double locking system for the battery compartment and memory card slot. These robust protective features ensure that photographers can concentrate fully on their subject, with full confidence in the camera’s durability.  

Furthermore, the minimal, intuitive design of the Leica X-U puts the most important creative tools directly at the photographer’s fingertips. Aperture and shutter speed can be set quickly and easily using the straightforward, typical ’Leica-style’ dials, while a practical underwater snapshot button ensures the camera is ready to capture the wonders of the underwater world immediately – without the need to search through menus. Thanks to the camera’s high resolution three inch screen and a wide range of useful automatic features, it takes just seconds to find the precise settings the photographer requires to capture their decisive moment.

Additionally, with its anodised aluminium control dials and an integrated flash above the lens, the Leica X-U is a perfect example of exceptional quality and attention to detail.

For those on a challenging professional assignment or a magical holiday of a lifetime, important moments can also be recorded in full HD, cinema-quality video – with a choice of 1920×1080 or 1280×720 pixel resolution, at 30 full frames per second in MP4 format. And whether the footage is intended for a professional production or a home movie to share with friends and family, the Leica X-U delivers high quality results that perfectly capture that special adventure.

Leica X-U (Typ 113) specifications

Price
MSRP $ 2950
Body type
Body type Large sensor compact
Body material Aluminum
Sensor
Max resolution 4928 x 3264
Image ratio w:h 3:2
Effective pixels 16 megapixels
Sensor photo detectors 17 megapixels
Sensor size APS-C (23.6 x 15.7 mm)
Sensor type CMOS
Color space sRGB
Color filter array Primary color filter
Image
ISO Auto, 100-12500
White balance presets 5
Custom white balance Yes (2 spots)
Image stabilization No
Uncompressed format RAW
JPEG quality levels Super fine, fine
File format
  • JPEG (Exif v2.3)
  • Raw (DNG)
Optics & Focus
Focal length (equiv.) 35 mm
Optical zoom 1×
Maximum aperture F1.7 – F16.0
Autofocus
  • Contrast Detect (sensor)
  • Multi-area
  • Center
  • Selective single-point
  • Single
  • Continuous
  • Live View
Autofocus assist lamp Yes
Normal focus range 20 cm (7.87)
Number of focus points 11
Screen / viewfinder
Articulated LCD Fully articulated
Screen size 3
Screen dots 920,000
Touch screen No
Screen type TFT LCD
Live view Yes
Viewfinder type None
Photography features
Minimum shutter speed 30 sec
Maximum shutter speed 1/2000 sec
Exposure modes
  • Program
  • Aperture priority
  • Shutter priority
  • Manual
Built-in flash Yes
Flash range 2.00 m (at ISO 100)
External flash Yes
Flash modes Automatic, automatic/red eye reduction, on, on/red eye reduction, long-term synchronization/red eye reduction, off
Drive modes
  • Single
  • Continuous
Continuous drive 5.0 fps
Self-timer Yes
Metering modes
  • Multi
  • Center-weighted
  • Spot
Exposure compensation ±3 (at 1/3 EV steps)
AE Bracketing ±3 (3 frames at 1/3 EV steps)
Videography features
Resolutions 1920 x 1080 (30p), 1280 x 720 (30p)
Format MPEG-4
Microphone Stereo
Speaker Mono
Storage
Storage types SD/SDHC/SDXC
Connectivity
USB USB 2.0 (480 Mbit/sec)
HDMI No
Microphone port No
Headphone port No
Remote control No
Physical
Environmentally sealed Yes
Battery Battery Pack
Battery description BP-DC8 lithium-ion battery & charger
Battery Life (CIPA) 450
Weight (inc. batteries) 635 g (1.40 lb / 22.40 oz)
Dimensions 140 x 79 x 88 mm (5.51 x 3.11 x 3.46)
Other features
Orientation sensor Yes
GPS None

Articles: Digital Photography Review (dpreview.com)

 
Comments Off on Leica launches its first rugged camera with the X-U (Typ 113) underwater compact

Posted in Uncategorized


Retro through-and-through: Fujifilm X-Pro2 First Impressions Review

17 Jan

The X-Pro2 is a high-end, rangefinder-esque mirrorless camera that directly succeeds the first X-mount camera: the X-Pro1. The Pro2 now sports a 24MP APS-C sensor and a host of feature improvements in a body that very closely resembles that of its predecessor.

Fujifilm X-Pro2 features

  • 24MP X-Trans CMOS III sensor (APS-C)
  • 273 Autofocus points (77 of which PDAF)
  • 2.36M-dot OLED/Optical hybrid viewfinder with pop-up picture-in-picture tab
  • ISO 200-12800, expandable to 100-51200 with Raw shooting at all settings
  • 1/8000 sec maximum shutter speed and 1/250 sec flash sync
  • Acros black and white film simulation
  • Grain Effect option for JPEGs
  • 1080/60p movies

The X-Pro2’s higher resolution sensor also gains wider-spread on-sensor phase-detect AF coverage, which is another significant improvement. In addition it has a small, thumb-operated joystick that allows you to more easily select an AF point and, in turn, the camera lets you select from a any of the camera’s AF points.

Other changes include allowing Auto ISO to extend up to 12800 and the ability to shoot Raw files at all the camera’s ISO settings (extended settings have always been JPEG-only on previous X-series cameras), as well as the ability to apply lossless compression to Raw files. The X-Pro2’s shutter has been improved, too, and can now shoot as fast as 1/8000 sec, with flash sync extended to 1/250 sec of a second.

But much of what else made the original X-Pro1 stand out remains. The genuinely rangefinder-styled body, rather than just being a rectangle with a band of faux leather around it, mimics most of the control points and design accents of a 1960s camera. It still has the all-metal construction but more attention has been made to provide environmental sealing, as you’d expect in a camera at this price.

And, although the body looks broadly the same, it’s been significantly reworked to offer improved ergonomics as well as additional features. The hybrid viewfinder has been improved through the inclusion of an X100T-style pop-up tab in the corner, onto which an LCD image can be projected.

Here’s a spec comparison between the X-Pro2 and its predecessor, as well as the X-T1:

 
Fujifilm X-Pro2
Fujifilm X-T1
Fujifilm X-Pro1
Pixel count 24MP 16MP 16MP
AF points 273 points (77 of which PDAF) hybrid system.
All directly selectable.
77 point (15 of which PDAF) hybrid system
49 directly selectable (9 of which PDAF)
49 point CDAF system
All directly selectable.
Viewfinder 2.36M-dot OLED/Optical Hybrid 2.36M-dot OLED 1.44M-dot LCD/Optical Hybrid
ISO Range 200-12800
(100-51200 Extended)
200-6400
(100-51200 JPEG-only)
200-6400
(100-25600 JPEG-only)
Auto ISO settings 3 1 1
Maximum frame rate
With AFC/With Live View
8 fps / 3 fps 8 fps / 3 fps 6 fps / 3 fps
Maximum shutter speed 1/8000 (Mechanical)
1/32000 (Electronic)
1/4000 (Mechanical)
1/32000 (Electronic)
1/4000 (Mechanical)
X-Sync Speed 1/250 sec 1/180 sec 1/180 sec
Movie shooting 1080/60p 1080/60p 1080/24p
Wi-FI Yes Yes No
Customizable Q Menu Yes Yes No
Custom ‘My Menu’ Yes No No
Direct controls Shutter Speed
Exposure Comp
AF Drive Mode
ISO
Shutter Speed
Exposure Comp
AF Drive Mode
ISO
Drive Mode
Metering Mode
Shutter Speed
Exposure Comp
AF Drive Mode
Direct AF point control Yes – Joystick Optional – At expense of custom buttons No
Custom buttons 6 6 (2 if direct AF select chosen) 2
Exposure Comp Dial ±3EV (±5EV using front dial) ±3EV ±2EV
Rear screen 3″ Fixed (3:2)
1.62M-dot (900 x 600)
3″ Tilting (3:2)
1.04M-dot (720 x 480)
3″ Fixed (4:3)
1.23M-dot (640 x 480)
Command dials 2 (Push-button type) 2 1 (Push-button type)
Card slots 2 (1 of which UHS-II) 1 (UHS-II) 1 (UHS-I)
Film Simulations* 9 8 7
AF Tracking Yes Yes No
Eye-detection AF Yes Yes No
AF in MF mode AF-C or AF-S AF-C or AF-S AF-S
Panorama mode No Yes Yes
Compressed Raw? Optional (Lossless) No No
Battery life 350 OVF
250 EVF
350 EVF ~300 OVF
Battery percentage? Yes No No
Maintain zoom when changing image in playback Yes No No
Lens Modulation Opt Yes Yes No
Grain simulation Yes No No
Split prism focus guide Color/Mono Mono No
Brightline display Yes N/A No

*Not including color filter simulation variations

As you can see, compared to the X-Pro1, the Pro2 is significantly improved. Almost every aspect of the camera has been refreshed and these updates quickly add up to a much nicer-to-use, more capable camera.

However, in the four years that have passed since the launch of the X-Pro1, a lot has changed, with mirrorless cameras maturing dramatically and expectations for features such as continuous autofocus and movie shooting leaping forwards. However, neither of these two factors is likely to be a prime concern for would-be buyers, instead, the main thing likely to make life difficult for the X-Pro2 could be the existence of its own sister model: the X-T1.

The X-T1 was described at launch as a flagship model and offers a fully fleshed-out feature set for enthusiasts, semi-pros and perhaps even some professionals. It has sealed magnesium alloy construction, a huge electronic viewfinder, weather sealing and abundant external controls. So is there really still room for a new X-Pro alongside the DSLR-style model?

Scanning through the table above, there are certainly some areas in which the X-Pro2 is more advanced than the X-T1, but details such as shutter speed and pixel count are just generational improvements that would make just as much sense in a X-T2. So one of the main things we’ll be looking to address in this review is: how does the hybrid viewfinder change the shooting experience and is it enough to allow the X-Pro and X-T lines to continue in parallel?

 Review History
29 Jan 2016 First Impression Review based on Pre-Production camera running Firmware 1.00

If you're new to digital photography you may wish to read the Digital Photography Glossary before diving into this article (it may help you understand some of the terms used).

Conclusion / Recommendation / Ratings are based on the opinion of the reviewer, you should read the ENTIRE review before coming to your own conclusions.

We recommend to make the most of this review you should be able to see the difference (at least) between X, Y, and Z and ideally A, B, and C.

This article is Copyright 1998 – 2016 and may NOT in part or in whole be reproduced in any electronic or printed medium without prior permission from the author.

Articles: Digital Photography Review (dpreview.com)

 
Comments Off on Retro through-and-through: Fujifilm X-Pro2 First Impressions Review

Posted in Uncategorized


Macphun Aurora HDR Pro Software – First Impressions

08 Dec

HDR, or High Dynamic Range, photography originally started as an attempt to correct the limited dynamic range for standard camera sensors, compared to what the human eye can see or perceive. This is not a new concept, but in case you’ve never heard of it, allow me to explain.

Back in the day, camera sensors had an average dynamic range of about 5–7 stops, where our eyes can easily adapt and recognize ranges from 11 to 14 stops. Nowadays, sensors of modern cameras are much more capable in terms of dynamic range, but they still, depending on the situation, can’t capture the whole range.

5 Images 1 Stop Apart - Basic Preset - Slight Contrast Adjustment

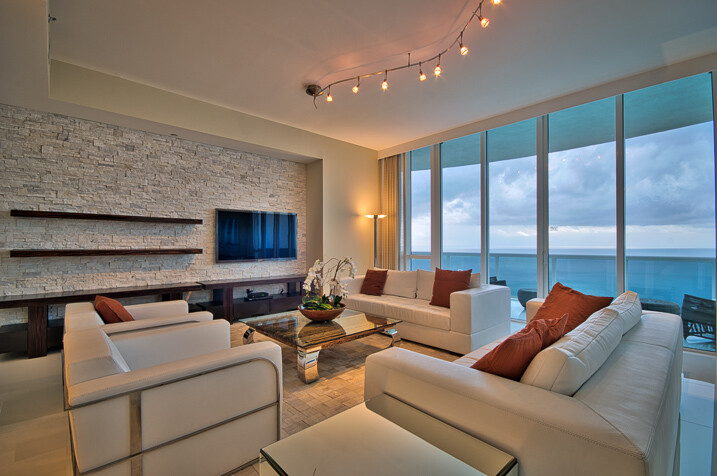
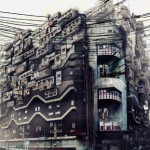
5 Images 1 Stop Apart – Basic Preset – Slight Contrast Adjustment


So HDR techniques utilize multiple images, with different exposures, of the same subject, that are then merged together to create an exposure range closer to what we can perceive with our eyes. Of course, this is not a new concept, and there is always a lot of controversy among photographers regarding the subject. Some people like it extreme or artsy, and others like it more natural. Both can be achieved through HDR methods. There are many different techniques and types of software for doing HDR. But, not all of them are easy to use and understand, with resulting images that are not natural, and over-processed.

Recently Macphun, one of the world’s leading developers in consumer and professional photography software for the Mac, has teamed up with Trey Ratcliff, an artist and HDR pioneer who mastered the technique, gaining over nine million fans. According to their statement, “Aurora HDR contains every imaginable tool needed to produce high-quality next generation dramatic images.”

I’ve been a fan of Trey’s wonderful images myself, so when I heard about the software, I wanted to give it a try. I just received a copy and have been playing around for a couple of days.

5 Images 2 Stop Apart - Treys Angels Within Preset - Slight Contrast Adjustment

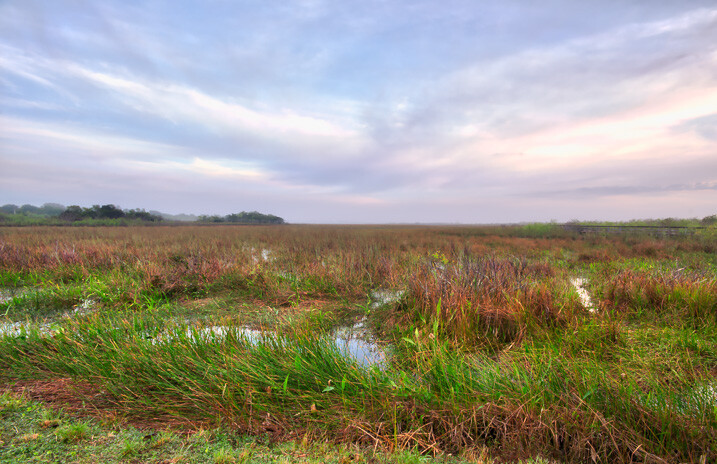
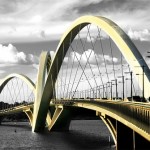
5 Images 2 Stop Apart – Treys Angels Within Preset – Slight Contrast Adjustment

Some of the key benefits of Macphun Aurora HDR Pro, as described by the developer, are:

  • Revolutionary HDR algorithms make possible the entire spectrum of HDR looks, from natural to highly stylized.
  • Total HDR editing experience with the most complete set of tools available.
  • Powerful one-click presets, including Signature Pro presets by Trey Ratcliff, yield fantastic results instantly.
  • Layers, masking and brushes provide the ultimate in selective editing.
  • Unique Radiance controls and custom texture blending for creative versatility.
  • Detail enhancement to increase drama in images.
  • Extensive color and toning controls for vibrant color combinations.
  • Approachable user interface makes for a comfortable, understandable experience.
  • Built-in sharing supports popular photo communities and social networks.
  • RAW, JPG, TIFF and other popular files support for the greatest flexibility.
  • Workflow tailored to any style, with support for using as a standalone app, or as a plugin to popular host applications.
7 Images 1 Stop Apart - Indoor Bright Preset - Slight Contrast Adjustment

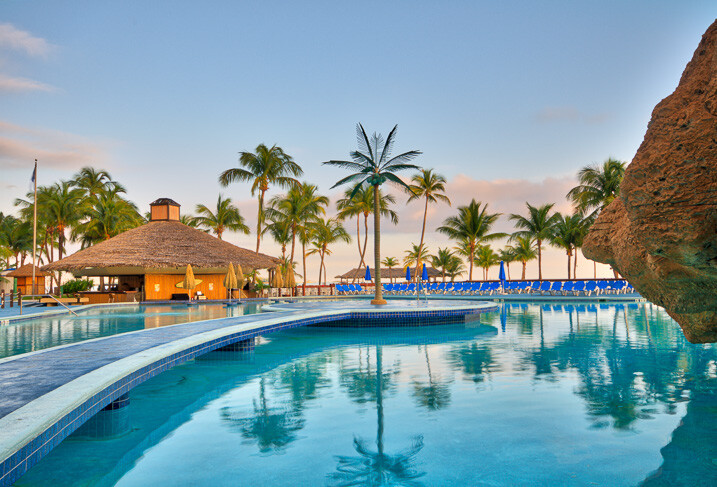
7 Images 1 Stop Apart – Indoor Bright Preset – Slight Contrast Adjustment

As mentioned above, the software can be used as a stand-alone application or as an plugin host operation within Adobe Photoshop, Adobe Lightroom or Apple Aperture. Because Lightroom is my base, I have chosen to use it from there.

After the installation, it took me a while to figure out how to make it work with Lightroom. Most plugins automatically install the extensions but with Aurora, you actually need to open the program, open an image, and then go to the Aurora HDR Pro menu and select Install Plug-Ins. In my opinion, I think it would be better in future editions to have the option of installing the plug-ins upon the initial installation, rather than having to go through this process. But after that, it integrated with Lightroom flawlessly.

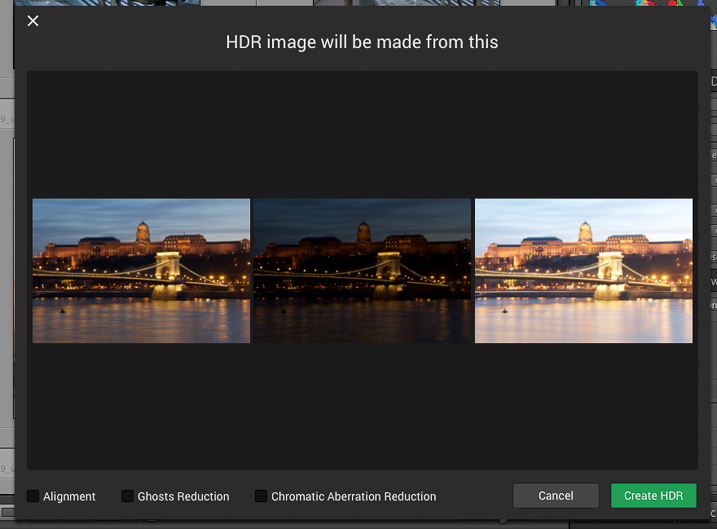
When launched, the first window that shows up displays the images from which the HDR will be made, as well as options for Alignment, Ghosts and Chromatic Aberration Reduction. So far so good. Pick alignment if the images were shot hand-held, pick Ghosts Reduction if there are moving subjects, and so on.

MacPhun-Aurora-HDR-First-Impressions (2 of 4)

Once you click Create HDR, the images are combined and the main interface will open up. The interface is well-rounded and easy to navigate. It features a large image view with three main sections: a navigation and tool bar at the top, layer and adjusting tools on the right side, and presets selections at the bottom.

MacPhun-Aurora-HDR-First-Impressions (3 of 4)

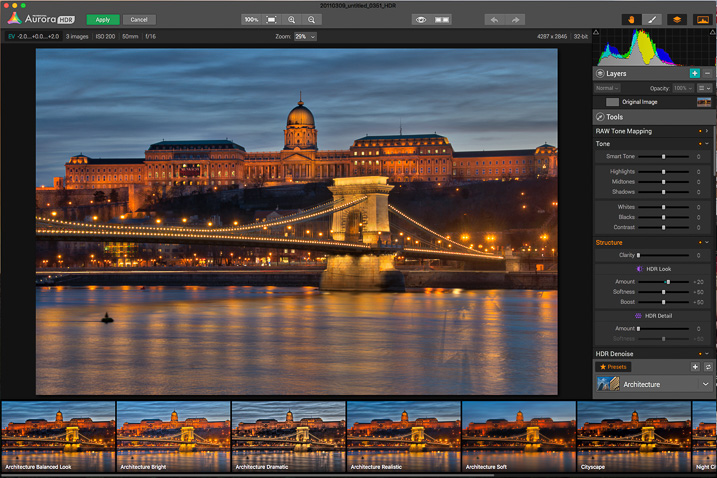
On the top bar you’ll find: the zooming tools, quick preview and compare options (to check against your original and edited images), a move tool (to move around when zoomed in), and a brush and eraser to use in layers (when creating masks) and the layers tool.

The main section of right panel contains the following tools:

  • Histogram: Displays the complete tonal range of your image from dark to light. Similar to in Lightroom, clicking the upper right and left corners will display the black and white clipping points.
  • Layers: I really liked this one; layers are a great way to stay organized and add different effects on your image by isolating them using masks. You can add as many layers as you want, and they can be also applied using different blend modes: normal, soft light, hard light, overlay, multiply, screen luminosity and color. They pretty much work as they do in Adobe Photoshop.
  • Tone Mapping: This panel controls how Aurora HDR compresses the files, and the weight it places on each exposure in the bracketed set.
  • Tone: This panel controls the highlights, mid-tones and shadows; it also helps with contrast, as well as pushing the black and white points.
  • Structure: This panel has several functions, but think of it as clarity on steroids. It works by finding edges, and avoids adding contrast to edges but rather, it affects areas. It contains several sliders to play with, including, of course, “Clarity” as well as sub-panels called “HDR Look” and “HDR Detail.” From here you can increase and decrease the texture of the image.
  • HDR De-noise: A tool to eliminate noise and artifacts produced by the merging of the photos.
  • Image Radiance: You can clearly notice Trey’s hand in this one; it gives a “dreamy” feeling to the photos.Right Panel Tools (1 of 1)
  • Color: Includes controls for adjusting color, vibrance, color contrast, temperature and tint in the image.
  • Details: Increased clarity, detail, and sharpness to bring out the details in an image. As there is no sharpening function, this works as a sharpening tool.
  • Glow: Another creative tool. With this one you can create softening effects to the lighter tones.
  • Top & Bottom Lighting: I really liked this addition too; they work similar to a graduated neutral density filter. This control splits the image in two segments and darkens or lightens the image.
  • Tone Curve: The curves tool. As in Adobe Photoshop or Lightroom, if you are familiar with working with curves, the panel is there. You can apply it overall, or it also works with independent channels: red, green and blue.
  • Color Filter: The color filters are available to adjust saturation and luminance to specific colors. It works similar to the HSL panel in Adobe Lightroom, but the Aurora Software lacks the hue option and is limited to six basic colors. Still, it is good to have it there to adjust. I’m not pretending to compare it with Lightroom as this is a different software; just mentioning options that you could be familiar with.
  • Color Toning: With this one you can change the tone of either the highlights or the shadows, and individually increase or decrease saturation of the same. A really nice creative tool for split toning. I also really like the preset options on top of the panel.
  • Vignette: The traditional vignette tool. It works as expected, but there is something very clever as well: the Inner Light function allows you to add more light to the center, or any part of the image.

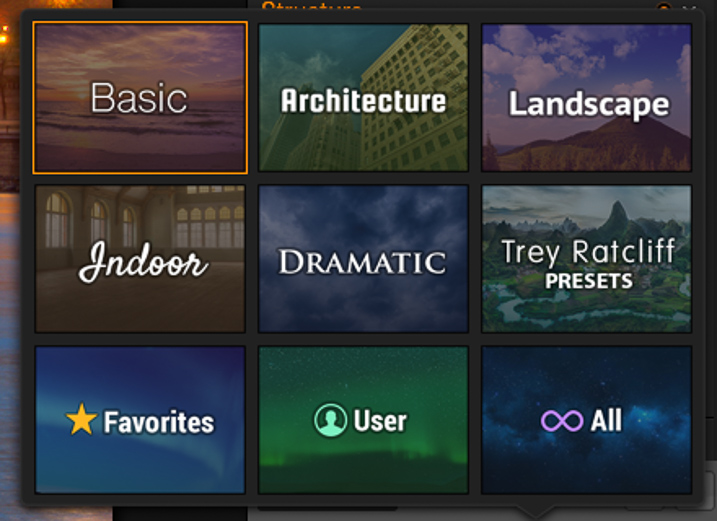
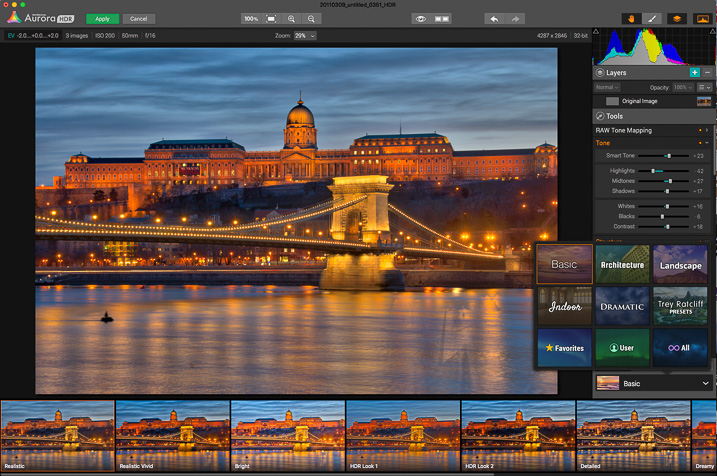
Lastly, there are the presets, created by Macphun and Trey himself. They provide a good starting point to try out different looks in a single click. Of course, you can also create your own presets and save them for future use.

MacPhun-Aurora-HDR-First-Impressions (4 of 4)

MacPhun-Aurora-HDR-First-Impressions (5 of 4)

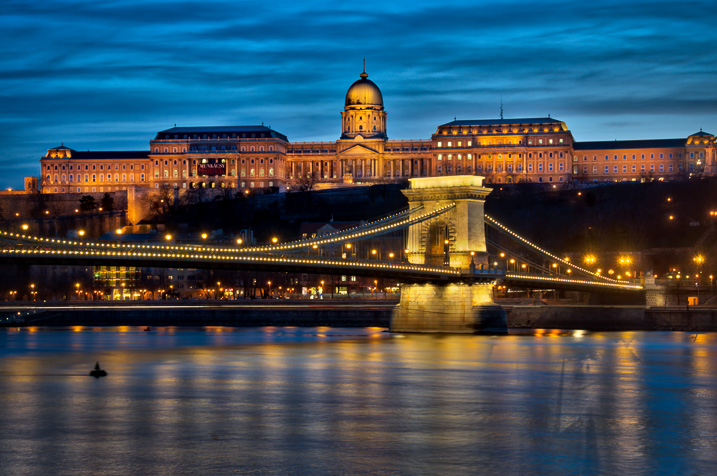
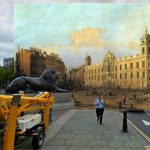
I created the image below by using three images, shot two stops apart. I started with the Basic Realistic preset as a base, and played with the sliders until I got what I wanted. Then, I added a layer to add more light to the palace in the foreground, and masked out the rest.

One of the things that I’ve noticed while working, is that the application is fast compared to other software I’ve used in the past, and that is a godsend. Everything loads fast, and the application seems to be very responsive. I’ll definitely continue to use it in the future and test more functions.

MacPhun-Aurora-HDR-First-Impressions (6 of 6)

Whether you are an HDR fan or have never experimented with the technique, you should give Macphun Aurora HDR Pro a try. This is a well-rounded application that can serve the needs of pros and amateurs alike.

Unfortunately, the software is only available for Mac, but I think overall it is a great alternative. They are currently three options. The Aurora HDR currently retails for $ 49.99; with this option there is no RAW support, and it can just run as a standalone application. The tested version is the Aurora HDR Pro that retails for $ 99, and there is also a package that includes the application plus training for $ 129.

googletag.cmd.push(function() {
tablet_slots.push( googletag.defineSlot( “/1005424/_dPSv4_tab-all-article-bottom_(300×250)”, [300, 250], “pb-ad-78623” ).addService( googletag.pubads() ) ); } );

googletag.cmd.push(function() {
mobile_slots.push( googletag.defineSlot( “/1005424/_dPSv4_mob-all-article-bottom_(300×250)”, [300, 250], “pb-ad-78158” ).addService( googletag.pubads() ) ); } );

The post Macphun Aurora HDR Pro Software – First Impressions by Daniel Korzeniewski appeared first on Digital Photography School.


Digital Photography School

 
Comments Off on Macphun Aurora HDR Pro Software – First Impressions

Posted in Photography


Small Footprints: London’s First Pedestrian & Bicycle Bridges

06 Dec

[ By WebUrbanist in Architecture & Cities & Urbanism. ]

london minimalist bridge crossing

Bucking the trend of extravagant elevated parks, this new walking-and-cycling-only bridge uses tight spirals on either side to minimize land usage with a slender tension-supported pathway (suspended from twin spires) stretched elegantly in between.

london spiral foot bicycle

Designed by Bystrup, a Danish firm, the crossing will span the River Thames in West London and beat out more lofty and complex proposals by other contributing architects.

london bridge at night

While certain other vehicular bridges accommodate non-motorized traffic in London, this one (if constructed before its close cousin, discussed below) is slated to be the first exclusively dedicated to walkers and bikers.

london operable bridge

This somewhat heftier structure is designed to be raised on demand, requiring a bit more bulk as a result (as well as waiting areas when the central portion is lifted to let boats pass).

london brige raised

Meanwhile, across town, another new bridge by ReForm is also in the works between Canary Wharf and Rotherhithe.

From the architects: “Our design will do this, creating an internationally recognisable landmark. Its unique and elegant form and operation will become an attraction for visitors. It will enhance the views along and across the Thames, providing scale and interest in the way that the ships on the river itself do.”

london night view

This latter bridge is integrated to pathways and green spaces both extant and planned on either side of the Thames.

london canary wharf bridge

Both bridges will help cut commuting times across London and help make the city friendlier toward those on foot or traveling by bike. Each also aims to become a defining feature of the city, without overwhelming existing bridges or architecture.

Share on Facebook


[ By WebUrbanist in Architecture & Cities & Urbanism. ]

[ WebUrbanist | Archives | Galleries | Privacy | TOS ]


WebUrbanist

 
Comments Off on Small Footprints: London’s First Pedestrian & Bicycle Bridges

Posted in Creativity