RSS
 

Posts Tagged ‘Finding’

Finding the Balance: Capturing Memories Versus Making Memories

27 Oct

CM3

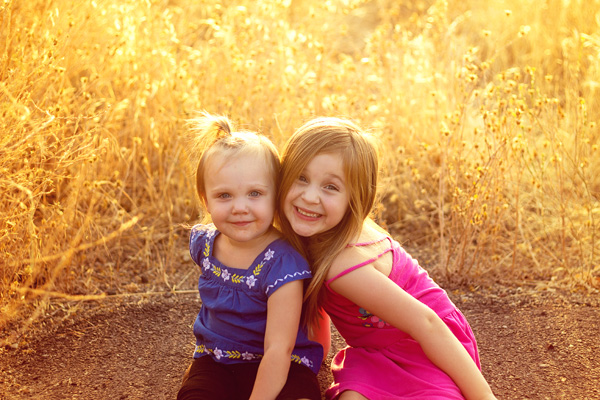
I am more than a little obsessed with capturing and preserving memories for my family. We have a photo wall that’s regularly updated. We print photo books, both from Instagram and of photos from my “real” camera. My girls know that twice a year, we go out to a field nearby our house, and I do a mini photo session with them. I’m the type of person who easily had 5,000 photos in the first year after my daughter was born, and that’s just what I decided to keep. So whenever I see a mom taking photos of her kids at the park, or a dad taking pictures at his son’s soccer game, I want to run over and give them a high five. I want to tell them that I think they are awesome, and that capturing those memories for their family is something priceless. They’re images that will be pulled out during graduation parties, played on wedding slideshows, and – God forbid – treasured after the loss of a loved one. It’s important work, and it is work that I feel absolutely passionate about.

But there’s a catch. If you’re anything like me, it can be easy to become so focused on capturing memories for our family and of our kids that we can sometimes tend to forget to be part of making memories WITH our family. It can be hard to find a balance, so here are a few tips that I have picked up along the way that can help you find that sweet spot of capturing those important moments, while also being present for them as well.

1. Do a dry run

CM

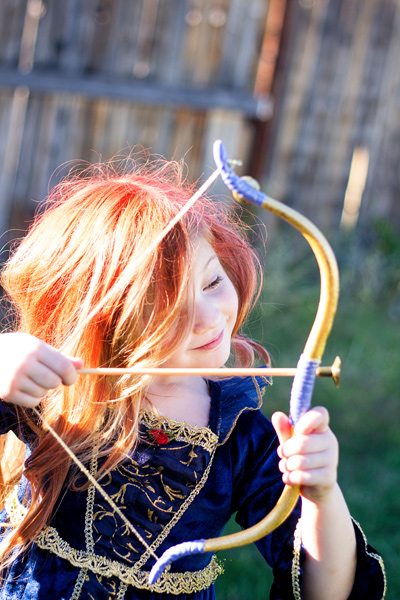
Halloween is coming up later this month, and my oldest daughter Lizzy wants to be Merida (from Pixar’s Brave). I absolutely want a non-phone photo of her all dressed-up in her costume. This is non-negotiable. But, I know that on the day of Halloween Lizzy will be excited (and probably a little hopped up on sugar), and trying to have a little photo session with her on that day would probably be fighting a losing battle. So, we did a dry run. We do this every year, and it works out so well for us because I can take a few photos of her to stick in the scrapbook in a no-pressure environment, and then on Halloween night, I can leave the camera at home and just be present with my family. We all get a good outcome, and in my book that’s a win. Does it really matter that the photo was taken the weekend before the event? Not to me in this instance, because the memory that I’m actually interested in capturing was the fact that at age four-and-a-half, Lizzy thought that Merida was the coolest of all the princesses, and that she wants to be strong, independent, and brave just like Merida is.

This tip is SO easy, but it has made such a big difference for our family, and it isn’t just for Halloween – this same idea would work for any occasion in which you want a photo of your kids either in a special outfit or with a particular person, opposed to during an event. For example, doing a dry run would be a good fit for capturing your daughter in her ballet outfit, taking a photo of your kids with Mom for Mother’s Day, or even to catch your kiddos in their Christmas pajamas.  As a bonus, doing a dry run lets us know if there are any costume or clothing  issues (dress is too itchy, shoes too tight, needing six cans of red hairspray instead of one) that need to be addressed before the big day as well.

2. Make good use of your camera’s creative modes

CM5

I have several friends who are currently learning how to shoot in manual. One of them was told by her mentor that the creative modes on her camera are cheating and that she should quit using them cold turkey and shoot in full manual, all the time, if she wants to be a real photographer. When she told me all this, I audibly groaned.

Here’s the deal – learning to shoot in manual is awesome and worthwhile. But as far as I’m concerned, if trying to shoot in full manual means that you spend all of your daughter’s soccer game (or birthday party) behind the camera trying to figure out appropriate settings rather than participating in the event itself, that’s a bummer. In my opinion, you would have been better off to stick your camera in Program mode or any other creative mode that you are very familiar with, take a few photos you love, and then be able to set the camera down and enjoy the rest of the time with your family. I’m not saying that you shouldn’t play around with settings or experiment at all, I’m simply saying that at special events like birthdays, weddings (in which you are not the official hired photographer), anniversaries, once-in-a-lifetime vacations, and graduations are the types of events where it is just as important to be a part of making the memories with your family as it is to be capturing those memories. If using one of your camera’s creative modes can help you in that way, go for it!

3. Don’t feel the need to photograph everything

CM2

Such an easy thing to say, and such a difficult thing to put into practice! The reality is that I don’t need to photograph all three times my daughter will go to the pumpkin patch this month between school field trips, family, and friends. The reality is that I don’t need to photograph every time my kids go out to the backyard to play. Sometimes, pulling out the camera while they play is an awesome time for me to practice and play around, but it can also really frustrate my kids if I do it too often (EVEN if I’m not asking them to, “Look here and say cheese!”).

So, for my sanity and theirs, whenever my gut instinct is to grab my camera, I try to stop and ask myself when the last time I photographed this particular event or activity was. If it has been less than a month, that’s a good cue for me to pause and consider whether or not I really need to bring the camera along that day. I really encourage all you moms and dads out there to choose a similar pause point for your family – maybe it’s weekly, maybe it’s monthly, but however frequent it is, it gives you and your kids some built in grace.

4. Get IN the picture sometimes

This is the only photo with me in it from my daughter's first birthday. It's a little blurry, but it went in the album nonetheless, and it's one of my daughter's favorite photos from the day.

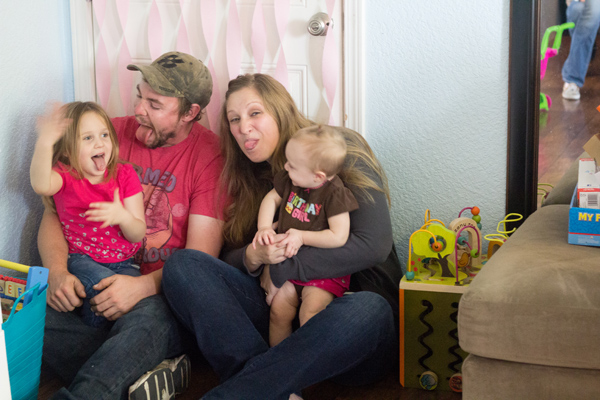
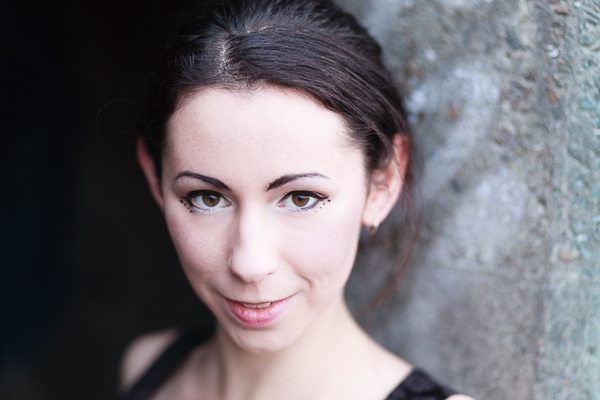
This is the only photo with me in it from my daughter’s first birthday. It’s a little blurry, but it went in the album nonetheless, and it’s one of my daughter’s favorite photos from the day.

If you’re the photographer of the family, chances are that there are a lot fewer photos of you in the family album than there are of anyone else. I think this is something that we ALL struggle with. Or maybe you’ve even tried to pass the camera off to someone else and have been disappointed by the blurry, too light, too dark, weirdly cropped results. I get it, and I’ve been there.

One thing that I’ve noticed is that if I’m quickly handing the camera off to a friend or family member that isn’t familiar with photography, I get the best result if I pass the camera off in AV mode, with the aperture set at least at the number of people that will be in the photo, and the center focal point selected. So, if there will be four people in the photo, make sure the aperture is set to at least f/4 when you hand it over. I usually have my 50mm lens on my camera, so if I hand the camera over in Program mode, there’s a chance that it will elect to shoot at f/1.8 or f/2.2, which would probably not yield the best results for a photo of four or five people. If you’re shooting with a kit lens that isn’t capable of shooting that wide open, it may be just as beneficial to pass off the camera in Program mode. This is just one simple thing that will help yield better results when passing the camera to someone else, but trust me when I say that when it comes to family photos, the important thing is that you’re there, not that you’re well composed and perfectly in focus.

Do you struggle with the balance between capturing memories and making them? Do you have any other tips you’d like to share?

The post Finding the Balance: Capturing Memories Versus Making Memories by Meredith Clark appeared first on Digital Photography School.


Digital Photography School

 
Comments Off on Finding the Balance: Capturing Memories Versus Making Memories

Posted in Photography


Finding Great Subjects to Photograph Close to Home

05 Aug

You don’t need to take expensive and exotic trips to make good images. So if staying at home is more your thing then a few simple ideas can help you create beautiful images. What you might view as commonplace and bland can still be photographed in an imaginative and skillful way to produce an image that shows a far more striking aspect of the subject or scene. I am not suggesting you get all creative with software manipulation either. I am suggesting explore your imagination and creativity; perhaps push your technical boundaries a little and this will further enhance your photographic skill.

flowers-home

The ability to take an everyday scene and construct from it a superb image will require your application of some or all of the following:

  • vision to see the various elements that might be included in an image
  • concentration and time to develop the idea and assimilate all the components
  • awareness to recognize the potential of a color, shape and form
  • observation to study the scene and time enough to mentally collate the aspects of the image and to try them out in camera
  • willingness to try something new

This skill of making the mundane magnificent is not dependent on the type of camera and lens you use, it works with anything. My particular interest is nature and wildlife, but the skill can readily be applied to most of your chosen genres of photography.

Getting started

To start you should be looking for a spark or catalyst to kick off the mental process. This can be anything that takes your fancy such as color, shape, pattern or motion.

Once you have selected your particular environment, and isolated some elements for a composition, then take some time to arrange and rearrange them in your mind. Walk around, kneel, lie down and test different perspectives. Work the opportunity and let the image evolve, don’t rush it. You may get a few strange looks in certain circumstances, but that is the price you pay.

Something simple like a field of rapeseed (or field of other flowers or crops depending on where you live) is a common, beautiful, bright yellow sight which also heralds the arrival of summer. The endless fields of yellow can be monotonous, but they can provide you with a colorful subject in their own right, or a backdrop for a smaller subject. You can use the color, the size of the field and the detail of individual flowers. Look about for a subject, choose a perspective and include other elements such as: blue sky, clouds, a tree, a car, a sunrise or sunset, or all of the above. Let the image unfold.

Finding subjects close to home

The images here are all taken this year, with this article in mind, all within a couple of miles of my house. This is to demonstrate that there is much on our doorsteps that might keep our photographic needs satisfied, well some of them at least.

Choose any patch of grass on a dewy morning and have a look for a good collection of dew drops and try a backlit shot. The sparkles and perfect shapes of the droplets make an intriguing subject. Here I have turned the image into a black and white just to emphasize the shape and patterns, but often you’ll want to keep the lovely green of the grass.

001 Dewy Morning in the Grass

Garden birds are probably the most accessible wildlife for you budding nature photographers. With some simple skills you can go beyond just taking a record shot, but can create lovely images. Place a bird feeder in a good position, with a decent background, and a thoughtfully placed perch and sit back and wait. Change the perch and change the background at will and you have a whole suite of different images available to you.

002 Robin on Chair

A sunrise over a meadow may be a regular occurrence in your home patch, but to make it a little different get down low in the vegetation. Here I have obstructed the sun with a tree at the edge of the meadow, and thus broken the sunlight up into many light sources coming through the foliage. The background is formed by selecting an aperture that provides sizeable circles of confusion (out of focus light sources) behind the subject. The subject is just a few seeding grass heads, but you can turn the simple into the stunning by constructing an image.

003 Meadow Sunrise

Vast fields of cultivated crops can provide you with a wonderful opportunity. A bright yellow rapeseed field for example. Look for something to isolate within the vast swathe of yellow that provides a point of interest in an image full of color. Sometimes it is simply a color that can spark your thinking, but spotting a dewy web provides a focus for the image. Prowling the edge of the fields on a bright and sunny day will also yield a lot of insect life, which could become your whole new world.

004 Rapeseed Field

You can choose a different day and different weather to change your image. On a foggy day dewdrops collect on spider webs and can give you an abstract view of the rapeseed field. The spark here was the pattern effect of the drops and then the gorgeous yellow background.

005 Rapeseed Field Dewdrops

This image was created by using a long lens that can accommodate a lot of foreground (has a lot of reach and you can stay back from the subject) and can throw the background and foreground out of focus with a shallow depth of field, while filling the frame. If you shoot into the sun, then the sunlight passing through the green foliage will bring out the bright, and almost luminous, green of the leaf with which you can compose the foreground and background. The spark was the beautiful color of the backlit green foliage, completely different from the front-lit color.

006 Garden Bluebell

Sometimes simplicity is the only catchword you need to remember. Find a patch of wildflowers, pick the most concentrated spot and shoot away, picking various subjects. The color and the profusion will give you all you need to create an intriguing and colorful image.

007 Summer Flowers

Spring and summer are obviously the prime times for encountering wildlife, and therefore photographic subjects for your nature images are abundant. Unless you live in the tropics, the winter season can be a lot more mundane, so you are probably going to have to work harder. Colorful weeds and insects are always a feature of summer. Putting them together works a treat, although it may take some patience.

008 Dandelion and Ladybird

It is not all about your hands and knees or the hedgehog perspective, so a few leading lines and an old barn will give you a far superior image to a snapshot of endless cultivated fields. Throw in a few colorful wildflowers in the foreground, a dark stormy sky and the farm fields you drive past routinely may take on a new perspective.

009 Old Barn in Fields

A very sparse little patch of flowers, with color being their only redeeming quality, can still provide you with a good opportunity. This technique is purely an in-camera one and utilizes controlled motion of the lens. Slow the shutter speed (low light, low ISO, dull weather or a combination) and zoom in or out by hand while the shutter is open gives the resulting motion blur. This can be used in a variety of ways and once you start your imagination may take hold. If you don’t have a zoom do the same with your prime lens but twist the camera in your hands.

010 Flower Burst

So just to show you that you can make great images close to home with a little effort.

Do you have any other tips or tricks for finding ordinary things and making great photos? Please share in the comments below.

The post Finding Great Subjects to Photograph Close to Home by Richard Taylor appeared first on Digital Photography School.


Digital Photography School

 
Comments Off on Finding Great Subjects to Photograph Close to Home

Posted in Photography


Finding New Photography Locations Just Got Easier With ShotHotspot

26 Jul

There are many ways to go about finding photography locations, but if you’re struggling to find new locations I’d suggest giving ShotHotspot a try.

shothotshop

Five Reasons to check out ShotHotspot?

#1 Great search functionality

shothotspot

Search locations, keywords, and type of photography

The standout feature of ShotHotspot has got to be the search functionality that they have built into the site. Much like Stuck on Earth the photographs they are using come from Flickr and Panoramio, but unlike Stuck on Earth and other outlets ShotHotspot allows you to search based on keywords, style of photography, location distance, and gives you full control over how strong the matching system should be.

shothotspot4

Search within a drawn box

As if that wasn’t enough, it gets even better!. Say you’re not exactly sure what the location that you want to search is called, but you have a general idea of where it is located on a map, you can simply draw a box and search only within that box for photographs taken there and still have access to the various filtering options.

By far they have one of the best search engines I’ve come across for finding locations to photograph, and with time it will only get better.

#2 Crowdsourced corrections from all visitors

One of the problems with pulling data from sites like Flickr and Panoramio is that you rely on the accuracy of the photographer’s location data and key wording. ShotHotspot occasionally will ask for your help in order to help make the location data better. It does this through a simple “Help us Out” box that asks for various information about the location that you are currently browsing.

shothotspot5

ShotHotspot asks for help from a human brain when it needs it

#3 User generated hotspots and information

On top of crowdsourcing for location corrections, ShotHotspot also allows its users to add hotspot locations to their database and edit information about current hotspots that they currently store. This allows for a massive worldwide approach to finding spots to photograph, and determining which ones are better than others. As a user you can add things like type of suitable photography, best time to visit, equipment required, cost of entry or even a general description of the location.

shothotspot6

Add information to locations to help make the database stronger

#4 Integrated with The Photographer’s Ephemeris

While the search functionality is probably the best feature of the site there are a couple of other cool additions that only add to the experience. The first of which is that HotShotspot is directly hooked into The Photographer’s Ephemeris. This allows you to get information on sunrise, sunset, anything else you’d like to know about the location with the click of a button.

shothotspot7

Clicking on the sun/moon calculator will open The Photographer’s Ephemeris

shothotspot2

Get all the details you need to plan for your shoot

#5 Integrated with Wikipedia

Finally ShotHotspot has also tapped into the gigantic database of Wikipedia for information about the locations it has in the database. Not every location has a wiki page so you’ll find some that are empty, but more popular locations will have a vast amount of information for you to browse through.

shothotspot3

Information from Wikipedia with a link to the Wiki page of the location makes it easy to find out more about where you’re going.

It’s still early, but I think ShotHotspot is a winner

In just a few minutes I found two locations I didn’t even know existed less than 20 miles from my house. I’m not saying that this will happen for everyone, but it’s a great sign for a site that’s only just getting started. Check out ShotHotspot and then come back here and let me know what you think.

The post Finding New Photography Locations Just Got Easier With ShotHotspot by John Davenport appeared first on Digital Photography School.


Digital Photography School

 
Comments Off on Finding New Photography Locations Just Got Easier With ShotHotspot

Posted in Photography


Finding A Moment With Guille Sola

19 Jun

Fashion Photography Blog presents the work of Guille Sola (FashionPhotographyBlog.com)FashionPhotographyBlog.com had the pleasure to speak to Spanish fashion photographer, Guille Sola, now based in London. I’ve been in touch with Guille for a while now, and have wanted to sit down and do an interview with him. I keep finding myself speechless and it comes to his work and spent ages trying to find the right words to describe his art. Perhaps it’s the cleanliness of his images or the fact he isn’t afraid to go to the edge and utilize the rawness of the frame, he seems to always be able to make the invitation to the viewer to join in on the intimate connection between photographer and model – a skill that is very hard to get right for most photographers.

Fashion Photography Blog presents the work of Guille Sola (FashionPhotographyBlog.com)

I managed to ask the photographer why he like fashion photography so much, he replied simply that “Fashion photography blends art and material world, this combination of opposite elements makes me crazy about it.” Though his passion is clear, it was not anticipated that he would end up doing fashion shoots. He explained that “I started studying photography when I was 18, at it wasn’t something planned. But when I started my first shoots I couldn’t stop. Fashion came later, and I would say it was precisely in the moment I saw an image made by photographer Guy Bourdin.”

Fashion Photography Blog presents the work of Guille Sola (FashionPhotographyBlog.com)

To be successful in fashion photography, Guille believes that you need 3 things: talent, luck and loads of patience. For those getting started in fashion photography, the photographer recommends that you shoot as often as you can, in his words he suggests that you “Make a lot of photo shoots, thousands, and save them in a tiny box for any moment they might be useful.”

Fashion Photography Blog presents the work of Guille Sola (FashionPhotographyBlog.com)

To Guille, photography is all about processes, not only is it a continuous learning process but systems of organization are key, whether you are dealing with your equipment, computer or team,  as he stated “Order is fundamental, as much for the materials as for your digital files. In the battlefield, the studio, it’s very important to blend with the models, the stylists, make-up artists and – especially with the client.”

Fashion Photography Blog presents the work of Guille Sola (FashionPhotographyBlog.com)

Drawing inspiration from London, where his is based, his most valuable piece of equipment in photography is his eyes, though you may also need to use your ears to listen out for networking opportunities, according to Guille, “Sometimes you have to hear and pay attention to a lot of things that actually don’t interest you, even if looks that they don’t.” For new photographers getting into competitive game, Guille recommends that you need to work on having an impressive portfolio and a good contact list. The last question I asked the photographer was about what he thought made his photographic style unique, he answered “I dare to say I portrait the beauty of the people I photograph.”

Fashion Photography Blog presents the work of Guille Sola (FashionPhotographyBlog.com)

For more information about Guille Sola’s photographic work and to contact him, you can check out the following:
Website: www.gsola.es
Tumbler: www.gsola.tumblr.com
Instagram: @guille_sola
Email: info@gsola.es


Fashion Photography Blog

 
Comments Off on Finding A Moment With Guille Sola

Posted in Uncategorized


Finding Vivian Maier – Der Film

10 Jun

Was ist interessanter: Die Fotos von Vivian Maier oder ihr geheimnisvolles Leben? Für einige Personen des Dokumentarfilms „Finding Vivian Maier“ ist es ganz klar die Geschichte dieser exzentrischen Frau, die als Kindermädchen arbeitete und ganz nebenbei und heimlich großartige Bilder machte.

John Maloof, Regisseur des Films und „Entdecker“ Vivian Maiers fand ihre Negative bei einer Auktion. Eigentlich auf der Suche nach historischen Aufnahmen des Stadtviertels, enttäuschten ihn die Aufnahmen zunächst. Sie zeigten Straßenszenen Chicagos aus den 50ern und 60ern, Portraits von Menschen. Doch er erkannte bald, dass er da auf etwas gestoßen war, was mehr als nur historischen Wert besaß.

Eine schöne Frau steht im Mittelpunkt einer Straßenszene und sieht nach rechts.

Eine Nachtaufnahme. Zwei Männer schleppen einen scheinbar Betrunkenen zwischen sich über die Straße.

Die Aufnahmen waren spannend, zeigten die Menschen auf eine besondere, gefühlvolle Weise. Einzig mit dem Namen der Fotografin und dieser Kiste voller Negative machte sich Maloof auf die Suche nach der Frau, die bei Google damals noch keinen einzigen Treffer ergab.

Im Dokumentarfilm begeben sich Maloof und sein Kollege Charlie Siskel auf Spurensuche. Menschen, die mit dem Kindermädchen in Kontakt standen, werden interviewt und berichten ausführlich über die Stärken, Schwächen und Exzentriken dieser mysteriösen Frau. Einig sind sich alle vor allem in einem: Warum hat sie nie gezeigt, was sie da macht? Keiner kannte ihre Bilder, niemandem hatte sie ihre Arbeiten gezeigt.

Plakat: Finding Vivian Maier

So kamen sie erst nach ihrem Tod ans Licht. Und mit ihnen der Ruhm, Ausstellungen und Veröffentlichungen. Hätte Vivian Maier das gewollt? Auch diese Frage wird in der Dokumentation aufgegriffen und zum Teil beantwortet. Ob sie einen so privaten Film über sich selbst gewollt hätte, bezweifle ich stark, aber ja, ich habe ihn mit Faszination gesehen. Trotzdem.

Wir alle bestimmen, was die Welt über uns erfährt. Doch ob wir wollen oder nicht – am Ende müssen wir Farbe bekennen. Es ist gut möglich, dass wir nichts über Vivian Maiers Leben und ihre Fotos wissen würden, wenn es nach ihr gegangen wäre. Sie entschied sich für eine heimliche Existenz und versteckte ihre Kunst, solange sie lebte. Doch wer seine Kunst verbirgt, vernichtet sie eben nicht. Vivian Maier bewahrte ihr Werk auf und überließ dessen Schicksal anderen.
– Charlie Siskel, Regisseur

Der Film ist abgesehen von diesem moralischen Konflikt sehr empfehlenswert. 84 Minuten mit deutschen Untertiteln. Ich habe gespannt die Geschichte um Vivian Maier verfolgt, habe mitgerätselt, war manchmal erstaunt, manchmal schockiert. Zudem bekommt man neben den besten Fotografien Maiers auch noch viele ihrer eigenen Filmaufnahmen zu sehen.

Der Film „Finding Vivian Maier“ kommt am 26. Juni 2014 in die deutschen Kinos.


kwerfeldein – Fotografie Magazin | Fotocommunity

 
Comments Off on Finding Vivian Maier – Der Film

Posted in Equipment


Finding and Achieving Your Style in Lightroom

26 Apr

Photo processed in Lightroom

There are so many options for processing photos in Lightroom that it’s no surprise that some photographers get confused. If you’re finding it difficult to decide what to do with your images (in the post-processing sense) you’re not alone.

The key is to think about what you want to achieve with your processing. That’s not always easy, but you may find it useful to start by thinking about the following aspects. Your answers will help determine the approach you take.

Colour

Do you want a bright, colourful image or a desaturated one? Perhaps you’d even like to work in black and white. If you are working in colour do you want the colour to be accurate, or your photo to be predominantly warm or cool toned? The decisions you make about colour will have a big impact on the direction you take once you get to the Develop module in Lightroom.

Tonal values

Do you want a light image, or a dark one? High contrast or low contrast? Some of this will be determined when you take the photo. For instance, if you decide you want to create a portrait with a dark background, then ideally you would make sure that the background is dark in the first place. But, there are ways of making backgrounds darker that mean you can change the look of a photo quite dramatically in Lightroom if you wish. There’s an example of that later, keep reading.

General feel

Do you want your photo to be conservative or edgy? Modern or maybe nostalgic, vintage or retro? These concepts may feel a little hard to pin down, but again they will help determine the path you take in Lightroom. If you want to create an image with a nostalgic feel, then how does that affect your approach to colour? Or to contrast? How would it be different if you decided to go for a modern look instead?

Portraits

With photos of people, do you want them to look stylized or natural? Are you interesting in capturing character or beauty? Or maybe even both? Do you want your subjects to be sexy or sensual, or asexual? Do you want them to be casual or fashionable? Again, some of these concepts are somewhat airy, but thinking about them will help you work out what approach to take in Lightroom.

Please note that you don’t have to think about all of these aspects. For most most photos, you will probably only have to consider two or three . Here are some examples:

Example 1: Portrait with dark background

The inspiration for this approach came from looking at the work of photographers like Tom Hoops, who use dark backgrounds to great effect in their portraits.

The first example is a portrait I took of a girl standing in the doorway of a concrete bunker. The light is coming from her left.

Photo processed in Lightroom

One side of the photo is already dark, so I decided to reduce the brightness of the other side to match. I used a Graduated Filter to darken the concrete wall, and an Adjustment Brush to make the model’s hair darker. Here’s the result.

Photo processed in Lightroom

Possible alternative B&W

The logical extension of this thought process is to convert the image to black and white and make the background even darker. I also increased Contrast in the Basic panel and applied Clarity to the model’s eyes with an Adjustment Brush to make them stand out more.

Photo processed in Lightroom

Example 2: Nostalgic colour

I took this close-up photo in a market in Shanghai, China.

Photo processed in Lightroom

There are two thoughts that occur to me here. First, that the two Buddha heads have beautiful textures that I’d like to emphasize. Second, that I’d like to give the image a nostalgic feel.

To achieve the nostalgic look, I used the Temp slider to make the photo warmer, and reduced the saturation of the colours with the Vibrance and Saturation sliders. I increased Clarity and Contrast to bring out the texture, and added a vignette using the Radial Filter. The dark shadows this creates add a sense of mystery.

Photo processed in Lightroom

Possible alternative add a plugin

How about seeing how far I can push the idea of bringing out the texture and reducing colour saturation? Nik Software’s Viveza2 has some excellent tools for this. See the resulting image below.

Photo processed in Lightroom

Example 3: Long exposure landscape

Finally, here’s a landscape that I took one evening using a shutter speed of 30 seconds. The light is flat and dull, and there is a strong blue colour cast.

Photo processed in Lightroom

One option here is to emphasize the late hour and natural blue colour of the light. But I decided to take a different approach and that I wanted to create an image with warm tones. I did this by pushing the Temp slider to the right. Then I increased Contrast to compensate for the flat light and reduced Highlights to bring back some of the subtle detail in the sky. I added Clarity to the rock arch with the Adjustment Brush to emphasize it as the focal point.

Photo processed in Lightroom

Possible alternative dark monochrome

A darker, monochrome version with a blue tone to evoke the atmosphere of the blue hour when the photo was taken. I applied more Clarity to the rock arch, beach and water to enhance the texture and contrast in these areas, then added a vignette with the Radial Filter.

Photo processed in Lightroom

 So as you can see there are many approaches to processing your images in Lightroom. Try different techniques and styles on the same image and you’ll start to learn which ones appeal to you most and are more your “style”. You can also create as many “Virtual Copies” of your image as you want and apply a different style to each for easy comparison. You can even save them as a Lightroom Preset if it’s a look you think you may want to use often.

What is your approach to processing images in Lightroom? If you have any tips for our readers then please leave them in the comments.


Mastering Lightroom ebook bundle

Mastering Lightroom: Book One and Two

My Mastering Lightroom ebooks are a complete guide to using Lightroom’s Library and Develop modules. Written for Lightroom 4 & 5 they take you through every panel in both modules and show you how to import and organise your images, use Collections and creatively edit your photos.


The post Finding and Achieving Your Style in Lightroom by Andrew S. Gibson appeared first on Digital Photography School.


Digital Photography School

 
Comments Off on Finding and Achieving Your Style in Lightroom

Posted in Photography


Finding Gold in Your Image Archives

24 Apr

No doubt like many other photographers, so many of my images have never seen the light of day. This is mostly for good reason; they are out of focus, poorly composed, badly timed, they just don’t make the cut. Often these images may be good, just not the BEST. I have learned though, that there can be gold hiding in your archives, just waiting to be rediscovered, taken into the develop module and shared with the world. I have found that spending some time digging through old shoots can yield some very positive results.

Make it part of your workflow to revisit your image archives

Maybe you have found that your photo editing workflow follows a predictable pattern, like mine. After importing, adding metadata, then backing up RAW images from a shoot, I like to take a first-pass look at the images, flagging the few that initially jump out, and rejecting those that are clearly unusable. It is easy to then go through again and pick out images that have potential, before filtering the flagged images and comparing them to find the sharpest or most accurately exposed selects. This gives me a small collection of images to edit.

Then comes the fun part! Using any combination of Adobe Lightroom, Photoshop and Nik Software, I edit my images to see what they can become! After editing the selects, I like to back them up both locally and online to my Photoshelter portfolio, which doubles as my image archive in the cloud. Finally, these images are shared on social network accounts. Done, right? On to the next project, assignment, location…

But maybe not. Of the images imported from CF cards, I might end up with between 1-5 images that I’m happy with. So if I come home from shooting an epic landscape with 50-100 images, what happens to the other 95% of my shots? If you’re anything like me, you probably have gigabytes worth of RAW images taking up space on your hard drive. Have you ever revisited a hard drive to find something you may have missed? I make this a regular part of my workflow and I would argue that doing so is well worth your time.

To give you an example, here is an image I made not long after moving to Mount Maunganui, New Zealand a couple of years ago. This is a shot of Tauranga Bridge Marina:

Tauranga bridge marina 1

Having driven past this location dozens of times, I already had an idea of the shot I wanted before I arrived. It was a cold night, and the sky hadn’t lit up in the way I was hoping, so I stayed past sunset and into twilight, my favourite time to shoot. Still nothing very inspiring, so I went home. I followed my usual workflow and ended up with the image above, which I wasn’t entirely happy with, so I moved on to the next thing.

Fast forward six months and I found myself revisiting that folder in Lightroom. I don’t remember what prompted it, but after finding this image, I edited it very differently and ended up with the image below. It was far better received by fans and clients online and became one of my top selling images last summer. Personally, I like this image a lot more than the first.

Tauranga bridge marina 2

Time is on your side

Of course it’s easy in hindsight to kick myself and wonder how I missed it, but this seems to happen on a regular basis. Something about the passage of time can help you to see images in a fresh light. Maybe it’s feeling differently about the image itself, or that particular place, or simply that my post processing workflow has evolved and I can see new potential in images. Whatever the reason, I rarely feel the same about an image a month, six months, or a year later.

Here’s another example from Castlepoint, in New Zealand’s lower North Island:

Castlepoint lighthouse 1

And here’s the image I found and edited more than two years later:

Castlepoint lighthouse 2

Make it a project

It’s natural for any artist or creative to be looking forward to the next project. I think it’s healthy for any artist or creative. It’s a necessary part of growing and developing your craft. I also think, however, that it’s healthy to reflect on previous work and see how far you have come. Searching image archives is a great way of doing this. Despite not having shot film since I was a child, I liken this process to rummaging through boxes of exposed negatives and taking them into the darkroom to find the gold that has never been printed.

I challenge you, if you don’t already, to spend some time rummaging through your archives. Go way back! To some of your earliest photographs! Or even something you shot last year; it doesn’t matter how old they are, just that you are looking at it with a fresh perspective. Make it your next project. You might be surprised what you come up with!

Have you found any hidden gems in your archives? Share with us in the comments below.

The post Finding Gold in Your Image Archives by Rowan Sims appeared first on Digital Photography School.


Digital Photography School

 
Comments Off on Finding Gold in Your Image Archives

Posted in Photography


Finding the Time to do Photography Part 1- Business Trip to Las Vegas

23 Apr
The Fire Wave at Valley of Fire State Park. 4 minutes, f/16, ISO 160. EOS 5D Mark III with EF 16-35 f/2.8L II.

The Fire Wave at Valley of Fire State Park.Exposure: ISO 160, 4 minutes, at f/16. EOS 5D Mark III with EF 16-35 f/2.8L II.

About a month ago, a question was posed on the DPS Facebook Page, “What is the number one obstacle to you taking better photos?” While some answered that they were unsure how to set exposure in Manual mode, and others thought their gear might be limiting them, the overwhelming number one answer was TIME.  In this day and age of being always on, always connected, and always on the go, it can be difficult to find time to do photography.  Like many, my day job, which isn’t as a full time photographer, keeps me busy and eats up much of my time. On weekends, I can occasionally make time but often life and family get in the way.

Scenic Drive in Valley of Fire. 1/10, f/16, ISO 100. EOS 5D Mark III with EF 24-70 f/2.8L II.

Scenic Drive in Valley of Fire. 1/10, f/16, ISO 100. EOS 5D Mark III with EF 24-70 f/2.8L II.

So what to do when you need a fix?  There are several things you can do. What I do is to take advantage of my job when I can. I do occasionally travel for work, and when I do, I bring my camera with me.  While I may not have an entire day, often I can find an hour at the end of the day, or I can even go shoot at night.  This was true when I went to Las Vegas recently for a trade show.  I had two days of training seminars, two days of trade show setup and four full days of trade show to work. Was I tired at the end of the day? Yes, but photography is how I relax, so it seemed only natural to eschew the neon glow of the restaurants and casinos and go grab my camera.

First of all, the day I arrived, my flight got in earlier in the afternoon.  I rented a car and headed out to Valley of Fire State Park, about 45 minutes northeast of Las Vegas. I got a mixed afternoon of clouds, which parted for a nice sunset. I then hung around for darkness and got a few night shots just to finish things off.

The next day, the work began, but after my work day ended, I headed out to the strip to shoot some of the neon.  The Vegas strip is an awesome place to shoot no matter what you like to shoot. Cityscapes, architecture, or people, it’s all there and it’s there every night. You need only spend an hour and you’ll get more than your fill. The beauty of it all is, Las Vegas makes its own light, so you can shoot 24-7 there.

Valley of Fire Storm. 1/1000, f/8, ISO 1600. EOS 5D Mark III with EF 24-70 f/2.8L II. I managed to catch the Valley of Fire on one of the few days it rained all year.

Valley of Fire Storm. 1/1000, f/8, ISO 1600. EOS 5D Mark III with EF 24-70 f/2.8L II. I managed to catch the Valley of Fire on one of the few days it rained all year.

Elephant Rock, in Valley of Fire, at night. 15 seconds, f1.4, ISO 800. EF 24mm f/1.4L II.

Elephant Rock, in Valley of Fire, at night. 15 seconds, f1.4, ISO 800. EF 24mm f/1.4L II.

Get over your objections

I know what your objections will be:

  • I can’t carry everything I need.
  • I don’t have room in my luggage.
  • I’m tired after a day of work.

I’ve said all of those myself, and at times, this attitude won out. But if you have a passion for taking pictures, you’ll find a way.  I carry a small travel tripod- a Gitzo 1541T.  It fits right in my luggage.  I realize that one’s a bit pricey, but there are many other options. Try a Gorillapod. They are small, lightweight, and come in a variety of sizes to fit almost any camera. Perfect for traveling light.

Don’t want to carry a DSLR?  Get yourself a smaller setup you won’t mind carrying.  I own a Canon G16 for when I don’t want to bring my full kit. I can still shoot RAW, have full manual control, but it’ll fit on my belt.  And if you do want a DSLR? Consider minimizing your kit for travel. Pick one or two lenses that can cover most of the standard range. I always have a hard time minimizing, but when I do, I usually carry my EOS 5D Mark III with EF 16-35 f/2.8L II and EF 24-70 f/2.8L II. This is the kit used for the shot of Fire Wave, and of Scenic Drive.  I added the EF 24mm f/1.4 for night shooting. If you’re using a DSLR with an APS-C sensor, an 18-135 is an excellent choice for a do-it-all lens.

I’m not saying finding the time is easy.  Sometimes it will require sacrifice. But I have never regretted spending even a minute with my camera, even when I was tired, or pulled in many directions.  If photography is a passion for you, you make time.  I’m not saying every day.  But I do make it a point to make time to indulge my passion.  You should too. Even if it’s just a minute.  In part two, I’ll discuss ways to make time when you’re at home.

EOS 5D Mark III with EF 16-35mm f/2.8L II. 5 seconds, f/11, ISO 200.

EOS 5D Mark III with EF 16-35mm f/2.8L II. 5 seconds, f/11, ISO 200.

EOS 5D Mark III with EF 16-35mm f/2.8L II.  1/25, f/8, ISO 640.

EOS 5D Mark III with EF 16-35mm f/2.8L II. 1/25, f/8, ISO 640.

Fire Canyon. EOS 5D Mark III with EF 16-35mm f/2.8L II. 1/5, f/16, ISO 100.

Fire Canyon. EOS 5D Mark III with EF 16-35mm f/2.8L II. 1/5, f/16, ISO 100.

The post Finding the Time to do Photography Part 1- Business Trip to Las Vegas by Rick Berk appeared first on Digital Photography School.


Digital Photography School

 
Comments Off on Finding the Time to do Photography Part 1- Business Trip to Las Vegas

Posted in Photography


Finding and Working with Available Light

17 Apr

I don’t use a flash for my photography, it’s a personal preference. Available light, in its many forms, is both challenging and rewarding so I rarely find a need to turn to creative lighting.

MWT_Avail_Light_2

Natural light, golden hour

What is ‘available light’?

Let’s be clear on definitions first. As a street photographer my preferred source of light is sunlight, more specifically, natural light. Available and ambient light refer to any and all light sources the photographer did not introduce for their photograph; light bulbs, candles, fire, neon, to name a few.

The available light around us is a great opportunity for our photography and photographers should be passionate about making best use of this light when capturing a photo.

George Eastman said, “Light makes photography. Embrace light. Admire it. Love it. But above all, know light. Know it for all you are worth, and you will know the key to photography.”

On a basic level we all recognise the beautiful sprawling vista before us looks wonderful bathed in the rays of the setting sun, and less so beneath an overcast grey sky. I refer to this as the quality of the light.

What are the different qualities of light?

Starting with the obvious, the sun, the qualities of its light are wildly variable.

MWT_Avail_Light_5

Natural light, sunset

Direct sun

The sun is warmer and softer at each end of the day. Shadows are long and also soft. These two periods, at sunrise and sunset, are referred to as the Golden Hour and many landscape photographers won’t recognise any other part of the day. Quick tip: when the skies are a glorious combination of oranges and reds, set your white balance to Sunny. Set to auto white balance, the camera often attempts to compensate for, what it believes are, overly warm tones.

During the day when the sun is high, the light is bright and harsh and shadows will be short. The principal challenge here is how to properly expose where there is a massive range of exposure between areas of light and shadow.

MWT_Avail_Light_4

Harsh direct sun

Indirect sun

This covers areas of shade, reflected sunlight, side lighting through a window and that pallid grey diffuse light from cloud cover.

MWT_Avail_Light_3

Indirect sun from a side window

Artificial light

Ignoring light from the night sky, what remains to light our photography is artificial light. No less challenging to work with, artificial ambient lighting can vary in brightness from a candle to stadium lighting, and can be located on ground level to anywhere overhead. There could be multiple sources and, if all this wasn’t bad enough, some of those light sources could be moving!

What is the quality and direction of light?

MWT_Avail_Light_6

Direct sun, nearly overhead casting short harsh shadows

Direct overhead sunlight

Taking a portrait in direct overhead sunlight is tough going. The light is bright and harsh, the shadows equally so. I’m a street photographer, so there’s no option to move subject(s). In this scenario I have to weigh up the contrasts between bright and dark areas, especially with faces. The subject’s clothes will affect the exposure, dark materials losing texture to the shadows more quickly. Backgrounds should be considered too. For example, a small portion of bright sky in the frame can horribly distract when the rest of the photo is a fairly balanced exposure.

If you can move your subject, the effects of the direct sun can be mitigated when you consider placing the person next to a light coloured wall, or other reflective surface. Very much along the lines of a subtle fill using the reflected light. These light and shadow areas will all be softer and your subject won’t be squinting. Moving to a wholly shaded area will result in a flat lighting with little or no shadow. Yes, exposure will be easy but your image will take on a decidedly flat look.

Open shade

Open Shade, Combination Of Sun And Shade

Open shade, combination of sun and shade

These areas are great opportunities to introduce depth into your images with portions of direct sunlight as well as shadows cast from the shaded area, all within the frame. Trees are the obvious candidates for partially shaded areas, but also consider open doorways and alleys. The example above takes advantage of the shade cast by several umbrellas.

Side light or window light

Making use of light from the side, open windows or low sun late in the day, also generates images with a real sense of depth. The side lighting will reveal the smallest textures. The dynamic range of light to dark in these scenes is much reduced. Pay attention to the contrast play now on a more horizontal plane than you would see with overhead light sources.

Diffuse light

With little or no discernible direction, diffuse light from a shaded area or overcast sky introduces problems with colour temperature and a general lack of depth in images. I don’t let this bother my street photography, however this is a challenge for a scheduled shoot.

I have generally been referencing available light from the sun. Working in environments with artificial light you are faced with the same factors, though problems can be amplified. Unnatural light frequently complicates exposures with off colour temperatures and much lower levels of light.

On one occasion, I was commissioned to photograph an event where all the lighting was eye level and against the walls! There are only so many silhouette shots you can get away with and I spent a large part of the evening against a wall to be able to shoot with the light.

How much light do you have to work with?

MWT_Avail_Light_7

Indoor artificial low light

Whatever the quality and level of the light, reflective surfaces are useful to make the best of the ambient levels. For planned shoots, particularly with models, metallic reflectors are an excellent method of manipulating light onto a subject. Even nature photographers carry fold up reflector discs to reduce the silhouetting effects of shooting into the sun. No reflector, and no alternate light sources? I suggest white walls, shiny floors, glass surfaces.

Low available light situations are challenging for photographers and this is one area where the right gear will enable you to take a better photograph. Capturing a well exposed image requires as much light as the sensor can get. Static subjects will allow a longer exposure. Events, concerts, parties, weddings all rely on photographers obtaining shots quickly. This means fast glass and, where needed, increased sensor sensitivity or ISO. I recommend a lens capable of f/2 for very low lit scenes. If you are shooting hand held, you will probably still need to increase your ISO to prevent a blurred exposure.

It frustrates me terribly to see so many people constantly using their smart phone, however, the light from the screens always helps illuminate faces. It is precisely this kind of observation that will help you find light where you need it. 

Notes on exposure

Exposure is influenced by aperture, shutter speed and ISO and your camera’s metering programme will wiggle those three factors to attempt to capture an evenly exposed scene. In reality, you are the principal metering programme; your ability to see where the light falls, the points of reflection and those areas of dark shadow.

My camera is set to spot metering and I pick an area of the scene to meter against and therefore influence the exposure. In bright sunlight, I might meter on the subject’s light coloured jacket to reduce the effects of the bright sun. At an event, I am likely to meter near to the ground to elevate overall exposure. Less commonly, and for balanced light situations, I will meter against the subject’s face. You will become more practiced with reading light levels and metering to control your exposures.

Don’t be fooled into thinking Auto White Balance will save your scene. Also, shooting RAW affords you the maximum dynamic range your camera is capable of and, though White Balance is an attribute, you still need to consciously set it. Carry white balance cards and custom white balance!

One final suggestion. Shoot RAW and set your camera to Black & White. Reviewing your images in monochrome will allow you to view only the luminosity in the scene and see where the light play is. You can set your image back to its original colour at a later stage.

Where would your photography be without light?! There are so many situations to which only practise reveals the solution, so please discuss available light questions and issues in the comments and I will do my best to answer.

The post Finding and Working with Available Light by Michael Walker-Toye appeared first on Digital Photography School.


Digital Photography School

 
Comments Off on Finding and Working with Available Light

Posted in Photography


15 December, 2013 – Finding Photos In Your Garden, etc.

15 Dec

It has been a cold week in the US.  Here in Indianapolis it got down to 5 degree (F) a day ago.  For you Celsius people that is -15.  We have published a lot of Antarctica images and ice and it is all too much a reminder of winter.  So, today we switch gears and give you a glimpse of warmer times to come.  Frank Sauer shares his article on Garden Variety.  This is an essay on photographing in your own backyard.  However it is a lot more.  It reminds us that we can find a lot of things to photograph near our homes without having to travel great distances.  Take your camera off the shelf and get out and find something close by that you have seen many times and try to see it differently.  Take some images and if you are bold enough share them on the forum.  

There was great response to Adam Woodworth’s recent article on Landscape Astrophotography.  Adam has made a 30 minute video illustrating how he works the image to come up with the final image.  It’s a great Photoshop tutorial on blending and layers.  Check it out HERE.

My good friend and fellow workshop leader Josh Holko from Australia recently completed a beautiful video about the Arctic.  There is some excellent photography in the video and it is well done.  Enjoy Arctic Expedition

Speaking of Arctic Expeditions, stay tuned this week as LuLa launches 2 back to back Arctic trips this July.  These will be most unique so look for our announcement very soon.


You can win an all-expenses paid photographic expedition to Antarctica, along with air fare from anywhere in the world. The value of this prize is $ 15,000.

The Luminous Landscape wants you to try any of our more than 60 training or travel videos and our new free video player. Each purchase is an entry, and an annual subscription that includes all previous as well as new videos counts as six entries. The winner of a free lifetime subscription is also chosen from each month’s entries.

FIND OUT MORE


The Luminous Landscape – What’s New

 
Comments Off on 15 December, 2013 – Finding Photos In Your Garden, etc.

Posted in News