RSS
 

Posts Tagged ‘Field’

The great outdoors: Canon EOS 5DS and 5DSR Field Test

07 Nov

Mikey Schaefer is no stranger to the great outdoors. As a professional photographer who specializes in shooting in some of the most extreme environments on earth, he tests his body – and his gear – to the limits. In this field test we’re following Mikey on a sports lifestyle / editorial shoot with Canon’s EOS 5DS and 5DSR, near his home town in Oregon. Read more

Articles: Digital Photography Review (dpreview.com)

 
Comments Off on The great outdoors: Canon EOS 5DS and 5DSR Field Test

Posted in Uncategorized


Lytro unveils Immerge, a pro-grade light field VR rig

06 Nov

Lytro, a company known for its light field cameras and technologies, has introduced Immerge, a professional-grade cinematic virtual reality rig. According to Lytro, this is the first ‘end-to-end’ virtual reality hardware and software solution, with the entire system comprising four primary components: a light field camera array, storage and processing server, an editor, and a video player. Read more

Articles: Digital Photography Review (dpreview.com)

 
Comments Off on Lytro unveils Immerge, a pro-grade light field VR rig

Posted in Uncategorized


Tripod Review: Gorillapod Focus Field Test

25 Oct

I personally have one of these guys and find it extremely handy for travel and using in places where you either aren’t allowed to have a tripod, or don’t want to haul a big heavy one around. Check out what you can do with the Gorillapod Focus with X ball head kit in this video from Big Iris Productions.

They put it in some pretty challenging situations and gave it a mixed review. I would add that I find it to work great just to put your DSLR onto and walk around with. I did that while travelling in Spain – put the camera on Gorillapod, and the strap around my neck as usual  – but then just rested the legs of the tripod on my hip. It takes all the weight off your neck and I found it really comfortable to walk around that way, ready to shoot.

googletag.cmd.push(function() {
tablet_slots.push( googletag.defineSlot( “/1005424/_dPSv4_tab-all-article-bottom_(300×250)”, [300, 250], “pb-ad-78623” ).addService( googletag.pubads() ) ); } );

googletag.cmd.push(function() {
mobile_slots.push( googletag.defineSlot( “/1005424/_dPSv4_mob-all-article-bottom_(300×250)”, [300, 250], “pb-ad-78158” ).addService( googletag.pubads() ) ); } );

The post Tripod Review: Gorillapod Focus Field Test by Darlene Hildebrandt appeared first on Digital Photography School.


Digital Photography School

 
Comments Off on Tripod Review: Gorillapod Focus Field Test

Posted in Photography


Sony RX10ii Field Test

12 Oct

Chris and Jordan from The Camera Store put the Sony RX10ii through it’s paces from both the still and video side of things.

They look at whether it has made big improvements over the previous iteration of this camera, and who it is best suited for. Have a watch of this if you are considering getting this camera, it may help you decide if it’s for you or not:

The guys seem to think this is a great hybrid camera, sort of an all-in-one. If you just want one camera that does good video, good still images, just grab and go, the Sony RX10 MarkII might be a good choice for you.

googletag.cmd.push(function() {
tablet_slots.push( googletag.defineSlot( “/1005424/_dPSv4_tab-all-article-bottom_(300×250)”, [300, 250], “pb-ad-78623” ).addService( googletag.pubads() ) ); } );

googletag.cmd.push(function() {
mobile_slots.push( googletag.defineSlot( “/1005424/_dPSv4_mob-all-article-bottom_(300×250)”, [300, 250], “pb-ad-78158” ).addService( googletag.pubads() ) ); } );

The post Sony RX10ii Field Test by Darlene Hildebrandt appeared first on Digital Photography School.


Digital Photography School

 
Comments Off on Sony RX10ii Field Test

Posted in Photography


How to Understand Depth of Field to Avoid Blurry Photos

21 Sep

Last week we released our brand new course – Photo Nuts and Shots which is all about teaching the tools, techniques and thought processes for creative photography. It’s by on of our most popular ebook authors, Neil Creek and features over two hours of video teaching.

We asked Neil to create this course as he has a natural knack of explaining technical concepts in a way that makes the intricacies of photography easy to understand.

We’re so convinced that this course will help you that we want to share a couple of minutes from one of the modules about avoiding blurry images with you here today.

Neil Creek runs through an additional 35 minutes of golden focus advice in this lesson – available in full when you purchase the course online today.

Keep in mind that this is just one of ten creative photography lessons included in Photo Nuts and Shots.

So you’ll not only discover practical tips and tricks for producing tack sharp photos, but get step-by-step guidance on:

  • Using light effectively
  • Avoiding and embracing lens flare
  • Composition techniques
  • Choosing creative exposure settings
  • Thinking flexibly on location
  • And much more!

With Neil’s comprehensive demonstrations and easy-to-understand teaching style, it’s like having your very own professional photography mentor.

All packaged in over two hours of streamable and downloadable video content for the terrific introductory price of USD $ 39. That’s 33% off!

Don’t miss out – take the full course today.

We’ve extended the 33% saving to our first course, Photo Nuts and Bolts, too (although you can certainly take one without the other). So both are USD $ 39 each, but for a limited time only. And you can rest assured that all of our video courses come with a 60-day money-back guarantee.   

googletag.cmd.push(function() {
tablet_slots.push( googletag.defineSlot( “/1005424/_dPSv4_tab-all-article-bottom_(300×250)”, [300, 250], “pb-ad-78623” ).addService( googletag.pubads() ) ); } );

googletag.cmd.push(function() {
mobile_slots.push( googletag.defineSlot( “/1005424/_dPSv4_mob-all-article-bottom_(300×250)”, [300, 250], “pb-ad-78158” ).addService( googletag.pubads() ) ); } );

The post How to Understand Depth of Field to Avoid Blurry Photos by Darren Rowse appeared first on Digital Photography School.


Digital Photography School

 
Comments Off on How to Understand Depth of Field to Avoid Blurry Photos

Posted in Photography


Can a Sony RX10 II keep up with a Nikon D5500 on the soccer field?

17 Sep

The RX10 II is an extremely versatile camera and so far, it has impressed us with its ability to perform well in most scenarios. But what about sports photography? We decided to bring it to the soccer field and pit it against a DSLR to see if it could keep up. The results? Find out here


Articles: Digital Photography Review (dpreview.com)

 
Comments Off on Can a Sony RX10 II keep up with a Nikon D5500 on the soccer field?

Posted in Uncategorized


Maximizing Depth of Field Without Diffraction

14 Sep

So you are out shooting and you want to capture the full scene in front of you – all the way from what is directly in front of you to the background way off in the distance. You know you need a really large depth of field, and you know what you need to do to get it.

You reach for the camera’s aperture control and crank it down all the way to f/22 (or f/32 if your lens allows). That will maximize your depth of field and have your picture looking sharp from front to back.

Or will it?

What is Diffraction?

There is a phenomena in photography called diffraction that has an adverse effect on your pictures, and sets in when you use smaller apertures. What is diffraction? Let me explain.

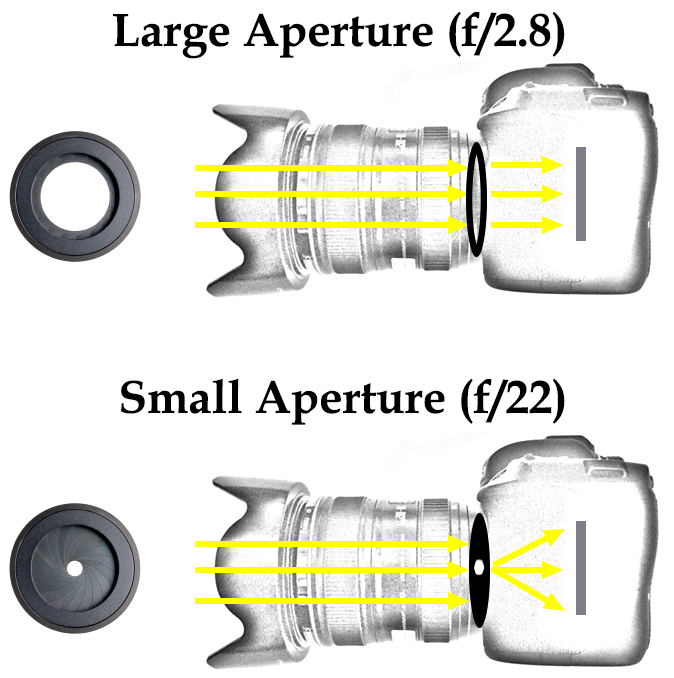
As you are probably aware, the aperture of a lens is the opening in the rear part of the lens that lets light into the camera. The body of the lens consists of optical elements that direct light toward the rear of the lens. When you use a large aperture, light freely moves through the optical elements and then through the aperture. When the aperture is very small, however, essentially the light has to bend to make its way through the aperture. That bending of light causes the waves to interfere with each other. The following graphic illustrates how this works:

Diagram showing how light enters the camera through the lens and results in diffraction at small aperture settings

What’s the result of this to your photography? In a word: softness.

A picture shot at f/22 will not be quite as sharp as one shot with an aperture that is a bit larger. Here is an example of detail from two photos, which are identical except that one was shot at f/8 and the other at f/22:

Example of photos taken with large and small apertures to show the effect of diffraction when using a small aperture on your lens

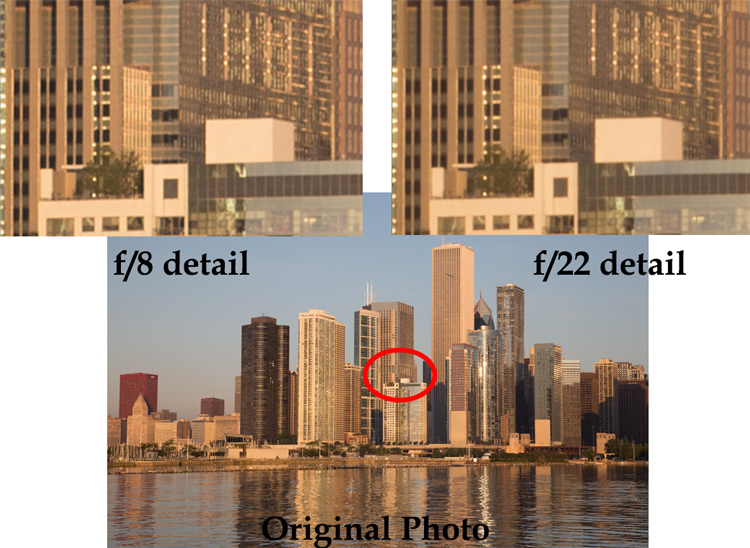
You can probably see that the f/8 detail is sharper than the f/22 detail.

The example above was shot outdoors with a 24-105 mm f/4 lens (my favorite). To see this application in other contexts, I also created another example, this time shooting indoors with a 70-200 mm f/2.8 lens with a minimum aperture of f/32.

Example of photos taken with large and small apertures to show the effect of diffraction when using a small aperture on your lens

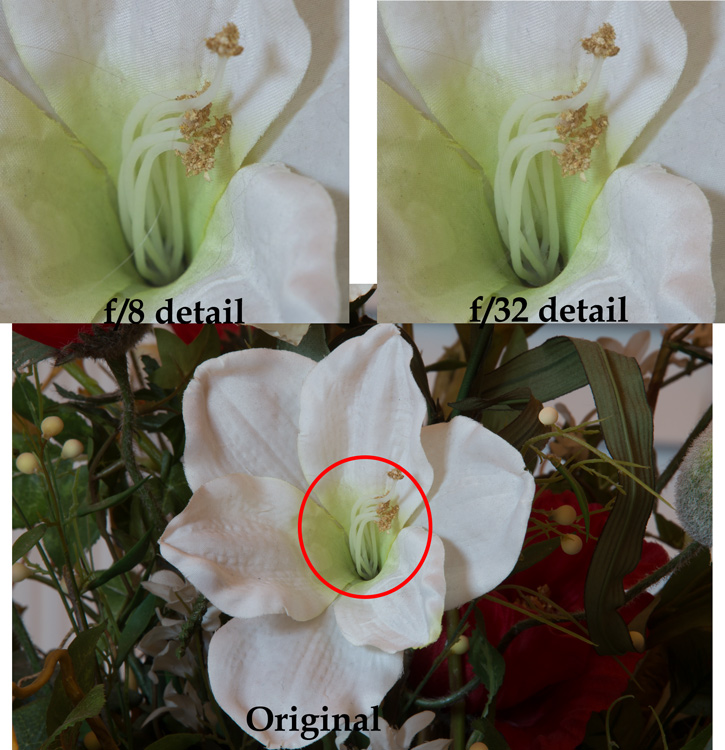
Again, the f/8 detail is sharper than that shot with the smallest aperture.

By looking at these examples, you can see that diffraction is not just theory, it has real affect on your photos.

Using the Sharpest Aperture

Okay, so now you see that diffraction is a real phenomenon, and you want to avoid it. What is the smallest aperture you should use? And what is the best aperture setting? Unfortunately, there is no one perfect answer. It depends on the lens. As a result, you should test your lens(es) to determine the aperture (or range of apertures) at which they work best (also known as the lens’ sweet spot).

To do so, just take the exact same picture at each aperture setting (in 1-stop increments). Be sure to use a tripod so your picture is exactly the same. In addition, make sure you are increasing (making longer) your shutter speed by an equal amount every time you change your aperture so that your exposure stays the same. After you have taken the pictures, load them onto your computer, zoom-in on each, and compare.

If you don’t want to test your lens and just want a quick rule of thumb for avoiding the effects of diffraction, generally avoid using an aperture smaller than f/11 or f/16. Most experts consider this range something of a maximum. In addition, the sharpest aperture on most lenses will be about f/5.6 – f/8, or about 1-2 stops smaller than its wide open aperture setting. When possible, default to using an aperture in this range.

Maximizing Depth of Field with Larger Apertures

You may find yourself wondering how to get a large depth of field without using a very small aperture. Keep in mind that you don’t always need to use the smallest aperture that your lens offers, to get a sufficient depth of field. If you are shooting outdoors, which is generally where you will want a small aperture and maximum depth of field, you should become acquainted with the subject of hyperfocal distance.

Despite its complex-sounding name, hyperfocal distance is just a measure of how close you can focus and still keep the background of your image acceptably sharp. You don’t necessarily need to use the smallest aperture possible, particularly when you are shooting wide-angle. For example, if you are using a full-frame camera with a 20mm lens, even using an aperture of f/8 will keep everything sharp from 5.5 feet in front of you, all the way to infinity!

This shows that you don’t always need to use an aperture like f/22. Get acquainted with hyperfocal distance (or keep a hyperfocal distance chart handy) to see how large you can make your aperture, yet still maximize depth of field.

Focus Stacking

Sometimes, however, you need to break out the heavy artillery and make sure everything – from what is right in front of you all the way to infinity – is in focus. To do that, use a technique called focus stacking.

To focus stack what you do is, take multiple pictures of the exact same thing at your lens’s sharpest aperture setting. Again, you should test your lenses to see what the sharpest setting is for each lens, but if you don’t know it will usually be in the range of f/5.6 – f/8.0. Set your lens to manual focus, and set the focus point on the closest part of the image (nearest part you want in sharp focus). Take the first shot, then repeat the process, gradually setting the focus point further and further away with each shot, until you are focused at infinity. Usually 3-5 shots will cover the entire range of the scene.

When you get your photos in your computer, you will combine the photos in Photoshop to create one file using the sharpest parts of each picture. There are a few different ways to do this:

  • Automatic: Use the Photomerge function to load your photos into Photoshop (File > Automate > Photomerge) and combine the images, making sure that the box to “blend images together” is checked. Photoshop will combine the images into one file and (usually) use the sharpest portions of each image.
  • Partial: You can also load the images as separate layers to one file in Photoshop, align your layers (Edit > Auto-Align Layers), and then have Photoshop automatically blend the layers (Edit > Auto-Blend).
  • Manually: Finally, you can do the process manually if you want complete control over it. Load the images as layers to the same file align the layers. To blend the photos, add a layer mask to the top layer (Layer > Layer Mask > Reveal All) and use a black brush to mask away everything except the sharpest point of that picture. Then merge down that layer (Layer > Merge Down) and repeat the process for each layer. This method will obviously take more time than the first two options above.

At the end of this process, you will have combined the layers such that the sharpest portion of each one is showing. The photo will be 100% sharp from front to back – with no effects of diffraction.

Application to Your Photography

You should be aware of diffraction, but don’t let it scare you away from using the aperture that you need. In particular, there is still a place for shooting with very small apertures. The effects of diffraction – while real – are not that great, and keep in mind that the examples set forth above showing the effects of diffraction were zoomed way in. If we look at the original pictures, can you tell which one was shot at the smaller aperture?

Full photos showing limited effect of diffraction

Can you see any diffraction here? In the top row, the picture to the left was shot at f/22 and the one to the right was shot at f/8. In the bottom row, the picture to the left was shot at f/8 and the one to the right was shot at f/32.

Can you see the diffraction in the images above? I can’t.

Worrying about diffraction should be reserved for those times you are dead set on absolute maximum image quality, or you know you are going to display a large version of the picture. Otherwise, you can still shoot with small apertures and you will likely not notice the difference. In other words, there is still a place for f/22 in this world.

However, on those occasions where it does matter, use a slightly larger aperture. Know your lens’ sweet spot and use that setting. Be familiar with the hyperfocal distance involved and see if you can keep the entire picture sharp at the larger aperture. Where you cannot, use focus stacking, this will ensure the sharpest pictures possible.

googletag.cmd.push(function() {
tablet_slots.push( googletag.defineSlot( “/1005424/_dPSv4_tab-all-article-bottom_(300×250)”, [300, 250], “pb-ad-78623” ).addService( googletag.pubads() ) ); } );

googletag.cmd.push(function() {
mobile_slots.push( googletag.defineSlot( “/1005424/_dPSv4_mob-all-article-bottom_(300×250)”, [300, 250], “pb-ad-78158” ).addService( googletag.pubads() ) ); } );

The post Maximizing Depth of Field Without Diffraction by Jim Hamel appeared first on Digital Photography School.


Digital Photography School

 
Comments Off on Maximizing Depth of Field Without Diffraction

Posted in Photography


Nikon D7200 Field Test: Desert dance photo shoot

10 Sep

Nikon’s flagship APS-C DSLR is a real workhorse. Offering a 24.2MP CMOS sensor, the D7200 provides a 51-point AF system sensitive to -3EV, an increased buffer depth with 6 fps continuous shooting and 1080 HD video at 60p. We tagged along with pro photographer Gabe Bienczycki on a desert photo shoot to push the D7200 to its limits. Read more

Articles: Digital Photography Review (dpreview.com)

 
Comments Off on Nikon D7200 Field Test: Desert dance photo shoot

Posted in Uncategorized


Tips for Depth of Field Control in Macro Photography

01 Sep

Depth of field is the amount of distance between the nearest and farthest objects that appear in acceptably sharp focus in a photograph, it varies depending on camera type, aperture and focusing distance. If you are into photography you probably already know this and how critical it is when you photograph in macro distances.

01

This image was done with a 100mm macro lens with a life-size converter attached, at a distance of 4 inches to the object to achieve this type of magnification. The Depth of Field you see here is impossible to achieve, as there is no way to have the whole ring in focus with this focal length and this distance to the object.

Here are a couple of test shots to show a comparison between an f/8 and an f/32 exposure of this image:

02

In this particular image f/8 would give you a very shallow Depth of Field, so if you would like to have more then f/32 would seem to be a better choice, right? But if you take a closer look, you will realize it is just not that easy.

03

The magnified image shows you that f/8 has shallow Depth of Field but, because it represents the sweet spot of this lens, it gives you great detail in the focused areas. On the other hand f/32 gives you more Depth of Field, but it lacks detail overall.

This lack of detail is due to diffraction, that is the slight bending of light as it passes around the edge of an object giving the photographed image a soft focus effect. So, sharp focus and deep Depth of Field are impossible to achieve in this image due to optical limitations.

A great work-around for these limitations is Focus Stacking (also known as Focal Plane Merging, Z-Stacking or Focus Blending), which combines images photographed with different focus distances into one final image with a greater Depth of Field.

This technique is only possible if the camera, and all the elements on the image are perfectly still, so the use of a steady tripod is really important.

Another important factor is to shoot, and focus without touching the camera. In this particular image the camera was tethered with a computer and a remote shooting app was used to focus the image.

04

The best way to capture these images is to start by focusing on the closest area first, then keep shooting, making sure you cover all the focusing length (move focus farther away from the camera with each successive shot). Just use the controls of your remote trigger and app to fine-tune the focus for each shot.

The final number of shots depends on how detailed you want your image to be, but keep in mind that the more images you have, the harder it will be to process later on. This particular image was made with a merge of 21 images.

05

After the images are captured it’s time to process them. There are a lot of software options on the market for focus stacking; this image was edited with Adobe Photoshop CC. Here are the steps:

  1. Open Photoshop, go on File > Scripts > Load files into a stack
  2. Select all the pictures and turn on “attempt to automatically align layers”
  3. Select all your files in the layer panel on the right side
  4. Go to edit > Auto-Blend Layers and select “stack Images”

You will end up with a stack of layers with associated masks that look something like this:

06

Each layer mask reveals the best of each focused part of the image, and they can also be manually adjusted for more controlled results. The final images are usually very impressive and allow you to achieve effects that would be impossible to reach any other way.

googletag.cmd.push(function() {
tablet_slots.push( googletag.defineSlot( “/1005424/_dPSv4_tab-all-article-bottom_(300×250)”, [300, 250], “pb-ad-78623” ).addService( googletag.pubads() ) ); } );

googletag.cmd.push(function() {
mobile_slots.push( googletag.defineSlot( “/1005424/_dPSv4_mob-all-article-bottom_(300×250)”, [300, 250], “pb-ad-78158” ).addService( googletag.pubads() ) ); } );

The post Tips for Depth of Field Control in Macro Photography by Ivo Guimaraes appeared first on Digital Photography School.


Digital Photography School

 
Comments Off on Tips for Depth of Field Control in Macro Photography

Posted in Photography


Olympus ‘Pro’ wideangle lens Field Test: Rock n’ Roll and Skateboards

11 Aug

In our latest Field Test we put Olympus’s new M.Zuiko Digital ED 8mm F1.8 Fisheye Pro and M.Zuiko Digital ED 7-14mm F2.8 Pro in the hands of DPReview writer Dan Bracaglia. Dan put them to the test in some of his natural environments: a rock concert, skate park, and a beach landscape at sunset. See video

Articles: Digital Photography Review (dpreview.com)

 
Comments Off on Olympus ‘Pro’ wideangle lens Field Test: Rock n’ Roll and Skateboards

Posted in Uncategorized