Recently long exposure photography has been quite popular, mainly in the landscape photography arena. One of the reasons (among the others) is that through a long exposure it is possible to visualize a scene with much more softness and harmony in respect to a standard exposure.
Thanks to the rapid evolution of digital cameras, we are now able to take really long exposures without getting so much digital noise, due to sensor overheating. Moreover, the improvements in neutral density filter quality allow us to take pictures with almost no color cast, and no decrease in sharpness.

Venezia by Luca Libralato: stacking of 3 x 260s exposures for a total of 780s (13 minutes)
If you love long exposure photography and you would like to push the exposure time to the edge, this technique of long exposure photo stacking is for you.
Here is the quick explanation of the Long Exposure Stacking technique: by taking several pictures (usually at least 30 seconds each for the purpose of this technique) you can blend them to get a result the equivalent of a long exposure photo with a total exposure time equal (or almost equal) to the sum of the single exposure frames.
This technique is mostly useful, and recommended for landscape photography, but some of the benefits may also be used in other types of photography, where you need maximum quality with several minutes of exposure. The step by step guide will be focused on landscape photography.
The advantages of using this approach are several:
- Increase the total exposure time.
- Reduce digital noise and hot pixels (shorter exposure pictures have less digital noise and hot pixels).
- Reduce vignetting (you will be using a lower ND power per shot with this technique, resulting in less vignetting).
- Minimize the risk of wasting time and photos (tripod shocks, sudden light change, etc.).
- Possibility to decide later on the strength of the long exposure effect.

Manarola by Luca Libralato: stacking of 3 x 260 second exposures for a total of 780 seconds (13 minutes)
The disadvantages are:
- You don’t have a single exposure and this is something which some competitions/contests rules don’t like.
- Some post-processing skills are required to blend the several exposures.
- If you are a purist – you may not like this technique.
When this technique should be used:
- If you want to push the exposure time to some really high values.
- If your camera sensor is adding a lot of digital noise due to overheating.
- If you are not sure about the final result of a very long exposure. Since this techniques is based on the sum of several short exposures, you can easily decide later how long the final exposure shall be (check also here for a similar approach: Long Exposure Photography Without a Tripod).
- With hostile ambient/weather conditions, you can use this technique to minimize the risk of wasting exposure time.
- If you want to maximize the probability to not miss the right moment in a fast changing light (the right moment can last few seconds, if you are exposing for several minutes, you can miss it for wrong exposure time for example).
Before going over the explanation of the technique, there are at least a couple of required skills you should have (apart from the basics for taking pictures with your camera):
- How to perform standard long exposure photography: you can check this awesome tutorial by Francesco Gola to improve your long exposure skills: Step-by-step Guide to Long Exposure Photography.
- Basic knowledge of Adobe Photoshop or similar photographic software which allows you to work on images using layers.
Let’s get on with the fun part: the implementation of Long Exposure Stacking!
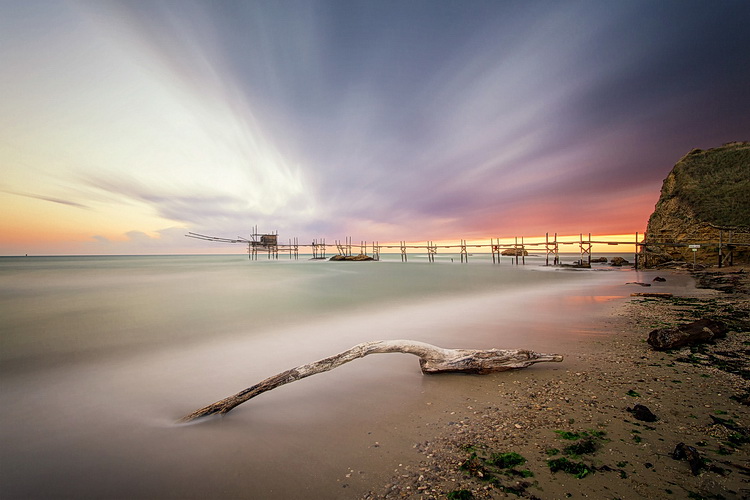
The Magic Of Punta Aderci by Luca Libralato: stacking of 2 x 260 second exposures for a total of 520 seconds (8:40 min)
Step 1: Gear
The photographic gear needed for this technique is luckily the same gear needed for taking long exposure photos. So if you are already familiar with long exposure photography, you are set. Otherwise here is a short list of all the tools:
- Digital Camera (which allows long exposure) + Lens (which allows you to mount neutral density filters)
- Tripod
- Remote trigger (optional, but suggested)
- Neutral density filters (optional if you shoot when it’s dark)
For further details about taking long exposure photography, you can check the related resources listed at the bottom of the article.
Step 2: Plan the shot
Never hit the shutter without having properly planned the photo. Of course there are a lot of variables involved, but planning can really play the most important part in a good photo. Do not underestimate the power of accurately planning a landscape photo – because luck can help you once, but planning your photography consistently, will increase the probability that you’ll be ready when the right conditions are present.

Rips Of Darkness by Luca Libralato: stacking of 5 x 120 second exposures for a total of 600 seconds (10 minutes)
Step 3: Take the shots
Once you have planned your photo and you are on location, you should then decide the two most important things in any photo (at least this kind of photo): composition and exposure (supposing you are taking landscape photography, depth of field should not be a variable in most cases). Composition is up to your taste, while exposure is a complex matter and depends upon different factors.
First thing every landscape photographer usually does before taking any picture, is metering the light to decide the exposure time. The final exposure time depends on several factors, such as strength of the wind, the movement of the clouds, water flow, and so on. The question at this point is, “How long shall I expose for?”.
If the light is changing suddenly, or there is a strong wind which can shake your camera/tripod during exposure, you may decide to avoid really long exposures (to avoid wasting shots or missing the right light). This is where this technique comes to your rescue.
Suppose you would like to have a total of eight minutes of exposure, instead of taking one single long exposure file you can split the total exposure time into four consecutive shots of two minutes each (for example). You can freely decide the final length of each exposure and the total number of shots, just keep in mind that you should keep the gap of time between the different photos to a minimum, if you are planning to do stacking. Needless to say that you should be careful in avoiding moving the tripod and the camera between each shot of the sequence. Once you have your consecutive shots, in the next step you will understand what to do in post-processing.
Before you start shooting: make sure you focused correctly and your tripod is stable (avoid sand or uneven floors where possible).
After the shot: make sure your histogram is fine and your picture is properly exposed, or exposed to the right.
Arco Della Pace by Luca Libralato: 6 x 130 second exposures, for a total of 780 seconds (13 minutes)
Step 4: Image Stacking
You should now be at home, or in your favourite cafe/pub with your laptop, and hopefully a coffee/beer. You should have downloaded all of your shots and selected the ones you would like to stack.
The stacking process will be shown for Adobe Photoshop (almost any version supports the feature) but you can use any software of your choice, which allows the use of layers. In Photoshop there are two different methods that can be used to stack files, with the goal to merge them into a simulated longer exposure:
- Load files into stack function (Files > Scripts > Load Files into Stack)
- Manual stacking
4.1 Load files into a stack
With the first method the procedure is semi automated, since you just need to go to Files > Scripts > Load Files into Stack

Photoshop: Load Files into Stack
All you have to do is then select the single long exposure, flag the boxes to Automatic Align Source Images and Create Smart Object.

Photoshop: Select files and create Smart Object
Once you have a new document with the Smart Object selected, all you have to do is go to menu Edit > Smart Objects > Stack Mode > Mean. This will weigh all images embedded into the Smart Object, rendering them as a new image which similar to what you would have obtained with a single long exposure of a total time equal to the sum of the single exposure.

Photoshop: Set Stack Mode to Mean
You can check the result on the image below.

Photoshop: Result after stacking
4.2 Manual stacking
By using the second method (which I trust can be used with every software which allows layers) the blending process is manual. The rule is that you have to fine tune the opacity of each layer by decreasing it after each shot.
The mathematic rule is as follows: each shot should have an opacity equal to 1 divided by its position in the stack. Here is a table which shows the rule:
- First photo (the one at the bottom) 100% (1/1)
- Second photo 50% (1/2)
- Third photo 33% (1/3)
- Fourth photo 25% (1/4)
- Fifth photo 20% (1/5)
- Sixth photo 17% (1/6)
- …
- Nth photo 1/N
This process will exactly replicate the first method (the result will be identical to an automatic Stack in Mean mode).
Step 4: Post processing workflow
At this point, all you have to do is follow your typical post-processing workflow:
- Clean dust spots, straighten the image, crop
- Adjust dynamic range with other exposures (3 or 5 bracketing shots for static underexposed parts)
- Adjust exposure and contrasts
- Adjust colors
- Add finishing touches to suit your taste
- Export
Here is the final result of the example

Arco Della Pace by Luca Libralato: stacking of 6 x 130 second exposures for a total of 780 seconds (13 minutes)
Conclusions
This technique is very useful sometimes because of its flexibility. Moreover you should consider the benefit in increasing the final quality of your file because of the stacking. It has been proven that by stacking images you can benefit by reduction in random digital noise equal to the square root of the total photos used. So for example if you use four photos, you will have in static part of the photo a reduction by half of the total random digital noise, which is a great achievement especially for underexposed portions. This technique is used a lot (even if with some different variations and implications) in astrophotography or in other fields when increasing the exposure time of a single shot is not suitable.
Don’t hesitate to ask questions in the comments box below if you need help or further explanations.
Related Resources:
- Step-by-step Guide to Long Exposure Photography by Francesco Gola
- Long Exposure Photography Without a Tripod by Viktor Elizarov
- How to do Long Exposure Photography and Light Trails at Night by Barry J Brady
- 11 Accessories for Long Exposure Photography by Scott Wyden Kivowitz
- 5 Tips for Better Long Exposure Landscape Photography by David Cleland
- 8 Tips for Long Exposure Photography by Elliot Hook
- 5 Tips for Getting Sharper Images When Doing Long Exposures by Kevin Choi
googletag.cmd.push(function() {
tablet_slots.push( googletag.defineSlot( “/1005424/_dPSv4_tab-all-article-bottom_(300×250)”, [300, 250], “pb-ad-78623” ).addService( googletag.pubads() ) ); } );
googletag.cmd.push(function() {
mobile_slots.push( googletag.defineSlot( “/1005424/_dPSv4_mob-all-article-bottom_(300×250)”, [300, 250], “pb-ad-78158” ).addService( googletag.pubads() ) ); } );
The post How to Improve Your Long Exposure with Photo Stacking by Luca Libralato appeared first on Digital Photography School.

Digital Photography School


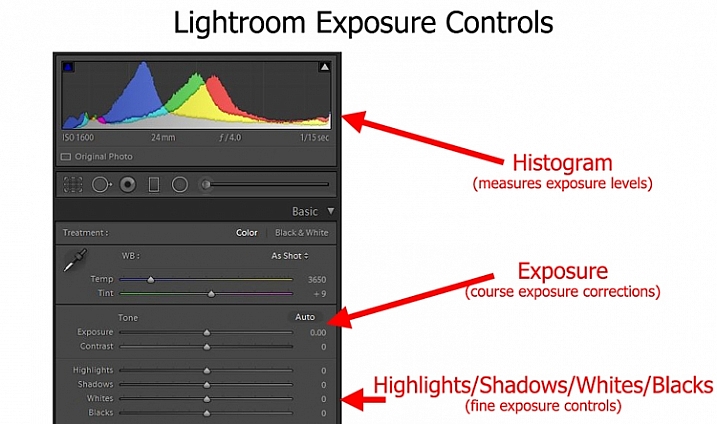
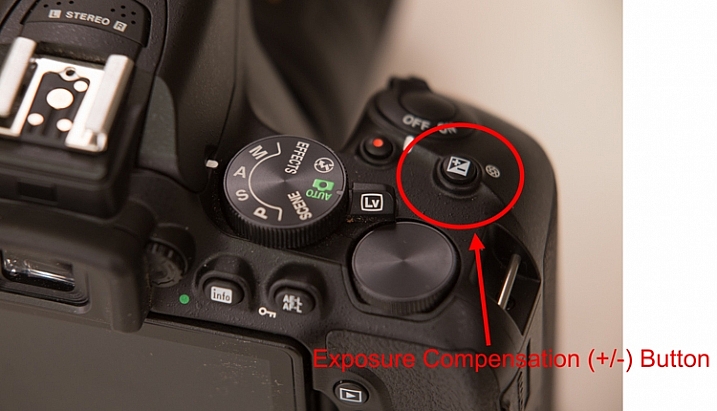
 You don’t have to shoot in Manual mode to take complete control over the exposure process.
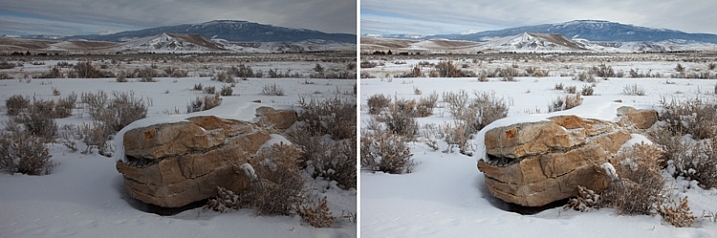


You must be logged in to post a comment.