Learning to use Photoshop can be overwhelming to some people. There are so many functions and so many tools that it can seem like you will never really understand how to use it. You search online for videos and tutorials, but even then, depending on your version of Photoshop you still may feel lost.
When photographers discover actions for Photoshop it’s sometimes like hitting the photography jackpot. They speed up your workflow. You can get more done. You can achieve different effects with them, but sometimes other photographers will tell you that it’s basically cheating in Photoshop.
Are you cheating yourself or your client when you use actions?
Most actions require a bit of tweaking when you use them to get the effect that you want. It’s very rare that once actions are played that they are perfect. This way a photographer can adjust them to get the look they desire for their images. When photographers use actions that require the tweaking of their images, they are learning more than just using the slider, they are learning how parts of Photoshop works. They are learning about blending modes, adjustments, curves, etc.
Photography is about finding your art and doing it your own way. Using an action does not compromise the vision of your art. You still make the decisions about how the end product looks. There are some people who will disagree and say that actions are cheating because you don’t have to learn to manually adjust everything by hand. You can get clean dishes by using a dishwasher or washing them by hand, is one way cheating? You still achieve clean dishes. Isn’t that the goal?
Some photographers use different actions combined with hand editing. They have learned Photoshop over time and figured out what works for their editing needs. You can even make your own actions by combining the actions you use the most and your own hand editing. It takes a little practice to get the technique down, but once you do you will speed up your own workflow go even faster. I have incorporated actions and hand editing and now when I do a photo shoot I typically know what type of look I am going to want for the final images. Whether I achieve those looks by hand editing or by actions or a combination doesn’t matter to my client. They just want beautiful images. You can even use actions multiple times or use different actions in a combination to achieve your desired look.
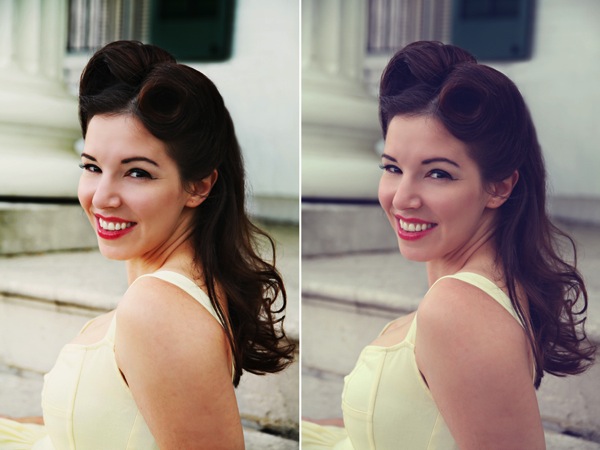
For this vintage type look I used Blue Ginger from Florabella Classic Workflow twice. The second time I only used it at 10%.
So, you decide that you want to look into actions, but then you Google them and are overwhelmed by the options that are out there. What’s next? How to choose? Well, this depends on the look you want for your images. Look at the images that are posted using the actions and see if they reflect your style and your images. There are some free actions out there, but most you have to purchase. Some are relatively inexpensive and there are some that are very expensive. For some people it’s very hard to commit to buying expensive actions without testing some first. There are some action developers that post some free sample actions for you to use so that you get an idea of how their actions work.
For this complete vintage look I used Pioneer Woman’s free set. I used Vintage and changed the edge burn to 74%, vintage blur to 84%, midtone bump to 85%, and turned grain off. Then I used the Old West action and just decreased the overall action to 37%
Whether your purchase your actions or use free actions the only thing you need to be sure of is that they are working with your overall images and that they are reflecting your style. As you learn Photoshop you may start creating your own actions that help your workflow and truly reflects your style and your artistic vision, or you may stick with what is working. Only you can decide what works best for your business, your images, and your clients.
A few recommended places to download free actions:
Colorvale Actions
Pioneer Woman
My Four Hens (Look for the freebie tab on their Facebook)
You can also purchased actions from:
Colorvale
My Four Hens
Wish Photography
Florabella
Post originally from: Digital Photography Tips.
Check out our more Photography Tips at Photography Tips for Beginners, Portrait Photography Tips and Wedding Photography Tips.
Actions: Efficient Editing or Cheating?
The post Actions: Efficient Editing or Cheating? by Guest Contributor appeared first on Digital Photography School.
Apps come and go, but every once in a while, a newcomer will jump on the scene and make you shake up your mobile photography routine. Over the past few weeks, a number of photo editing apps have emerged on every mobile platform and a few have the potential to change our mobile photography workflow. Click through for our list of five new must-have photo editing apps.
Adobe has released version 12 of its Photoshop Elements software for Mac and Windows. One of the highlights of the latest version of this consumer-friendly photo editor is ‘Mobile Access’, which uses Adobe’s Revel cloud service to let users view and retouch photos on their mobile devices, keeping everything in sync. Other new features include ‘Content-Aware Move’, guided editors, and 64-bit support for Macs. Best of all, there’s no monthly subscription fee. Read on to learn more about Elements 12, and if it may be a good substitute for its big brother.
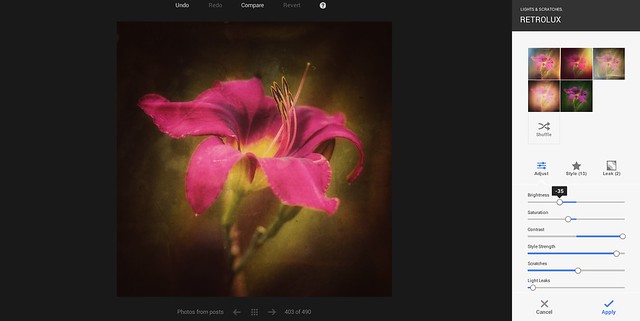
Today Google+ released a whole new enhanced online photo editing suite of tools. I’ve been playing around with them for the past few hours and am impressed with what you can do with them as an online editor. While they won’t replace my more traditional desktop tools (i.e. Lightroom, Photoshop, Nik, FX Photo Studio Pro, etc.), I think a lot of more casual users will love them.
The online editor does a lot of the basics of editing (contrast, brightness, shadows, cropping, sharpening, structure etc.), but it also comes with some pretty slick vintage and what they call retrolux editing. These new tools allow you to customize your photos in a lot of the more popular faux photo styles currently hip with the Instagram crowd. While G+ offers some quick filters, they also give you more granular control over how much of each sort of effect you want.
The new editor also includes spot editing tools, which allow you to adjust only parts of a photo that need it and some interesting spot focusing tools, including tilt shift editing.
I edited the photo at the top of this post using the new G+ tools. It’s great to see Google continue to invest and innovate in the online photo sharing space. Below are some screen shots of some of the tools in action.
You can find more information about the new tools here and in the embedded post at the bottom of this post.
As part of its effort to ‘make Flickr awesome again’, parent company Yahoo has released a hefty update to its Flickr app for iOS. Improved capture tools include the ability to lock separate focal and exposure points on the capture screen with a two finger tap. In addition, users can view the filters ‘live’. When you are ready to edit, you can customize the exposure using the new Levels adjustment, correct color balance, sharpen, brighten, crop, straighten, or even add vignetting to your image. Click through for more details at connect.dpreview.com.
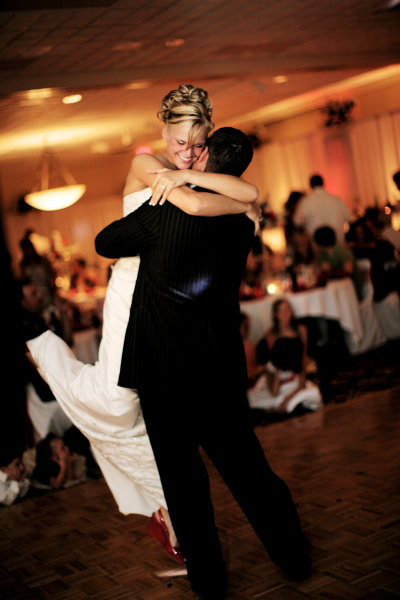
It’s done. You survived it. It was the longest day of your photography career, you’re exhausted, and all you can think about is how right I was (it’s cool—I get that a lot). But…….You. Did. It. And chances are you didn’t get locked in a bathroom, or miss the kiss, or have a complete equipment failure, or faint face-first into the cake. You shot a wedding. What’s next?
Back-up everything. Possibly several times
As no-brainer as this is, when I shoot portraits, I’m not a diligent about it as I should be. I’m more of a “cross my fingers/hope for the best/fly by the seat of my pants” kind of gal in most areas of my life. But a wedding is different. Good luck explaining to a new bride that your laptop played a vanishing act with the images and you need her to re-do the whole wedding for photographic purposes. It’s my greatest fear. My greatest fear used to be a complete equipment failure at a wedding, but then I had that happen a few weeks ago and somehow survived it, so I’ve graduated my fear list a bit. As soon as I get home from a wedding, no matter that I can barely see straight, I upload everything to my computer, and then back-up everything to an external drive or disc. Additionally I don’t erase my memory cards until I need them again and I have cloud storage. Because I’m neurotic like that. Weddings are often thousands of images and this takes both time and space. Having both of those things is yet another factor in the expense of wedding photography (see: never shoot a wedding for free). In most other areas of my life, I am totally okay with just hoping for the best and surrounding it with good thoughts. But this isn’t one of them.
Give a sneak peek
These images are going to take you a long time to go through, edit, and deliver. Unless you have some sort of crazy amazing one day editing process, which if you do, I’m going to need you to email that to me immediately. While everyone is anxious to see pictures, no one is more anxious than a still-glowing bride. Give them a little taste and buy yourself some time to ice your camera-strap-indented neck and regain clear vision. Social media is a fabulous option for this if it’s available to you. That way everyone can see them and fawn over how great the images are, giving you a little boost of confidence and the newly minted couple a little attention—both of which work in your favor for the long editing road ahead. (Oh friend, it’s a long road.)
Decide if you are interested in doing this again
Every wedding I have ever shot has led to at least one referral. In general, I don’t photograph weddings. Yet, there I am, every summer, finding myself wanting to pass out from heatstroke with a 10 pound black box in front of my face. Why? Because I’m a sucker. I suppose I could tell you that it’s because I love weddings and true love and all that, but the truth is: I’m a sucker. Throw a few compliments at me and I’ll do about anything that doesn’t involve roller coasters. I hate roller coasters. (I also hate those rides where you spin on something that’s spinning. I’d like to have a long talk with the guy who thought that was a good idea for your internal organs.) Even if you didn’t hand out a single business card……even if you don’t have a single business card…..they will find you. Unless you were a miserable human being to be around (I don’t judge—I’ve been there), you will get a call about another wedding. Decide right now if this is something you ever want to do again so you can handle that call that will come later. There is nothing wrong with saying no, thank you. It might not be your cup of tea. Or quad carmel latte (I’m becoming a really expensive coffee date lately). There is also nothing wrong with having loved it. The point is that you need to decide quickly because there is literally a barista of sorts waiting on your order and she has a whole line of impatient people behind you and a smoke break coming up.
Don’t overdo it
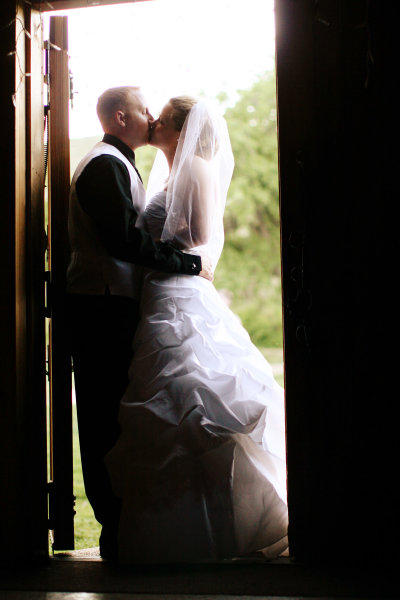
The last wedding I shot came in at just shy of two thousand images. There were 26 guests, and that’s including the dog ring bearer. I shot for less than 4 hours. I’m an over-shooter. I know this. In my defense: WHAT IF I MISS SOMETHING??? For this said wedding I have no less than 40 images of “the kiss”. Truth? They all look the same. Don’t get me wrong—it was an amazing kiss. Record books, in fact. But, those 40 images I shot in probably 30 seconds of time all look pretty much the same. Yet I want them to see every one!!! What if they love one that’s slightly different than another?? What if the clouds moved just a bit and it makes for the best of forty? I don’t know. What I do know is that to the average person, all 40 of those images look exactly the same. Pick one, edit it to loveliness, and move on. No one knows you have forty of them. And likely, no one cares.
Deliver the images with deserved fanfare
I personally don’t do any printing; if you book a session or a wedding with me, your flat fee includes my time, the finished (edited) high resolution images on a disc, and a full printing and usage release. This is how I have been doing it for years and I find that not having to mess with an 8×10 print of this one or a 5×7 of that one or marking-up my printing costs to cover everything is a much easier way of doing things. And easy works best for me because I am a terrible insomniac (see numerous references to coffee above) and when I get overwhelmed with work (which is often), I go lock myself in my closet and cry a little. However, just handing over a disc feels like a near let-down when I’ve been editing for weeks and, as previously mentioned, spent an extremely long and tiring day just shooting the images. I like a little fanfair, and because wedding photography is such an investment, I think my clients should get a little ribbon and bow. Or maybe a horn section. Depends on what I have access to at the time. I like to put together a “highlight” slideshow of 50 or so of the images that the couple can send to their friends and family to watch online. Additionally, I usually put together a little gift of sorts to give along with the disc—maybe a large print that I put in a readymade frame or for a smaller wedding, I might print off 4×6 prints of each image and put these in a pretty box so theycan make awedding album easily. It honestly just depends on the couple and what I charged. My goal here is only to hand them over something more lovely than a cold silver flat circle.
Wedding photography was never my goal, nor do I consider myself a wedding photographer. I have never advertised or marketed for it, though I have shot about 70 of them in the last decade. It’s tough—I’m not set-up to be a wedding photographer, both from an equipment and time perspective, yet I find myself doing several a year even still. All joking aside, I don’t EVER take on a wedding just for the money or just out of wanting to do something wonderful for a loved one. Every wedding I have ever shot I only ended up there because I truly felt that I was the best person for the job. Many times I was right (this isn’t a time to be humble), but a couple times I was wrong and it makes for a painfully long event day and editing process.
The reason wedding photography is met with such passion by veterans and hobbyist alike is because it’s a big deal; there are no re-dos, no second chances. It’s a type of photography that is all it’s own. So only shoot the weddings where you feel confident that you and the couple feel similar about the end vision. Only shoot the weddings where you genuinely like the couple; if you wouldn’t want to have a beer with them, you’re not going to want to spend a 10 hour day with them. Only shoot the weddings that will give you more than a paycheck, whether that be experience, a day of fun, or that good feeling of doing something wonderful for someone else and knowing you did a good job. It doesn’t matter if you believe in true love or soul mates, it doesn’t matter if you feel like weddings are too over-the-top and unnecessary, it doesn’t matter if one of the biggest highlights was the free piece of cake (I’m a big fan of cake), what matters is that you went in there knowing that you were the person for the job, that you stayed there feeling like you were doing a great job, and you left there happy to have done it.
Tired and glad for it to be over, but happy to have done it.
Post originally from: Digital Photography Tips.
Check out our more Photography Tips at Photography Tips for Beginners, Portrait Photography Tips and Wedding Photography Tips.
So You’re Going to Shoot A Wedding: Part 3 of 3 [editing, etc.]
When it comes to movies, editing is kind of a big deal.
Without it, we wouldn’t have twist endings. (Looking at you, M. Night.) We wouldn’t have out-of-order movies to entertain our brains (Marty McFly 4ever). We wouldn’t even have beginnings, middles, and ends!
Frankly, movies would be pretty weird and probably not very good at all without editing.
Thanks to Instagram’s 4.1 update, you can now upload videos to Instagram, meaning a whole new world of video editing has opened up!
Sound, filters, transitions, sequencing — there is so much you can do to an Instagram video before uploading it. And awesomely, you can do it all on your phone.
Consider this guide an editing workshop that’ll turn your Instagram videos into cinematic artworks served 15 seconds at a time.
10 Tips for Editing Instagram Videos
You Can Now *Upload* Vids to Instagram
Instagram must’ve read our minds with the 4.1 update because we were like Man, wish we could upload #tbt vids!
Now, you totally can. You can upload any video that’s in your phone’s library, and with a quick file transfer, you can even upload videos that are sitting on your computer (we’ll show you how in the guide below!).
Being able to upload video opens up a whole new world! It means that you can get way more precise about how you shoot and edit your videos because you can use outside apps, add sound and video effects, splice together clips, and speed up or slow down your footage.
Read on to learn how to which tools and apps are the handiest, how to optimize shooting and editing within Instagram itself, and how to make a workflow for churning out really great videos!
Pre-req reading: Check out our essential guide to Instagram video if you haven’t yet. It answers all the questions you might have about Instagram video and also give you ideas to start.
How to Get Videos onto Your Phone
Shoot it on your phone.
Shooting videos on your phone is obviously the fastest way to get videos onto your phone.. But did you know there are lots of options besides shooting within the Instagram app?
Yeah! It’s actually quite refreshing to shoot video outside the Instagram app.
You’ll pick how you shoot your video based on what you want your end-result to be like. Here are a couple options and why you’d use them:
Your phone’s native camera app.
Use this to shoot multiple clips that you can then arrange in the order you’d like in Instagram. This gives you more freedom with time and set-up because you don’t have to shoot in order like you do in the Instagram app. (Also, you don’t have to fear accidentally losing your work-in-progress while working in the app!)
A filter app.
Use this to get a different look besides the filters that Instagram offers. We dig Vintagio (Android & iOS) and 8mm (iOS). Or you can even layer filters to come up with your own feel.
An advanced video editing app.
Apps like iMovie (iOS) equip you with extra tools that give you more precise editing tools and control over sound and transitions. If you find yourself using one of these often, then you might end up shooting through these apps to make it seamless.
PRO-TIP: When you upload a rectangular video (which is what most other apps shoot in), your video will be cropped in Instagram. Instagram crops to center your video, so while you’re shooting, just envision that either side of your video will be lopped off.
Transfer files from your computer to your phone easily.
Maybe you have phone videos that you long ago saved to your computer. Maybe you have vids you shot on your DSLR. Maybe you have childhood vids transferred from old VHSs.
Whatever it is, your video’s trapped on your computer, and you need to get it to your phone so you can share its amazingness with all of your Instagram followers STAT.
The file might be too big to email to yourself and bothering with cables can be cumbersome and take time.
Here’s how to do it the e-z way:
Use an iFlash Drive to transfer files. This is a spacious drive (up to 16GB) that lets you quickly transfer files between your phone and your laptop. One end connects to your phone, the other a USB.
Use an EyeFi SD card to wirelessly send vids straight from your DSLR and onto your phone. (IT DOES THAT.) You can see how it works in the vid above!
Use an app like Dropbox (Android & iOS) or Cloud to store in internet-space and download it on whatever device you want, whenever you need it. If you have a iThingies, you can also use iCloud to sync your files across computers and devices.
Make Your Video Legit with Transitions
Instead of having your video abruptly switch from scene to scene all choppy-like, you can use transitions to give your video a more cinematic, elegant flow.
Use objects as a clever transition.
One really clever way to transition scenes is to use objects as a divider between two completely different shots. Check out the vid to the right to see how cool this effect is!
How to do it? Pan your camera horizontally across your first scene and place your transitional object at the end of it. (We used bags as our objects in the sample video above. Yours can be anything — a tree, a person, a telephone pole.) When your video pans half-way through that object, cut the scene.
Now, go to a new location for your next scene, and place the same object at the start of the new panning scene. Start shooting at the halfway mark of the object where you stopped your previous scene and end the scene halfway through the next object. Repeat for however many scenes you want to sequence together. The end result will look like one seamless pan that completely changes location between objects. That’s movie magic, baby.
PRO-TIP: Measure how far your object is away from your camera, so that you can make it consistent from one scene to the next.
BONUS IDEA: Place a piece of paper over your phone lens to give yourself a black screen between scenes. You can also pull it away and allow your camera to adjust exposure and come into focus as you’re filming — this ends up looking like a dreamy fade-in. Check out our example.
Use apps to add transitions between scenes.
Apps are great because they give us access to tools that previously only pros had. Case in point, iMovie (iOS) and WeVideo (Android & iOS) give you options for placing transitions between video scenes.
You can do a simple fade in/fade out, text (think silent movies!), and all the transition types that you never really thought about but have probably seen on TV or in movies.
Pull focus a.k.a. Changing depth of field
Pulling focus is this fancy thing cinematographers do to get movie-watchers to pay attention to a particular part of the screen or to spice up a moment with visual drama.
You’ve seen this in movies when an out-of-focus shot suddenly comes into sharp focus or when something that’s in the foreground falls out of focus and the background comes into focus instead.
Pulling focus can also mean simply keeping your subject in focus as they move within your shot.
The cool thing about all of this? You can do it on your phone! Here are two ways:
Tapping to focus.
While your phone doesn’t have much of depth of field to work with, you will still notice certain parts of your shot going in and out of focus as you move your phone. This is especially true if one subject in your shot is a lot closer to your lens than everything else in the shot.
As you move or as your subject moves, pay attention to how your focus changes, and tap your screen to keep what you want in focus nice and sharp. You might *want* something to fall out of focus, so tap a different part of your screen to get them to fall out of focus.
Using a telephoto phone lens for dramatic depth of field.
Watch the video above to see just how dramatic of a focus shift you can get with a telephoto phone lens! Because it’s telephoto, you get a nice range of depth of field. It also has a focusing ring that lets you control exactly where focus falls in your shot.
Another way to do it is by using an iPhone SLR lens mount to shoot phone photos and vids with SLR lenses. You read right — you can shoot videos using your SLR lenses mounted onto your phone.
Chopping & Sequencing Clips
The editing choices you make can really make your video stand out from the rest. Remember Memento? Yeah, those guys were nominated for best film editing at the Oscars for the super clever way they edited the story out of order. Now bookmark that in your brain, and get your tapping finger ready.
Plan your video.
When it comes to editing, the best thing you can do is to plan out what you’re going to shoot before you even start. This can be as quick as taking out 30 seconds to come up with a vision for your video in your mind.
Questions to ask yourself: What are you trying to get across in your video? What will the beginning, middle, and end be? How long should each clip be, so that you can fit your entire story into your time limit? Maybe your idea’s worth spanning over more than one Instagram post — how many?
Chopping.
Maybe your clip is too long or you want to sequence a bunch of clips together, but they don’t quite start or end the way you want them to. Go to town like a lumberjack on a tree trunk: chop. it. down.
How? Instagram lets you trim down video clips. After you load a video, hit Next. Then use the slider to shorten the video to the length you want. Move the video timeline underneath the slider to indicate exactly which part of the video you want to crop down to.
Most phones’ native camera apps also already have simple editing tools that let you shorten your video clips down just how you like them. In iOS, view a video in your library, and move the slider on each end of your video clip’s timeline to where you’d like it. Then hit the “Trim” button that appears in the top right corner.
Sequencing.
Sequencing is all about the order of your clips and how you transition between them. If your video is spur of the moment, you can edit as you shoot within Instagram by viewing your video and the going back to the previous screen to delete and add scenes.
However, if you’re shooting something more complex, there’s a disadvantage to editing together clips as you go within Instagram. You can’t rearrange the order of videos you’ve already placed into your Instagram video. So if you wanted to be able to do that and get more precise with how your clips transition and the order that they play, then you’ll want to use a video editing app like iMovie or WeVideo. If you work better on the big screen, you might even edit it on your computer and then transfer the file back to your phone.
Fast & Slow Motion
Slow motion is the raddest. Everyone and their mom knows it. While there has yet to emerge one great app that gives you the kind of slow-motion effects you see coming out of a Phantom Flex camera, there’s no harm in pushing the limits of slow-motion tools that currently exist in apps.
We were able to speed up the video above using Vintagio. Because the speed up and slow down tool only lets you change the speed a little bit, we ran the video through the app twice to speed it up doubly. You can do the same thing for slowing down your video.
Keep in mind, it won’t look as smooth as other slow motion videos because your phone just doesn’t shoot video at a high enough frame per second. Again, there’s no harm in playing with what you have, so experiment!
We haven’t found a great Android app for slowing down or speeding up video, but if you know of one, let us know.
Oh yeah, and if you’re into editing video on your desktop, Twixtor is a tool that manipulates video to make it look like it was shot at a higher frame per second than it actually was. In short, it gives you a slow motion effect without having to use an expensive slow motion camera.
Adding Music, Sound Effects, and Muting
One amazing advantage to being able to upload videos to Instagram is that you can edit sound on your videos before you post them!
Depending on what app you’re using for video editing, you can control the sound in your videos in all kinds of ways.
Here are some ideas:
Mute or lower the sound in your video
Record narration or sound effects to lay over your video
Import music from your phone’s library
If you’re wondering which apps do what, here’s a quick rundown. iMovie and Vintagio give you the ability to control volume on your video. The iMovie app in particular lets you lay over a narration or any recording that you make, as well as import music and sound effects.
Meanwhile, WeVideo doesn’t let you edit sound within the phone app, but the app syncs your video to the desktop app, which gives you sound editing options. Vintagio comes with pre-selected music that you can play over your video, too.
Filters, in Apps and By Hand
Instagram video comes with a set of squeaky new filters, but what if you’re looking for something different?
Outside apps.
8mm and Vintagio do a good job of covering specific film looks based on time period. For example, if you want a black and white ‘20s silent film look vs. a warm 70s vibe.
If those aren’t enough iMovie and WeVideo have filters, too. And if you’re into experimentation, overlap filters across apps to make your own awesome filter! You can even name it after your favorite celebrity cat.
Filters by hand.
DIY the dang thing. We’re talking hold up anything that looks like it could potentially Shooting a horror vid? Hold up some red glass over your lens.
Want to make it lo-fi? Grab some plastic to give your video dreamy vignetting.
Want to give your video a warm tint Coen brothers style? Use your sunglasses to wash your video in color. If you’re into these ideas, check out our roundup of 10 DIY Filters on the Cheap.
Dreamy lens flares.
We’ve played around with how to create intentional lens flares. Here are two fun and easy ways to do it:
1) Lens whacking is a videography technique that’s similar to free-lensing. You remove the lens from your DSLR and slightly move it away from the camera body. The purpose here is to let light hit the camera sensor to create moving light leaks, which we can attest are very pretty and –heck we’ll say it– dreamy. If you shoot on a DSLR, here’s a guide with samples.
Since phone’s don’t quite work this same way, you can still create the illusion of light leaks by having your subject backlit and letting your phone’s auto-exposure shift with the movement of your camera or your subject. This can create rays of light in your video that can look quite lovely.
2) Sprinkling water either directly on your lens or onto a clear sheet in front of your lens. Try something like a pane of glass, mylar or anything clear. Here’s our full guide on playing with water for lens effects.
360-Degree Time-lapses
Time-lapses are cool, but have you ever seen a panning time-lapse? It’s dually impressive! It’s one of those effects that stops you in your tracks because you wonder, How’d they do that?
If you’re not sure what a panning time-lapse is, it’s when your camera pans across a landscape and simultaneously shoots a time-lapse.
Two popular ways to make a panning time-lapse is by using a slider that moves your camera horizontally or by using a rotating mount that turns your camera 360-degrees.
We were able to make the 360-degree time-lapse above with a simple rotating mount called the Camalapse. You can use this mount with any camera that has a tripod thread, but we mounted our phone by pairing it with the Glif (a tripod mount for iPhones).
Just grab a time-lapse app, like Lapse-It (Android & iOS), set up how long you want to shoot your time-lapse for, twist the Camalapse (twists similar to a kitchen timer), and let ‘er go. In the end, you’ll get a rad video that all your buddies will be asking you about.
PRO-TIP: Because time-lapses are usually slow-paced, we sped ours up by running it through Vintagio’s speed-up tool two times.
STOP-MOTION & Editing Photos into Video
If you’re using the internet right now, there’s a good chance you’ve seen a stop-motion or two. Stop-motions, when well done, have the power to blow people’s minds, and that’s a good thing!
Stop-Motion Tips.
We have so many tips in our Ultimate Guide to Stop-Motion, but here are the essentials. Of utmost importance, keep your camera still. Put it on a tripod or set it somewhere where it absolutely won’t move.
Aim for consistent lighting. If this is going to take a while, shoot in a place where your light isn’t moving (i.e. the sun traveling across the sky), unless o’ course that’s what you want.
If you’re shooting and editing within Instagram, tap lightly and quickly to record, so you don’t accidentally make each clip too long. For smooth movement, each clip should be as brief as you can shoot it.
To get more precise, you can shoot individual photos for each frame in your phone’s native camera app, and then import the photos to create a video in iMovie or WeVideo. This’ll let you throw out any mess-up shots or figure out if you need to reshoot a particular part of the stop-motion.
PRO-TIP: A camera phone remote can make shooting tiny clips easier and also prevent you from accidentally moving your phone while tapping.
The Quickie Slideshow — Your Life in Instagram Flashed Before Your Eyes.
You might’ve heard about Pummelvision. It was a web app that took all of your Facebook or Flickr photos and turned them into a lightning-fast slideshow. It was like watching your life flash before your eyes! We cried, not kidding.
Everlapse is a similar idea, but it takes your most popular Instagram photos and turns them into a short reel that you can share on Instagram. We’re getting verklempt just thinking about all the memories.
Instagrammers with Vid Skillzzz
Hopefully at this point, you’ve abandoned this article and are outside shooting and maybe will not read these words until hours from now (which we’re fine with because OMG you should be out shooting!).
And if not, your brain’s about to be so full of ideas they’ll start to leak out your ears/eyeballs/face. Why will that happen? Because gathered up a list of amazing Instagram videographers for your personal inspiration.
@megancignoli — A photographer/director with a jelly-worthy talent for stop-motion. Girl’s got creativity *and* patience.
@nazfilms — A cinematographer who makes incredible experimental Instagram videos completely shot and edited on his iPhone. Watch with sound. Also, watch for his just started #flickstagramseries.
@bythebrush — A painter who needs to get into movie-making stat. Especially good for inspiration on transitions between scenes, as well as music use.
@pinot — An illustrator & animator whose animations makes us question reality.
@teresa_franco — A nurse who can wield a macro phone lens like a pro. Check out her amazing insect videos.
@mariamsitchinava — An editorial photographer who turns her stills into gorgeous filmic vignettes.
@cole_rise — While this photographer/pilot doesn’t have a lot of videos up right now, he’s one to watch.
@rokuthecat — Just because.
Related posts:
Pro-Tips for Shooting Better Instagram Videos Extra vids for bloggers: 1, 2, 3 “Well that’s weird,”…
FlipClips — Print Your Short Videos into Magical Flipbooks If you bought your digital camera in the past few…
10 Tips to Make Your Phone Photos Amazing; Plus, Our New Phoneography Blog! Phoneography is the best. No matter where you go, you’ve…
I have become a huge fan of Kickstarter and every so often you find a real gem of a project. Sometime ago I stumbled on to the CTRL+Console app (download link) and loved the idea. If you’re unfamiliar with the project check out CTRL+Console Kickstarter page, but note it is no longer active. In short the app acts as a GUI to a variety of shortcuts in Adobe Premiere Pro, Final Cut Pro, Quicktime and soon for Lightroom.
CTRL+Console – Adobe Premiere Pro Editor
While a lot of Kickstarter projects feel or look like a do it yourself project this one is quite polished. The app was released yesterday on the Apple iTunes store and is now public. It is free to download with the Quicktime console being accessible out of the gate, but you’ll need to purchase/unlock additional editors with in the app. For the app to communicate with the programs on your computer you do need to download a program, but it’s of minimal effort to set up. Overall I think its a great concept and has been extremely well executed. To ground expectations though it did just come out and there are a couple of bugs for Windows users I hear, but they’re being tackled quickly.
One of the nicer touches that was included in the app for those that took part in funding the project was this very nice Thank You page in the app. Much to my surprise I actually found my name listed pretty quickly. A nice touch by Jeff Chow who made the app!
CTRL+Console – Thank You Page, That’s Me
Copyright Jim M. Goldstein, All Rights Reserved
CTRL+Console: One Cool Video & Photo Editing App
The post CTRL+Console: One Cool Video & Photo Editing App appeared first on JMG-Galleries – Landscape, Nature & Travel Photography.
Comments
By: Open Your Creative Eye » CTRL+Console: One Cool Video & Photo Editing App » Page: 1 | Open Your Creative Eye by Open Your Creative Eye » CTRL+Console: One Cool Video & Photo Editing App » Page: 1 | Open Your Creative Eye
Related Stories
CTRL+Console: One Cool Video & Photo Editing App – Enclosure
I have become a huge fan of Kickstarter and every so often you find a real gem of a project. Sometime ago I stumbled on to the CTRL+Console app (download link) and loved the idea. If you’re unfamiliar with the project check out CTRL+Console Kickstarter page, but not it is no longer active. In short the app acts as a GUI to a variety of shortcuts in Adobe Premiere Pro, Final Cut Pro, Quicktime and soon for Lightroom.
CTRL+Console – Adobe Premiere Pro Editor
While a lot of Kickstarter projects feel or look like a do it yourself project this one is quite polished. The app was released yesterday on the Apple iTunes store and is now public. It is free to download with the Quicktime console being accessible out of the gate, but you’ll need to purchase/unlock additional editors with in the app. For the app to communicate with the programs on your computer you do need to download a program, but it’s of minimal effort to set up. Overall I think its a great concept and has been extremely well executed. To ground expectations though it did just come out and there are a couple of bugs for Windows users I hear, but they’re being tackled quickly.
One of the nicer touches that was included in the app for those that took part in funding the project was this very nice Thank You page in the app. Much to my surprise I actually found my name listed pretty quickly. A nice touch by Jeff Chow who made the app!
CTRL+Console – Thank You Page, That’s Me
Copyright Jim M. Goldstein, All Rights Reserved
CTRL+Console: One Cool Video & Photo Editing App
The post CTRL+Console: One Cool Video & Photo Editing App appeared first on JMG-Galleries – Landscape, Nature & Travel Photography.
Aviary has announced a significant update to its Android photo editing app. Version 3.0 of Photo Editor by Aviary introduces a sleeker interface, modifications to some existing editing tools and availability of new filters previously only on the iOS version of the app. Click through for more details.


You must be logged in to post a comment.