RSS
 

Posts Tagged ‘Editing’

5 Tips to Cut Your Portrait Editing Time in Half

12 Jan

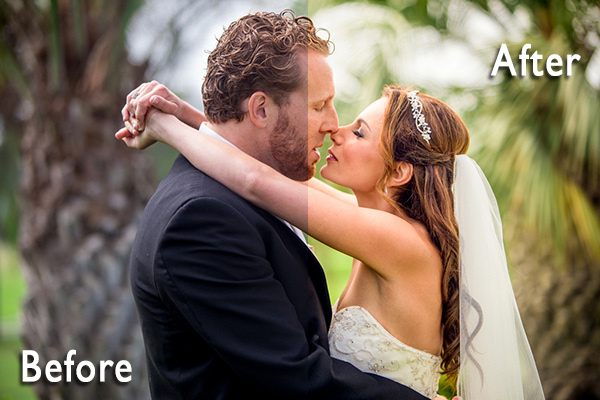
Editing is the bottleneck part of the workflow for many portrait photographers. We can shoot a great picture in mere seconds, but when it comes to editing dozens of images, it often feels like it takes forever. The biggest editing time saver is of course to get it right when shooting. There are countless things that can’t be “fixed” in Photoshop, but editing images isn’t meant to be the main part of a photographer’s job anyway.

lynseymattingly3

I am always hesitant to talk about editing because I think it gets taken way too far, way too often and in those cases we aren’t talking about photo editing, but rather imagery manipulation (which is an art in and of itself, but an art completely different than portrait photography). All of that said, oh how I wish someone had taught me some tricks, and gave me some tips when I first started. You can learn to pose people, find good light and the ins and outs of your camera in time, but learning to edit is a frustrating and lengthy process that used to make me want to go pick-up an application at McDonalds.

Professional photographers who have had great success are often so hesitant to tell their secrets and explain what they have learned. I have never understood that. I could tell you everything I do, exactly how I do it, and if you went about it the exact same way, you would still end up with a completely different image of your own. So here it is, my five best portrait editing tips (along with a bonus extra five tips below) to make your editing process more productive and hopefully much quicker. Because I use Photoshop, these are all geared in that direction, though there should be equivalents for nearly all image editing software.

lynseymattingly11

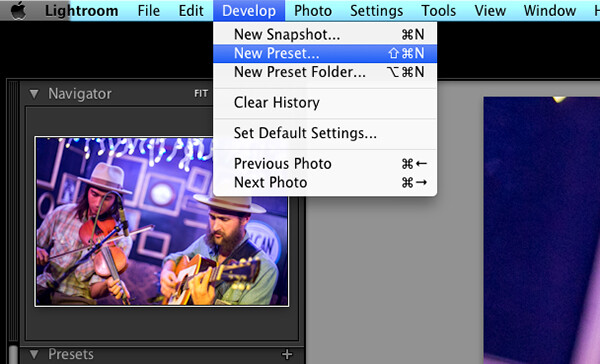
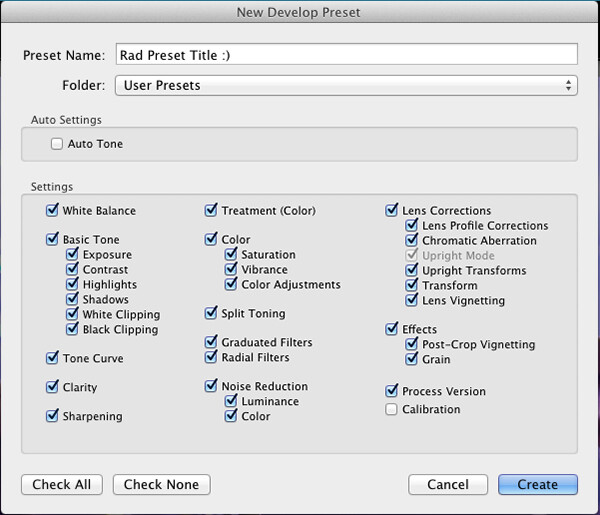
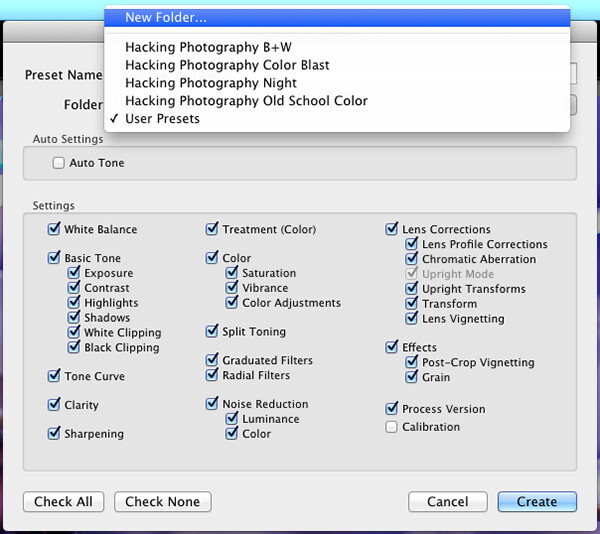
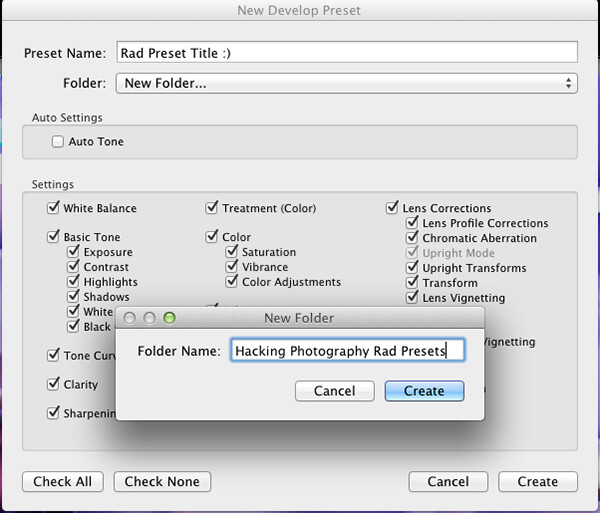
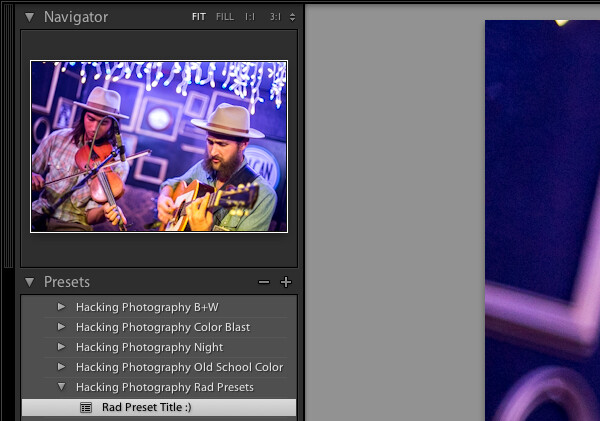
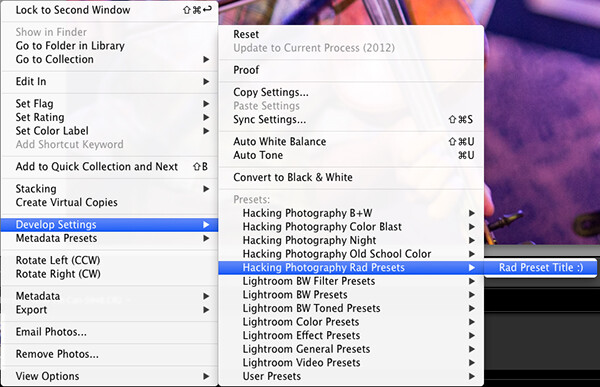
#1 – Learn shortcuts and use actions

All editing software offer keystroke shortcuts and actions (or similar) to make the things you do often easier and quicker. I could have a four year degree in Adobe and still likely just be scratching the surface of what can be done with photo editing software like Photoshop and Lightroom. Luckily I don’t have to store all of that in my brain (which is already pretty crowded with song lyrics and useless trivia), because I have memorized the keyboard shortcuts for the tools I use most often and have set up all of my customized actions to run on my F keys. Not only does this make editing ridiculously quick, it also means that I give 100% of my attention to a shoot and when it comes time to be an editing machine, I can sing-along to my terrible music and multi-task straight through it.

lynseymattingly4

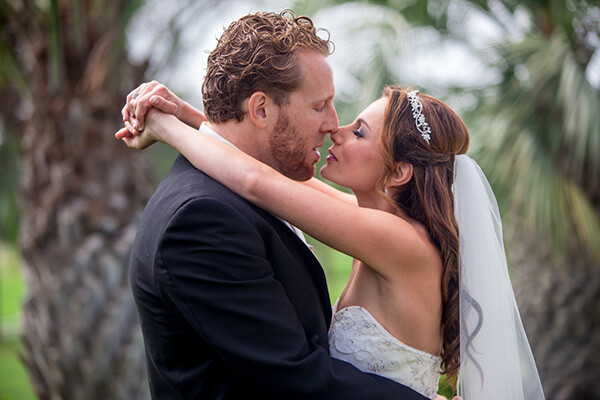
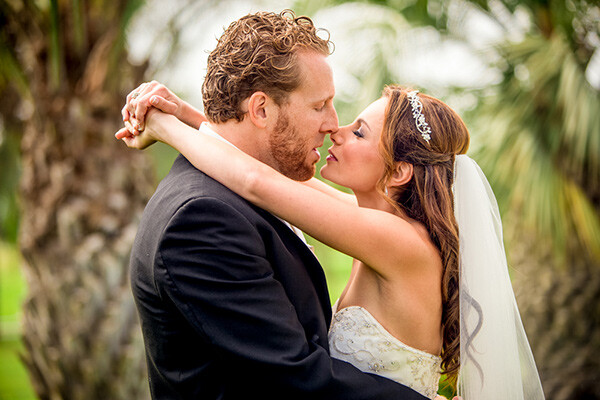
#2 – Have one black and white and one color process

Converting an image to a fun vintage or using your skills to cross-process is tempting, and maybe here and there, it’s fun. But the easiest way to scale back the amount of time you sit staring at editing software is to streamline your process and this means doing all of your images in the same manner.

lynseymattingly10I have one way that I do black and white images that I have programmed into a single action. Same with my color shots. I do whatever basic touch-up I’m going to do first, then I hit play for either my color or black and white action. Because I always photograph people, this simple task works for every photo I need to edit. It also has the added bonus of giving my images continuity and a signature look.

My color images look different than yours – and they should! You should have a color process that gives people a hint that you took the image. Same for monochrome; I want someone to look at a black and white photo I took and know “that’s one of Lynsey’s photos”. This not only cuts down on editing time, but also helps define your brand.

#3 – Run auto options

When I get tired because I’ve been editing for hours on end, I can stare at an image forever and know that it needs something but I have no idea what. This is when it’s time for two things: to change the music you’re listening to and to run an “auto” function – auto color, auto tone, or the auto RAW image editor – not typically to use it, but to see what your software, in all its brilliance, thinks you should do. Sometimes it will have good ideas and sometimes it won’t, but it will always gives you a look at the image in a different way, which can be extremely helpful.

lynseymattingly2

#4 – Accept a few universal truths

Everyone has one eye that is larger than the other. Kids will always have a scratch or scab somewhere. Double chins can happen to anyone. Most adults have a physical feature they aren’t 100% happy with.

My husband has a gorgeous head of hair. At an age when many men are shaving their heads to supersede a bald spot, my husband gets asked if he does shampoo commercials. (He should, if only so we can become millionaires already, and get a pool.) You would think this would make for great pictures – not having to work with a shiny head reflecting everywhere – but you’d be wrong; you see, he hates his forehead. Which I think is ridiculous as it’s perfectly proportioned to his head and glorious hairline. But, even though he is my husband and knows I am always right, there is no convincing him on this issue. Nor is it my place to try when taking his picture.

lynseymattingly9

The best thing I can do for anyone who expresses concern for a facial or body feature is give them a picture where they aren’t going to see their perceived flaw immediately. Pull out the great features so that you aren’t trying to both, take good pictures, and also change their mind.

#5 – Aim for people to look exactly like themselves, turned up ONE notch

You are not a plastic surgeon. We all want our clients to love photos of themselves but that shouldn’t come at the cost of you having to spend a great deal of time manipulating an image. My rule is simple: I don’t edit permanent features or make massive changes to faces or bodies. If you have a mole, I’m not going to touch it. But if you happen to have a pimple on picture day, fixing that is the least I can do for you. I sometimes dodge eyes lightly (keyboard shortcut O), but never in an obvious way. I may whiten teeth a bit (using the magnetic lasso and hue/saturation levels), smooth out a chin line (clone stamp and healing brush), or pull in a lumpy bit at the waist or otherwise (liquify and clone stamp), but only in a way that is more flattering and looks the way I know they usually would if they didn’t have a giant camera in their face, uncomfortable clothes on, and were running around after kids, or just generally feeling awkward like people tend to when someone is taking their picture.

lynseymattingly8

Like many other portrait photographers, I use a retouching tool (Totally Rad Pro Retouch action is my preference) that I apply liberally with the brush tool to all faces and then scale back by lowering the opacity. This allows for skin to look natural – normal skin has lines and freckles and areas rosier than others, but takes care of the small bumps and spots that cameras have a way of highlighting and putting on display.

What happens when you blow it? You took shots that no amount of editing could make great? You vow to do it right next time, that’s what. Here is a little lagniappe from me to you:

My five best quick portrait tips for getting it right in camera

1.) Shoot from above

Always have your subject lower than you so you are shooting downward. This can prevent double chins, unflattering angles, and in my husbands case, imaginary big foreheads. Unflattering portraits are most often due to bad camera angles and that is something that can’t be changed in any editing process.

2.) Avoid “dead light”

Shade is a wonderful thing for natural light photography, but large patches of shade, particularly in the morning hours, can often be very cold for color temperature. Everyone looks better with a little warmth, so strive to shoot in shady area that feel more warm in tone (think orange, yellow, red) than cool (blue).

3.) Suggest solid clothing or large scale prints. Small prints on a shirt tend to make people look larger.

4.) Photograph people doing something….anything. Avoid a boring portrait that is “all face” by having moment or action—this can be as small as involving their hands to frame their face or something more significant like leaning on wall or, my favorite, spinning.

5.) Talk honestly with your subjects beforehand. Find out what features they feel most comfortable with and anything they would like you to avoid or watch out for. I’ve heard it all, from people swearing they have tiny heads to people who felt their large feet would throw off the entire photo. The single best thing you can to ensure they will like their photo is listen to them before you even take one. It is not your job to tell them they are wrong about their insecurities–it’s your job to try and show them they are likely being over-critical. Hear their words so you will be mindful of their concerns and photograph them looking beautiful. Or handsome. Or at least like they don’t have a big forehead.

googletag.cmd.push(function() {
tablet_slots.push( googletag.defineSlot( “/1005424/_dPSv4_tab-all-article-bottom_(300×250)”, [300, 250], “pb-ad-78623” ).addService( googletag.pubads() ) ); } );

googletag.cmd.push(function() {
mobile_slots.push( googletag.defineSlot( “/1005424/_dPSv4_mob-all-article-bottom_(300×250)”, [300, 250], “pb-ad-78158” ).addService( googletag.pubads() ) ); } );

The post 5 Tips to Cut Your Portrait Editing Time in Half by Lynsey Mattingly appeared first on Digital Photography School.


Digital Photography School

 
Comments Off on 5 Tips to Cut Your Portrait Editing Time in Half

Posted in Photography


ACDSee Ultimate 8 introduces layer-based editing

11 Dec

ACD Systems has announced ACDSee Ultimate 8, bringing for the first time layer-based editing to its Digital Asset Management and image manipulation software. It offers the same image adjustment capabilities provided by ACDSee Pro 8 with the added ability to create and manipulate layers, as well as support for 32-bit and 64-bit transparency. Read more

Articles: Digital Photography Review (dpreview.com)

 
Comments Off on ACDSee Ultimate 8 introduces layer-based editing

Posted in Uncategorized


Digital Photo Editing Workflow – Better Images From Capture to Output

06 Dec

Better images from capture to output

A comprehensive look at the essential steps and principles in an effective photo editing workflow with highlights of key tools.

Have you ever tried to find a digital photo you know you worked on, but couldn’t remember where you saved it, or even what it’s called? Do you find yourself re-editing photos you’re sure you finished before? Or are you stuck, staring at an image you know could be made better, but not sure which adjustments to make, or even where to start?

We’ve all been there: hundreds of images to sort through. Files scattered all around your hard drives; photos missing, others duplicated in unnecessary versions, who-knows-what lurking in mysterious places with confusing names. And prints coming back from the lab looking, well, crappy. All the while, knowing you have photographic gems just waiting to be discovered and brought to life.

Nat coalson digital photo editing workflow image 1 diagram H

If you’re feeling overwhelmed by digital photography, you’re not alone. Capturing digital images has become so easy in recent years that it’s easy to get stressed, if only because of the sheer volume of pictures you’re making.

For every serious photographer, capturing an image is only the beginning of a complex process with numerous pitfalls. So how can you streamline this tangled mess? The key to keeping your digital photography fun and productive is to adopt, and adapt, an effective, consistent workflow.

Why workflow matters

The concept is simple – your photography workflow is the sequence of steps and actions you take to edit your photos, work them up to a result you consider finished, and share them with the world. Editing photos can be like baking a cake or assembling flat pack furniture. You start with raw ingredients, or loose parts, and use an ordered sequence of steps to put the thing together. In a good photography workflow, the end result is a perfectly crafted image, securely stored for future use, all with the least possible effort.

Efficiency is important. Without a good workflow, at minimum you’re wasting time. Worse, you run the very real risk of losing your most precious photos. Forever. A couple of years ago I knew a wedding photographer, then aspiring to become professional, who lost an entire wedding shoot because of relatively simple errors in her workflow. (In short, the mistakes derived from a convoluted importing method and totally inadequate backups.)

Maybe you’re only taking pictures for fun? If you’re planning to continue with photography, you still need to use an effective workflow. If you don’t, your photo archive will become a beast, very difficult to tame. And your images won’t look as good as they could. No fun.

When you’re starting out in digital photography, you need to develop good habits early. Even if you’ve been shooting for years, it’s never too late to improve your process.

Nat Coalson Within the Great Cloister 600px

Now it’s personal

You can craft your digital photography workflow to suit your own situation and preferences. But every effective workflow shares common tasks, proven techniques and best practices. These established methods have evolved with real-world use across all genres of photography. They apply equally to beginning enthusiasts and seasoned pros.

I first began editing photos in the early 1990s, working in a magazine publishing environment. Under tight deadlines and managing many thousands of digital assets, a good workflow was crucial. As a working photographer, I’ve been refining my own workflow for over a decade and I still make little tweaks now and then.

Continually finding ways to tighten the screws helps eliminate the risk of disaster, while also making the practice of photography more fun and rewarding. You can master your own photography workflow, too. You first need to understand the most common problems and tasks you’re likely to encounter. Then learn the best tools and techniques for dealing with them. A good photo editing workflow:

  • Uses the fewest steps possible.
  • Is non-destructive and allows you to change your mind or redo steps without losing image quality< ./li>
  • Protects your images now and for the future.
  • Provides the best looking photos.

So let’s review the essential parts of a practical photo editing workflow.

Nat coalson digital photo editing workflow image 1 diagram V

Stage 1. Capture

Whatever the end result you’re envisioning, great digital photographs begin with good data. You should always strive to make the best capture you can, and in most cases, try to finish the photo as much as possible in-camera. Work carefully to make the most accurate exposure with the ideal level of sharpness for the given scene or subject. Regardless of your capture format, you should always be working to master your camera techniques.

Stage 2. Import

Copying files from removable media onto more permanent storage is also variously called downloading, ingesting, transferring, etc., but the result is the same. Right after a shoot, copy all your images from the memory card into a new folder on at least one hard drive, then back up everything right away.

Backup. Backup. Back Up!

Every computer user knows the importance of backing up data. But too many people don’t do it, or don’t do it often enough. This isn’t a single step in the workflow; it’s something you should do frequently throughout the process. You should have your image files saved on at least three separate media sources:

  1. Your master working drive
  2. A current backup of the master drive
  3. A complete historical archive, preferably stored in a separate physical location from your master and working backups

(The topic of digital photo storage and backup is so important that we’ll revisit it repeatedly in the future!)

Stage 3. Organize

After your photos are copied onto your working storage media (and backed up!), sort through the pictures to separate your favorite images from the rest. The best way to do this is with ratings (e.g. stars) or other ranking methods (colors, flags, etc.).

Nat coalson digital photo editing workflow Image 2 selections

Whichever system you prefer, keep all the photos from a single shoot together in one folder and use the ratings attributes to annotate your selections. During this stage you should also apply and enhance the metadata associated with your files. Keywords, copyright notices and contact information are just a few of the many types of textual information you can embed within a digital image.

Escaping folder hell

In the early days of digital media, it was common practice to move files from one folder to another during the editing workflow. For example, all the original images, often scans from film, would first be put into one folder. As individual photos were selected, processed and output, the files would be copied again (or moved) into other folders representing the stage of the workflow it was in. DON’T DO THIS! It creates a very unwieldy hierarchy of files and folders and makes good organization all but impossible.

Modern imaging software, and more specifically, metadata—allows you to more effectively organize files using virtual methods (such as Lightroom’s Collections and virtual copies) without the need to ever copy or move your original images on the hard drive. In an efficient workflow, there is no need to use separate folders for different types of files.

Stage 4. Develop

This is where you apply digital processing to make each image look as good as it can to fulfill your creative vision for the picture. Like Import, this stage has different names depending on who you’re talking to. Developing is the term most often used by Lightroom users. Enhancing, adjusting, post-processing, and simply editing are other common terms to describe this stage, which itself is comprised of several distinct steps.

The ideal order of operations for developing a photo depends on the characteristics of the original capture; some images will need very different enhancements than others. Still, it’s possible to define a typical sequence of steps as below.

TIP: Work global to local

Make the biggest changes first, then work your way to smaller details. In photo editing, this means first making global adjustments (those that apply to the entire image) before working on the local adjustments. And, earlier in the workflow, apply any changes relevant for large batches of images before moving on to fine tune individual photos.

Develop steps

  1. Crop and straighten. Since it changes the composition, cropping can be the most significant change you can make to a photograph. It’s best to do it early in the process, but you need to use a method that allows you to go back and refine the crop later if you change your mind.
  2. Correct distortion. Most camera lenses introduce various amounts of distortion to a picture; some more than others. Fix distortion as one of your first, regular steps.
  3. Adjust exposure and tones. The tonal range of an image refers to the various levels of brightness of each pixel, from pure white to solid black. Tone is independent from color. Simply setting the white and black points can have a huge impact on the overall appearance of an image, so you should normally do this before moving on to color. Tonal contrast should also be handled during this step; the variation between light and dark tones determines how much impact (or punch) a picture has. Naturally, some pictures will look best as low contrast.
  4. Adjust white balance and color. White balance plays the biggest role in the color of a photo. If the photo has a strong color cast — for example, an indoor photo captured using outdoor white balance settings — you should fix it before addressing tone. But for images with white balance that seems fairly accurate, set the tone before refining the white balance. After setting white balance, consider making other color adjustments, most notably saturation and vibrance, which affect how pure and vivid the colors appear. Alternatively, convert to black-and-white or apply special color effects during this step.
  5. Apply local adjustments. These are edits you make only to small areas of the picture. Examples are dodging and burning (lightening and darkening, respectively) and selective color adjustments. In general, you should try to make local adjustments after you’ve finished the global adjustments.
  6. Apply noise reduction. Noise appears in digital images as soft colored blobs or grainy speckles. Most images can be improved with varying amounts of noise reduction. Photos captured at high ISO, made in the dark, or ones that are significantly underexposed, will need more aggressive noise reduction. You’ll normally want to deal with noise reduction after you set tone and color, because those global adjustments will affect the appearance of noise. Zoom in for larger previews when adjusting noise reduction and sharpening.
  7. Apply sharpening. Sharpening is all about contrast. The appearance of sharpness in a digital image is based on the relative lightness or darkness of neighboring pixels along the edges of lines within the picture. More contrast along the edges equals more sharpness. As such, you shouldn’t try to refine the sharpening levels until you’ve already set the global tone range, because the overall contrast of the image will have a major effect on the appearance of sharpness. Do your sharpening a bit further into the workflow.
  8. Perform retouching. Many pictures contain elements that you want to remove altogether. In some cases, these are artifacts — undesirable results of digital processing or camera characteristics including noise, chromatic aberration, fringing and sensor dust spots. Other times, there’s something ugly in the frame, like a telephone pole sticking out of your mother-in-law’s head. Retouch your photos using Lightroom’s Spot Removal tool or Photoshop’s Clone Stamp and Healing Brush.Other processing can reduce or eliminate the need for retouching, so it can be a waste of time and effort to retouch photos earlier in the workflow. For example, you could spend twenty minutes removing dust spots around the edges of a photo and then decide you want to crop the picture tighter anyway.Do your retouching toward the end of the workflow.
  9. Apply special effects. All the previous developing steps will apply to most of your photographs. After you’ve corrected the technical issues and processed the photo to an acceptable baseline quality, consider applying further stylistic adjustments and special effects.

Nat coalson digital photo editing workflow image 3 barcelona

Stage 5. Output

After you edit photos to a level of perfection you’re happy with, think about sharing and reproducing them. In the digital realm, output generally refers to the many ways you can bring your images into the real world. To do this, from your finished master image, export derivative files, specifically for each intended purpose.

Sharing online is a great start. Most web sites have some important parameters you need to know for your images to look their best (and all web site specs are not the same). Take the time to research the best file settings for your file uploads.

High quality printed reproductions — photo books, notecards, calendars, fine art prints, etc. – also require you to follow specific parameters for exporting image files from your editing software.

TIP: About resizing photos

When you’re editing photos, you should always process your master images at their native resolution. In other words, whatever the pixel dimensions of the image as it came off your camera, do all your editing at that size. Any resizing should be done at the very end of the workflow and only on copies of the master file, each exported to the specifications for the output destination. Don’t resize your master files! (Lightroom keeps this simple – since there are no controls for resizing during the editing process, you can only do it only during an export.)

Nat Coalson Flow III 575px

Conquer your photo editing workflow

When you don’t follow a good system, digital photography can become stressful. Losing pictures, redoing steps, and not getting the quality you’re hoping for are all side effects of an ineffective workflow. Who wants any of that?

Remember that everybody who’s mastered their personal photography workflow had to start somewhere. You’ve likely mastered some parts of the process already. Now, identify specific bottlenecks and key areas for improvement in your own photo workflow. Pick one aspect of the workflow that seems unfamiliar or challenging, and start there.

Crafting your ideal workflow doesn’t happen all at once, nor is it a purely linear process. With so many steps and potential traps, you’ll need to study and practice each of the different stages independently, then tie them together into a cohesive sequence.

TIP: The main reason Adobe Photoshop Lightroom is widely considered the best photo editing software is that it provides most of the capabilities you need to handle the complete photo workflow as describe above.

When you follow an optimized process for working with your pictures and develop a clear understanding of the principles behind your decisions, you’ll have more fun working on the things you enjoy, rather than struggling with tedious tasks.

Practicing good workflow techniques helps you make great photos – easier!

googletag.cmd.push(function() {
mobile_slots.push( googletag.defineSlot( “/1005424/_dPSv4_mob-all-article-bottom_(300×250)”, [300, 250], “pb-ad-78158” ).addService( googletag.pubads() ) );
} );

The post Digital Photo Editing Workflow – Better Images From Capture to Output by Nat Coalson appeared first on Digital Photography School.


Digital Photography School

 
Comments Off on Digital Photo Editing Workflow – Better Images From Capture to Output

Posted in Photography


4 Steps to Less Stressful and Easier Photo Editing

31 Jul

Have you ever returned to your computer with a memory card full of photos and become overwhelmed at the idea of going through all of them?

Tree starburst

The thought of sorting and analyzing so many pictures can seem so daunting it’s sometimes hard to even know where to start! Often we find ourselves copying the contents of our cameras to our computers and letting our precious memories collect digital dust, though we promise ourselves we will get around to organizing them – someday. Modern technology has made this task easier, with various software and cloud-based services even promising to find your best photos for you. And while these digital assistants certainly have merit, I like to take a different approach to dealing with all the images I capture.

The following tips will help you streamline your photography workflow and make the task of sifting through your images not only easier, but a lot more enjoyable too. While I work mostly in Adobe Lightroom, these general practices will apply no matter which photo editing software you use.

Step 1: Get rid of bad photos

This is the first thing I do when sorting through pictures, and it’s a tough hurdle to overcome because I have a tendency to want to save everything. But this step will make all the difference in managing your growing photo library, especially if you have never done it before.

Let’s say you went on a summer family trip to a national park, and you returned home with thousands of pictures to deal with. It might be tough, but as you look through them, try to think about what images will matter the most to you a year from now. You might have had a wonderful time at the Grand Canyon during your vacation, but will you really want 50 pictures of your child looking down at the great abyss? What about the ones where he is blinking, out of focus, or looking the other way? It is likely that two or three good pictures are all you need. In this first step, it’s up to you to find the ones that best encapsulate your experience as a whole, and ditch the rest.

Unicycling

I captured close to 100 photos on my brother’s recent visit, but this is one of just a handful I really need to remember the day, and all the things we did.

This approach might seem coldhearted and cruel, but it’s a necessary step in taming the photo-management beast. When you revisit the pictures from your summer trip a couple years from now, you won’t need a thousand of them to help you remember the experience. A tenth of that will probably be perfectly appropriate. If you hang on to every last one you might find that they become an albatross around your neck, weighing you down so much that you don’t even want to look back at your pictures because there are just so many of them.

To put things in another perspective, think about a time when one of your friends wanted to show you photos from his or her family trip. How long did it take you to grow tired of looking at the same types of images over and over? You could have easily gotten the point with just a few pictures, and then spent time visiting with your friends about the events surrounding the photos.

Moth

Of all the photos I took during this nature walk, this was one of only a few that I decided to keep. And in the years since, I haven’t missed the others at all.

One nice advantage of using a photo management program is that you can remove unwanted photos without actually deleting them from your hard drive. In Lightroom, pressing the “X” key on a photo will mark it as rejected, so it will no longer show up in your photo library but will still exist on your computer. This helps soften the initial blow, and then you can go back later and actually delete the rejected photos if you so desire. Alternatively, you can press the “P” key to flag a photo as one of your favorites, or assign star ratings to the images you like best. Then you can instantly sort out your best shots later down the line, and delete the rest when you are ready.

Step 2: Basic Editing

After culling your pictures to find the ones you like most, the next step is to perform basic edits and save the real heavy lifting for later. After removing the duds from my most recent camera import, I typically go through each of the remaining images and apply the simplest of edits such as crop, straighten, and exposure. Not much else is needed at this stage, as you are essentially preparing your photos for any real edits that might need to be done later. These basic adjustments are very quick, and you can churn through your recent batch of vacation, birthday, or hiking photos in a manner of minutes or hours instead of days or weeks.

You can also copy and paste adjustments, so if you have a dozen similar photos you can edit one and then apply those adjustments to the rest with a simple keystroke. This is also a good time to do apply some rudimentary organization to your photos as well, using tools like keywords, flags, categories, or star ratings. Be careful not to get caught up in editing any single photo in depth at this stage. The goal of Step 2 is to dig a little deeper into the photos you like, which will help you decide where to concentrate your efforts if you do need to do more intensive edits afterwards.

Husky

I had to crop this photo in order to draw the viewer’s attention to the dog’s eyes.

Step 3: Advanced Editing

By this point you should now have a curated set of photos that you really like, with some mild corrections applied to help them look a little more pleasing. Now it’s time to perform the types of more detailed edits that will help your images truly shine. Advanced adjustments to a photo’s white balance, color saturation, contrast, and other parameters, while also applying localized improvements like dodging and burning can take a long time, but the results are well worth it.

It’s important to do this step last, or else you can easily wind up spending a great deal of time editing a single picture early in the process only to realize there are plenty of better ones that should have had your attention instead.

Family

This family photo turned out fine, but I had to do some color corrections and other enhancements to get it to look how I really wanted. By doing this step last I was able to devote more time to the editing process and not worry about processing hundreds of additional images.

Step 4: Walk Away

This might sound silly, but often the most useful activity you can do when editing your photos is nothing at all. Take a break, get a coffee, head out for a walk, or just go to bed and come back to your pictures the next day with a fresh set of eyes. I’m amazed at how often I stare at a photo performing detailed adjustments trying to get things just right, only to leave my computer and return after a short hiatus and realize the solution was much easier than I realized at first.

As a case study in how all this works, let me share the following example. My brother and I recently I spent an afternoon at the beach trying to get pictures of a rock hitting the water. When I got back to my computer I found that we had over 50 of images to go through, and following the aforementioned workflow strategies helped make things much easier. After importing the images into Lightroom I went through and rejected about 35 right off the bat. That left me with a much more manageable set, so I cropped and applied some basic adjustments to the remainder. This helped me realize that I needed to reject more of them, now that I was looking at the cream of the crop in greater detail, and I ended up with three photos to edit more extensively. When I was finished, I ended up with exactly one photo from the afternoon that I really liked.

Water splash

Not only is this the best photo out of the many I shot that day, but looking at it allows me to remember many other things about the afternoon as well. I don’t need a hundred poorly-composed, out-of-focus pictures to remember a fun afternoon at the beach. Instead I have this one and just a couple others that all serve to bring back some amazing memories.

Following this simple process, and adjusting it to suit your individual needs, can transform photo sorting from a tedious chore into an activity that is enjoyable, relaxing, and fun.

The post 4 Steps to Less Stressful and Easier Photo Editing by Simon Ringsmuth appeared first on Digital Photography School.


Digital Photography School

 
Comments Off on 4 Steps to Less Stressful and Easier Photo Editing

Posted in Photography


Ten Go-to Editing Tips for Using Photoshop

28 Jul

PS CC launch

The recent release of Adobe Photoshop Creative Cloud (CC) 2014 (which is the 15th release of the product) got me thinking about my own workflow. Photoshop is an amazing piece of software. I have been using it commercially since version 5. However, I don’t necessarily think the latest version is the best one. I’ve just recently upgraded to CS6 and I’m loving it but I can’t see myself going the CC route just yet, as it doesn’t suit my business model.

The beauty of this software is the power that it can bring to your images, but it is a complex piece of software and coming to grips with it as a beginner can be daunting. Time and practice will be your allies in learning Photoshop.

As a photographer, Photoshop is the main editing software package I use in my photography workflow. Every photographer or designer has their own unique approach to editing images using Photoshop. I find this fascinating.

I’m constantly refining, and tweaking my editing workflow. I get such a buzz when I find an alternative method or a shortcut, that I wasn’t aware of before, which makes things more efficient. Having said that there are a lot of the features in Photoshop I wouldn’t use, and there are some that I use more than others.

Before I start editing my images in Photoshop, I open them with Adobe Camera Raw (ACR) since I shoot RAW format. I need to make basic adjustments such as exposure, white balance, correcting chromatic aberration and any lens distortion. From there, I take my images into Photoshop as Smart Objects.

The following tips for using Photoshop are my regular editing techniques in no particular order. These can be used in most versions of Photoshop. These are a small set of useful tips. I could have extended it by a dozen more.

Ten go-to editing tips for using Photoshop

1. Duplicating Layer Masks for other Adjustment Layers

To save time when you need a copy of a mask from one layer to another adjustment layer; when you’ve used the brush tool to create a mask. Simply hold down the Option key on a Mac or CTRL key on a PC, click on the layer mask and drag it to the adjustment layer in question. This makes a copy of the layer mask without having to redo the same again.

Gorilla duplicating masks on other adjustment layers

2. Add a Curves Adjustment Layer with a Difference

Normally in the Curves adjustment, you adjust points on the curve line which affect the image’s tonal range. The S-shaped curve is a classic tonal tweak for boosting contrast and color saturation. However, if you add a curves adjustment layer, change the blend mode to Soft Light and reduce the Fill down to approximately 55% (the reduction amount will depend entirely on your image & preference), this gives a similar boost to color and contrast. For demonstration purposes, I have left the Fill at 100%, so that you can see a difference as outlined within the white square.

Field in France curves softlight

3. Dodge and Burn

Create a separate layer, change the blend mode (Mode) to Overlay and fill the layer with 50% gray. Name this layer “Dodge and Burn”. The Dodge and Burn tools are my go-to method for making selected areas of an image lighter or darker. Dodge is for lightening and the Burn tool is for darkening an area. Use a soft Brush and set Exposure to between 6-12%. In most cases, I leave Range set to Midtones. If you find that you have overdone it in the specific areas, just reduce the Opacity on the layer. The image on the right (below) shows the areas where I used the Burn tool to darken his arm, his face, and the bright spots in the background, and also where I lightened his back shoulder.

Secret Agent Dodge Burn

4. Layer Comps

I find the Layer Comps feature in Photoshop invaluable. It is a useful guide to the different editing stages as a before and after comparison. It is so easy to overdo it and get carried away with over-editing your image. This has five stages from straight out of camera, to the final image.

Poker

5. Stamp Visible

Cmd+Shift+Alt+E (Mac) or Ctrl+Alt+Shift+E on a PC is the command to keep all the layers in a Photoshop file and make a merged copy on top of them. I find this particularly useful, especially at the end of my editing process, where I apply some sharpening or contrast by using a Topaz effect (plug-in for Photoshop).

6. The “Place” Command

This is found under File>Place. I normally work with multiple images in the same document. Therefore, I find using this method really handy as it imports the image as a Smart Object automatically, which is great for resizing the image without any degradation.

7. Patch Tool

The Patch Tool was my favorite of the Healing Brush Tools in Photoshop CS5. But now that I’ve upgraded to CS6, the Patch tool has just gotten even better. You can now use the Patch tool to fill using the Content-Aware on a new empty layer. I prefer to set the Adaption to Loose. Make sure Sample All Layers has been ticked. The Healing Brush also feels more intuitive to use than before.

Ringbuoy Patch Tool

8. CMD+T or Transform

I seem to use this shortcut a lot. If I’m working on multiple images in the same document, I may need to resize one or two of the images accordingly. As I import my images using the Place command, this means they are converted to Smart Objects, so the resolution of the images isn’t affected when transforming or resizing.

9. CMD+T+Warp Tool

Similar to the above point, the Warp tool is great for fine-tuning an element of an image, especially if you are working on composites. In the image below, I was using my own stock photo of Heron’s talons to replicate the Owl’s talons for the purpose of realism.

Owl Warp tool

10. Opening a Second Window for the Same Document

When you are retouching your image to get rid of dust and blemishes and so forth, you may need to zoom in as much as 300% or more. Open another window for the same document by Window>Arrange>New window for new_filename.PSD but keep it at 25% (or fit to window). This way, instead of zooming back out to see how the image looks and then zooming back in to resume your retouching, just click on the second window where you have the same document viewed at 25% (or fit).

Do you have another other go-to Photoshop tools or tips you’d like to share? What is in your workflow? Please share in the comments.

The post Ten Go-to Editing Tips for Using Photoshop by Sarah Hipwell appeared first on Digital Photography School.


Digital Photography School

 
Comments Off on Ten Go-to Editing Tips for Using Photoshop

Posted in Photography


Adobe Photoshop Express update brings Raw editing

15 Jul

Adobe has updated both the iOS and Android versions of its free Photoshop Express mobile app. The new version comes with a number of added features and improvements but to many photographers the most useful new function will be the ability to edit Raw files. We gave it a try – read more on our sister site, connect.dpreview.com.

Articles: Digital Photography Review (dpreview.com)

 
Comments Off on Adobe Photoshop Express update brings Raw editing

Posted in Uncategorized


Save Tons of Editing Time with Lightroom Presets

21 May

On now at SnapnDeals you can get 100 of my custom Presets 50% off. Deal ends soon, don’t miss out so grab it here. 

before-after-lightroom-presets

Photographers don’t have a lot of extra time to edit. As a full-time photographer myself, I rely heavily on any tools that save me time in the editing process. One of the tools I use is Lightroom presets.

What are Lightroom presets?

A preset is a pre-determined position all (or some) of the of sliders in Lightroom (they are pre-set, get it?) In other words, you can edit a photo to your liking, and then save that exactly combination of slider positions for future use on another image.

First things first: how do you create a Lightroom preset?

Very easily! Once you have a photo edited the way you want it you need to save those settings.

Step 1:  Click “Develop” then “New Preset”

presets-step-0

Step 2: Give your preset a title

Lightroom Presets Tutorial

Name your new Preset

Step 3: Choose the folder you want the preset stored in, or create a new folder.

This is a good idea to separate your presets by type. You would be surprised how many random presets you end up with over a few years. Consider creating folders based on the type of edits they are.

Lightroom Presets Tutorial 3

Choose the folder to save it in

You can see I’ve named my presets by color blast (big colors), night, old school color, and black and white. Now I can quickly find the preset I’m looking for based on what type of edit I want to do.

preset-step-3-web

Or make a new folder and give it a name

Step 4: Click the boxes you want applied to this preset and click “create” to create your preset

Sometimes you don’t want every box checked when you create a preset. Imagine you just edited an underexposed photo and had to increase the exposure two full stops (+2 on the exposure slider) to get it correct. This preset would look great on underexposed photos in that set, but would overexpose photos that had the correct exposure.

Another scenario is that you create a preset that only applies a slight vignette to your photos. Unchecking every box except the “vignetting” box would create a preset that would keep the ‘look’ of any photo you are editing and only apply that vignette to it. Pretty cool!

Step 5: You’re done, the preset is complete.

preset-step-4-web

There’s your new Preset

The preset is complete and waiting in the folder you just created. Just open the folder and click the preset title to apply it to future photos.

Lightroom presets save time by enabling batch editing

Imagine shooting 300 images in an area where the lighting isn’t changing and stays consistent. You edit the first image to your liking and save the settings as a preset. Instead of individually editing the remaining 299 images one by one, you can apply that preset and achieve the same ‘look’ as the previous photos. 

The next time you want that type of ‘look’ on a photo with a similar lighting setup you can just apply a preset in one click. It will move all the sliders to those exact positions so the edit style stays the same.

The best part about this is batch editing your photos all at once. You can edit a single image and then apply that preset directly to as many photos as you would like in just one click.

How do you batch edit photos?

Select all the photos you want to apply the preset to, right-click the any of the photo thumbnails, and follow this path:

Lightroom Presets Tutorial 5

That will apply the preset automatically to all the images you selected in one click.

For a walk through on how to do this watch this video as I go through all the steps:

Lightroom presets also save time with the live preview feature

When you hover over the preset names the image thumbnail in the top left corner will give you a preview of what that image will look like with that preset. As you scan your mouse over the list you will be able to tell if a certain preset will look good or not. If it does, you can click once and be done with the image.

Lightroom presets give you a great starting point

Instead of manually editing a photo from scratch, you can apply a preset to make a big change and edit from there. It’s like getting a big head start.

Lightroom presets can do a one-click edit

If I’m hitting a blank spot on where I want to take an image I will hover over my presets and see if I like any of the previews. Sometimes I love it and it’s a one-click edit.  Sometimes I like the look but know it needs a little tweaking. Either way it can save a lot of time. Check out a few one-click edits below from some of my presets.

Straight out of camera

Straight out of camera

After one-click Preset

After one-click preset

before-5968

Straight out of camera

After one-click Preset

After one-click preset

Hacking-Photography-Color-Pop-Presets---Fill-Light-Smooth-Pre

Straight out of camera

After one-click Preset

After one-click preset

I hope you’ve seen how much Lightroom presets can help speed up your editing time and supply you with some very creative edits. I’d love to hear your thoughts in the comments below.

For more information on Lightroom presets check out these:

  • A Concise Guide to Lightroom Develop Presets
  • 4 Quick Tips For Getting The Most Out of Lightroom Presets
  • How to Add an Opacity Slider to Lightroom Develop Presets with The Fader Plug-In

Don’t want to make your own presets? On now at SnapnDeals you can get 100 of my custom Presets 50% off. Deal ends soon, don’t miss out so grab it here. 

The post Save Tons of Editing Time with Lightroom Presets by Mike Newton appeared first on Digital Photography School.


Digital Photography School

 
Comments Off on Save Tons of Editing Time with Lightroom Presets

Posted in Photography


Apps and Hacks for Editing On Your Phone

20 Mar
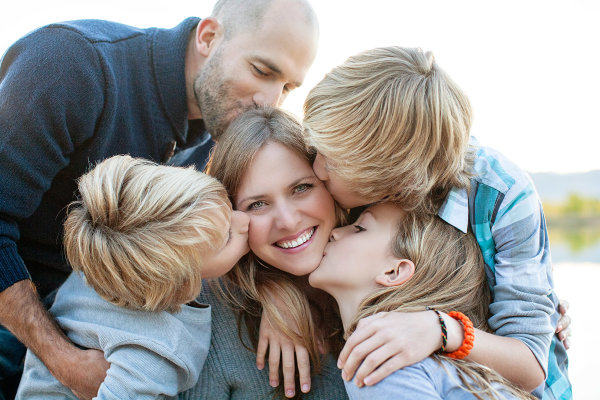
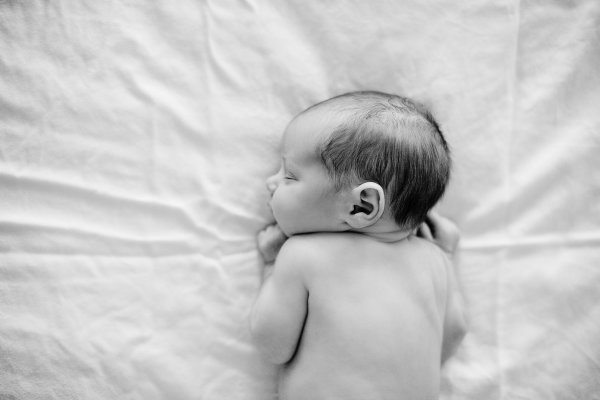
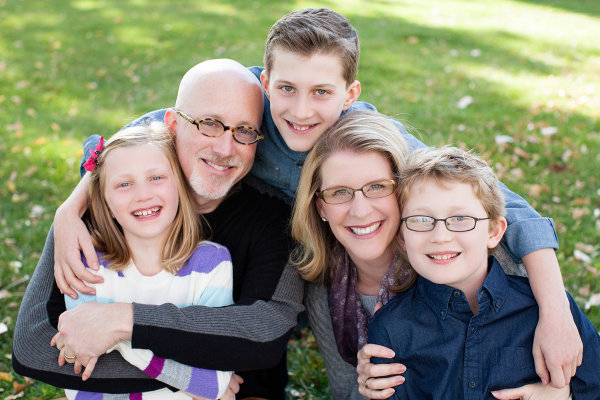
Extra photos for bloggers: 1, 2, 3

The secret behind the very best pix on Instagram is that they’re not exactly “insta.”

Most wow-worthy shots have had some work done.

It takes a few edits to transform a good photo into a holy-smokes-wow photo.

Today, we’re bringing you a step-by-step look at one such transformation.

Watch one photo go from neat to woah-woah-wow and pick up some editing hacks and app recommendations along the way.

Learn to Edit like An Instagram Master, All On Your Phone!

(…)
Read the rest of Apps and Hacks for Editing On Your Phone (466 words)


© laurel for Photojojo, 2014. |
Permalink |
No comment |
Add to
del.icio.us

Post tags:


Photojojo

 
Comments Off on Apps and Hacks for Editing On Your Phone

Posted in Equipment


Red Giant offers subscription to video editing tools

18 Mar

product-list-prem-8-med.jpg

Using a similar model as Adobe’s Creative Cloud, video effects maker Red Giant – creators of Trapcode and Magic Bullet – is making their post-production tools and plugins available via subscription. Instead of buying individual software licenses, Red Giant’s service called Universe allows you to pay monthly or yearly for access to their suite of products that work in popular video editing software such as Final Cut Pro or Adobe Premiere. Learn more

News: Digital Photography Review (dpreview.com)

 
Comments Off on Red Giant offers subscription to video editing tools

Posted in Uncategorized


Non-destructive photo editing feature coming in Android 4.4 KitKat

06 Nov

kitkat.png

Google is giving a sweet treat to photographers in its new KitKat operating system. Android 4.4 will be shipping with a non-destructive photo editing feature in the native Gallery app. From what we’ve seen of the software so far, it appears to offer a huge collection of some of the most advanced editing tools available on any mobile photography app. Learn more on connect.dpreview.com.

News: Digital Photography Review (dpreview.com)

 
Comments Off on Non-destructive photo editing feature coming in Android 4.4 KitKat

Posted in Uncategorized