Google has launched version 1.17 of its Google Photos for Android app and the update brings an important improvement: non-destructive editing. Read more
Articles: Digital Photography Review (dpreview.com)
Google has launched version 1.17 of its Google Photos for Android app and the update brings an important improvement: non-destructive editing. Read more
Articles: Digital Photography Review (dpreview.com)
Starting immediately, Google’s Nik Collection of desktop image editing plug-ins is being offered free of charge. Nik’s Analog Efex Pro, Color Efex Pro, Silver Efex Pro, Viveza, HDR Efex Pro, Sharpener Pro and Dfine apps are all available as a free download from Google, a substantial savings over the previous $ 150 price.
Nik’s applications put a focus on ease of use and accessibility, compatible with Photoshop, Lightroom and Aperture. The company was purchased by Google in 2012, and prior to that each program cost around $ 100 for a total of up to $ 500 for the software suite. Google opted to offer the whole bundle for $ 150, and made it available for all of its supported applications via a single installer.
To download the collection without dropping a dime, head to Google’s Nik Collection site.
Mac:
Windows:
GPU Compatibility:
NVIDIA GeForce 8 Series, GeForce 9 Series, GeForce 100 Series, GeForce 200 Series, GeForce 300 Series, GeForce 400 Series, GeForce 500 Series, ATI Radeon HD2000 Series, Radeon HD3000 Series, Radeon HD4000 Series, Radeon HD5000 Series, Radeon HD6000 Series.
If no compatible card is available, GPU acceleration will be disabled and the CPU will be used.
Articles: Digital Photography Review (dpreview.com)
I love Lightroom, and use it for the vast majority of my portrait editing. You can achieve a wide variety of portrait effects in Lightroom, from harsh and grungy, to soft and dreamy. My technique varies depending on the kind of portrait I’m editing, although the workflow remains consistent.
The photo I’ve selected for this exercise, is one you can easily replicate at home. It was shot indoors, with a large window as the only light source, and is one of a series shot in the same location.
One of the great features of Lightroom is the ability to sync settings. It’s a huge time-saver when you have a series of images, all shot in similar conditions. Once you are happy with the general settings (white balance, shadow-highlight ratio, etc.) of one image, you can sync the rest of the images in the series, with the same settings. After that, you’ll only need to fine-tune the others.
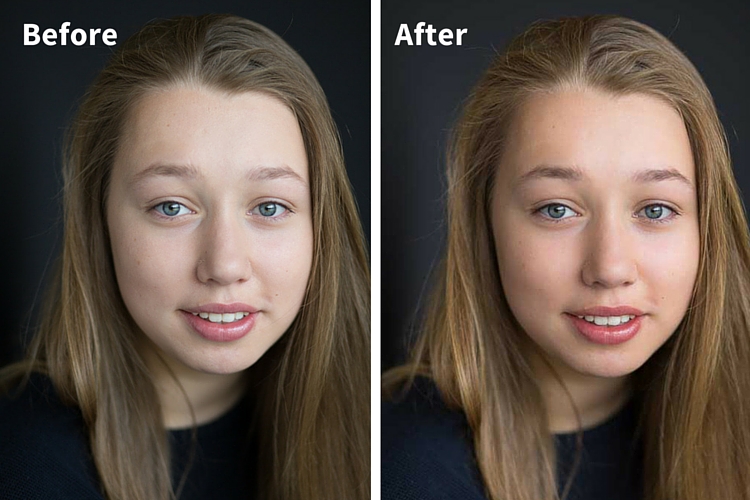
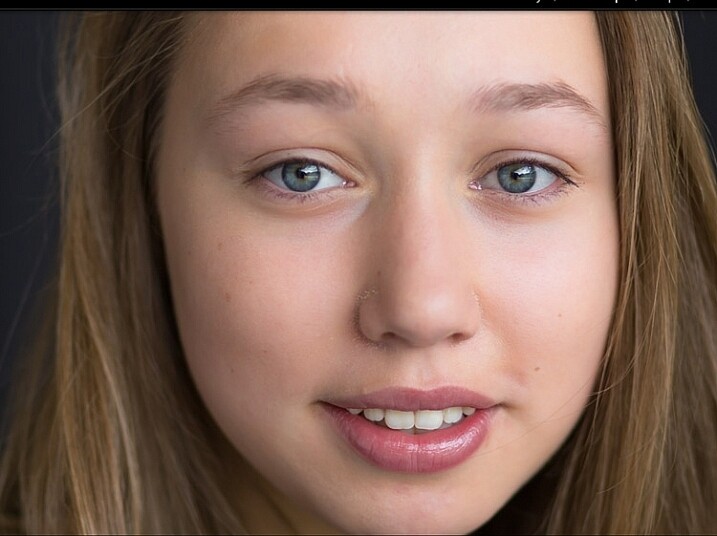
This before image is too cool for my liking, and there is not enough separation between the model’s hair and the background. I am also going to smooth out her skin tone, and bring a bit more sparkle to her eyes.
As you work through each step on your own image, play around with the sliders to see what effect each one of them has.
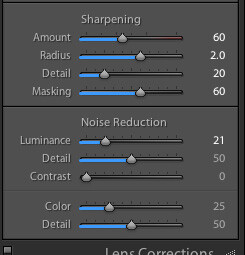
Sharpening preset
In the LIBRARY module, import your image into Lightroom. I have created a custom sharpening preset (shown here), which I find works with the majority of my portraits. I apply this preset upon import – a handy shortcut, especially when you’re importing a large number of images at once. It’s easy to create your own presets in Lightroom, read this tutorial How to Create Your Own Lightroom Presets on dPS, that shows you how.
To apply a preset on import, go to the righthand panel in LR, to the tab labelled “Apply during import”. Go to Develop settings > user presets, then click on the preset you wish to apply.
Once you have imported your file, go to the DEVELOP module.
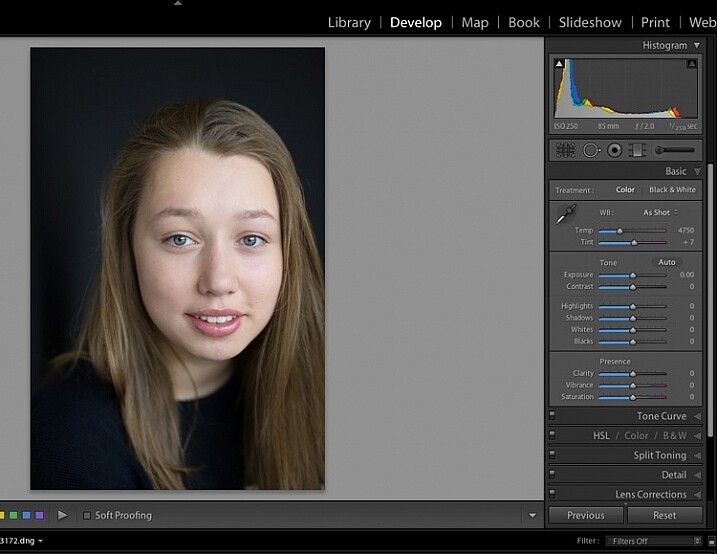
Import your file.
The colour tint in this photo is a bit cold. There are a number of ways to adjust the white balance. If there was a neutral wall or surface in this photo, you could use the eyedropper tool. In this case, there isn’t a neutral reference, so I have moved the sliders under the white balance section to give the image more warmth.
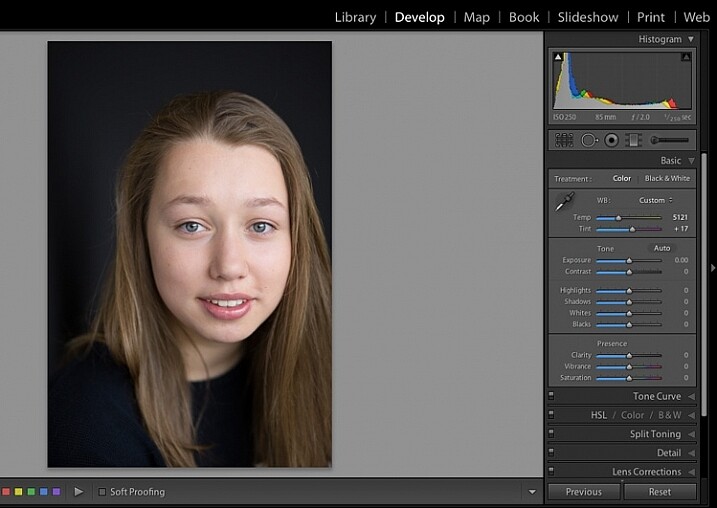
Correct the white balance.
The model’s skin tone is a little too light, and her hair and the background are too dark. To redress the imbalance, pull back the highlights and lighten the shadows. You can fine-tune this later if necessary.
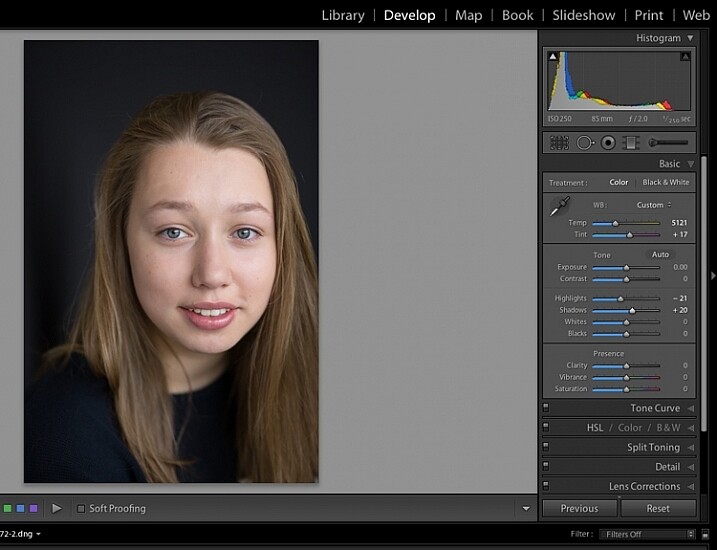
Adjust highlights and shadows.
The image still looks a little dull. Use the sliders under the presence tab to increase the vibrance and saturation, and move the whites slider up to give your portrait a nice clean look. Now it’s starting to look like my model’s real-life skin tone.

Increase vibrance and saturation.
You can crop at any stage. I’ve cropped this image for a tighter, better-balanced headshot.
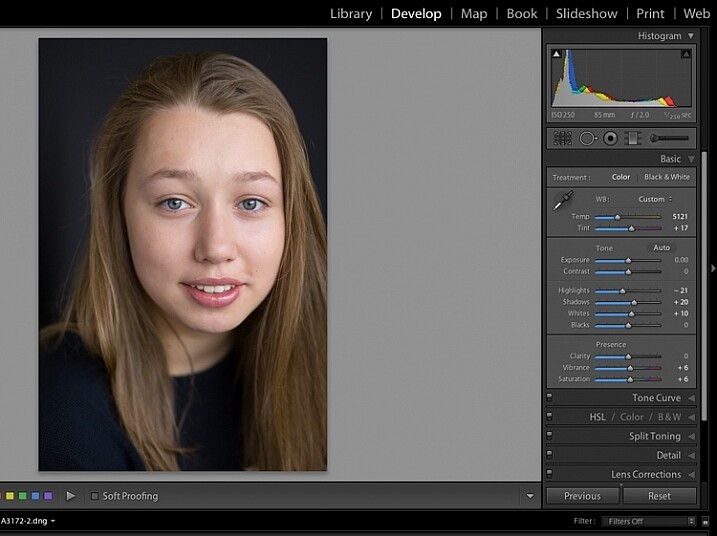
Crop your image.
Zoom in to take a closer look at the skin. This model is very young with almost flawless skin. Usually I wouldn’t do much, if any, softening with such great skin. However, for the purpose of this exercise, I will.
Select the brush tool. You can load your brush with any adjustments you want to apply. Although there are brush presets you can use for skin softening, teeth whitening, etc., I find them too heavy-handed.
Set the clarity slider down to around -35 to -40, and the (contrast to +35, and the Highlights to +15 or so – this will help maintain contrast and keep the face from looking flat) sharpness up to +20. This will vary according to your subject’s skin, and the kind of effect you want to achieve. In this example it will just even out the skin tone and give it a soft, glowing appearance. A mature person photographed in stronger light, will require a different treatment. The lower the clarity slider, the softer the skin will appear. For a grungy look, increase the clarity slider.
Reducing the clarity tends to flatten out the image, so you can increase the contrast, deepen the shadows and increase the highlights to balance this out. Keep the feather and flow at 100%, and brush all over the face with a large brush.
Zoom in close to look at the skin.

Brush all over the area with your adjustment brush.
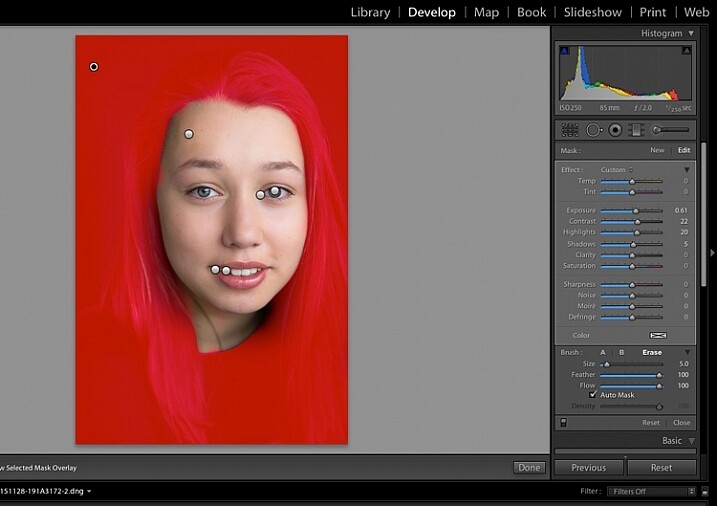
Underneath the image, check the box “Show selected mask overlay” (or use the keyboard shortcut, O) to see exactly what parts of the image your brush adjustments have touched. Often you’ll find it has covered the eyes and mouth, which is not desirable. Still using the adjustment brush, click on the erase brush tool, and remove the brushed-on effect from around the eyes, mouth, and hair.
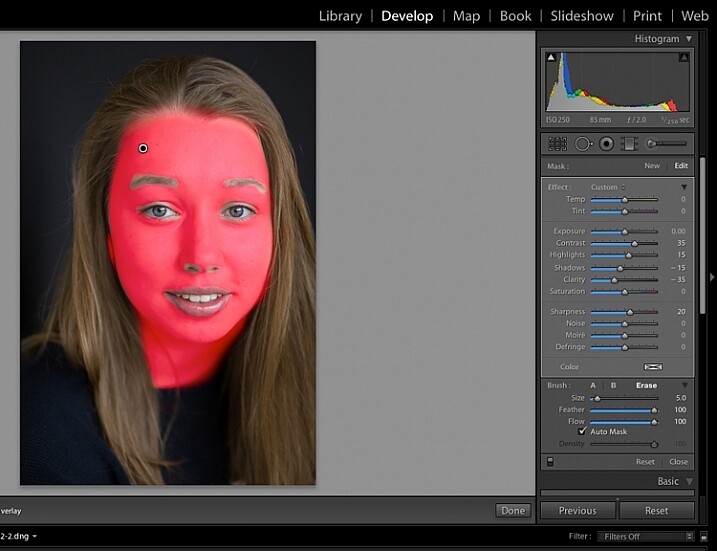
Brush off the adjustments from unwanted areas.
Here are the adjustments so far. Looking good.
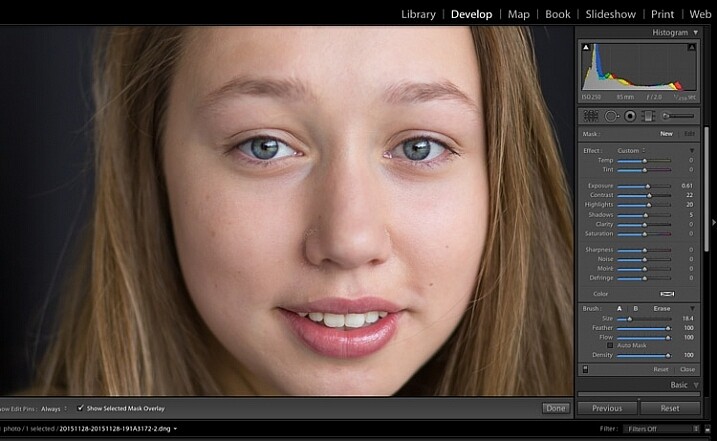
Zooming in even closer, then use the Adjustment Brush to add clarity and sparkle to the eyes. Note that by increasing the clarity, you also make the affected part of the image darker. Compensate with your exposure slider.
In this photo, I also increased the saturation of the iris a little to enhance the blue of the model’s eyes. Be sparing with this technique to avoid an unnatural look.
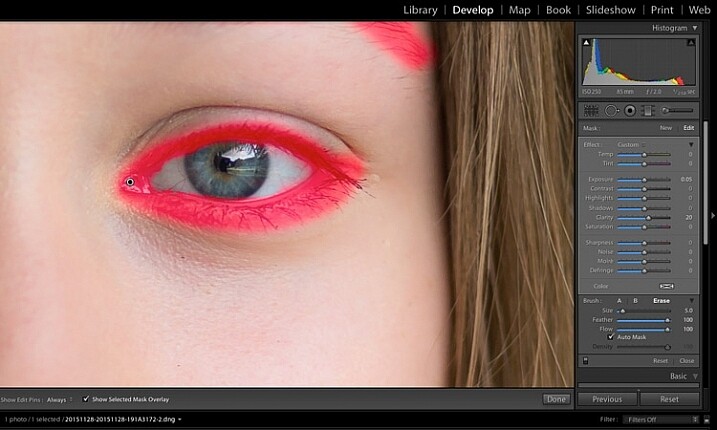
Use the brush tool to sharpen the outline of the eyes.
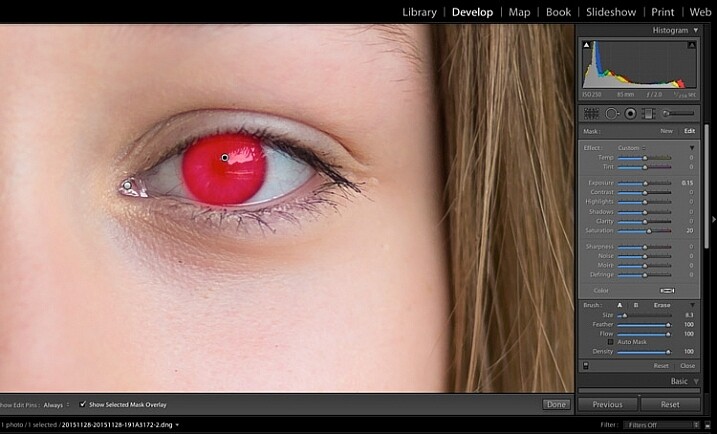
Treat the iris separately.
Moving on to the mouth area now. Again, this model doesn’t need any work on her lips or teeth; this is for the purpose of demonstration. Using the same technique as with the eyes, brush on clarity and increase saturation. I have also moved the temp and tint sliders up to alter the hue of her lips.
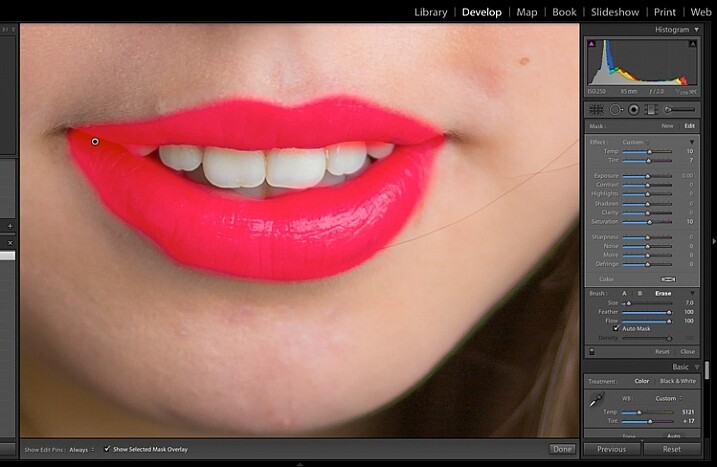
Brush over the lips to add colour and clarity.
To lighten teeth, use the brush tool with the saturation slider decreased, and the exposure slider increased just a little. As with the eyes, be sparing with this step.
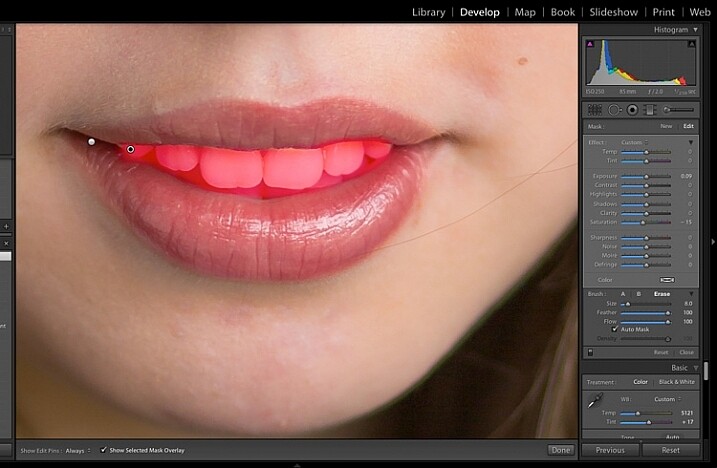
Lighten or whiten the teeth.
Finally for this image I have lightened the hair and background to reduce contrast between her face and the background, and to give separation between hair and background.
Finally, lighten the hair and background to give separation.
The final image is a vast improvement on the SOOC (straight out of camera) image.
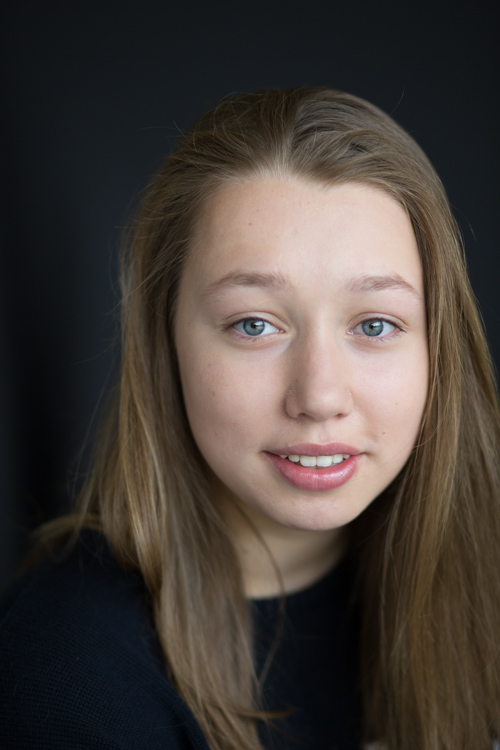
Before Lightroom adjustments. |
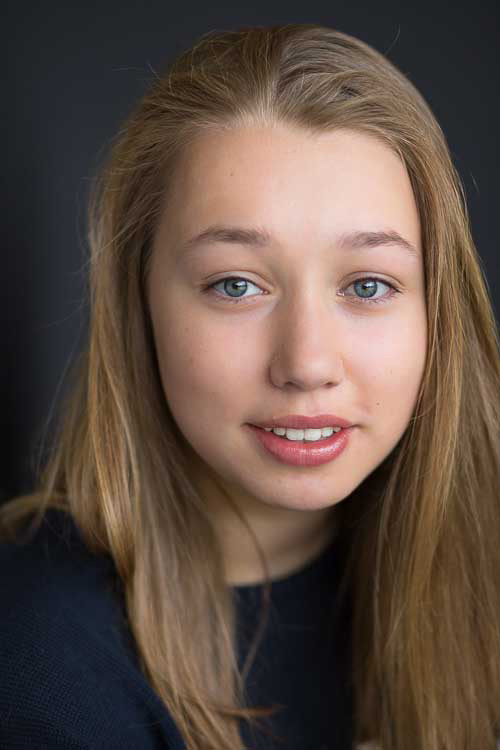
After all Lightroom adjustments. |
Lightroom editing is as much about personal preference as your shooting style, and my workflow and style represents just one approach of many. Share your tips and tricks (and, of course, questions) in the comments section below.
googletag.cmd.push(function() {
tablet_slots.push( googletag.defineSlot( “/1005424/_dPSv4_tab-all-article-bottom_(300×250)”, [300, 250], “pb-ad-78623” ).addService( googletag.pubads() ) ); } );
googletag.cmd.push(function() {
mobile_slots.push( googletag.defineSlot( “/1005424/_dPSv4_mob-all-article-bottom_(300×250)”, [300, 250], “pb-ad-78158” ).addService( googletag.pubads() ) ); } );
The post 11 Steps for Basic Portrait Editing in Lightroom – A Beginner’s Guide by Karen Quist appeared first on Digital Photography School.
Get Viktor’s Lightroom Rapid Editing System for Travel Photography Course 50% off now at SnapnDeals for a limited time only – February 9th-23rd, 2016.
A few years ago, just as I returned with 5,000 brand new photos from a driving trip to California, Utah and Nevada, I realized that I needed a completely new editing workflow. Two months later, I was not even close to being done with editing.

I spent the following year or so testing different approaches and systems, with the main goal to streamline, simplify, and speed up the entire process – from the moment the picture is taken, until it is published and safely backed up to the cloud.
After implementing my new workflow, using it for over a year and tweaking it along the way, I can now process and edit thousands of photos in a matter of hours. I would love to share my new workflow with you.
The biggest change in my editing workflow happened when I practically stopped editing photos while traveling. Instead, I concentrated only on shooting, rather than wasting time on anything else.

By the end of each day on the road, I import all new photos to a temporary Lightroom catalog, and during the import, I select the option to generate Smart Previews. This allows me to have access to all my photos through Lightroom Mobile on my tablet. I also rename all the images using my renaming template.

After renaming, my photos then have the following naming structure:
During initial import, I also apply top level tagging based on the location, or type of photos. For example, I might apply very generic tags like “Canada” and “New Brunswick.”
But, even before I import the photos to Lightroom and generate the Smart Previews, I always have another option to access my images. Since switching to mirrorless, I can now connect to my camera using my tablet or smartphone at any time, grab a few images for a quick edit in Snapseed, and post them to social media. As I mentioned before, my editing workflow is minimal on the road.
The real processing work starts as soon I am home. Sometimes, however, it can start even sooner. If it is a long flight home, I might cull some photos on the plane using Lightroom Mobile, with the main purpose simply to refresh my memories of the trip and make notes.
At home, I connect my master travel external hard drive to my desktop computer, and use the Lightroom option “Import from Another Catalog.” I then bring all the new photos to my main catalog and generate full-size previews for all of them. Because it typically takes a while to import thousands of RAW files and generate full-size previews, I often start the process before going to bed, so that when I wake up in the morning everything is ready.
Culling is the process of selecting the best photos for editing, and rejecting the bad ones. For a long time, I struggled with this step, as it was always time consuming, and quite often I would get distracted with an interesting image and start editing before finishing my selection.
Lightroom has multiple organizational features for culling that can, to be honest, be overwhelming at times. Features include: Flagging, Starring, Color Tagging, Collections, Smart Collections, Quick Collection. In the past, I tried to use all of them to design an elaborate system that was impossible to sustain for very long. Each time I failed with one system, I would come up with an even more complex scheme. Eventually, I recognized that it was time to simplify the process.
The inspiration for my new culling strategy was from the book, The ONE Thing, by Gary Keller. It states that in order to be 100% efficient you should concentrate on only one thing at a time. In other words, multitasking is evil. Inspired by the book, my process soon changed. My first goal, after importing new photos to Lightroom, is now to remove all the bad shots, the ones that can never be used (out of focus photos, for example). I quickly go through all my photos and use the keyboard shortcut “X” to flag all rejected shots. The process goes very fast even if I have thousands of photos because I concentrate on only one task.
After I finish marking the photos, I immediately delete the rejected files so they do not go to my backup system.
The next step is my favorite. I go through the photos again, and with the help of the keyboard shortcut “P” (P is for PICKED), I flag all the photos that have the potential to be processed and published (keepers). Once again, I only concentrate on a single task as I am not trying to grade picked photos or set star value. This approach allows me to identify the keepers at an incredible and efficient speed.
The next step is to make the keepers pretty.
The development of a new Lightroom editing approach was triggered by the realization that 80-90% of the edits I perform in Lightroom are identical for every edited image, and only 10-20% contributes to the uniqueness of any given photograph. The rationale was to automate the 80-90% of the editing process to save time on repetitive tasks.
In order to automate the editing, I created a two-level preset based system, one that I call Lightroom Rapid Editing. Lightroom Rapid Editing allows me to overcome the limitation of the presets, such as when any given preset produces a very different result depending on the level of exposure, lighting conditions, shadows and the dynamic range of the scene. With this two-level approach, I am able to compensate for various lighting conditions without touching the main Lightroom editing tool.
Level 1 – Style Presets. The presets that define the “LOOK” and style of the photograph. For example: cool or warm, cross processed or natural, contrasted or soft.

Level 2 – Adjustment Presets. The presets that allow fine-tuning of a photo without altering the style, and without the use of Lightroom editing tools. I named them the TOOLKIT.

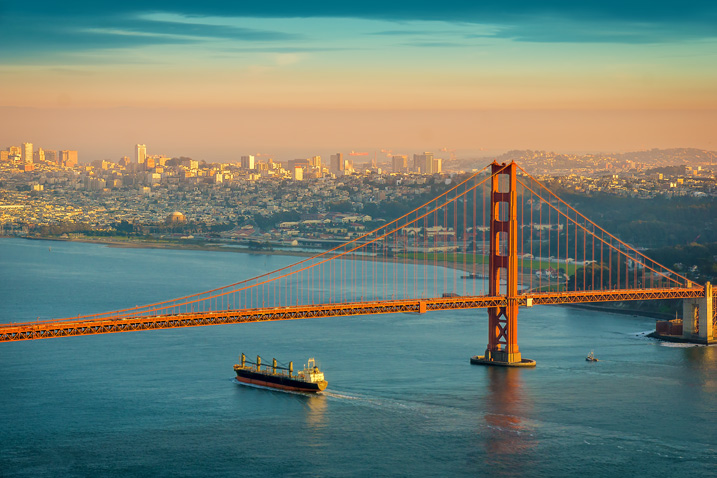
When I returned from a driving trip to Atlantic Canada, I brought back over a thousand new photos. After selecting around 10 keepers, I wanted to edit them using a similar style, and then publish them as the Atlantic Series on my travel photography blog. I started with my favorite photo from the selection.

I began with Level 1 of Rapid Editing by applying the NATURAL style preset to the selected image (above).

Natural style preset applied.
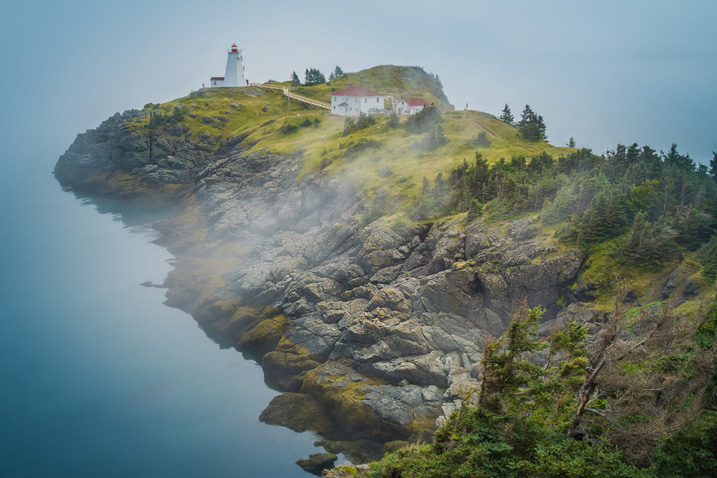
Even though I liked the style, the image did not look good at all, because it was too dark, with deep shadows in the background. This is when the second level of editing came into play.
From the TOOLKIT adjustment presets collection, I applied the following presets:
Below is the final result. It took me five clicks to go from the original unprocessed RAW image to the final edit.

The next step was to come up with a more creative style for this particular photograph. I used the two-level Lightroom Rapid Editing process to produce three more creative versions.

Preset: Broken Clouds

Preset: Drought

Preset: Point Lobos
During the next step, I selected the edited version I liked the best. In this particular case, I chose the image with the Point Lobos preset effect. I then used the SYNC SETTINGS functionality of Lightroom, to synchronize the editing settings with the rest of the flagged photos (the other nine keepers).
In the last step, I went through the photos one more time, using only the TOOLKIT, and focused on each photo individually. At this stage, I mostly adjusted the Exposure and Open Shadow to compensate for different lighting conditions and exposure imperfections (underexposure and overexposure). This process typically does not take long – an average of 10-15 seconds per photo.


At this point, I was finished with Rapid Editing. I managed to complete 80-90% of the editing process without touching any of the Lightroom editing tools. As you can see, Lightroom Rapid Editing allows me to process a high volume of photos in a relatively short amount of time, while also giving the photos a similar look and feel, that makes the set distinguished and unique.
After this two-level editing process, it was then time to perform the last 10-20% of editing that cannot be automated.
Depending on the image, I might open it in Photoshop for selective editing. In most cases, I clean the images by removing distracting elements from the composition (electric wires, debris). Another option I often use is Lightroom Adjustment Brushes for selective editing.
The very last step of my workflow is publishing. I use the plugin functionality of Lightroom to synchronize my newly created photos with my cloud portfolio on SmugMug. With SmugMug cloud service, I have access to all my photos at full resolution, and 100% quality anytime and anywhere.
One of my favorite features of SmugMug is the ability to create custom sized images on the fly by manually changing an image URL, without using any editing tools.
What I learned after designing my photo editing workflow is that there is no perfect solution for travel photography that fits every photographer. Any system we put in place is in a constant state of fluctuation, and all we can do is keep adjusting it based on the type of photography and our individual habits and routines.
Do you have a workflow you’d like to share with us? Please do so in the comments section below.
If you found this helpful, get Viktor’s Lightroom Rapid Editing System for Travel Photography Course 50% off now at SnapnDeals for a limited time only – February 9th-23rd, 2016.
googletag.cmd.push(function() {
tablet_slots.push( googletag.defineSlot( “/1005424/_dPSv4_tab-all-article-bottom_(300×250)”, [300, 250], “pb-ad-78623” ).addService( googletag.pubads() ) ); } );
googletag.cmd.push(function() {
mobile_slots.push( googletag.defineSlot( “/1005424/_dPSv4_mob-all-article-bottom_(300×250)”, [300, 250], “pb-ad-78158” ).addService( googletag.pubads() ) ); } );
The post Photo Editing Workflow for Travel Photography by Viktor Elizarov appeared first on Digital Photography School.
Photo Mate, arguably the most comprehensive Raw image editing app for Android, has received a substantial update. Version R3 comes with an all-new rendering engine for both Raw & JPEG editing. This includes improvements to all the important adjustments, such as contrast, shadows, highlights and exposure. Read more
Articles: Digital Photography Review (dpreview.com)
I admit it, I take too many photos. I know it, and I have too many images to deal with, and unless I am getting paid to finish them and send them out to a client, they may never get processed. Are you in the same boat? Do you too have some images that have just been sitting there in your digital desk drawer?
With digital photography, and especially because of how cheap memory is (don’t forget to include web hosting sights and the cloud), more and more photos are just there and never used. The best solution is to be more decisive, and just take fewer photos. But we all get out of hand, and sometimes just come home with more images than we know what to do with.
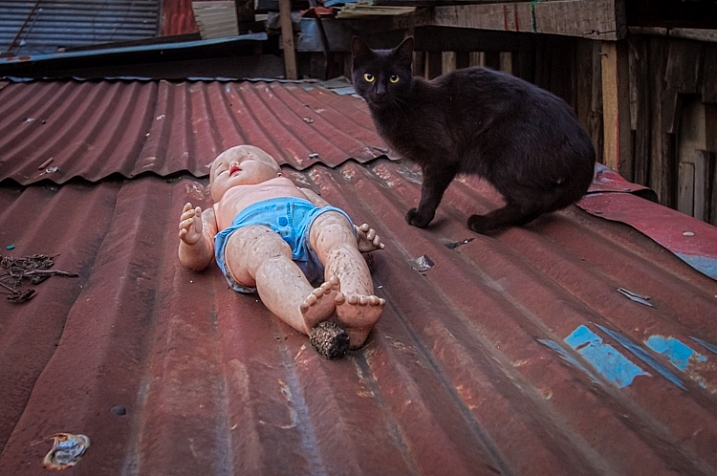
Final product after the simple steps followed below—a workflow that you can adjust to your own tastes too!
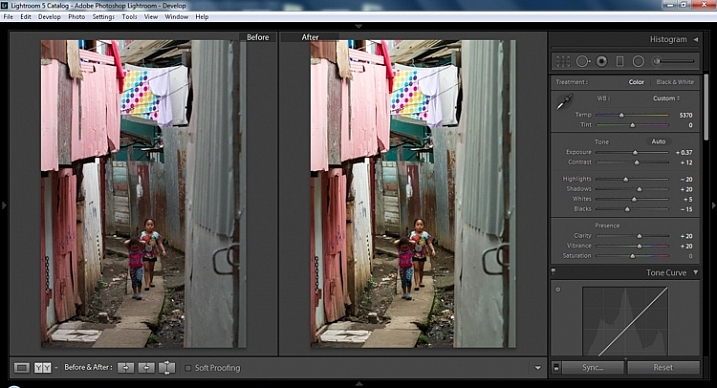
So the best thing to do is get to the grind and produce something. But it doesn’t need to be so much of a grindstone as you might think. I love taking photos more than processing and unless I am flying solo, I think I’ve got lots of people onboard with me. As you know, photography is not about broad strokes, and details are important. This set of instructions is specifically designed for street photography. But, are most of your photos from your travels? Well, streets (along with the convenient airplane) is maybe how you got there. Much of what we do as photographers crosses over into different genres of style and art. So have a go at the following tutorial, and you may find that with your own adjustments this is a recipe for more than just the street.
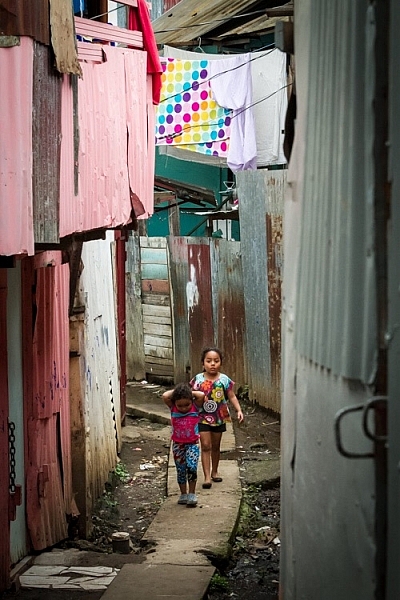
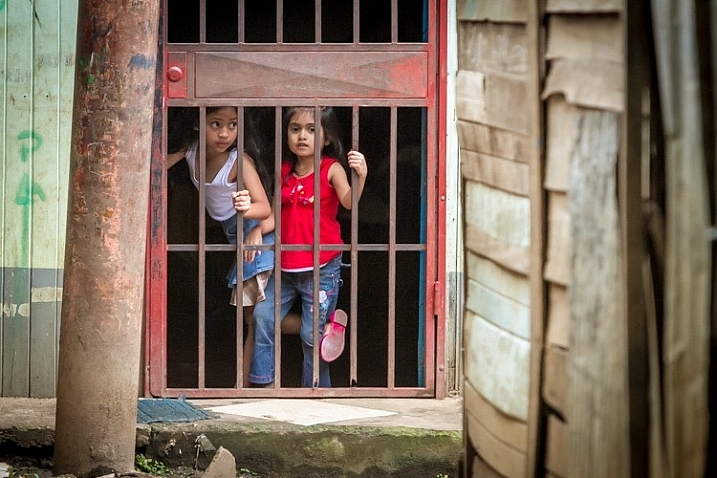
Final image of two young girls walking in the slums of San Jose Costa Rica, all editing was done following the steps below.
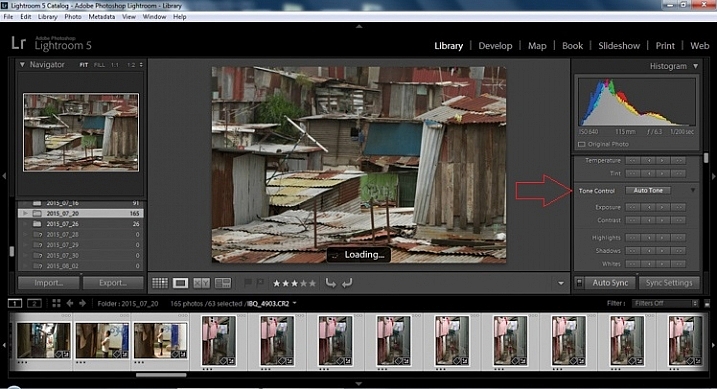
These instructions begin in the Library module of Lightroom, and then progress into the Develop module. There are countless modifications that can be made upon importing, categorizing them, giving them tags, etc. As the point of this tutorial is to streamline your workflow, the tips for editing will also be streamlined. So let’s get at it!
Select a batch of images that are preferably in similar lighting conditions, and which have a similar theme. For example, choose a set of photos that were all shot outside over the course of a few hours, but not all night. Or a group of photos that were all shot in the rain. Lighting and theme conditions can vary, but greater variations will have potential greater variations in results.
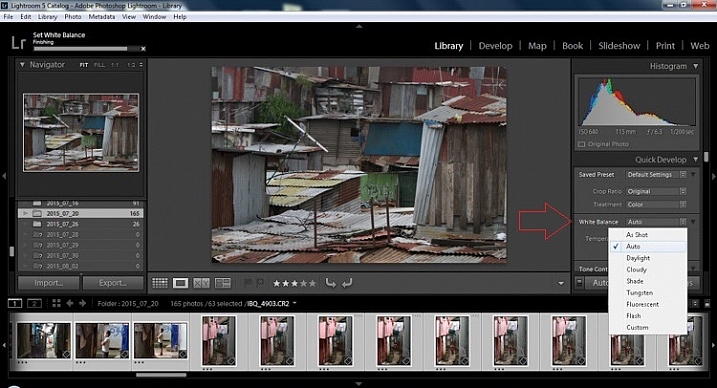
In the Quick Develop Panel (at the top of the right panel in the Library Module) Select White Balance and choose Auto. Before you turn away, let me assure you that there have been more Ph.D.s awarded, and dissertations given, in creating the algorithms behind this button. If you compound the interest in dollars that has been invested in this Auto algorithm it would sustain many third and fourth quarter GDP figures for entire nations.
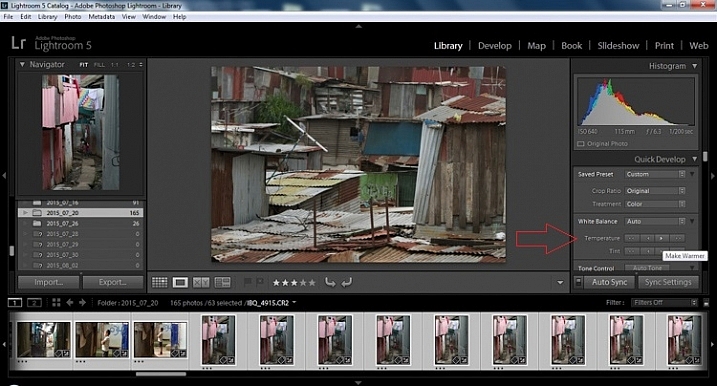
Next, push the single arrow pointing right under the temperature heading indicated by the Make Warmer hint that appears if you hover over it. The single arrow will increase your warmth tone by +5. If you want plus +10 push it twice, using the double arrow will increase it in increments of +15.
I know it is scary, and it does make me cringe sometimes too, but anything can be shifted, tweaked, and tuned later (and should be) to your liking. This will Auto Tone your exposure, highlights, shadows, whites, and blacks to each photo individually, so it is not the same as batch editing which will be covered later.
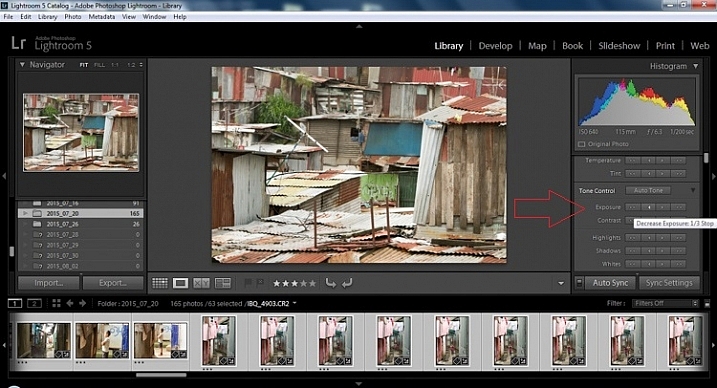
Select the single arrow to the left, decreasing the exposure by a 1/3 of a stop. It is minor, but keeps your darker tones (especially things like black asphalt) a little darker. Note: this is assuming you have a correct exposure to begin with – if it’s a bit out you can adjust later on a per image basis as needed.
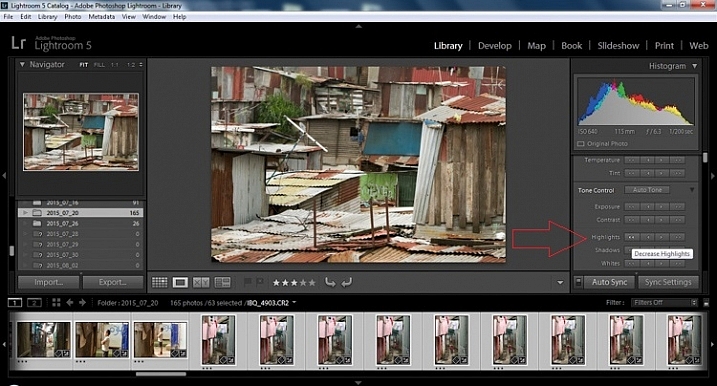
For the Highlights, use the double arrow to the left, decreasing the highlights, and select it once. Be patient, as depending on how many pictures you select and your computer speed, it may take more than a few seconds. This can be monitored by looking in the top left of the screen above the Navigator window (progress bar).
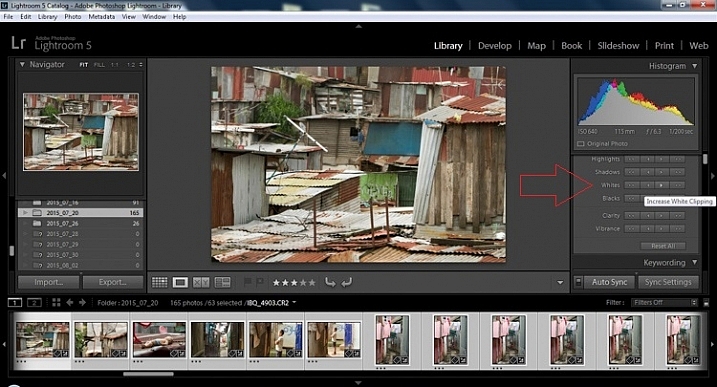
For the shadows, use the double arrow on the right, decreasing the shadows, and click it once.
Increase the white clipping by +5, by clicking the single right arrow once. Decrease the black clipping by -5 by clicking the single left arrow once.
Increase the clarity by +20, by pressing the double arrow to the right once (for more information about clarity please look near the end of the article which describes it in more detail).
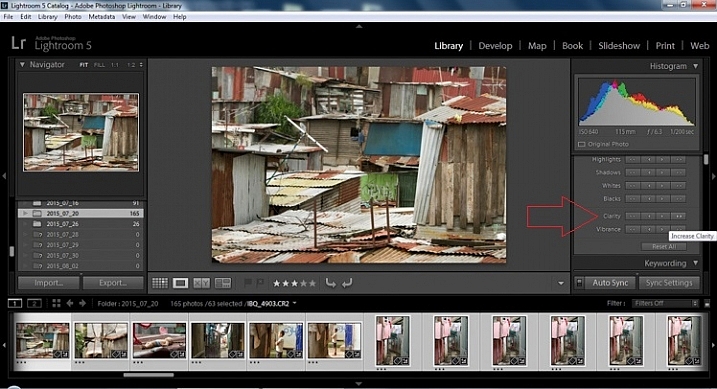
The final step in the Library module is to increase the vibrance by pressing the double arrow to the right (for more detailed information about vibrance please see below).
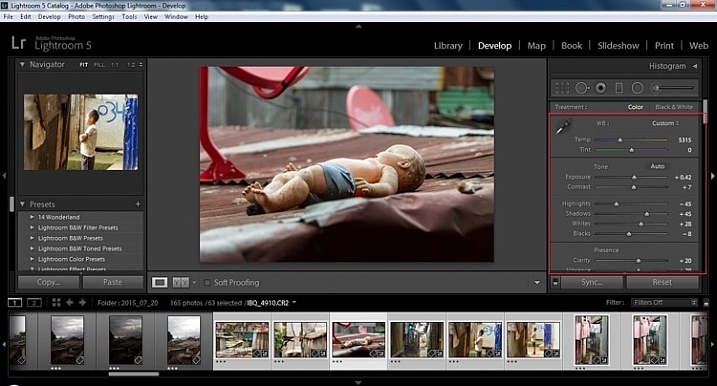
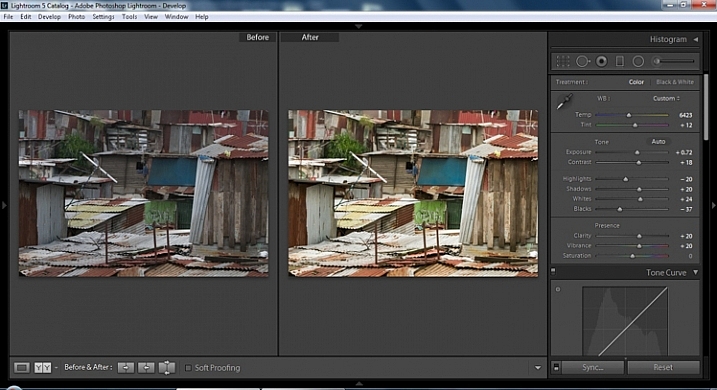
Now we will be moving into the Develop module. To this point, all the changes that you’ve made, have been applied to all the photos in the group, which you originally selected. Looking at the image below, you can see that despite the simple clicks made in the Library module, many delicate changes have been made. Again, all of these changes can be fine-tuned to your liking later. There are hundreds of modifications that can be made, but let’s keep those for later.
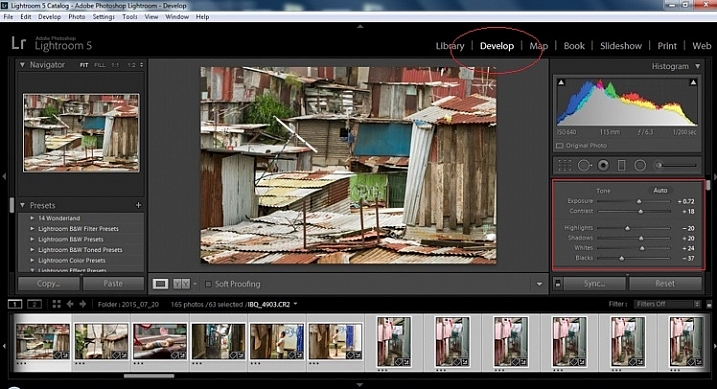
Notice the sliders have moved based on the changes you made in the Library Module Quick Develop panel.
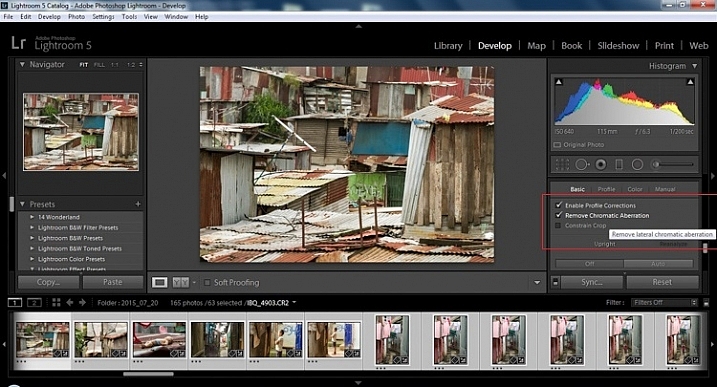
This step requires you to scroll down to the Lens Corrections Panel, and select two checkboxes. The first is Enable Profile Corrections, and the second is Remove Chromatic Aberrations. Both of these will allow Lightroom to make changes to the photo based on the lens used, and the inherent flaws that exist in that lens. A variety of corrections may or may not be included like, barrel distortion, vignetting, and as the second suggests, green and purple colors that result from diffraction in the lens.
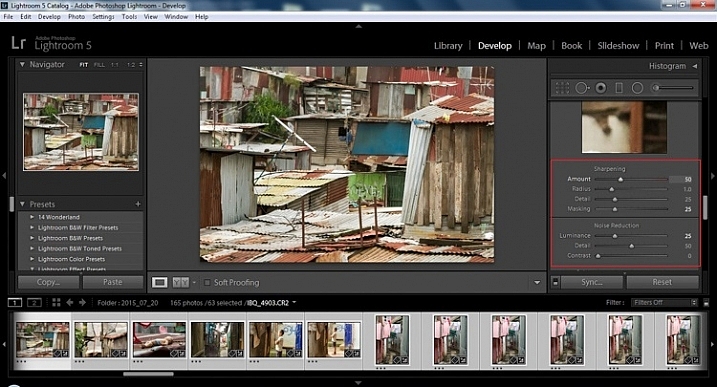
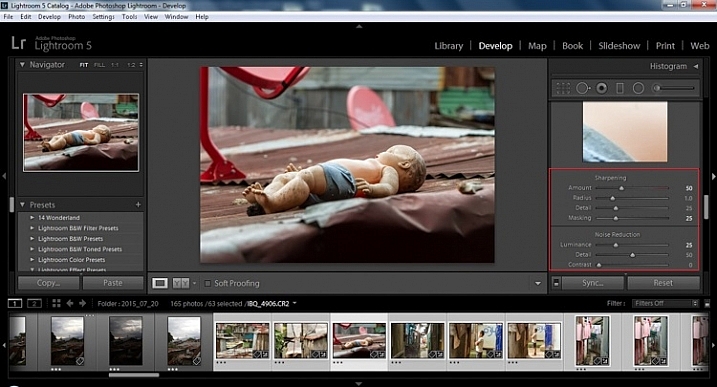
Next is to scroll up and go to sharpening, increase it to +50, then increase your masking to +25. Finally you may or may not need to reduce noise. For this example, because the ISO was 640 the noise reduction was increased to +25. To understand, sharpening and masking in more detail and their relationship to noise reduction please read below.
Are you still with me? Here is where you will thank some of those computer science majors for creating the AUTO button. This is why they get the big bucks, and it saves us large amounts of time. We don’t need to apply these changes individually.
At the bottom of the Develop module there is a rectangular button that says Sync. PUSH IT! Make sure all your images are still selected before you sync (highlighted in the thumbnail strip at the bottom).
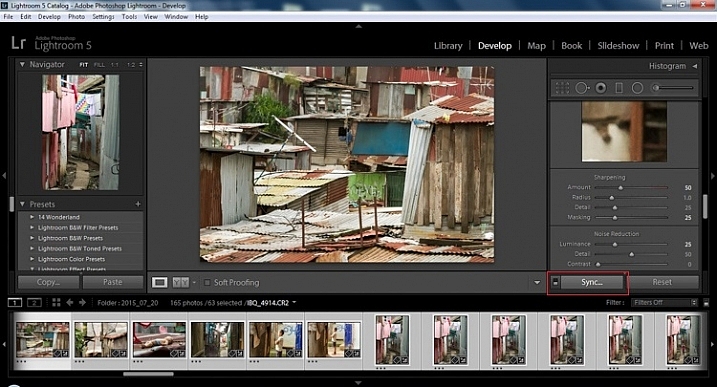
When the Synchronize Setting window pops up, select Check None. This will ensure that no unwanted changes will be made to your previous adjustments.
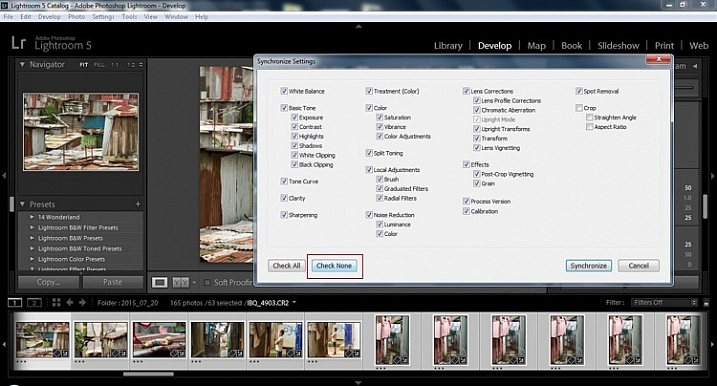
Now check the boxes labeled Sharpening, Noise reduction (which will subsequently select both boxes below it), Lens Profile Corrections, Chromatic Aberration, and finally Process Version. Notice these are the same adjustments that you had made in steps 12 and 13.

Finally, press the “Synchronize” button.
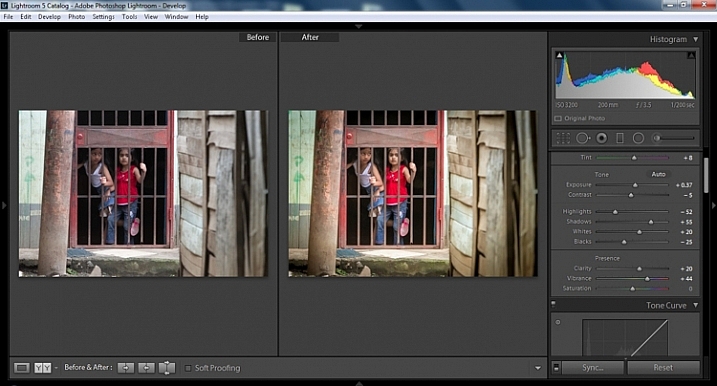
Looking at the screenshot above, you can see that the all of the selected photos have had the changes made to them. If I were to go back and make all the individual changes to the potentially tens, hundreds, or even in bizarre cases thousands of photos, it would have taken me time that I don’t have, and neither do you. Looking at the image below you can see that the exposure, shadows, lights, whites and blacks have remained unique to the individual photo.
Below are simple side by side comparisons. In the last one I actually made a few additional small adjustments, and added a -10 vignette. Other than that, it is ready for export, along with almost all of the other photos that were just individually and batch adjusted. It is a bit of mix and match magic that keeps your photos natural, and true to the street.
Clarity increases the contrast where two different tonal values meet. It is like contrast but on a micro scale, makes the image seem to be sharper. The lights will get lighter and the darks darker, but only where the different tone values meet, not broadly across the whole tonal range of the image.
Vibrance increases the tone of colors that are not already saturated. It is like a balancing scale for color. Saturation on the other hand, increases the intensity of all spectrums of light. Thus, vibrancy helps to bring out subtleties in the colors. For street photography, it brings out richness, without creating an over-saturated look. Sometimes I pull the vibrance up, and push the saturation down, to maintain an urban feel but doing so without making it look over-worked.
Just as I said, clarity is like contrast on the micro scale, sharpness is like clarity on a micro scale. Thus, it is like micro-micro scale. So we are still dealing with tonal values, but in even more detail. So be careful how much you increase your sharpness. Never try to rescue camera shake or blur in the photo using sharpness. “The devil is in the detail,” and this is no truer than in the sharpness slider. Because what you gain in sharpness you also increase the amount of noise (not desirable). If you have a high ISO, sharpness is more of an enemy than a friend.
Final image all adjustments applied
Textures will become more enhanced, but smooth surfaces will not be affected, resulting in less excess noise being introduced. This will help the street photography mood, without giving it an overly grainy feeling, or your shadows having too much noise. So how much of this movement left and right on the Masking slider is helping or hurting all your hard work? Thanks to those “AUTO guys” the Alt key on windows (Opt on Mac) will give you a grayscale impression of exactly where, and how the sharpening is impacting your photo. White indicates the area on the photo where sharpening is being applied, and black shows where it is not. You will notice that the contrasts and textures deserve most of the sharpening, alleviating your smooth tones and surfaces from the ill effects of sharpness.
So hopefully that will give you some things to try out with your images to process your street photography faster and consistently. Do you have any other tricks and tips you use? Please share in the comments below.
googletag.cmd.push(function() {
tablet_slots.push( googletag.defineSlot( “/1005424/_dPSv4_tab-all-article-bottom_(300×250)”, [300, 250], “pb-ad-78623” ).addService( googletag.pubads() ) ); } );
googletag.cmd.push(function() {
mobile_slots.push( googletag.defineSlot( “/1005424/_dPSv4_mob-all-article-bottom_(300×250)”, [300, 250], “pb-ad-78158” ).addService( googletag.pubads() ) ); } );
The post 13 Steps for Editing Street Photography in Lightroom from Start to Finish by Branson Quenzer appeared first on Digital Photography School.
MaxCurve is an app for iPhone and iPad that, as the name suggests, relies predominantly on curves for image editing. Overall, there are 20 curve adjustments available which are grouped into so-called kits. Another key feature of MaxCurve is its ability to connect, via Wi-Fi, to a desktop version of Photoshop that is running on a Windows PC or Mac. Read more
Articles: Digital Photography Review (dpreview.com)
Photoshop and Lightroom are awesome tools for photographers, professionals and amateurs alike. While Lightroom is considered the most comprehensive tool to do some basic image editing, such as fixing exposure, white balance, and contrast, Photoshop is often chosen by photographers for further creative processing. Without a doubt, Photoshop is a powerful program with huge possibilities. However, once you really dig Continue Reading
The post 50 Photoshop & Lightroom Photo Editing Tutorials to Enhance Your Images appeared first on Photodoto.
Don’t you hate when you realize that you spend more time in front of the computer than actually taking photographs? The realization is even more depressing when you are a travel and landscape photographer and, by definition, you are supposed to travel and discover the world’s beauty.
This is how I felt about 12 months ago during my second ever processing crisis as a photographer.
The first crisis happened about 10 years ago when I became more serious about photography, and started taking more photos. This was a time when 100% of my editing was done in Photoshop, which quickly led me to feel like I was drowning in gigabytes of digital images. What I did not realize at the time was that a majority of photographers who had switched to the digital realm, shared my pain.
This is when Adobe saved us all by releasing Lightroom, an application designed specifically for digital photographers. Lightroom not only offered non-destructive photo editing but a complete digital photography workflow with streamlined digital asset management as well.
I immediately embraced Lightroom by starting with the beta version, which allowed me to cut my photo editing time in half. With every new version, Lightroom became more sophisticated and versatile, almost completely replacing Photoshop in my workflow. After Adobe released Lightroom 6, I recognized that I could complete 90% of my processing in Lightroom, and my need for Photoshop was minimal (10%).
But, sophistication and versatility had its own price. Lightroom became much slower and its complexity skyrocketed.
Another factor that contributed to my second processing crisis was my switch from a Canon DSLR, to a Sony mirrorless. The new Sony camera (A6000) had a bigger sensor and produced much bigger file sizes, which slowed my editing down even more.
After a long trip to Hawaii, California, and the Southwest, I brought back more than 5,000 brand new photos. The process of Lightroom editing was slow and painful, making it obvious that I had to come up with the completely new workflow to reflect a higher volume of larger files.
I started by analyzing my Lightroom editing habits, and soon enough, I made a discovery that became the foundation for my new workflow. Perhaps less of a discovery and more like a simple realization, I noticed that 80% of my edits are identical for every single photo I process, with only 20% varying from photo to photo.
The solution was obvious. By automating the 80%, I could radically reduce the time I spend in front of the computer. The use of preset functionality in Lightroom was an obvious choice.
I dove into my Lightroom Portfolio Collection and selected the images that best reflected my personal style and artistic vision. I then created presets based on those selected photos.
At that point, I faced a challenge. As you have probably noticed, LR presets usually do not work out of the box; their settings are too specific for a particular photo to work with every image. Depending on the lighting condition of the scene, contrast level, shadow depth, and color saturation, the same preset can produce a completely different result across different images.
I managed to overcome this challenge by separating my presets into two categories, and using a two-level editing approach.
Okay, enough theory, let’s get to the practical demonstration – here’s my new Lightroom editing workflow in action:
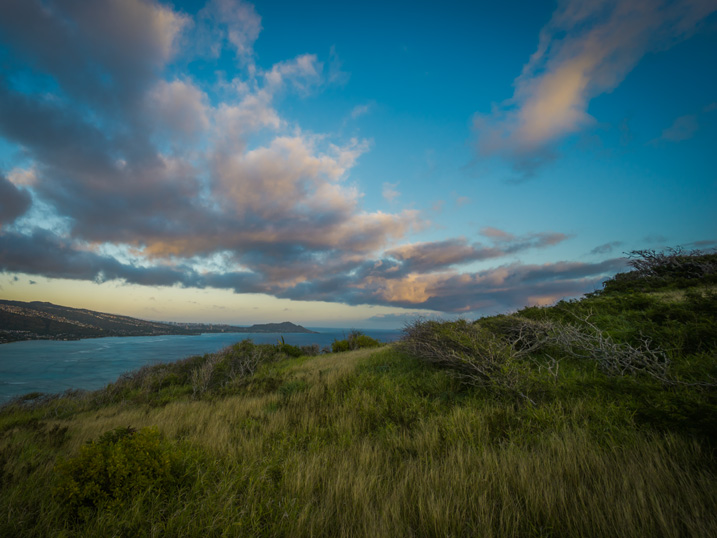
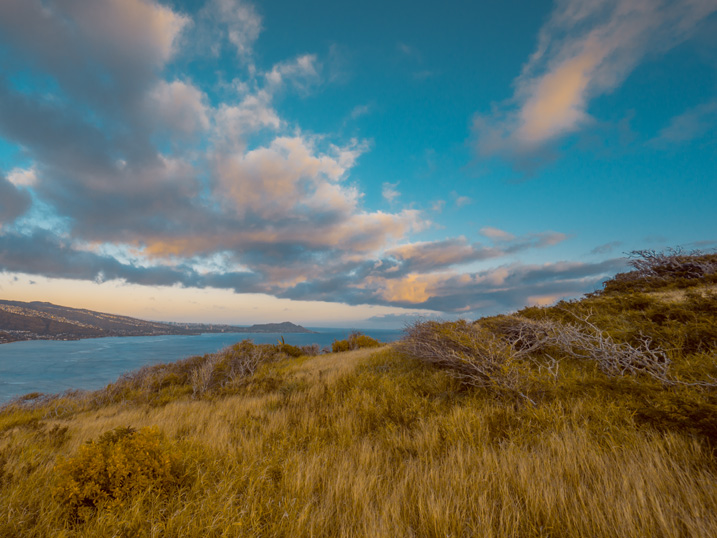
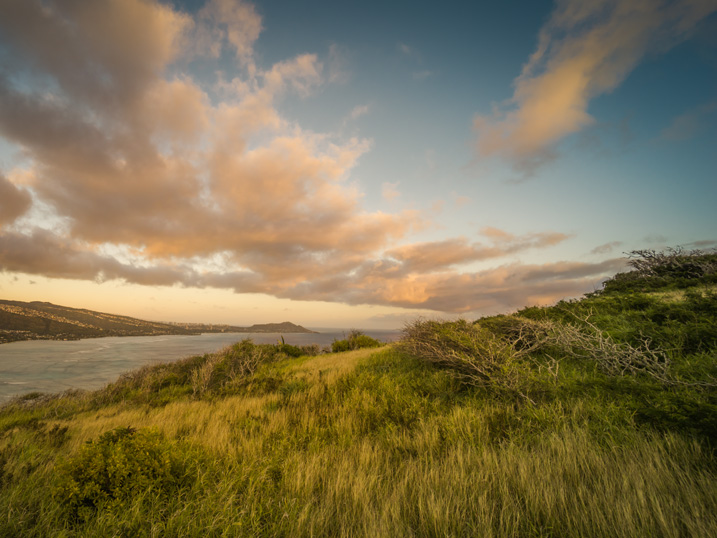
Here is a photo I took in Hawaii at sunrise. This is a typical landscape photo featuring the open sky and water, mountains, and foreground vegetation. In order to preserve the details in the highlights, I set the exposure for the sky area, as I normally do for the majority of landscapes. It resulted in an underexposed capture.
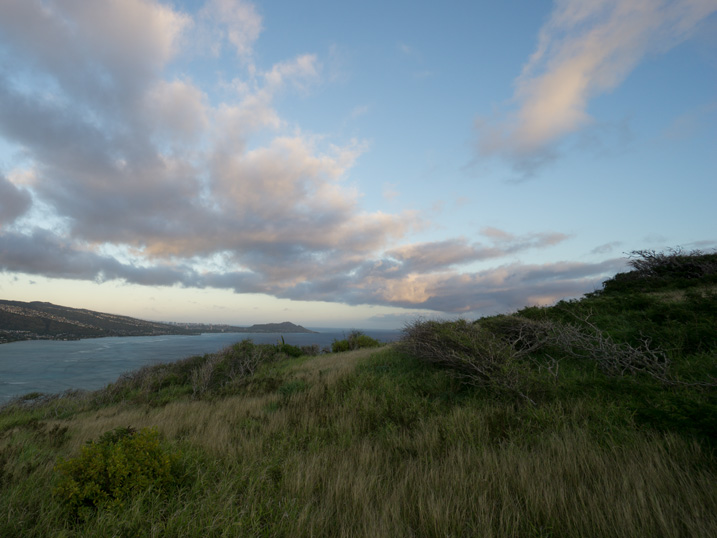
The goal here is to correct the exposure, recover the shadows, and bring back the rich colors of the tropical sunrise.
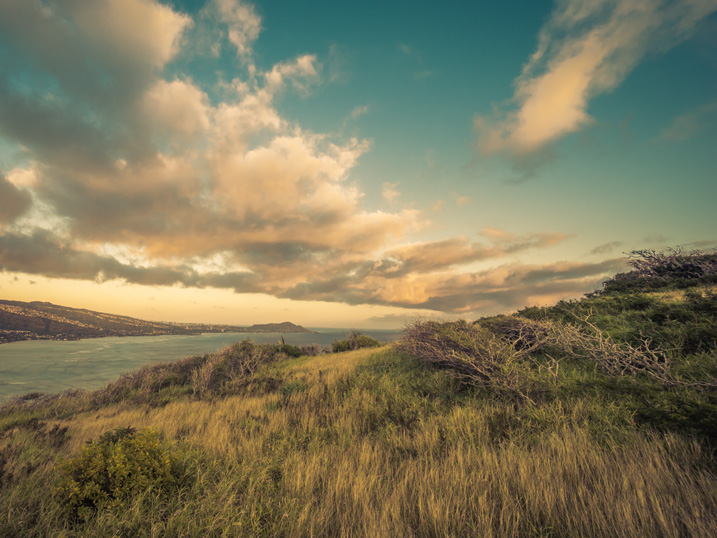
I always start my landscape editing by trying to achieve a natural look first by applying the NATURAL preset from my STYLE collection.
Even though I managed to boost the colors and define the sky, the result is far from exciting, as the photo is much too dark.
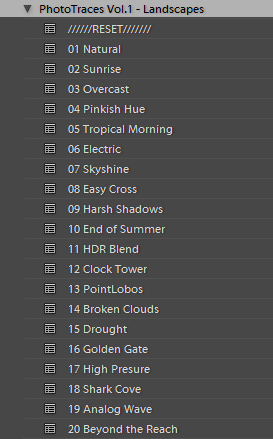
This is when my ADJUSTMENT collection, which I call the TOOLKIT, comes into play.
The TOOLKIT is a selection of 40 presets where each is responsible for changing only one specific parameter, without changing the style of the image. Together, they help to fine-tune different aspects of the photo.
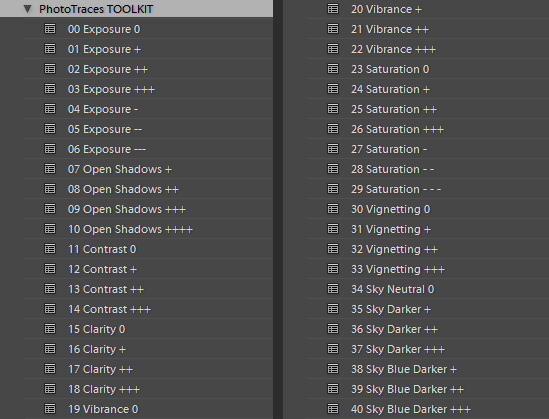
The TOOLKIT presets are stackable, which means that you can apply multiple presets to the image without the presets overwriting each other.
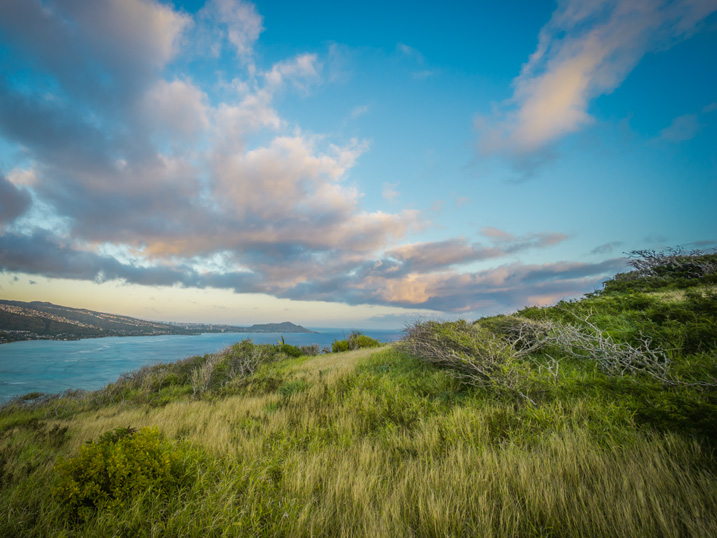
This is all I had to do. As you can see, I managed to complete 80% of my entire editing in five clicks, without touching the right panel of Lightroom where all of the editing tools are housed.
The last step is to record the editing steps. I use the Snapshot functionality of Lightroom to save my editing steps as a new Snapshot. For the name, I use “Lightroom Editing Formula”.
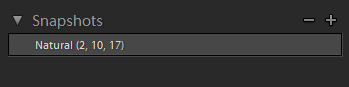
The Lightroom Editing Formula starts with the name of the preset and follows with the numbers inside the brackets, where each number represents a specific ADJUSTMENT preset from the TOOLKIT collection.
If I edit a photo for my blog, I might stop here and export it as a JPEG; but, if I am working on a portfolio piece, I try to explore a variety of artistic styles. I follow a similar approach by going through the three steps of my workflow, but each time select a different STYLE preset.
Every time I achieve a result I like, I save it as another Snapshot.
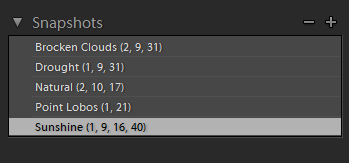
By the time I am done, I might have anywhere from four to five different editing versions for the same image.
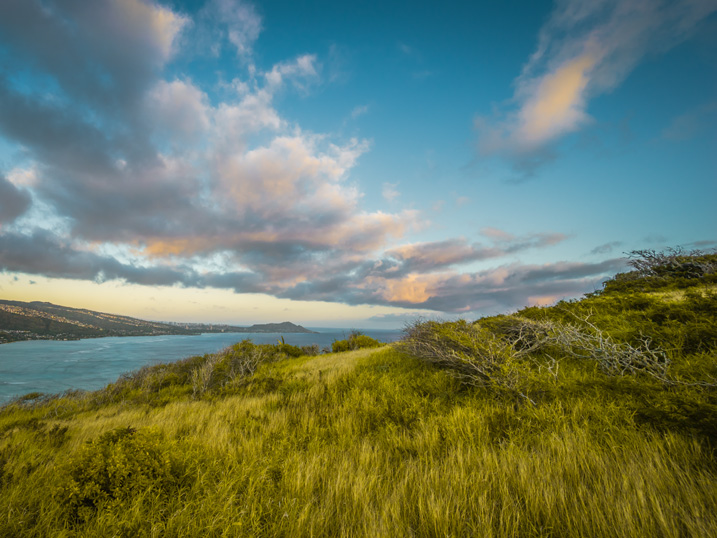
Here is the most exciting part; I get to select the most interesting version for my portfolio and perhaps another one for Instagram.
From here, I normally jump to Photoshop and perform the remaining 20% or so of the editing process. In Photoshop, I mostly clean up the image with the help of the Stamp Tool, and do noise reduction using Topaz DeNoise plugin.
The entire process of producing five different versions of the featured photo took me less than 10 minutes, and all without having to touch the main editing tools in Lightroom. I call it Lightroom Rapid Editing.
By streamlining and automating my Lightroom workflow, I managed to reduce the total editing time by more than half.
How can you use these tips to reduce your editing time? Do you have any other time savers you’d like to share? Please do so in the comments below.
googletag.cmd.push(function() {
tablet_slots.push( googletag.defineSlot( “/1005424/_dPSv4_tab-all-article-bottom_(300×250)”, [300, 250], “pb-ad-78623” ).addService( googletag.pubads() ) ); } );
googletag.cmd.push(function() {
mobile_slots.push( googletag.defineSlot( “/1005424/_dPSv4_mob-all-article-bottom_(300×250)”, [300, 250], “pb-ad-78158” ).addService( googletag.pubads() ) ); } );
The post How to Reduce Editing Time by Automating Your Lightroom Workflow by Viktor Elizarov appeared first on Digital Photography School.
 |
Phase One has launched Capture One Pro 9, the latest iteration of its tethering and image editing software. Capture One Pro 9 offers a ‘completely updated contrast engine,’ additional brushes, color editor masks and new keyword tools, among other features. Phase One also now offers three activations of the software for each standard license a photographer purchases. Also on the list of updates is the ability to apply curves locally, the addition of a Luma option to the curve tool palette and a battery status icon for the tool bar to view tethered camera battery life.
Capture One Pro 9 is available now for Mac and Windows for $ 299 / €279 to new customers. Capture One Pro 7 and 8 customers can upgrade for $ 99 / €99. Anyone who purchased Capture One Pro 8 after October 30, 2015 will be exempt from the upgrade fee.
Press release:
Unleashes Unprecedented Power, Precision and Quality
COPENHAGEN, November 30, 2015 — Phase One, creator of the world’s finest open-platform, high-end camera systems and professional imaging software today released Capture One Pro 9. Known for its outstanding tethered capture capability, high-quality raw conversion, and precision image editing tools, Capture One Pro is already considered by 100,000 of the world’s leading photographers to be the best image capture application.
Capture One Pro 9 introduces many new image quality precision tools, including a completely updated contrast engine. Capture One Pro 9 also brings powerful new asset management capabilities, including unprecedented sortable keywords capability. It has been designed to help speed the image-management process for volume keyword applications. Besides new physical workflow features, Capture One Pro 9 also gives customers three activations for each standard license to support on-location activation management, as requested by photographers.
NEW IMAGE EDITING TOOLS
Revised contrast engine – Changes have been made to the algorithms of color, saturation and contrast. And the color editor has been revised to align design with the color balance tool. Handles are made easier to use and adjust, and the tool is now scalable when undocked.
Masks from color editor – The color editor now allows the user to make a mask from a color edit.
New Brush pack – Tool changes include the addition of flow, airbrush, straight line brushing, and the ability to link brushes.
Luma curves and local curves – Added to the curve tool palette, Luma curves can be used to create contrast curves without affecting saturation. Also, curves can be used locally.
Battery status for toolbar – This new tool can be placed on the tool bar where it gives a power supply overview to the attached tethered camera, warning photographers of low power during a shoot.
Export EIP for catalogs – Catalog users can now benefit from EIP export for easy transportation of RAW and Settings, off system. In the Export originals panel, there is now an option to Export as EIP. Sessions users can also choose to Export originals. This creates a workflow in which the original RAW and adjustments are not packed – instead a copy is made, packed as EIP.
DNG colors – This new feature allows Capture One Pro to treat and display supported camera files that have been converted to DNG (and include the RAW file in the DNG package), as if in their original format.
NEW ASSET MANAGEMENT TOOLS
Keywords Tool – Keywords may be added and removed from images. The standard Capture One tool tips for local reset, local copy apply, pre-sets and help are available for this tool.
Keyword Libraries – Used to manage the list (or lists) of keywords in a catalog or a session. As the Keywords tool adds keywords to images, the document Keyword Library is populated. This forms a keyword list for any and all terms in the current document and is unique for the session or the catalog.
Sortable Keywords – Unique to Capture One Pro 9, users are able to reorder keywords in the Keywords tool for single image selections.
Originally developed to render the exceptional image quality captured by medium format Phase One camera systems, today Capture One Pro supports more than 400 different camera models. Capture One Pro is designed with more than enough available “headroom” to satisfy requirements for the highest resolution now and in the future. Whether or not photographers own a Phase One camera, all photographers can benefit from Capture One Pro’s exceptional image quality and workflow advantages.
“Capture One Pro is essential for all commercial shoots; we use nothing else,” said Jonathan Rose, Company Director, DigiBoutique Ltd.
“Capture One Pro 9 is all about quality of life improvements for working photographers – whether they’re in the studio, or shooting landscape or portraits,” said Henrik O. Håkonsson, President, Phase One. “And those who are switching or stepping up from mainstream software might now find that Capture One Pro meets more, if not all, of their needs, beyond its legendary raw conversion capabilities.”
For illustrative & tutorial videos and details on all the new and improved features in Capture One Pro 9, including new cameras and lenses supported, please go to: www.phaseone.com/tutorials
Availability and Pricing
Capture One Pro 9 is available now for the Mac and Windows operating systems online at www.phaseone.com/store and from Phase One authorized partners worldwide. www.phaseone.com/partners. New with this release, each license permits three activations.
New customers can purchase Capture One Pro 9 for 299 USD or 279 EUR. Owners of previous versions of Capture One Pro 7 and 8 may upgrade for 99 USD or 99 EUR. For customers who have purchased Capture One Pro 8 since October 30, 2015, Phase One is offering a grace period, exempting them from the upgrade fee. Eligible customers should contact support www.phaseone.com/support to have their keys upgraded.
Capture One Pro is also available by subscription. Capture One Pro 8 subscribers can simply download the new Capture One Pro 9 release. A single-user subscription is 15 USD / 12 EUR per month for a 12-month plan. Please see all subscription options at www.phaseone.com/store
Articles: Digital Photography Review (dpreview.com)
You must be logged in to post a comment.