RSS
 

Posts Tagged ‘easy’

Natural Looking HDR in Photoshop and Lightroom in 5 Easy Steps

06 Feb

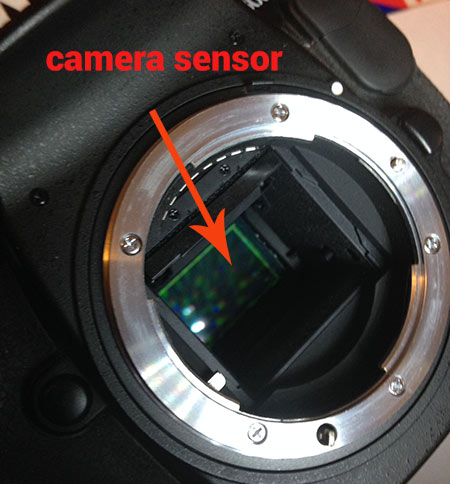
HDR (High Dynamic Range) photography was developed out of necessity to overcome limitations of photography equipment, mostly in digital cameras’ sensors. From the beginning, the technology was intended to make photographs as close as possible to human experience by bridging the gap between what the human eye perceives, and what the digital camera can actually capture.

NaturalLookingHDR Photo 1

Montreal, Canada – HDR processed, five exposures, tripod.

Think of HDR as a sophisticated, software based, ND (Neutral Density) filter. Instead of placing it in front of the lens at the moment of capturing photos, HDR allows you to accomplish it in post-processing. It sounds practical and convenient, right? There is no need for extra equipment and you can work on extending the dynamic range of the scene without rush, at your own pace, in the comfort of your home.

NaturalLookingHDR Photo 2

Montreal, Canada – HDR processed, three exposures, hand-held.

Why is HDR photography getting such bad press lately?

I believe that the main reason for this is the misconception in defining what HDR actually is. Somehow, there is a notion, that HDR is a new style in photography, which is completely false. HDR is not a style or genre; it is a technique of post-processing. It is a tool. The way the final photo looks is absolutely up to you, as you have full control over the entire process.

There are many different tools and techniques for creating HDR photographs and each one has its own advantages and limitations. If you are going for a surrealistic, edgy look in your images, Photomatix is your best friend.

But, if you are like me and your main goal is to achieve images that are as natural as possible and reflect the best aspects of the original scene, I definitely have a solution for you – one that I’ve successfully used for years and love.

On my blog, dedicated to travel and landscape photography (see my bio below for a link), you can find a detailed breakdown of my shooting and processing techniques for almost every photograph. In most cases where I used this technique, it is not easy to tell if the photo was processed as HDR unless you read the description. They look that natural.

NaturalLookingHDR Photo 3

Big Sur, California – HDR processed, three exposures, tripod.

The technique is somewhat underappreciated, but it is very powerful and easy to master. The beauty of it is that you do not have to learn additional software and there is no learning curve. You use familiar and powerful Adobe tools, Lightroom and Photoshop, and nothing else.

NaturalLookingHDR Photo 4

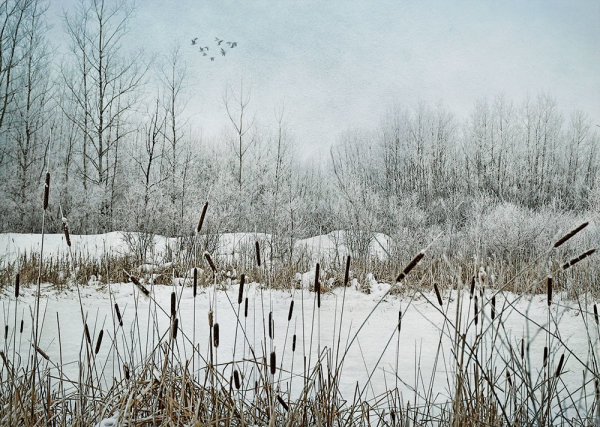
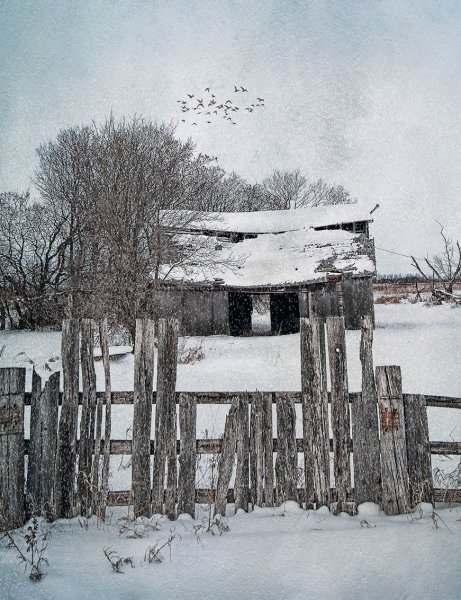
Cayo Coco beach, Cuba – HDR processed, three exposures, tripod.

This technique leverages the power of 32-bit processing in Photoshop HDR Pro, the module of Photoshop that was established in version CS3.

Below is the infographic that illustrates the schematic view of the entire process, from the time you take the photo to the moment you are ready to save the final image.

NaturalLookingHDR Photo 5

The Technique

1. Bracketing Photographs

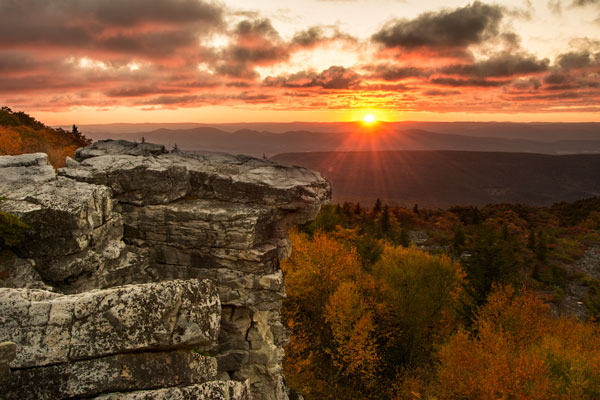
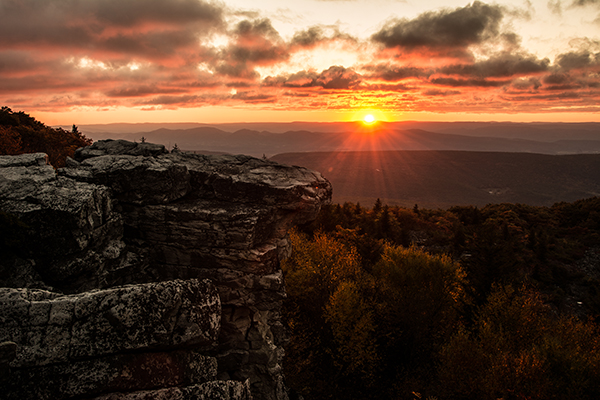
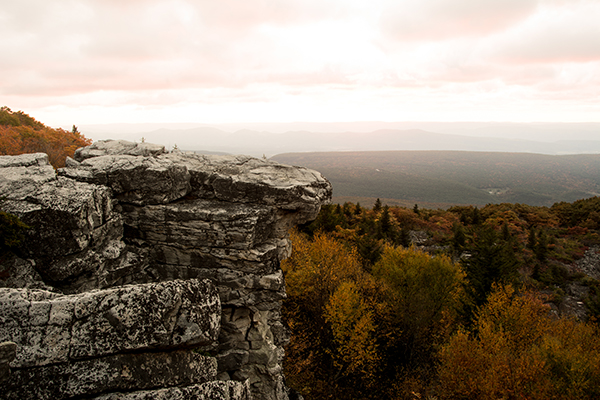
Before you can start processing photos for HDR you need to take a series of bracketed shots with different exposure values. Normally, you take between three and five shots in each series but, in extreme lighting conditions (example: shooting directly into the sun), you might need to take anywhere from seven to even nine shots.

Ideally, you take multiple shots on a tripod but, since Photoshop has an extremely effective alignment tool, it is possible to take hand-held photos and let Photoshop align them.

2. Lightroom: Preprocessing

This is very simple step that should not take longer than one to two minutes. Import photos into Lightroom and only apply the following adjustments in the LENS CORRECTIONS panel:

  • Enable Profile Corrections. Lightroom detects the model of your lens and applies corrections to fix any type of distortions.
  • Remove Chromatic Aberration. Lightroom automatically cleans the edges in your photographs.

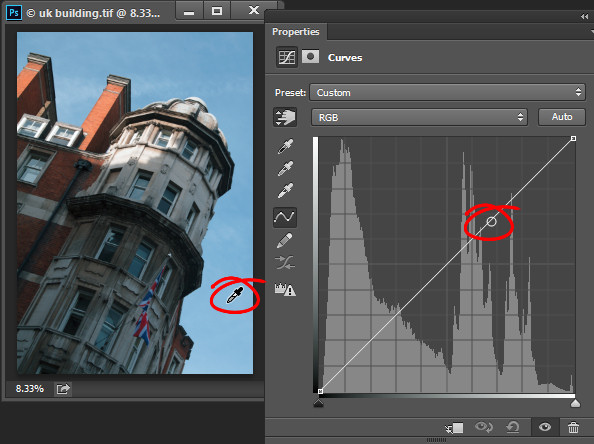
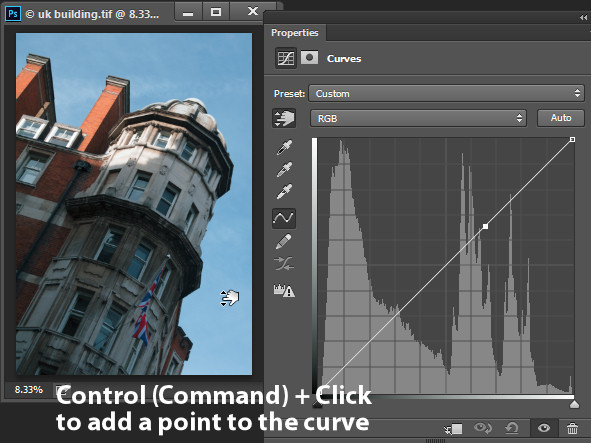
3. Photoshop: Tone Mapping

This is an almost completely automated process and should not take longer than two minutes.

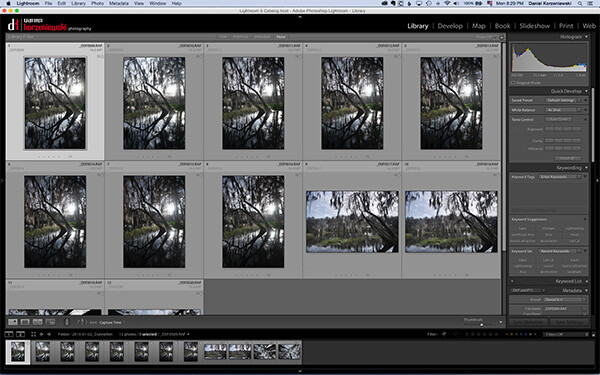
In Lightroom, select the bracketed photos that you want to merge to HDR. Right click (option click on Mac) and go to Edit In > Merge to HDR Pro in Photoshop.

NaturalLookingHDR Photo 6

Your bracketed photos will open in Photoshop and will be placed on separate layers. Immediately, the complex algorithm will be applied in order to align the layers. This comes in handy if you took the photos hand-held, without a tripod.

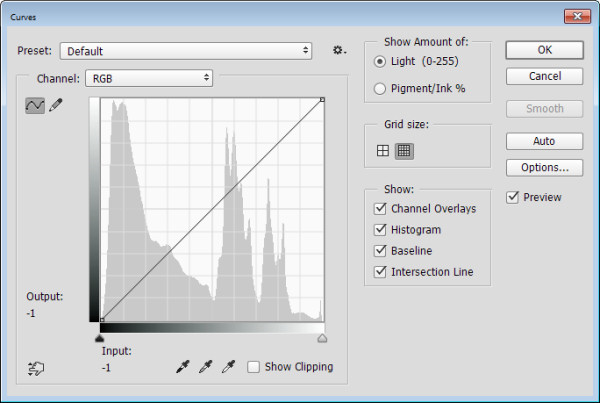
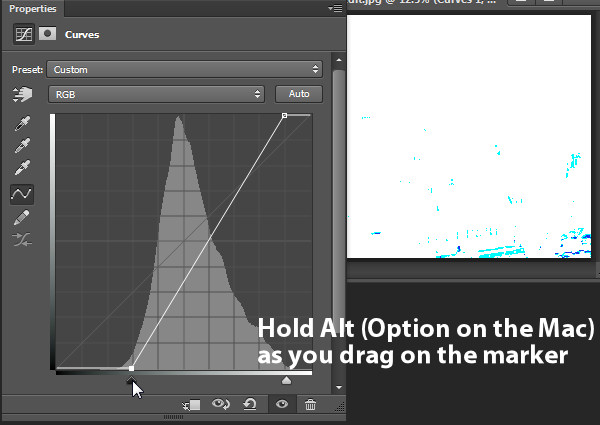
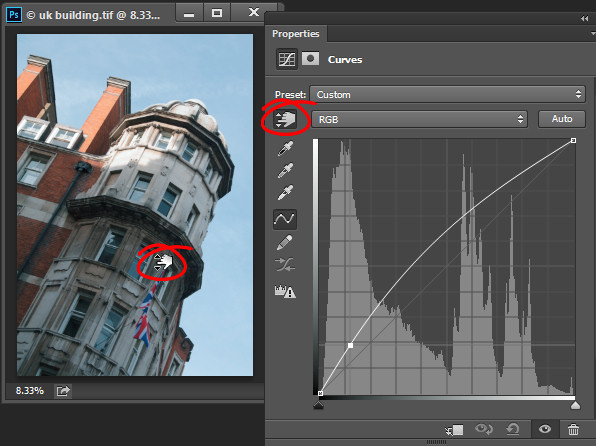
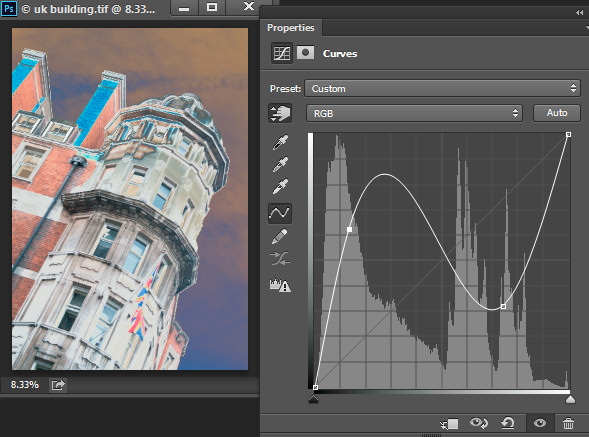
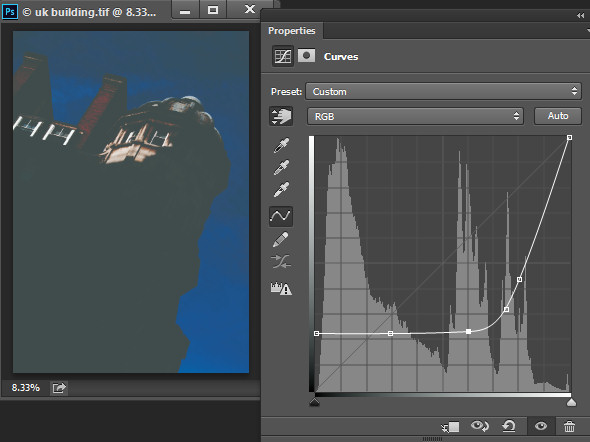
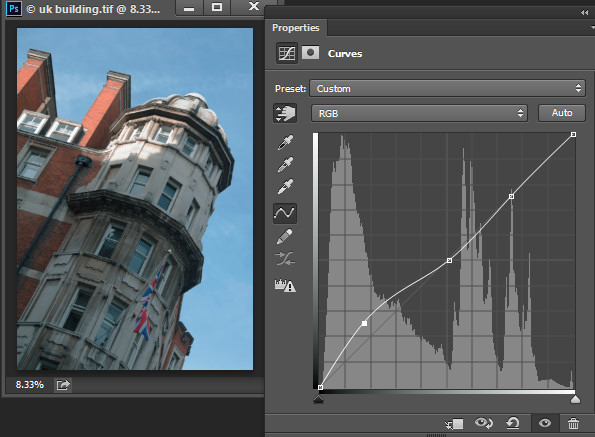
Next, the HDR Pro interface is triggered. All you have to do here is select the tone mapping mode. Opt for the 32-bit option to ensure that you preserve as much information as possible from the original images. Click OK.

NaturalLookingHDR Photo 7HDR Pro will merge the bracketed photos into a new 32-bit image and open it in Photoshop’s main interface. The tone mapping is complete. All you have to do now is save the document (File > Save). The new HDR image will be saved and automatically imported back into Lightroom. You can find it next to the original bracketed photos.

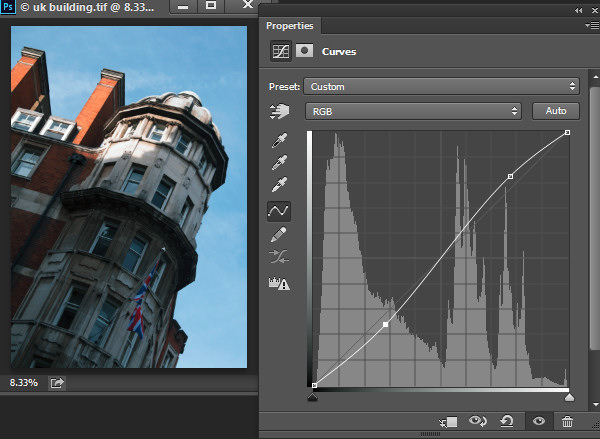
4. Lightroom: Main Processing

This is the most exciting step. You edit the newly tone mapped HDR image with enormous bit depth (32-bit) to give it the desired look and feel you want. Use standard Lightroom workflow to achieve your artistic vision.

Here is the photograph I took in Cuba and processed using this technique. Below the photograph, you can find a screenshot of the Lightroom interface with all of the adjustments I performed in order to achieve the final look.

NaturalLookingHDR Photo 8

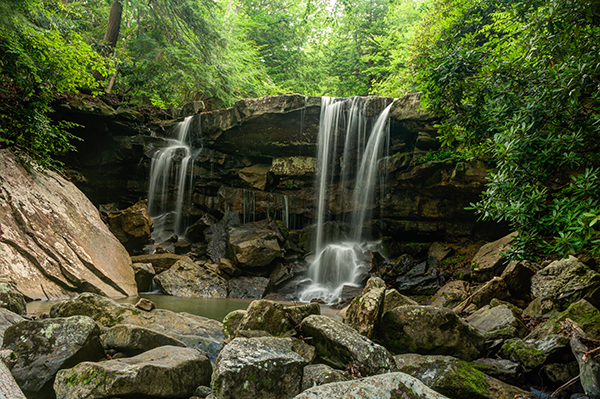
Cayo Santa Maria, Cuba – HDR processed, three exposures, tripod.

NaturalLookingHDR Photo 9

At this point, HDR processing is done. If you are happy with the way your photo looks, you can save it as a JPEG directly from Lightroom (“Export” in Lightroom).

5. Photoshop: Final Touches (Optional Step)

In some cases, HDR photos require additional edits, such as selective sharpening, noise reduction and HDR artifacts cleaning. Photoshop is your best friend for selective editing.

Select the HDR photo in Lightroom, right click and select Edit > Edit in Adobe Photoshop. In Photoshop, do what is necessary to improve your final photo. In the majority of cases, all you will need is to reduce noise and nothing else.

That is it. This is how you achieve natural looking HDR images in five easy steps or less.

NaturalLookingHDR Photo 10

Manhattan, New York – HDR processed, three exposures, hand-held.

PROS of 32-bit HDR processing in Photoshop HDR Pro

  • It does not require stand-alone HDR software
  • The learning curve is minimal
  • Tone mapping and editing are completely two separate processes and it is easy to achieve a natural look
  • This technique takes advantage of 32-bit editing

CONS of 32-bit HDR processing in Photoshop HDR Pro

  • In some cases when there are multiple moving objects in the scene (trees, leaves, water), it can cause artifacts that require additional cleaning.

Have you tried this method before? How do you process your HDR images? Please share in the comments below.

googletag.cmd.push(function() {
tablet_slots.push( googletag.defineSlot( “/1005424/_dPSv4_tab-all-article-bottom_(300×250)”, [300, 250], “pb-ad-78623” ).addService( googletag.pubads() ) ); } );

googletag.cmd.push(function() {
mobile_slots.push( googletag.defineSlot( “/1005424/_dPSv4_mob-all-article-bottom_(300×250)”, [300, 250], “pb-ad-78158” ).addService( googletag.pubads() ) ); } );

The post Natural Looking HDR in Photoshop and Lightroom in 5 Easy Steps by Viktor Elizarov appeared first on Digital Photography School.


Digital Photography School

 
Comments Off on Natural Looking HDR in Photoshop and Lightroom in 5 Easy Steps

Posted in Photography


Geotagging Photos in Lightroom in 4 Easy Steps

04 Feb

For travel photography, geotagging your photos has become fundamental. By geotagging your images, you’ll not only be able to remember the locations once you are back home, but also it will help on searches. If you intend to sell your photos at any time, adding the metadata pertaining to the location into the file is going to improve searches and make your photograph easier to find on the web.

Geotagging is a rather simple process and there are a couple different ways to do it. At the simplest level, you simply attach a GPS data-logger to your camera and the location will be recorded into the EXIF of the photo at the time you take it. That’s it. Now if you own multiple bodies, then you’ll need a different GPS device for each of them.

Bad_ElF_Geo_Tracker

The other option you have is to get an independent GPS tracker to record the data and then pair it with the photos. As I always carry at least two camera bodies, this is option I utilize. I have tried a couple of loggers and ended up with the Bad Elf 2200 GPS Pro. It is small, convenient and pro-rated, and it can be paired with up to five devices at the same time via Bluetooth. Of course there are other options on the market; all you need is to be sure that you’ll be able to obtain and export the recorded tracks from the device.

Working with Lightroom

Something that’s important before you start: to avoid headaches, is to always wise to check your camera clock. It should be set to the actual local time zone in which you are shooting, as once you import the data, Lightroom will try to synchronize the time of the EXIF data from the camera with the time of the recorded data from the GPS logger. If you forget to do this, there is a way to correct it later, but it will be much more seamless if you do it beforehand.

Once you do that, the process is fairly simple and can be done with the following steps.

1) Obtain your GPS file

Export the GPS data from your logger in the format .gpx. This is the standard for these type of files; save them as they can be useful for other applications as well in the future. As an example, in this recent post I have included a detailed map of my trek to illustrate a day in the field.

2) Import your files into Lightroom

Import your files into Lightroom as you normally do and then go to the Map Module.

Import_Photos

Go_to_Map_Module

3) Load your tracklog file

Select all the photos you want to add the GPS information to. This one is a bit tricky – you need to click on a menu down at the bottom close to the icon with the lock. From there, select “Load Tracklog” and navigate to the menu where you saved the file previously.

Load_Tracklog

Select_your_Track

4) Tag the photos with the GPS information

As soon as you import the file, you’ll see the track loaded into the map. Go to the same menu and select “Auto-Tag XXX Selected Photos.” That’s it – that should do it, and now you’ll also see a bubble over the track that indicates where the photos were taken. At this point the GPS coordinates have already been recorded in Lightroom.

Track_Loaded

Auto_Tag_Photos

GPS_Icon_Added

If for any reason you forgot to put the correct time on the camera, you can now adjust it by going to  “Set Time Zone Offset” from the same menu you were working.

Set_Time_Offset

You can take a look at the photos’ meta data and you’ll find the exact GPS coordinates along with location information. As you can see, this process takes only a minute or two to complete and it is fairly easy.

GPS_Data_LR

If you are not already tagging your photos, I hope you can incorporate the process into your workflow soon. I believe it will be important in the long run and you’ll never forget again where that photo was taken, especially in unfamiliar places.

googletag.cmd.push(function() {
tablet_slots.push( googletag.defineSlot( “/1005424/_dPSv4_tab-all-article-bottom_(300×250)”, [300, 250], “pb-ad-78623” ).addService( googletag.pubads() ) ); } );

googletag.cmd.push(function() {
mobile_slots.push( googletag.defineSlot( “/1005424/_dPSv4_mob-all-article-bottom_(300×250)”, [300, 250], “pb-ad-78158” ).addService( googletag.pubads() ) ); } );

The post Geotagging Photos in Lightroom in 4 Easy Steps by Daniel Korzeniewski appeared first on Digital Photography School.


Digital Photography School

 
Comments Off on Geotagging Photos in Lightroom in 4 Easy Steps

Posted in Photography


Easy Peasy Photoshop Actions – 71 Super Premium Actions for Only $24

18 Dec

You have heard of Inky Deals which is one of the leading deals websites in the design community, with an extended family of more than 300,000 design enthusiasts. They’re the only ones who offer a 200% money back guarantee on every product. This means that if you’re not happy with it, you get your money back and you also get Continue Reading

The post Easy Peasy Photoshop Actions – 71 Super Premium Actions for Only $ 24 appeared first on Photodoto.


Photodoto

 
Comments Off on Easy Peasy Photoshop Actions – 71 Super Premium Actions for Only $24

Posted in Photography


The Easy Way to Make Your Own Custom Photoshop Brushes

26 Nov

If you’ve never heard about the creative use of brushes in Photoshop, this article is for you. If you already know about using brushes, you’ll be able to ramp up your creativity once you learn this easy skill – making your own brushes.

DSC_0974Pond2W

What are Photoshop brushes and why you’d want to learn how to make your own?

Photoshop brushes are tools that are mostly used just like regular paint brushes to add strokes of color to your images. Most often people will use them as part of their dodging and burning workflow. Some people also use them in digital painting. The built-in brush set comes with a great assortment of  brush styles, such as soft bristles, round, square etc., but you can also make your own “fancy” custom brushes (which are reusable) to speed your workflow and add elements of interest to your images.

The creative side of custom brushes allows you to use all sorts of imagery, textures, individual shapes, and even other photos like an old fashioned stamp pad, so you can quickly add artistic treatments to your images. You can even make a brush of your signature to easily sign your work.  Then combining the stamped brushes with layers and blending modes you have a whole other set of easy creative tools you can use to multiply your photographic impact.

brushes-palette

Screenshot of the Brushes Palette – notice the birds and my name close to the bottom? These are custom brushes.

Making reusable items into brushes helps you to easily add objects of interest or even subject matter to your images. Birds are very popular in landscape images these days. Who doesn’t instantly feel the freedom and purpose of birds in flight? Adding a carefully placed flock of birds, or even just one bird in flight, can change the entire story of the image and add a powerful element to your composition.

_300385203W

Adding a “flock of birds” brush to create a better story.

By creating your own “instant flock” with brushes you will never be at a loss to fill an empty sky. As well, this technique is the same whether you’re making a birds brush, a signature brush, sparkles, snow flakes, or music notes – what you can create is entirely open, limited only by your imagination.

The Simple Process for Making Custom Brushes

Let’s use birds for this example. Birds are popular and a versatile addition to landscape images, so this demo will show you how to make a custom reusable brush for adding a flock of birds to your images. This assumes you have a photo of birds. If you don’t, but still want to follow along, the zip file below contains all the elements you need to replicate this specific tutorial.

Step 1

Open the image you want to make the brush of – birds, trees, etc. – in Photoshop. The best images to use are ones where the item that is to be the brush is isolated on a plain background, in the case of birds a clear blue sky is perfect. If you want to make brushes from images of trees, try to use images where the trees are against a plain uncluttered background.

A good image for a brush base.

A good image for a brush base.

Step 2

Double click on the background layer to make it editable – it should now be called Layer 0. Make a new empty layer and move it beneath Layer 0 as shown below.

layers

Step 3

Next,  you are going to select the background and cut it out. Using the Magic Wand tool, set the Tolerance in the top menu to around 50. This will ensure that all your background pixels are selected. If you have a more complex background, you will have to play with the Tolerance, or perhaps try the Lasso tool to cut out the background.

magicwand

Background selected with the Magic Want tool.

Step 4

With Layer 0 as your active layer, and the background with the marching ants, hit Backspace on your keyboard to delete the background. Click CTRL D to remove the marching ants. Your image should now look like this:

brush-base

Step 5

Now you’ll will make the actual brush. You can use the Rectangular Marquee tool or the Freehand Lasso to select the birds or the subject of your brush. Which tool you use will depend on your brush subject. I will use the Rectangular Marquee tool for this example. Using the marquee tool draw a selection  around your birds.

selection

Under the Edit menu, look for Define Brush Preset and select it. You’ll get a pop up that wants you to name your brush. Give it a creative name and click ok.  Now go into your Brush Preset palette by clicking on the brush tool, and you’ll see your newly minted brush at the bottom of the list.

brush tool     brushes context menu


your-new-brush

Step 6 IMPORTANT!

The final step is to SAVE your new brush so you can use it over and over. Look for the little gear in the top right corner of this brush preset palette. Click Save Brushes and give your new set a name.

You’re done! Yay. Birds in flight forever. Whenever you want to add birds, just select this brush from the palette and stamp away (use the brush at 100% to have solid birds, anything less they will become see-through).

One big hint for using ANY brush is to use it on a new layer. This way if you don’t like its position, opacity, size, etc., you can easily edit it without having to start your image over again.

You may have noticed that this SAVE you just did, saves all the other brushes together with your new one.  If you want to really get savvy with custom brushes to create special brush sets with only your brushes watch for my article on Advanced Brush Creation and Management.

Download the zip file for this image: DPS Making Brushes – use it to create your bird brushes. Show us the images you’ve made using brushes,  especially the ones you’ve created with this file!

The post The Easy Way to Make Your Own Custom Photoshop Brushes by Alex Morrison appeared first on Digital Photography School.


Digital Photography School

 
Comments Off on The Easy Way to Make Your Own Custom Photoshop Brushes

Posted in Photography


Two Quick and Easy Photoshop Head-Swapping Techniques

03 Nov

photo-1

Sometimes you get that photo that is almost perfect. If all it takes to make it great is a little head swap, well, today is your lucky day! I’m going to show you two techniques, for quick and easy head swapping. I’ve even included a demo video at the end, if you want to watch the tips in action. I am using Photoshop CS6 for this demonstration. If you are using a different editing program, these methods may not work for you. If you are using an older version of Photoshop, the techniques should work the same, but your screen may look slightly different.

potential

Ready to see how to combine two photos to make that perfect photo? Let’s get started! First, open the two photos you want to work on in Photoshop. Select the photo that you want to swap a head FROM. Now we’re ready to really get to work.

Method #1

01

For the first method, we are going to use the Lasso Tool. You can click right on the lasso in the menu, or click “L” as a shortcut. The instructions will indicate shortcuts in parenthesis (L) to help speed things up as you as you try these techniques on your own photos.

02

Use Cmd/Ctrl+C to copy the selection

Use the lasso to draw a loose circle around the part of the photo that you want to move. You’ll want to leave extra room, and make the circle fairly large. This is easy to take off later, but if you have to add more on, you can’t do anything except start over. Copy the selected part of your photo.

03

Go back to your original photo, and paste the selection there. I like to decrease the opacity of that layer so I can line things up a little bit easier. Select the move tool, and move the layer around until things are as lined up as possible. In the photos I worked with, I tried to line the mom’s fingers up exactly. If you can find something near the edge of the new part and the old part that is the same in both photos, this can make things a lot easier.

04

Bring the opacity of the layer back up to 100%, and add a mask to the layer. Layer masks are really awesome! They allow you to show parts of that layer or hide them.

05

Now you can select a soft brush. You want your brush to be black, because your layer mask is white. When you are turning part of the layer off, you need to make sure that the brush is the OPPOSITE color of the mask (white reveals, black conceals). If the white box is in the front, just click “X” to toggle back and forth between black and white.

06

Use that black brush to hide the excess parts of the new layer. I like to start with the hard circle edges, and then work in to the details. You can zoom your photo in as close as you need to for this part.

08

Once you feel that it’s mostly there, you can click the visibility off and on on the layer to see if there are strange things happening, or spots that you missed. If you turned too much of the layer off with your black brush, simply change your brush back to white and brush it back on.

09

Method #2

Not too hard, right? Let’s try another method for swapping heads, this time using the Clone Stamp. This one is not as forgiving, but it is super quick! You’ll want to make sure that your two photos are very similar for this one. The placement needs to be close to the same for both photos. This method works especially well if you just need to replace closed eyes with open eyes from an almost identical photo.

10

Select your Clone Stamp tool, and let’s give this one a try!

11

It’s easiest if you select a part of the photo that is easy to see and line up once you switch to the original photo. In this example, I selected mom’s hand.

12

Cmd/Cntrl+J duplicates the layer as well

You can do this without making a background copy, but if you don’t make a background copy, and you make a mistake, you have to start over. This allows you to fix a mistake later without starting completely over.

13

Line the stamp up with your selected spot, and then, while holding down the mouse button, move the stamp over the old part that you want to replace. As you do this, you’ll see the new face appear.

14

If you covered more area than you wanted to, add a layer mask, and use the soft black brush again to take off some of that layer. (Just like we did before.)

finish

Head swapping doesn’t work for every photo, and it always works best for photos taken one right after the other, with all the people positioned almost the same. It never hurts to give it a try, and the more you practice, the better you will get at making it look natural, and working quickly. You’ll also be able to tell at a glance if a head swap will work for two photos or not.

I’ve made a quick video demo to show these techniques in action. Let me know if you have any questions, and I’ll do my best to answer them. Now, go swap a few heads, just for fun!

The post Two Quick and Easy Photoshop Head-Swapping Techniques by Melinda Smith appeared first on Digital Photography School.


Digital Photography School

 
Comments Off on Two Quick and Easy Photoshop Head-Swapping Techniques

Posted in Photography


5 Easy Steps to Exposure Blending for High Contrast Landscapes

27 Oct
Final Image  Bear Rock, Dolly Sod Wilderness Area, West Virginia

Final Image: Bear Rock, Dolly Sod Wilderness Area, West Virginia. Sunrise and Sunsets can be extremely contrasting and very challenging to capture the wide exposure range.

Here’s a problem I am sure you have encountered, instances where you try to photograph an image that has a greater range of light and dark than your camera can accurately capture. In the example above, when we set our exposure to expose the sky correctly, the foreground objects are severely under-exposed. Likewise, if we set our exposure to correctly expose the foreground, the sky is blown out and loses almost all detail. One solution to this dilemma might be to use HDR software to combine several bracketed exposures into one image. However, this method can be overwhelming and time-consuming to do correctly for a pleasing result. Another solution to this problem could be to use graduated neutral density filters. Unfortunately, a good set of filters can be quite expensive and a cheap set can harm the quality of your image.

A simple solution to this problem scenario may be as easy as taking two exposures, one correctly exposed for the dark areas (in this case the foreground) and the other correctly exposed for the lighter area (in this case the sky). Place your camera on a tripod so that both images will be composed exactly the same.

image correctly exposed for the sky 1/10 of a second @ f/10. ISO 100

Image exposed for the sky: 1/10th of a second @ f/10, ISO 100

Image exposed for the foreground: 1 second @ f/10, ISO 100

Image exposed for the foreground: 1 second @ f/10, ISO 100

Now, let’s look at a simple five step exposure blending process, performed in Photoshop, to resolve this contrast issue.

Step 1: Open your images

Open the two exposures in Photoshop as layers. This can be simply done with the following script. In Photoshop, select: File/Scripts/Load files into stacks (if you use Lightroom just select both thumbnails, right click and choose “Edit in>Open as Layers in PS). Then select your two exposure files. Label the layers for identification. (In this case we label one layer “Sky” and the other “Foreground”). Drag the Sky to the top layer if not already in that position.

Step 2: Add a layer mask

Add layer mask filled with black to top layer.

Add layer mask filled with black to the top layer.

Add a layer mask, as shown below, to the highlighted Sky layer. While holding down the ALT (opt) key, select the Add layer mask button located at the bottom of the layer palette. This will add a layer mask to the Sky layer and automatically fill it with black. The black-filled layer will mask out all of the Sky layer and reveal all of the Foreground layer.

Step 3: Paint over sky

Click on the black layer mask and select the paintbrush tool. Set your paintbrush to paint with white, and set the size of your brush as needed. Set the hardness of your brush to a low number to give it a soft edge while you paint. Paint over the sky area of the image, which will reveal the Sky layer. By adjusting the opacity, size and hardness of the brush as you paint, blend the two exposures together.

Paint with white on your layer mask to reveal the sky in the top image. use different opacities and hardness to make the blending look natural.

Paint with white on your layer mask to reveal the sky in the top image. Use different opacities and brush hardness to make the blending look natural. This is what the mask might look like.

Step 4: Add finishing touches

Add adjustment layers (see below) as needed to adjust colors and contrast of the layers to make the image look natural.

Final layer palette

Final layer palette

Step 5: Save your file

Save your file as a Photoshop document (.PSD). This will preserve your image with layers which you can return to if you need to make further adjustments to improve the image.  You can now can flatten the layers (Layer/ Flatten Image) and Save As a single layer file such as a JPG.

This image was created from three files using Exposure blending. Exposure #1 was exposed for the light green area above the falls and exposure #2 was exposed for the shadow area below the falls. The light was hitting the rock on the left  very hard so a third exposure was need just for that rock.

This image was created from three files using exposure blending. Exposure #1 was exposed for the light green area above the falls and exposure #2 was for the shadow area below the falls. The light was hitting the rock on the left very hard so exposure #3 was needed just for just that rock.

So next time you are faced with an extremely contrasting scene, try this easy exposure blending process to extend the exposure range of your image. Do you have any exposure blending tricks that you use? Post samples of your images.

The post 5 Easy Steps to Exposure Blending for High Contrast Landscapes by Bruce Wunderlich appeared first on Digital Photography School.


Digital Photography School

 
Comments Off on 5 Easy Steps to Exposure Blending for High Contrast Landscapes

Posted in Photography


Elevate Your Landscape Photography Skills To The Next Level With These Easy Tips

25 Oct

My experience has taught me that landscape photography is great for everyone who’s just starting out with photography because landscapes give you the chance to improve your photography skills without annoying a model or someone else. This is how I started with photography after all. Ladscapes are also great for learning the basics of photography, since you have all the Continue Reading

The post Elevate Your Landscape Photography Skills To The Next Level With These Easy Tips appeared first on Photodoto.


Photodoto

 
Comments Off on Elevate Your Landscape Photography Skills To The Next Level With These Easy Tips

Posted in Photography


How to do Quick and Easy Curves Adjustments in Photoshop

02 Oct

Photoshop-make-adjustments-using-the-curves-dialog-opener

When you are starting out learning to edit in Photoshop there are a lot of tools from which to choose. The Curves Adjustment is one of the more advanced tools, so it often overwhelms new users. However it is such a powerful tool that it is well worth investing some time learning to use it. In this article I’ll explain what you can understand about your image from the Curves dialog and how to use curves to edit your photos.

Creating a Curves Adjustment

You can get to the Curves dialog in two ways; by choosing Image > Adjustments > Curves or you can add it as a new adjustment layer by selecting Layer > New Adjustment Layer > Curves. In each case the dialog is a little differently laid out but the same features are available.

This is the curves dialog you see when you choose Image > Adjustments > Curves:

Photoshop-make-adjustments-using-the-curves-dialog-1

And this is the Curves dialog you see when you choose Layer > New Adjustment Layer > Curves:

Photoshop-make-adjustments-using-the-curves-dialog-2

In this article I’ll focus on the Curves Adjustment Layer dialog because when you edit a photo using Adjustment Layers you can come back later and remove the adjustment or fine tune it. It would be more difficult to do this if you were to apply the effect directly to the image. In addition an adjustment layer has a mask that you can use to remove its effect from selected areas of the image. In short, using a Curves adjustment layer is a non-destructive editing technique.

When you open the Curves dialog you’ll see a chart – called a histogram – beneath the curve line (you must be using Photoshop CS3 or later to see this). The histogram is a plot of the brightness of every pixel in the image so it is an indication of the image’s tonal range. The darker pixels are plotted on the left and the lighter pixels on the right.

Photoshop-make-adjustments-using-the-curves-dialog-3

Ideally the histogram should stretch between the left and right side of the grid without bumping up heavily against either edge. If the histogram is hard up against the left edge of the grid as in the following example, the image is underexposed so the image contains plugged up shadows where detail has been lost.

Photoshop-make-adjustments-using-the-curves-dialog-4

On the other hand, if the histogram is jammed up against the right side of the grid, the image contains blown out highlights. It is overexposed and some detail has been lost in the highlight areas.

Photoshop-make-adjustments-using-the-curves-dialog-5

Plugged up shadows and blown out highlights may be difficult, if not impossible to recover, particularly if you capture images as jpeg files. If you capture in a raw format you have a better chance of recovering detail in these areas because more data is retained in the raw file.

Setting the White and Black points

If the histogram does not reach either edge of the grid then you will have an image that lacks either blacks, whites, or both. Hold the Alt key (Option key on a Mac) and drag each triangle marker underneath the histogram to move them inwards so they appear just under the point where the first white or black pixels are located in the chart.

Photoshop-make-adjustments-using-the-curves-dialog-6

Holding the Alt or Option key ensures that you can see the pixels change on the image as you are adjusting them. Adjust the markers under the chart until you only just see a few white and black pixels in the image (as seen above as areas that are light or a color).

Photoshop-make-adjustments-using-the-curves-dialog-7

Remove a Color Cast

The Curves dialog also has an eyedropper that you can use to remove a color cast from the image. Click the middle of the three eyedroppers to set a grey point by clicking on an area of the image which should be neutral grey. If the color under the eyedropper isn’t neutral (if it’s Red, Green and Blue values are not equal) then Photoshop will adjust the image to make the color neutral – effectively removing the color cast. You can click repeatedly on the image until you find a place that gives you a good result. It is advisable to set the sample size on the tool options bar to 3 by 3 Average before you sample a gray point so that your sample is more than just a single pixel.

Photoshop-make-adjustments-using-the-curves-dialog-7a

Adjusting the Curve

The standard curve is actually a straight line running diagonally across the grid from the bottom left to the top right of the chart. This straight line is equivalent to no adjustment at all so, by default, the Curves adjustment does nothing to the image.

Photoshop-make-adjustments-using-the-curves-dialog-8

You can adjust the Curve line a couple of ways. One option is to click and drag on the line in an upward or downward direction to adjust the pixels of that tone in the photo. One adjustment that you can perform using this technique is to drag the line into what is often referred to as a shallow S-curve.

To do this, click and drag the line down on the left side of the grid and drag the line slightly up on the top right of the grid. This adds additional contrast to the image mid-tones – because anywhere that the curve line is steepened, you add contrast and anywhere it is flatter you reduce the contrast. By dragging the line into a shallow S-curve you’re steepening the line through the area in which the image mid-tones are located increasing contrast in those tones.

Photoshop-make-adjustments-using-the-curves-dialog-9

You can also adjust the curves line by clicking the onscreen adjustment tool and then drag on an area of the image that you want to adjust. Drag upward to lighten the tones represented by the pixels under the eyedropper, and drag downward to darken them. Notice that you aren’t just adjusting the area around the point where you are dragging, you are also adjusting all the pixels of that tonal value in the image, wherever they are located.

Photoshop-make-adjustments-using-the-curves-dialog-10

Whenever you’re adjusting the curve line make sure not to flatten it or invert it. If you invert the line as shown below then you’ll invert the colors in the image.

Photoshop-make-adjustments-using-the-curves-dialog-11

If the line is flat (horizonally) then the pixels in the flat area will all become the same shade of gray.

Photoshop-make-adjustments-using-the-curves-dialog-12

Working with Points on the Curve

To add points to the curve line simply click on the line where the point should be added. To remove a point on the curve, click on it and drag it off the edge of the chart and it will be removed.

Sometimes you may want to fix the line so it does not move, thus allowing you to adjust the curve on either side of the fixed point. To fix the line, click on it to add a point at its current position. Sometimes you may need to add a couple of points so that you can then adjust other areas of the line without also affecting tones that you don’t want to change. In the image below I have fixed the highlights so that the curve line wouldn’t move when I dragged up on the left end to lighten the darker areas of the photo. If I hadn’t locked down the highlights the entire curve line would have moved upwards, risking the highlights become too light.

Photoshop-make-adjustments-using-the-curves-dialog-13

Using the onscreen (targeted) adjustment tool you can also determine where on the curve line certain tones in the image are located. Instead of clicking and dragging on the image, simply hold your mouse pointer over an area of interest. When you do this the appropriate point on the curve that relates to the pixels under the mouse pointer will be indicated with a hollow circle.

Photoshop-make-adjustments-using-the-curves-dialog-14

If you want to add a point on the curve at this location Ctrl + Click (Command + Click on a Mac) on the image to do so.

Photoshop-make-adjustments-using-the-curves-dialog-15

Adjusting Individual Colors with Curves

In addition to the RGB channel you can also adjust the curve for individual color  channels. From the dropdown list that displays RGB by default, choose the channel you want to adjust – there are selectors for Red, Green and Blue.

Photoshop-make-adjustments-using-the-curves-dialog-16

The red channel controls both red and cyan in the image; drag upward to add red to the image and downward to add cyan. The green channel controls green and magenta, so drag upward to add green and downward to add magenta. Likewise the blue channel controls blue and yellow; drag upward to add blue and downward to add yellow.

Using the color channels you can, for example, warm up an image. You could do this by adding red (drag up on the curve in the red channel) or yellow (drag down on the curve in the blue channel), or both.

Photoshop-make-adjustments-using-the-curves-dialog-17

Adjusting the Curves Adjustment

Once you have applied a Curves adjustment to your photo you can close the Curves Properties dialog. At any time, if you used a curves adjustment layer you can double click on the curves layer thumbnail to open the curves dialog and further adjust it.

Photoshop-make-adjustments-using-the-curves-dialog-17a

As with other adjustment layers a layer mask is automatically added to the curve adjustment layer. Target the mask in the Layers palette and you can then paint on it with black or gray to remove the effect of the curve from a selected area of the image. Paint on the mask with white to paint reveal the adjustment in that area again. In the image below, the mask shows that the curves adjustment affects only the building (white area) and not the sky (black area).

Photoshop-make-adjustments-using-the-curves-dialog-18

You can also add a black to white gradient fill to mask the curves adjustment so it is applied to the top part of the image and not the bottom.

In some situations you may want to add multiple curve adjustments to an image – the first which fixes one part of the photo and another to fix another part of the photo. You can use the layer masks to control how each curves adjustment affects the photo.

Photoshop-make-adjustments-using-the-curves-dialog-19

Using Presets

Photoshop ships with some curves presets that you can use by selecting them from the Preset dropdown list.

Photoshop-make-adjustments-using-the-curves-dialog-20

You can also create your own presets. So if there is an adjustment such as a shallow S-curve that you like to apply to many of your photos, you can save this curve as a preset by first adjusting the line to the desired shape then click the fly-out menu and choose Save Curves Preset, type a name, and click Save. In future your preset will be available from the list.

Photoshop-make-adjustments-using-the-curves-dialog-21

Learning to use curves will give you more options when editing your images in Photoshop. You’ll find curves are a feature of most advanced editing software so it is an adjustment you will find in other programs including Gimp, Lightroom and Adobe Camera Raw.

You can view a video of this tutorial on curves below:

Do you have any other tips for using curves in Photoshop? Please share in the comments below.

The post How to do Quick and Easy Curves Adjustments in Photoshop by Helen Bradley appeared first on Digital Photography School.


Digital Photography School

 
Comments Off on How to do Quick and Easy Curves Adjustments in Photoshop

Posted in Photography


How to Clean Your Camera Sensor in 3 Easy Steps

04 Sep

There is really nothing more frustrating for photographers than a camera sensor that is full of dust and specks. Dust on the sensor happens, it’s just a fact of digital photographic life. If you’re an outdoor photographer with a zoom lens, or one who changes lenses in the field, dust and particles will find a way onto your sensor on an almost regular basis. But even studio photographers experience the distress of a dirty sensor.

_2DS3368Wjpg

The world’s dirtiest camera sensor. Yuck.

A few weeks ago I was on a mountain photo tour, and was constantly changing lenses in the windy and dusty alpine weather. This is a photo taken to show you my sensor dust. All those black specks are fragments of airborne stuff that either gets sucked into your sensor when you use a zoom lens, or when you change your lens outdoors. The image above is the result.

There’s not too much you can do about it if you’re out on a shoot, other than know that there will be many hours spent on your computer editing out those miserable spots from your otherwise beautiful photos. However, you needn’t stress once you get back to your home base, where you can easily take care of cleaning the sensor and removing the smudges in three easy steps.

Is Your Sensor Dirty?

Check to make sure your sensor needs cleaning. It’s quite possible that it does, but you may not know it. If you shoot wide open, or at larger apertures (smaller f-stop number, such as f/2.8) you may not really see any sensor gunk on your images unless you view them at 100% on your monitor. But one day you’ll want, or need, to set your aperture to f/8, or f/16; then sensor dust will become visible, almost as if from nowhere, to torment you, frame by frame.

To see if you have sensor dust right now, so you won’t be surprised when you’re out in the field shooting, stop down to the smallest aperture on your lens (the largest f-stop number, f/32 for example) and take a photo of a white or light colored wall. What I do then, is open the image in Photoshop and click on Auto Tone (under the Images Menu item). Horrors! Do you see it? Hopefully your sensor dust won’t look as bad as mine, above. But if you see the dreaded black specs, read on.

Step 1) Using the Auto Clean Function

Many newer DSLRs have a special function for automatically cleaning the sensor.  Look for it in the Tools menu on your camera. When you use this tool, the camera gives the sensor a series of micro-vibrations that “shake” the dust loose, in theory anyway. You may have to repeat this process several times. But with some patience, and providing your sensor is not as bad as the example in my image above, you’ll be relatively free of most of your sensor dirt in a few minutes.

sensorclean-menu

If you don’t have this feature on your camera, don’t worry, there is a way to manually clean your sensor. Sooner or later, even those photographers with auto-clean cameras will have to wash their sensors using this manual method, Step 2 below.

Step 2) Using Sensor Swabs and Eclipse Fluid

Sensor swabs are specially designed cleaning pads for camera sensors. Used with a few drops of Eclipse cleaning fluid they will wipe you sensor clean. Think of it as a tiny Swiffer for your sensor. You can get the swabs in exactly the right size for your sensor, so one swipe in each direction could be all you need.

comboW

The procedure is easy. You’ll simply put 2 drops of the fluid on a pad, and then gently wide the swab across your sensor ONCE, ONE WAY. Then change directions and swipe the other way. Throw that swab away. If you need to repeat the process, use a new swab.

Step 3) Power up, Mirror Up

To use the swabs you’ll need to keep your mirror up to give you access to your sensor. This is the tricky part – you don’t want your mirror to come down while the swab is still inside your camera.

If you don’t have a setting for Lock Mirror Up for Cleaning, make sure your battery is fully charged, and set your camera exposure on Bulb. The Bulb setting will allow you to keep the mirror up until you release the shutter (use a locking shutter release to hold it not your finger). This way you can access the sensor, and do the quick sensor two-step, swipe left, swipe right.

sensor1W

Check your results: take another shot at the same stopped down aperture and take a look at the difference.

_2DS3392w

Image of sensor dust after using Sensor Swabs. The main culprits are gone.

There are still three spots but all the big blobs, and large dust particles are gone. Depending on your preferences, you may be happy with this knowing that it’s a few easy clicks of the clone tool to remove these small faint marks. Or you may want to give the sensor another round of swabbing. Either way the sensor is super clean compared to the initial test image.

Cleaning your sensor is not difficult, you do need to be careful but it’s very worth the effort. Your photographs will love you for it.

I’d love to see your sensor dust horror stories – post your before and after cleaning shots here.

Editor’s note of warning: if you are terrified of damaging your sensor (it is delicate) you can usually find a local camera store that offers this service. You will pay a lot more for it than doing it yourself, but if they damage it, they have to replace it for you. The camera that is! If you damage your sensor there is no going back. So do follow the directions exactly, and do be cautious. Perform this procedure in as dust-free, windless room as possible. And remember to NEVER, EVER touch your sensor with your fingers. The oil from your fingers will do more damage and is much harder to remove (i.e. you’ll likely be sending it to the manufacturer to get that off).

The post How to Clean Your Camera Sensor in 3 Easy Steps by Alex Morrison appeared first on Digital Photography School.


Digital Photography School

 
Comments Off on How to Clean Your Camera Sensor in 3 Easy Steps

Posted in Photography


How to Alienate Photography Models in Five Easy Steps

22 Aug

Back in June, I decided to try my hand at modeling. Now, this is not completely new — I’ve been modeling for myself (with my mom pressing the shutter button, as I don’t have a remote and have never mastered the self-timer) for about six years now, on and off since I got my first (and only) DSLR. I’ve modeled Continue Reading

The post How to Alienate Photography Models in Five Easy Steps appeared first on Photodoto.


Photodoto

 
Comments Off on How to Alienate Photography Models in Five Easy Steps

Posted in Photography