We test and try a lot of digital cameras and lenses here at DPReview, and with holiday season finally here, we’ve been updating our range of buying guides. Click through for our recommendations.
Articles: Digital Photography Review (dpreview.com)
We test and try a lot of digital cameras and lenses here at DPReview, and with holiday season finally here, we’ve been updating our range of buying guides. Click through for our recommendations.
Articles: Digital Photography Review (dpreview.com)
 |
French startup Pixii has announced its first product, the Pixii camera. The Pixii is a digital rangefinder with an M-mount that pairs with your smartphone to use the mobile device’s display and memory.
The machined aluminum body houses a CMOS sensor with global electronic shutter and 12-bit sampling rate that, according to Pixii, offers a dynamic range of 60-90dB. Base ISO is 200 and gain can be adjusted from ISO 100 to 6400. Unfortunately at this point there is no information on the sensor’s dimensions or pixel count. All we know is it features a 5.5µm pixel pitch.
 |
Lenses are attached via a Leica M mount but, using an adapter, you can also shoot with M39 and LTM lenses. Shutter speed can set to auto or manual but focus and aperture are controlled manually only.
“The digital camera hasn’t changed much since the 90s,” says PIXII founder David Barth. “But now the new generation is learning photography with a smartphone: who understands why a camera still needs to bother with a screen or an SD card?”
On the camera’s back there is no display but an optical viewfinder that offers a 0.67x magnification, LED backlit frame lines (40/50mm and 28/35mm) and exposure indicators. LED brightness adjusts automatically and the viewfinder also offers automatic parallax correction.
 |
On the top plate you can find a small OLED control screen that displays the most important camera and image settings but images have to be reviewed on the display of your smartphone. There is no card slot either. Instead images are saved into 8 or 32GB of built-in memory or directly transferred to your phone.
Other features include a tripod mount, Wi-Fi/Bluetooth connectivity (presumably for connecting to the smartphone) and a 1000mAh Li-ion battery.
There is no information yet on pricing or availability but we will let you know as soon as we get an update from Pixii.
 |
Articles: Digital Photography Review (dpreview.com)

Photography is now more accessible than ever. You can document your life on the go with just a tap on a smartphone screen or a quick snap on a digital camera.
Whether it’s treasured photos of your children, your latest holiday snaps or pictures from a wedding, the advent of smartphone photography has made it incredibly easy to capture the moments that matter to you.
But have you ever wondered what would happen to your precious photos if the technology failed or there was a data loss? It’s no longer the norm to print photos. More and more of our photos are stored only digitally on phones and computers. And while our technology usually works fine, one tech catastrophe can wipe out your entire photo collection if you haven’t taken the right precautions.
Mark Lord Photography has put together the following series of infographics that look the changing nature of photography, along with some helpful tips on how to make sure your photos are safe for years to come. Let’s take a look.

The rise of smartphones has contributed to an exponential growth in the number of photos being taken. In 1990, around 57 billion photos were taken. While this number rose significantly to 86 billion in 2000, growth skyrocketed in the new millenium when smartphones and affordable digital cameras were introduced to the market.
In 2010, 380 billion photos were snapped. And by 2017 this number rose to 1.2 trillion – a 1295% percent increase in just seven years. Amazingly, we now take more photos in just two minutes than were taken throughout the entirety of the 1800s, when photography first emerged.

Cameras were once an expensive luxury, but the widespread availability of advanced smartphones with increasingly powerful cameras has changed that. It’s incredibly easy to take out your phone and get a quick snap. So it’s no surprise that 85% of all photos are now taken on phones, with more traditional digital cameras only being used 10% of the time.
This may be part of the problem. You usually need to develop the photos from a camera, or at least upload them to your computer and sort them. But with phones it’s tempting to just leave your photos there, collecting virtual dust.
Everyone is a little more casual with photos today. You can take photos whenever you like, so people are naturally taking more photos than ever before.
But it doesn’t mean we’ve stopped taking photos of things we care about. In 1960, 55% of all photos taken were of babies. And today 67% of parents still photograph their children weekly.
Technology hasn’t completely changed what we want to photograph. Most photographs taken are still of families, friends, and special events. Despite the fact everyone’s supposedly gone selfie mad, only 32% of participants in a survey had taken one in the past two months, whereas 77% had taken pictures of friends and family.
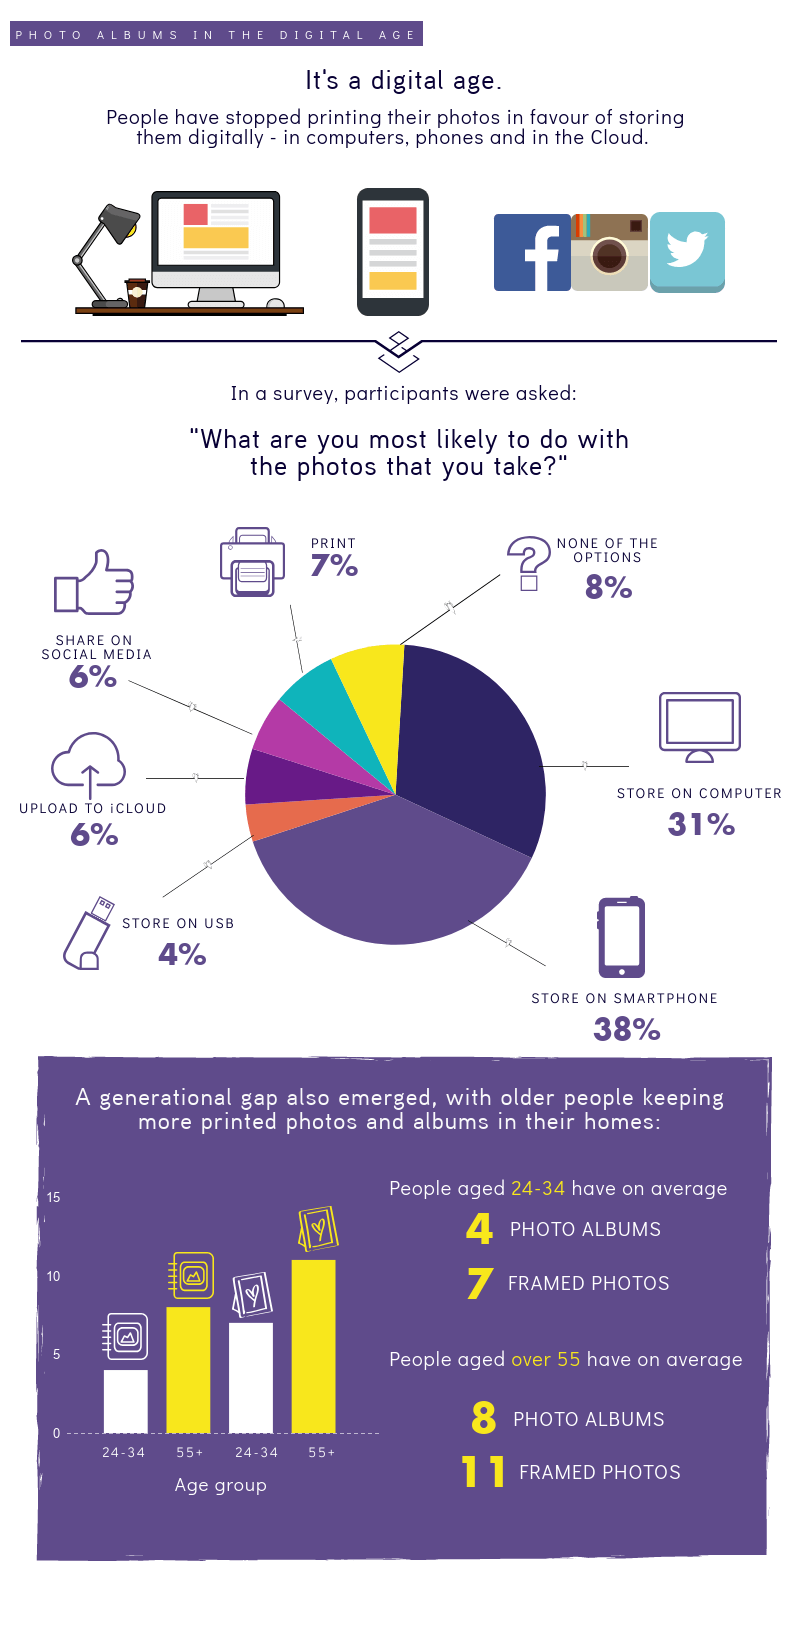
With digital storage getting cheaper and better all the time, people have ditched printing photos in favor of storing them digitally – on computers and phones, and in the cloud. In a recent survey, 69% of participants said they’d #most likely keep their pictures stored on phones and computers. This is compared to a measly 7% who reported that what they’d most likely do is print them off, and just 6% who said they regularly posted photos on social media.
It seems this will continue to be the case. Older people tend to have more framed photos and albums around the home, while the number falls off for the younger generation. People over 55 have on average eight photo albums and 11 framed photos, whereas those aged 24-34 have just four albums and seven framed photos. This generational divide will probably become more pronounced as time goes on.

Printing photos is clearly on the decrease. In an ideal world, the lack of physical copies wouldn’t be an issue. But technology isn’t immune to failure or human error. Nearly a third of people have already lost important videos and photos after losing a smartphone, and 113 phones are lost or stolen every minute around the world. Data loss poses a constant threat to your photo collections, which is why it’s vital to back them up – ideally in multiple places.

Wondering what you can do to ensure your photos are preserved for posterity? Here are some top tips for keeping photos safe long beyond the life of your smartphone.
We hope you enjoyed this series of infographics. Feel free to leave a comment below, or share this post with your friends.
The post Preserving Your Digital Memories appeared first on Digital Photography School.
 |
Canon has ported a large chunk of its Digital Photo Professional (DPP) Raw processing software’s feature set to mobile and launched the DPP Express app for Apple’s iPad.
The new app works in conjunction with Canon’s Camera Connect app and offers a wide range of processing functions for Canon .CR3 Raw files and JPEG images. Files can be viewed, adjusted and saved to the cloud, a computer or your camera – all wirelessly.
 |
 |
The Camera Connect app, which also allows you to control the camera remotely, is used to wirelessly download images from your Canon camera to the iPad. Once on the tablet, images can then be processed and edited in DPP Express. The user interface has been designed with simplicity in mind and adjustment options include tone curves, picture settings, gamma levels and lens correction. All changes are applied in real time.
DPP Express also offers Multiple Editing Histories, allowing for several edited versions of the same image. Up to four editing histories let you compare effects and editing options on the same image and can be copied and pasted between files to apply the same workflow to more than one image.
The app is compatible with newer iPads and iPad Pro models running iOS 11. For more information on compatibility and features have a look at the Canon website. You can download DPP Express from the iOS App Store.
Articles: Digital Photography Review (dpreview.com)
What’s all the fuss and hype about RAW files? Let’s look at a little story as a comparison.
The Hans Christian Andersen story of an incredibly vain King is an amusing tale with an interesting moral.
One day the king, who was very fond of fine clothing, was approached by two slick-talking swindlers. They posed as weavers, and they said they could weave the most magnificent fabrics imaginable. Not only were their fabrics uncommonly fine, but clothes made of this fabric were invisible to anyone who was unfit for office, or who was unusually stupid.
“Those would be just the clothes for me”, thought the Emperor. “If I wore them I would be able to discover which men in my empire were unfit for their posts. And I could tell the wise men from the fools.” As the story goes, the king bought into the story and the clothes. As a result, the people of the kingdom discovered more about their king than they ever cared to know.

Ignorance of the truth sometimes comes at an embarrassing price.
The truth occasionally gets lost in marketing hype, even in photography. How many times have you heard the claim that vast amount of visual information can be seen in RAW image files? There’s a major problem with that claim, the same problem that “exposed” the king in all his vanity. The claim ain’t exactly accurate.
RAW files do indeed contain all the information collected by a digital camera’s image sensor. But the file’s information itself cannot be viewed because the RAW data is not an image at all, it’s merely numbers.
Only when these numbers are parsed (interpreted) as colors and tones by special software can they display any visual information. RAW Interpreter software builds an initial visual image from the data in the file.
The RAW image, just like the ill-informed Emperor’s clothes, doesn’t actually exist until the file data is interpreted. There is no such thing as a RAW image, only RAW data.

RAW Interpreter software includes Adobe’s Camera Raw and Lightroom, ON1’s Photo Raw 2018 and Alien Skin’s Exposure3, among others.
When you do open a RAW file in Camera Raw, Lightroom, ON1 Photo Raw, Alien Skin Exposure 3, etc., the image you initially see on the screen is actually based on the camera’s built-in JPEG expression of the RAW data; a mere rough draft of the file’s potential information. The camera’s exposure settings (recorded along with the RAW image) determine the file’s initial appearance on the computer monitor.
Once this initial image appears on the monitor, each RAW Interpreter software provides a fairly exhaustive array of color and tonal sliders that can shape the data into a variety of interpretations. Each interpretation can be saved in JPEG format and published for others to see. Folks who shoot and publish JPEGs directly out of the camera are really shortchanging the file’s potential and leaving important color and detail on the cutting room floor.

The term RAW is not an acronym for some technical phrase nor is it a reference to some uncooked food. It is merely a coined word describing the collection of undeveloped (latent) image data from the camera’s image sensor. This data file contains all the raw chroma and luminous data extracted from millions of light buckets called image receptors located on the camera’s image sensor. Each light bucket is covered by a blue, green, or red filter.

Individual image sensors are like small light meters, each covered by a red, green, or blue filter. The Bayer filter array uses more green filters than red and blue, relying on the camera’s image processor to interpret the correct light color and intensity for each pixel.
These RGB filters split the incoming light into three channels of information. Each receptor records the strength of the filtered light as an individual color that will eventually form a single pixel in the image.
While the initial grid of receptors is covered with more green filtered buckets than red or blue, the purpose for this imbalance is a bit too complicated for this article. Suffice to say, the image processor in the camera performs some very complicated math to determine each pixel’s color value and brightness.

A digital camera’s image processor sends RGB pixel values to the camera’s viewing screen to preview each scene prior to capturing the image.
This light capture process begins even before the display is visible on the back of the camera. Every time you reposition the camera to frame your shot, the image processor does its magic again and delivers a new preview of the composition. If your camera is set to display a pre-capture histogram of the scene, this processor data is used to simulate the graph on the histogram.
But the real heavy-lifting happens when you push the shutter button and the image is captured. Once all the individual colors are recorded on the sensor and delivered to the processor, the final image information is preserved on the camera’s hard drive.

The individual tonal values (luminosity) of the RAW file were fine-tuned in Adobe’s Camera Raw software to reveal detail not visible in the JPEG file.
In a RAW file, the value of each pixel can be extensively adjusted for hue (color), saturation (intensity), and luminance (brightness). JPEG files record pixels with the same initial color values but the JPEG file format significantly restricts the ability to adjust those values in the editing process. The latitude of JPEG adjustments is significantly limited.

The controls in Alien Skin’s Exposure3 Raw Interpreter software provide extensive control over hue and saturation color adjustments.
JPEG files record each color pixel as an initial luminance (brightness level) and chroma (color) value. When all the pixels on the grid (bitmap) are collectively interpreted in imaging software, a visible replica of the original scene appears on the monitor. If that same image is also captured as RAW information, the values of luminance and chroma are captured in the context of a larger color space and can be interpreted in a wide variety of expressions of the original scene.

Color negatives are produced from latent images when exposed films are fully developed in photo chemical solutions.
RAW files have been likened to photographic color film negatives in that when they are “developed” (viewed in RAW Interpreter software), the image can be “printed” (published) in a number of unique colors and tonal versions.
But the truth is that because this RAW file is not an image per se, but a record of the light characteristics captured by each of the camera’s light buckets, the original image data contained in the RAW file never gets altered, it only gets interpreted.
The interpretations are records of the luminous and chroma adjustments made to the RAW bitmap pixels. These interpretations are what gets saved as JPEG images.
Unlike the yarn spun by the king’s “couturiers,” RAW data files deliver custom-tailored results and can make you look really smart in a couple of ways. Dress your images for success.
The post RAW Files: Digital Manifestations of the Emperor’s New Clothes appeared first on Digital Photography School.
 |
After an initial unsuccessful crowdfunding campaign the team behind the ‘I’m Back’ digital back for old film SLRs returned to Kickstarter in March 2018 with a refined product. In the second attempt the funding goal was reached and now the the digital back has entered production in Hong Kong.
The ‘I’m Back’ is available for a range of old film-SLRs, such as Nikon’s F-Series, the Olympus OM10 or the Canon AE-1, and works by capturing the image projected onto a focus screen using a 1/2.33″-type 16MP Panasonic image sensor. The back is connected to the camera by detaching the rear plate from the latter, adjusting the aperture for the digital module, connecting the Flash Sync cable and setting exposure mode to Bulb.
 |
The back can record JPEG and Raw files and comes with a 2″ touchscreen for live view focusing, a maximum of 64GB of storage, a USB Type-C connector and Wi-Fi connectivity. Don’t expect DSLR-level image quality, however. The back has been designed with cost in mind and ‘I’m Back” founder Samuel Mello Medeiros says:
“I’m Back was created with the intention of reusing the old analog in a digital way, but maintaining a ‘retro’ aspect in the photos thanks to the focusing screen. It is not intended to have the quality of a digital camera of last generation, therefore, it is not an accessory to be at par with a digital or even an analog.”
With the first units being sent out to Kickstarter backers, the back should be available to retail customers in the coming months. No retail pricing has been announced yet but initial backers were able to secure a device starting at €175 (approximately $ 205), so expect a slightly higher price in the shops.
Articles: Digital Photography Review (dpreview.com)
 |
Polaroid has launched the Mint 2-in-1 digital instant camera at the IFA trade show in Berlin. The Mint camera (not to be confused with the Instax-mini-compatible Mint InstantFlex TL70) comes with a 16MP image sensor, a microSD-slot for cards of up to 256GB capacity, a built-in selfie mirror, and a self-timer. A smartphone-like LED-flash is on board as well.
Polaroid says the camera “makes it easier than ever to capture and print instant photos that last a lifetime” and the built-in printer, which uses the inkless ZINK-technology can produce color, black-and-white or sepia prints in less than a minute. Before printing, users have the option of adding a frame to the image. The Polaroid Mint instant camera is available in black, white, red, blue and yellow and will set you back $ 99.99.
 |
The Mint Instant Digital Pocket printer is Polaroid’s second new product at the trade show and meant to be used in conjunction with mobile devices. The pocket-sized printer uses the same ZINK technology as the Mint camera and lets you print any photo from your smartphone or tablet via the Polaroid Mint app and a bluetooth connection. The app features many common editing functions, including filters, frames and stickers.
The printer can be charged via a USB port and is the battery is good for 50 prints. The Polaroid Mint printer is available in black, white, red, blue and yellow and retails at $ 129.99. More information on the Mint camera and printer is available on the Polaroid website.
 |
Articles: Digital Photography Review (dpreview.com)
$ (document).ready(function() { SampleGalleryV2({“containerId”:”embeddedSampleGallery_5303876064″,”galleryId”:”5303876064″,”isEmbeddedWidget”:true,”selectedImageIndex”:0,”isMobile”:false}) });
Phase One has announced its new ‘Infinity Platform,’ which has built the core of the company’s Capture One software into the processors of three new XF IQ4 54 x 40mm digital backs. According to Phase One, having ‘Capture One Inside’ brings “unprecedented image editing and processing – once possible only in the Capture One software.” The new processor also provides improvements in JPEG quality, live view and frame rates.
The Infinity Platform includes three digital backs, including two 150 Megapixel, Sony-designed BSI-CMOS models (IQ4 150MP and IQ4 150MP Achromatic) as well as a 100MP Trichromatic model. The backs now include three new tethering options, via Wi-Fi, USB-C and Ethernet. All three models have dual card slots, supporting XQD and SD.
The three XF IQ4 backs will ship in October and include the camera body and prism and the Blue Ring prime lens of your choice. Prices range from from $ 47,990 for the IQ4 100MP to $ 54,990 for the IQ4 150MP Achromatic.
Press Release
COPENHAGEN, Aug. 28, 2018 – Phase One today announced a giant leap forward in photography: Phase One XF IQ4 Camera Systems are built upon the new and expandable Infinity Platform. Three full frame medium format camera systems, based on the Infinity Platform, include the IQ4 150MP (151-megapixels), the IQ4 100MP Trichromatic (101-megapixels), and the IQ4 150MP Achromatic (151-megapixels). Each delivers a flexible and customizable photographic solution designed to evolve and adapt over time. The IQ4 features a new level of workflow optimization, integration and support for all photographic applications.
With the Infinity Platform, Phase One has moved the core of Capture One’s imaging processor into the IQ4 itself. ‘Capture One Inside’ offers unprecedented RAW file control. Image editing and processing – once possible only in the Capture One software application – can now be controlled within the IQ4. The Infinity Platform also allows Phase One to challenge fundamental imaging concepts, such as the limitations of dynamic range. Additionally, the IQ4 delivers new tethering and storage options, wireless integration, and performance improvements.
“Our customers drive us to break down barriers and keep pushing forward,” said Henrik O. Ha?konsson, CEO & President, Phase One, A/S. “With the Infinity Platform we are completely dedicated to grow the IQ4, adapting and expanding incrementally to match the pace of technology – making it unique in the photographic world – a camera investment that pays back with years of cutting-edge operation. We dedicate the new XF IQ4 Camera System to these individuals whose passion for perfection is unlimited.”
Phase One is widely known for its modular, open-platform approach. Like the Phase One XF camera body, introduced in 2015, the Infinity Platform of the IQ4 has been engineered to anticipate developments in technology, and expand functionality to support customers’ changing workflow demands.
Key Features and Future-Forward Innovations
Building on 25 years of digital imaging innovation and the success of the XF Camera System, the IQ4 introduces:
151-Megapixel Backside Illuminated (BSI) Sensor
The IQ4 150MP and IQ4 150MP Achromatic models feature an ultra-efficient pixel design that delivers unprecedented image quality and detail. A world first in full frame medium format photography.
‘Capture One Inside’
The core of Capture One’s RAW imaging processor has been integrated into the Infinity Platform, opening a multitude of customizations and imaging possibilities. Key for expanding workflow efficiency, images can now be processed by the camera itself. ‘Capture One Inside’ enables:
Three New Tethering Options
Wireless, USB-C, and Ethernet offer greater control of connectivity and workflow. In addition, users will be able to interface directly with accessories such as hard drives, NAS storage, network solutions, mobile devices, etc. New ports (Ethernet and USB-C) can offer charging capabilities of the camera system or sustained power from compatible devices. Each tethering option brings its own unique workflow benefit, such as speed, extended cable length, evolving camera control and freedom from cabling.
Dual Storage
Support for both XQD and SD memory cards can be combined with the above tethering options to provide a multitude of workflow solutions.
Open Platform
Time-lapse and bracketing tools now operate independently of the camera body, enabling sequencing options across other camera bodies such as technical cameras.
More information about the IQ4, Infinity Platform and supported XF Camera System configurations can be found here: www.Phase One.com/IQ4
Availability and Pricing
The XF IQ4 150MP, IQ4 100MP Trichromatic, and IQ4 150MP Achromatic Camera Systems, will be available in October 2018 through Phase One
Partners: www.Phase One.com/partners.
The Manufacturer Suggested Retail Price for the XF IQ4 Camera Systems (including XF camera body and prism, a Blue Ring prime lens of your choice, 5-year warranty and 5-year uptime guarantee) are:
For more information, please go to: www.Phase One.com or book a demo on: www.Phase One.com/DemoSignup
Articles: Digital Photography Review (dpreview.com)
Astrophotography has become increasingly popular in recent years, with good reason. There’s something about the night sky, stars, and The Milky Way that are fascinating to us. They remind us of how small we are and how huge the universe we live in really is. Photographing them can make for some pretty spectacular images.

As camera technology has advanced, photographing the night sky has become possible for photographers of all levels and budgets. Low-light performance continues to improve, allowing us to photograph the stars at higher and higher ISOs. However, digital noise continues to be one of the biggest challenges for astrophotographers.
There are a number of different approaches to dealing with digital noise in your astrophotography, from your camera settings to the way you process them in post-production.
Digital noise is caused by a couple of things. Firstly, the camera sensor heats up as it exposes an image, causing an increase in noise. Secondly, an increase in sensor sensitivity, or ISO, can lead to more digital noise in your images. As both high ISO values and long exposures are going to lead to more digital noise, you’re going to need a strategy to deal with it in your astrophotography.

There is a technique called exposure stacking that is very effective in reducing the digital noise in your photos. You take multiple exposures with the same settings, stack them into layers inside Photoshop, align the stack, then Photoshop will create an image based on the median of all the stacked exposures. The final image will show the parts of your exposures that are consistent through each layer, like the stars. Because digital noise is random, and changes from one exposure to the next, it will not be visible in the final stacked image.
If you’re still following me, great. It sounds complicated, but I’m going to walk you through exposure stacking step-by-step and you’ll see it’s really not that difficult. It can take a little time to get right, but it’s totally worth it when you see the difference it can make in your night sky photos.

There are plenty of other articles that will teach you in detail how to take great astrophotography, so I won’t go into it here. However, there are a few considerations that are required to get the exposures correct in order to be able to use the exposure stacking technique later.
1. You need multiple exposures with the same camera settings. You can take as many shots as you want, but I would suggest using a minimum of 10. Try to capture them as close together as possible to minimize movement of the stars between each exposure. The more time that lapses from the first exposure to the last, the more work will be required to stack them properly.
2. Turn off Long Exposure Noise Reduction. This is probably called something like “Long Exposure NR” in your camera. It will cause each exposure to take twice as long when it’s turned on, meaning there will be twice as much movement of the stars between exposures. It also means you’ll be double-processing your images, causing a reduction in image quality.
3. Make sure the stars in your photos are pinpoint. They need to be sharp and have as little streaking as possible. You can work out the maximum exposure time to create pinpoint stars based on the focal length of your lens using this tool.
Again, there is a wealth of information about how to process astrophotography in Adobe Lightroom. All I do in Lightroom is check each exposure to eliminate any images that are unusable due to camera movement, do a basic edit, then open my selected images to Photoshop as layers.

Use “Open as Layers in Photoshop” to do exposure stacking. Go to: File > Edit In > Open as Layers in Photoshop.
The main things to remember here are that you make sure to sync your edits with all the exposures that you’ll be using and to avoid over-processing the images in Lightroom. Avoid sharpening and noise reduction at this stage of the process. Also take it easy on contrast, clarity, and dehaze. You can perform more creative edits on the final stacked image.
Ensuring your images are all aligned correctly is vital when doing exposure stacking. If they are not, you will end up with blurry stars. There are a couple of ways to align exposures. Try the auto-alignment method first and if it doesn’t do a good job you’ll need to use the manual method.


When Photoshop has finished working its magic, you should end up with an image that’s much cleaner with significantly less noise than you started with. Your stars probably won’t look quite as sharp when zoomed into 100%, especially if the alignment wasn’t quite right, but you’ll be the only person who looks that closely. Don’t forget to crop the edges that have moved during the alignment process.
Now you can apply any other creative edits you might like to your image. You can either do this while still in Photoshop or save the image and apply the adjustments back in Lightroom.

This may seem like a complicated process, but once you’ve done it once or twice you’ll get much quicker. If you’re anything like me, you’ll find the effort is worth it for the lovely, clean, noise-free astrophotography images it gives you.
The post How to Reduce Digital Noise in Astrophotography Using Exposure Stacking appeared first on Digital Photography School.
 |
According to a report on the Japanese Nikkei website, electronics manufacturer Casio—one of the pioneers in the digital camera segment—is exiting the digital compact camera market. The company generated a loss of 500 million Yen (approximately $ 4.6 million USD) in the fiscal year that ended March 2017, and has come to the conclusion that no market growth or increase in market share can be expected for the future.
Casio had already silently withdrawn compact cameras from markets outside Japan (the last model in our database is the 12MP ZR5000 from 2016) but was still selling digital compacts in its home country until now.
 |
| Casio EX-F1 from 2008 |
The first Casio model in our camera database is the 1996 QV300, which offered a whopping 640 x 380 pixel resolution and a 47-106mm equivalent zoom range. Many of the company’s later models did not particularly stand out from the competition, however. The EX-F1 superzoom (pictured above) was the most notable exception. Its ability to shoot 60 frames per second still images and 1200 fps videos (at a tiny resolution) were unheard of at the time of launch.
Have you owned a Casio digital camera, or do you still own one? Let us know in the comments.
Articles: Digital Photography Review (dpreview.com)
You must be logged in to post a comment.